
About
This section is included to assist the students to perform the activities in the book. It includes detailed steps that are to be performed by the students to achieve the objectives of the activities.
Chapter 1: JavaScript, HTML, and the DOM
Activity 1: Extracting Data from a Page
Solution:
- Initialize a variable to store the entire content of the CSV:
var csv = 'name,price,unit ';
- Query the DOM to find all the elements that represent each product. Notice how we wrap the HTMLCollection instance returned in Array.from so that we can handle it like a normal array:
var elements = Array.from(document.getElementsByClassName('item'));
- Iterate over each element found:
elements.forEach((el) => {});
- Inside the closure, using the product element, query to find the price with the unit. Split the string using a slash:
var priceAndUnitElement = el.getElementsByTagName('span')[0];
var priceAndUnit = priceAndUnitElement.textContent.split("/");
var price = priceAndUnit[0].trim();
var unit = priceAndUnit[1].trim();
- Then query for the name:
var name = el.getElementsByTagName('a')[0].textContent;
- Append all information to the variable initialized in step 1, separating the values with commas. Don't forget to add newline characters to each line you append to:
csv += `${name},${price},${unit} `;
- Print the variable containing the accumulated data using the console.log function:
console.log(csv);
- Paste the code in the Chrome Console tab; it should look like this:

Figure 1.62: Code ready to run in the Console tab
After pressing Enter to execute the code, you should see the CSV printed in the console, as shown here:
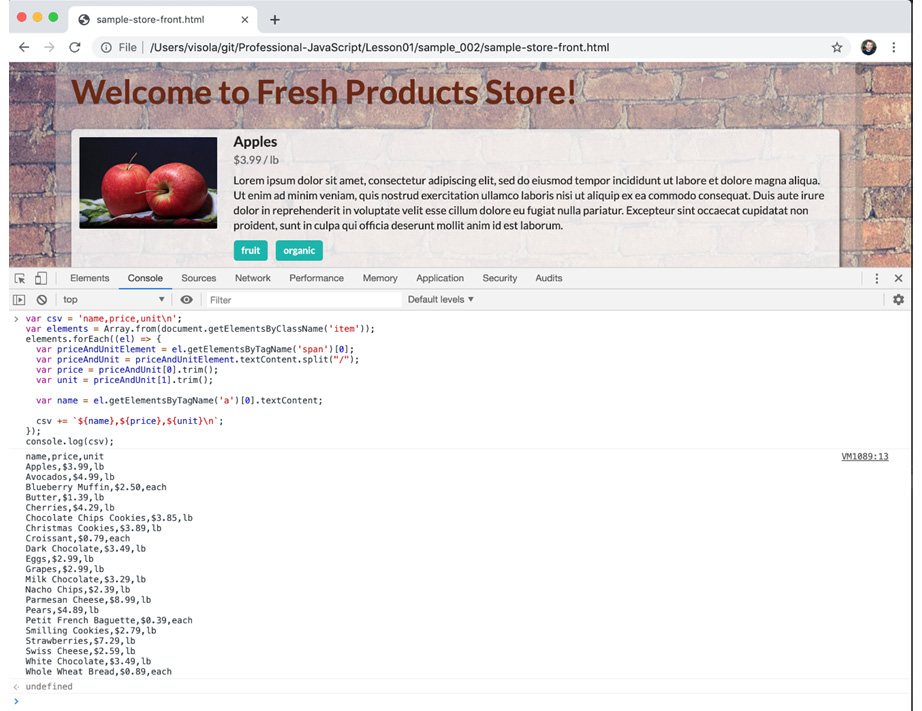
Figure 1.63: The storefront with the code and output in the Console tab
Activity 2: Replacing the Tag Filter with a Web Component
Solution:
- Start by copying the code from Exercise07 into a new folder.
- Create a new file called tags_holder.js and in it add a class called TagsHolder that extends HTMLElement, then define a new custom component called tags-holder:
class TagsHolder extends HTMLElement {
}
customElements.define('tags-holder', TagsHolder);
- Create two render methods: one to render the base state and one to render the tags or some text indicating that no tags are selected for filtering:
render() {
this.shadowRoot.innerHTML = `
<link rel="stylesheet" type="text/css" href="../css/semantic.min.css" />
<div>
Filtered by tags:
<span class="tags"></span>
</div>`;
}
renderTagList() {
const tagsHolderElement = this.shadowRoot.querySelector('.tags');
tagsHolderElement.innerHTML = '';
const tags = this._selectedTags;
if (tags.length == 0) {
tagsHolderElement.innerHTML = 'No filters';
return;
}
tags.forEach(tag => {
const tagEl = document.createElement('span');
tagEl.className = "ui label orange";
tagEl.addEventListener('click', () => this.triggerTagClicked(tag));
tagEl.innerHTML = tag;
tagsHolderElement.appendChild(tagEl);
});
}
- In the constructor, call w, attach the component to the shadow root, initialize the list of selected tags, and call both render methods:
constructor() {
super();
this.attachShadow({ mode: 'open' });
this._selectedTags = [];
this.render();
this.renderTagList();
}
- Create a getter to expose the list of selected tags:
get selectedTags() {
return this._selectedTags.slice(0);
}
- Create two trigger methods: one to trigger the changed event and one to trigger the tag-clicked event:
triggerChanged(tag) {
const event = new CustomEvent('changed', { bubbles: true });
this.dispatchEvent(event);
}
triggerTagClicked(tag) {
const event = new CustomEvent('tag-clicked', {
bubbles: true,
detail: { tag },
});
this.dispatchEvent(event);
}
- Create two mutator methods: addTag and removeTag. These methods receive the tag name and add a tag if not present, or remove tag if present, in the list of selected tags. If the list was modified, trigger the changed event and call the method to re-render the list of tags:
addTag(tag) {
if (!this._selectedTags.includes(tag)) {
this._selectedTags.push(tag);
this._selectedTags.sort();
this.renderTagList();
this.triggerChanged();
}
}
removeTag(tag) {
const index = this._selectedTags.indexOf(tag);
if (index >= 0) {
this._selectedTags.splice(index, 1);
this.renderTagList();
this.triggerChanged();
}
}
- In the HTML, replace the existing code with the new component. Remove the following lines:
<div class="item">
Filtered by tags: <span class="tags"></span>
</div>
And add:
<tags-holder class="item"></tags-holder>
Also add:
<script src="tags_holder.js"></script>
Note
You can see the final HTML on GitHub at https://github.com/TrainingByPackt/Professional-JavaScript/blob/master/Lesson01/Activity02/dynamic_storefront.html.
- In filter_and_search.js, do the following:
At the top, create a reference to the tags-holder component:
const filterByTagElement = document.querySelector('tags-holder');
Add event listeners to handle the changed and tag-clicked events:
filterByTagElement.addEventListener('tag-clicked', (e) => filterByTagElement.removeTag(e.detail.tag));
filterByTagElement.addEventListener('changed', () => applyFilters());
Remove the following functions and all references to them: createTagFilterLabel and updateTagFilterList.
In the filterByTags function, replace tagsToFilterBy with filterByTagElement.selectedTags.
In the addTagFilter method, replace the references to tagsToFilterBy with filterByTagElement.addTag.
Chapter 2: Node.js and npm
Activity 3: Creating a npm Package to Parse HTML
Solution:
- In an empty folder, use npm to create a new package. You can use all the default values for the options:
$ npm init
This utility will walk you through creating a package.json file.
It only covers the most common items, and tries to guess sensible defaults.
See 'npm help json' for definitive documentation on these fields and exactly what they do.
Use 'npm install <pkg>' afterwards to install a package and save it as a dependency in the package.json file.
Press ^C at any time to quit.
package name: (Activity03)
version: (1.0.0)
description:
entry point: (index.js)
test command:
git repository:
keywords:
author:
license: (ISC)
About to write to .../Lesson02/Activity03/package.json:
{
"name": "Activity03",
"version": "1.0.0",
"description": "",
"main": "index.js",
"scripts": {
"test": "echo "Error: no test specified" && exit 1"
},
"author": "",
"license": "ISCs"
}
Is this OK? (yes)
- To install cheerio, run npm install. Make sure that you type the name of the library incorrectly:
$ npm install cheerio
npm notice created a lockfile as package-lock.json. You should commit this file.
npm WARN [email protected] No description
npm WARN [email protected] No repository field.
+ [email protected] 19 packages from 45 contributors and audited 34 packages in 6.334s
found 0 vulnerabilities
- Inside this folder, create a file called index.js and add the following to it:
const cheerio = require('cheerio');
- Create a variable that stores the HTML from the sample code from GitHub (https://github.com/TrainingByPackt/Professional-JavaScript/blob/master/Lesson01/Example/sample_001/sample-page.html). When creating multiline strings, you can use backquotes:
const html = `
<html>
<head>
<title>Sample Page</title>
</head>
<body>
<p>This is a paragraph.</p>
<div>
<p>This is a paragraph inside a div.</p>
</div>
<button>Click me!</button>
</body>
</html>
`;
- Parse the HTML and pass it to cheerio. In cheerio's examples, you are going to see that they name the parsed variable as "$" (dollar sign). That is an old convention that was used in the jQuery world. This is what it looks like:
const $ = cheerio.load(html);
- Now, we can use that variable to manipulate the HTML. To start, we will add a paragraph to the page with some text in it:
$('div').append('<p>This is another paragraph.</p>');
We can also query the HTML, similar to what we did in Chapter 1, JavaScript, HTML, and the DOM, using CSS selectors. Let's query for all the paragraphs and print their content to the console. Notice that cheerio elements do not behave exactly like DOM elements, but they are very similar.
- Use the firstChild attribute to find the first node of each paragraph and print its content, assuming it will be the text element:
$('p').each((index, p) => {
console.log(`${index} - ${p.firstChild.data}`);
});
- Lastly, inside index.js, print the manipulated HTML to the console by calling the html function:
console.log($.html());
Now, you can run your application by calling it from Node.js:
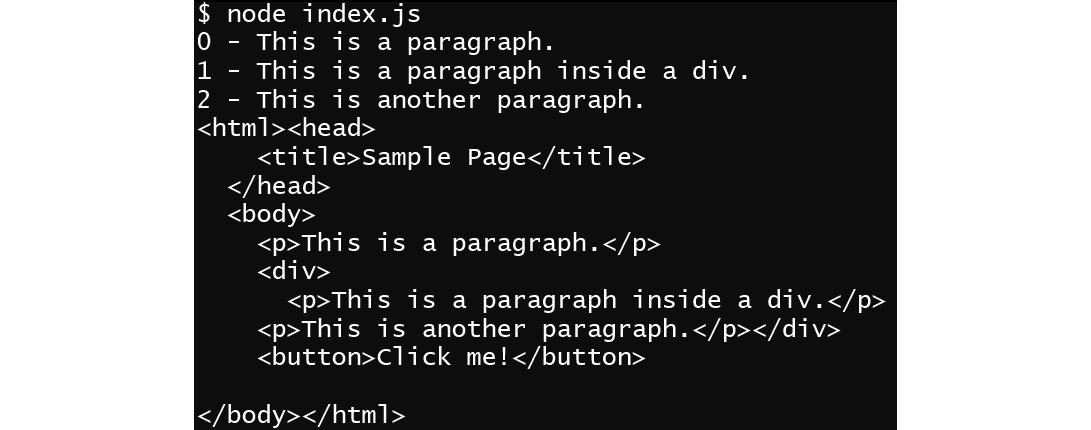
Figure 2.7: Calling the application from Node.js
Chapter 3: Node.js APIs and Web Scraping
Activity 4 Scraping Products and Prices from Storefront
Solution
- Start the dynamic server to serve the storefront application using the code from Exercise 14, Serving Dynamic Content, in this chapter:
$ node Lesson03/Activity04/
Static resources from /path/to/repo/Lesson03/Activity04/static
Loaded 21 products...
Go to: http://localhost:3000
- In a new Terminal, create a new npm package, install jsdom, and create the index.js entry file:
$ npm init
...
$ npm install jsdom
added 97 packages from 126 contributors and audited 140 packages in 12.278s
found 0 vulnerabilities
- Call the require() method to load all the modules you will need in the project:
const fs = require('fs');
const http = require('http');
const JSDOM = require('jsdom').JSDOM;
- Make an HTTP request to http://localhost:3000:
const page = 'http://localhost:3000';
console.log(`Downloading ${page}...`);
const request = http.get(page, (response) => {
- Ensure a successful response and collect the data from the body using the data event:
if (response.statusCode != 200) {
console.error(`Error while fetching page ${page}: ${response.statusCode}`);
console.error(`Status message: ${response.statusMessage}`);
return;
}
let content = '';
response.on('data', (chunk) => content += chunk.toString());
- In the close event, parse the HTML using JSDOM:
response.on('close', () => {
console.log('Download finished.');
const document = new JSDOM(content).window.document;
writeCSV(extractProducts(document));
});
The preceding callback calls two functions: extractProducts and writeCSV. These functions are described in the upcoming steps.
- Use the extractProducts function to query the DOM and fetch product information from it. It stores all the products in an array, which is returned at the end:
function extractProducts(document) {
const products = [];
console.log('Parsing product data...');
Array.from(document.getElementsByClassName('item'))
.forEach((el) => {
process.stdout.write('.');
const priceAndUnitElement = el.getElementsByTagName('span')[0];
const priceAndUnit = priceAndUnitElement.textContent.split("/");
const price = priceAndUnit[0].trim().substr(1);
const unit = priceAndUnit[1].trim();
const name = el.getElementsByTagName('a')[0].textContent;
products.push({ name, price: parseFloat(price), unit });
});
console.log();
console.log(`Found ${products.length} products.`);
return products;
}
- Use the writeCSV function, which opens the CSV file to write, ensuring that no error occurred:
function writeCSV(products) {
const fileName = 'products.csv';
console.log(`Writing data to ${fileName}...`);
fs.open(fileName, 'w', (error, fileDescriptor) => {
if (error != null) {
console.error(`Can not write to file: ${fileName}`, error);
return;
}
- Now that the file is open, we can write the product data to the file:
// Write header
fs.writeSync(fileDescriptor, 'name,price,unit ');
// Write content
products.forEach((product) => {
const line = `${product.name},${product.price},${product.unit} `;
fs.writeSync(fileDescriptor, line);
});
console.log('Done.');
});
}
- In the new Terminal, run the application:
$ node .
Downloading http://localhost:3000...
Download finished.
Parsing product data...
.....................
Found 21 products.
Writing data to products.csv...
Chapter 4: RESTful APIs with Node.js
Activity 5: Creating an API Endpoint for a Keypad Door Lock
Solution
- Create a new project folder and change the directories going to it to the following:
mkdir passcode
cd passcode
- Initialize an npm project and install express, express-validator, and jwt-simple. Then, make a directory for routes:
npm init -y
npm install --save express express-validator jwt-simple
mkdir routes
- Create a config.js file, just as you did in Exercise 21, Setting Up an Endpoint that Requires Authentication. This should contain a randomly generated secret value:
let config = {};
// random value below generated with command: openssl rand -base64 32
config.secret = "cSmdV7Nh4e3gIFTO0ljJlH1f/F0ROKZR/hZfRYTSO0A=";
module.exports = config;
- Make the routes/check-in.js file in order to create a check-in route. This can be copied in whole from Exercise 21, Setting Up an Endpoint that Requires Authentication:
const express = require('express');
const jwt = require('jwt-simple');
const { check, validationResult } = require('express-validator/check');
const router = express.Router();
// import our config file and get the secret value
const config = require('../config');
- Create a second route file called routes/lock.js. Start the file off by importing the required libraries and modules, and create an empty array to hold our valid passcodes:
const express = require('express');
const app = express();
const { check, validationResult } = require('express-validator/check');
const router = express.Router();
// Import path and file system libraries for importing our route files
const path = require('path');
const fs = require('fs');
// Import library for handling HTTP errors
const createError = require('http-errors');
// Import library for working with JWT tokens
const jwt = require('jwt-simple');
// import our config file and get the secret value
const config = require('./../config');
const secret = config.secret;
// Create an array to keep track of valid passcodes
let passCodes = [];
- Create a GET route for /code that requires a name value, which is continued after the code in the preceding step in the routes/lock.js file:
router.get(['/code'], [
check('name').isString().isAlphanumeric().exists()
],
(req, res) => {
let codeObj = {};
codeObj.guest = req.body.name;
// Check that authorization header was sent
if (req.headers.authorization) {
let token = req.headers.authorization.split(" ")[1];
try {
req._guest = jwt.decode(token, secret);
} catch {
res.status(403).json({ error: 'Token is not valid.' });
}
// If the decoded object guest name property
if (req._guest.name) {
codeObj.creator = req._guest.name;
- Create another route in routes/lock.js. This one will be for /open and requires a four-digit code that will be checked against the passCodes array to see whether it is valid. Below that route, make sure to export router, so that it can be used in server.js:
router.post(['/open'], [
check('code').isLength({ min: 4, max: 4 })
],
(req, res) => {
let code = passCodes.findIndex(obj => {
return obj.code === req.body.code;
});
if(code !== -1) {
passCodes.splice(code, 1);
res.json({ message: 'Pass code is valid, door opened.' });
} else {
res.status(403).json({ error: 'Pass code is not valid.' });
}
});
// Export route so it is available to import
module.exports = router;
- Create the main file where our routes will be used in server.js. Start by importing the libraries needed and setting URL encoding the JSON:
const express = require('express');
const app = express();
// Import path and file system libraries for importing our route files
const path = require('path');
const fs = require('fs');
// Import library for handling HTTP errors
const createError = require('http-errors');
// Tell express to enable url encoding
app.use(express.urlencoded({extended: true}));
app.use(express.json());
- Next, in server.js, below the preceding code, import the two routes, implement a 404 catch-all, and tell the API to listen on port 3000:
// Import our index route
let lock = require('./routes/lock');
let checkIn = require('./routes/check-in');
app.use('/check-in', checkIn);
app.use('/lock', lock);
// catch 404 and forward to error handler
app.use(function(req, res, next) {
- Finally, we will test the API to ensure it was done correctly. Start by running your program:
npm start
- With the program running, open a second Terminal window and use the /check-in endpoint to get a JWT and save the value as TOKEN. Then, echo that value to ensure it was successful:
TOKEN=$(curl -sd "name=john" -X POST http://localhost:3000/check-in
| jq -r ".token")
echo $TOKEN
You should get back a long string of letters and numbers like the following:

Figure 4.24: Getting TOKEN from the check-in endpoint
- Next, we will use our JWT to use the /lock/code endpoint to get a one-time passcode for Sarah:
curl -sd "name=sarah" -X GET
-H "Authorization: Bearer ${TOKEN}"
http://localhost:3000/lock/code
| jq
You should get back an object containing a message and a four-digit code like in the following:
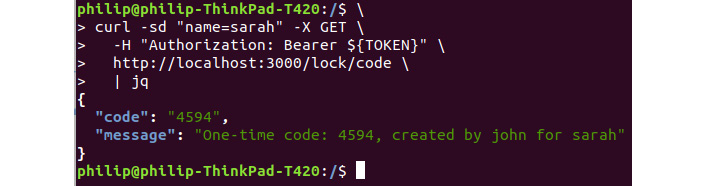
Figure 4.25: A four-digit one-time code
- To ensure the code works, send it to the /lock/open endpoint. We will send the following command once, expecting it to be successful. We will then send the same command a second time, expecting it to fail since each code is used only once. Run the following twice:
# IMPORTANT: Make sure to replace 4594, with your specific passcode!
curl -sd "code=4594" -X POST
http://localhost:3000/lock/open
| jq
Running the preceding command twice should return something like the following:

Figure 4.26: Running the command twice results in an error
If your result is the same as shown in the preceding figure, then you have successfully completed the activity.
Chapter 5: Modular JavaScript
Activity 6: Creating a Lightbulb with a Flash Mode
Solution:
- Install the babel-cli and babel preset as developer dependencies:
npm install --save-dev webpack webpack-cli @babel/core @babel/cli @babel/preset-env
- Add a file called .babelrc to the root directory. In it, we will tell Babel to use the preset settings:
{
"presets": ["@babel/preset-env"]
}
- Add a webpack configuration file at webpack.config.js in the root directory:
const path = require("path");
module.exports = {
mode: 'development',
entry: "./build/js/viewer.js",
output: {
path: path.resolve(__dirname, "build"),
filename: "bundle.js"
}
};
- Create a new file called js/flashingLight.js. This should start as a blank ES6 component that extends Light. In the constructor, we will include state, brightness, and flashMode:
import Light from './light.js';
let privateVars = new WeakMap();
class FlashingLight extends Light {
constructor(state=false, brightness=100, flashMode=true) {
super(state, brightness);
let info = {"flashMode": flashMode};
privateVars.set(this, info);
if(flashMode===true) {
this.startFlashing();
}
}
- Add a setter method for the FlashingLight object, which will also trigger stop and start flash methods.
setFlashMode(flashMode) {
let info = privateVars.get(this);
info.flashMode = checkStateFormat(flashMode);
privateVars.set(this, info);
if(flashMode===true) {
this.startFlashing();
} else {
this.stopFlashing();
}
}
- Add a getter method for the FlashingLight object:
getFlashMode() {
let info = privateVars.get(this);
return info.flashMode;
}
- Create a startFlashing function that references the parent class's lightSwitch() function. This step is tricky because we have to bind it to setInterval:
startFlashing() {
let info = privateVars.get(this);
info.flashing = setInterval(this.toggle.bind(this),5000);
}
- Create a stopFlashing function that can be used to turn off the timer:
stopFlashing() {
let info = privateVars.get(this);
clearInterval(info.flashing);
}
- As the last part of flashingLight.js, close the class and export it:
}
export default FlashingLight;
- Open src/js/viewer.js and modify the button to create a flashing light instead of a colored light:
button.onclick = function () {
new FlashingLight(true, slider.value, true);
}
- Compile the code by running our build function with npm:
npm run build
- Open up build/index.html and set the script location as bundle.js:
<script src="bundle.js" type="module"></script>
- To test that everything is working as expected, run npm start and open localhost:8000 in your browser. Hit the build button to create a full page of lights. If everything has been done correctly, you should see each light blink at 5-second intervals:

Figure 5.20: Lightbulbs with flash mode
Chapter 6: Code Quality
Activity 7: Putting It All Together
Solution
- Install the developer dependencies listed in the linting exercise (eslint, prettier, eslint-config-airbnb-base, eslint-config-prettier, eslint-plugin-jest, and eslint-plugin-import):
npm install --save-dev eslint prettier eslint-config-airbnb-base eslint-config-prettier eslint-plugin-jest eslint-plugin-import
- Add an eslint configuration file, .eslintrc, which contains the following:
{
"extends": ["airbnb-base", "prettier"],
"parserOptions": {
"ecmaVersion": 2018,
"sourceType": "module"
},
"env": {
"browser": true,
"node": true,
"es6": true,
"mocha": true,
"jest": true
},
"plugins": [],
"rules": {
"no-unused-vars": [
"error",
{
"vars": "local",
"args": "none"
}
],
"no-plusplus": "off",
}
}
- Add a .prettierignore file:
node_modules
build
dist
- Add a lint command to your package.json file:
"scripts": {
"start": "http-server",
"lint": "prettier --write js/*.js && eslint js/*.js"
},
- Open the assignment folder and install the developer dependencies for using Puppeteer with Jest:
npm install --save-dev puppeteer jest jest-puppeteer
- Modify your package.json file by adding an option telling Jest to use the jest-puppeteer preset:
"jest": {
"preset": "jest-puppeteer"
},
- Add a test script to package.json that runs jest:
"scripts": {
"start": "http-server",
"lint": "prettier --write js/*.js && eslint js/*.js",
"test": "jest"
},
- Create a jest-puppeteer.config.js file containing the following:
module.exports = {
server: {
command: 'npm start',
port: 8080,
},
}
- Create a test file at __tests__/calculator.js that contains the following:
describe('Calculator', () => {
beforeAll(async () => {
await page.goto('http://localhost:8080');
})
it('Check that 777 times 777 is 603729', async () => {
const seven = await page.$("#seven");
const multiply = await page.$("#multiply");
const equals = await page.$("#equals");
const clear = await page.$("#clear");
await seven.click();
await seven.click();
await seven.click();
await multiply.click();
await seven.click();
await seven.click();
await seven.click();
await equals.click();
const result = await page.$eval('#screen', e => e.innerText);
expect(result).toMatch('603729');
await clear.click();
})
it('Check that 3.14 divided by 2 is 1.57', async () => {
const one = await page.$("#one");
const two = await page.$("#two");
const three = await page.$("#three");
const four = await page.$("#four");
const divide = await page.$("#divide");
const decimal = await page.$("#decimal");
const equals = await page.$("#equals");
await three.click();
await decimal.click();
await one.click();
await four.click();
await divide.click();
await two.click();
await equals.click();
const result = await page.$eval('#screen', e => e.innerText);
expect(result).toMatch('1.57');
})
})
- Create a Husky file at .huskyrc that contains the following:
{
"hooks": {
"pre-commit": "npm run lint && npm test"
}
}
- Install husky as a developer dependency by running npm install --save-dev husky:
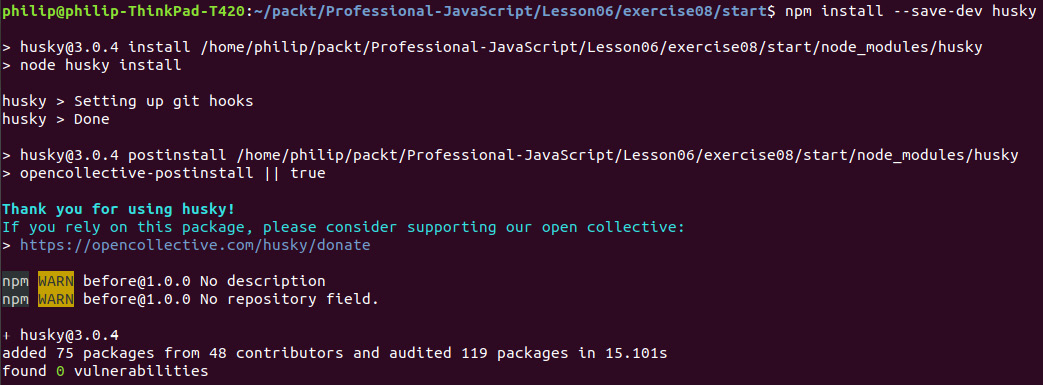
Figure 6.19: Installing Husky
- Ensure that tests are working correctly using the npm test command:
npm test
This should return positive results for two tests, as shown in the following figure:
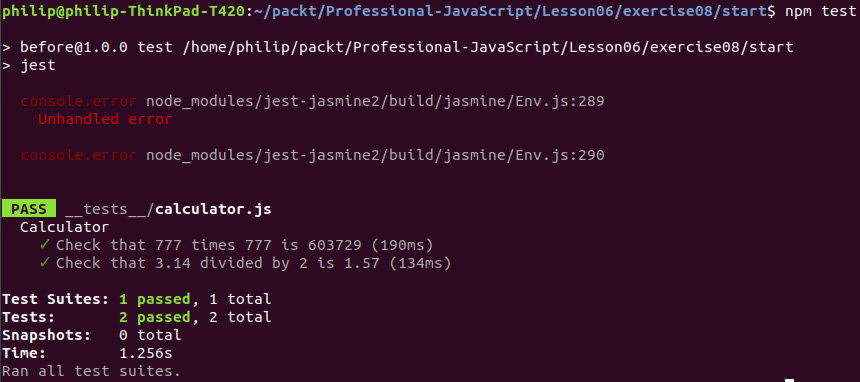
Figure 6.20: Showing the positive result of two tests
Ensure the Git hook and linting is working by making a test commit.
Chapter 7: Advanced JavaScript
Activity 8: Creating a User Tracker
Solution
- Open the Activity08.js file and define logUser. It will add the user to the userList argument. Make sure no duplicates are added:
function logUser(userList, user) {
if(!userList.includes(user)) {
userList.push(user);
}
}
Here, we used an includes method to check whether the user already exists. If they don't, they will be added to our list.
- Define userLeft. It will remove the user from the userList argument. If the user doesn't exist, it will do nothing:
function userLeft(userList, user) {
const userIndex = userList.indexOf(user);
if (userIndex >= 0) {
userList.splice(userIndex, 1);
}
}
Here, we are using indexOf to get the current index of the user we want to remove. If the item doesn't exist, indexOf will return –1, so we are only using splice to remove the item if it exists.
- Define numUsers, which returns the number of users currently inside the list:
function numUsers(userList) {
return userLeft.length;
}
- Define a function called runSite. We will create a users array and call the function we declared previously to test our implementation. We will also invoke the function afterward:
function runSite() {
// Your user list for your website
const users = [];
// Simulate user viewing your site
logUser(users, 'user1');
logUser(users, 'user2');
logUser(users, 'user3');
// User left your website
userLeft(users, 'user2');
// More user goes to your website
logUser(users, 'user4');
logUser(users, 'user4');
logUser(users, 'user5');
logUser(users, 'user6');
// More user left your website
userLeft(users, 'user1');
userLeft(users, 'user4');
userLeft(users, 'user2');
console.log('Current user: ', users.join(', '));
}
runSite();
After defining the functions, running the preceding code will return the following output:

Figure 7.62: Output of running log_users.js
Activity 9: Creating a Student Manager Using JavaScript Arrays and Classes
Solution
- Create a School class that includes all the student's information:
class School {
constructor() {
this.students = [];
}
}
In the School constructor, we simply initialize a list of students. Later, we will add new students to this list.
- Create a Student class that includes all the relevant information about the student:
class Student {
constructor(name, age, gradeLevel) {
this.name = name;
this.age = age;
this.gradeLevel = gradeLevel;
this.courses = [];
}
}
In the student constructor, we are storing a list of courses, as well as the student's age, name, and gradeLevel.
- Create a Course class that will include information about the course's name and grade:
class Course {
constructor(name, grade) {
this.name = name;
this.grade = grade;
}
}
The course constructor simply stores the name of the course and grade in the object.
- Create addStudent in the School class:
addStudent(student) {
this.students.push(student);
}
- Create findByGrade in the School class:
findByGrade(gradeLevel) {
return this.students.filter((s) => s.gradeLevel === gradeLevel);
}
- Create findByAge in the School class:
findByAge(age) {
return this.students.filter((s) => s.age === age);
}
- Create findByName in the School class:
findByName(name) {
return this.students.filter((s) => s.name === name);
}
- In the Student class, create a calculateAverageGrade method for calculating the average grade of the student:
calculateAverageGrade() {
const totalGrades = this.courses.reduce((prev, curr) => prev + curr.grade, 0);
return (totalGrades / this.courses.length).toFixed(2);
}
In the calculateAverageGrade method, we use array reduce to get the total grades of all the classes for our student. Then, we divide this by the number of courses in our courses list.
- In the Student class, create a method called assignGrade, which will assign a number grade for a course the student is taking:
assignGrade(name, grade) {
this.courses.push(new Course(name, grade))
}
You should do your work in the student_manager.js file and modify the provided method template. You should see the TEST PASSED message if you implemented everything correctly:

Figure 7.63: Screenshot showing the TEST PASSED message
Activity 10: Refactoring Functions to Use Modern JavaScript Features
Solution
- Open Activity03.js; it should contain various functions written in legacy JavaScript. When you run Activity03.js using Node.js, you should see the following output:

Figure 7.64: Output after running Lesson7-activity.js
- You need to refactor itemExist, using the includes array:
function itemExist(array, item) {
return array.includes(item);
}
In pushUnique we will use array push to add new item to the bottom
function pushUnique(array, item) {
if (!itemExist(array, item)) {
array.push(item);
}
}
- In createFilledArray, we will use array.fill to fill our array with an initial value:
function createFilledArray(size, init) {
const newArray = new Array(size).fill(init);
return newArray;
}
In removeFirst we will use array.shift to remove the first item
function removeFirst(array) {
return array.shift();
}
- In removeLast, we will use array.pop to remove the last item:
function removeLast(array) {
return array.pop();
}
In cloneArray we will use spread operation to make clone for our array
function cloneArray(array) {
return […array];
}
- We will refactor our Food class using the ES6 class:
class Food {
constructor(type, calories) {
this.type = type;
this.calories = calories;
}
getCalories() {
return this.calories;
}
}
After you have finished the refactor and run the existing code, you should see the same output:

Figure 7.65: Output showing the TEST PASSED message
Chapter 8: Asynchronous Programming
Activity 11: Using Callbacks to Receive Results
Solution:
- Create a calculate function that takes id and a callback as an argument:
function calculate(id, callback) {
}
- We will first call getUsers to get all of the users. This will give us the address we need:
function calculate(id, callback) {
clientApi.getUsers((error, result) => {
if (error) { return callback(error); }
const currentUser = result.users.find((user) => user.id === id);
if (!currentUser) { return callback(new Error('user not found')); }
});
}
Here, we get all of the users, then we apply the find method to the user to find the user we want from the list. If that user does not exist, we call the callback function with the User not found error.
- Call getUsage to get the user's usage:
clientApi.getUsage(id, (error, usage) => {
if (error) { return callback(error); }
});
Then, we need to put the call to getUsage inside the callback of getUsers so it will run after we have finished calling getUsers. Here, the callback will be called with a list of numbers, which will be the usage. We will also call the callback with the error object if we receive an error from getUsage.
- Finally, call getRate to get the rate of the user we are doing the calculation for:
clientApi.getRate(id, (error, rate) => {
if (error) { return callback(error); }
let totalUsage = 0;
for (let i = 0; i < usage.length; i++) {
totalUsage += usage[i];
}
callback(null, {
id,
address: currentUser.address,
due: rate * totalUsage
});
});
We will put this call inside the callback for getUsage. This creates a nested chain request for all the information we need. Lastly, we will call the callback with the information we are calculating. For the final due amount, we use array reduce to calculate the total usage for that user, and then multiply that by the rate to get the final amount due.
- When the function is completed, invoke it using an existing ID, as in the following code:
calculate('DDW2AU', (error, result) => {
console.log(error, result);
});
You should see output like this:

Figure 8.43: Invoking the function using an existing ID
- Invoke the function using an ID that doesn't exist:
calculate('XXX', (error, result) => {
console.log(error, result);
});
You should see the following output with the error returned:

Figure 8.44: Invoking a function using an ID that doesn't exist
Activity 12: Refactor the Bill Calculator Using Async and Await
Solution
- Create the calculate function as an async function:
async function calculate(id) {
}
- Use await to call getUsers to get the resolved result in users:
const users = await clientApi.getUsers();
const currentUser = users.users.find((user) => user.id === id);
When we are using the await keyword, we must use async functions. The await keyword will break the control of our program and will only return and continue execution once the promise it is waiting for is resolved.
- Use await to call getUsage to get the usage for the user:
const usage = await clientApi.getUsage(currentUser.id);
- Use await to call getRate to get the rate for the user:
const rate = await clientApi.getRate(currentUser.id);
- Lastly, we will call return to retrieve id, address, and due:
return {
id,
address: currentUser.address,
due: (rate * usage.reduce((prev, curr) => curr + prev)).toFixed(2)
};
- Write the calculateAll function as an async function:
async function calculateAll() {
}
- Use await when we call getUsers and store the result in result:
const result = await clientApi.getUsers();
- Use a map array to create a list of promises and use Promise.all to wrap them. Then, should be use await on the promise returned by Promise.all:
return await Promise.all(result.users.map((user) => calculate(user.id)));
Because await will work on any promise and will wait until the value is resolved, it will also wait for our Promise.all. After it is resolved, the final array will be returned.
- Call calculate on one of the users:
calculate('DDW2AU').then(console.log)
The output should be as follows:

Figure 8.45: Calling calculate on one of the users
- Call the calculateAll function:
calculateAll().then(console.log)
The output should be as follows:
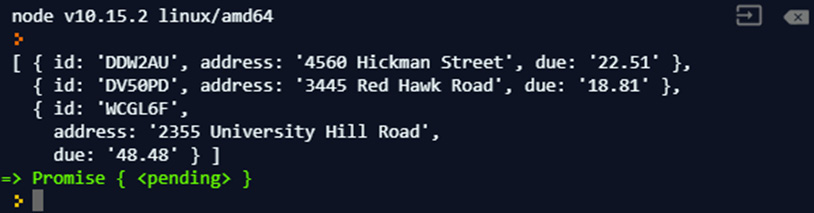
Figure 8.46: Calling the calculateAll function
As you can see, when we call async functions, we can treat them as functions that return a promise.
Chapter 9: Event-Driven Programming and Built-In Modules
Activity 13: Building an Event-Driven Module
Solution:
Perform the following steps to complete this activity:
- Import the events module:
const EventEmitter = require('events');
- Create the SmokeDetector class that extends EventEmitter and set batteryLevel to 10:
class SmokeDetector extends EventEmitter {
constructor() {
super();
this.batteryLevel = 10;
}
}
In our constructor, because we are extending the EventEmitter class and we are assigning a custom property, batteryLevel, we will need to call super inside the constructor and set batteryLevel to 10.
- Create a test method inside the SmokeDetector class that will test the battery level and emit a low battery message in the event that the battery is low:
test() {
if (this.batteryLevel > 0) {
this.batteryLevel -= 0.1;
if (this.batteryLevel < 0.5) {
this.emit('low battery');
}
return true;
}
return false;
}
Our test() method will check the battery level and emit a low battery event when the battery has less than 0.5 units. We will also reduce the battery level every time we run the test method.
- Create the House class, which will store the instances of our event listeners:
class House {
constructor(numBedroom, numBathroom, numKitchen) {
this.numBathroom = numBathroom;
this.numBedroom = numBedroom;
this.numKitchen = numKitchen;
this.alarmListener = () => {
console.log('alarm is raised');
}
this.lowBatteryListener = () => {
console.log('alarm battery is low');
}
}
}
In the House class, we are storing some information about the house. We are also storing both of the event listener functions as properties of this object. This way, we can use the function reference to call removeListener when we want to detach a listener.
- Create an addDetector method in the House class. Here, we will attach the event listeners:
addDetector(detector) {
detector.on('alarm', this.alarmListener);
detector.on('low battery', this.lowBatteryListener);
}
Here, we are expecting the detector that's passed in to be an EventEmitter. We are attaching two event listeners to our detector argument. When these events are emitted, it will invoke our event emitter inside the object.
- Create a removeDetector method, which will help us remove the alarm event listeners we attached previously:
removeDetector(detector) {
detector.removeListener('alarm', this.alarmListener);
detector.removeListener('low battery', this.lowBatteryListener);
}
Here, we are using the function reference and the alarm argument to remove the listener attached to our listener. Once this is called, the events should not invoke our listener again.
- Create a House instance called myHouse. This will contain some sample information about our house. It will also be used to listen to events from our smoke detector:
const myHouse = new House(2, 2, 1);
- Create a SmokeDetector instance called detector:
const detector = new SmokeDetector();
- Add our detector to myHouse:
myHouse.addDetector(detector);
- Create a loop to call the test function 96 times:
for (let i = 0; i < 96; i++) {
detector.test();
}
Because the testing function will reduce the battery level, we will expect a low battery alarm to be emitted if we call it 96 times. This will produce the following output:

Figure 9.50: Low battery alarm emitted
- Emit an alarm on the detector object:
detector.emit('alarm');
The following is the output of the preceding code:

Figure 9.51: Alarm emitted for the detector object
- Remove detector from the myHouse object:
myHouse.removeDetector(detector);
- Test this to emit the alarms on the detector:
detector.test();
detector.emit('alarm');
Because we just removed detector from our house, we should see no output from this:

Figure 9.52: Testing the emit alarms on the detector
Activity 14: Building a File Watcher
Solution:
- Import fs and events:
const fs = require('fs').promises;
const EventEmitter = require('events');
- Create a fileWatcher class that extends the EventEmitter class. Use a modify timestamp to keep track of the file change.
We need to create a FileWatcher class that extends EventEmitter. It will take the filename and delay as parameters in the constructor. In the constructor, we will also need to set the last modified time and the timer variable. We will keep them as undefined for now:
class FileWatcher extends EventEmitter {
constructor(file, delay) {
super();
this.timeModified = undefined;
this.file = file;
this.delay = delay;
this.watchTimer = undefined;
}
}
This is the most basic way to see whether a file has been changed.
- Create the startWatch method to start watching the changes on the file:
startWatch() {
if (!this.watchTimer) {
this.watchTimer = setInterval(() => {
fs.stat(this.file).then((stat) => {
if (this.timeModified !== stat.mtime.toString()) {
console.log('modified');
this.timeModified = stat.mtime.toString();
}
}).catch((error) => {
console.error(error);
});
}, this.delay);
}
}
Here, we are using fs.stat to get the file's information and comparing the modified time with the last modified time. If they are not equal, we will output modified in the console.
- Create the stopWatch method to stop watching the changes on the file:
stopWatch() {
if (this.watchTimer) {
clearInterval(this.watchTimer);
this.watchTimer = undefined;
}
}
The stopWatch method is very simple: we will check if we have a timer in this object. If we do, then we run clearInterval on that timer to clear that timer.
- Create a test.txt file in the same directory as filewatch.js.
- Create a FileWatcher instance and start watching the file every 1000 ms:
const watcher = new FileWatcher('test.txt', 1000);
watcher.startWatch();
- Modify some content in test.txt and save it. You should see the following output:
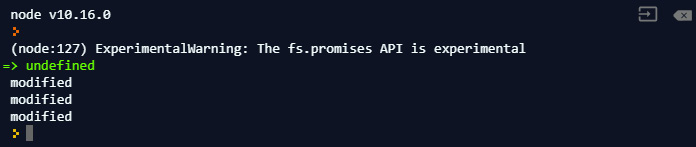
Figure 9.53: Output after modifying the content in the test.txt file
We modified the file twice, which means we are seeing three modified messages. This is happening because when we start the watch, we class this as the file being modified.
- Modify startWatch so that it also retrieves the new content:
startWatch() {
if (!this.watchTimer) {
this.watchTimer = setInterval(() => {
fs.stat(this.file).then((stat) => {
if (this.timeModified !== stat.mtime.toString()) {
fs.readFile(this.file, 'utf-8').then((content) => {
console.log('new content is: ', content);
}).catch((error) => {
console.error(error);
});
this.timeModified = stat.mtime.toString();
}
}).catch((error) => {
console.error(error);
});
}, this.delay);
}
}
When we modify test.txt and save it, our code should detect it and output the new content:

Figure 9.54: The modifications that were made in the file can be seen using the startWatch function
- Modify startWatch so that it emits events when the file is modified and an error when it encounters an error:
startWatch() {
if (!this.watchTimer) {
this.watchTimer = setInterval(() => {
fs.stat(this.file).then((stat) => {
if (this.timeModified !== stat.mtime.toString()) {
fs.readFile(this.file, 'utf-8').then((content) => {
this.emit('change', content);
}).catch((error) => {
this.emit('error', error);
});
this.timeModified = stat.mtime.toString();
}
}).catch((error) => {
this.emit('error', error);
});
}, this.delay);
}
}
Instead of outputting the content, we will emit an event with the new content. This makes our code much more flexible.
- Attach event handlers to error and change them on our file watcher:
watcher.on('error', console.error);
watcher.on('change', (change) => {
console.log('new change:', change);
});
- Run the code and modify test.txt:

Figure 9.55: Output after changing our file watcher
Chapter 10: Functional Programming with JavaScript
Activity 15: onCheckout Callback Prop
Solution
- Change the current directory to Lesson10 and run npm install if you haven't done so in this directory before. npm install downloads the dependencies that are required in order to run this activity (React and Parcel).
- Run parcel serve activity-on-checkout-prop-start.html and then execute npm run Activity15. You will see the application starting up, as follows:

Figure 10.42: Output after running the start html script
- Go to http://localhost:1234 (or whichever URL the start script output). You should see the following HTML page:

Figure 10.43: Initial application in the browser
- The onClick of the Proceed to checkout can be implemented as follows:
render() {
return (
<div>
<p>You have {this.state.items.length} items in your basket</p>
<button onClick={() => this.props.onCheckout(this.state.items)}>
Proceed to checkout
</button>
</div>
);
}
This follows on from the following investigation:
Finding the button in the Basket component's render method whose text is Proceed to checkout.
Noticing its onClick handler is currently a function that does nothing when called, () => {}.
Replacing the onClick handler with the correct call to this.props.onCheckout.
- We should see the following after clicking the Proceed to checkout button:

Figure 10.44: Output after clicking on the "Proceed to checkout" button
Activity 16: Testing a Selector
Solution
- Run npm run Activity16 (or node activity-items-selector-test-start.js). You will see the following output:

Figure 10.45: Expected output after running the start file of the activity
- Test that, for empty states, the selector returns []:
function test() {
assert.deepStrictEqual(
selectBasketItems(),
[],
'should be [] when selecting with no state'
);
assert.deepStrictEqual(
selectBasketItems({}),
[],
'should be [] when selecting with {} state'
);
}
- Test that, for an empty basket object, the selector returns []:
function test() {
// other assertions
assert.deepStrictEqual(
selectBasketItems({basket: {}}),
[],
'should be [] when selecting with {} state.basket'
);
}
- Test that, if the items array is set but empty, the selector returns []:
function test() {
// other assertions
assert.deepStrictEqual(
selectBasketItems({basket: {items: []}}),
[],
'should be [] when items is []'
);
}
- Test that, if the items array is not empty and set, the selector returns it:
function test() {
// other assertions
assert.deepStrictEqual(
selectBasketItems({
basket: {items: [{name: 'product-name'}]}
}),
[{name: 'product-name'}],
'should be items when items is set'
);
}
The full test function content after following the previous solution steps:
function test() {
assert.deepStrictEqual(
selectBasketItems(),
[],
'should be [] when selecting with no state'
);
assert.deepStrictEqual(
selectBasketItems({}),
[],
'should be [] when selecting with {} state'
);
assert.deepStrictEqual(
selectBasketItems({basket: {}}),
[],
'should be [] when selecting with {} state.basket'
);
assert.deepStrictEqual(
selectBasketItems({basket: {items: []}}),
[],
'should be [] when items is []'
);
assert.deepStrictEqual(
selectBasketItems({
basket: {items: [{name: 'product-name'}]}
}),
[{name: 'product-name'}],
'should be items when items is set'
);
}
- There should be no errors in the output of the implemented test:

Figure 10.46: Final output showing no errors
Activity 17: Fetching the Current Basket From BFF
Solution
- Change the current directory to Lesson10 and run npm install if you haven't done so in this directory before.
- Run the BFF for Activity 17 and npx parcel serve activity-app-start.html. During development, run npm run Activity17. You will see the application starting up, as follows:

Figure 10.47: Running the initial start file for the activity
- Go to http://localhost:1234 (or whichever URL the starting script output). You should see the following HTML page:

Figure 10.48: Initial application in the browser
- Run the following query in the GraphiQL UI:
{
basket {
items {
id
name
price
quantity
}
}
}
The following is the output of the preceding code:
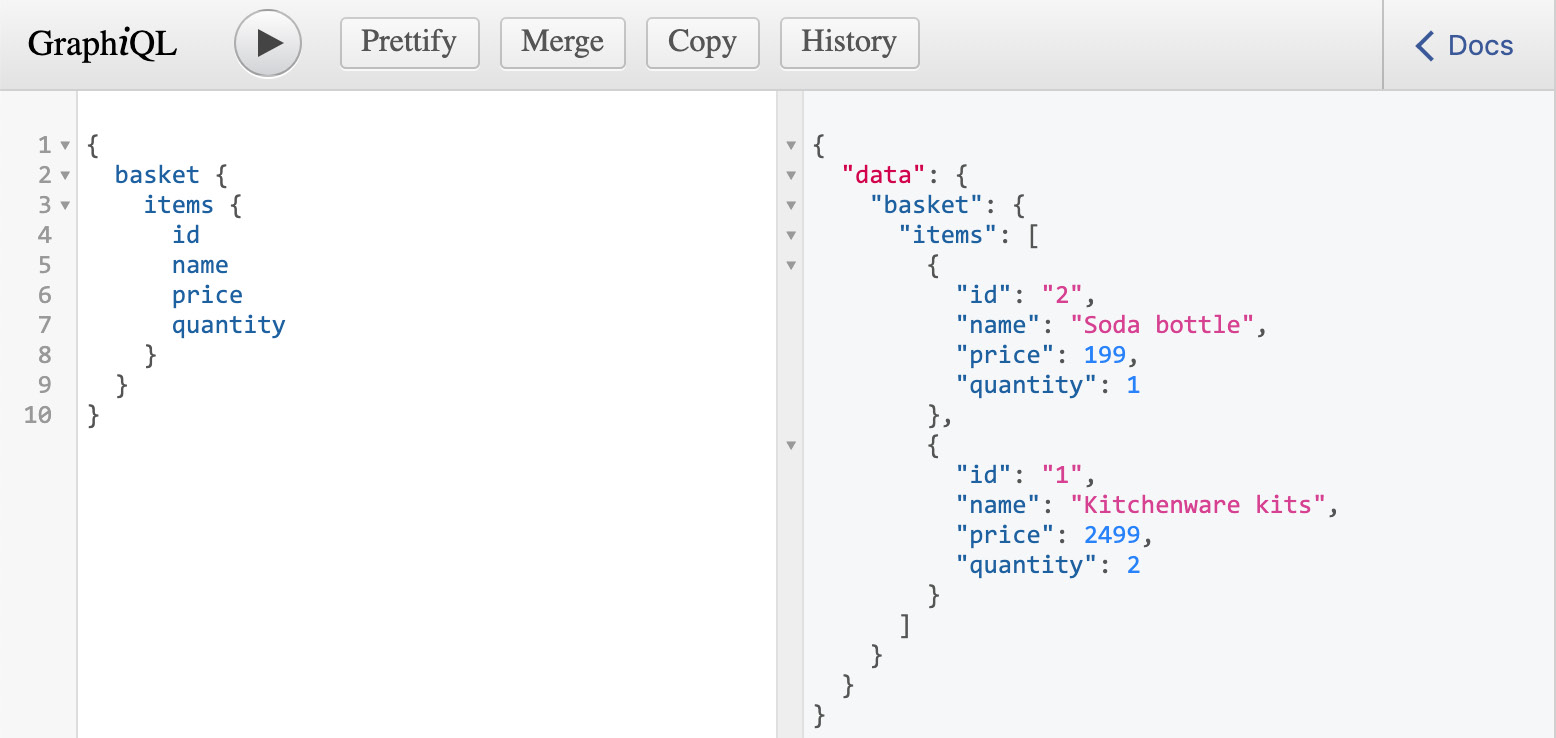
Figure 10.49: GraphiQL UI with basket query
- Create a new requestBasket action creator (that leverages redux-thunk). It calls fetchFromBff with the query from the previous step and dispatches a REQUEST_BASKET_SUCCESS action with a basket payload extracted from the GraphQL response:
function requestBasket() {
return dispatch => {
fetchFromBff(`{
basket {
items {
id
name
price
quantity
}
}
}`).then(data => {
dispatch({
type: REQUEST_BASKET_SUCCESS,
basket: data.basket
});
});
};
}
- Reduce the basket data into the store and add the following case to appReducer to reduce our new REQUEST_BASKET_SUCCESS action's basket payload into the state:
const appReducer = (state = defaultState, action) => {
switch (action.type) {
// other cases
case REQUEST_BASKET_SUCCESS:
return {
...state,
basket: action.basket
};
// other cases
}
};
- Add requestBasket in mapDispatchToProps, like so:
const mapDispatchToProps = dispatch => {
return {
// other mapped functions
requestBasket() {
dispatch(requestBasket());
}
};
};
- Call requestBasket on componentDidMount:
class App extends React.Component {
componentDidMount() {
this.props.requestBasket();
}
// render method
}
When loading up the application with all the preceding steps completed, it flashes with the "You have 0 items in your basket" message before changing to the following screenshot. When the fetch from the BFF completes, it is reduced into the store and causes a re-render. This will display the basket once again, as follows:
