
Learning Objectives
By the end of this chapter, you will be able to:
- Identify the best practices for writing clean JavaScript code
- Perform linting and add a lint command to your node project
- Use unit, integration, and end-to-end testing methods on your code
- Automate linting and tests using Git hooks
In this chapter, we will focus on improving code quality, setting up tests, and automating tests to run before a Git commit. These techniques can be used to ensure that mistakes or errors are found early on and never make it to production.
Introduction
In the previous chapter, we explored the concepts of modular design, ES6 modules, and their use with Node.js. We took our compiled ES6 JavaScript and converted it into a compatible script using Babel.
In this chapter, we'll discuss code quality, which is one of the key qualities of professional JavaScript development. When we start writing code, we tend to focus on solving simple problems and evaluating the outcome. When it comes to the small pet projects that most developers start with, there is little need to communicate with others or work as part of a large team.
As the projects, you work on becoming larger in scope, the importance of code quality increases. In addition to ensuring that the code works, we have to consider other developers who will use the components we create or update the code we write.
There are several aspects of quality code. The first and most obvious is that it does what it is intended to do. This is often easier said than done. Often, it can be difficult to meet the requirements of a large project. To make matters more complex, often adding a new feature can cause an error in some existing part of the application. We can reduce these mistakes through good design but, even so, these types of breakages are bound to happen.
As agile development becomes more popular, the speed at which code changes have also increased. As a result, tests are more important than ever. We'll demonstrate how you can use unit tests to confirm the proper functioning of functions and classes. In addition to unit tests, we'll look at integration testing, which ensures that all aspects of the program function together correctly as expected.
The second component of code quality is performance. The algorithms in our code may produce the desired result, but do they do so efficiently? We'll look at how you can test functions for performance to ensure that algorithms can return results in an acceptable amount of time when processing a large input. As an example, you may have a sorting algorithm that works great with 10 rows of data but takes several minutes once you try processing 100.
The third aspect of code quality we'll talk about in this chapter is readability. Readability is a measure of how easy it is for a human to read and understand your code. Have you ever looked at code written with vague functions and variable names or variable names that are misleading? When writing code, consider that others may have to read or modify it. Following some basic guidelines can help to improve your readability.
Clear Naming
One of the easiest ways to make code more readable is clear naming. Make using variables and functions as obvious as possible. Even on a one-man project, it's easy to come back to your own code after 6 months and have trouble remembering what every function does. When you're reading someone else's code, this is doubly true.
Make sure your names are clear and pronounceable. Consider the following example, where a developer has created a function that returns the date in yymm format:
function yymm() {
let date = new Date();
Return date.getFullYear() + "/" + date.getMonth();
}
When we're given the context and explanation of what this function does, it's obvious. But for an outside developer skimming over the code for the first time, yymm can easily cause some confusion.
Vague functions should be renamed in a way that makes their use obvious:
function getYearAndMonth() {
let date = new Date();
return date.getFullYear() + "/" + date.getMonth();
}
When the correct naming of functions and variables is used, it becomes easy to compose code that is easily readable. Consider another example, in which we want to turn on a light if it's nighttime:
if(time>1600 || time<600) {
light.state = true;
}
It's not at all clear what's going on in the preceding code. What exactly is meant by 1600 and 600, and what does it mean if the light's state is true? Now consider the same function rewritten as follows:
if(time.isNight) {
light.turnOn;
}
The preceding code makes the same process clear. Instead of asking whether the time is between 600 and 1600, we simply ask whether it is night, and, if so, we turn the light on.
In addition to being more readable, we have also put the definition of when it is nighttime into a central location, isNight. If we want to make night end at 5:00 instead of 6:00, we only have to change a single line within isNight instead of finding all instances of time<600 in our code.
Convention
When it comes to the convention of how to format or write code, there are two categories: industry- or language-wide convention and company/organization-wide convention. The industry- or language-specific conventions are generally accepted by most programmers using a language. For example, in JavaScript, an industry-wide convention is the use of camel case for variable names.
Good sources for industry-wide conventions include W3 JavaScript Style Guide and Mozilla MDN Web Docs.
In addition to industry-wide conventions, software development teams or projects will often have a further set of conventions. Sometimes, these conventions are compiled into a style guide document; in other cases, these conventions are undocumented.
If you're part of a team that has a relatively large code base, documenting the specific style choices can be useful. This will help you to consider what aspects you'd like to keep and enforce new updates, and which aspects you may want to change. It also helps onboarding new employees who may be familiar with JavaScript but not familiar with the specifics of the company.
A good example of a company-specific style guide is Google JavaScript Style Guide (https://google.github.io/styleguide/jsguide.html). It contains some information that is useful in general. For example, Section 2.3.3 discusses the use of non-ASCII in code. It suggests the following:
const units = 'μs';
Is preferable to using something like:
const units = 'u03bcs'; // 'μs'
Using u03bcs without the comment would be even worse. The more obvious the meaning of your code, the better.
Companies often have a set of libraries they favor for doing things such as logging, working with time values (for example, the Moment.js library), and testing. This can be useful for compatibility and the reuse of code. Having multiple dependencies that do similar things, used by different developers, increases the size of the compiled project, for example, if a project is already using Bunyan for logging, and someone else decides to install an alternative library such as Morgan.
Note: Style Guides
It's worth taking the time to read over some of the more popular style guides for JavaScript. Don't feel obligated to follow every single rule or suggestion, but get accustomed to the thinking behind why rules are created and enforced. Some popular guides worth checking out include the following:
MSDN Style Guide: https://developer.mozilla.org/en-US/docs/Web/JavaScript/Guide
Opinionated versus Non-Opinionated
When it comes to convention, the term "opinionated" is one you will likely come across. When exploring existing libraries and frameworks, you will often see phrases such as "an opinionated framework." In this context, "opinionated" is a measure of how strictly a convention is enforced:
Opinionated: Strictly enforces its chosen conventions and methods of doing things
Non-opinionated: Does not enforce convention, that is, as long as the code is valid, it can be used
Linting
Linting is an automated process where code is examined and validated against a standard of style guidelines. For example, a project that has linting set up to ensure two spaces instead of tabs will detect instances of tabs and prompt the developer to make the change.
It's important to be aware of linting, but it's not a strict requirement for your projects. When I'm working on a project, the main points I consider when deciding whether linting is needed are the size of the project and the size of the team working on the project.
Linting really comes in handy on long-term projects with medium- to large-sized teams. Often, new people join the project with experience of using some other styling convention. This means that you start getting mixed styles between files or even within the same file. This leads to the project becoming less organized and harder to read.
If you're writing a prototype for a hackathon, on the other hand, I would suggest that you skip the linting. It adds overhead to a project, that is unless you're using a boilerplate project as your starting point, which comes with your preferred linting installed.
There is also the risk of linting systems that are too restrictive and end up slowing down development.
Good linting should consider the project and find a balance between enforcing a common style and not being too restrictive.
Exercise 29: Setting up ESLint and Prettier to Monitor Errors in Code
In this exercise, we will install and set up ESLint and Prettier to monitor our code for styling and syntax errors. We will use a popular ESLint convention that was developed by Airbnb and has become somewhat of a standard.
Note
The code files for this exercise can be found at https://github.com/TrainingByPackt/Professional-JavaScript/tree/master/Lesson06/Exercise29/result.
Perform the following steps to complete the exercise:
- Create a new folder and initialize an npm project:
mkdir Exercise29
cd Exercise29
npm init -y
npm install --save-dev eslint prettier eslint-config-airbnb-base eslint-config-prettier eslint-plugin-jest eslint-plugin-import
We're installing several developer dependencies here. In addition to eslint and prettier, we're also installing a starting config made by Airbnb, a config to work with Prettier, and an extension that adds style exceptions for our Jest-based test files.
- Create a .eslintrc file:
{
"extends": ["airbnb-base", "prettier"],
"parserOptions": {
"ecmaVersion": 2018,
"sourceType": "module"
},
"env": {
"browser": true,
"node": true,
"es6": true,
"mocha": true,
"jest": true,
},
"plugins": [],
"rules": {
"no-unused-vars": [
"error",
{
"vars": "local",
"args": "none"
}
],
"no-plusplus": "off",
}
}
- Create a .prettierignore file (similar to the .gitignore file, this just lists the files that should be ignored by Prettier). Your .prettierignore file should contain the following:
node_modules
build
dist
- Create a src folder and, inside it, create a file called square.js that contains the following code. Make sure that you include the out-of-place tab:
var square = x => x * x;
console.log(square(5));
- Create a lint script in your npm package.json file:
"scripts": {
"lint": "prettier --write src/**/*.js"
},
- Next, we will test and demonstrate prettier --write by running our new script from the command line:
npm run lint
- Open src/square.js in a text editor; you can see that the out-of-place tab was removed:

Figure 6.1: The out-of-place tab was removed
- Next, go back to package.json and extend our lint script to run eslint after prettier is complete:
"scripts": {
"lint": "prettier --write src/**/*.js && eslint src/*.js"
},
- In the command line, run npm run lint again. You will encounter a linting error due to the code format in square.js:
> prettier --write src/**/*.js && eslint src/*.js
src/square.js 49ms
/home/philip/packt/lesson_6/lint/src/square.js
1:1 error Unexpected var, use let or const instead no-var
2:1 warning Unexpected console statement no-console
2 problems (1 error, 1 warning)
1 error and 0 warnings potentially fixable with the --fix option.
The preceding script produces one error and one warning. The error is due to the use of var when let or const could be used. Although, in this particular case, const should be used, as the value of square is not reassigned. The warning is in regard to our use of console.log, which generally shouldn't be shipped in production code, as it will make it hard to debug the console output when an error occurs.
- Open src/example.js and change var to const on line 1, as shown in the following figure:

Figure 6.2: The var statement replaced to const
- Now run npm run lint again. You should now only get back the warning:
> prettier --write src/**/*.js && eslint src/*.js
src/js.js 48ms
/home/philip/packt/lesson_6/lint/src/js.js
2:1 warning Unexpected console statement no-console
1 problem (0 errors, 1 warning)
In this exercise, we installed and set up Prettier for automatic code formatting, and ESLint to check our code for common bad practices.
Unit Tests
A unit test is an automated software test that checks whether a single aspect or function in some software is working as expected. For example, a calculator application might be split up into functions that deal with the Graphical User Interface (GUI) of the application and another set of functions responsible for each type of mathematical calculation.
In such a calculator, unit tests might be set up to ensure that each mathematical function works as expected. This setup allows us to quickly find any inconsistent results or broken functions caused by any changes. As an example, such a calculator's test file might include the following:
test('Check that 5 plus 7 is 12', () => {
expect(math.add(5, 7)).toBe(12);
});
test('Check that 10 minus 3 is 7', () => {
expect(math.subtract(10, 3)).toBe(7);
});
test('Check that 5 multiplied by 3 is 15', () => {
expect(math.multiply(5, 3).toBe(15);
});
test('Check that 100 divided by 5 is 20', () => {
expect(math.multiply(100, 5).toBe(20);
});
test('Check that square of 5 is 25', () => {
expect(math.square(5)).toBe(25);
});
The preceding tests would run every time the code base was changed and be checked into version control. Often, errors will arise unexpectedly when a function that is used in multiple places is updated and causes a chain reaction, breaking some other function. If such a change happens and one of the preceding statements becomes false (for example, 5 multiplied by 3 returns 16 instead of 15), we will immediately be able to associate our new code change with the break.
This is a very powerful technique that can be taken for granted in environments where tests are already set up. In work environments without such a system, it's possible that changes from developers or updates in software dependencies that unexpectedly break an existing function are committed to source control. Later, the bug is found, and it becomes difficult to make the association between the broken function and the code change that caused it.
It's also important to remember that unit tests ensure the functionality of some sub-unit of work, but not the functionality of a project as a whole (where multiple functions work together to produce a result). This is where integration testing comes into play. We will explore integration tests later on within this chapter.
Exercise 30: Setting up Jest Tests to Test a Calculator Application
In this exercise, we will demonstrate setting up a unit test using Jest, the most popular testing framework in the JavaScript ecosystem. We will continue with our example of a calculator application and set up automated testing for a function that takes a number and outputs its square.
Note
The code files for this exercise can be found at https://github.com/TrainingByPackt/Professional-JavaScript/tree/master/Lesson06/Exercise30.
Perform the following steps to complete the exercise:
- On the command line, navigate to the Exercise30/start exercise folder. This folder includes a src folder that contains the code we will be running our tests on.
- Initialize a npm project by entering the following command:
npm init -y
- Install Jest using the --save-dev flag (this indicates that the dependency is required for development but not production) by entering the following command:
npm install --save-dev jest
- Create a folder called __tests__. This is the default location where Jest looks for tests:
mkdir __tests__
- Now we're going to create our first test in __tests__/math.test.js. It should import src/math.js and ensure that running the math.square(5) returns 25:
const math = require('./../src/math.js');
test('Check that square of 5 is 25', () => {
expect(math.square(5)).toBe(25);
});
- Open package.json and modify the test script so that it runs jest. Notice the scripts section in the following screenshot:
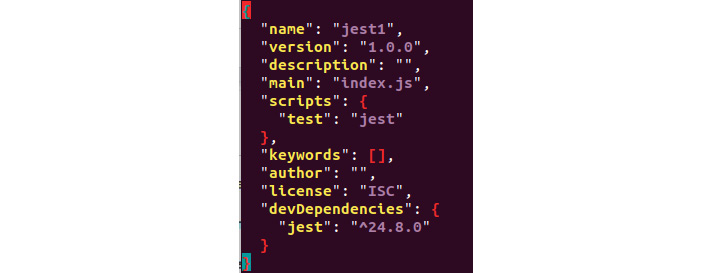
Figure 6.3: The test script modified so that it runs Jest
- On the command line, enter the npm run test. This should return a message that tells us the wrong value was found, as shown in the following code:
FAIL __test__/math.test.js
✕ Check that square of 5 is 25 (17ms)
● Check that square of 5 is 25
expect(received).toBe(expected) // Object.is equality
Expected: 25
Received: 10
2 |
3 | test('Check that square of 5 is 25', () => {
> 4 | expect(math.square(5)).toBe(25);
| ^
5 | });
6 |
at Object.toBe (__test__/math.test.js:4:26)
Test Suites: 1 failed, 1 total
Tests: 1 failed, 1 total
Snapshots: 0 total
Time: 1.263s
This error triggers because the start code has purposely included an error in the square function. Instead of multiplying the number by itself, we have instead doubled the value. Notice that the number of received answers was 10.
- Fix the error by opening up the file and fixing the square function. It should multiply x, as shown in the following code, instead of doubling it:
const square = (x) => x * x;
- With our code fixed, let's test again with npm run test. You should get a success message, as follows:

Figure 6.4: Success message shown after testing with npm run test
In this exercise, we set up a Jest test to ensure that running our square function with an input of 5 returns 25. We also looked at what to expect when the wrong value is returned by running our test with a mistake in the code that returned 10 instead of 25.
Integration Tests
So, we have discussed unit tests, which are extremely useful for finding the cause of errors when a project's code changes. However, it's also possible that the project passes all unit tests yet does not work as expected. This is because the whole of the project contains additional logic that glues our functions together, as well as static components such as HTML, data, and other artifacts.
Integration tests can be used to ensure a project works from a higher level. For example, while our unit tests directly call functions such as math.square, an integration test will test multiple pieces of functionality working together for a particular result.
Often, this means bringing together multiple modules or interacting with a database or other external components or APIs. Of course, integrating more parts means integration tests take longer, so they should be used more sparingly than unit tests. Another downside of the integration test is that when one fails, there are multiple possibilities as to the cause. In contrast, a failed unit test is generally easy to fix as the code being tested is in a specified location.
Exercise 31: Integration Testing with Jest
In this exercise, we'll continue where we left off in our last Jest exercise, where we tested that the square function was returning 25 in response to 5. In this exercise, we'll continue by adding some new tests that use our functions in conjunction with each other:
- On the command line, navigate to the Exercise31/start exercise folder, and install the dependencies with npm:
npm install
- Create a folder called __tests__:
mkdir __tests__
- Create a file called __tests__/math.test.js. Then, at the top, import the math library:
const math = require('./../src/math.js');
- Similarly to the last exercise, we'll add a test. The main difference here, however, is that we're combining multiple functions:
test('check that square of result from 1 + 1 is 4', () => {
expect(math.square(math.add(1,1))).toBe(4);
});
- Add a timer to measure performance to the preceding test:
test('check that square of result from 1 + 1 is 4', () => {
const start = new Date();
expect(math.square(math.add(1,1))).toBe(4);
expect(new Date() - start).toBeLessThan(5000);
});
- Now, test to make sure everything works by running npm test:
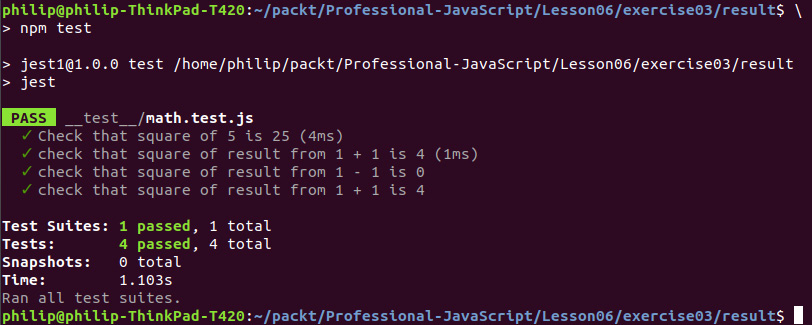
Figure 6.5: Running npm test to make sure everything is working fine
You should see an output similar to the preceding figure, with each test passing with an expected result.
It should be noted that these integration tests are somewhat simplistic. In a real-world scenario, integration tests combine functions, as we demonstrated previously, but from different sources. For example, when you have multiple components created by different teams, integration testing is there to ensure that everything works together. Often, bugs can be caused by simple things, such as updating an external library.
The idea is that multiple parts of your application are integrated, giving you a greater chance of finding where something breaks.
Code Performance Fibonacci Example
Often, a problem has more than one solution. While all solutions might return the same result, they likely don't have the same performance. Take, for example, the problem of getting the nth number of the Fibonacci sequence. Fibonacci is a mathematical pattern where the next number in the sequence is the sum of the last two numbers (1, 1, 2, 3, 5, 8, 13, …).
Consider the following solution, where Fibonacci calls itself recursively:
function fib(n) {
return (n<=1) ? n : fib(n - 1) + fib(n - 2);
}
The preceding example states that if we want to get the nth number of the Fibonacci sequence recursively, then get the Fibonacci of n minus one plus the Fibonacci of n minus two, unless n is 1, in which case, return 1. It works and will return the correct answer for any given number. However, as the value of n increases, the execution time increases exponentially.
To see how slow this performs, add the fib function to a new file and use the function by console logging the result as follows:
console.log(fib(37));
Next, on the command line, run the following command (time should be available in most Unix- and Mac-based environments):
time node test.js
On a particular laptop, I got back the following, which indicates the 37th digit of Fibonacci is 24157817 and the execution time took 0.441 seconds:
24157817
real 0m0.441s
user 0m0.438s
sys 0m0.004s
Now open up that same file and change 37 to 44. Then, run the same time node test command again. In my case, an increase of only 7 caused the execution time to increase up to 20 times:
701408733
real 0m10.664s
user 0m10.653s
sys 0m0.012s
We can rewrite the same algorithm in a more efficient way to increase speed for larger numbers:
function fibonacciIterator(a, b, n) {
return n === 0 ? b : fibonacciIterator((a+b), a, (n-1));
}
function fibonacci(n) {
return fibonacciIterator(1, 0, n);
}
Even though it appears to be more complex, this method of generating a Fibonacci number is superior due to the speed of execution.
One of the downsides of tests with Jest is that, given the preceding scenario, both the slow and fast versions of Fibonacci will pass. Yet, the slow version would clearly be unacceptable in a real-world application where quick processing has to be done.
To guard against this, you may want to add some performance-based tests that ensure functions are completed within a certain time period. The following is an example of creating a custom timer to ensure that a function finishes within 5 seconds:
test('Timer - Slow way of getting Fibonacci of 44', () => {
const start = new Date();
expect(fastFib(44)).toBe(701408733);
expect(new Date() - start).toBeLessThan(5000);
});
Note: Future versions of Jest
It can be somewhat cumbersome to manually add timers to all your functions. For this reason, there is discussion within the Jest project to create an easier syntax for accomplishing what has been done previously.
To see the discussion related to this syntax and whether it's been resolved, check issue #6947 for Jest on GitHub at https://github.com/facebook/jest/issues/6947.
Exercise 32: Ensuring Performance with Jest
In this exercise, we'll use the technique described previously to test the performance of two algorithms for getting Fibonacci:
- On the command line, navigate to the Exercise32/start exercise folder and install dependencies with npm:
npm install
- Create a folder called __tests__:
mkdir __tests__
- Create a file called __tests__/fib.test.js. At the top, import the fast and slow Fibonacci functions (these are already created in the start folder):
const fastFib = require('./../fastFib');
const slowFib = require('./../slowFib');
- Add a test for fast Fibonacci that creates a timer and ensures that the timer hasn't run for longer than 5 seconds:
test('Fast way of getting Fibonacci of 44', () => {
const start = new Date();
expect(fastFib(44)).toBe(701408733);
expect(new Date() - start).toBeLessThan(5000);
});
- Next, add a test for slow Fibonacci, which also checks the run time is less than 5 seconds:
test('Timer - Slow way of getting Fibonacci of 44', () => {
const start = new Date();
expect(slowFib(44)).toBe(701408733);
expect(new Date() - start).toBeLessThan(5000);
});
- From the command line, run the tests using the npm test command:

Figure 6.6: Result from the Fibonacci tests
Notice the preceding error response for the part that mentions the timer. The expected result for the function's running time was under 5,000 milliseconds but, in my case, I actually received 10,961. You'll likely get a different result based on the speed of your computer. If you didn't receive the error, it may be that your computer is so fast that it completed in less than 5,000 milliseconds. If that's the case, try lowering the expected maximum time to trigger the error.
End-to-End Testing
While integration testing combines multiple units or functions of a software project, end-to-end testing goes one step further by simulating the actual use of the software.
For example, while our unit tests directly called functions such as math.square, an end-to-end test would load the graphical interface of the calculator and simulate pressing a number, say 5, followed by the square button. After a few seconds, the end-to-end test would look at the resulting answer in the graphical interface and ensure it equals 25 as expected.
End-to-end testing should be used more sparingly due to the overhead, but it is a great final step in a testing process to ensure that everything is working as expected. In contrast, unit tests are relatively quick to run and, therefore, can be run more often without slowing down development. The following figure shows a recommended distribution of tests:
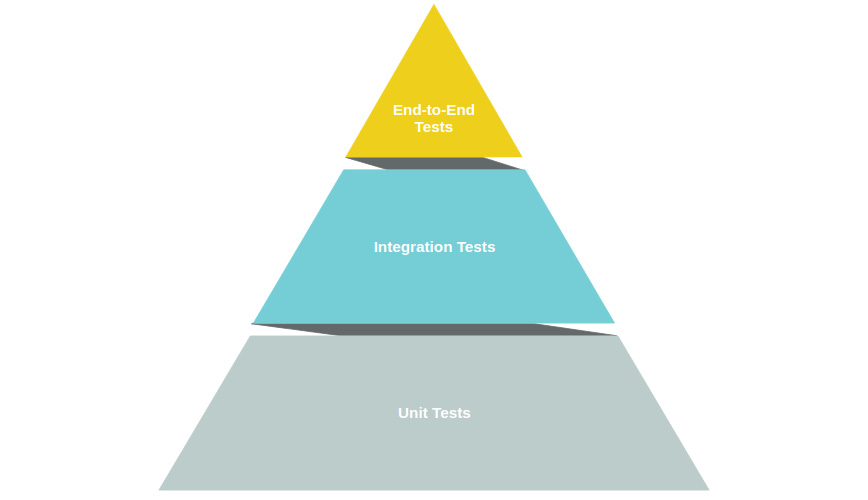
Figure 6.7: Recommended distribution of tests
Note: Integration Testing versus End-to-End Testing
It should be noted that there can be some overlap between what is considered an integration test and what is considered an end-to-end test. The interpretation of what constitutes a test type may vary between one company and another.
Traditionally, tests have been classified as either a unit test or an integration test. Over time, other classifications have become popular, such as system, acceptance, and end-to-end. Due to this, there can be an overlap as to what type a particular test is.
Puppeteer
In 2018, Google released the Puppeteer JavaScript library, which has drastically increased the ease with which end-to-end testing can be set up on a JavaScript-based project. Puppeteer is a headless version of the Chrome web browser, meaning that it has no GUI component. This is crucial, as it means we're testing our applications with a full Chrome browser, rather than a simulation.
Puppeteer can be controlled through jQuery-like syntax, where elements on an HTML page are selected by ID or class and interacted with. For example, the following code opens Google News, finds a .rdp59b class, clicks on it, waits 3 seconds, and finally takes a screenshot:
(async() => {
const browser = await puppeteer.launch();
const page = await browser.newPage();
await page.goto('http://news.google.com');
const more = await page.$(".rdp59b");
more.click();
await page.waitFor(3000);
await page.screenshot({path: 'news.png'});
await browser.close();
})();
Bear in mind that, in the preceding example, we're selecting a .rdp59b class that looks like it was automatically generated; therefore, it is likely that this class will change in the future. In the case that the class name changes, the script will no longer work.
If upon reading this, you find the preceding script does not work, I challenge you to update it. One of the best tools when working with Puppeteer is the Chrome DevTools. My usual workflow is to go to the website I'm writing a script for and right-click on the element that I'll be targeting, as shown in the following figure:

Figure 6.8: Right-click to inspect in Chrome
Once you click on Inspect, the DOM explorer will pop up and you'll be able to see any classes or IDs associated with the element:
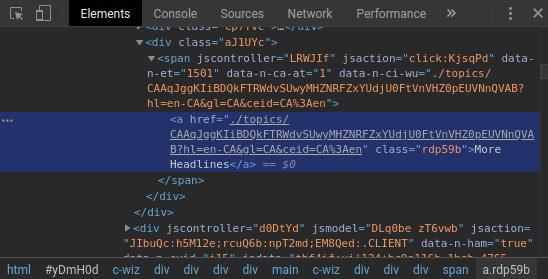
Figure 6.9: DOM explorer in Chrome DevTools
Note: Puppeteer for Web Scraping and Automation
In addition to being useful for writing end-to-end tests, Puppeteer can also be used for web scraping and automation. Almost anything that can be done in a normal browser can be automated (given the right code).
In addition to being able to select elements on a page via selectors, as we previously looked at, Puppeteer has full access to keyboard and mouse simulation. Thus, more complex things such as automating web-based games and daily tasks are possible. Some have even managed to bypass things such as captchas using it.
Exercise 33: End-to-End Testing with Puppeteer
In this exercise, we're going to use Puppeteer to manually open an HTML/JavaScript-based calculator and use it as an end user would. I didn't want to target a live website as its content often changes or goes offline. So, instead, I have included an HTML calculator in Exercise33/start of the project files.
You can view it by installing dependencies with npm, running npm start, and then going to localhost:8080 in your browser:
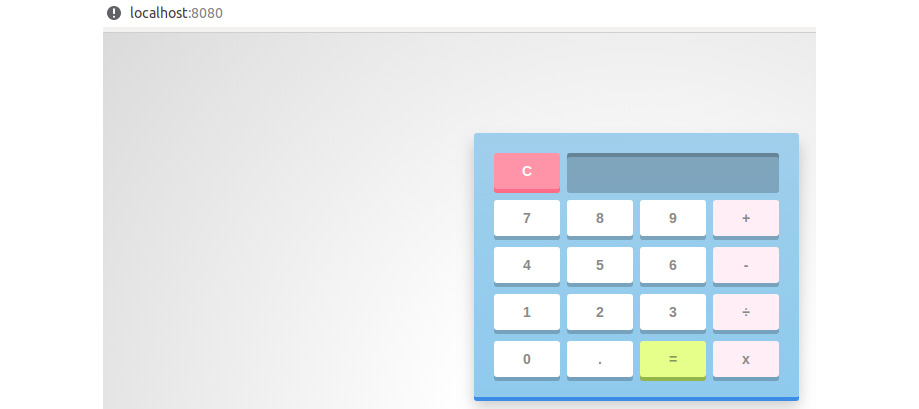
Figure 6.10: Site showing the demonstration of a calculator created using Puppeteer
In this exercise, we'll be creating a script that opens the site, presses the buttons, and then checks the site for the correct results. Instead of just checking the output of a function, we're listing actions to take on the site and specifying the HTML selector to use as the value to run our tests against.
Perform the following steps to complete the exercise:
- Open the Exercise33/start folder and install the existing dependencies:
npm install
- Install the required jest, puppeteer, and jest-puppeteer packages:
npm install --save-dev jest puppeteer jest-puppeteer
- Open package.json and configure Jest to use the jest-puppeteer presets, which will automatically set up Jest to work with Puppeteer:
"jest": {
"preset": "jest-puppeteer"
},
- Create a file called jest-puppeteer.config.js and add the following to it:
module.exports = {
server: {
command: 'npm start',
port: 8080,
},
}
The preceding configuration will make sure the npm start command is run before the testing phase. It also tells Puppeteer to look for our web application on port: 8080.
- Make a new folder called __tests__, as we did in our previous examples:
mkdir __test__
- Inside the __tests__ folder, create a file called test.test.js that contains the following:
describe('Calculator', () => {
beforeAll(async () => {
await page.goto('http://localhost:8080')
})
it('Check that 5 times 5 is 25', async () => {
const five = await page.$("#five");
const multiply = await page.$("#multiply");
const equals = await page.$("#equals");
await five.click();
await multiply.click();
await five.click();
await equals.click();
const result = await page.$eval('#screen', e => e.innerText);
expect(result).toMatch('25');
})
})
The preceding code is a complete end-to-end test for multiplying 5 by 5 and confirming that the answer returned within the interface is 25. Here, we're opening the local website, pressing five, pressing multiply, pressing five, pressing equals, and then checking the value of the div with the ID of screen.
- Run the tests using npm:

Figure 6.11: Output after running the calculator script
You should see a result, as shown in the preceding figure, with the output of 25.
Git Hooks
The tests and linting commands discussed here can be incredibly useful for maintaining and improving your code quality and functionality. However, in the heat of actual development, where our focus is on specific problems and deadlines, it can be easy to forget to run the linting and test commands.
One popular solution to this problem is the use of Git hooks. A Git hook is a feature of the Git version control system. A Git hook specifies a terminal command to be run at some specific point in the Git process. A Git hook can be run before a commit; after, when a user updates by pulling; and at many other specific points. A full list of possible Git hooks can be found at https://git-scm.com/docs/githooks.
For our purposes, we'll focus only be using the pre-commit hook. This will allow us to find any formatting issues before we commit our code to the source.
Note: Exploring Git
Another interesting way of exploring the possible Git hooks and how they're used in general is to open any Git version control project and look in the hooks folder.
By default, any new .git project will contain a large list of samples in the .git/hooks folder. Explore their contents and have them trigger by renaming them with the following pattern:
<hook-name>.sample to <hook-name>
Exercise 34: Setting up a Local Git Hook
In this exercise, we'll set up a local Git hook that runs the lint command before we're allowed to commit using Git:
- On the command line, navigate to the Exercise34/start exercise folder and install the dependencies:
npm install
- Initialize the folder as a Git project:
git init
- Create the .git/hooks/pre-commit file, which contains the following:
#!/bin/sh
npm run lint
- If on an OS X- or Linux-based system, make the file executable by running the following (this is not required on Windows):
chmod +x .git/hooks/pre-commit
- We'll now test the hook by making a commit:
git add package.json
git commit -m "testing git hook"
The following is the output of the preceding code:
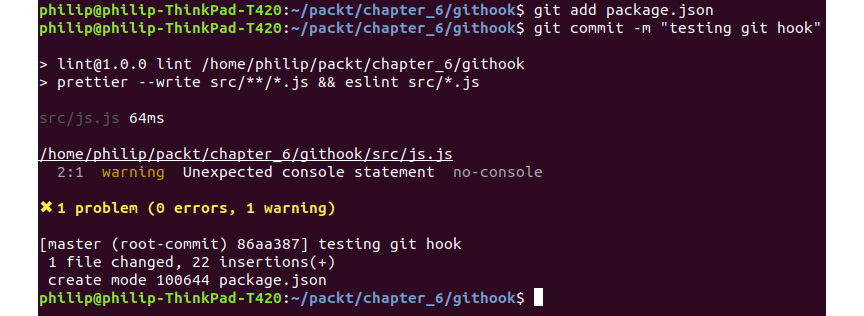
Figure 6.12: Git hook being run before committing to Git
You should see the lint command being run before your code is committed to the source, as shown in the preceding screenshot.
- Next, let's test failure by adding some code that will generate a linting error. Modify your src/js.js file by adding the following line:
let number = square(5);
Make sure that you keep the unnecessary tab in the preceding line, as this will be what triggers a lint error.
- Repeat the process of adding the file and committing it:
git add src/js.js
git commit -m "testing bad lint"
The following is the output of the preceding code:
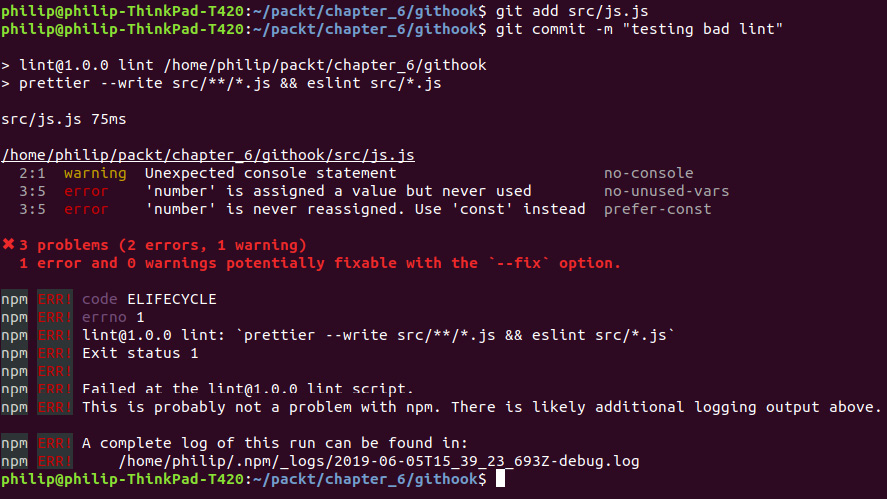
Figure 6.13: A failed linting before committing the code to git
You should see the lint command running as before; however, after it runs, the code is not committed like the last time, due to the Git hook returning an error.
Sharing Git Hooks with Husky
An important factor to be aware of with Git hooks is that, because these hooks are within the .git folder itself, they are not considered part of the project. Therefore, they will not be shared to your central Git repository for collaborators to use.
However, Git hooks are most useful in collaborative projects where new developers may not be fully aware of a project's conventions. It's a very convenient process when a new developer clones a project, makes some changes, tries to commit, and immediately gets feedback based on linting and tests.
The husky node library was created with this in mind. It allows you to keep track of your Git hooks within the source code using a single config file called .huskyrc. When a project is installed by a new developer, the hooks will be active without the developer having to do anything.
Exercise 35: Setting up a Commit Hook with Husky
In this exercise, we're going to set up a Git hook that does the same thing as the one in Exercise 34, Setting up a Local Git Hook, but has the advantage of being shareable across a team. By using the husky library instead of git directly, we'll ensure that anyone who clones the project also has the hook that runs lint before committing any changes:
- On the command line, navigate to the Exercise35/start exercise folder and install the dependencies:
npm install
- Create a file called .huskyrc that contains the following:
{
"hooks": {
"pre-commit": "npm run lint"
}
}
The preceding file is the most important part of this exercise as it defines exactly what command will be run at what point in the Git process. In our case, we're running the lint command before any code is committed to the source.
- Initialize the folder as a Git project by running git init:
git init
- Install Husky using npm:
npm install --save-dev husky
- Make a change to src/js.js that will be used for our test commit. As an example, I'll add a comment as follows:

Figure 6.14: The test commit comment
- Now, we'll run a test ensuring it works like in the previous example:
git add src/js.js
git commit -m "test husky hook"
The following is the output of the preceding code:

Figure 6.15: Output after committing the test husky hook
We're getting a warning about our use of console.log, but you can ignore this for our purposes. The main point is that we have set up our Git hook using Husky, so anyone else who installs the project will also have the hooks set up, as opposed to if we set them up directly in Git.
Note: Initializing Husky
Take note of the fact that npm install --save-dev husky was run after our Git repository was created. When you install Husky, it runs the required commands to set up your Git hooks. However, if the project isn't a Git repository, it won't be able to.
If you have any problems related to this, try re-running npm install --save-dev husky once you have initialized a Git repository.
Exercise 36: Getting Elements by Text with Puppeteer
In this exercise, we're going to write a Puppeteer test that verifies a small quiz app is working. If you go into the exercise folders and find the starting point for Exercise 36, you can run npm start to see the quiz we'll be testing:
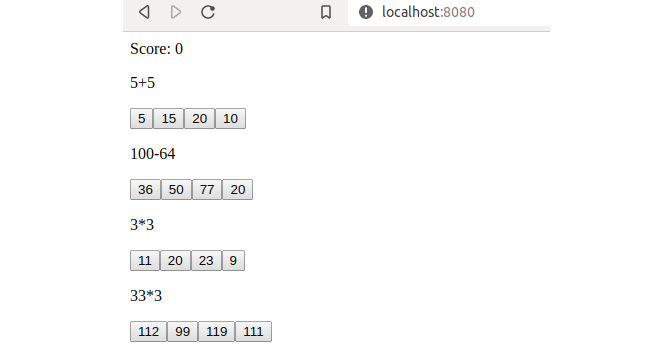
Figure 6.16: Puppeteer showing a small quiz app
In this application, clicking on the correct answer of a question makes the question disappear and the score increment by one:
- On the command line, navigate to the Exercise36/start exercise folder and install the dependencies:
npm install --save-dev jest puppeteer jest-puppeteer
- Add a test script to package.json by modifying the scripts section so that it looks like the following:
"scripts": {
"start": "http-server",
"test": "jest"
},
- Add a Jest section to package.json that tells Jest to use Puppeteer presets:
"jest": {
"preset": "jest-puppeteer"
},
- Create a file called jest-puppeteer.config.js where we will tell Jest to turn our quiz app on before running any tests:
module.exports = {
server: {
command: 'npm start',
port: 8080,
},
}
- Create a folder called __test__ where we will put our Jest tests:
mkdir __test__
- Create a test in the folder called quiz.test.js. It should contain the following to initialize our test:
describe('Quiz', () => {
beforeAll(async () => {
await page.goto('http://localhost:8080')
})
// tests will go here
})
- Next, replace the comment in the preceding code with a test for the first question in our quiz:
it('Check question #1', async () => {
const q1 = await page.$("#q1");
let rightAnswer = await q1.$x("//button[contains(text(), '10')]");
await rightAnswer[0].click();
const result = await page.$eval('#score', e => e.innerText);
expect(result).toMatch('1');
})
Notice our use of q1.$x("//button[contains(text(), '10')]"). Instead of using an ID, we're searching the answers for a button that contains the text 10. This can be very useful when parsing a website that doesn't use IDs on the elements you need to interact with.
- The following test is added to the last step. We'll add three new tests, one for each question:
it('Check question #2', async () => {
const q2 = await page.$("#q2");
let rightAnswer = await q2.$x("//button[contains(text(), '36')]");
await rightAnswer[0].click();
const result = await page.$eval('#score', e => e.innerText);
expect(result).toMatch('2');
})
it('Check question #3', async () => {
const q3 = await page.$("#q3");
let rightAnswer = await q3.$x("//button[contains(text(), '9')]");
await rightAnswer[0].click();
const result = await page.$eval('#score', e => e.innerText);
expect(result).toMatch('3');
})
it('Check question #4', async () => {
const q4 = await page.$("#q4");
let rightAnswer = await q4.$x("//button[contains(text(), '99')]");
await rightAnswer[0].click();
const result = await page.$eval('#score', e => e.innerText);
expect(result).toMatch('4');
})
Notice how the line at the bottom of each test has an expected result, one higher than the last; this is us tracking the score on the page. If everything is working properly, the fourth test will find a score of 4.
- Finally, return to the command line so that we can confirm the correct results. Run the test command as follows:
npm test
The following is the output of the preceding code:
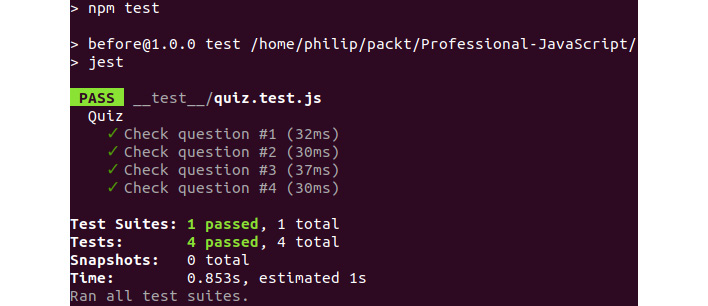
Figure 6.17: Command line confirming the correct results
If you have done everything correctly, you should see four passing tests as a response to running npm test.
Activity 7: Putting It All Together
In this activity, we'll combine several aspects of the chapter. Starting with a pre-built calculator using HTML/JavaScript, your task is the following:
- Create a lint command that checks the project against prettier and eslint using the eslint-config-airbnb-base package, as was done in a previous exercise.
- Install puppeteer with jest and create a test command in package.json that runs jest.
- Create a Puppeteer test that uses the calculator to calculate 777 multiplied by 777, and ensure the answer returned is 603,729.
- Create another Puppeteer test to calculate 3.14 divided by 2, and ensure the answer returned is 1.57.
- Install and set up Husky to run both the linting and testing commands before a commit is made using Git.
Perform the following steps to complete the activity (high-level steps):
- Install the developer dependencies listed in the linting exercise (eslint, prettier, eslint-config-airbnb-base, eslint-config-prettier, eslint-plugin-jest, and eslint-plugin-import).
- Add an eslint configuration file, .eslintrc.
- Add a .prettierignore file.
- Add a lint command to your package.json file.
- Open the assignment folder and install the developer dependencies for using Puppeteer with Jest.
- Modify your package.json file by adding an option telling Jest to use the jest-puppeteer preset.
- Add a test script to package.json that runs jest.
- Create a jest-puppeteer.config.js to configure Puppeteer.
- Create a test file at __tests__/calculator.js.
- Create a Husky file at .huskyrc.
- Install husky as a developer dependency by running npm install --save-dev husky.
Expected Output
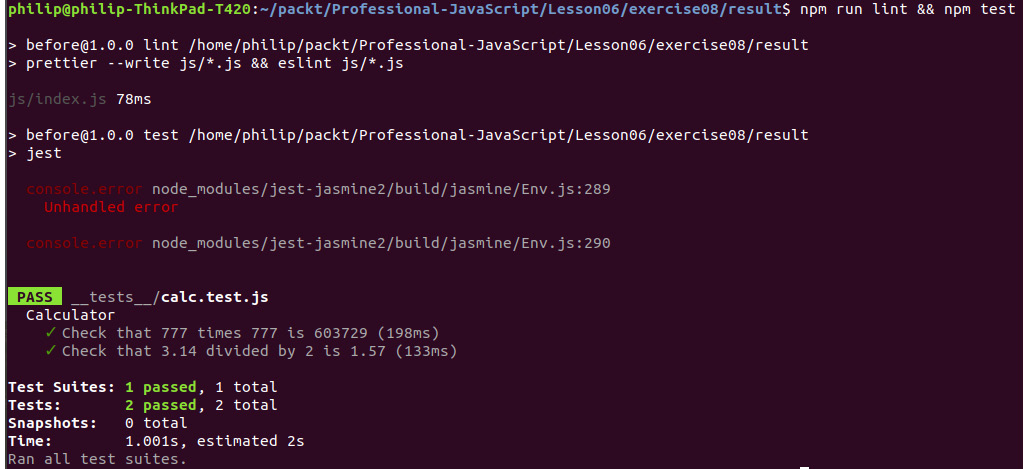
Figure 6.18: The final output showing calc.test passed
After completing the assignment, you should be able to run the npm run lint command and the npm test command and get tests passing like in the preceding screenshot.
Note
The solution for this activity can be found on page 602.
Summary
In this chapter, we looked at aspects of code quality with an emphasis on automated testing. We started with the basics of clear naming and getting familiar with the industry-wide conventions of the language. By following these conventions and writing clearly, we're able to make our code more readable and reusable.
Building from there, we looked at how linting and testing commands can be created with Node.js using a handful of popular tools, including Prettier, ESLint, Jest, Puppeteer, and Husky.
In addition to setting up tests, we talked about the categories of tests and their use cases. We went through unit tests that ensure that individual functions are working as expected, and integration tests that combine multiple functions or aspects of a program to ensure things are working together. Then, we performed end-to-end tests, which open the application's interface and interact with it as an end-user would.
Finally, we looked at how we can tie it all together by having our linting and testing scripts automatically run with Git hooks.
In the next chapter, we'll look at constructors, promises, and async/await. We'll be using some of these techniques to refactor JavaScript in a modern way that takes advantage of the new features available in ES6.