
Learning Objectives
By the end of this chapter, you will be able to:
- Set up the project structure for an Express.js API
- Design an API with endpoints using different HTTP methods
- Run the API on the localhost and interact with it via cURL or a GUI-based tool
- Parse user inputs for endpoints and consider different ways of dealing with errors
- Set up an endpoint that requires user authentication
In this chapter, we will use Express.js and Node.js to set up an API that can be used by frontend applications.
Introduction
Application Program Interfaces (APIs) have become more important than ever. The use of an API allows for a single server-side program to be used by multiple scripts and applications. Due to its usefulness, API management has become one of the most common tasks for backend developers using Node.js.
Let's take the example of a company with both a website and a mobile app. Both of these front-facing interfaces require essentially the same functionality from the server. By wrapping this functionality in an API, we allow for clean separation and reuse of the server-side code. Gone are the days of clunky PHP applications that embed backend functionality directly into the interface code of a website.
We'll use Node.js to set up a Representational State Transfer (REST) API. Our API will run on Express.js, a popular web application framework with routing functionality. With these tools, we can quickly have an endpoint running on our localhost. We'll look at the best practices for setting up an API as well as the specific syntax that is used in the Express.js library. In addition to this, we will also consider the basics of API design, simplifying its use for the developers and services that use it.
What is an API?
An API is a standardized way of interacting with a software application. APIs allow different software applications to interact with each other without having to understand the inner workings of the underlying functions.
APIs have become popular in modern software engineering as they allow organizations to be more effective by reusing code. Take the use of maps as an example: before the popularization of APIs, organizations needing map functionality would have to maintain map widgets internally. Often, these map widgets would perform poorly, as they were only a secondary concern of their business and engineering teams.
Now it's rare for a website or application that uses a map to maintain it internally. Many applications for the web and mobile phones are utilizing map APIs from either Google or alternatives such as OpenStreetMap. This allows each company to focus on its core competency by not having to create and maintain their own map widgets.
There are several successful start-ups whose business models revolve around providing a service via an API. Some examples include well-known companies such as Twilio, Mailgun, and Sentry. In addition to this, there are several smaller companies that offer unique services via APIs, such as Lob, which can send physical letters and postcards on request via their API. Here, developers simply send the contents of the letter and the destination address to Lob's API and it will automatically be printed and sent in the mail on the developer's behalf. Here are a few examples of the API services provided by a number of well-known companies.

Figure 4.1: API-based company examples
These companies enable developers to make apps better and faster by providing building blocks that can be used to provide a particular service. The proof of its effectiveness can be seen in the widespread adoption of these services. Companies that use Twilio to provide text or phone integration include Coca-Cola, Airbnb, Uber, Twitch, and many others. Many of those companies, in turn, provide their own APIs for other companies and developers to build upon. This trend is referred to as the API economy.
Another thing these services all have in common is that they use REST via HTTP. New developers often assume that all APIs are used via HTTP; however, when we talk about an API, there is no restriction on the protocol or medium used. The interface of an API could theoretically be anything from a button to a radio wave. While there are many interface options to choose from, HTTP is still the most widely used medium. In the next section, we'll discuss REST in more detail.
What is REST?
REST is a software architecture pattern for creating web-based services. This means that resources are represented by a specific URL endpoint, for example, website.com/post/12459, where a website's post can be accessed by using its specific ID. REST is the method of mapping resources to URL endpoints.
A related concept in the area of database management is that of CRUD (create, read, update, and delete). These are the four ways in which you can interact with database resources. Similarly, there are also four ways in which we generally interact with resource objects defined by our API endpoints. The HTTP protocol has built-in methods that facilitate tasks such as POST, GET, PUT, and DELETE.
The functionalities of the previously mentioned tasks are as follows:
- POST: Creates an object resource
- GET: Retrieves information about the object resource
- PUT: Updates a specific object's information
- DELETE: Removes a specific object
Additional Methods: In addition to the four main methods, there are some other less frequently used methods. We won't use them here and you shouldn't worry about them as they are rarely used by clients and servers:
- HEAD: This is the same as GET but only retrieves headers and not the body.
- OPTIONS: This returns a list of allowed options for the server or API.
- CONNECT: This is used for creating an HTTP tunnel.
- TRACE: This is a message loopback used for debugging.
- PATCH: This is similar to PUT but is used for updating a single value. Note that PUT can be used instead of PATCH.
Express.js for RESTful APIs on Node.js
The good news is that if you understand basic JavaScript, you're already halfway to creating your first API. Using Express.js, we can easily construct HTTP endpoints. Express is a popular and minimal web framework that is used for creating and hosting web applications on a node. It includes several built-in routing methods that allow us to map incoming requests. There are many middleware packages that make common tasks easier. We will use a validation package later in this chapter.
In this chapter, we'll be creating various aspects of a hypothetical smart-house API. This will require adding endpoints for various devices that have logic to change the state of the devices. Some of the endpoints will be open to anyone in the network, for example, a smart light, while others, such as a heater, will require authentication.
Note
What is a smart house? A smart house is a house that contains internet-connected devices, which you can interact with via a cloud-based control system. The trend of devices that are connected to the internet and communicate with users and other devices is often referred to as the Internet of Things (IoT).
In this chapter, we'll write an API for a house that contains smart devices, including a smart lightbulb and a heater. The code files for this exercise are available at https://github.com/TrainingByPackt/Professional-JavaScript/tree/master/Lesson04/Exercise16.
Exercise 16: Creating an Express Project with an Index Route
In this exercise, our aim is to create a new node project, install Express, and then create an index route that returns a JSON object with a single attribute of the message. Once it's running, we can test it by making a cURL request to our localhost. To do this, perform the following steps:
- Create a folder called smartHouse and initiate an npm project:
mkdir smartHouse
cd smartHouse
npm init
- Install the express library, using the -s flag to have it saved to our package.json file:
npm install -s express
- Create a file called server.js that imports express and makes an app object:
const express = require('express');
const app = express();
- Add an app.get method that specifies '/' for our index route in server.js:
app.get('/', (req, res) => {
let info = {};
info.message = "Welcome home! Our first endpoint.";
res.json(info);
});
The preceding code creates an HTTP GET function that returns an object called info with a single attribute of message.
- Add an app.listen function that tells our application to listen on port 3000:
// Start our application on port 3000
app.listen(3000, () => console.log('API running on port 3000'));
The preceding steps are all that is needed for a simple example of the Node.js Express API. By running the preceding code, we'll create an application on our localhost that returns a simple JSON object.
- In another Terminal window, return to the root of your smartHouse folder and run the following command:
npm start
- Confirm the application is running correctly by going to localhost:3000 in your web browser:

Figure 4.2: Showing localhost:3000 in the web browser
If you've copied the code correctly, you should see a JSON object being served at localhost:3000, as displayed in the preceding screenshot.
Note
If, during any step, you're having trouble or aren't sure what the project files should look like, you can use the project folders to move your code back in line with the project. The folders will be named based on which step they're associated with, for example, Exercise01, Exercise02, and so on. When you first go into a folder, make sure to run npm install to install any modules used by the project.
Interacting with Your API via HTTP
In this section, we'll interact with the server created in Exercise 16, Creating an Express Project with an Index Route. Therefore, make sure you keep a Terminal window open with the server running. If you've since closed that window or turned it off, simply return to the smartHouse folder and run npm start.
We verified that our API is running by using the web browser. A web browser is the easiest way to look at a route, but it is limited and only works for GET requests. In this section, we'll look at two other methods for interacting with the API in a more advanced way, both of which allow for more advanced requests including the following:
- Requests beyond GET, including PUT, POST, and DELETE
- Adding header information to your requests
- Including authorization information for protected endpoints
My preferred method is to use the command-line tool cURL. cURL stands for Client for URLs. It comes installed on most versions of macOS, Linux, and Windows 10 (for versions released in 2018 and later). It is a command-line tool for making HTTP requests. For a very simple command, run the following:
curl localhost:3000
The following is the output of the preceding code:

Figure 4.3: Showing cURL localhost:3000
Note
The command-line program jq will be used throughout this chapter to format cURL requests. jq is a lightweight and flexible command-line JSON processor. The program is available for macOS, Linux, and Windows. If you cannot get it installed on your system, you can still use curl without jq. To do so, simply remove the | jq command from the end of any curl command in this chapter.
Instructions for installing jq can be found at https://github.com/stedolan/jq.
By using curl with jq, we can make reading the output a bit easier, which will be especially useful once our JSON becomes more complex. In the following, we'll repeat the same curl command as in the preceding example, but this time using a Unix pipe (|) to feed the output into jq:
curl -s localhost:3000 | jq
When piping curl into jq as in the preceding command, we'll use the -s flag, which stands for "silent." If curl is piped without this flag, you'll also see unwanted information about the speed of the request.
Assuming that you've done everything correctly, you should observe some cleanly displayed JSON as the output:

Figure 4.4: cURL piped to jq
If you prefer using a GUI-based application, you can use Postman, which is a Chrome extension that can easily send HTTP requests in a straightforward manner. Generally, I prefer cURL and jq for quick use on the command line. However, for more complex use cases, I may open up Postman, as the GUI makes dealing with headers and authorization a bit easier. For instructions on installing Postman, check out the website at https://www.getpostman.com:

Figure 4.5: Screenshot of the cURL request in Postman
Exercise 17: Creating and Importing a Route File
Currently, our application is running with a single endpoint at the root URL. Typically, an API will have many routes, and keeping them all in the main server.js file will quickly cause the project to become unorganized. To prevent this, we'll separate each of our routes into modules and import each one into our server.js file.
Note
The complete code for this example can be found at https://github.com/TrainingByPackt/Professional-JavaScript/tree/master/Lesson04/Exercise17.
Perform the following steps to complete the exercise:
- To get started, create a new folder in the smartHouse folder:
mkdir routes
- Create the routes/index.js file and move the import statements and main function from server.js into that file. Then, below that, we'll add a line that exports the router object as a module:
const express = require('express');
const router = express.Router();
router.get('/', function(req, res, next) {
let info = {};
info.message = "Welcome home! Our first endpoint.";
res.json(info);
});
// Export route so it is available to import
module.exports = router;
The preceding code is essentially the code we wrote in the first exercise being moved to a different file. The crucial difference is the very bottom line where it says module.exports = router;. This line takes the router object we create and makes it available for importing into another file. Every time we create a new route file, it will contain that same bottom line for exporting.
- Open server.js and delete lines 3 to 8, as the app.get method has been moved to the /routes/index.js file. Then, we'll import the path and fs (filesystem) libraries. We'll also import a library called http-errors, which will be used later on for managing HTTP errors. The top nine lines of server.js will read as follows:
const express = require('express');
const app = express();
// Import path and file system libraries for importing our route files
const path = require('path');
const fs = require('fs');
// Import library for handling HTTP errors
const createError = require('http-errors');
- Below that, also in server.js, we'll turn on URL encoding and tell express to use JSON:
// Tell express to enable url encoding
app.use(express.urlencoded({extended: true}));
app.use(express.json());
- Next, we will import our index route and associate it with a path. After we've done that and the preceding steps, server.js should contain the following:
// Import our index route
let index = require('./routes/index');
// Tell Express to use our index module for root URL
app.use('/', index);
- We can create a catch-all 404 error for any URL that is visited that doesn't have a corresponding function. Inside the app.use method, we'll set the HTTP status code to 404 and then use the http-errors library we imported in step 2 to create a catch-all 404 error (it's important that the following code is underneath all other route declarations):
// catch 404 and forward to error handler
app.use(function(req, res, next) {
res.status(404);
res.json(createError(404));
});
- The final line in the file should exist from our previous exercise:
// Start our application on port 3000
app.listen(3000, () => console.log('API running on port 3000'));
With this done, running our code should produce the following output, which is identical to the result in Exercise 16, Creating an Express Project with an Index Route:

Figure 4.6: Output message
The advantage of having a routes folder is that it makes organizing our API easier as it grows. Every time we want to create a new route, we just have to make a new file in the routes folder, import it using require in server.js, and then use the Express app.use function to associate the file with an endpoint.
Templating Engines: In the preceding two lines where we used app.use, we were modifying the settings of express to use extended URL encoding and JSON. It can also be used to set a templating engine; for example, the Embedded JavaScript (EJS) templating engine:
app.set('view engine', 'ejs');
Templating engines allow Express to generate and serve dynamic HTML code for websites. Popular templating engines include EJS, Pug (Jade), and Handlebars. By using EJS, for example, we could generate HTML dynamically using a user object passed from a route to a view:
<p><%= user.name %></p>
In our case, we will not need to make use of view or templating engines. Our API will return and accept standard JSON exclusively. If you are interested in using Express for HTML-based websites, we encourage you to research the templating engines that are compatible with Express.
HTTP Status Codes
In step 6 of Exercise 17, Creating and Importing a Route File, we set the HTTP status code for our response to 404. Most people have heard of a 404 error as it is commonly seen when a page can't be found on a website. However, most people don't know what a status code is, or of any codes beyond 404. So, we will start by explaining the concept of status codes and going over some of the most commonly used codes.
A status code is a three-digit number that is returned from a server in response to a client request over HTTP. Each three-digit code corresponds to a standardized status, for example, not found, success, and server error. These standardized codes make dealing with servers easier and more standardized. Often, a status code will be accompanied by some additional message text. These messages can be useful for humans, but when writing a script to deal with HTTP responses, it's much easier to simply account for status codes. For example, creating a case statement based on the status code returned.
Response codes fall into categories that are determined by the first digit in a three-digit number:

Figure 4.7: Table of HTTP response code categories
Each of the categories of HTTP codes contains several specific codes that are to be used in certain situations. These standardized codes will help clients deal with responses even if they involve an unfamiliar API. For example, any 400-series client error code indicates to the client that the problem was with the request, whereas a 500-series error code indicates that the issue may be with the server itself.
Let's take a look at some of the specific HTTP status codes that exist in each of the categories from the following figure:

Figure 4.8: Table of HTTP response codes
In the following figure, we can see a few more specific HTTP status codes:

Figure 4.9: Table of HTTP response codes continued
The codes that are listed here are only a handful of the dozens of HTTP status codes that are available. When writing your API, it is useful to use status codes where appropriate. Status codes make responses easier to understand for both users and machines. When testing our application, we may want to write a script that matches a list of requests with the expected response status codes.
When using Express, the default status code is always 200, so if you don't specify a code in your result, it will be 200, which indicates a successful response. A full list of HTTP status codes can be found at https://developer.mozilla.org/en-US/docs/Web/HTTP/Status.
To set a status code error, use the preceding code section and replace 404 with any error code supported by the http-errors library, which is a sub-dependency of Express. A list of all supported error codes can be found in the project's GitHub at https://github.com/jshttp/http-errors.
You can also pass an additional string to createError() to set a custom message:
res.status(404);
res.json(createError(401, 'Please login to view this page.'));
If you're using a success code, simply use res.status and return your JSON object as you would with the default 200 status:
res.status(201); // Set 201 instead of 200 to indicate resource created
res.json(messageObject); // An object containing your response
Note
There are many status codes that are rarely used; among these are some joke codes created throughout internet history:
418 – I'm a teapot: Made as an April Fool's joke in 1998. It indicates that the server refuses to brew coffee because it's a teapot.
420 – Enhance your calm: Used in the original version of Twitter when an app is being rate-limited. It is a reference to the movie Demolition Man.
Designing Your API
It's important to consider the design of your API early on in the software design process. Changing the endpoints of your API after release will require updating any service that relies on those endpoints. If an API is released for public use, it is often required that it maintain backward compatibility. Time spent on planning endpoints, accepted HTTP methods, required input types, and structures of JSON returned will be saved in the long run.
Often, guidelines relating to your specific use case or industry can be found, so be sure to do your research on this beforehand. In our example of a smart-home API, we'll take inspiration from the World Wide Web Consortium's (WC3's) recommendation related to IoT devices. The WC3 is one of the most influential organizations working to develop web standards, and their IoT initiative is known as Web of Things (WoT). You can find out more about this at https://www.w3.org/WoT/.
According to the WoT guidelines, each device should contain information about the model as well as a list of possible actions that can be used with the device. Here are some endpoints that are recommended by the WoT standard:
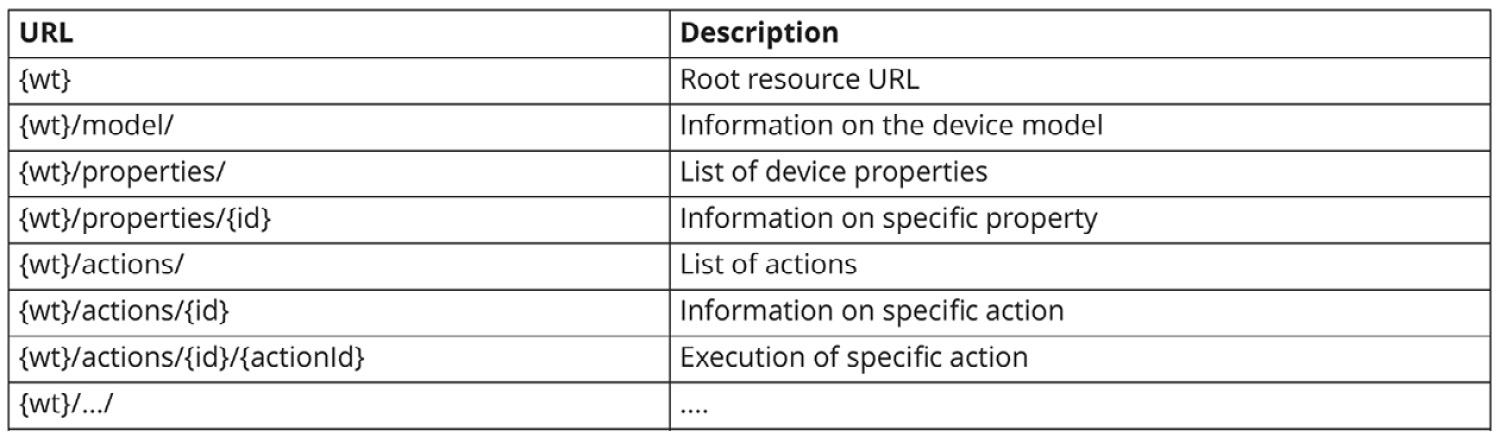
Figure 4.10: Table of standard WoT routes
This design is useful for two reasons – firstly, because it conforms to a standard, which gives users a set of expectations. Secondly, the use of helper endpoints such as /properties/ and /actions/ give users the ability to discover how the API can be used by requesting additional information at those endpoints.
Each device added to the house should have the /model/, /properties/, and /actions/ endpoints. We'll map the endpoints shown in the preceding table onto each device in our API. The following tree diagram shows a map of our API stemming from the root endpoint.
The third level in the following figure shows the /devices/light/ endpoint, and, stemming from that endpoint, we have the endpoints listed in the preceding table:

Figure 4.11: A tree chart of the smart-house API design
As an example of the kind of JSON that would be returned by an endpoint, we'll look more closely at the /devices/light/actions route defined in the preceding diagram. The following example shows the object of an action that contains a single action called Fade:
"actions": {
"fade": {
"title": "Fade Light",
"description": "Dim light brightness to a specified level",
"input": {
"type": "object",
"properties": {
"level": {
"type": "integer",
"minimum": 0,
"maximum": 100
},
"duration": {
"type": "integer",
"minimum": 0,
"unit": "milliseconds"
}
}
},
"links": [{"href": "/light/actions/fade"}]
}
}
We're basing our fade action on the suggestions made by Mozilla in their WoT documentation at https://iot.mozilla.org/wot. They've created this documentation with the goal of complementing the standard proposed by W3C and have included many examples of JSON representing IoT devices and their associated actions.
Notice that the object contains the name of the action, a description of the action, and the accepted values to use the action. It's also always a good idea to include the unit of measurement where applicable. With the duration, we know that it's measured in milliseconds; without this information, we'd have no idea what "1" really means.
By reading the preceding JSON, we can see that we need to send a request with a number for the desired lighting level (0 to 100) and another number to specify the length of time for the dimming. Using curl, we might fade the lights as follows:
curl -sd "level=80&duration=500" -X PUT localhost:3000/lightBulb/actions/fade
According to the API action description, the preceding request should cause the lightbulb to fade to 80% brightness over a period of 500 milliseconds.
Note
Documentation with Swagger: Although it won't be covered in this book, another project you should look into is Swagger. This project helps automate the process of creating, updating, and displaying your API documentation and works well with Node.js and Express.
An example of the kind of interactive documentation generated by Swagger can be seen at https://petstore.swagger.io/.
Exercise 18: Creating Action Routes
In this exercise, our aim is to create a new route file that returns information about the fade action, which we looked at in the previous section. The starting point for this exercise will be where we left off at the end of Exercise 17, Creating and Importing a Route File.
Note
The complete code for this example can be found at https://github.com/TrainingByPackt/Professional-JavaScript/tree/master/Lesson04/Exercise18.
Perform the following steps to complete the exercise:
- Create a sub-folder in the routes folder called devices:
mkdir routes/devices
- Copy routes/index.js to routes/devices/light.js:
cp routes/index.js routes/devices/light.js
- Next, we'll open up /routes/devices/light.js from the previous exercise and modify it. Find line 6, which should contain the following:
info.message = "Welcome home! Our first endpoint.";
We will replace the preceding line with a large block of JSON that represents a list of all the device actions:
let info = {
"actions": {
"fade": {
"title": "Fade Light",
"description": "Dim light brightness to a specified level",
"input": {
"type": "object",
"properties": {
"level": {
"type": "integer",
"minimum": 0,
"maximum": 100
},
In our case, the only action is fade. This action will change the lightbulb's level of brightness over a defined period of time (measured in milliseconds). This endpoint won't contain the logic to implement the function, but it will return the details needed to interact with it.
- In the server.js file, import our newly created device route:
let light = require('./routes/devices/light');
- We'll now use the preceding route by telling Express to use our light object for the /devices/light route:
app.use('/devices/light', light);
- Run the program with npm start:
npm start
- Test the route by using curl and jq:
curl -s localhost:3000/devices/light | jq
If you copied the preceding code correctly, you should get a formatted JSON object representing the fade action as follows:

Figure 4.12: The cURL response for localhost:3000/devices/light
Further Modularizing
In the project files, we'll separate the light route further by making a lightStructure.js file, which contains only a JSON object representing the light. We won't include the long string of JSON that includes model, properties, and action descriptions.
Note
There won't be an exercise for the changes made in this section, but you can find the code at https://github.com/TrainingByPackt/Professional-JavaScript/tree/master/Lesson04/Example/Example18b.
Exercise 19 will start off using the code found in the Example18b folder.
It's useful to separate static data such as the endpoint object and the functions of separate files. lightStructure.js will contain the data representing the model, properties, and actions. This allows us to focus on the logic of endpoints in light.js. With this, we'll have four endpoints that each return the relevant section of the JSON light object:
// Light structure is imported at the top of the file
const lightStructure = require('./lightStructure.js');
// Create four routes each displaying a different aspect of the JSON object
router.get('/', function(req, res, next) {
let info = lightStructure;
res.json(info);
});
router.get('/properties', function(req, res, next) {
let info = lightStructure.properties;
res.json(info);
});
router.get('/model', function(req, res, next) {
let info = lightStructure.model;
res.json(info);
});
router.get('/actions', function(req, res, next) {
let info = lightStructure.actions;
res.json(info);
});
When working on a large block of JSON like the one found in lightStructure.js, it can be useful to use a GUI visualization tool. One example is https://jsoneditoronline.org/, which provides a tool that allows you to paste a block of JSON on the left-hand section of a page, and, on the right-hand side, visualize it as a tree-like object:

Figure 4.13: Online JSON explorer/editor
Changes can be made on either side of the visualization and copied to the other. This is useful because the more complex a JSON object becomes, the more difficult it is to see how many levels exist within a property.
Type Checking and Validating the Input Sent to an Endpoint
While type checking and validation are not strictly required for the creation of an API, using them can cut down on debugging time and help to avoid bugs. Having a guaranteed input for an endpoint means that code can be written with a focus on returning the desired result without considering the many edge cases that can be created by input outside that which is expected.
Since this task is so common with the creation of APIs, a library has been created to make verifying the input of Express endpoints easy. With the express-validator middleware, we can simply pass the input requirements to our endpoint as an argument. For example, the requirements described by the JSON object returned in Exercise 18 for our lightbulb's fade action can be represented with the following array:
check('level').isNumeric().isLength({ min: 0, max: 100 }),
check('duration').isNumeric().isLength({ min: 0 })
]
As you can see, it contains an entry for each expected input. For each of these inputs, we perform two checks. The first is .isNumeric(), which checks that the input is a number. The second is .isLength(), which checks that the length is within the specified minimum to maximum range.
Exercise 19: Creating a Route with Type Checking and Validation
Note
The complete code for this example can be found at https://github.com/TrainingByPackt/Professional-JavaScript/tree/master/Lesson04/Exercise19.
In this exercise, we'll expand on our routes/devices/light.js file by adding a route that accepts PUT requests in /actions/fade.
The route will check that the request conforms to the standards specified by the fade action object, which we added to the devices/light endpoint in Exercise 18, Returning JSON Representing Action Routes. This includes the following aspects:
- The request contains level and duration values.
- The level and duration values are integers.
- The level value is between 0 and 100.
- The duration value is above 0.
Execute the following steps to complete the exercise:
- Install express-validator, which is a middleware that wraps validator.js for the easy use of the validation and sanitization functions with express:
npm install -s express-validator
- Import the check and validationResult functions from the express-validator library by putting routes/devices/light on line 2, just below the require statement for express:
const { check, validationResult } = require('express-validator/check');
- Below the route.get function we wrote in the last exercise, create the following function that will handle PUT requests:
// Function to run if the user sends a PUT request
router.put('/actions/fade', [
check('level').isNumeric().isLength({ min: 0, max: 100 }),
check('duration').isNumeric().isLength({ min: 0 })
],
(req, res) => {
const errors = validationResult(req);
if (!errors.isEmpty()) {
return res.status(422).json({ errors: errors.array() });
}
res.json({"message": "success"});
});
- Run the API with npm start:
npm start
- Make a PUT request to /devices/light/actions/fade with the incorrect value (na) to test the validation:
curl -sd "level=na&duration=na" -X PUT
http://localhost:3000/devices/light/actions/fade | jq
The -d flag indicates "data" values to be passed to the endpoint. The -X flag indicates the HTTP request type.
If the preceding steps were done correctly, we should get an error when we make a PUT request to /devices/light/actions/fade with non-numeric values for the level and duration:

Figure 4.14: The cURL error response for the /device/light/actions/fade route with incorrect data
- Next, we'll make a PUT request like before, but with the correct values of 50 and 60:
curl -sd "level=50&duration=60" -X PUT
http://localhost:3000/devices/light/actions/fade | jq
Sending a PUT request with values in the correct range should return the following:

Figure 4.15: The cURL response for the /device/light/actions/fade route with correct data
The preceding screenshot indicates that the PUT request was successful.
Useful Defaults and Easy Inputs
So, we've seen how enforcing restrictions on inputs to an endpoint can be helpful. However, excessive restrictions and requirements can hinder the user experience of an API. Let's take a closer look at the lightbulb fade action. In order to allow for the feature of fading over a period of time, we require the user to pass a value for the duration. Many people already have experience of using a fade action on a physical lightbulb.
With a physical lightbulb, we know that we input our desired brightness level by adjusting a physical switch or other input. The duration is not necessarily part of that process or consciously thought about by the user. This creates the expectation that you should be able to fade the light by only the desired level.
For this reason, we should consider making the duration value optional. In the case that a duration value is not received, the script will fall back to a default value. This allows us to meet user expectations while still allowing fine-grained control for users who want to specify a duration.
Exercise 20: Making the Duration Input Optional
Note
The complete code for this example can be found at https://github.com/TrainingByPackt/Professional-JavaScript/tree/master/Lesson04/Exercise20.
In this exercise, we'll modify the fade action to make the duration an optional input. We'll modify our fade action endpoint to use a default value of 500 milliseconds if no duration value is provided:
- In routes/devices/light.js, modify the line that validates duration by adding .optional() to the chain of functions. It should look like this:
check('duration').isNumeric().optional().isLength({ min: 0 })
- In routes/devices/light.js, delete the return statement and add the following in the same location:
let level = req.body.level;
let duration;
if(req.body.duration) {
duration = req.body.duration;
} else {
duration = 500;
}
The preceding code creates a level variable using level input and initializes an empty variable for the duration. Next, we check whether the user provided a duration input. If so, we set the duration to that value. If not, we set duration to 500.
- Now, we'll create a message object called message using our level and duration variables. Then, we'll return that message object to the client:
let message = `success: level to ${level} over ${duration} milliseconds`;
res.json({"message": message});
- Finally, we'll associate a second route with our function so that sending a PUT request to /devices/light executes the same function as /devices/light/actions/fade. This is accomplished by changing the first argument of router.put with an array that contains the old value and a new one of /. The opening of the router.put section should look like this:
// Function to run if user sends a PUT request
router.put(['/', '/actions/fade'], [
check('level').isNumeric().isLength({ min: 0, max: 100 }),
check('duration').isNumeric().optional().isLength({ min: 0 })
],
(req, res) => {
- Now that we're done with the coding part, we'll turn on the server for testing:
npm start
- With the server running in one Terminal, open another to perform a few tests using curl. In the first command, we'll check that our new default endpoint is working and that our default value for the duration is used when no duration is provided:
curl -sd "level=50" -X PUT http://localhost:3000/devices/light | jq
If you've copied everything correctly, you should see an output like this:

Figure 4.16: The cURL response for the /device/light route without a specified duration
- We'll also want to make sure that providing a duration value overrides the default value. We can test this by making a cURL request that specifies a duration value:
curl -sd "level=50&duration=250" -X PUT http://localhost:3000/devices/light | jq
When specifying 250 as the duration value, we should see a confirmation that level will change to over 250 milliseconds in the response:

Figure 4.17: The cURL response for the /device/light route with a specified duration
With these changes, we've now made fade the default action for /devices/light and given the duration input a default value if not provided. It's worth noting that we now have two functions associated with the /devices/light endpoint:
- HTTP GET /devices/light: This returns information about interacting with the light.
- HTTP PUT /devices/light: This performs the default action of the light.
The reuse of the same endpoint with multiple methods is a good practice. Another common example is that of blog entries, where an API might have a single endpoint with four functions based on the method used:
- HTTP POST /blog/post/42: This creates a blog post with an ID of 42.
- HTTP GET /blog/post/42: This returns blog post #42 as a JSON object.
- HTTP PUT /blog/post/42: This edits blog post #42 by sending new content.
- HTTP DELETE /blog/post/42: This deletes blog post #42.
This makes sense logically using the REST model, where each endpoint represents a resource that can be interacted with in various ways.
In our case, we have made a PUT request to the /devices/light route that triggers the fade function. Arguably, a switch function that turns the light on and off would be more in line with most people's expectations of the default action of light. In addition to this, the switch would be a better default because it requires no inputs from the client. Fade was only chosen for this project because the switch was thought to be too simplistic.
We won't go into much depth on the switch function, but it would likely contain something like the following code section, which allows the client to specify the desired state. If no state is specified, it becomes the opposite of the current value:
if(req.body.state) {
state = req.body.state;
} else {
state = !state;
}
Middleware
Middleware functions in Express are functions that run before the function associated with an endpoint. Some common examples of this include logging a request or checking for authentication before running the main function of an endpoint. In these cases, the logging and authentication functions will be common among all the endpoints that use them. By using middleware, we can reuse code that is common across endpoints.
With Express, we can have middleware functions that run for all endpoints by using app.use(). For example, if we wanted to create a function that logs a request to the console before running the main route, we could write a logger middleware:
var logger = function (req, res, next) {
// Request is logged
console.log(req);
// Call the special next function which passes the request to next function
next();
}
To have the logger run with all endpoints, we tell our app to use it with the following:
app.use(logger);
If, instead, we want our middleware function to run on only some routes, we could attach it directly:
app.use('/devices/light', logger, light);
There is no limit to the number of middleware functions that can be used for some or all routes. When multiple middleware functions are used, they are called in the order that they are declared in your code. When one middleware function finishes, it passes the req and res objects on to the next function in the chain:

Figure 4.18: Diagram of middleware chaining
The preceding diagram visualizes a request process where once a request has been received by the server, it runs the first middleware function, passes the results to a second middleware function, and, when that is complete, our /devices/light destination route is finally run.
In the next section, we'll create our own middleware for checking whether guests have checked in to get an authentication token.
Exercise 21: Setting Up an Endpoint that Requires Authentication
Note
The complete code for this example can be found at https://github.com/TrainingByPackt/Professional-JavaScript/tree/master/Lesson04/Exercise21.
In the following exercise, we'll build on our project by adding an endpoint that requires authentication with a JSON Web Token (JWT). We'll create two new endpoints: the first, restricted light, will be identical to light but requires authentication. The second endpoint, check-in, allows clients to get a token by sending the server their name.
Note
JWT and Security: This exercise is meant to highlight how JWT authentication works. It wouldn't be secure in production as there is no means of verifying that the name supplied by the client is authentic.
In production, a JWT should also contain an expiry date by which a client has to renew the token for continued use. For instance, a token given to a mobile app client might have an expiry date of 7 days. The client might check on startup whether the token is expiring soon. If so, it would request an updated token and the user of the application wouldn't notice the process.
If, however, the user of the mobile app hadn't opened it in many days, the app would require the user to sign in again. This adds security, since any third party that might find a JWT only has a very short period of time in which to use it. For example, in the case that a cell phone is lost and found several days later, many applications using JWTs with expiry dates will require signing in again to interact with the owner's account.
Perform the following steps to complete the exercise:
- Create a config.js file with a random secret value:
let config = {};
config.secret = "LfL0qpg91/ugndUKLWvS6ENutE5Q82ixpRe9MSkX58E=";
module.exports = config;
The preceding code creates a config object. It sets the secret attribute of config to a random string. Then, it exports the config object.
It's important to remember that the secret is random and so yours should be unique to the one that is shown here. There is no set method for generating the random string but an easy way on the command line is to use openssl, which should be installed by default on most Linux and Mac operating systems:
openssl rand -base64 32
- Install jwt-simple with npm:
npm install -s jwt-simple
- Create the routes/check-in.js file for the check-in endpoint. Import the following modules, which we will need to make use of:
const express = require('express');
const jwt = require('jwt-simple');
const { check, validationResult } = require('express-validator/check');
const router = express.Router();
// import our config file and get the secret value
const config = require('../config');
const secret = config.secret;
- Below the import, in routes/check-in.js, we'll create a post route that requires a string value for name. We'll then encode all the information that has been sent into a JWT. This JWT is then returned to the client to use for authentication:
router.post('/', [
check('name').isString()
],
(req, res) => {
// If errors return 422, client didn't provide required values
const errors = validationResult(req);
if (!errors.isEmpty()) {
return res.status(422).json({ errors: errors.array() });
}
// Otherwise use the server secret to encode the user's request as a JWT
let info = {};
info.token = jwt.encode(req.body, secret);
res.json(info);
});
// Export route so it is available to import
module.exports = router;
- In server.js, also import config.js and jwt-simple, and set the secret value:
// Import library for working with JWT tokens
const jwt = require('jwt-simple');
// import our config file and get the secret value
const config = require('../config');
const secret = config.secret;
- In server.js, add a middleware function to see whether a user has a valid token:
// Check if the requesting client has checked in
function isCheckedIn(req, res, next) {
// Check that authorization header was sent
if (req.headers.authorization) {
// Get token from "Bearer: Token" string
let token = req.headers.authorization.split(" ")[1];
// Try decoding the client's JWT using the server secret
try {
req._guest = jwt.decode(token, secret);
} catch {
res.status(403).json({ error: 'Token is not valid.' });
}
// If the decoded object has a name protected route can be used
if (req._guest.name) return next();
}
// If no authorization header or guest has no name return a 403 error
res.status(403).json({ error: 'Please check-in to recieve a token.' });
}
- In server.js, add the check-in endpoint and a second light to the restricted-light endpoint:
// Import our index route
let index = require('./routes/index');
let checkIn = require('./routes/check-in');
let light = require('./routes/devices/light');
// Tell Express to use our index module for root URL
app.use('/', index);
app.use('/check-in', checkIn);
app.use('/devices/light', light);
app.use('/devices/restricted-light', isCheckedIn, light);
The section of server.js where routes are imported and set up should look like the preceding code, with three new lines added. You can see that there is one line to import the check-in route and two for creating our new routes. Notice that we don't need to import restricted-light as it reuses the light object. The crucial difference with restricted-light is the use of the isCheckedIn middleware function. This tells express to run that function before serving the light route.
- Turn the server on with npm start:
npm start
- Open another Terminal window and run the following command to get a signed JWT token:
TOKEN=$(curl -sd "name=john" -X POST http://localhost:3000/check-in
| jq -r ".token")
The preceding command uses curl to post a name to the check-in endpoint. It takes the result from the server and saves it to a Bash variable called TOKEN. The TOKEN variable is local to the Terminal window in which the command was run; so, if you close the Terminal, you'll need to run it again. To check that it was saved correctly, tell the Bash shell to print the value:
echo $TOKEN
The following is the output of the preceding code:

Figure 4.19: Checking the value of $TOKEN in the Bash shell
You should see a JWT token, as shown in the preceding figure.
- Send a cURL request to restricted-light, with an authentication token, by running the following command in your Terminal:
curl -sd "level=50&duration=250" -X PUT
-H "Authorization: Bearer ${TOKEN}"
http://localhost:3000/devices/restricted-light
| jq
It should return a successful fade, as shown in the following figure:

Figure 4.20: A successful cURL request to restricted-light using JWT
- Send a curl request to restricted-light, without an authentication token, in your Terminal:
curl -sd "level=50&duration=250" -X PUT
http://localhost:3000/devices/restricted-light
| jq
In comparison, sending the same request without the endpoint returns an error:

Figure 4.21: Trying to cURL restricted-light without a JWT
We now have an endpoint set up to distribute authentication tokens and a protected endpoint that requires them. We can now add additional routes that require authentication tokens by reusing our isCheckedIn function with any new endpoint. We just need to pass the function to Express as the second argument, as done in server.js.
The Contents of a JWT
In the previous exercise, during step 7, we requested a token from the server and saved the value to our local Terminal session. For the exercise to have worked, the JWT should have the three parts separated by a period. If we take the JWT that was returned from our echo $TOKEN command and put it into the website jwt.io, we can look at the contents of the JWT more closely.
Additionally, paste your secret value into the bottom-right corner of the GUI, which should display Signature Verified in the bottom-left corner. This tells us that the JWT being viewed was created using the private signature:

Figure 4.22: Showing JWT.io with JWT data
The JWT website allows us to easily visualize what the three sections of the JWT represent. The first section in red is the header, that is, information that describes the encoding standard used. The purple section is the payload – it contains the data that was verified by the server when the token was created, which, in our case, is just a name. Finally, the blue section is the signature, which is the result of hashing the contents of the other two sections with the server's secret.
In the preceding example, the PAYLOAD section is the smallest of the three. This won't always be the case as the red and blue sections are fixed in size, while the purple section is dependent on the size of the payload. If we request another token from our server using the check-in endpoint, then instead of just providing a name, we also provide an email and phone number. This means we will see a resulting token that has a larger purple section:

Figure 4.23: JWT.io with a token that has a larger payload
MongoDB
Many APIs make use of a database for keeping track of the underlying data being read and written by the API. In other cases, such as IoT, the functions at endpoints may update a real object. Even when a real object or event is being tracked or triggered, it is a good idea to track the expected state in a database. A database representation can be accessed and manipulated quickly.
We won't go into depth on the use and design of a database; however, we'll briefly talk about how you could use one to extend the functionality of an API. It is rare that you will have an API that goes beyond hello world without making use of a database of some sort.
The most popular database used with Node.js is MongoDB. MongoDB is an object-oriented library with a convenient syntax for working with JSON objects. In addition to storing data as JSON-like objects, it doesn't require the use of a schema. This means that the attributes for an object can change over time without you having to do any configuration on the database.
For example, we may start tracking events in our database that simply contain the request body and a timestamp:
{
"timestamp": 1556116316288,
"body" : { "level" : "50", "duration" : "250" }
}
We might start out with a very simple event log, and later decide that additional details should be saved along with each event. For example, if we include authorization data and the exact path of the request, our log objects would look like the following:
{
"timestamp": 1556116712777,
"body" : { "level" : "20", "duration" : "500" },
"path" : "/devices/light",
"token" : null
}
If a SQL database was used instead, we would first need to add path and token columns to the database schema. The flexibility of MongoDB is one of its great features along with the simplicity of adding it to a project that already uses JSON for data manipulation.
Often, APIs will be completely based around a database, as is the case for most social-media style apps. For example, with Twitter, Facebook, and Instagram, each user, post, and comment is ultimately an entry in a database that is made accessible to the client-side software through an API.
We won't go into depth on the use of databases with an API, but an extra folder explaining how to set up MongoDB and use it with this API for logging events has been included with the project files (see the following note).
The use of event logging with JWT would allow us to associate any malicious use of restricted endpoints with a specific JWT. By using a logging system and enforcing the use of JWTs on all endpoints, we could associate any requested action to smartHouse with a specific user. In the case of malicious use, a JWT could be blacklisted. Of course, this would require more stringent requirements for issuing a JWT; for example, requiring a guest to present government-issued photo identification.
Note
Middleware with MongoDB logging example: You can refer to the folder called extra/mongo_logger_middleware in the project file for an example of creating a catch-all middleware that logs information about each request including the methods, data, and user information. Something like this could be used to track which requests were made by who.
When running this code, you'll need to first run npm install. In addition to this, make sure you have MongoDB installed locally and running. For more details, see the README file in the folder at https://github.com/TrainingByPackt/Professional-JavaScript/tree/master/Lesson04/Example/extra/mongo_logger_middleware.
Activity 5: Creating an API Endpoint for a Keypad Door Lock
In this activity, you need to create an API endpoint for a keypad door lock. The device needs a new endpoint to support the use case of authenticated users being able to create one-time passcodes to open the door.
Perform the following steps to complete the activity:
- Create a new project folder and change directories going to it.
- Initialize an npm project and install express, express-validator, and jwt-simple. Then, make a directory for routes.
- Create a config.js file, which should contain a randomly generated secret value.
- Make the routes/check-in.js file, in order to create a check-in route.
- Create a second route file called routes/lock.js. Start the file off by importing the required libraries and modules, and create an empty array to hold our valid passcodes.
- Below the code in routes/lock.js, create a GET route for /code that requires a name value.
- Create another route in routes/lock.js. This one will be for /open and requires a four-digit code that will be checked against the passCodes array to see whether it is valid. Below that route, make sure to export router, so that it can be used in server.js.
- Create the main file where our routes will be used in server.js. Start by importing the libraries needed and also setting URL encoding the JSON.
- Next, in server.js, import the two routes, implement a 404 catch-all, and tell the API to listen on port 3000.
- Test the API to ensure it was done correctly. Start by running your program.
- With the program running, open a second Terminal window and use the /check-in endpoint to get a JWT and save the value as TOKEN. Then, echo that value to ensure it was successful.
- Use our JWT to use the /lock/code endpoint to get a one-time passcode for a new name.
- Send the code to the /lock/open endpoint twice to get an error for the second instance.
Note
The solution to this activity can be found on page 594.
Summary
In this chapter, we've explored the use of Node.js for creating RESTful APIs. We've considered various uses of APIs and some techniques for designing them. Looking at aspects such as HTTP codes and input validation, we've considered common problems that are dealt with when creating and maintaining APIs. Despite this, there are still many areas of API design and development that haven't been considered.
The best way to continue improving your knowledge about API design and creation is to start making your own, whether at work or through personal projects. The code we've created throughout the exercises in this chapter can be used as a jumping-off point. Try expanding on what we've done here to create your own endpoints and eventually your own APIs.
In the next chapter, we'll talk about code quality. This will include techniques for writing readable code as well as techniques that can be used to test our code. Those techniques can be used in conjunction with what you've learned here to ensure that the endpoints you create continue to return the correct values as your project grows.