
3
Visual Composition
Composition in video, film, and photography involves mastering the ability to select and compose within a frame. The rectangular frame itself is a convention; natural vision is not limited by a rectangle and reality doesn’t come neatly packaged in ready-made 16×9 borders. A frame positions the spectator in relation to the world on the screen and focuses attention on relationships of the subjects within the frame to each other and to their surroundings.
Level Horizon
The human eye sees somewhat differently from a camera. The eye makes quick saccadic movements back and forth across points of interest, scanning detail that it projects across the densely packed area on the retina called the “fovea.” Vision consists of interpretations by the brain of these scanned images cross-referenced with other information, including our sense of balance from the semicircular canals in our ears. So if we tilt our head from side to side, the world that we perceive stays upright. A camcorder, on the other hand, shows every moment of imbalance. So, an initial compositional challenge, if we want to create an image of the world the way we perceive it, is to consciously level the camera.
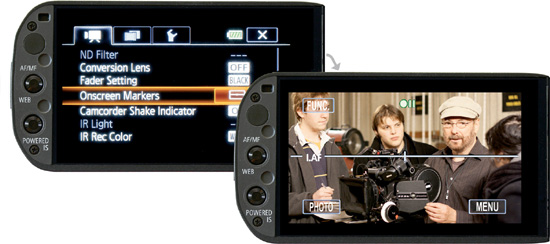
The G10/XA10 has a built-in level guide that consists of a horizontal line that bisects the screen, as shown in Figure 3.1. It would have been really elegant if Canon had instead engineered a floating line that remained truly level regardless of the tilt of the camera, alerting the operator whenever the frame is askew. But the level guide in the G10/XA10 is simply a stationary reference line with a cross-hatch in the center.
The horizontal line is a useful guide for finding a center point and for leveling two-dimensional subject matter like shots of text or graphics, but completely ineffective as a guide for leveling the camcorder in a three-dimensional space unless the camcorder is exactly perpendicular to a table edge, ceiling beam, baseboard, or other horizontal image in the three-dimensional world. A horizontal architectural detail viewed at any other angle actually should appear as a slant due to the laws of perspective. Consequently, the horizontal marker is almost useless as a leveling aid when shooting live action.
Figure 3.1 The horizontal onscreen marker.
A vertical line near the center of the frame would have actually been more useful for the purpose of leveling. If a vertical image in this part of the composition appears upright, like the vertical edge of a doorway or the corner of a room, then the camera is level and horizontals will appear in perspective at their appropriate slant. Fortunately, the G10/XA10 does provide a grid pattern that will serve this purpose and is an aid for many other compositional concepts. To enable the grid or the level, choose FUNC > MENU > Camera icon > Onscreen Markers; then choose Level, Grid, or Off.
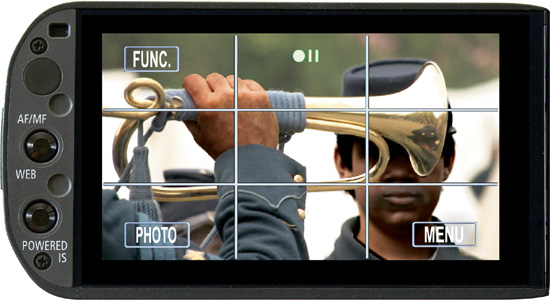
You can choose whether the grid is white, which is probably too distracting, or gray, which I recommend. Two horizontal lines and two verticals—each a third of the distance from the edge of the frame—divide the grid into nine rectangular panels: upper left, upper middle, upper right; middle left, center, middle right; lower left, lower middle, and lower right. This is actually much more useful than a single horizontal line across the center. You can use one of the vertical lines to keep your camera level by lining it up with the image of a column, a doorway, or edge of a building. The grid is particularly useful for composing shots using a compositional concept called the “rule of thirds.”
The Rule of Thirds
Let’s say you are shooting a series of interviews or actions and you balance every composition to be central. This soon becomes problematic. Always composing for symmetry relegates editing to an act of popping everything into the same spot on the screen. This results in a visually impoverished series of central compositions that disregard the uniqueness of how subjects occupy space and how they relate to each other. In contrast, if the composition for each interview or each action had its own sense of balance (or imbalance) and represented the subject’s particular relationship to his or her surroundings, then changing from scene to scene, or person to person with unique positions on the screen, could have significance in making a visual statement about opposition, similarity, continuity, or change.
Often, an off-balance composition or a composition that achieves balance in a more dynamic way than centrality can imply a variety of ordinate and subordinate relationships within the on-screen environment, as well as relationships to off-screen space and spatial relationships from shot to shot. The rule of thirds is an outgrowth of this concept. As shown in Figure 3.2, Canon’s grid is horizontally and vertically divided into thirds. Aligning a subject of interest on a one-third division line or intersection can create a kind of dynamic tension and balance.
Figure 3.2 The grid marker divides the frame into vertical and horizontal thirds.
The rule of thirds is not actually a rigid rule; it is a convention. The concept is similar but not identical to the “golden ratio” or “golden mean,” which goes back 2,400 years to the classic Greeks including Pythagoras. The rule of thirds was first written about in the late 1700s and is the idea that aside from dead center, a compositional subject of interest placed one-third or two-thirds of the way to the left or right (or up or down) also achieves a kind of a balance. In this way the volume on one side at the one-third point in a framed composition is balanced by a void or a view of the background on the remaining two-thirds. This simple mathematical relationship creates a sense of intentionality without being overly contrived as dead center sometimes seems, and is watchable for a period of time.
Not every shot should obey the so-called rule of thirds. Sometimes, a subject should actually be central as a statement of super balance or of finality. Such a statement of extraordinary balance is possible only if most of the other shots are non-central. And sometimes, visual composition demands outright imbalance or a balance achieved by something other than one-third divisions. The main point is to not be overly dependent on centrality and to look for compositions that best represent the relevant relationships of the subject and environment.
Aligning the horizon in a landscape or aligning the subject’s eyes in a portrait at exactly the halfway mark creates a self-conscious division that hinges on the horizon or on the eyes. This will look almost as awkward and self-conscious as placing the horizon exactly on the bottom of the frame or placing the upper limit of the frame exactly on top of the subject’s head. Aesthetically, the frame is not a container or a box with rigid borders; it is a selection from a world that is larger than the frame.
If you need an aid for composing shots, Canon’s grid is an effective tool. It can give you a compositional sense of where you might want to place subjects of interest. Using it can jolt you out of continually placing subjects dead center by default.
Look Space
If a subject is looking at the camera, dead center is only one of several places to put the subject. Alternatively, you might find compositional clues in the environment for whether the subject should be more to the left or right. When a subject is looking to the left or right, a concept called “look space” is a rationale for an off-center composition. The gaze direction of a subject can imply a relationship with off-screen space. If the subject is looking to screen left or screen right, the frame will usually include more space on the side of the gaze direction, often close to the rule of thirds. If the next shot shows the object of the subject’s gaze, the object will usually be off-center on the side to which the subject was looking. In this way, the gaze of the subject connects with the general direction of the object of attention, and during a cut, the look space of the outgoing shot is replaced by the object of attention in the incoming shot. The cut is immediately understood by the spectator’s unconscious mind as connecting the subject’s gaze from the previous shot to whatever occupies that part of the screen in the current shot. If a composition is made with cramped look space, with the subject looking toward the near edge of the frame, it will suggest that the subject is looking away or avoiding looking.
In preparing a series of interviews, some media makers will create a storyboard or a shot list with one subject shot toward the left, another toward the right, and another in the center to compositionally differentiate each when eventually cutting from one to the next. Dramatic scenes are often composed with one character left of center and the other right of center when they are reacting to each other in individual shots. Off-center compositions should not be arbitrary; they should be based on justifications and implied relationships. The spectator feels oriented by these compositional choices.
The 180° Rule and 30° Rule
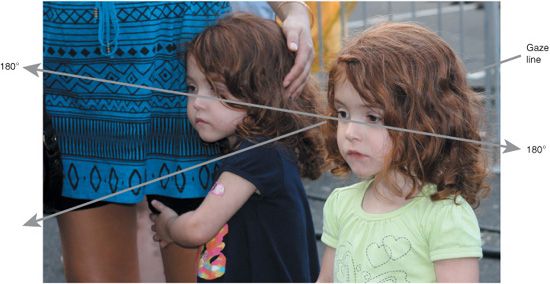
The 180° rule is a framing and sequencing convention that helps maintain continuity when taking consecutive shots of the same subject. A composition with more than one subject usually sets up a left/right orientation in the mind of the spectator. Even a shot with a single subject implies a left/right orientation if the direction of the subject’s gaze is to the left or the right. This line between points of interest or interaction is called the “line of action.” Any subsequent shots taken on this side of the line of action will maintain the same left/right relationship. But any camera position that crosses that 180° line will flip the left/right relationship. Editing this image into a sequence that was shot from the other side could disorient the audience, causing whatever was expected on the left to pop up on the right and vice versa. If you are setting up two cameras, their images will have a matching left/right orientation if both cameras shoot from the same side of the line of action. If you are taking many shots of the same subject with a single camera with the intention of cutting them together, you will maintain a coherent left/right relationship by staying on one side of the 180° line. (See Figure 3.3.)
Figure 3.3 The 180° line between two points of interest and the gaze line.
Continuity editing is a lot easier if you follow the 180° rule when filming, but this does not mean you must never cross this imaginary line. If everyone slavishly obeyed this convention, then we would never see the fourth wall of a room (like the missing fourth wall of a stage set). In addition, potential visual development could be inhibited if there is something worth seeing from the other side of the line. The 180° rule is simply a convention for helping continuity, there are lots of ways around it. At certain moments in films like Taxi Driver and The Conformist, directors Martin Scorsese and Bernardo Bertolucci blatantly make 180° cuts to purposely disorient the spectator. However, they tend to make a pattern of it through several cuts so the violation feels intentional instead of like a mistake.
At times, the viewer may sense no disorientation when left and right are reversed if the incoming shot is meaningful and rewarding the moment it pops on the screen. There are also ways of crossing the line while maintaining continuity—for example, if the actions of your subjects move within the shot to create a new 180° line or if the camera itself physically crosses to the other side while filming. Another technique for crossing the line is to insert a neutral shot between footage from two different sides of the line (like a cutaway or detail that has no relevant left/right orientation). The 180° rule applies only when two shots of the same subject (or the interaction of the subject and object with a left/right relationship) are directly cut together for continuity.
The 30° rule is another continuity convention. It says that when cutting together two or more shots of the same subject, there must be at least a 30° shift in the axis, the angle of view, or both. This is based on the idea that if a shot changes, it should bring enough new information to warrant the cut. Sequential shots of the same subject, in the same scale, from the same view will result in a “jump cut,” where any slight variation in facial expression or gesture will be a noticeable discontinuity and the cut itself will seem trivial if all we see is a slightly disrupted version of the previous shot. Cutting a head-and-shoulders view from straight-on to three-quarters (which is a 45° shift) or to profile (which is a 90° shift) will more effectively flow together as long as there are not any major gestural discrepancies.
Aside from shifting the axis, a significant shift in the field of view will help shots of the same subject flow together, like cutting from a head-and-shoulders view to a full-face view or to waist-high view as long as there is no major mismatch. Of course, the cut will have more of a sense of continuity if the change of shot has meaningfully revealed something worth showing or emphasizing. What this means on the practical level is that shooting for continuity with two cameras on the same subject or when changing positions on the same subject with a single camera, the axis or the field of view of one should be at least 30° different from the other (and on the same side of the 180° line). Of course, this convention, too, can be circumvented—by inserting a cutaway shot in between, by trying to elide over a jump cut with a quick dissolve or fade (as is often done with documentary interviews), by intentionally creating a style or pattern out of jump-cutting, or by providing an incoming shot that is so rewarding that any discrepancy of continuity is disregarded by the viewer.
Eyeline
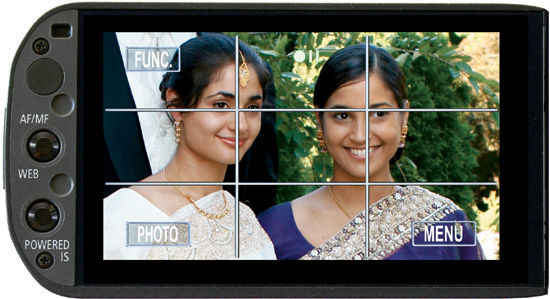
Another compositional consideration is eyeline. The idea of eyeline is that in a waist-high, chest-high, shoulder-high, full-face, or a partial-face composition within a frame, the eyes are usually placed above the center of the frame at about the two-thirds height (varying from between three-fifths to four-fifths). This convention goes back hundreds of years in portraiture. Eyeline is a very pervasive convention. Some of its effectiveness is functional, caused by not wanting wasted space above a subject’s head in a typical portrait, and in tighter compositions wanting to provide compositional space for the mouth as a secondary point of interest. Therefore, the eyes fit well at a two-thirds position. Some of its effectiveness is also purely conventional and cultural. When things have been done that way for six centuries of portrait painting and almost two centuries of photography, they set up expectations and a sense of familiarity in the spectator.
In full shots and long shots, the focus is not usually on the eyes and the position of eyes in the frame is not that significant. In shots that emphasize the face, the concept of eyeline provides a way to communicate normalcy by following the convention. Alternatively, you can communicate the opposite by choosing an unusually low or high eyeline. If you wanted a shot to create the sense that a person is short, is seated while others stand, has stepped down into a hole, or is a young child in the presence of adults, you might place his or her eyeline below center. Alternatively, in the case of the last example, you might create an image in which the child’s eyeline is normal while the adults’ eyelines are abnormally high or at the higher end of normal. What you are doing is orienting the spectator using compositional expectations developed over centuries of portraiture that eyes will appear in a certain space in the frame.
Within a composition that emphasizes the face, you usually want to put eyes in a prominent place, and they will seem more normal if they are above the halfway mark. (See Figure 3.4.) In full-face and wider compositions, a two-thirds eyeline leaves some space above the top of the head (called “head space” or “head room”). Consequentially, the frame does not box the face, nor does the subject’s head seem to support the upper part of the frame like a caryatid, an ancient Greek architectural column in the shape of human being. Occasionally, a low eyeline is justified when something of interest in the upper part of the composition balances off the face, like in Christian iconography the dove representing resurrection flying overhead.
Figure 3.4 The eyeline convention.
There are lots of reasons to disobey the eyeline. You may want to create a quirky composition or portray a character reclining or hanging upside down, and that’s fine. But if you want to use the viewer’s expectations that eyes look normal at three-fifths through two-thirds to four-fifths the height of the frame, the audience does not question this position and accepts the subject as a normal height.
In shots that emphasize a human face, the spectator makes contact with the subject’s eyes. We even judge height not by looking at the top of someone’s head, but by looking at how high someone’s eyes are. In editing, one of the valuable functions of the eyeline convention is that when you cut from partial face to full face, head and shoulder, chest high, or waist high (and at times to an even wider frame), the eyes will remain in the same part of the frame if the eyeline convention is followed. Consequently, the person’s apparent height continues through the cut, the spectator’s point of focus to the subject’s eyes is unbroken, and greater continuity is achieved. If you completely disregard this convention, then continuity editing will be more difficult and a subject’s face, apparent height, and physical relationship to others will arbitrarily jump around from cut to cut.
Figure and Ground
There is a difference between the world we perceive when we are physically present and the world as recorded. In the real world, it is easy enough for us to separate figure from ground. When we occupy the same physical space as we look at someone, the person’s face does not blend with the lamp behind his or her head. We know the space (knowledge is part of perception), and all of our senses are working. Our eyes produce three-dimensional binocular vision. Our eyes, ears, and other sensory organs feed information to our brain, which constructs a sense of where something is positioned in space. When we shoot with a camcorder, however, all the information we have is two dimensional within a 16×9 frame. We have to make an effort for the recording to seem as dimensional as we perceived it by using compositional techniques to separate figure from ground.
Major ways of separating figure from ground include movement, selective focus, chiaroscuro, and backlight. If the subject moves and the background stays still (or if the subject is still and the background moves), we do not feel that one is fused to the other. When there is constant movement, like framing a person inside a moving car as the exterior continuously passes by, separation of figure and ground takes care of itself. Otherwise, we need to enhance separation.
In everyday life, our eyes have a very deep depth of field. Chances are, if you look around the room right now, you will see nothing out of focus because your eyes instantly follow-focus, and they scan points of interest through rapid saccadic movements, which the brain constructs into a sharp image. Selective soft focus with a camera lens is not so much a natural phenomenon than a screen convention used to replace the lack of binocular vision, saccadic vision, the orientation of being in the same actual space, and the coordination of eye, ear, and brain in their roles in spatial perception. We encounter shallow focus more often in still photos or motion-picture images than in the real world, but we unquestioningly accept it in film and video as one of the clues of emphasis and de-emphasis and separation of figure from ground.
Small-format camcorders have an inherently deep depth of field. That is their advantage—and when you want shallow focus, it is their curse. The ![]() -inch CMOS chip in the G10/XA10 has more control of selective focus than the ¼-inch chips that usually come in palm-size camcorders but considerably less than larger camcorders, DSLRs, and motion-picture cameras. Selective focus is discussed in Chapter 5, “Selective Focus and Depth of Field.”
-inch CMOS chip in the G10/XA10 has more control of selective focus than the ¼-inch chips that usually come in palm-size camcorders but considerably less than larger camcorders, DSLRs, and motion-picture cameras. Selective focus is discussed in Chapter 5, “Selective Focus and Depth of Field.”
Chiaroscuro is one of the other major ways of separating figure from ground. In the visual arts and photography, chiaroscuro is the compositional concept of playing off light against dark and dark against light. If you examine paintings by Caravaggio and others from the Baroque period, you will see extremes of light and dark, often with the brightest part of the subject in front of the darkest part of the background and vice versa. Even with the soft window light of a Vermeer painting, the darkest part of the figure is often contrasted with a lighter area of the wall. This concept is used in video composition by paying attention to foreground and background relationships and controlling where you place the subject, where you place the camera, and set dressing, or by adding light to or subtracting light from the foreground or background. Sometimes, placing the camcorder two steps in one direction or another will make a difference between a shot in which the subject blends into the background or stands out. Citizen Kane, which uses deep focus extensively, employs chiaroscuro as its major means of separating figure from ground. The effect of chiaroscuro is that subjects have more dimensional identity from their surroundings, more like the world we perceive. (See Figure 3.5.)
Figure 3.5 Separation of figure and background.
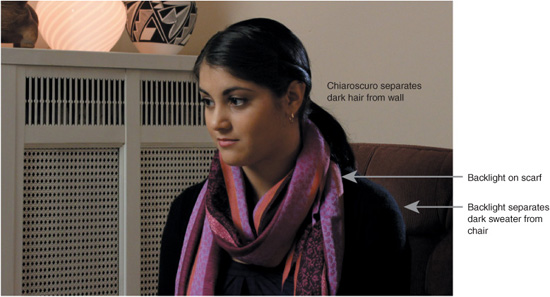
Another way of separating figure from ground is backlight. Coming from three-quarter rear to fully behind the subject, backlight is usually a hard light (that is, not bounced or diffused), so you can control its spill and flag it off the camera if necessary. A large soft light coming from behind would not produce as sharp an edge of backlight on the subject as hard light and would probably create issues of spill and lens flare. Although skylight (or even a simulation of skylight) coming through a window is fairly soft, it might, at times, be used for backlight to provide a little intentional flare of daylight entering an interior space. In most cases, crisper, more controllable hard backlight without flare is preferred. Hard backlight is typically used to create a small outline of light around what would have been the darker side of the subject. This prevents a medium or dark subject from blending into a medium or dark background. The main purpose of backlight is to separate figure from ground and to provide an extra dimension of modeling on the subject.
Video itself provides a certain amount of separation of figure from ground through what is called “contour enhancement,” which is the Sharpness control in the Image Effects menu of the G10/XA10. The Sharpness control electronically exaggerates differences so that, for example, an image of a person has a mild electronic line around it. Although this makes it easier to shoot video compared to film, this electronic contour is rather artificial looking compared to the effect achieved through lighting and chiaroscuro. When sharpness is set too high, it separates skin irregularities and makes video grain more visible. So the Sharpness control should never be abused. Images will look less electronic and have much better dimensional and photographic qualities with Sharpness at 0 or even turned to a negative number, provided the lighting and composition have independently created the appropriate emphasis and separation.
Selecting Shots
Even though you have a small handheld camera that lends itself to run-and-gun operation in situations where you may be constantly improvising, you need to shoot in a disciplined manner to produce useful footage that will help you tell your story. If you are moving along handholding the camera and something of interest happens, it can be important to become a stationary human tripod for a while. Hold certain moments in a well-composed frame and let the subject do the moving as opposed to following every one of the subject’s micro-movements with the frame. At times, you can even let the subject move into or out of the frame, because you may compositionally need an entrance or an exit in the edited piece. Footage is very difficult to edit if the subject is in every frame. In many kinds of productions, there are compositional needs for action/reaction shots, cutaways, distant establishing shots, intimate details, and even sometimes the absence of the central character.
Whether shooting reality or fiction, novice media makers often feel as if they have to match each shot with the next for the sake of continuity. However, shooting real or dramatic events for action/reaction between characters is more likely to move the structure along more dynamically than shooting solely for continuity with the main character in every shot. In fact, continuity itself is rather bland, particularly if it is excessive. Some shot changes might be conceived as contrast, oppositional forces, or separate elements of the whole, and others as ellipses, jumping forward in time. If 90-minute feature films had absolute continuity, they would always be about 90 minutes of a person’s life. Some shots should propel us forward (or backward) in time in relation to the previous shot, while others should shift us elsewhere in space. Otherwise, films and video would be as statically contained as stage space.
Compositionally, look for how the frame sets up relationships. Every photograph implies a position from where the view was seen. The camera places the spectator into seemingly objective, subjective, interpretative, reflexive, intimate, distanced, privileged, or even voyeuristic relationships to the subject or event on the screen. Is the camera within or outside the circle of action? The act of framing calls attention to relationships among subjects within the frame as well as to relationships to the foreground and background and between on-screen and off-screen space.
An important consideration, particularly for run-and-gun types of shooting, is to make sure you get the variety of shots that you need—not simply for variety’s sake but to create emphasis, progression, continuity, cutaways, details, and a shape to your scene with a beginning, middle, and end. Most kinds of productions need B-roll images (potential insert and cutaway shots), including establishing shots and close-up details that could be relevant in the editing. If you have been following a subject intimately within the social space, you might also move back and take a full view of the action or take an external view of the location when you get an opportunity. If all you have is the same subject in every shot in the same place in every frame, your choice in editing is only to jump cut. If you are compositionally shooting for action/reaction and shooting to represent relationships, including from person to person and person to environment, you may need a range of shots. It takes rigor to make sure you get these extra materials.
Does your production have a need for any of the compositional choices in the following list?
![]() An establishing shot
An establishing shot
![]() A long shot (LS), medium shot (MS), and close-up (CU) (at appropriate moments)
A long shot (LS), medium shot (MS), and close-up (CU) (at appropriate moments)
![]() An entrance into the frame
An entrance into the frame
![]() An exit from the frame
An exit from the frame
![]() An eye-level, high-angle, and low-angle shot (at appropriate moments)
An eye-level, high-angle, and low-angle shot (at appropriate moments)
![]() An extreme close-up of detail
An extreme close-up of detail
![]() A z-axis composition (showing relationships on the depth axis)
A z-axis composition (showing relationships on the depth axis)
![]() An off-center composition
An off-center composition
![]() A shot that uses or implies off-screen space
A shot that uses or implies off-screen space
![]() A reverse shot (an opposing view without crossing the 180° line)
A reverse shot (an opposing view without crossing the 180° line)
![]() An over-the-shoulder (OTS) shot
An over-the-shoulder (OTS) shot
![]() A line-of-sight (LOS) shot (sharing line of sight, even in high or low angle)
A line-of-sight (LOS) shot (sharing line of sight, even in high or low angle)
![]() A point-of-view (POV) shot (through a character’s eyes)
A point-of-view (POV) shot (through a character’s eyes)
![]() A well-planned tracking shot (pan, dolly, hand-held, or steadicam)
A well-planned tracking shot (pan, dolly, hand-held, or steadicam)
![]() A counterpoint camera movement (in relation to the subject’s movement)
A counterpoint camera movement (in relation to the subject’s movement)
![]() A reveal (a moving camera that discovers something of significance)
A reveal (a moving camera that discovers something of significance)
![]() A sustained long take that replaces LS, MS, and CU in its development
A sustained long take that replaces LS, MS, and CU in its development
![]() A set of action/reaction shots
A set of action/reaction shots
![]() Coverage (a second view to provide alternative shots from another angle)
Coverage (a second view to provide alternative shots from another angle)
![]() An effective concluding shot
An effective concluding shot
In terms of visual composition, the cliché idea is that close-ups have impact, medium shots have less impact, and full shots have the least impact. But this has no basis in film theory or actual practice. If your primary form of communicating to the audience is limited to facial expression, then of course, a facial close-up will have more impact than a long shot. But human interactions are articulated by much more than facial expressions, and this is a pretty impoverished way to think about all the possibilities of visual expression.
In the era of daytime TV soap opera, domestic dramas were shot primarily in close-up and medium shot with three or four cameras on studio sets that represented bedrooms, living rooms, and hospitals. Even though these productions abounded in close-ups, they were visually uninteresting. In comparison, Hollywood films and even made-for-television dramas have an expressively greater range of space that includes exteriors as well as interiors and the potential for action, interaction, and overview. Some have casts of thousands or special effects; even a modest film or video may have elegant—even breathtaking—moments that happen in long shot. Long shots have just as much potential to be expressive as close-ups; they simply express different things.
Significant moments can also happen in medium shot, where the emphasis is on human relationships within the frame. An example would be in Jean Renoir’s Grande Illusion when French and British prisoners of war rehearse for a variety show and a fellow prisoner enters the rehearsal dressed in costume as a woman. Everyone falls absolutely silent and stares. The impact of the collective reaction is expressed in medium long shot and is far more potent than showing an individual face in close-up. For most forms of video, you need to master the expressive potential of medium shots and long shots in addition to close-ups.
Many beginners tend to shoot in medium shot by default. They might do this out of shyness—not wanting to get too close. They not only miss close-ups and long shots, they often fail to fully exploit the real potential of medium shots themselves. In medium shot, look for meaningful character-to-character and character-to-environment relationships and develop how you use the frame for emphasis, de-emphasis, selection, and visual development. Because of its depth of field, the G10/XA10 is a really good camcorder for revealing relationships at medium distance, particularly when composing on the z axis (the depth axis).
Other media makers think of small camcorders as relegated to close-ups. Of course, the G10/XA10 is well equipped for close-ups with its 10× zoom lens and powered image stabilizer. And, in general, it is easy to be intimate with a small camcorder. With its inherently deep depth of field and natural-looking wide lens, the G10/XA10 is equally capable of expressive long shots if your eye for composition and your creative imagination are up to the task. The point is that visual composition depends on finding the best form to suit the content moment by moment, not a simple formula.
Another tendency for beginning video makers is to take all their shots from the height at which they happen to be standing, regardless of the subject. Whether the camcorder is at the same eye level as your subject, or above or below, is a significant compositional consideration. If you film three-year-olds at a pre-school and shoot from adult height, that choice places the spectator in an adult relationship to the scene. If you shoot from a three-year-old’s height by getting down on your knees, using a monopod, or sitting while everyone else stands, then you have compositionally positioned the spectator in the world of the three-year-old. Shooting the scene halfway between adult height and child height creates an even different point of view. It may be that the entire piece has all three (or more) heights at different times, or predominantly stays with one as the best way to interpret the scene. The important thing is that a camcorder as agile as the G10/XA10 frees you to shoot at waist height, positioned on the floor, at the end of a monopod six feet above your head, or nearly any angle you need.
You ought to have a rationale for the relationship of the camera to the event. This is true whether you are shooting a wedding, a dramatic film, or a socially conscious documentary. A major compositional consideration is where you place the spectator—how intimately; how distant; how much higher, lower or on the level as the subject; in the space of the event; at its edge; or outside of it. Sometimes, you select a particular position to align the spectator with a foreground or background relationship, which might demand a straight-on shot, a higher angle looking down, or a lower angle looking up. If the shot is meaningful, it will justify itself.
Not every scene needs the same approach. Some scenes may need very little camera movement and a tripod may be appropriate. Others may need to move intimately within the social space of the event or, conversely, might need to respect a physical distance. Most types of productions need a variety of shots that position us as spectators in meaningful relationships with the subject and the event while providing emphasis and visual development.