
8
Shooting in Available Light
The G10/XA10’s portability, image stabilization, low-light capabilities, SMART AUTO, programmed modes, and manual controls make it an ideal camcorder for shooting under available light conditions. Available light has the potential to look natural to its location and often provides expressive visuals that are more interesting, more varied, and more justified than conventional setups of artificial light. The challenge for working with available light is to enhance visual meaning and provide emphasis/de-emphasis, composition, and progression primarily through controlling the camera within existing conditions.
When shooting in daylight, the major lighting variables are time of day, weather conditions, and shaping the effect of the light with the camera itself through exposure, color balance, framing, and where you place the camera in relation to the subject, sun, and sky. Positioning the camera in relation to the sun makes the difference between flat frontal lighting, 45° modeling of highlight and shadow, side-lighting that bisects the figure with highlight and shadow, three-quarter backlighting, or a silhouetted figure in backlight. Selective framing shapes the appearance of daylight further through juxtaposing foreground and background relationships: bright subject/bright background, bright subject/shaded background, shaded subject/bright background, shaded subject/shaded background, dark hair/bright sky, light hair/ dark foliage, et cetera.
One of the most problematic situations for shooting is a partially sunny day with small dense clouds intermittently traversing the sun. You never know from minute to minute whether you have direct light, obscured light, or radical exposure changes in the middle of a shot. At best, the clouds on an intermittently sunny day may provide an interesting skyscape as a background for a low-angle composition. Clear sunlight or completely overcast can be accommodated more easily.
Even shooting on rainy or snowy days has possibilities. Media makers often put off shooting because the weather is bad, without considering that their subject might have effectively been shot in the rain as long as the camcorder is protected from moisture with an umbrella or rain barney, or by shooting from windows, porches, or from within a car. The textural qualities of wetness, water ripples, light reflections from wet surfaces, and the image of rain itself are among a whole range of expressive and visually interesting possibilities with available light.
The process of shooting in available daylight involves checking the weather, then shooting in the bright sun, overcast, rain, fog, sleet, snow, or wind if appropriate; waiting for the appropriate conditions; or rescheduling entirely. Each weather condition has its own challenges. Even bright sunlight offers difficulties because of the extreme contrast between direct sunlight and shade, which extends beyond the range of the camcorder, and the fact that the sun’s angle and consequent camera positions change noticeably as the day progresses.
Scouting
To be prepared to use available light expressively, it would be ideal to scout the location the day before shooting. For direct sunlight, log the usable angles of the sun versus time of day, taking digital stills to test for effective camera positions and visual compositions. Shooting location stills like these is an ideal task for the still photo mode of the G10/XA10 because the photos will be taken with the identical lens, image processor, and number of pixels as the eventual video, and are automatically encoded with date and time. This is a perfect reference for documenting the evolving appearance of daylight from particular angles at precise points in time.
Scouting an exterior is done to plan when the light will be optimum and where you can place the camera the following day. It may be that certain kinds of shots can be taken at 10 o’clock in the morning and other shots at three o’clock in the afternoon based on where the sun is and where shadows fall. You may want to exploit a particular time of day—for example, using sunrise or sunset as a background; shooting very early in the morning or late in the afternoon when the sun is low on the horizon, creating very long shadows; or shooting mid-morning and mid-afternoon for a classic balance of light and shadow.
To aid in the scouting process, Sun Seeker is an iPhone and iPad app that uses GPS and magnetometer data to lay out the hour-by-hour path of the sun for a particular location. For planning optimal light conditions, Sun Seeker presents a map view that shows the direction of sunlight for each daylight hour, a flat compass view, and a dimensional augmented-reality camera view. It also calculates precise times for sunrise and sunset.
If you are shooting an exterior event that must happen at a predetermined time, it is useful to visit the location at the equivalent time on the previous day and take test photos to see what problems need to be solved. If you cannot adapt the production schedule to the optimum lighting conditions, then at least know what to expect. Whether you scout or simply adapt as you arrive, your primary controls of sunlight are as follows:
![]() Dealing with the angle of the sun
Dealing with the angle of the sun
![]() The physical placement of your camcorder
The physical placement of your camcorder
![]() The composition in your frame, including foreground and background
The composition in your frame, including foreground and background
![]() Using reflectors to improve or control the light
Using reflectors to improve or control the light
Using a Reflector
A reflector can shape and redirect sunlight to provide a key light in a shaded area, a fill light in a sunny area to control the density of shadows, a dimensional accent from the side or rear, or a pool of light that heightens part of the background. Shooting under direct sunlight without a reflector can produce unnaturally dense shadows because video cannot detect as much shadow detail as the human eye. On a bright day, opaque shadows will not be noticed in a long shot, but when you move in for a close-up, spectators usually expect to see detail in the facial shadows. With limited crews and equipment, wide shots in contrasty sunlight are photographed without a reflector, whereas close-ups and waist-high shots will typically add fill light to prevent excessive highlight/shadow contrast using a reflector held just beyond the frame. In available light, a reflector is an effective way to regulate shadow detail and keep it from being crushed by the limited range of video. Controlling the angle and distance of this reflector will make the difference between deep dramatic shadows with details on the edge of visibility, to natural appearing contrast, to pale unnoticeable shadows.
Metallic reflectors made from foil, metal sheets, or metallic fabric are pebbled or textured to even out irregularities and hotspots. Smooth mirror-like reflectors can be used only on subjects like foliage, where unevenness will not be detected. Lightly textured metallic reflectors provide a pool of directional light. If you were to make a reflector by covering several square feet of cardboard, foamcore, or plywood with shiny aluminum foil, you should crinkle the foil first and then stretch it out.
Matte white reflectors of cloth or foamcore can be used to produce soft fill light for close-ups. Foamcore (or foam board) is a lightweight polystyrene foam sheet laminated with white poster paper on each side, available in art stores. Compared to metallic reflectors, matte reflectors do not throw as much light and need to be relatively close to the subject. Matte white reflectors are generally flattering and subtle, and simply restore to the shadow side of the subject some of the facial detail that you would expect to see with the naked eye but would otherwise be lost within the narrow exposure range of video.
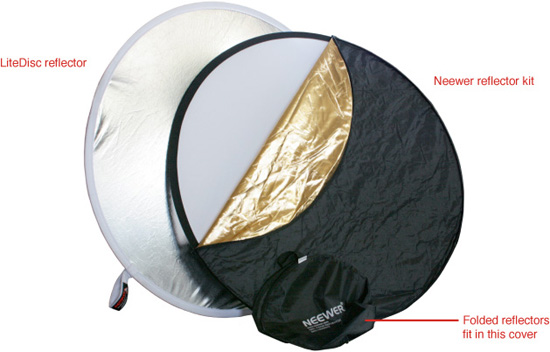
Covering larger areas, Hollywood films might fill the shadow side of bright sunlight with banks of 10,000-watt arc or HMI (metal halide) lights or use 20-foot-long reflectors, or might even go the other direction by hanging a 20×20 foot overhead cloth mesh called a “butterfly” to diminish direct sunlight while the non-directional light from the sky remains the same on the shadow side. For those of us working with palm-sized camcorders, the instrument of choice is a foldable 42- to 52-inch circular reflector made of cloth (silvered on one side and matte white on the other) stretched over a spring steel hoop. The reflector can be held by hand or clamped to a light stand that has a proper accessory arm.
LiteDisc by Photoflex is a particularly good brand used by professionals. A 42-inch Photoflex circular reflector that collapses and folds to one-third its diameter for storage sells for approximately $45, and a five-in-one model with silver, white, gold, and black surfaces that zip over a 42-inch translucent hoop sells for about $95. For those looking for a bargain, Neewer imports from China a 43-inch five-in-one collapsible reflector (model 110CM) that sells for approximately $13 on Amazon.com. It holds Amazon’s number-one sales rank in its category. The stitching on the Neewer model is coarser than on the Photoflex, its surfaces are a bit more wrinkled, and its carrying bag is made of lighter cloth, but the quality and evenness of the reflected light from each brand are nearly identical. The Neewer reflector is so inexpensive, there is no excuse for not owning one. (See Figure 8.1.)
The translucent surface on the Neewer 110CM can be used as a reflector or as diffuser with light passing through it. The black surface is used for negative fill, keeping light off of things. If a shiny object or a bright surface casts unwanted light into the scene, the black disc can be used to block the light. It can also be used to shade the camera from unwanted light, flagging the lens to prevent flare or glare. The silvered surface can redirect sunlight to illuminate something that is otherwise in shade or be used as a key light on the subject when the sun is supplying backlight. The white reflector considerably softens the light and has much less reach compared to the silvered surface. White is used as a subtle fill light, particularly in close-ups.
Figure 8.1 LiteDisc and Neewer reflectors.
A gold reflector can be used to warm pale skin or suggest the light from a fire or a candle. Ironically, however, one of the major uses of the gold reflector is actually to cool the background. To do this, you cast reflected golden light on the subject while excluding it from the background. Then manually set the white balance referenced to a white card or diffuser dome held in the golden light. The effect will be a subject with normal skin tones in an environment that is decidedly cooler. If this is done in a crowd, it can create a special kind of emphasis where the subject looks humanized and everyone else looks icy. This technique, whether it is accomplished by the lighting or by a colorist in postproduction, is often applied in feature films.
Exposure in Available Light
Selective exposure is an important control in available-light situations. Bright sunlight (with its inherent deep shadows) and sunny days with intermittent clouds offer particular challenges to finding an ideal exposure and to maintaining consistent exposures that will match in editing. It is absolutely essential to avoid overexposing the highlights, which can easily happen in bright sunlight and light that continually varies. Burned-out highlights that have lost all their detail cannot be redeemed in postproduction.
You might try to deal with available light using SMART AUTO, which lets the camcorder analyze and compute exposure and color balance parameters based on 38 types of scenes. Alternatively, you can shoot in available light with much more personal control in a programmed mode with selected manual overrides chosen to match the conditions, or achieve maximum control by shooting in full manual mode.
As discussed in Chapter 2, “Run-and-Gun Shooting,” SMART AUTO is engaged when the camcorder’s AUTO/M/CINEMA switch is set to AUTO. It is important to observe the icons in the upper-left corner of the touchscreen to confirm how SMART AUTO is interpreting the scene. The icons will indicate a stationary portrait, people moving, a blue sky background, a gray sky background, vivid red/green colors, a sunset, close objects, extreme close objects (tele-macro), a night scene, a spotlight, and various combinations of backlit situations. SMART AUTO adjusts focus, image stabilization, depth of field, f/stop, shutter speed, gain, color balance, saturation, and contrast to suit each type of scene. If the icons are at odds with your intentions, and if the visual result is not what you want, you should move into Rec. Program mode or full Manual Exposure.
If you simply want plain vanilla automatic exposure that is not second-guessing your intent and your scene’s content, switch to M mode and select Programmed AE (choose FUNC > Rec. Program > Programmed AE). In addition to Face Detection and Touch & Track (as you also had in AUTO mode), Programmed AE mode gives you several ways to focus, including the ability to toggle between manual and auto focus, to instantly engage manual focus by turning the ring on the lens, or to engage Touch Focus. Programmed AE also provides selections in the program panel to set a particular white balance, backlight compensation, automatic gain limit, or +/− Exposure control. To access these settings, choose FUNC and select WB, BLC, AGC, Focus, and/or +/− Exposure.
If you want even more specific control over a particular aspect of exposure, then choose FUNC > Rec. Program and select Av (aperture value), Tv (time value), or full Manual Exposure instead of Programmed AE. In Av, Tv, full Manual Exposure, or Programmed AE itself (under +/− Exposure or AGC Limit), an aspect of exposure can be assigned to the CUSTOM key and dial (see Chapter 4, “Controlling Exposure”). The CUSTOM key and dial are particularly useful for ongoing manual adjustments of exposure in the extremes of bright sunlight and shade, and in intermittent clouds and sunlight. Expose so that zebra patterns do not exceed 100 percent in the highlights.
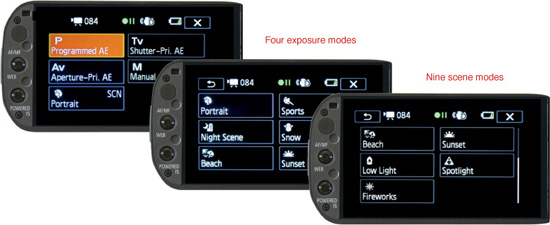
If your available light conditions perfectly fit the Portrait, Sports, Night Scene, Snow, Beach, Sunset, Low Light, Spotlight, or Fireworks settings, then you can select one of these Scene Program modes. When you choose FUNC > Rec. Program, only one scene choice initially appears among the panels. By default, this will be the scene type that had been previously cued (Sunset, Night Scene, and so on). If you tap the scene icon marked by the letters “SCN,” all nine choices then appear (see Figure 8.2):
![]() Portrait
Portrait
![]() Sports
Sports
![]() Night Scene
Night Scene
![]() Snow
Snow
![]() Beach
Beach
![]() Sunset
Sunset
![]() Low Light
Low Light
![]() Spotlight
Spotlight
![]() Fireworks
Fireworks
Figure 8.2 P, Tv, Av, and M offer four approaches to exposure; nine scene modes optimize exposure, color, focus, and image stabilization for particular shooting conditions.
Overcast
It is much easier to shoot video on an overcast day. The advantage of such soft non-directional light is that you can shoot from almost any angle—front, side, back, high, or low—without encountering excessive brightness or loss of detail in shadows. The angle of light does not noticeably change every five minutes the way bright sunlight does. The disadvantage is the subject can easily look flat or bland.
Instead of having to cope with the overly high contrast of direct sunlight, the major problem of an overcast day is the bland lack of contrast. Framing foreground/background relationships with chiaroscuro (playing light against dark or dark against light) can make up for the lack of contrast range in the light itself. Providing one brilliant color (like a red sweater) or including a white reference and black reference in the shot can also keep an otherwise gray scene from being bland.
White reference and black reference are compositional concepts that affect the way the spectator perceives the lighting and tonal range of a shot. If a composition contains a small amount of nearly fully exposed white and a small amount of rich black, then everything in between will look as if it had been intended even if the rest of the composition is overly dark, overly light, or blandly narrow in its range of tones. The eye and brain of the spectator sense that this is normal because white is white and black is black. Psychologically, black does not look fully black except in the presence of white, and our brains understand the relative value of pale, medium, and dark tones when perceived in relation to black and white. In fact, the darkness in a night scene will look more effective if there is a white reference in the shot, and rather gray scenes with a limited tonal range will seem richer and more tangible with a black reference and white reference in the composition. When working with highly diffused light like an overcast day, a black reference and white reference in the composition can compensate for the lack of highlight and shadow and provide the impression of a more complete range of tones.
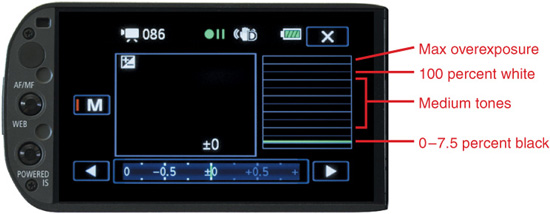
Full AUTO mode with SMART AUTO will generally produce consistent results on an overcast day. There will be fewer surprises and misreadings because the light itself is more consistent. However, whether shooting in soft overcast light or harsh sunlit situations, shooting in complete Manual Exposure or Programmed AE, Tv, or Av are much better choices because they allow the options of exposure controls on the touchscreen or the CUSTOM dial, plus manual controls over focus when you want them. You can use zebra patterns to establish whether you have a white reference at nearly full exposure in the frame. If you are in either manual mode or +/− Exposure mode, the waveform monitor is the ideal tool for graphically indicating both white and black levels in the composition, as shown in Figure 8.3. (Choose FUNC > Rec. Program > Manual and select WFM or Zebra and set the percent or choose both WFM and Zebra.)
Figure 8.3 Watch out for flattening at the top of the WFM response curve (clipping whites) or at the bottom (crushing blacks).
In the right hands, soft light can be very expressive. Vermeer’s paintings often pictured subjects in soft skylight coming through a side window, and Lance Accord’s cinematography for Lost in Translation makes extensive use of soft light by augmenting the skylight from large room-length hotel windows with KinoFlo fluorescents balanced for daylight.
Seemingly gray overcast moments can be full of color by increasing saturation in Image Effects in program mode, or by using the Vivid cinema filter, or enhancing color in postproduction where you will have more control. A good portion of making an overcast day expressive is in controlling what is contained in the shot. The pervasiveness of bland soft light on an overcast day allows you to be free to explore foreground/background relationships and extensive camera movements. Sometimes, starker costumes might be needed on an overcast day or when shooting during the indirect light of magic hour.
Magic Hour
During magic hour, there exists a form of soft, indirect light that is quite different from an overcast day. Just after the sun disappears over the horizon at sunset or for about 20 minutes just prior to sunrise, when the atmosphere is reasonably clear, you have a brightly glowing sky where the light seems to come from everywhere yet the sun is not visible. This is magic hour. In black-and-white shots, this will be incredibly bland. But in color, you end up with luminous soft light and a blue sky (as opposed to the soft light and a bleak gray sky of an overcast day). Objects are differentiated primarily by their color as in an Impressionist painting instead of by light and shade. Magic hour produces romantic color shifts evolving as the minutes pass, and the color balance changes from typical photographic daylight to or from skylight, to the atmospheric effects of post-sunset or pre-sunrise.
The film Days of Heaven was shot by Nestor Almendros extensively in magic hour. Almendros received the Academy Award in Cinematography for this production. The story is about migrant farmworkers who labor from sunrise to sunset and their personal interactions occur in the little periods of time just before sunrise and just after sunset. Magic hour, when indirect light is everywhere, does not provide modeling from light to dark. Almendros exploited this by using low angles to silhouette people against the sky or costumes that had dark black and bright white in them so that they stood apart against the medium tones of the wheat fields. The film’s landscapes often featured a luminous ultra blue sky, at times with the remnants of occasional clouds or a few rays of sunset reds and purples that compensated for the flatness and the blandness of the shadowless light hitting most of the landscape. For certain shots, Almendros added a bit of reflected light on a subject’s face in the foreground.
In magic hour, under the right conditions, you might see a dramatic skyscape while the light on the landscape and subjects will be as shadowless as on an overcast day. In most cases, magic hour is more controllable just after sunset than just before sunrise, and the results are somewhat different because one progresses toward darkness and the other toward brightness. To be prepared for shooting magic hour before sunrise, you have to anticipate pre-sunrise in the dark and be set up for it while not really knowing how things will look until the effect of the light is already occurring and constantly changing, eventually leading to sunrise or morning mist.
If you set your color on Auto White Balance, you are probably not going to be able to exploit the wonderful pinks, purples, and blues that can occur at magic hour. Auto White Balance will try to make the light neutral. Three strategies for shooting in magic hour are to use the Sunset mode, which intensifies colors; to use the Vivid cinema filter; or to use a manual white balance locked to some fixed point at or between 3,000°K and standard daylight 5,600°K, depending on what looks good in the viewfinder. The Sunset mode, which you select by choosing FUNC > Rec.
Program > SCN > Sunset, does not allow any additional adjustment of color balance. Most professionals would probably not choose the ready-made Sunset mode for this reason. The Vivid cinema filter does allow additional color balance control, but its increased saturation could be done in postproduction instead of committing to it in the camera. Of the various choices, setting a manual color balance allows a greater range of options and control. Similar strategies can be applied to shooting sunrise or sunset.
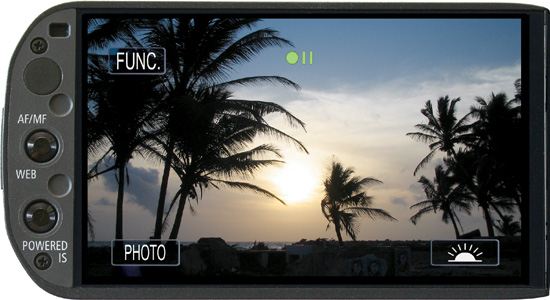
Sunrises or sunsets can provide beautiful images in their own right (see Figure 8.4). They are also an opportunity to portray a subject in silhouette or modeled with redirected sunlight from a reflector. As with magic hour, automatic settings will attempt to normalize the color during sunrises and sunsets, which may or may not be appropriate. When the camcorder is locked to a manual color temperature, the exceptional colors will stand out. Reds and purples will remain rich and the progression over time to (or from) full daylight will not be negated by a program that continues to adjust. To lock in a fixed white balance while in Programmed AE, Tv, Av, Manual Exposure, or the Vivid cinema filter, choose FUNC > WB > K Color Temperature or lock to Daylight, Tungsten, or some other fixed value.
Figure 8.4 Sunset with silhouetted trees in the foreground.
In addition to white balance, you may also want to lock the exposure to manual or to AGC Limit for sunset to maintain the progression toward darkness. Auto exposure would attempt to negate the progression, and eventually create a muddy graininess as it increased gain while trying to compensate as the horizon darkens. Exposure for sunrise is more difficult than sunset. One strategy for a sunrise is to manually preset the exposure based on a recent test—say, at the point the sun just clears the horizon.
Using this setting the next time you shoot, the sunrise will start considerably underexposed, reach a perfect balance at the point the sun clears the horizon, and then proceed to wash out the frame. Of course, a sunset (which is easier to expose) altered in postproduction to play in reverse will look like a sunrise, provided people or birds do not pass through the shot.
Interior Light
Interior available light can be skylight through a window or illumination from a table lamp, floor lamp, or ceiling light. You have some control over this by simply opening or closing blinds and turning existing lights on or off. If you have the time and opportunity, you might increase or decrease the wattage in existing fixtures or exchange bulbs for ones that match color temperature and help create the look you want to design.
If your available light interior has a significant amount of skylight coming through the windows, you may want to balance any additional light in the room to be consistent with daylight by doing the following:
![]() Using a reflector to redirect window light onto the subject or onto part of the interior
Using a reflector to redirect window light onto the subject or onto part of the interior
![]() Using 5,600°K daylight compact fluorescent bulbs in existing lamps and fixtures
Using 5,600°K daylight compact fluorescent bulbs in existing lamps and fixtures
![]() Adding 5,600°K light from a KinoFlo or Interfit fluorescent instrument
Adding 5,600°K light from a KinoFlo or Interfit fluorescent instrument
![]() Bouncing a tungsten light with a half-blue gel to bring up the base level with partially corrected light
Bouncing a tungsten light with a half-blue gel to bring up the base level with partially corrected light
![]() Silhouetting the subject against the window by exposing for the exterior and using no additional interior light
Silhouetting the subject against the window by exposing for the exterior and using no additional interior light
Using available interior light often involves shooting under low-light conditions. The G10/XA10 has an unprecedented ability to accommodate low light compared to other camcorders in its price range and even many high-end camcorders. By designing the CMOS chip with exactly 1,920×1,080 photo receptors, Canon was able to make each individual pixel 2.75 microns instead of the 1.7 microns found in most consumer and pro-sumer camcorders. According to Canon, this produces a 25 percent improvement in low-light sensitivity and a 280 percent improvement in dynamic range, which translates into more detail in the highlights and shadows.
Canon recommends a minimum light level of at least 1.5 lux to produce a discernible image, which for most purposes is far from a professionally usable image. So do not expect night vision miracles. The term “lux” refers to the intensity of light falling on an object at a distance of one meter from a single candle, and the term “footcandle” is the intensity of light falling on an object at a distance of one foot from a single candle. In each case, these are standard scientifically calibrated candles, but not that far off from a typical dinner candle. A lux is about ![]() of a footcandle—
of a footcandle— ![]() to be exact. 1.5 lux is a very small amount of light—the equivalent of a solitary dinner candle about 48 inches from the subject. You cannot really shoot at 1.5 lux without expecting considerable video noise, motion blur, and a degraded image. You will need at least 17 to 20 lux, the light of a typical bedroom or dim living room, to begin to achieve clean results. This is still an impressively low amount of light compared to most camcorders.
to be exact. 1.5 lux is a very small amount of light—the equivalent of a solitary dinner candle about 48 inches from the subject. You cannot really shoot at 1.5 lux without expecting considerable video noise, motion blur, and a degraded image. You will need at least 17 to 20 lux, the light of a typical bedroom or dim living room, to begin to achieve clean results. This is still an impressively low amount of light compared to most camcorders.
In very low light, the gain can rise to the point that you see grain, video noise, unevenness, and eventually an unacceptably degraded image. Every change of 6dB of gain is the equivalent of making the photo receptor twice as sensitive. With the gain at 6dB or even 12dB, the image should still look pretty clean. You will have to decide whether you want to get as high as 18dB or will allow it to max out at 24dB (or even higher if you switch to the Low Light mode). For interior and low-light situations, you need to determine your limit for maximum gain and when shooting provide a base level of enough light so that gain will never have to exceed that point.
Base Level
The term “base level” is used by some to describe the existing level of ambient light at a location—whatever value is already there—to which more light can be added. However, base level is used by others to describe the minimum level of light needed to produce an acceptable picture, a more useful concept. Phrased another way, your minimum base level is the answer to the question, “How much light do I need to shoot at the widest aperture, slowest shutter speed, and the highest gain that I am willing to accept?”
For certain kinds of low-light shooting, it is important to get the image no matter how ugly it looks. In other cases, it is important to have the image only if it looks good. Each would require a different base level of light. You will need to derive a lighting value from previous experience or shoot tests in low light with the gain at 6dB, 12dB, 18dB, and 24dB (or at levels in between) to find the lighting threshold at which the image is acceptable or unacceptable for your purposes. This will be useful information for setting or limiting gain in future low-light situations.
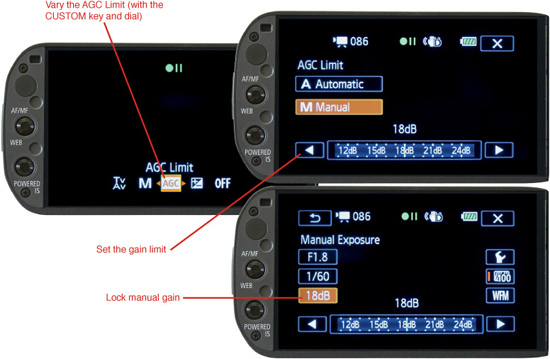
To manually control the Automatic Gain Limit as your major exposure variable, enter Programmed AE by choosing FUNC > Rec. Program > P Programmed AE >X. Then, press the CUSTOM key for two seconds. When exposure options appear across the bottom of the touchscreen, use the CUSTOM dial to select AGC and press the CUSTOM key again. You will now see the dB limit on the left side of the touchscreen and can adjust its value with the dial either for test purposes or as an effective exposure control during low-light shooting. As long as the light is very low, this will also give you the ability to set your gain threshold and to manually underexpose at selected moments by turning the gain even lower. Once you have enough light to shoot at zero gain, the AGC Limit will cease to be a way to manually control exposure, and the +/− Exposure mode would be preferable. (See Figure 8.5.)
Figure 8.5 The three ways to control gain are shown here.
To obtain enough light, there is an advantage in low light to shooting in wide angle, which opens to f/1.8. Zooming to full telephoto will lose 1![]() stops at the widest aperture compared to wide angle, which more than doubles the amount of light needed. Also, shooting at a slower shutter speed of
stops at the widest aperture compared to wide angle, which more than doubles the amount of light needed. Also, shooting at a slower shutter speed of ![]() for frame rates of PF30 and 60i, and
for frame rates of PF30 and 60i, and ![]() for PF24 and 24p, will allow the camcorder to attain an acceptable exposure in half the light of the typical shutter speeds of
for PF24 and 24p, will allow the camcorder to attain an acceptable exposure in half the light of the typical shutter speeds of ![]() or
or ![]() .
.
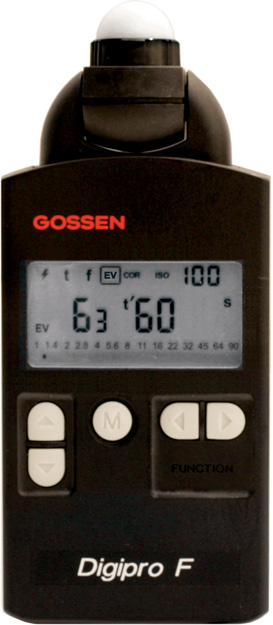
It is also possible to use a light meter on its EV (exposure value) setting to find out if you have an adequate base level of light. (See Figure 8.6.) Set the ISO value on the meter at 100, which many people use as a standard. (You could set it for a calculated sensitivity of the camcorder, but this will change proportionally with your gain settings on the camcorder. For the purpose of reading a base level of light, a sensitivity setting of ISO 100 or any higher value like 400 or 800 will do as long as you consistently use the same number.) The meter reads the light falling on its dome, which should be held in the light and facing toward the camcorder as a substitute for the subject.
Figure 8.6 A light meter in EV mode is useful for testing the base level of light.
From experience or testing, you will eventually learn what EV you need for your minimum base level of light and can make judgments from that information. If your EV reading does not reach your minimum base level, then your choices are as follows:
![]() Augment the scene with available light to lower the gain and improve the image.
Augment the scene with available light to lower the gain and improve the image.
![]() Increase the gain and accept a visually degraded image.
Increase the gain and accept a visually degraded image.
![]() Settle for a dark image.
Settle for a dark image.
If you do not have access to a light meter, you can put exposure in full manual mode and use the camcorder as a light meter. Lock the aperture to f/2.0, the shutter speed to your intended setting, and slide the Gain value until you just reach the 100 percent zebra pattern threshold on a white card, or if exposure cannot reach that level, calibrate your zebra threshold for 70 percent—an acceptable underexposure for very low-light situations. You will have to visually judge the quality of the image to determine whether that dB setting is clean enough to be acceptable.
If the gain setting has to go higher than you prefer, your options are to add light to achieve or exceed the minimum base level; stay at the high gain, accepting the degraded image; or purposefully set the gain lower if the composition and nature of the picture look adequate when underexposed (a judgment call). This last option will produce richer blacks and less video noise, but at the expense of losing detail in the dark areas and possibly muddying middle tones. This may be fine for some compositions and types of subjects and not for others. To purposely choose underexposure is an interpretive decision. If you choose to operate with lower gain, this can be done by remaining in full manual exposure mode (choose FUNC > AGC LIMIT > Manual and set the desired dB) or with automatic exposure in Programmed AE or Tv or Av modes (choose FUNC > Rec. Program and select Programmed AE, Av, or Tv), plus setting an AGC Limit.
If you can master manual settings, it really helps to have full control of exposure, even in available light situations. Manual control will permit you to have a purposefully dark shot if necessary or to selectively lock in an exposure based on a selected part of your composition. Otherwise, as you pan around, auto exposure and Programmed AE are going to try to even out what is actually there, which will probably be less expressive than if you let dark areas be dark.
Shooting in very low-light conditions might eventually get to the point that you simply take what you are given, and just as you would outdoors, control the situation more with where you place the camera and how you use the frame. There may be choices in low-light situations that range from expressive silhouette to acceptable underexposure, particularly if there is a white reference in the shot or at least a small portion of the composition normally exposed. Sometimes, the apparent circumstances, the reality of the moment, and rich sound can compensate for less visual information.
Fluorescents
A room lit with fluorescent ceiling fixtures produces an unflattering downlight that leaves eye sockets dark and flattens faces. The phosphors in the brightest, least expensive, longest-life industrial and consumer fluorescent bulbs do not cover the whole visual and photographic spectrum. Consequently, people do not look attractive under them. The light is high in green content, which under-renders skin tones and warm colors. The white balance setting on your camcorder can help correct for some of this, but certain wavelengths of color are entirely missing, and clothing and skin tone can never appear quite natural.
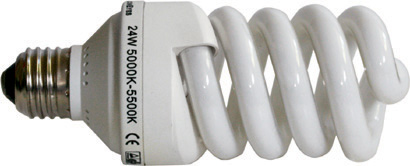
Increasingly, spiral compact fluorescents (CFLs) with a screw base are used where incandescent bulbs had been, as shown in Figure 8.7. Fluorescent bulbs have a Color Rendering Index (CRI) rating that indicates the percentage of the visible spectrum they produce. Anything below 80 percent of the spectrum is not photographically pleasing and may not even have a CRI rating printed on its base or packing. Fluorescents with a CRI in the 80s are called “wide spectrum” and those in the 90s are called “full spectrum.”
Figure 8.7 A wide spectrum CFL
The least expensive tube and screw-in fluorescents for home, school, and industry are bright, efficient, and long lasting but typically have a CRI rating between 40 to 60, which produces unnatural skin tones and skewed colors on video or film. Even after white balancing, a camcorder cannot adapt to the incomplete spectrum as well as the human eye can; consequently, the camcorder appears to exaggerate the effect. Sometimes, the incomplete spectrum is exactly perfect for producing an empty, impersonal mood like the parking garages where reporter Bob Woodward (played by Robert Redford) meets “Deep Throat” in All the President’s Men. But should a workplace, kitchen, or classroom look like this on video?
There are a number of possible solutions. Photographically desirable fluorescents have a CRI rating from 80 to as high as 98 and will have their rating printed on their base or their packaging. A solution could be to replace industrial- or consumer-quality fluorescents with full-spectrum bulbs. This might be practical for a few fluorescent tubes or for CFL screw-in bulbs, but is not a likely solution for situations involving dozens of lamps in ceiling fixtures, since full-spectrum fluorescents cost three to six times more than regular consumer bulbs. A simpler, quicker solution would be to augment the ceiling fluorescents with full-spectrum soft key or fill light from the side or up to a 45° frontal angle. As it mixes with the ceiling light, the additional light would improve the color rendering, provide visibility in the subject’s eye sockets, and create a more modeled, less flattened appearance.
Suitable instruments for supplementing cool white fluorescent light include the following:
![]() A 500- to 750-watt quartz-halogen light (like a Lowel Omni or Tota) bounced off a white ceiling, wall, or corner through a half-blue CTB filter
A 500- to 750-watt quartz-halogen light (like a Lowel Omni or Tota) bounced off a white ceiling, wall, or corner through a half-blue CTB filter
![]() A professional fluorescent fixture like a KinoFlo or an Interfit 9 CFL light with daylight full-spectrum bulbs
A professional fluorescent fixture like a KinoFlo or an Interfit 9 CFL light with daylight full-spectrum bulbs
![]() An LED panel light including inexpensive ones made by Neewer
An LED panel light including inexpensive ones made by Neewer
These instruments are discussed in Chapter 10, “Shooting at Night.” Quartz-halogen light filtered with half-blue CTB will still look a bit warm compared to 4,100°K fluorescent ceiling lights, but the two hues will be close enough to create an acceptable color modeling across your subjects. Full spectrum “daylight” fluorescent or LED instruments will be bluer than cool white industrial or consumer fluorescents, but close enough to blend with either fluorescents or skylight through windows.
Practicals
A practical is a source of light that is used as an image within the frame. A practical may or may not supply real illumination to its surroundings, but its image adds to the tonal range of a scene, its mood, and potentially its visual meaning like time, temperature, the nature of the place, or the nature of the event. Images that generate light can be evocative on the screen and available light situations are often full of images that produce light. Examples of exterior practicals include the sun as an on-screen image at sunrise or sunset, the moon, a lighthouse, car headlights, neon signs, storefronts, lanterns, flashlights, fireworks, flares, bonfires, or even a jar full of fireflies. Interior practicals include table, floor, and ceiling lamps; candles; matches; a fireplace; glowing coals; a gas range; heater filaments; televisions; computer screens; indicator panels; molten metal in a foundry; and phosphorescent materials that glow.
The primary problem with practicals is keeping their brightness within the limited exposure latitude of video without underexposing the rest of the picture or overexposing the practical. Solutions include adding fill light so the rest of the picture is closer to the value of the practical and subduing the practical light so that it is more in balance with the ambient level. If a table lamp, for example, appears disproportionally bright, it can be toned down with lower-wattage bulbs or a solid-state dimmer. An inexpensive $13 to $30 dimmer from a hardware store might work, but these often cause the light bulb to produce a 60-cycle hum and possibly a visible flicker at low settings. A professional-quality solid-state dimmer, like the American DJ Uni Pak II shown in Figure 8.8, will provide better results. It sells for $110, weighs three pounds, has a readout of the precise level of power, two Edison outlets, and controls up to 10 amps (1,200 watts).
Figure 8.8 A dimmer is useful for reducing the intensity of practicals that would otherwise be too bright in the frame.

In more than one film, cinematographer Vittorio Storaro has strategically placed a scarf over the front of a lampshade to subdue the direct light into the lens while allowing a table lamp to still provide visible illumination to the wall and table. Storaro has also been known to use dimmers. If a scene had a hanging bare light bulb in the shot, cinematographer Andy Laszlo would tone down the side facing the camera by spraying it with soluble brown hair dye—the kind of washable temporary coloring available in drugstores. In this way, the side facing the camera did not bloom and overpower the scene, while the un-dyed portion of the bulb provided some real illumination that was visible on the actors. Laszlo called this “liquid dimmer.”
Another way to cinematically deal with an overly bright practical is to expose for the practical itself and allow the foreground subject to be in silhouette or semi-silhouette as you might do with palm trees or lovers in front of a sunset. To produce a silhouette, the camcorder needs to be in +/− Exposure or full Manual Exposure mode with values set to favor the background while the underlit foreground goes dark. The G10/XA10’s Backlight mode would have the opposite effect, making a dim foreground subject lighter at the expense of overexposing the background. Allowing the foreground figure to go dark is sometimes a more interesting solution. Silhouette is just one more expressive possibility within the enormous range and variety of available light.
Except for when we look at a light source itself, like a candle, a bonfire, or the setting sun, light is otherwise invisible until it interacts with something. Light is articulated by dust, smoke, or fog or by opaque, translucent, transparent, or textured surfaces. Light does not mean anything until it hits something. A great deal of lighting involves selecting and controlling what light hits and how those surfaces articulate light. The G10/XA10—with its range from SMART AUTO, to programmed modes, to providing complete manual control—is a perfect tool to explore the evocativeness of available light.
In available light situations, you can think less about power cables, light stands, and high-wattage instruments, and begin to explore light by controlling what it strikes: the color and contrast range of the subject (opaque, translucent, transparent subjects); black reference and white reference; surface quality (dry, dull, wet, shiny, metallic, smooth, textured); three dimensionality with highlight and shadow; fog and smoke; dulling spray, wetting, covering objects, shading objects, and placing objects or materials to create shadows.