
5
Selective Focus and Depth of Field
Auto focus has its limits. It is responsive to images with adequate light and at least moderate contrast with vertical detail. Auto focus may not work well, however, in situations with low contrast, no vertical detail, fast motion, very low light, night scenes, or when shooting through wet or dirty windows.
The G10/XA10 camcorder has three levels of auto focus:
![]() Instant (I.AF). Instant auto focus glides decisively into place.
Instant (I.AF). Instant auto focus glides decisively into place.
![]() Medium (M.AF). Medium auto focus moves into focus at moderate speed.
Medium (M.AF). Medium auto focus moves into focus at moderate speed.
![]() Normal (AF). Normal auto focus moves slowly into focus using “normal” through-the-lens technology.
Normal (AF). Normal auto focus moves slowly into focus using “normal” through-the-lens technology.
Instant and Medium auto focus use both through-the-lens auto focus and an external focus sensor just below the lens. The extra sensor helps the camcorder lock into focus more quickly, minimizes the need to hunt for focus, and improves focus in low-light and very bright situations. In comparison, Normal AF operates somewhat slowly. It uses only the through-the-lens sensor and can at times be indecisive, particularly in low light.
The Instant and Medium settings work best for most auto-exposure situations, but they are not available under certain conditions. For example, shooting in infrared is limited to Normal through-the-lens auto focus, as is shooting with an auxiliary converter lens. Attaching a wide angle or tele converter actually covers the external auto focus sensor. If you attach an auxiliary lens, you need to access the Camera menu and let the camcorder know that you are using a wide angle or tele conversion lens; otherwise, auto focus will try to obtain information from a blocked sensor. To do so, choose FUNC > MENU > Camera icon > Conversion Lens; then choose Wide, Tele, or OFF.
Face Detection
Face Detection and Touch & Track are an integral component of full AUTO mode and cannot be turned off. They are also available in M and CINEMA modes except in Night, Low Light, Fireworks, or Manual Exposure mode. In M and CINEMA modes, Face Detection and Touch & Track can be turned off in the Camera menu or can be toggled to other forms of focus with the AF/MF switch.
As discussed in Chapter 2, “Run-and-Gun Shooting,” the camcorder’s logic system detects, analyzes, and optimizes faces. In Face Detection, the camera focuses on the most prominent face in the composition and displays a white frame around it along with dark gray frames around secondary faces—up to nine simultaneously. As a shot develops, Face Detection focuses on whichever face is dominant in the composition and the indicator frame changes accordingly. If you tap a particular face on the touchscreen, even a secondary one, the system goes into Touch & Track mode. It locks onto that face and will track-focus wherever the image moves until the selected face becomes obscured or exits the frame. At that point, the logic system returns to Face Detection, which shifts focus to other faces or, if there are no faces, glides into auto focus on a prominent non-facial image.
Touch & Track can also lock onto a vehicle, an animal, or an object with distinctive features if you tap its image on the touchscreen instead of a face. The camcorder then momentarily drops its priority for faces and will track the selected image, keeping it in focus as it previously did with faces.
In M or CINEMA mode, touching the AF/MF switch will toggle to manual focus without Face Detection. This enables you to lock focus into manual at any point or to focus primarily in manual mode and toggle back to AF when you want the camcorder to automatically track faces. As you toggle back and forth, letters on the left side of the touchscreen indicate manual focus (MF) or the form of auto focus you had preselected in the menu: I.AF (Instant), M.AF (Medium), or AF (Normal). I.AF is the default auto focus and for most situations it works best.
If Face Detection and Touch & Track are disabled under the Camera menu, then the AF/MF toggle switch becomes a way to use both auto focus and manual focus without Face Detection, instead of as a means of moving in and out of Face Detection. To enable or disable Face Detection and Touch & Track, choose FUNC > MENU > Camera icon > Face Detection and select ON or OFF.
Face Only
On the AF/MF switch, the manual focus (MF) mode typically operates without Face Detection. However, there is a way to make it responsive to faces. If you reassign the identity of the AF/MF button to Face Only AF, you will be able to toggle between AF (which operates as before) and Face Only, which operates as manual focus until it detects a face. To do so, choose FUNC > MENU > Tool icon > Assign Button 1; then scroll to Face Only AF.
Now the camcorder will track focus on a selected face in either AF or MF mode. The AF side of the toggle switch will always be auto. It will recognize and track faces as long as Face Detection and Touch & Track are enabled under the Camera menu, which is the default position. Under AUTO, the touchscreen says either I.AF, M.AF, or AF (depending on your earlier selection of the type of auto focus) along with a plain smiley face icon indicating Face Detection.
In Face Only, when you press the AF/MF button to enable what would have been the manual focus mode, the I.AF letters turn gray and the smiley face icon has the letter O indicating you are in Face Only mode. When there is no face in the composition, the camcorder is actually in manual focus. When the camera’s logic detects a face, auto focus takes over, the letters I.AF light up, and auto focus tracks faces. It will lock on a face if you select one and will track focus until the face is no longer detected, at which point focus reverts to manual if no other face is on the screen.
If Face Only is activated on the Tool menu while Face Detection is disabled under the Camera menu, then ironically, only the manual focus side goes into Face Detection. This gives you one more combination of possibilities: an auto focus that does not recognize faces and a semi-manual focus that does.
The LCD Screen
The LCD screen rotates 270° to allow for normal, high-angle, low-angle, and waist-high filming positions. The screen can rotate up to 90° downward for shooting high angles while holding the camcorder above your head with arms extended or on a monopod. It is also possible to instantly shoot at a very low angle by turning the monopod and camcorder upside down, with the intention of uprighting the shot in post production. For extensive shooting upside down, the camcorder can be set for Scan Reverse in the Film Clip menu, which will render the original files as upright images. To set this, choose FUNC > MENU > Film Clip icon > Scan Reverse Rec; then choose Both (for upside down), as shown in Figure 5.1.
Figure 5.1 Scan Reverse controls are shown on the left, and LCD Mirror Image controls on the right.
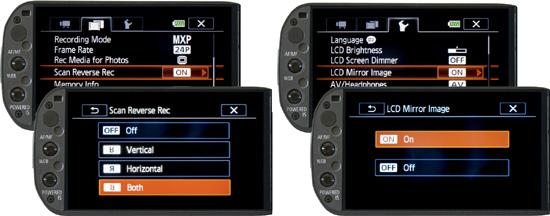
Tilting the LCD 45° to 90° upward is convenient for viewing while shooting from waist high and lower angles. When the LCD panel is turned 180° forward so the subject of the shot can see his or her own image (or for filming yourself), the LCD clicks into Mirror mode, which reverses the left-to-right screen image (not the recorded image) like a mirror. This happens automatically with the LCD in the completely forward position, provided the Mirror function has been activated in the Tool menu. (Choose FUNC > MENU > Tool icon > LCD Mirror Image > ON, also shown in Figure 5.1.) The regular (non-mirror) orientation would be disconcerting when viewing yourself live as you and the LCD image of yourself diametrically face each other. With the LCD facing forward for recording and monitoring oneself, the camcorder is usually operated with the wireless remote. The difference between Scan Reverse and Mirror mode is that Scan Reverse actually records a flipped image, whereas Mirror mode simply shows you one when the LCD faces forward but records a standard image.
The LCD panel can also be folded against the side of the camcorder with the screen facing outward. This would allow viewing in tight quarters when there is no space behind the camcorder, or could allow a director to monitor from the side while the operator uses the rear viewfinder.
To change LCD and viewfinder brightness from normal to bright or back to normal, press the DISP. button on the left side of the camcorder for two full seconds. This affects only the monitor brightness, not the recorded image. However, running the LCD or viewfinder on the bright setting reduces the usage time of the battery. There is an additional dim setting on the LCD menu under the Tool icon, for when normal screen brightness might be a distraction.
The Viewfinder
The viewfinder at the rear end of the G10/XA10 could have been better designed. Its magnification is low, it does not tilt, and its rear-focusing dioptric adjustment uses a tiny plastic lever just under the eyepiece. The lever is so close to the eyecup it is very difficult to adjust while looking through the viewfinder—which of course you have to do in order to make the adjustment. The lever should have been larger and in a more accessible place, like the side or top of the viewfinder. Even with these shortcomings, however, there are times when it becomes preferable to use the rear viewfinder instead of the LCD screen—for example, when extreme bright light makes it more difficult to judge the touchscreen image compared to the shielded image in the viewfinder.
Some people prefer stabilizing the camcorder against their face. For some, their visual style changes subtly to become more psychologically motivated as the camera becomes contiguous with the eye and head. Instead of the camcorder being a selection device held at the length of a partially bent arm, where framing a shot is a bit like pointing with your hand, the camcorder held against the face becomes more directly an extension of the eye, head, and brain. For some operators, the frame and its movement take on more human qualities in this position. Shooting through the rear viewfinder can be particularly good for point-of-view shots. People unconsciously respond to the camera as if it is a person when it is held to the face.
A particular occasion for focusing and framing through the viewfinder is shooting while the LCD screen is turned 180° toward an interview subject. The front-facing LCD creates a strong point of eye contact for the subject on an axis fairly close to the lens while also allowing the videographer to monitor the scene through the rear viewfinder. Many camcorders turn off the LCD screen when the viewfinder is activated. Fortunately, Canon allows the possibility for both to operate simultaneously. This makes the G10/XA10 a particularly good on-axis interview camera.
If you view with the LCD panel in its traditional position, the alternatives for an on-axis interview are letting the subject look much further off axis or unconsciously leaning around to address you beside or behind the camera. Simply asking the subject to speak to the camera lens is about as motivating as saying, “Speak to a potato.” Documentary filmmaker Errol Morris achieves his riveting on-axis interviews in films like The Fog of War by using a live image of his face on a teleprompter directly in front of the camera lens, which shoots through the teleprompter image.
You can begin to approximate this directness and intimacy with the camcorder’s LCD facing forward, allowing the subject to make contact with his or her own image while having a conversation with the operator who is on the same axis behind the camera. There is actually something for the subject to see, which is less likely to generate a blank stare. As with recording yourself, the LCD screen needs to be set for Mirror Image; otherwise, it is a disconcerting experience for the subject to see each gesture appear on the opposite side of the screen as an observer from the opposite side would see. As a menu item, the LCD Mirror Image setting can always be left ON because the mirror effect does not kick in until the LCD screen is turned 180° toward the subject and the inverted image appears only on the LCD screen. The actual recorded image is correct left-to-right.
Dioptric Correction
Before using the viewfinder, you have to adjust the rear-focusing diopter. “Dioptric correction” refers to the use of a magnifying lens (a diopter) to correct for the viewer’s eyesight. You need to make this adjustment even if you have perfect eyesight because the aforementioned lever, shown in Figure 5.2, is variable. It can easily be knocked off focus and may not be perfectly centered. Instead of making the rear-focus adjustment while viewing an image, you might point the camcorder at a blank surface or even leave the lens cap on. You are adjusting the optical correction for your eye to the viewfinder’s miniature LCD; the focus of the front zoom lens has nothing to do with this adjustment. You need to focus on the pixels themselves. If the pixels and display data look sharp to your eye, you are now set up to judge the focus of images through the zoom lens.
Figure 5.2 The dioptric adjustment lever is just below the viewfinder’s eyepiece.
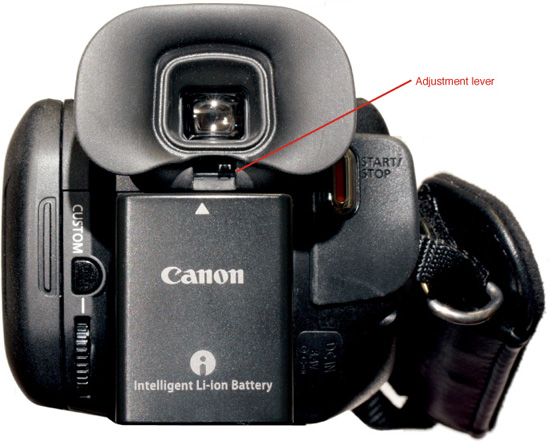
Pull the eyepiece straight back until it clicks. This turns it on. Look through the viewfinder and slide the knob at the bottom of the eyepiece until the pixels and the data information are as sharp as possible. The dioptric adjustment is very small, and unfortunately does not lock in place. It is inconveniently located just below the eyecup. In order to have access to this tiny lever, you will need to hold your eye a few inches away while making the adjustment with your fingernail. At the point you do not need the rear viewfinder, press it forward to turn it off to save battery power.
If you use the viewfinder instead of the touchscreen, some videographers find it useful to shoot part of the time with both eyes open—one eye composing the frame and the other working almost like peripheral vision scouting the next shot.
The Lens
Focal length is a measure of the optical power of a lens. It is the length from the optical center of a lens to the focal plane when the lens is focused on infinity. A higher-powered lens has a longer focal length and greater magnification. It relation to a particular format size, we can call a lens “wide angle” if it demagnifies, makes objects look further away, and exaggerates depth. We can call a lens “telephoto” if it magnifies in relation to its format size, flattens space, and makes objects appear closer than they actually are. Somewhere in between is a “normal lens” for a particular format size, which makes objects appear in normal perspective—more or less the way we see them with an unaided eye.
The G10/XA10 zoom lens has a focal length of 4.25 to 42.5mm, which is the 35mm equivalent of a somewhat mild wide angle of 30.4mm to a relatively powerful telephoto of 304mm. The setting for “normal” perspective on this lens is approximately 6mm to 7mm, just a bit tighter than full wide angle. The lens features a professional eight-blade iris, which provides a smoother and more natural bokeh in out-of-focus parts of the composition. Most lenses in this price range have a six-bladed iris, which produces artificial hexagons from out-of-focus points of light. The eight-bladed shutter in the G10/XA10 also minimizes diffraction (light bending around edges of the iris). The higher number of iris blades helps maintain image quality in the higher aperture numbers where diffraction can degrade the image.
Instead of a small focusing knob below the lens, as on previous Vixia camcorders, the manual focus ring is actually on the lens, where it should be, and glides into focus with smoothness and accuracy. It feels thoroughly professional. Its parameters can be adjusted in the Tool menu in terms of clockwise and counter-clockwise rotation and coarse-to-fine response using the following commands, respectively:
![]() Choose FUNC > MENU > Tool icon > Focus Ring Direction and select Normal or Reverse.
Choose FUNC > MENU > Tool icon > Focus Ring Direction and select Normal or Reverse.
![]() Choose FUNC > MENU > Tool icon > Focus Ring Response and select Fast, Medium, or Slow.
Choose FUNC > MENU > Tool icon > Focus Ring Response and select Fast, Medium, or Slow.
The f/number is the focal length divided by the diameter of the lens aperture. This number provides a relative comparison of brightness among lenses of different focal lengths. A telephoto lens lets though a narrower beam of light; in order to be as bright as a wide angle (which lets through light from a much wider area), the telephoto needs a proportionally larger aperture to equal the same f/number. A 10mm lens with an aperture of 5mm would equal f/2 (a focal length of 10 divided by a width of five). A 40mm lens would need an aperture of 20mm to equal f/2. The most relevant f/number is the widest aperture of a lens, which provides a relative indication of low-light capability.
F/stops are a series of lens-aperture calibrations that are multiples of the square root of two: f/1.4, f/2, f/2.8, f/4, f/5.6, f/8, et cetera, used for exposure as the iris is opened or closed to regulate light. By being based on the square root of two (which is 1.414), each “stop” represents a halving or a doubling of the amount of light of each previous or next stop. Each stop also affects the depth of field, which is shallowest at the widest aperture and progressively deeper at higher f/numbers (smaller apertures). The higher the f/stop number, the smaller the aperture. At higher f/numbers, there is more diffraction—with light bending as it comes through the smaller aperture opening—which would need a different optical correction than light coming through an aperture of f/2.8, for example.
As discussed in Chapter 4, “Controlling Exposure,” lenses contain a matched set of glass elements to correct for chromatic aberration, curvature of field, diffraction, and various forms of distortion. The kind of optical correction needed when the aperture is wide open—say, f/1.8—is different from what is needed at f/8. So, lenses are designed with a series of optical compromises. The highest aperture on this lens is f/8 and its lowest opens to f/1.8 in wide angle. F/4 is the most corrected and least compromised aperture on this lens.
Zoom lenses are designed for the aperture to physically change size during zooming to maintain a constant f/stop setting and constant brightness as the focal length changes. A telephoto lens needs a physically wider aperture because it intersects a narrower field of light compared to wide angle. On some zoom lenses—including the G10/XA10—this proportional adjustment is not possible at the lowest setting when there is no additional space for the aperture to open. So the f/1.8 reading in wide angle becomes 2.8 as you zoom to telephoto, a drift in brightness of nearly 1½ stops. (One stop is the difference between f/2 and f/2.8.) At a setting of f/2.8 and above, the aperture can remain constant throughout the entire zoom range because it has the physical space to adjust proportionately.
Focus Assistance, Peaking, Focus WFM
A quick and easy form of Focus Assistance is magnification. It momentarily enlarges the picture to double size; consequently, you see only the center of the frame for focusing. Manually turning the lens focus ring automatically engages Focus Assistance; any discrepancy in your focus is amplified by a factor of two on the touchscreen or viewfinder while the actual picture being framed or recorded is the full frame. So you can keep recording as you focus, but you cannot use the enlarged image as a guide to framing when focusing. When you have finished adjusting the lens, the enlarged image takes about one full second before it returns to normal scale. For those who find it a distraction when Focus Assistance magnifies the image every time you turn the focus ring, the feature can be disabled in the Camera menu. To enable or disable Focus Assistance, choose FUNC > MENU > Camera icon > Focus Assistance and then choose ON or OFF.
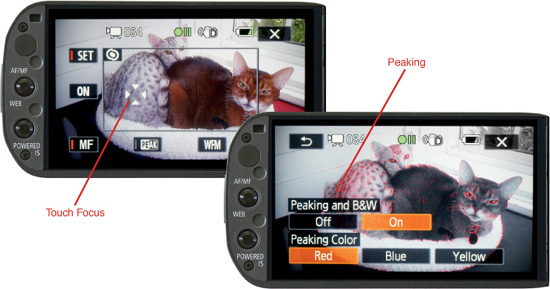
Another major form of assisting focus is a Peaking indicator, as shown in Figure 5.3. It displays sharply focused edges within your composition in a red, blue, or yellow highlight visible only on the touchscreen or viewfinder. You can turn Peaking on in the Focus panel, which is discussed later in this chapter. Its setup comes with a Tool icon that enables you to choose the highlight color and determine whether it is displayed over normal color video or black and white on the monitor screen (not the recorded image). The black-and-white option makes highlighting stand out even more. If Peaking has been activated, it continues to operate even after the Focus panel has been closed in M or CINEMA mode.
The Focus panel also provides a Focus waveform monitor. This WFM is not to be confused with the highly valuable WFM that measures exposure. They handle two completely different waveforms. The Focus WFM graphically indicates the portion and relative position of maximum sharpness within a composition. It is sort of like Peaking but instead of highlighting sharp edges directly on the image, the Focus WFM displays this information in a waveform across the bottom of the touchscreen with peaks that indicate maximum edge sharpness. It is primarily sensitive to vertical edges. The Focus WFM can be used alone or simultaneously with Peaking. If you have never used a Focus WFM before, using both the Focus WFM and Peaking together will help you understand how to read the waveform. For critical focusing, I prefer Peaking, the momentary image magnification of Focus Assistance, and the practice of prefocusing by zooming to telephoto.
Figure 5.3 The Focus panel and Peaking adjustment sub-panel.
Focus Panel and Touch Focus
In the Program menu, the Focus panel provides a range of tools, techniques, and instruments for critical focus. (See Figure 5.4.) Some of these include auto focus, manual focus, Touch Focus, a rectangular focusing window, a Peaking indicator, a Focus waveform monitor, readouts of focus distance in feet, and the ability to set a prefocused distance to which you can return at any point. In addition, both Focus Assistance (by turning the focus ring on the lens) and the AF/MF switch on the left bezel of the LCD screen continue to be active within the Focus panel.
Figure 5.4 The Focus panel with both Peaking and the Focus WFM turned on to indicate points of sharpness.
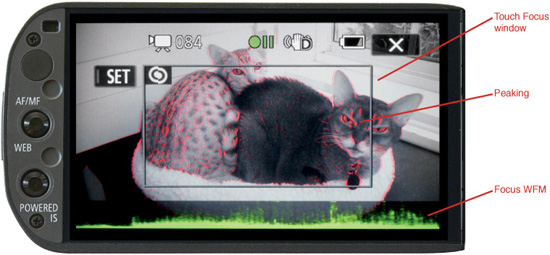
Touch Focus works intuitively. Simply tap a point anywhere in the inner focusing rectangle. An auto focus indicator momentarily blinks at the spot and disappears when it locks that point in manual focus. The MF letters in the lower left of the panel become highlighted. You can continue to select new points of focus and the Touch Focus will lock to them.
You can switch to auto focus any time by tapping the MF letters in the lower left of the screen or the AF/MF button to the left of the touchscreen. Either method will move your focus back and forth between auto and manual. Tapping a new focus point in the Focus panel will also switch from auto focus (or a previous manual setting) to a new locked-in manual setting.
If Touch Focus does not quite hit its mark or if you simply want to focus the lens directly, you may turn the manual focus ring on the lens. Focus Assistance momentarily magnifies the viewfinder image by a factor of two and focus distance in feet is displayed. When you have finished adjusting the lens, the Focus panel will lock to this focus distance.
When you would like to commit a particular focus distance to memory, tap SET after you have achieved focus by touch or by the manual lens ring. The distance will momentarily display on the screen and the letters SET will be highlighted. As long as SET remains highlighted, the camcorder will remember that preset focus distance. You may now focus by touch, lens ring, or auto focus, but can return to the preset focus any time by tapping ON. This is one tap away when you are in MF mode. However, the word ON disappears from the touchscreen when you are in AF mode. In this case, to activate ON, you need to first tap MF. Touching SET a second time will cancel the current preset focus setting. The preset focus setting will also be canceled when the camcorder is turned off.
All of these manipulations of focus can be done with greater judgment and accuracy when the Peaking indicator or the Focus WFM is enabled. Their access icons are on the bottom of the Focus panel. Peaking will remain active after you exit the Focus panel, even if you turn the camcorder off in between. In contrast, the Focus WFM operates only with the Focus panel screen and is disengaged when you exit the panel.
Zoom Focus
Discrepancies in focus are more apparent in high definition than they are in standard definition; consequently, focus is very critical. Your recorded image is 1,920×1,080 pixels but your LCD screen is 852×480 and only 3½ inches diagonally for an image that will be displayed 15 to 20 times that size on a monitor and even larger on a projection screen. So it is impossible to critically judge focus by simply looking at the image on a 3½-inch LCD screen. An initial technique is to use the zoom lens itself as a magnifying aid.
The lens in the G10/XA10 is what is known as a “parafocal zoom,” which means there is no focus shift as you zoom. If you focus in telephoto, the image will hold focus over the entire zoom range. However, if you initially focus in wide angle where the depth of field is nearly infinite, that point of focus will not be precise enough for the shallower depth of field of telephoto where discrepancies are more critical. Prefocusing in telephoto is a safe technique if you are going to be shooting in the mid range of your zoom lens or in wide angle. Focusing in telephoto can be done with the AF/MF switch by simply switching to auto focus (AF) in full telephoto and then toggling to manual focus (MF) to lock in the setting, which will be useful for the whole zoom range.
Zoom all the way to telephoto to enlarge a detail in your subject. The enlarged image magnifies any focusing discrepancy, and depth of field is shallower and more critical in full telephoto. Adjust the image to be as sharp as possible by momentarily pressing the auto focus button to the left of the LCD screen; then press a second time to lock to manual focus. As you zoom back to frame your subject, depth of field becomes noticeably extended in medium and wide angle.
For many camera operators, the instant magnification of Focus Assistance replaces having to zoom in. However, Focus Assistance is only a 2× magnification and full telephoto is a 10× magnification. For even more critical focus, zooming in and Focus Assistance magnification can be used together. In M or CINEMA mode, simply zoom all the way to telephoto and focus manually. As soon as you touch the focus ring on the lens, Focus Assistance will kick in and combined with the zoom’s magnification you will instantaneously have 20× magnification.
Depth of Field
Depth of field (DoF) is the near-to-far distance that appears to be in sharp focus within a shot. Three primary factors determine depth of field: aperture (f/stop), focusing distance, and focal length (wide angle to telephoto). DoF becomes shallower in telephoto with longer focal-length lenses, at closer focusing distances, and at lower f/stops like f/1.8 or f/2.8.
Format size also has an effect on depth of field. Small format needs lenses that produce less magnification to provide its wide angle, normal, and telephoto views than would be required of a larger format like 35mm. Because focal length is one of the major factors that affect depth of field, the shorter focal length lenses required by small format inherently have a deeper depth of field. There is also recalculation of what constitutes “sharp” for each format size based on the circle of confusion (CoC), which can be described as a measurement of how large a single point of light can get before its boundary erodes too far into adjoining photo-sensor pixels or film grains and causes soft focus. Cinematographers and videographers never calculate the CoC themselves, but it is factored in for a particular format size whenever they consult a depth-of-field table or computer application that calculates depth of field. The format size for the G10/XA10 is a ![]() -inch sensor; based on its sensor and pixel size, its CoC is 0.011mm (a smaller tolerance than 16mm, APS-C, or 35mm).
-inch sensor; based on its sensor and pixel size, its CoC is 0.011mm (a smaller tolerance than 16mm, APS-C, or 35mm).
Table 5.1 and Table 5.2 show the depth of field for wide angle (rounded up to 4.3mm), medium telephoto (20mm), and full telephoto (42.5mm) for the lens on the G10/XA10, the extremes on the zoom lens. The first column is the focal length and f/stop. The second column is the distance setting on the lens. The third column shows the approximate near-to-far limits that appear to be in sharp focus, which is the most useful part of the information. The fourth column is the depth of field itself, which is how deep the area of sharp focus is (the nearest distance subtracted from the furthest distance). For each combination of focal length and f/stop, the hyperfocal distance is highlighted. Hyperfocal distance is the focus setting that provides the deepest depth of field. Because depth of field changes with focal length and aperture, so too does the hyperfocal distance. If you choose to set your lens at the hyperfocal distance, everything from half its distance setting will be in focus up to infinity.
Table 5.1 Depth of Field in Wide Angle
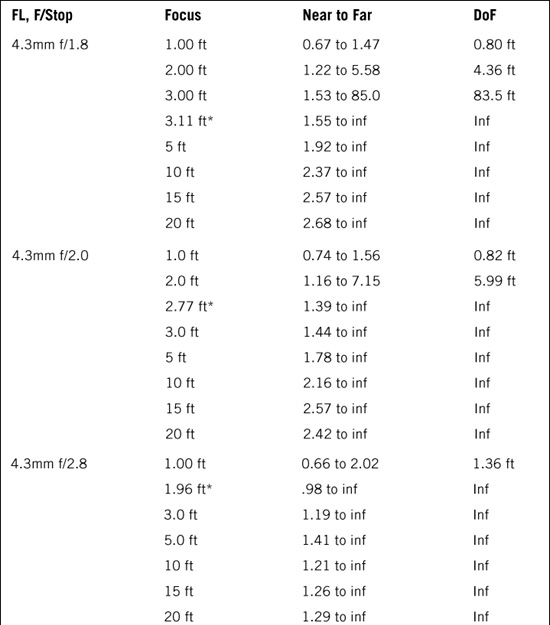
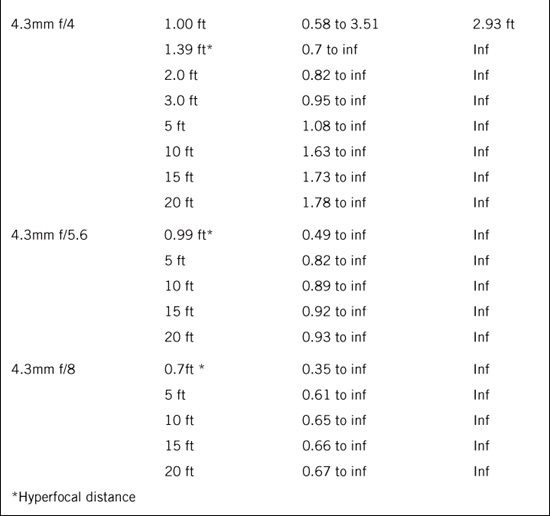
Table 5.2 Depth of Field in Telephoto
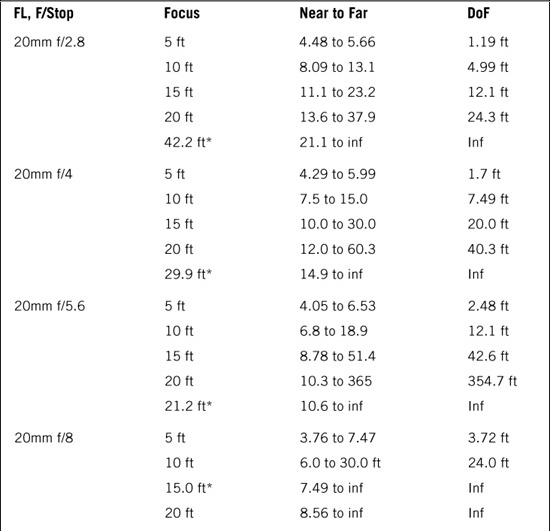
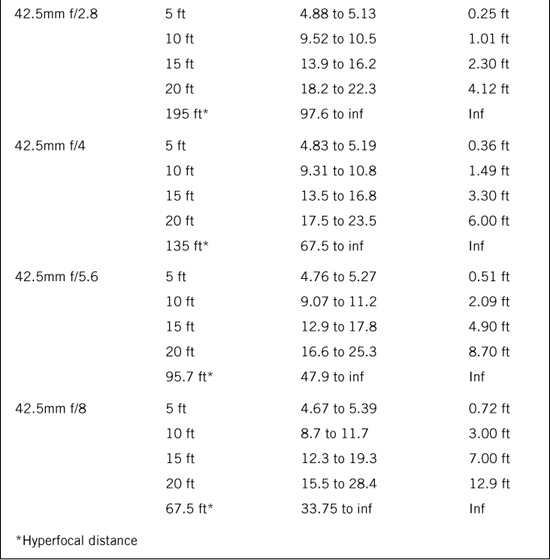
These tables illustrate how depth of field varies with focal length (optical power), aperture (f/stop), and distance. At wide angle, the depth of field on the G10/XA10 lens is infinite at every aperture once you have focused to a little more than three feet. You can also see that the depth of field shrinks exponentially as you move closer to the subject or increase the focal length. In planning a shot, it may be useful to know that your depth of field is only three inches (0.25 feet) when focused five feet away in full telephoto at f/2.8 versus 1.92 feet to infinity in full wide angle at f/2.8. These tables will help you determine the distance, aperture, and focal length you need to keep both the foreground and background in focus or to selectively focus on one while keeping the other in soft focus.
It is nearly impossible to judge DoF on a 3½-inch LCD screen. This is where a DoF table can be useful, particularly for planning a shot that involves simultaneous focus between near and far subjects in the same frame. How far apart in depth can two subjects be with both in focus, or how far apart must they be for you to focus on one at the exclusion of the other? The answers will depend on the aperture, focal length, and focusing distance.
For more detailed calculations of DoF over an entire range of focusing distances, aperture settings, and focal lengths you may want to use an iPhone or iPad application. Consider the following:
![]() pCAM. pCAM is an app for professional filmmakers, video makers, and still photographers that computes depth of field, hyperfocal distance, circle of confusion, field of view, filter factors, exposure variables (frame rate, shutter speed, footcandles, and lux), light coverage, and scene illumination. In addition, it can do conversion calculations between U.S. and metric, and also provides a Siemens focus star for testing sharpness and an insert slate. It handles data for every format including
pCAM. pCAM is an app for professional filmmakers, video makers, and still photographers that computes depth of field, hyperfocal distance, circle of confusion, field of view, filter factors, exposure variables (frame rate, shutter speed, footcandles, and lux), light coverage, and scene illumination. In addition, it can do conversion calculations between U.S. and metric, and also provides a Siemens focus star for testing sharpness and an insert slate. It handles data for every format including ![]() -inch video, which is the sensor size of the G10/XA10. pCAM won the 2010 Emmy Award for Outstanding Achievement in Engineering Development from the Academy of Television Arts and Sciences.
-inch video, which is the sensor size of the G10/XA10. pCAM won the 2010 Emmy Award for Outstanding Achievement in Engineering Development from the Academy of Television Arts and Sciences.
![]() DOFMaster. DOFMaster is a straightforward, easy-to-read app specifically dedicated to depth of field. Insert your format size—which in the case of the G10/XA10 is
DOFMaster. DOFMaster is a straightforward, easy-to-read app specifically dedicated to depth of field. Insert your format size—which in the case of the G10/XA10 is ![]() -inch—lens focal length (4.25mm for wide angle up to 42.5mm for telephoto), f/stop, and the focusing distance. Based on this information, DOFMaster calculates the near limit of focus, the far limit, the total depth of field, and the hyperfocal distance, which is the closest distance setting that would achieve the deepest depth of field at that focal length and f/stop.
-inch—lens focal length (4.25mm for wide angle up to 42.5mm for telephoto), f/stop, and the focusing distance. Based on this information, DOFMaster calculates the near limit of focus, the far limit, the total depth of field, and the hyperfocal distance, which is the closest distance setting that would achieve the deepest depth of field at that focal length and f/stop.