
15
Special Features
The G10/XA10 is filled with special features, such as an f/1.8 zoom lens with an eight-blade iris and a manual focus ring; 16 zoom speeds plus variable control; ease-in/ease-out zoom motion; a native 1,920×1,080 CMOS sensor; neutral density filters that automatically keep the lens at its optimum aperture; a built-in waveform monitor; an edge monitor; powered and dynamic image stabilization; Face Detection; Touch & Track; and most of the functions of Canon’s XF series of professional camcorders packed into a palm-sized camera body. In addition, the XA10 accommodates professional balanced-line microphones with 48 volts of phantom power, and has the ability to shoot in infrared light. All these features are discussed in depth in other chapters. This chapter is an opportunity to cover a few additional features that have not been described in as much detail.
CINEMA Mode
Like many camcorders, the G10/XA10 has a built-in CINEMA mode—in this case with a choice of nine customizable cinema filters plus some other options. Switching to CINEMA mode automatically sets the frame rate at PF24 (not a true 24p). Canon has made the assumption that you want your CINEMA mode clips shot at 24 (23.976) progressive but converted to 60i (59.94 interlaced fields), which allows them to be matched to many other forms of video in editing. However, if you want to edit a true 24, most editing programs have a reverse 3:2 mode that eliminates the extrapolated fields that the camcorder generated to make 24 progressive frames into 60 interlaced fields. Reverse 3:2 converts your video back to 24 de-interlaced frames per second.
The nine cinema filters are as follows (see Figure 15.1):
![]() Standard provides a film look, with a contrast response curve that retains more detail in the shadows and highlights.
Standard provides a film look, with a contrast response curve that retains more detail in the shadows and highlights.
![]() Vivid accentuates primary colors and increases saturation.
Vivid accentuates primary colors and increases saturation.
![]() Canon describes Dream as a “magical look” but, as discussed in Chapter 6, “Controlling Color,” this is a subjective description and some might interpret its de-saturated look as bleak reality instead of dream.
Canon describes Dream as a “magical look” but, as discussed in Chapter 6, “Controlling Color,” this is a subjective description and some might interpret its de-saturated look as bleak reality instead of dream.
![]() Cool adds a bluish tint.
Cool adds a bluish tint.
![]() Nostalgic adds a washed-out warm tone, which the menu suggests is like “old TV programs,” but illustrates this with a car from the 1920s or 1930s. Broadcast television did not even exist in the 1920s and 1930s. Television was black-and-white in the 1940s and 1950s, and had rather garish color in the 1960s and 1970s, not a faded, nostalgic look.
Nostalgic adds a washed-out warm tone, which the menu suggests is like “old TV programs,” but illustrates this with a car from the 1920s or 1930s. Broadcast television did not even exist in the 1920s and 1930s. Television was black-and-white in the 1940s and 1950s, and had rather garish color in the 1960s and 1970s, not a faded, nostalgic look.
Do not be guided solely by Canon’s descriptions. With completely different lighting or subject matter, the filter may suggest a different interpretation.
![]() Sepia creates a warm, faded look while still retaining a hint of the original color.
Sepia creates a warm, faded look while still retaining a hint of the original color.
![]() Old Movies provides an alternative cine look with simulated scratches and an extremely wide letterboxed screen reminiscent of Cinemascope of the 1950s and 1960s.
Old Movies provides an alternative cine look with simulated scratches and an extremely wide letterboxed screen reminiscent of Cinemascope of the 1950s and 1960s.
![]() Memory softens contrast, and the frame has slightly vignetted (darkened) edges.
Memory softens contrast, and the frame has slightly vignetted (darkened) edges.
![]() B&W strips the image of color and has three adjustable levels of contrast.
B&W strips the image of color and has three adjustable levels of contrast.
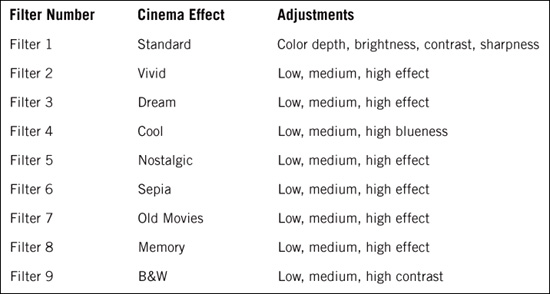
To enter the Cinema menu, press the Filter icon that appears at the lower left of the touchscreen when the camcorder’s mode switch is on CINEMA. The nine selections in CINEMA mode provide various degrees of preset color and contrast to look like different kinds of film transferred to video, along with individual adjustments that can be accessed by tapping the Tool icon under each filter. Table 15.1 outlines the various CINEMA mode adjustments that can be made.
However, there is actually a 10th choice for creating a cinema look: switching out of CINEMA mode to M mode and setting the frame rate for 24p (23.976) by choosing FUNC > MENU > Film Clip icon > 24p. This will provide a true progressive-frame look with cinema characteristics. In addition to the wide range of exposure and white-balance choices under M mode, you can choose FUNC > Image Effects to customize your settings for color depth, brightness, contrast, and sharpness. These Image Effects adjustments are very similar to the Standard cinema filter, but the video signal is actually recorded as 24p instead of PF24 and you have the ability to select other programmed adjustments and scene-based programs that are unavailable in CINEMA mode.
Figure 15.1 CINEMA mode options.
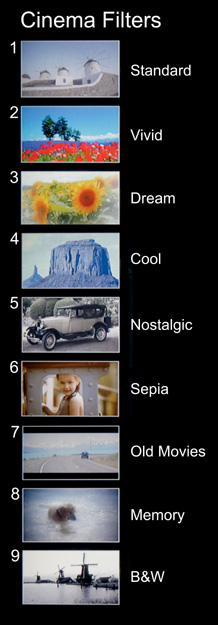
Table 15.1 Cinema Mode Adjustments
Saving and Loading Menu Settings
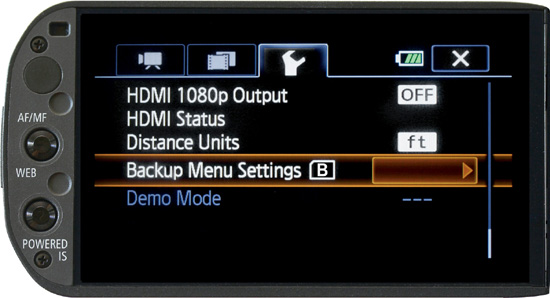
One of the most useful special features on the G10/XA10 is the ability to collectively save and reload all the customized adjustments that you have set on the camcorder. Your entire range of menu settings—such as color depth, brightness, contrast, and sharpness under Image Effects; CINEMA mode filter settings; audio settings; white balance; frame rate; assigned keys; zoom rates; language; and other setup functions— can be saved to an SDHC or SDXC memory card in slot B. To do so, choose FUNC > MENU > Tool icon > Backup Menu Settings (see Figure 15.2); then tap Save and tap Yes. (If a Menu Settings file already exists on memory card B, saving the current settings will overwrite that file.)
Figure 15.2 Access Backup Menu Settings under the Tool menu.
To load previously recorded memory settings from an SDHC memory card in slot B, choose FUNC > MENU > Tool icon > Backup Menu Settings; then tap Load (instead of Save) and tap and Yes. This will replace all the values on the camcorder’s setup menus, and the touchscreen will momentarily go black as it restarts. You could keep several less expensive 8GB SDHC cards with different menu presets for different projects or different production strategies for use in memory slot B.
There is a RESET button on the body of the camcorder, which looks like a tiny hole to the left of the Camera/Playback switch. It can be engaged with the end of a paper clip while the battery and power source have been removed from the camcorder. This action will restore all functions back to their default values when the camcorder is turned back on. This is much more extreme than saving and loading your favorite configurations of settings on memory card B. If you prefer the default mode for every function, pressing the RESET button might be a way to go. Otherwise, the RESET button is more typically used as a corrective measure if the touchscreen displays abnormal characters or the camcorder operates erratically and turning off power and restarting does not seem correct the problem.
Chroma Key and In-Camera Decorations
Chroma key is a special-effect technique of combining two video images in which a uniformly colored portion of the first image is digitally processed to become transparent, through which we see the second image. Almost any color can be used as long as it is completely absent from the parts of the image that are to remain opaque. Green works particularly well as a chroma key color because it can be kept off of skin tones and costumes. A green-screen chroma key process was used, for example, to create Iron Man flying through the sky out of footage of Robert Downey Jr. suspended on wires in front of a uniformly green background, combined with aerial footage and computer-generated images that digitally replaced everything that was green. Iron Man 2 used an enormous green screen that covered an area 600×200 feet. Compositing of two layers of images is typically done in postproduction using special-effects programs from companies like Autodesk and Adobe, although most editing programs have the capability to perform chroma key composites at 1,920×1,080 resolution.
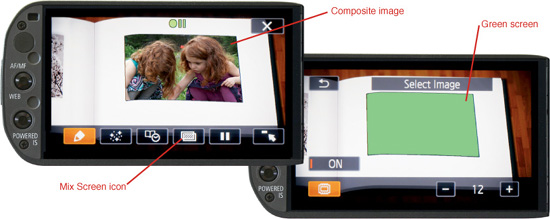
In a crude way, chroma key can actually be done in the camera with the G10/XA10 during the recording process with a preshot still image that has a uniform green area into which the camcorder will “key” moving video. Choose FUNC and scroll down to Decoration; then, in the Decoration panel, choose Mix Screen (indicated by an icon showing one screen over another). Next, tap ON to open the chroma key screen and press the plus (+) or minus (−) button as many times as needed to locate and select your pre-stored image. Finally, tap the Return arrow icon in the upper left to matte your selected still image over live video while you record. (See Figure 15.3.)
The camcorder’s built-in memory comes pre-initialized and already contains 27 prepared JPEG images for use as chroma key mix frame mattes along with a few music files. If you re-initialize the internal memory, all your video, still, and data files will be erased, but the pre-installed music and image mix frames will be restored after initializing. Most of the supplied image mix frames are keyhole mattes, where you see through an opening in a graphic or a photograph to live action that you will shoot.
Figure 15.3 A stored still image is chroma keyed in the camera over live video.
You can make your own mix frame mattes by photographing a composition in front of a green screen using the camcorder’s Photo mode or with a separate camera. Monochrome green-screen backgrounds can consist of green paper, cardboard, a painted wall, or canvas. The Rosco Company, which manufactures theatrical gels, makes a green-screen paint; in addition, green-screen fabric can be purchased in various sizes over the Internet. When the camcorder is attached to a computer, a JPEG file of a green-screen photo can be taken from the DCIM folder or imported from your computer and dropped in the MY_PICTURES resource folder. It is important that the file is JPEG format and is exactly 1,920×1,080 pixels and uses a numbering convention similar to the file names already in the folder.
Before inserting your green-screen image into MY_PICTURES, you can enhance it in a program such as Photoshop. Using the Magic Wand tool, lasso the green-screen area and drop in a 100-percent green or enhance the area to make it absolutely even. If the photo was taken at a higher resolution, use the Crop tool to resize it to exactly 1,920×1,080 and export the file as a JPEG.
When you choose FUNC > Decoration > Image Mix and select a photo you have placed in the MY_PICTURES file, there will be additional prompts for selecting green or blue and adjusting a slider to tune to the particular color. Pressing ON will enable the effect. Exiting the Decoration panel will turn the effect off, and returning to the Decoration panel will restore it.
Decoration mode also allows you the choice of drawing over an image or by tapping the screen, adding a time/date or caption, and momentarily placing an animated stamp over the image like wiggling musical notes, stars, or sparkles. These can be done while recording. Go to FUNC, scroll down to Decoration, and tap the pencil, stars, clock, or Mix Screen icon, which respectively represent Drawing Pens, Animated Stamps, Captions (for date/time), and chroma key.
In-camera decorations and the chroma key feature are intended primarily for non-professionals. Everything that can be done here can be accomplished with much more control entirely in postproduction in an editing program, a graphics program, or an effects application like Adobe After Effects, and would not be restricted to a still image as an overlay.
Scan Reverse
Changing the scan direction allows you to reverse the image horizontally, vertically, or both. Shooting into a mirror requires horizontal correction to restore left-to-right orientation and readability. Shooting upside down requires both horizontal and vertical correction. This is very useful to correct for the orientation of the camera on a copy stand, on a car-window mount (in which case you may lack enough space to mount the camera upright on a slanted windshield), and very low-angled shots where the camera is simply held upside down on a monopod. Manfrotto makes a tripod with a center pole that can swing 180° to place the camera between the tripod legs near the floor for low-angle shots.
There is seldom a call for a reversed vertical scan by itself, but the G10/XA10 also includes that option. A reversed vertical scan might be used if you want to create the appearance of an upside-down mirror image or to correct an image that appears reversed and upside down because it was shot facing a mirror on the floor. A regular upright mirror image needs only horizontal correction. To scan-reverse an image or to remove the effect, choose FUNC > Film Clip icon > Scan Reverse Rec and choose Off, Vertical, Horizontal, or Both. (See Figure 15.4.)
Figure 15.4 Scan reverse settings.
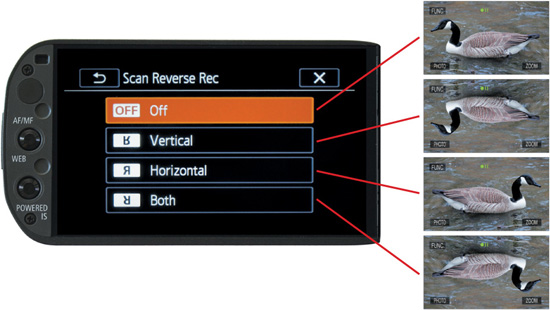
The Scan Reverse setting is not the same as LCD Mirror Mode, found under the Tool icon. The difference is that Scan Reverse actually records a flipped image, whereas Mirror Mode simply shows you one when the LCD faces forward toward the subject while a standard image is being recorded.
Assignable Buttons
You can re-program certain menu items that you need often onto the two mechanical buttons on the left bezel of the LCD screen. You might do this if you wanted to forego the ability to toggle between manual/auto focus or to use the POWERED IS button for steady tight telephoto shots. Most videographers will find that these two buttons are extremely useful at their default assignments and probably will not reassign them. But depending on your style of shooting, some may consider reassigning one or the other button to be able to toggle into Backlight Correction mode, into Face Only detection mode in manual focus, or between a current and a preset white balance value. To re-program these buttons, choose FUNC > MENU > Tool icon and choose Assign Button 1 or Assign Button 2. Then choose one of the following:
![]() Backlight Always ON
Backlight Always ON
![]() Face Only AF
Face Only AF
![]() Story Creator
Story Creator
![]() Video Snapshot
Video Snapshot
![]() White Balance Priority
White Balance Priority
![]() Infrared Light
Infrared Light
![]() Audio Output Channel
Audio Output Channel
![]() AF/MF (button 1 only; the default setting)
AF/MF (button 1 only; the default setting)
![]() Powered Image Stabilization (button 2 only; the default setting)
Powered Image Stabilization (button 2 only; the default setting)
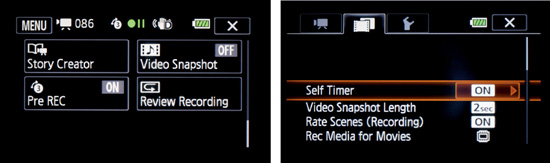
Pre-Record and the Self Timer
The G10/XA10 can automatically pre-record for three seconds before you press the Record button. This will be the most useful if you already have the subject or an entrance point in frame while you are waiting for a significant moment to begin. To engage this pre-record function, called Pre REC, while in M or CINEMA mode, press FUNC and scroll down to Pre REC and press ON. The next shot you record will begin three seconds before you press the START button. If the function has been pre-activated, an oval icon with a three in its center appears in the lower right of the touchscreen. To de-activate Pre REC, follow the same procedure and click OFF. The Pre REC function cannot record a full three seconds if you press Record less than three seconds after activating the function or after the end of the previous shot.
The Pre REC function automatically deactivates after five minutes of inactivity, when you move the AUTO/M/CINEMA switch, when you activate Video Snapshot, when enter Playback mode, when you enter Standby mode (by closing the touchscreen), or when you tap any of the other program panels. After you have recorded a shot using Pre REC, the function automatically turns off at the end of the shot and the icon with a three in its center will disappear.
The G10/XA10 also has a self timer, which you access by choosing FUNC > MENU > Film Clip icon > Self Timer and selecting ON. The self timer is really a 10-second delay—sort of the opposite of the Pre-Record function. When in Self Timer mode, a clock icon appears in the upper part of the touchscreen near the left. When you press the Record button, the camcorder beeps once a second for the first eight seconds of the 10-second countdown, then six quick beeps at the number two, and a lower-pitched beep just as recording begins. The timer automatically reverts to OFF position after a timed shot. Figure 15.5 shows the Pre REC setting and the Self Timer setting.
Figure 15.5 The Pre REC setting (left) and the Self Timer setting (right).
Rating Scenes
The camcorder allows you to rate scenes immediately after recording each clip. To enable this function, choose FUNC > MENU > Film Clip icon > Rate Scenes Recording. After each clip, a set of ratings will appear across the bottom of the screen and the option to touch the ellipsis (…) button to leave it unrated. Scenes can be rated in all recording modes, including full AUTO, but the function has to be enabled under the Film Clip menu while in M or CINEMA mode. In Playback mode, you have the option to play scenes within the camera that have been prioritized by rating. This may help in reviewing footage in the field and in playing back selected shots in Story mode while the clips are still in the camcorder.
Eye-Fi
The camcorder will support an Eye-Fi card inserted in memory slot B. Eye-Fi will enable you to wirelessly auto-upload stills and any video files you have converted to standard definition to a video-sharing website.
For Web quality, MTS files can be individually or batch down-converted to standard definition inside the camcorder itself. (See Chapter 18, “Managing and Storing Video Files,” for more information.) You must install a supplemental network to configure Eye-Fi; follow the instructions that come with the card. If you are within lock-in range of a configured network, uploading will start automatically and an Eye-Fi icon will appear to show the status. If the icon is grayed out, communication is not established. If the icon is flashing, it indicates that the camera is connecting; if it is animated, upload is in progress. An exclamation mark over the icon indicates an error. The word “OFF” over the icon indicates that Eye-Fi is turned off in the Tool menu. To turn Eye-Fi communication on or off, choose FUNC > MENU > Tool icon > Eye-Fi Communication and select Auto or Off. Photos recorded onto memory card B will upload automatically when the camcorder is switched to Playback mode and Eye-Fi communication is enabled.
When using the camcorder abroad, check to see if Eye-Fi has been approved for that region.
Fader
The camcorder has two built-in transition effects: fade-in/fade-out and wipe open/wipe closed. The fade and wipe effects can be set to operate for a single shot or for a series of shots until you return to the Fade panel and select OFF. The effect is available in M mode and in all CINEMA mode filters except Old Movies (which is probably the very place you would want to use it, as fades and wipes are old movie conventions). To enable these effects, choose FUNC > Faders and select Fade Once, Fade Always, Wipe Once, or Wipe Always. To disable these effects, choose OFF. You can also select whether to fade to black or wash to white. To do so, choose FUNC > MENU > Camera icon > Fader Setting and select Black or White.
After the effect has been turned on and you have exited the Faders screen, an F1 (fade) or F2 (wipe) icon will appear in the lower right of the touchscreen. The fade or wipe effect will operate automatically each time you press the regular START/STOP button to shoot a clip if you had selected Fade Always or Wipe Always. The audio also fades in and out simultaneously with the picture. In addition to being unavailable in Old Movies mode, fades and wipes will not operate in Decoration mode, Video Snapshot, or full AUTO, or when three-second pre-recording is activated.
Of course, anyone seriously adding effects to video will do it in postproduction, when you can precisely cue the in point and out point and will have dozens of 2D and 3D effects to choose from.
Digital Zoom and Digital Tele Converter
The camcorder’s optical zoom has a range of 10×, from 4.25mm in wide angle to 42.5mm in telephoto. Its image quality is quite good. Through digital processing, the zoom range can be extended from 10× to either 40× or 200×. Once you come to the end of the optical zoom’s range, Digital Zoom seamlessly continues the zoom by magnifying pixels. Digital Zoom is available only in the M mode. It cannot be used in AUTO mode, CINEMA mode, or for taking still photos. To activate Digital Zoom for 40× or 200×, choose FUNC > MENU > Camera icon > Digital Zoom; then select 40×, 200×, 2.0× Digi Tele-conv., or Off. (See Figure 15.6.)
Figure 15.6 Digital Zoom settings.
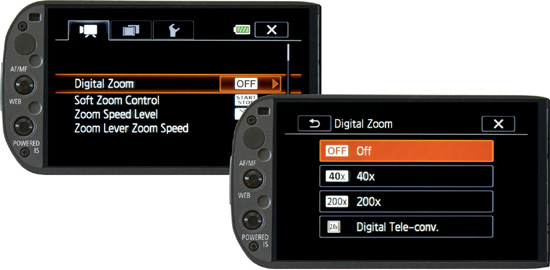
The 2.0× Digital Tele-conv. choice operates differently. This feature is intended to look like the effect of adding an optical telephoto converter lens, which would magnify the whole zoom range as opposed to eliding from optical zoom into and extended digital zoom. Setting 2.0× Digital Teleconv. in the Camera menu causes its icon to appear in the Zoom program window but does not activate it. Digi Teleconv. operates only when you open the Zoom program screen (choose FUNC > Zoom) and tap Digi Tele-conv.
The effect is very similar to 2× Focus Assist. The image instantly magnifies by a factor of two. The difference is that the magnification of Focus Assist appears only on the LCD screen and viewfinder, whereas Digi Tele-conv. magnifies the actual recorded image. By the way, 2× Focus Assist does not operate when you are on the Zoom program screen.
Both Digital Zoom and Digital Tele-conv. degrade the image by magnifying pixels. I do not recommend using either function unless your purpose is to provide an image with noticeable pixels that is explicitly meant to look like blown-up video. The seamless move from optical into digital magnification might be useful under some circumstances, but if a zoom really has to be magnified, recropped, or zoomed into, it could be done in postproduction with programs like After Effects that can re-render the image with less noticeable degradation.