
9
Lighting Techniques
This chapter will be a quick crash course in lighting techniques, terms, and concepts centered on a half dozen lightweight location instruments that are appropriate to palm-sized camcorders like the G10/XA10.
Light serves multiple functions, the most obvious being to provide clarity and visibility. The initial question is whether there is a base level of enough light to photograph a clean image. An acceptable base level will be different for surveillance than for home video or event photography, and considerably different for broadcast-quality documentary or fiction. The issue of base level was discussed in the previous chapter on available light. Beyond simply having enough light to shoot at an acceptable exposure, the principal issues of lighting are concerned with separation of figure and ground, emphasis, expressiveness, and ultimately with meaning.
Basic Concepts
When light comes from a relatively finite source like a light bulb, a welder’s arc, or a candle, it spreads naturally and falls off rapidly in proportion to the square of the distance from its point of origin. This is called the inverse square law. Light will be ![]() as bright at five feet as it is at one foot from its source. Consequently, gradations of light are natural, whereas flat, featureless lighting can be bland and unexpressive and in many situations unnatural. Do not be afraid of uneven light or a range from light to dark. Just make sure through exposure settings or by adding fill light that the extremes are within the recording latitude of the camcorder so you don’t clip whites or crush desired shadow detail into blackness.
as bright at five feet as it is at one foot from its source. Consequently, gradations of light are natural, whereas flat, featureless lighting can be bland and unexpressive and in many situations unnatural. Do not be afraid of uneven light or a range from light to dark. Just make sure through exposure settings or by adding fill light that the extremes are within the recording latitude of the camcorder so you don’t clip whites or crush desired shadow detail into blackness.
You learn more about a three-dimensional object if it is brighter on one side than the other, allowing light and shadow to reveal the object’s contours, crevasses, and textures. Flat frontal lighting carries much less information. This is why we use the terms “key light” for the brighter light coming from a predominant source on one side versus “fill light,” which determines the density and detail of the shadows. Fill light can be rather non-directional, like the luminosity from the sky, which makes shadow detail visible in sunlight. Alternatively, fill light may come from ambient light bouncing from surfaces in a room or from secondary sources that are weaker compared to the key light.
Light is a dynamic component of visual communication. It creates emphasis and de-emphasis, and works as both a modifier and an indicator. As a modifier, light can make a face look younger, older, mysterious, muscular, relatively smooth, or noticeably textured, revealing every wrinkle, pore, and blemish. It can make a bedroom look spacious, claustrophobic, bright, dark, or shadowy. As an indicator, light can make that same space imply midnight, dawn, mid-afternoon, or evening, indicate warmth or cold, or even suggest the light of a particular season. A space can be completely reshaped with light and shadow.
Modeling the subject and modeling the space are often approached as two separate but related lighting problems. To really establish emphasis, de-emphasis, texture, mood, and a sense of place, the background may have certain needs that are not taken care of simply by the spill of the subject’s key and fill lights. Think of modeling the subject with an appropriate balance of key, fill, and sometimes backlight, and of additionally shaping and painting the environment with light and shadow. Within the balance between the subject and the environment, light plays a role as an indicator of mood, time, season, temperature, and off-screen space. A background can be darker, brighter, or at the same level as the subject, and different ratios will suggest a range of meanings.
Key and Fill Light
Key light is the dominant modeling light that hits the subject. Usually, it is the apparent source and often the brightest light, although a thin line of backlight might be equal to or brighter than the key light. Positioning the key light is often the first consideration. Determine where the predominant source would logically come from— a window, ceiling, table lamp—and select and place the key light to simulate its hardness or softness and its directionality. Sometimes cheat the angle and axis to create better modeling. Pay attention to where shadows fall and adjust the key light to minimize unwanted shadows or to more precisely place wanted shadows within the visual composition.
Key light is almost never full frontal. It usually comes from an angled position— often ¾ front so as to create light-and-shade modeling on the subject; as sidelight, which bisects the subject in light and shadow; or even ¾ from the rear, which lights the partially visible upstage portion of the subject while leaving a predominant portion in shadow.
After establishing the key light, you might now consider fill light. In natural situations, fill light is supplied by the sky or from ambient light bouncing off walls. Very likely, part of your key light will bounce off surfaces to supply some level of fill light. If you want deep, impenetrable shadows, then you would not add any fill at all. In fact, you might try to limit ambient light by closing blinds, turning off ceiling lights, flagging off spill from your key light, and using black cloth or the black side of a reflector to cover off-screen areas that might reflect light. Removing ambient light in this fashion is called “negative fill.”
Conversely, you might add fill light if you want to see detail in shadows. The amount of fill light you add will determine whether shadows on the subject are extremely transparent, normal, relatively pronounced, or highly dramatic. Soft fill light could come from a reflector, from a fluorescent or LED instrument, or from a tungsten-halogen spot or flood light with an umbrella or bounced on the ceiling, a wall, or into the far corner of a room. By its nature, fill light is less intense than key light, ranging from barely visible (say, ![]() as bright) to about half as bright. Fill light is typically placed somewhere on the opposite side as the key, ranging from slightly behind the subject, to from the side, to any number of positions from the front. Each of these positions will create a different kind of modeling on the subject relative to the key light.
as bright) to about half as bright. Fill light is typically placed somewhere on the opposite side as the key, ranging from slightly behind the subject, to from the side, to any number of positions from the front. Each of these positions will create a different kind of modeling on the subject relative to the key light.
Physical Variables
At least a dozen physical variables affect the appearance and ultimately the mood, emphasis, and meaning of light. One of these variables is exposure, which can be controlled in the camera (as discussed in Chapter 5, “Selective Focus and Depth of Field”) as well as further adjusted in postproduction. Exposure itself can lighten, darken, and alter the impression of a scene.
Another physical variable of light is color. Aspects of color can be controlled in the camera’s White Balance, Image Effects, and Cinema settings, as well as in postproduction after filming is completed. But a significant amount of the effect of color begins with the choices of the sources and the placement and shaping of natural and artificial light within the actual physical space, where there is an even greater ability to affect the look of the scene. Different lighting instruments come with a color balance of 3,200°K (for tungsten or for “warm” fluorescents), 4,100° fluorescent, or 5,600° daylight. Extremes of tungsten and 5,600° daylight in the same shot will look exaggeratedly orange and blue on video. Added lights are usually chosen to match the color balance of existing ambient light or at least be close enough to allow blending and color modeling.
In addition to color, other physical variables of light include intensity (brightness), angle, axis, coherence (hardness or softness), highlight/shadow ratio, foreground/ background ratio, the spread (spot/flood), the throw (distance), the number of sources, and the shape and pattern of light and shadow. Intensity is controlled by the choice of instrument, the choice of lamp and wattage, varying the distance (the throw), adjusting the spot/flood control (the spread), filtering, bouncing (which also diffuses the light), and sometimes with a dimmer.
The angle is the result of the height of the light source in relation to the subject. A typical angle is 45° to 70° high so that light will illuminate eye sockets and will shape the face in meaningful ways. Shadows from 45° to 70° lighting will fall reasonably close to the subject so they are not hitting the upper portions of other subjects and are not distractions on the background. As a natural phenomenon, we are used to light coming from above, but not vertically straight down. The only time the light is at 90° overhead is outside at noon on the equator or when you are standing in the one spot in a room directly below a ceiling light. Most of the time, even in interiors, we are used to light coming from an angle from above. Of course, there are occasional times that justify light coming from much higher or lower angles. The axis is the position of the light falling on the subject in relation to the camera: frontal, ¾ front, sidelight, and ¾ rear.
Hard and Soft Light
Coherence is how hard or soft (diffused) the light is. Hard light produces a coherent, defined shadow and comes from such sources as direct sunlight, a welder’s arc, the filament of a bare light bulb, a lensless spot or flood light that produces direct light, or a focused beam from a lensed instrument. Greater distance produces dimmer light but it also produces harder light. So a diffused source like a fluorescent bulb will begin to produce coherent, defined shadows at a great enough distance. Sources of diffused light include an overcast day, skylight, fog, a paper lantern, a translucent lamp shade, fluorescents, lights with frosted or diffusion gels, or bounced light from a ceiling, wall, reflector, or umbrella.
With hard light, the position and angle of the instrument, the camera, and the subject need to be precise. A hard, direct key light calls attention to the angle and position of its source and creates sharply defined shadows that may be harsh or disconcerting if they fall in the wrong places, or may be dramatic and graphically interesting if they are used well. Consequently, hard light needs to be strongly justified by the situation and the nature of the implied practical source. A key light should be hard if it is meant to imitate a source like direct sunlight, a bare unfrosted bulb, a search light, or a light from a distance that produces graphically defined shadows. Otherwise, a soft or partially softened key is subtler and can appear more natural for interiors. The dangers of hard light used inappropriately are noticeable shadows in unwanted places and an artificial, theatrical appearance.
Backlight is positioned to produce a crisp line of light on the edge of the subject for the purpose of separating figure from background. It is almost always hard light because soft light coming from behind the subject toward the camera can create spill and lens flare. The intensity of backlight is usually equal to or brighter than the key light, depending on whether it is hitting a light or dark subject and how much separation is needed.
An instrument’s spot/flood control affects the light’s spread and intensity. It does not affect hardness/softness. The term “flood” simply means a wide spread of light, which could ultimately be hard light, as with a lensed instrument set to flood position.
In lighting, the term “soft” means diffused. It does not mean low intensity. Soft light comes from a source like a fluorescent lamp, has passed through diffusion media like fog or a frost gel, or was bounced from a ceiling, wall, corner, reflector, or umbrella. Soft light produces amorphous, less-noticeable shadows that lack hard edges. Soft light from a surface as large as an umbrella wraps around the contours of a three-dimensional subject instead of producing defined chiseled edges like direct hard light.
Used as either a key or a fill, soft light is more forgiving in terms of placement. Almost any position that does not spill into the lens could be viable. Diffused light does not produce distracting shadows and it is natural to many situations: an overcast day, skylight, indirect window light, fluorescent interiors, and light from frosted or shaded fixtures. In fact, with the exception of a small reading lamp, we tend to light almost all of our own interior living spaces with soft light. A table lamp, for example, produces soft diffused sidelight through its translucent shade, which also has an opening on the top that allows light to hit the ceiling to produce a spread of bounced soft light from above.
One of the best positions for a soft key light is from the side so that in spite of the tendency of soft light to wrap around and flatten three-dimensional surfaces, it will still produce a modeled brighter and darker side of the subject relative to the camera’s view. Fill light is almost universally done with soft light. Diffused fill has the effect of controlling the transparency and density of shadows caused by the key light while not adding any new shadows of its own. Soft light does not call as much attention to itself, which is a particular advantage for fill light. Soft light can be very expressive, but its pitfalls include unwanted spill and flatness or blandness if you do not pay attention to highlight/shadow and foreground/background relationships.
One simple methodology for lighting a scene would be to do the following (see Figure 9.1):
1. Determine the nature of the subject’s key light and position it to come from a logically motivated direction.
2. Place the fill light and determine its appropriate level of intensity for effective modeling of the subject, density of shadows, and the nature of the scene. Some situations need no additional fill or may need negative fill.
3. Examine where shadows fall and adjust key and/or fill for better modeling, minimizing distracting shadows or enhancing meaningful shadows.
4. Paint the background with light and shadow so that in relation to the subject, the scene represents the appropriate sense of space, time, temperature, mood, and the nature of the event. This may also include practicals (visible sources of light in the picture, like a candle or a table lamp).
5. If the subject needs more separation from the background, consider a rim of backlight on the subject, or consider lightening or darkening an area of the background so the subject stands out with proper emphasis.
6. Suggest off-screen space with additional light through a window, in a hallway, on the other side of a door, or a hint of light from some other connected but not entirely visible part of the location.
Figure 9.1 Off-screen key, fill, backlight, and background light, plus an on-screen practical.
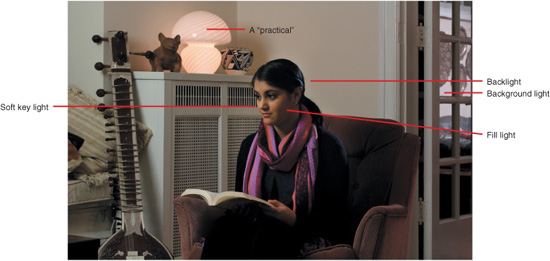
In each of these steps, you are dealing with issues of emphasis, balance, color, pattern, and their implied meanings. Of course, an outline like this is a simplification. Not every situation will have the same needs, and many things may complicate the process, like the unique demands of working with a combination of natural and artificial light, shooting in a complex or large space with multiple key lights, accommodating complicated and extensive subject movement or camera movement, dealing with reflections, or dealing with inadequate space for placing lights. But this list should give you an organized way of approaching the process.
If you are inexperienced in lighting, you might first explore augmenting available light with soft light. In an interior lit by bland available light, you might add a soft key light from the left or right side to provide brightness to model your subject. Or you might add soft fill light if the existing light already provides an adequate key but you need to lighten shadows.
Tungsten-Halogen Lights
Many professional lighting instruments use tungsten-halogen bulbs, also called quartz-halogen or simply quartz lights. Whether quartz or glass, tungsten lights produce a full spectrum of visible light with true colors once the camcorder is white balanced. A tungsten-halogen bulb has a tightly wound tungsten filament surrounded by iodine or bromine vapor sealed in a quartz glass envelope. Household incandescent bulbs darken with age because their tungsten filaments evaporate over the life of the lamp, darkening the glass, reducing the intensity, and shifting the color temperature. In comparison, tungsten-halogen lights do not darken, shift color, or significantly lose intensity with age. Evaporated tungsten does not adhere to quartz, so as the bulb cools down, tungsten molecules return to the filament itself. Quartz also withstands more heat than glass, which means high-wattage quartz bulbs can be used in smaller, brighter, more efficient instruments.
There are a number of precautions that you must take with tungsten-halogen lamps:
![]() Never touch the quartz envelope.
Never touch the quartz envelope.
![]() Always use a glove, paper towel, or cloth when changing bulbs. Finger oil etches into quartz, which creates a hot-spot that gets thinner over time and may eventually shatter.
Always use a glove, paper towel, or cloth when changing bulbs. Finger oil etches into quartz, which creates a hot-spot that gets thinner over time and may eventually shatter.
![]() Work at least five feet away from any open faced quartz light.
Work at least five feet away from any open faced quartz light.
![]() Always warn people when high-wattage lights are being turned on.
Always warn people when high-wattage lights are being turned on.
![]() Make certain that light stands are secure. With 500- to 1,500-watt lights, use heavy-duty 14-gauge extension cords and make sure the total wattage does not get too close to the maximum load of the circuit breaker. A 500-watt instrument will draw from 4 to 5 amperes and most modern circuits have a capacity of 20 amps.
Make certain that light stands are secure. With 500- to 1,500-watt lights, use heavy-duty 14-gauge extension cords and make sure the total wattage does not get too close to the maximum load of the circuit breaker. A 500-watt instrument will draw from 4 to 5 amperes and most modern circuits have a capacity of 20 amps.
In theatrical film production, the most often used lighting instrument is the Fresnel, which features a lens that has had its front curve collapsed into concentric rings. This produces a much thinner lens that has the optical power of a thick lens but can withstand more heat and intersect more light. The characteristics of a Fresnel include hard light that produces sharply defined shadows, an ability to focus its spread from flood to spot, and an even field of light with a natural-looking fall-off in brightness on the outer edges instead of a defined circle of light like a follow-spot. It is this fall-off in edge brightness that makes the Fresnel so useful. Its pool of light imitates the natural fall-off of light over distance and allows subtle blending of the light from one instrument into another to cover wider areas.
Cinematographer Ross Lowell designed the lensless Lowel Omni-light as a lightweight, lower-cost alternative to the Fresnel. It features a 500-watt quartz-halogen bulb situated deeply in a doubly curved parabolic reflector. The reflector’s dimpled surface helps smooth the field of light and its double curve helps the edge of the Omni-light’s beam fall-off in brightness, which is useful for blending. A knob adjusts the position of the quartz-halogen bulb in relation to the reflector to alter the spread of light from spot to flood. The Omni-light’s range from spot to flood is not as long as a typical Fresnel, the field of light is not as even, the edge fall-off is not as subtle, and its direct light produces a slightly double shadow that is not as clean and defined as a Fresnel. But it is a very efficient instrument that produces more usable light per watt than a Fresnel and it comes with accessory arms and slots for holding gels, umbrellas, flags, scrims, and reflectors. It is very versatile and ideally suited for field production with the G10/XA10. (See Figure 9.2.)
The Omni-light can be used as direct hard key light from positions like ¾ front, side, and ¾ rear in situations where you want to produce defined shadows. It can also be used as background light to bring out texture and to cast defined shadows onto or within the background, and as a direct backlight to produce a thin rim of light on the subject to separate the subject from the background. Bounced off a white ceiling, wall, or corner or with an umbrella, the Omni-light can be used as a soft key light, often positioned on the side. Bounced from farther away, it can serve as a fill light to control the density and detail of shadows and to bring up the general base level of a location that already has existing illumination. Bounced light will be subtler than hard direct light and less likely to call undue attention to itself. It is also less likely to cause unwanted reflections from windows and shiny surfaces.
Figure 9.2 Lowel Omni-lights and Tota-lights with and without accessory umbrellas.
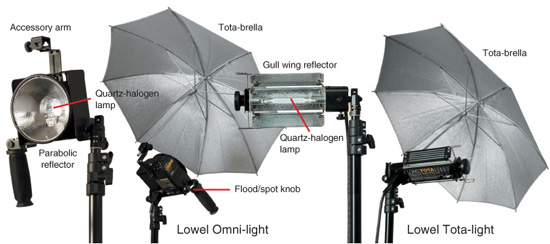
The Lowel Tota-light has a 750-watt tube-shaped quartz-halogen bulb mounted on a reflector panel flanked by two gull-wing reflectors. The instrument has no focus controls. Its hinged reflector wings lock into place for the proper and most efficient position for lighting. The wings also fold over the bulb to close the instrument compactly for storage and transport. The Tota-light should never be turned on with its reflector wings closed or partially closed because this would trap enough heat to char and melt the reflectors. It is possible to use the instrument with the gull wings opened beyond the lock point. This would be a way to light all four walls in a room with a single vertical Tota-light facing outward from a corner.
The knob on the Tota-light tilts the instrument 360°, and there are slots for an umbrella, for a gel frame, and for flexible shafts for flags or other accessories. In addition, a second Tota-light can stack and lock onto a first instrument, providing a total of 1,500 watts. Having a tube-shaped bulb, the Tota-light produces shadows with fuzzy elongated edges on one dimension that are not as well defined as an Omni-light or a Fresnel. So, as a hard direct light, the Tota-light is more typically used as backlight on a subject and for lighting backgrounds, taking advantage of its broad spread when mounted horizontally. Where the Tota-light comes into its own is as a soft light, either with an umbrella or bounced from ceiling, walls, or corner. Bouncing spreads the area of the light and loses some light, so the Tota-light’s 750 watts and its smaller profile make it an even more effective soft light than the 500-watt Omni-light.
Since the Omni- and Tota-lights have a tungsten filament, they mix with existing tungsten light such as ceiling lamps, floor lamps, and table lamps that may be providing real illumination or are practicals (sources of light used as images in the frame). Incandescent practicals like a candle or table lamp usually burn at 2,600–2,900°K and will look slightly orange compared to the professional 3,200°K light from the Omni- or Tota-light, but the match will be close enough. When used with 4,100°K fluorescents, the Omni- or Tota-light will need a half-blue gel, also called ½ CTB, to come close to balancing. The blue-filtered professional light will help provide the full spectrum that most fluorescents lack and will help counter the excessive green that makes people look so unattractive under most fluorescent light.
Fluorescents
Professional fluorescent lighting instruments can provide a diffused 5,600°K daylight, a cool-white, or a simulated tungsten balance that can be used as either a soft key light or a fill. Fluorescents provide three to four times more light per watt, run relatively cool, and have a useful life of 5,000 to 10,000 hours compared to 60 to 150 hours for tungsten-halogen lamps. The KinoFlo company began manufacturing professional fluorescent instruments in 1987 and received an Academy Award for technical innovation. They engineered high-frequency ballasts to minimize the possibility of flicker, stepped up the voltage to create higher light output, used high-quality full-spectrum fluorescent tubes balanced for daylight or for tungsten, designed fixtures for positioning light units on stands, and provided barn doors and louvers to control spill. A typical unit might contain four 24- or 48-inch fluorescent tubes that could either be dimmed or turned on individually. As fluorescents are dimmed, they retain a constant color temperature—unlike tungsten lamps, which get progressively redder. Instead of dimming to total black, fluorescents eventually extinguish at about 5 percent brightness, but this is no problem because the purpose of dimming (as well as the purpose of individual switches) is to adjust intensity for the desired balance, not to produce an on-screen fade-out. KinoFlo has also designed special units that can light car interiors or fit into tight cramped spaces.
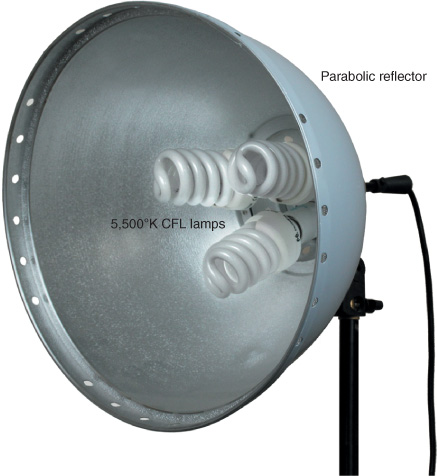
KinoFlos are relatively expensive—often $1,000 or more for a four-light fixture. For those on a budget, there are a number of alternatives, including the Interfit INT110 (see Figure 9.3) and INT216 fluorescent photo floods. Interfit is well known for strobe units, stands, and accessories for studio still photography, but they also make fluorescent fixtures that contain screw-in CFLs (compact fluorescent bulbs) complete with a large parabolic reflector, a light stand, and the fluorescent bulbs themselves at less than ![]() the cost of a KinoFlo. Using a large reflector and screw-in CFL bulbs, the Interfit lights are not as rugged and compact as KinoFlos. The spiral Interfit bulbs have a Color Rendering Index (CRI) rating of 82 compared to a CRI of 95 for KinoFlo, although you can buy higher-quality CFL bulbs for the Interfit fixture.
the cost of a KinoFlo. Using a large reflector and screw-in CFL bulbs, the Interfit lights are not as rugged and compact as KinoFlos. The spiral Interfit bulbs have a Color Rendering Index (CRI) rating of 82 compared to a CRI of 95 for KinoFlo, although you can buy higher-quality CFL bulbs for the Interfit fixture.
Professional fluorescent and LED lights are particularly useful in augmenting existing fluorescent light. Ceiling fluorescent fixtures, as you find in a classroom or an office, provide a bland down-light that does not adequately bring out the three-dimensional features of subjects. In addition, industrial and consumer fluorescents have an uneven spectrum with a high green content that produces unnatural colors. Setting your camcorder to auto white balance, manual white balance, or the Fluorescent H filter can provide only a partial compensation for the irregularity of consumer fluorescent bulbs that are not rated as full spectrum. Under these conditions, camcorders can make white look white, but usually end up with unnatural mid-tones because certain wavelengths are missing entirely.
Figure 9.3 Interfit INT110 fluorescent fixture.
Unless there is adequate daylight coming through windows, you will want to augment fluorescent down-light with a 45° or side soft key light to improve the modeling of the subject and improve the color. Appropriate lights include full-spectrum fluorescent instruments like KinoFlo or Interfit, an LED array like Litepanels or inexpensive copies like Neewer and Fancier, or a bounced tungsten-halogen like an Omni- or Tota-light with a half-blue filter.
Lights on the Camera
On-the-camera light can look unnatural. The on-axis position produces flat, unmodeled illumination, and subjects lit with direct frontal light cast an artificial shadow outline onto the background similar to a flash photo. Because the light source is nearly on axis with the lens, it can also produce red eye when light reflects off the subject’s retina and makes the pupil appear to glow red. For expressive purposes, the worst position for a light is on the camera. Nevertheless, there are situations that call for on-camera light in news coverage, event videography, and documentary.
Two solutions make lights mounted on the camera more professionally acceptable. One is to purposely use very low powered light that simply brings up more detail and does not call attention to itself in situations that already have some existing light. The other solution is to use softer, somewhat diffused light on-camera, possibly from an array of LED lights.
The Canon VL-5 on-camera video light ($77) is a small, low-wattage light that fits into the powered mini advanced shoe of the G10 but will not fit the XA10, which has a universal standard shoe. The VL-5 is about 2![]() inches tall and 2½ inches long, weighs less than
inches tall and 2½ inches long, weighs less than ![]() of an ounce, and has a switch for on, off, and auto. At only 5 watts, its purpose is not to light a scene but to simply add to the base level of light for subjects close to the camera, as if the viewer’s eye had adjusted to low illumination. This can be useful for highlighting the subject and bringing out details.
of an ounce, and has a switch for on, off, and auto. At only 5 watts, its purpose is not to light a scene but to simply add to the base level of light for subjects close to the camera, as if the viewer’s eye had adjusted to low illumination. This can be useful for highlighting the subject and bringing out details.
Even at only 5 watts, the VL-5 will consume as much power as the rest of the camcorder, cutting the life of a charged battery in half. But there is an enormous convenience in not having to carry an additional power supply for the light. The VL-5 supplies tungsten warm tones at 3,000°K that blend with household and professional incandescent lights or with 2,700°K to 3,200°K “warm” and “bright” fluorescents. In comparison, most LED lights tend to be in the blue range, closer to daylight balance. The VL-5’s illumination is low enough that the spotlighting effect of on-camera light is usually subtle enough to appear natural and potential background shadows are obscured or washed out by existing light in the location. The 3,000°K light is very humanizing on skin tones. If the VL-5 is used for nighttime exteriors, the camera will need to be reasonably close to the subject because a 5-watt instrument does not have much reach. In some situations, when the G10 is white balanced for the VL-5’s warm tungsten color, the effect will be to cool the rest of the environment, setting the subject apart.
The VL-5 can create marginal visibility in a totally dark room, enabling you to at least get an image at the expense of running the camera in high gain. With no other ambient light to blend with it, the light will have an artificial spotlight appearance. But in some situations, it is important to get the shot even if the image is degraded and the light looks self conscious.
Canon’s VL-10Li ($89) is a 10-watt tungsten light that fits in the standard accessory shoe of the XA10 and requires a dedicated camcorder battery cupped to its back. The light and battery make the camcorder a bit top heavy, but it is still well balanced and the dedicated battery means the lighting unit will not drain the camcorder’s power. The functions and characteristics are similar to the VL-5 except 10 watts is much brighter. The VL-10Li can also be used on the G10 camcorder with a hot shoe–to–standard shoe adapter.
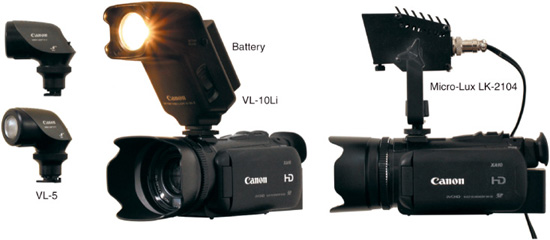
A more professional alternative to the VL-10Li is the Micro-Lux LK-2104 ($119), which also fits into the standard accessory shoe on the XA10’s body or its handle. When mounted on the handle, the additional height minimizes the chance of red eye. The unit will need an external 12-volt rechargeable battery equipped with a four-pin XLR power outlet. Various companies make batteries with XLR connectors or make an adapter for four-pin outlet–to–car cigarette lighter plug that would enable the use of other power sources. The Micro-Lux accommodates a 10-, 20-, or 35-watt MR-11 two-pin miniature reflector bulb. As with the VL-5 and VL-10Li, the reason for using an instrument like this is to provide a warm tungsten accent light. Its angle can be tilted for bounce lighting and the unit can also be mounted on a tripod or a light stand with an adapter. Figure 9.4 shows the VL-5, the VL-10Li, and the Micro-Lux LK-2104.
Figure 9.4 On-camera tungsten lighting instruments.
LED Lights
Professional light-emitting diode (LED) on-camera lights by Litepanels start at $275 for the Micro LED, $405 for the MicroPro, and $745 for the MiniPlus Spot or MiniPlus Flood. LEDs have a life of 30,000 hours, compared to 8,000 for compact fluorescents, 1,000 for household incandescents, and about 100 for high-intensity tungsten-halogen lamps. They are mercury-free, which makes them more ecologically friendly than fluorescents. LEDs are so efficient that battery life is approximately three to four times longer than with comparable incandescent light.
On-camera LED arrays usually produce a bluish-white, partially soft light at 5,600°K from an array of 48 to 140 high-efficiency light-emitting diodes. These kinds of lights match well with “cool” and “daylight” fluorescents, skylight, and indirect daylight. Because almost all of the energy in an LED goes into producing light, the instrument does not get hot. To potentially match tungsten light, on-camera LEDs also come with an add-on amber filter, which takes out about half the light. The light produced by Litepanels is dimmable from 100 percent down to zero without flicker or change in color temperature. It is softer, subtler, and brighter, and its reach extends further than Canon’s VL-5 and VL-10Li incandescent lights.
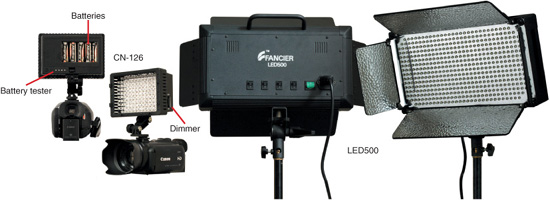
Litepanel units are also obviously expensive. What you are paying for is the reputation of the company, brighter LEDs with a precise spread, and accurate full-spectrum color. A remarkably inexpensive plastic alternative is the CN-126 LED Video Light by Neewer (and similar models by Fancier and Opteka), which sells for only $35 to $40. Neewer also makes the CN-160, which sells for $40 to $50. They run on AA batteries or on an adapter for a Sony or Panasonic camcorder battery. They both have a built-in dimmer and come with three interchangeable filters: diffusion, which softens and broadens the light pattern; pale magenta, which reduces green for somewhat truer color; and amber, for approximating incandescent light. Even though the amber filter reduces the intensity by 50 percent, there is still enough light to provide a useful fill or accent in a dim incandescent interior.
A disadvantage of any lighting instrument mounted on the camcorder is the possibility of glaring reflections of the light itself shining directly back into the lens. It is very important to avoid shooting toward glass or other reflective or shiny surfaces. With a shoe adapter, a compact LED array like the CN-126 or CN-160 can be mounted on a clamp or even on a monopod or boom pole held by an assistant. An angle higher than camera height from the right or left should provide better modeling on the subject and reduce the probability that the light source itself will be picked up by the camera.
Litepanels, as well as lower-priced brands like Neewer and Fancier, make LED fixtures with arrays of 500 and 1,000 LEDs that mount on stands. These units can serve as a daylight-balanced, slightly diffused key or fill light. As with the camera-mounted models, the instruments manufactured by Litepanels have truer color and greater brightness, but cost about $1,700. In comparison, the LED500 Light by Fancier sells for $179 and the LED500A model sells for $199. The lower-priced LED500 runs on 120 volts and has individual switches for adjusting intensity by turning on or off rows of LEDs. The 500A additionally includes a dimmer dial and the ability to be powered by either 120 volts or 12 volts. The Fancier LED500A and many other 12-volt lighting instruments use four-pin XLR connectors. If you want to power the LED500A by a car battery, you will need an Arri cigarette lighter adapter to XLR/4 ($39), available from places like B&H Photo. Figure 9.5 shows various LED light rigs.
Figure 9.5 Inexpensive LED array lighting fixtures by Neewer (left) and Fancier (right).
Lighting Accessories
Air-cushioned, heavy-duty light stands 9.5 feet tall under the brand name of Impact sell for $39 to $45 at B&H Photo. If one section accidentally becomes loose while a light is attached, the air cushioning feature lets it safely recede into the next section instead of collapsing with a jolt that could damage the light. Impact also makes extension arms with clamps for mounting reflectors and zipper cases for holding lights and stands.
Black aluminum foil under the brand names of Cinefoil and Blackwrap can be very useful for shaping and flagging off light and for creating shadow shapes. Never cover an instrument too completely with Blackwrap; it could trap in so much heat that plastic parts and metal reflectors might char or melt. Always leave space for enough air ventilation.
The Rosco Company manufactures a range of colored gels for film, video, and theater, as well as numerous accessories including diffusion materials, butterfly cloth (for diffusion awnings), reflection materials, fog machines, LED panels, photographic backdrops, and shadow-producing materials. One of the most useful filters for lighting video is a half-blue, such as a Rosco Cinegel ½ CTB available from B&H Photo.
Accessories for Lowel Omni- and Tota-lights include silver and white umbrellas, gel frames for holding filters, barn doors, flags for blocking off light, reflector panels, wire mesh scrims for reducing light, and flexible arms for holding some of these accessories. Lowel’s Tota-brella fits both the Omni- and Tota-lights, is of particularly good quality, and sells for $17 for white and $20 for silver. The white umbrella is translucent and provides two different qualities of soft light, depending on whether you use the light reflected from its inner surface or the light passing through its white cloth, which has the characteristics of a paper lantern. The silver umbrella provides the highest light output. The Tota-brella’s 27-inch size is perfect for Lowel Omni- and Tota-lights. Larger umbrellas will make the light stand off balance.