
12
Controlling the Moving Camera
Camera movement is basic to cinematic expression. The fact that the camera (the surrogate for the spectator) can move is one of the major characteristics that makes film and video aesthetically different from theater. Conceptually, the camcorder can move with its subject from a vantage point in front, alongside, or from behind, or can move in counterpoint, setting up a more complex relationship between the camera and the subject. A good example of each of these modes all in one shot is the scene in Scorsese’s Raging Bull, when Robert de Niro, as boxer Jake LaMotta, comes from the dressing room and through the cramped arena hallways. At first, the camera is traveling in front, then momentarily alongside, and eventually following as de Niro’s character enters the cheering, crowd-filled stadium. Halfway down the aisle, the camera and de Niro go separate ways. De Niro continues into the depth of the frame and climbs into the boxing ring while the camera moves to the right and ascends upward on an unseen crane, a counterpoint movement.
In addition, the camera can also move of its own volition. In this mode, the camera serves as the visual narrator of the scene when it searches, seeks, or reveals on its own. An example of this is the end of Citizen Kane, where the moving camera explores Kane’s warehouse full of belongings accumulated over a lifetime and ends by revealing Rosebud. These two examples of long takes are highly structured. Each shot is engaging, has visual development, creates anticipation, and leads to a moment of significance. In Citizen Kane, it leads to a reveal, and in Raging Bull, it develops through a changing relationship between camera position and subject, to a grand establishing shot for the boxing match, and a visual summation of the central character’s height of popularity. The camera movements are not arbitrary; each internal development could have been a different panel in a storyboard.
Even when shooting an event or an observational documentary, every camera movement should count. Very likely, this will mean holding for long lengths of time while the subject moves within the frame or even enters or exists from the frame, saving camera movements for major actions, reactions, and responses. The spectator is engaged and reassured if camera movements are decisive and meaningful. Shooting with too many camera movements, or following every micro-movement of the subject, over-determines the footage, making it difficult to edit. Arbitrary and indecisive camera movements are not useful at all. There is a need for structure and development within the moving camera shot, and a single moving camera often replaces what could have been many individual shots.
Formal camera movements consist of the pan, tilt, crane, zoom, and dolly and their hand-held and Steadicam equivalents. Devices for aiding the movement of palm-sized camcorders include optical and digital image stabilization, handgrip, fluid pan/tilt head, hand-held monopod, camera stabilizer, wheelchairs, mini dollies, skater dollies, sliders, jibs, and vehicle mounts.
Hand-Held Camera Movement
For hand-held work with the camcorder, cupping your hand under the built-in side strap lends itself to tilted horizons and even a rotational wobble as your wrist flexes. Many users prefer shooting with a pistol grip or a small monopod mounted directly below the camcorder’s center of gravity. The Barska Accu Grip ($14) works well.
A wide-angle lens demagnifies camera instability. Conversely, telephoto magnifies any instability, which has ramifications for hand-held work. In addition, telephoto looks like an optically enlarged image, whereas physical proximity in wide angle or normal will feel like actually being close. In fact, some filmmakers adopt a hand-held strategy of shooting primarily in wide angle and accomplish long shots, medium shots, and close-ups by physically moving with the camera instead of zooming. Compared to zooming, this will have a much different feeling that will more physically place the spectator within the circle of interaction.
Image Stabilization
Because our brains cross-reference the information from our eyes with our biological sense of balance, the perceived world does not bounce or rock as we walk, jump, or move through space. If you want to create an image of the world the way we perceive it without unintended dips and jolts, the central problem with camera movement is image stabilization.
Because the G10/XA10 is lightweight, well balanced, has good image stabilization, and is easy to hand hold, it lends itself to mobility. The camcorder has three levels of optical image stabilization. Optical image stabilization uses a set of moving optical elements in the lens that are affected by inertia or powered servomotors. The elements consequently bend the light in the opposite direction of an abrupt movement to correct for camera shake. Standard and Dynamic image stabilization operate solely with inertia-sensitive lens elements. Dynamic image stabilization is the most appropriate for hand-held work, including pans, tilts, and walking with the camcorder. Standard is appropriate for shooting when the camcorder is primarily stationary or when using an auxiliary wide-angle or tele-converter lens. It is also possible to turn image stabilization off for occasions when the camcorder is solidly mounted. To choose image stabilization settings, choose FUNC > Image Stabilizer and then choose Standard, Dynamic, or OFF
When image stabilization is activated, a symbol appears in the upper right of the touchscreen. For Standard stabilization, the symbol is an image of a hand. For Dynamic stabilization, a hand with the letter D appears. (See Figure 12.1.) Dynamic image stabilization is the default mode in the G10/XA10, and it works well in wide angle up to three-quarters of the zoom range. It will cover most of your hand-held needs for stabilization.
Figure 12.1 Dynamic and Powered image stabilization.
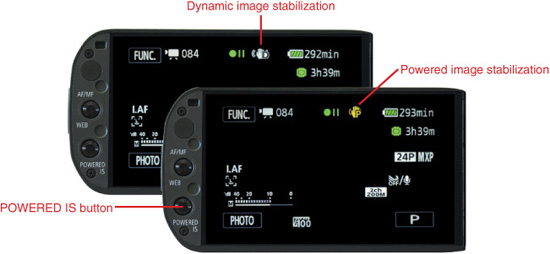
As you approach full telephoto, the lens not only magnifies the size of the image, it significantly magnifies camera shake. Additional stabilization is necessary. The inertia of the camera lens is caused simply by its mass, and is no different when the lens is in telephoto than in wide angle. Yet a 42.5mm telephoto needs 10 times the stabilization of a 4.25mm wide angle. Powered IS is a special stabilization mode that more aggressively holds the frame in one place. It is not intended to handle major camera movements.
For greater resistance to unwanted motion, Powered IS (image stabilization) uses sensors called “accelerometers,” which detect subtle movements and send a signal to servo units in the lens that more aggressively position counter movements of the image-stabilizing elements. The G10/XA10’s Powered IS attempts to keep points of interest in the same place in each frame. It does this with much less degradation of the image than postproduction techniques because stabilization is accomplished optically.
Powered IS should be used primarily for those times when you need to make a hand-held shot appear as stable as on a tripod or Steadicam while holding a tight frame in telephoto, such as a facial close-up taken from a distance. This mode is intended for keeping the frame in one place, and not for major movements of the camera itself such as quick pans or tilts for which Powered IS will over-compensate, making the image initially blur at the edges and eventually swim and bounce.
Powered IS does not appear as a menu-screen choice in the Image Stabilization panel because it is turned on and off entirely by an external button. Pressing the POWERED IS button on the left bezel of the touchscreen momentarily overrides any existing stabilization setting. The symbol in the upper right of the touchscreen becomes a yellow hand and the letter P, indicating that Powered IS is active.
Powered IS should happen at only selected times—typically, while shooting a tightly framed image. Consequently, it is made to operate only when you manually press the POWERED IS button on the left bezel of the touchscreen and is disengaged when you physically release the button. Upon release, the camcorder automatically returns to the default mode of Dynamic optical image stabilization. The POWERED IS button can be set to operate in either hold on/release off, or press on/press off. If you anticipate a number of static hand-held telephoto shots of extensive length, you can re-program the POWERED IS button to operate as press on/press off instead of its default intermittent mode. To do so, choose FUNC > MENU > Tool icon > Powered IS Button; then select Toggle On/Off (or select Press & Hold to return to the preferred mode of operation).
The Toggle On/Off setting is not recommended. In this mode you must consciously press the button a second time to disengage Powered IS. Leaving Powered IS running for extended periods will drain the battery more quickly. More significantly, it can too easily be left on in situations where it is not appropriate.
Image stabilization can also be accomplished in postproduction. Avid, Final Cut Pro, After Effects, and other programs can magnify the image and re-render each frame so that certain fixed points sequentially appear in the same place relative to the frame. This is effective for unsteady hand-held shots that ought to be still. It is less effective on tracking shots, but you could try to have a runner’s nose, ear, or cap appear in the same place in each frame, as if the camera stayed perfectly locked to this moving image. In either case, digital image stabilization in postproduction usually degrades the image because it has to crop, enlarge, and re-render sequential images to make the frame appear steady for the whole shot. However, if you are able to work in a non-linear software application that provides a 10-bit color space (versus the usual default setting of 8-bit color space), the amount of image degradation will be minimized. DaVinci Resolve and Apple Color enable the editor to adjust to color space accordingly.
Zoom Versus Dolly
A zoom is an optical camera movement that attempts to imitate a dolly. In actuality, the two feel somewhat different. A dolly physically moves the spectator through space, whereas the zoom magnifies and demagnifies a flat image from a fixed position. The zoom feels considerably flat, while the dolly feels more dimensional. A dolly places the spectator more tangibly in the world of the story or event.
Do not zoom excessively. A zoom feels like a self-conscious manipulation of the image. A zoom-in to telephoto can feel like an exclamation point, as if the camera operator is saying “Look at this!” A zoom can easily call attention to itself; excessive zooming communicates impatience and severely limits your options in editing. Most of the time, cinematographers and videographers use the zoom to adjust framing and hold that position for a considerable duration until there is a compelling reason to reframe or change scale.
When you do use a zoom, the G10/XA10 has a number of sophisticated features that help make the zoom less obtrusive and potentially more expressive. These include variable-speed operation and the ability to program 16 constant speeds from as short as two seconds to as long as four minutes, 45 seconds over the entire zoom range. To achieve this, do one of the following (see Figure 12.2):
![]() Choose FUNC > MENU > Camera icon > Zoom Speed Level and select Fast, Normal, or Slow.
Choose FUNC > MENU > Camera icon > Zoom Speed Level and select Fast, Normal, or Slow.
![]() Choose FUNC > MENU > Camera icon > Zoom Lever Zoom Speed and select Var or Constant (1–16).
Choose FUNC > MENU > Camera icon > Zoom Lever Zoom Speed and select Var or Constant (1–16).
![]() Choose FUNC > MENU > Camera icon > Handle Rocker Zoom Speed and set 1–16.
Choose FUNC > MENU > Camera icon > Handle Rocker Zoom Speed and set 1–16.
![]() Choose FUNC > MENU > Camera icon > Wireless Ctrlr Zoom Speed and set 1–16.
Choose FUNC > MENU > Camera icon > Wireless Ctrlr Zoom Speed and set 1–16.
Figure 12.2 Extensive zoom controls.
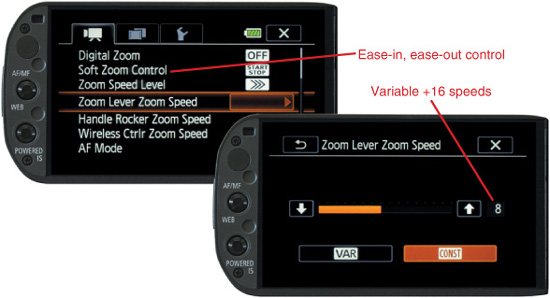
The XA10 provides access to four different places for controlling the zoom: the touchscreen, the zoom rocker on the camcorder body, the zoom lever on the handle, and the zoom control on the remote. Each of these can be preset to a different zoom rate, which means you can have variable speed on one control. The touchscreen zoom control is accessed in the Programmed Menu (choose FUNC > Zoom).
The menu allows for an overall category of Fast, Normal, or Slow, which affects the rate of all the zoom controls. Fast doubles the speed compared to Slow, and normal is in between. The zoom control on the touchscreen has no additional speed adjustments. The zoom lever on the camera body can be additionally set for variable or for constant with its own choice of 16 speeds. The zoom rocker on the XA10 handle and the one on the wireless remote have independent speed presets from 1 to 16. So you can preset different zoom speeds on different controllers.
Soft Zoom
The G10/XA10’s Soft Zoom Control setting enables you to customize zoom movement to seem less mechanical by providing for its speed to ease-in, ease-out, or both at the beginning and end of a zoom. This will help the zoom feel more natural, the way a dolly has to overcome inertia to start moving and has to decelerate to stop. This is a unique professional feature not found in other camcorders in this price range. To change this setting, choose FUNC > MENU > Camera icon > Soft Zoom Control and choose Off, Start, Stop, or Start & Stop.
Tripod
A tripod is just as much an instrument for camera movement as it is for stability, provided it has a good fluid head for smooth pans and tilts. Pan and tilt movements shot in telephoto can particularly benefit from the stability of a tripod. Refer to the previous chapter for a selection of tripods and fluid heads appropriate for the weight, scale, and price range of the G10/XA10.
Just as it is possible to zoom too much, it is possible to pan too much. Excessive pans create the equivalent of a ping-pong match that becomes less interesting with repetition and problematic to edit. A dialogue structured with pan left, pan right, pan left, pan right, pan left, pan right, and so on, will soon cry out for a two-shot of both speakers or holding on one as the other talks off-screen. Pan at significant moments, not every moment.
The fact that a tripod is typically locked in one place means that it can easily feel constrained as a scene develops. This can be countered by finding new physical positions for the tripod so that the scene has visual development. It is also possible to physically liberate the tripod by combining it with other means of motion. Simply combining a pan with a simultaneous zoom can create a compound movement that keeps the tripod from feeling pivoted in one spot and the zoom from feeling like a flat magnification. Other devices that help the tripod break out of its spatial limitations include mounting a jib or a slider on the tripod or mounting the tripod itself on a dolly platform so that it can physically move through space.
Camera Jib
A jib is a hand-operated boom with the camera at one end and counterweights at the other. It is sometimes called a “mini crane.” Lightweight models have a six- to 12-foot arm that can be mounted on a tripod at its fulcrum point. Larger and longer ones need a heavy-duty base of their own. The cradle for the camera has controls to remotely adjust its tilt independently of the movement of the arm.
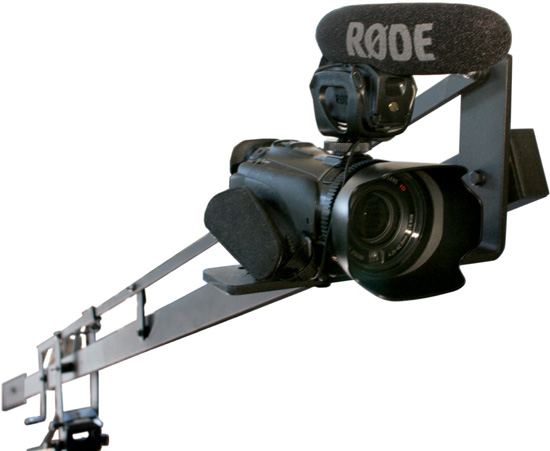
A jib adds the vertical dimension of camera movement. It can take the camcorder through sweeping vertical and horizontal moves that feel more dynamic than simply rotating or tilting the camera on the axis of a tripod’s pan head. In addition, a jib can quickly frame high-angle and low-angle shots, whereas a tripod is always stuck at the limited height of its legs. Among the lowest-priced models, the ProAm DVC200 camera jib, shown in Figure 12.3, has an eight-foot arm and sells for $279. Prices for camera jibs can extend into the thousands. Complex models have servomotors and remote monitors.
Figure 12.3 ProAm DVC200 camera jib.
Camera Stabilizers
Cinematographer Garrett Brown invented the Steadicam in the early 1970s as a way to physically isolate and suspend the motion-picture camera from the operator to produce spectacularly smooth tracking shots. The Steadicam premiered in feature-length films in 1976 with Marathon Man, Bound for Glory (winner of the Oscar for Best Cinematography), and Rocky (winner for Best Picture). It has been a staple of motion-picture production ever since. Over the last two decades, other companies have started making competing devices, and the term “Steadicam” is sometimes applied generically (like Kleenex for tissues and Coke for a cola drink).
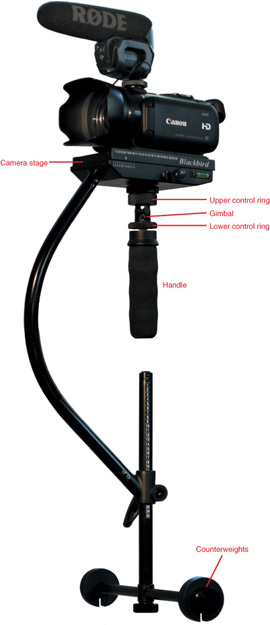
A full stabilizer rig for a 35mm motion-picture camera or large video camcorder consists of a body harness, an articulated arm, a precisely balanced camera mount on top of a vertical armature attached to an ultra-low friction gimbal, and a sled at the opposite end containing counterweights, batteries, and a dedicated monitor. The whole rig with camera included can weigh 40 to 70 pounds and involve weeks or months of training to operate. With the advent of small, professional-quality digital camcorders, models like the Blackbird designed by Camera Motion Research, the HD1000 by Glidecam, and the Merlin by Steadicam are made for lightweight hand-held operation without the additional body braces. (See Figure 12.4.)
Instead of supporting a 20- to 40-pound camera, which in turn needs to be counter-weighted and monitored, the lightweight stabilizers are designed for camcorders weighing one to seven pounds and depend on the camcorder’s LCD screen for monitoring. The mini stabilizers are simple compared to a full Steadicam rig; are light enough to dispense with the dedicated monitor, articulated arm, and body harness; and are simply held by hand with a handle attached to the gimbal. But even these lightweight models demand a certain amount of practice, finesse, and stamina to achieve professional results. Holding and balancing even four to eight pounds (the camcorder, battery, armature, handle, gimbal, and counterweights) in front of you can become a strain on your arm, wrist, and back over an extended period of time.
Figure 12.4 Blackbird stabilizer.
People who have never used a Steadicam or similar stabilizer have the misconception that you just strap it on and it does all the work for you. In actuality, it requires practice; coordination of arm, leg, and back muscles; and almost acrobatic dexterity to use a Steadicam well. Even with a hand-held unit, it can take 30 minutes and sometimes longer to make all the adjustments to balance the camcorder on the stabilizer.
The camcorder base must rest perfectly horizontal on the fore and aft, sideways, and rotational planes of the stabilizer’s mounting platform. This platform in turn rests on an armature pole connected to a ball socket or ultra-low friction gimbal joint. Then you need to adjust counterweights and leverage at the opposite end of the armature, locate the stabilizer’s center-of-gravity balance point, and adjust the gimbal position to be just above the center of gravity. The test for this is when the stabilizing armature is turned horizontal, it almost balances with the camcorder on one side and counterweights on the other, but it slowly uprights itself with the camcorder on top. When all the adjustments are correct, the camcorder is suspended in a nearly neutral position so that the inertia of its own weight and its counterweights, and the leverage of the unit’s support armature, resist vibration and abrupt changes.
Now comes physical practice, which can take days or weeks as you develop dexterity. Initially, your arm or back will get sore after about 20 to 30 minutes. First, you will have to practice simply taking a few steps and coming to a stop without the camcorder wanting to rotate, tilt, or move on its own. After you have mastered starting and stopping, you will practice moving backward in a straight line while shooting forward, and walking forward while shooting backward. You eventually move on to making turns and more complex movements with high, low, and angled camera positions. With heavier body-braced rigs, you will wait until you have mastered moving in open spaces before trying to walk through an actual doorway or turn an actual corner without the camcorder bashing into the wall. Later skills include climbing stairs. It is for these kinds of moves that the physical stabilizer, with its counterbalanced weights, leverage, and gimbal, far exceeds what the optical stabilization built into the G10/XA10 can do.
Very likely, you will use the camcorder’s built-in image stabilization for most hand-held work and use the Steadicam or comparable device for the occasional long tracking shot over rough terrain or to glide up the steps of the Philadelphia Art Museum as in Rocky (1976), which was shot by Garrett Brown himself. Stabilizers appropriate for the G10/XA10 are the Steadicam Merlin ($799), manufactured by Tiffen; the Glidecam HD1000 ($369); and the Blackbird ($469), by Camera Motion Research. My personal preference is the Blackbird for small camcorders like the G10/XA10.
If you cannot afford $369 to $799 for a camera stabilizer the size of a Merlin, GlideCam, or Blackbird, there are several alternatives. One is to shoot hand-held tracking and dolly shots in full wide angle to demagnify camera shake. Another is to hand-hold a monopod. Shots that follow or move along with primary motion within the frame (like running with a runner in the shot) will somewhat justify camera shake, and the moving figure within the frame will call less attention to irregularities of movement of the frame itself.
A Monopod as a Stabilizer
Imagine if you had to carry a teacup filled to the brim by holding it the way we do a camcorder: with your fingers under a leather strap attached to its side. Liquid will spill with the slightest bounce or bend of the wrist. Carrying a dozen filled teacups on a tray might be easier to keep steady, both because of the inertia of additional weight plus the balance achieved by the lateral width of the tray acting somewhat like a tightrope walker’s pole. The same principles of inertia and balance apply when you carry a camcorder on a sophisticated device like a Steadicam. They can even apply to a monopod.
A monopod is already much more mobile than a tripod, and it does not always have to rest on the ground. It can be used like a stripped-down Steadicam for mobile shots. Place the monopod horizontally across your index and middle finger to find the balance point between the camcorder and the rest of the pole. This is the center of gravity for the monopod at that particular length. For mobile shots, hold the monopod just above the center of gravity and you will have the maximum stabilization the monopod is capable of providing. If this is combined with Dynamic image stabilization and predominantly wide angle, camera movements can be almost as fluid as a Steadicam.
Sliders and Mini Dollies
Camera sliders are used for two- to three-foot horizontal (and sometimes vertical) movements with DSLR cameras and small camcorders like the G10/XA10. A slider is a three- to six-foot linear metal track or rail with a sliding low-friction mount for a camcorder. The slider can be placed on the floor for low angle, on a table for waist height, or on a tripod for variable height to create professionally smooth linear camera moves. Longer and heavier sliders can span two tripods. Movement with a slider or a dolly looks more dynamic than a pan, which feels rooted on a pivot. Sometimes, a two- or three-foot movement is enough to make the camera feel fluidly alive. To get the most production value out of a slider, you might move across a foreground subject or object that is framed in a z-axis (depth axis) composition. Sliding just enough to change the compositional relationship between foreground and background can create a strong illusion of dramatic movement when in essence you are moving the camera only a few feet.
The camera mount on a slider glides smoothly as you push it along the metal track. More expensive models operate with a geared rubber belt and a crank, and some are motorized. They vary in price from $150 to $1800. The cheapest ones may not be as quiet, nor glide as smoothly, and may not have the ability to be used vertically or on a slant. The versatile belt driven Kessler Pocket Dolly ($649) works horizontally, vertically, and on an angle.
At the lower end of the price range, the Igus DryLin W16-A linear motion system ($159) has many industrial uses, including serving as a camera slider. (See Figure 12.5.) It consists of a ¼-inch aluminum mounting plate on a four-inch carriage that slides on a hefty guide rail slightly over 39 inches (one meter) in length. The carriage has low-friction, lubrication-free bearings for gliding smoothly. The operation makes a mild sliding sound, which means the microphone should be separate from the camcorder, closer to the subject than to the slider.
Figure 12.5 Igus DryLin linear slider.
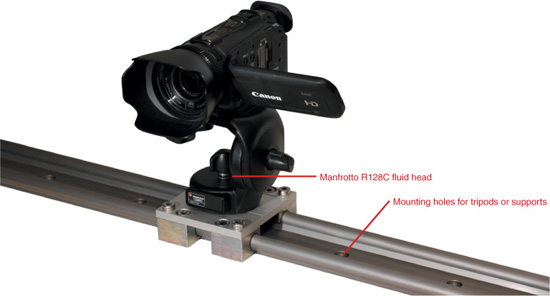
Because this heavy-duty model is modular and customizable for various industrial purposes, it does not arrive ready for mounting the camcorder. You have to drill one ![]() -or
-or ![]() -inch hole through the ¼-inch aluminum carriage plate to accommodate a
-inch hole through the ¼-inch aluminum carriage plate to accommodate a ![]() -inch bolt for mounting a tripod head. One of the fluid heads discussed in Chapter 11, “Mounting the Camcorder,” will do. When you drill the hole, cover sensitive areas with tape and make certain no metal shavings get on the bearings or rail. Igus also sells lighter-weight pre-drilled carriage and rail systems such as the DryLin W1040-B for $114 and the DryLin W1080-B for $150, plus the undrilled DryLin W1040-A for $80. Each of these is also one meter long. For the G10/XA10, the lighter rails are probably just as effective as the heavier model but may be more likely to warp if dropped or abused.
-inch bolt for mounting a tripod head. One of the fluid heads discussed in Chapter 11, “Mounting the Camcorder,” will do. When you drill the hole, cover sensitive areas with tape and make certain no metal shavings get on the bearings or rail. Igus also sells lighter-weight pre-drilled carriage and rail systems such as the DryLin W1040-B for $114 and the DryLin W1080-B for $150, plus the undrilled DryLin W1040-A for $80. Each of these is also one meter long. For the G10/XA10, the lighter rails are probably just as effective as the heavier model but may be more likely to warp if dropped or abused.
The bottom of the rail plate contains nine evenly spaced mounting holes about 4¾ inches apart. The central hole of the assembly can be attached with a bolt to the head of a heavy-duty tripod. Because the rail is only one meter in length and the camcorder is not heavy, the rail does not need to span two tripods. For the carriage to slide smoothly, it is important to keep the low-friction bearings and the rail clean. If you are going to operate the assembly directly on the ground or floor, you might use a couple of six-inch pieces of 1×3 pine as protective feet bolted on the bottom of each end of the rail.
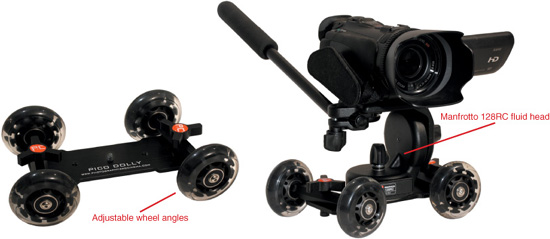
The Dot Line Pico dolly ($59) is a table-top “skater” with an adjustable wheel assembly at each end for creating straight or curved camera movements. (See Figure 12.6.) Its body is a 7¾-inch long metal mounting plate with a central hole for a pan/tilt head and additional holes for accessories. The Pico dolly is like an expensive roller skate with slightly softer wheels that has been machined for smooth operation with a small camcorder or DSLR. It can be used on a table for close-up videography, on a smooth floor for low-angle dolly shots, or on a 1×6 plank mounted across two tripods for horizontal moves at higher levels. The ball-bearing wheels produce some sound, so the microphone should be closer to the subject than to the dolly. It is compact and convenient and comes with a zippered nylon carrying case.
Figure 12.6 Pico skater dolly.
RigWheels are a portable and customizable way to provide mobility for the camcorder. They consist of four small carriage assemblies with four one-inch wheels per carriage with a ![]() -inch bolt for mounting each carriage. They can be configured as a floor or track dolly by bolting them to a plywood base wide enough to fit your tripod. As a dolly, it can run on a floor provided the floor is very smooth. But wooden, tile, ceramic, linoleum, cement, and even marble floors are typically uneven, and carpet would be impossible. RigWheels are more effective as a track dolly running on inexpensive 1
-inch bolt for mounting each carriage. They can be configured as a floor or track dolly by bolting them to a plywood base wide enough to fit your tripod. As a dolly, it can run on a floor provided the floor is very smooth. But wooden, tile, ceramic, linoleum, cement, and even marble floors are typically uneven, and carpet would be impossible. RigWheels are more effective as a track dolly running on inexpensive 1![]() -to two-inch diameter PVC pipe from the hardware store. Lay out two rails of track, align the width between them to the spacing of the wheel assemblies on your platform dolly, and secure the track to the floor with Mylar packing tape. Dolly movement is now perfectly straight and smooth, and the four small wheels on each carriage unit perfectly straddle the PVC pipe.
-to two-inch diameter PVC pipe from the hardware store. Lay out two rails of track, align the width between them to the spacing of the wheel assemblies on your platform dolly, and secure the track to the floor with Mylar packing tape. Dolly movement is now perfectly straight and smooth, and the four small wheels on each carriage unit perfectly straddle the PVC pipe.
As an alternative, RigWheels can be bolted to a smaller base of plywood, plastic, or metal and used as a skater dolly, table dolly, or slider. A price of $115 for four tiny sets of wheels may seem high, but the quality of their construction, the ease with which they can be mounted, and the fact that they glide well on both rounded pipe and smooth flat surfaces make them far less expensive and more versatile than many other kinds of dollies and sliders.