
19
Editing
In learning any editing program the first things you need to know are how to do the following:
![]() Open the program.
Open the program.
![]() Name a project.
Name a project.
![]() Set preferences.
Set preferences.
![]() Ingest/capture footage.
Ingest/capture footage.
![]() Arrange and begin to trim shots.
Arrange and begin to trim shots.
This will enable you to accomplish some basic functions before you really start learning the complexities of an editing program. This chapter introduces some of the major editing programs and discusses some of these initial steps. Your workflow choice in capturing, importing, or ingesting AVCHD video from the G10/XA10 into an editing program is whether to ingest MTS video files directly from your storage drive (or camcorder), which some (but not all) editing programs allow, or to have the editing program or a separate intermediate program transcode the MTS files into a much less condensed, high quality format best suited for editing.
Major Editing Programs
The major professional editing programs are Avid Media Composer, Final Cut Pro, Premiere Pro, and Sony Vegas Pro. Over the past decade, 70 to 90% of Hollywood feature films and prime-time television programs have been edited on Avid Media Composer. Avid received an Oscar for Technical Achievement from the Academy of Motion Picture Arts and Sciences, and the ACE Technical Excellence Award from the American Cinema Editors guild. By 2011, Apple’s Final Cut Pro 7 was being used by 54% of the broader professional editing community including independents and schools. Features like The Social Network and The Girl with the Dragon Tattoo were edited on Final Cut. As high-definition video emerged in recent years, Adobe Premiere Pro and Sony Vegas Pro have increasingly been adopted by professional editors, particularly for commercials, documentaries, and music videos. All four of these programs are excellent at cutting, pasting, and arranging picture and sound across a timeline, and they each include advanced tools for titling, visual effects, audio mixing, image correction and mastering.
Final Cut Pro
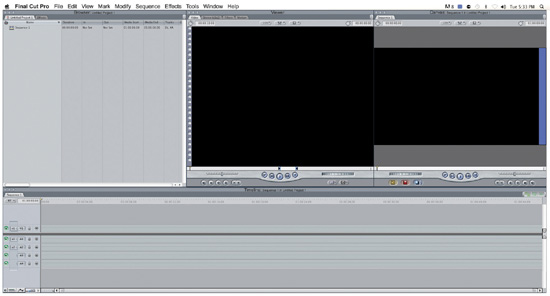
In 2011, Apple completely rethought the nonlinear editing process and made a clean break from its highly successful Final Cut Pro 7 (shown in Figure 19.1), which had been adopted by a large portion of the professional community. The new version, Final Cut Pro X, does many things more quickly and automatically completes many formerly tedious tasks in the background, but it also left out certain functions. For all practical purposes, it was a completely new editing program designed for the world of file-based, tapeless media production, with little tying it to previous versions. This orphaned the loyal users of the previous version of the software, Final Cut Pro 7, and created an uproar. Independent media-makers, film schools, and professional editors (who continually face heavy production deadlines) strongly objected to having to relearn a completely new interface that used different working methods, employed different workflows, and provided no support or interface for legacy projects in Final Cut Pro 7. For certain functions, Final Cut Pro X was unworkable for production houses that depended on Final Cut Pro’s ability to share files and projects among editors, incorporate older projects into newer releases, perform multi-camera editing, work with edit decision lists, and export to tape. Some of these problems, such as multi-camera editing, have since been addressed by incremental upgrades to Final Cut X, and there is now a $10 third-party conversion application called 7toX by Intelligent Assistance that allows older project files from Final Cut 7 to be imported as Final Cut X “events.”
Although Apple’s Final Cut Pro 7 is no longer available for purchase, many people continue to use it. For this reason, we have included information in this chapter and in Appendix F, “Basic Keyboard Commands: Final Cut Pro,” available at www.courseptr.com/ downloads, on both Final Cut Pro 7 and its successor, Final Cut Pro X.
Because so much of Final Cut Pro X operates automatically, professionals derogatorily called it “iMovie Pro.” In a sense, Final Cut Pro X is intended to work as simply and quickly as a consumer program, but produce professional results. If it provides the results you need, Final Cut Pro X is worth consideration. It costs $299 but does not come bundled with programs like Compressor, Color, Motion, Soundtrack, and DVD Studio Pro, which have to be purchased separately. However, Final Cut Pro X can directly and efficiently work with MTS files from camcorders like the G10/XA10 (as can the latest versions of Avid Media Composer, Adobe Premiere Pro, Sony’s Vegas, and Grass Valley’s Edius). Apple’s previous editing program, Final Cut Pro 7, worked with MTS files only by transcoding to Apple’s editing format ProRes 422, which is time-consuming and creates enormous video files in the process. However, many professionals prefer to transcode to a format optimized for editing and have accepted this time-consuming step as part of the workflow.
Avid Media Composer
Another major editing program is Avid Media Composer, which has long been a professional editing standard in the feature-film industry. Avid Media Composer is used on more Hollywood films than any other editing platform. It comes in a software-only version and well as in hardware-accelerated versions. With Avid’s free AMA plug-in, Media Composer 6—the latest version of the software—will capture MTS files directly from the G10/XA10 or from a storage drive, making the files available for editing on the timeline without transcoding. Alternatively, Media Composer can transcode MTS files into DNxHD, Avid’s high-quality editing codec. Media Composer works on both Windows and Mac multi-core computers that have high-quality graphics processors.
Media Composer includes a strong assortment of effects, titling, color-correction, and audio controls. It interfaces easily with Pro Tools, which is also made by Avid and is the industry standard for audio processing, mixing, and editing. There are many hardware and software add-ons for Avid Media Composer. With ScriptSync, an add-on sold separately, Avid can automatically locate shots and multiple takes by phonetically analyzing dialogue tracks. It can search, find, and sync these shots to a written script along with groups of alternative shots that share the same dialogue. This is useful for comparing multiple takes and assembling shots for script-based projects such as feature films. With the PhraseFind add-on, Avid can phonetically index and locate sound/picture clips based on a key word or phrase instead of a script. This is highly useful for organizing and editing documentary dialogue and interviews, or for locating a shot or a cut point in many kinds of productions. PhraseFind sells for $495. This may sound expensive for a search tool, but it can eliminate many hours of searching and logging, or in some cases, many weeks of work on projects with high shooting ratios.
Avid Media Composer 6 sells for $2,399 bundled with a whole suite of extra programs for special effects, encoding tasks, and authoring DVDs. There are other package prices that include acceleration and professional input/output hardware as part of the bundle. Avid Media Composer 6 also has an educational price of $295 for those who qualify for an academic discount. The education edition does not include some of the bundled software, but the Media Composer editing program itself has complete functionality at an amazing price.
Adobe Premiere Pro
Adobe Premiere Pro CS6 sells for $599–$799, depending on discounts, with an educational price of $299 for those with academic credentials. Premiere Pro enables you to import and work directly on the timeline with MTS files with most other tapeless formats simultaneously without transcoding or rewrapping. It can run on a multi-core Windows or Macintosh computer with a 64-bit operating system and a high-quality graphics processing unit. It will not run on 32-bit computers.
One of the major strengths of Premiere Pro is its ability to interface with other Adobe software for photography, effects, graphics, and Web development. Adobe’s Creative Suite Production Premium 5.5 ($1,145–$1,194) is a bundled collection that integrates Premiere Pro CS5.5 with After Effects CS5.5 (for creating effects, including the Warp Stabilizer tool to correct skew from CMOS camcorders during moments of fast motion), Photoshop CS5 Extended, Audition for multi-track audio editing, Flash Catalyst, Flash Professional, Illustrator, Media Encoder, Device Central, OnLocation (for monitoring and recording to disc in the field), Encore authoring tools, and Bridge (for organization and browsing among applications). Creative Suite Production Premium 5.5 has an academic price of $449.
Sony Vegas
Sony’s Vegas Pro 11 works directly with MTS files and can mix MTS with other kinds of video without having to transcode. The program includes real–time effects preview, image stabilization (including correcting for the skew effect of the CMOS photo sensor), stationary and moving titles, 2D and 3D transitions, and multi-camera editing. Vegas also features an authoring program for DVDs and Blu-ray discs. The editing process involves dragging and dropping media files from the Device Explorer into the Media Pool, the Timeline, or the Trimmer window as well as working with tool icons and keyboard commands.
Sony’s MXF file format uses a lower bit rate than Avid DNxHD145 and Apple ProRes 422. Its files will take up less hard-drive space and it will work with less robust computers as long as the computer has a high-quality NVIDIA or ATI graphics board with at least 512MB of GPU memory, 4GB of RAM, and 64-bit processing.
As a nonlinear video editor, Sony Vegas developed from the desktop audio processing, mixing, and editing program called Sound Forge, which Sony acquired in 2003. This meant that as Vegas developed, it always had sophisticated audio editing and excellent audio features. It currently includes Dolby Digital Professional Encoder for 5.1 surround sound. Vegas Pro 11 operates on PC platforms only and sells for $549 or at an academic discount price of $350.
In addition to the four previous editing programs (actually, five, considering the two versions of Final Cut Pro), you may want to consider Grass Valley’s Edius 6 and EditShare’s Lightworks. Edius 6 is a versatile multi-format editing program for Windows that enables you to work natively in MTS files and mix formats and even frame rates in real time without transcoding. Its slogan is, “Edit anything.” Edius sells for $729 but you can download a 30-day free trial. There is a special price of $399 if you cross-grade from Avid, Premiere, Final Cut Pro, or Vegas, and an educational price of $159 for those who qualify for an academic discount.
Lightworks by EditShare is an Oscar-winning professional program used over the years in such films as Goodfellas (1990), Pulp Fiction (1994), Braveheart (1995), Jerry Maguire (1996), Moulin Rouge (2001), 28 Days Later (2002), Chicago (2002), The Departed (2006), Shutter Island (2010), and The King’s Speech (2010). Lightworks has a downloadable public beta copy of its current version for Windows available for free. (Mac and Linux versions are in development at the time of this writing.) To find out more, visit www.editshare.com; then click Products and Lightworks. While it does provide the basic editing system without charge, Lightworks makes money on licenses and proprietary plug-ins for some of its professional features.
Workflows
Your editing workflow should try to find the best balance between quality and efficiency in relation to the following questions:
![]() What format and quality level should I shoot in?
What format and quality level should I shoot in?
![]() Where and when do I store and back up raw (the original) media files?
Where and when do I store and back up raw (the original) media files?
![]() Do I ingest all of my footage for editing or only selected files?
Do I ingest all of my footage for editing or only selected files?
![]() Do I import from the camcorder, a card reader, or a storage drive?
Do I import from the camcorder, a card reader, or a storage drive?
![]() Do I import raw MTS files directly or immediately transcode MTS to a high quality editing codec? Or do I initially edit off-line in a lower-quality “proxy” codec and later conform a high-quality master with only the footage needed?
Do I import raw MTS files directly or immediately transcode MTS to a high quality editing codec? Or do I initially edit off-line in a lower-quality “proxy” codec and later conform a high-quality master with only the footage needed?
![]() Do I need to intercut or interface with other formats?
Do I need to intercut or interface with other formats?
![]() How do I organize my project in the editing program?
How do I organize my project in the editing program?
![]() Which editing procedures should I do first?
Which editing procedures should I do first?
![]() Should I upgrade to a 10-bit high-quality editing codec before color correcting and effects?
Should I upgrade to a 10-bit high-quality editing codec before color correcting and effects?
![]() Does the project need to interface with plug-ins and other programs?
Does the project need to interface with plug-ins and other programs?
![]() Do I need to share work on the project with other editors (or effects, graphics, or sound people) on other workstations?
Do I need to share work on the project with other editors (or effects, graphics, or sound people) on other workstations?
![]() Does the project need the services of a professional production house?
Does the project need the services of a professional production house?
![]() Do I store all the parameters and iterations of the project?
Do I store all the parameters and iterations of the project?
![]() What format(s) do I need to export, to where, and for what purpose?
What format(s) do I need to export, to where, and for what purpose?
![]() Do I create and store a completed master, and in what form?
Do I create and store a completed master, and in what form?
![]() What are the final exhibition formats for the project?
What are the final exhibition formats for the project?
There is no single set of right answers because there are trade-offs involving time, cost, drive space, image quality, types of equipment and software, ease of operation, learning curves, personal preferences, client preferences, broadcast standards (if applicable), and ultimately what will be acceptable for your purpose with your resources for a particular type of project. The answers were simpler and clearer in the analog age because there were fewer options. Now there are many more variables and many more ways to accomplish each stage of the digital media-making process. The important thing is to find good answers for each of these questions rather than ending up with a workflow by default that may not provide the best results given your time and resources.
Getting Started in Final Cut Pro 7
When you open Final Cut Pro 7, open the Final Cut Pro menu (in the upper-left corner) and select System Settings. Under the Scratch Disk tab, click the top Set button and select where you want your project files to be saved. This creates a Capture Scratch folder where transcoded clips will be placed, a Render Files folder, and an Audio Render Files folder. To name and save your project, click the File menu (upper-left corner) and choose Save Project As.
Final Cut Pro 7 has a Browser window (top left) to organize media in your project, a Viewer window (top middle) to preview and prepare source clips, and a Canvas (top right) to view edited sequences. The Timeline (bottom) provides a graphic layout for assembling and editing picture and tracks. The Tool palette is nearby on the bottom right and the Audio meter is next to the Tool palette. To make a window active, click anywhere in that window. To make sure that the window is active, look for the highlighted window bar.
If your working preferences are not already set in FCP7, open the Final Cut Pro menu and choose User Preferences. Within the General tab, change the Levels of Undo setting (top left) from 10 to anywhere between 30–50. This will enable you to use the Undo function (Command+Z) 30 to 50 times if you make a mistake. In the same tab (General), make sure the Autosave Vault checkbox is checked to further protect your project. Finally, you select and set audio and video settings in the Sequence menu. Highlight a specific sequence, open the Sequence menu (top middle), and select settings for frame size, pixel aspect ratio, and compression to match your video’s dimensions (1,920×1,080 and 16×9).
As explained in the previous chapter, most editors transfer the media files from the camcorder (or its chip) to a high-speed internal or external hard drive prior to editing. To ingest your media from the hard drive, follow these steps:
1. Open the File menu and choose Log and Transfer or press Shift+Command+8.
2. In the window that opens, click the Add Volume icon (a folder with plus sign).
3. Locate and open the AVCHD folder you want to import. The folder’s list of clips will collect on the left.
4. Label the logging fields for each clip or allow Final Cut Pro 7 to automatically name clips by choosing a preset in the Name Preset menu.
5. Select the media that you want to transfer and click Add Selection to Queue.
Media will automatically start transcoding and transferring. Final Cut Pro 7 will warn you that if you stop or pause the process, partially transferred media will not be saved. The transcoded files are stored in your Capture Scratch folder (where you set your scratch disk earlier) and will appear in the Browser window, ready for editing. Final Cut Pro 7 cannot edit with native AVCHD/MTS files. Your MTS files need to be transcoded to Apple ProRes422 during log and transfer and will occupy 3–10× more drive space.
There are several tools that will help you keep your media organized. The Browser window contains projects, which contain all clips, sequences, and effects of your movie. Each project appears as a tab in the window. Bins are folders that keep media organized. To create a new bin, Control-click in the Browser window and choose New Bin from the menu that appears. Sequences are containers for editing dozens or hundreds of clips together into a scene or an entire production. Multiple sequences are often used to create trial edits and alternative versions. To create a new sequence, follow the steps for creating a new bin, but select New Sequence instead of New Bin in the menu. You can drag individual clips and sequences into different bins at any time.
To start the edit, double-click a clip in the Browser window. The video will appear in the Viewer window. Locate in and out points by moving the playhead (the yellow upside-down triangle at the bottom of the frame) and mark them using the I and O keys. Click the center of the video in the Viewer window and drag it straight into the Timeline.
There are two essential tools for editing in the Timeline:
![]() The arrow-shaped Selection tool (keyboard shortcut: A) is the topmost icon in the Tool palette. The Selection tool enables you to select, move, drag, and rearrange clips within the Timeline.
The arrow-shaped Selection tool (keyboard shortcut: A) is the topmost icon in the Tool palette. The Selection tool enables you to select, move, drag, and rearrange clips within the Timeline.
![]() The Razor Blade tool (keyboard shortcut: B) in the middle of the Tool palette enables you to perform a straight cut, splitting one clip into two.
The Razor Blade tool (keyboard shortcut: B) in the middle of the Tool palette enables you to perform a straight cut, splitting one clip into two.
To zoom in or out of an area of the Timeline, press Command+plus (+) or Command+minus (−).
Basic keyboard commands for Final Cut Pro 7 are listed in Appendix F. In addition, Moviola’s Final Cut Pro Field Guide is a useful app for iPhone or iPad that provides instructions, workflows, troubleshooting tips, and a searchable list of Final Cut Pro keyboard shortcuts.
Getting Started in Final Cut Pro X
To begin a project in Final Cut Pro X, open the File menu, choose New Project, type the name of your project, and click OK. As you work on your project, Final Cut Pro X auto-saves after every change. The layout contains an Event Browser (upper-left window), which displays all the source media. Connected to the Event Browser is the Event Library, where you can see each individual event and the media it contains. Events are folders that hold all the video clips, audio clips, images, render files, and database files. The Viewer (upper-right window) plays back projects and clips, and the Magnetic Timeline (bottom) is where your edits take place.
With Final Cut Pro X, the project settings will automatically match the settings of the first clip dropped into the Magnetic Timeline by default. To find the Preferences, open the Final Cut Pro menu and choose Preferences. In the Preferences dialog box, there are three options: Editing, Playback, and Import. The audio and video settings for the project will change automatically with the media files you use in the edit.
To import media, you will choose between importing selected files or importing all files from an AVCHD folder on a storage drive or directly from a file-based camera such as the G10/XA10. Final Cut Pro X can edit natively with raw AVCHD/MTS and many other kinds of files or edit in Apple ProRes 422. To import files, follow these steps:
1. To import from your storage drive, click the Import Files option found in the Event Browser window; alternatively, open the File menu, choose Import, and select Files.
2. Locate the file(s) you want to import. Designate the event in which the files will be placed. You can add files to an existing event or create a new event.
3. Click Import (bottom right), and the clips will appear in the Event Browser.
4. Alternatively, to import directly from the camcorder, make sure the camcorder is plugged into the computer. Then click the Import from Camera button in the Event Browser window or open the File menu and choose Import From Camera (keyboard shortcut: Command+I).
5. Select your camcorder or device from the list; available clips will appear on the lower right.
6. To import all clips, click the Import All button. Alternatively, Command-click each thumbnail you want to import and then click the Import Selected button.
7. Select the destination for your clips by either adding them to an event or creating a new event.
8. Click Import. The clips will appear in the Event Browser.
Final Cut Pro X gives you options to transcode media:
![]() Create Optimized Media. This transcodes files into the Apple ProRes 422 codec.
Create Optimized Media. This transcodes files into the Apple ProRes 422 codec.
![]() Create Proxy Media. This transcodes the files into the Apple ProRes 422 “proxy” codec (for off-line edits at about 30 percent of the 145Mbps data rate of ProRes 422).
Create Proxy Media. This transcodes the files into the Apple ProRes 422 “proxy” codec (for off-line edits at about 30 percent of the 145Mbps data rate of ProRes 422).
Using the Action menu in the Event Browser, selected clips can be sorted and grouped by date created, date imported, reel, scene, duration, and file type.
In the Event Browser, position the playhead to mark in and out points using the I and O keys, respectively, on a selected clip. Then drag the clip from the Event Browser to the Timeline. You can rearrange the clip in the Timeline by dragging it with the Select tool (a cursor arrow), which you can also use to trim a clip by dragging the end of a clip left or right. To remove clips from the Timeline, select the clip(s) and press the Delete key.
Editing tools are located in a pop-up menu in the Timeline (middle left). The Zoom tool (keyboard shortcut: Z) magnifies or demagnifies part of the Timeline. When the Zoom tool is activated, click the Timeline to zoom in. To zoom out, hold down the Option key as you click. Basic keyboard shortcuts for Final Cut Pro X are listed in Appendix F, along with shortcuts for the older program, Final Cut Pro 7, which many people still use.
Getting Started in Avid Media Composer 6
When you open Avid Media Composer 6, a Select Project window presents a list of existing projects or the option to start a new project. For a new project, you need to choose an existing user profile or create a new profile. To create a new profile, click the User Profile drop-down menu and select Create User Profile. The window will prompt you for a name and location where your project will be saved. Select Private if you are working alone on the project. Private will save files to your Users folder on the computer. Select Shared if working with multiple editors who have different logon identities. Select External to save the project anywhere else, like the Desktop or to a specific hard drive.
To set up the project itself, select New Project, give the new project a name, and set the project settings. The Media Composer editing interface opens. The editing windows are very customizable, offering options to configure the screens and tools to suit individual styles of editing. To set the interface to a default window layout, open the Windows menu, choose Workspaces, and choose Source/Record Editing.
Media Composer 6 uses tabs to help keep the workspace organized. (See Figure 19.2.) Like all sophisticated editing programs, there are three, four, or more ways to accomplish the same task using the cursor, moveable tools, icons, menus, or keyboard commands. The Project window (top left) provides access tabs to bins, settings, format, usage, and info. The Format tab enables you to review project settings, and the Settings tab provides a list of settings in Avid Media Composer with options for adjusting.
Figure 19.2 Avid Media Composer.
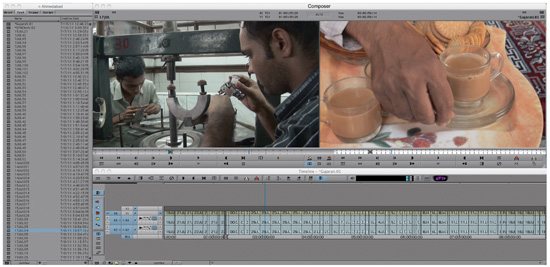
Next to the Project window are the Source and Record monitors for viewing and cueing source media clips (left) and edited Timeline media (right). Below these windows is the Timeline, where you edit your clips. There are many different tools, which you can access from menus, keyboard commands, or panels of icons near the areas they will affect. In the Settings tab in the Project window, you can select All Settings or just Active Settings. Import Settings enables you to adjust for import. Timeline Views displays settings for the Timeline.
Avid Media Composer supports multiple workflows for importing media. Like Apple, Avid Media Composer has its own high-quality video codec, DNxHD, which is optimized for the purpose of editing. DNxHD has three professional-quality bit rates: 10-bit 220x, 8-bit 220, and 8-bit 145. But Avid Media Composer can also work natively in most tapeless formats, including MTS files from AVCHD, RED/RED EPIC, QuickTime, ProRes, HDCAM SR, XDCAM, P2, GFCAM, and Canon XF. To use this function, you need Avid Media Access (AMA), a plug-in that enables the editor to work with native camera files without having to transcode, rewrap, import, and/or copy media. AMA creates a link to the specific volume(s) or file(s) but does not store the media in Avid Media Composer. It only references the media from your storage or backup drive, your media card, or the camcorder itself if you want to keep it attached during editing. To download the free AMA plug-in for your specific format, visit www.avid.com/US/products/Avid-Media-Access/Plug-ins.
Using AMA saves hours of transcoding and enables you to start editing immediately. However, when applying individual effects, titles, and color correction, and eventually creating a master, there will be pauses for rendering. The alternative is to import and transcode into a DHxHD format at the beginning. This involves investing time up front but speeds up effects and color-correction processes because you are working in a high-quality format made specifically for editing.
To import files without using AMA, do the following:
1. Open the Tools menu and choose Media Creation.
2. In the dialog box that opens, click the Media Type tab, choose File Format, and select MXF (the most commonly used format for an HD project).
3. Click the Import tab and select the target drives and the resolution, which will be DNxHD145 (unless you are intercutting with even higher resolution footage).
4. Open the bin into which you want to import the files.
5. Open the File menu, choose Import, and mark the video files you want to import.
6. Click Open. Your MTS files will transcode into DNxHD145 and populate the specified bin.
The bin can display the names and data of your clips in four different ways: a brief list (with standard info), a text view (with complete data), a frame view (with storyboard icons), and a script view (which displays thumbnails of each clip similar to the frame view, but with a dialog box that you can use to type notes or script details). Selecting a clip in the bin makes it appear in the Source monitor for examining or for marking in and out points.
There are many alternative ways of assembling your media clips. They can be dragged directly from the bin or Source monitor onto the Timeline and then further trimmed and rearranged, or they can be cued in the Source monitor with IN and OUT points and a keyboard command used to insert or overwrite the shot to a designated point in the Timeline. Basic keyboard shortcuts for Avid Media Composer 6.0 and other recent versions are listed in Appendix G, “Basic Keyboard Commands: Avid Media Composer,” available at www.courseptr.com/downloads.
Getting Started in Premiere Pro
As you open Adobe Premiere Pro CS6, you see an Open Project option and a New Project option. To create a new project, click New Project, name your project in the dialog box that appears, and set its location. When you click OK, the Premiere interface is launched. The opening steps involve defining the settings and creating a save location for your project. You can rearrange Premiere’s interface to fit individual editing needs by selecting various options from the Workspace menu. The default opening workspace is the Editing mode, in which all the basic editing windows are visible.
The Project panel (top-left window) is where the project files, clips, sequences, and graphics are located. The Source monitor (top-middle window) is used to view and trim raw media. The Program monitor (top-right window) is for viewing the project in progress, and the Media Browser (bottom-left window) is where you can view the contents of your entire computer to find, view, and import files. The Timeline (bottom middle) shows your sequence along with audio and video clips associated with the sequence. The Tools panel (to the right of the Timeline) performs editing functions. The Audio meter (to the right of the Tools panel) monitors audio levels.
Project settings apply to the entire project. To view, set or change project settings, open the Project menu, choose Project Settings, and choose General or Scratch Disk. Be aware that most project settings cannot be changed after they have been set at project creation.
Not many sequence settings can be changed. If major changes to the sequence settings are needed, you need to create a new sequence. To match source media settings and sequence settings automatically, select a desired clip in the Project panel and drag it onto the New Item icon located at the bottom of the Project panel. This will automatically create a new sequence and match the settings. If the setting in question can be changed, you can access the setting by opening the Sequence menu in the Project panel and choosing Sequence Settings.
There are two ways to import media with Premiere. The most common way is open the File menu and choose Import. Premiere also enables you to import footage using the Media Browser, which allows you to navigate anywhere on your computer. Once you find your media, you can view it before importing. After you select media to import, double-click on the file(s) or folder, and Premiere will import and place the files in the Project panel. Premiere can natively edit and manage AVCHD/MTS files.
The Project panel uses folders called bins to organize project files. To create a new bin, open the File menu, choose New, and select Bin. To rename a bin, click its current name to select and type the new name.
To edit a clip, follow these steps:
1. Select the clip in the Project panel. It will appear in the Source monitor.
2. Move the playhead (the blue marker) to the desired cue points.
3. Press I to mark an in point and O to mark an out point.
4. Then, click the center of the video and drag it down into the Timeline.
5. Use items in the Tools panel to perform simple cuts, rearrange clips, trim edges, and lengthen, shorten, or divide a clip.
You can use the Zoom tool to magnify and demagnify the Timeline, enabling you to make finer adjustments or larger changes. To remove clips from the Timeline, select a clip and press the Delete key. This will remove the clip and leave a gap where the clip used to be. To delete the clip and close the gap, select the clip, open the Edit menu, and choose Ripple Delete. Alternatively, right-click the clip (or Control-click on a Mac) and choose Ripple Delete from the menu that appears. Basic keyboard shortcuts for Adobe Premiere Pro CS6 (which are also relevant to CS5 and CS5.5) are listed in Appendix H, “Basic Keyboard Commands: Premiere Pro,” available at www.courseptr.com/downloads.
Getting Started in Sony Vegas Pro 11
To get started using Sony Vegas Pro, follow these steps:
1. Open the Project menu and choose New.
2. Set Region, Audio, Video, and Project settings.
3. Name the project and set the project’s destination folder.
4. Check the Manage Project Files checkbox to save all project files—audio, video, images, et cetera—in the project folder.
5. Click OK.
The workspace is divided into three primary areas:
![]() The Track list (bottom left) displays the track order in the project and contains controls used to determine track compositing and mixing.
The Track list (bottom left) displays the track order in the project and contains controls used to determine track compositing and mixing.
![]() The Timeline (bottom right) is used for arranging and editing.
The Timeline (bottom right) is used for arranging and editing.
![]() The window-docking area (top) is where you can organize frequently used windows into a stack for alternately displaying the Preview window, Trimmer window, Explorer window, Transitions window, FX window, Device Explorer window, and Media Generators window. For quick access, each window has a tab at the bottom with its name on it.
The window-docking area (top) is where you can organize frequently used windows into a stack for alternately displaying the Preview window, Trimmer window, Explorer window, Transitions window, FX window, Device Explorer window, and Media Generators window. For quick access, each window has a tab at the bottom with its name on it.
To access preferences in Vegas Pro, open the Options menu and choose Preferences. There are tabs for each category of changeable settings. The General tab includes standard program settings, and the Video tab enables you to control display, video events, and video tracks. The settings in the Preview Device tab enable you to configure an external monitor. The settings in the Audio Device tab enable you to adjust sound-recording and playback options. The Editing tab has preference controls for specific editing options and configurations.
Changing the project properties is different from changing the project preferences. The preferences affect how the Vegas program functions overall. Project properties affect the specific project. Open the File menu and choose Properties to adjust, set, or review settings that are specific to the project. The Properties window contains five tabs: Video, Audio, Ruler (for changing the Timeline scale and ruler), Summary, and Audio CD (for burning “disc-at-once” CDs—an extension of the program’s sophisticated audio mixing and mastering capabilities).
To import media, open the Project menu and choose Import. Then locate the media files you want to add to the project media list and click Open. To import media from a device, open the View menu and choose Device Explorer. If the device is connected, it should display on the left side of the Device Explorer. When you select the device, its media files will be displayed. Select the clips, click the Import button, and the clips will appear in the Project Media window, where they can be assigned to bins to organize your project.
When you locate a media file in the Explorer or Project Media window and drag it to the Timeline, an event is created. Events in the Timeline can contain video, audio, still images, or generated media such as titles and effects. In addition to specialized functions that can be performed in the Trimmer, Transitions, and Effects windows in the window-docking area, you can cut, paste, trim, split, or delete events in the Timeline using drag-and-drop operations with the cursor, keyboard commands, and tools like the Cut button. (The difference between a cut and a delete is that a cut places the extracted media on the Clipboard for further use.) Basic keyboard shortcuts for Sony Vegas Pro 11 are listed in Appendix I, “Basic Keyboard Commands: Sony Vegas Pro,” available at www.courseptr.com/downloads.