
10
Shooting at Night
The rods in the human eye are sensitive only to light and dark values, and are a thousand times more sensitive than the cones, which sense color. This is why we perceive an otherwise colorful world as dull and desaturated in subdued light and nearly black and white at night. All the colors are still there, but the cones in our retina are not sensitive enough to respond when the light falls below a certain intensity.
Darkening a scene in video does not necessary look like nighttime; it may just look gray or simply underexposed. A successful nighttime scene usually has some portion of the composition fully exposed, even if it is only a car headlight acting as a white reference in an otherwise dark composition. More likely, to replicate how the human eye adapts to low light, we usually expect some areas to be dark and desaturated, other areas to be completely black, while the center of attention, like the highlight portion of your subject’s face, has a reasonable amount of visible detail.
For urban exteriors, certain clues tell us that it is nighttime: a black sky, a general lack of fill light (because the sky is no longer luminous), dense shadows, and light from car headlights, store signs, and windows articulating the nightscape. A rural exterior night scene might have different clues: the moon and moonlight, trees silhouetted against a dark gray sky, a lone highway light, porch light, or campfire, along with large expanses of darkness. For an interior, like a bedroom, at 2 a.m., any visible sky through the window is dark. If no lights are on in the bedroom, then visibility is provided by light coming from outside the room, a shaft of hallway light from under the door, or light from a distant streetlamp or the moon casting a Venetian blind or window-molding shadow into the room. In each of these cases, there still has to be some source of light to create a visual scene. Depicting the night environment, whether city or rural, can also depend on off-screen sound because we see less on the screen. The darkness on the screen seems more visual when we hear crickets, the distant hoot of an owl, or footsteps walking through leaves.
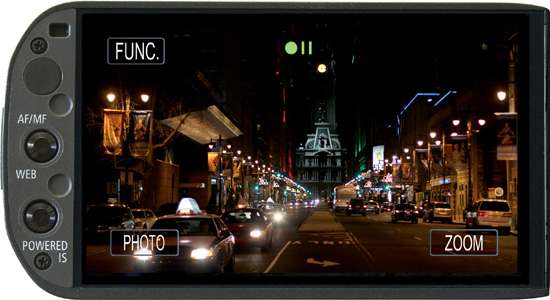
In urban areas, there is a lot of light at night. In fact, an urban nightscape is often a composition of extremes: storefronts and small pools of light at full exposure or nearly, plus bright overexposed light sources often visible in the shot, like streetlamps and car headlights, along with a black sky and significant areas of underexposure or complete darkness. (See Figure 10.1.) Some of your options for shooting under these conditions are full AUTO mode, Spotlight, Night Scene, Programmed AE, or with full manual control.
Figure 10.1 Shooting at night in available light.
AUTO Mode at Night
In full AUTO mode, the camcorder’s logic will try to decide whether your compositions are simply dark scenes that need to be fully brightened or whether they fall into one of the 38 categories in which SMART AUTO takes over. The danger of this mode is that exposure will ride up and down as the camera’s logic system gets different clues. If you are inexperienced with the camcorder or are shooting under such rushed and varied conditions that you have no alternative, then shoot in full AUTO mode. Pay attention to the icons appearing in the upper left of the touchscreen. If it simply says “AUTO,” the camcorder has not figured out a more specific interpretation of the scene and will increase the exposure to make the image an average brightness. A head-and-shoulder icon indicates that SMART AUTO has gone into Portrait mode and will expose for skin tones. If the icon shows the sun peeking from its upper corner even though it is nighttime, then SMART AUTO has read the situation as a backlit scene and will raise the exposure to bring out details.
If you intend for your shadows to be dark, as they often should be at night, there is a danger that AUTO mode will bloom and clip highlights while trying to lighten details in dense shadows. In full AUTO mode, you have no direct control over the matter. As you move the camcorder, SMART AUTO may change its interpretation and your scene will have varying exposures. SMART AUTO’s 38-scene repertoire does include settings that are well adapted to nighttime, such as Night Scene and Spotlight, but there is no guarantee that SMART AUTO will lock and hold onto these settings when you want them. If SMART AUTO continually misreads the scene or your intentions, then you would fare better using Night Scene or Spotlight in a programmed or manual mode.
The other reason to select programmed or manual control is to have the ability to toggle between auto and manual focus with the button to the left of the touchscreen. Full AUTO mode does allow Face Detection and Touch & Track focus, but at night under low visibility these functions are unpredictable and less reliable. SMART AUTO is a considerable improvement over an auto-exposure system that treats every situation the same, but it is no match for the ability to lock into a single program mode that specifically matches your intentions. Under the M setting, Spotlight, Night Scene, Low Light, Programmed AE, and Manual offer different approaches and different controls for shooting at night.
Spotlight and Night Scene Programs
The Spotlight programmed mode is intended for situations comparable to a follow spot in a theatrical performance: a pool of light illuminating a small part of the composition while the rest of the area is dark. But Spotlight conditions do not have to be on stage or in a theatrical situation. A person sitting under a streetlamp in a dark park or illuminated by a shaft of light from a car headlight or the beam from a handheld flashlight searching a dark space are comparable to spotlight situations. Simple auto exposure will try to bring up details in the black areas and consequently unnaturally gray the dark areas, overexpose the lit area, and increase the video noise. Spotlight, on the other hand, normalizes the lit area and lets dark be dark. To select Spotlight, with the AUTO/M/CINEMA switch set to M, choose FUNC > Rec. Programs > Spotlight.
White balance is automatic in Spotlight, but you are allowed to use +/− Exposure to manually adjust brightness. If exposure is already at maximum aperture, “plus” may not have an effect because this mode sets a limit on gain, but “minus” allows you to darken even further. Spotlight teamed with +/− control can be effective for certain kinds of nighttime compositions that predominantly have a single pool or shaft of light in a dark black environment. Of the programmed modes, Spotlight tends to allow more of the composition to go dark and will do the most to prevent the peak values of highlights from clipping. To operate +/− Exposure control, press the CUSTOM key for two seconds, dial to +/−, and press the CUSTOM key again to activate.
For even greater control of exposure under Spotlight, go to the program panel and press +/− Exposure. A window opens that allows you to select a specific point of exposure on the screen, adjust and lock +/− Exposure values to manual, and monitor on the waveform monitor. (Choose FUNC > +/− Exposure > WFM.)
Under more varied nighttime conditions, the Night Scene program works remarkably well, handling multiple pools of light, neon signs, store fronts, streetlamps, car headlights, points of light in the shot, minimal fill light, and areas of darkness. To select this mode, with the AUTO/M/CINEMA switch set to M, choose FUNC > Rec. Programs > Night Scene. This mode does not allow you to manually set white balance, aperture, shutter speed, or gain. Like Spotlight, it already has preselected parameters, including its own gain limits that work well with most night exteriors. Night Scene does not allow +/− Exposure control with the CUSTOM key. However, it does allow you to use touchscreen +/− Exposure control if you additionally select it from the program panel. (With the AUTO/M/CINEMA switch set to M, choose FUNC > +/− Exposure. Also open the waveform monitor for monitoring.) This gives you a critical element of manual control.
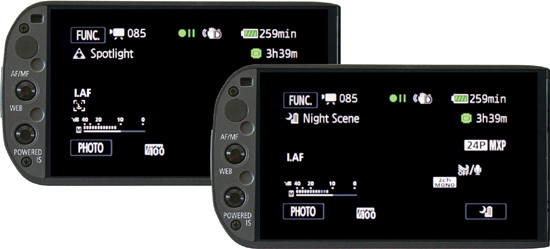
Night Scene will be a little brighter and will bring out more detail than Spotlight. Both modes are viable portrayals of night, but with different levels of black, mid-tones, and white. To decide between one and the other, you might compare them by directly switching between Spotlight and Night Scene on the Rec. Programs selection panel while looking at your scene. (See Figure 10.2.) This test takes only a few seconds. In addition to exteriors, both Spotlight and Night Scene could be used for predominantly dark interiors that have small areas of light. Both program modes produce a rich nighttime black that minimizes grain and muddiness.
Figure 10.2 Spotlight and Night Scene menu options.
Low Light Mode
The Low Light program does the opposite. It tries to bring visibility to most of the picture by opening to the widest aperture, running at a slower shutter speed if necessary, and raising gain with the ability to go beyond the 24dB maximum until dense shadow is made lighter. This is fine if you must see detail at any expense, but the Low Light mode often grays out the picture and could destroy the feeling of nighttime.
Higher gain produces grain and a degraded image, so you will want to test this program to see if it is appropriate for your purposes. If you want to retain some of the blackness of nighttime in the composition, then Low Light would be a wrong choice. The Low Light program will produce the lightest rendition of nighttime and will push the exposure by going into very high gain. This could produce burned-out highlights on grainy, visually degraded images when the gain reaches maximum. Low Light is the right choice when seeing detail in the image is more important than the look of night.
A candle-flame icon in the upper-left corner of the touchscreen indicates that you are in Low Light program mode. Low Light does not allow you set a gain limit, but it does allow you to toggle between auto and manual focus, to control +/− Exposure on the CUSTOM dial or from the program panel with a waveform monitor as with Spotlight and Night Scene. With any of these programmed modes, it is good to have manual control over focus and some aspect of exposure.
Programmed AE
Programmed AE (choose FUNC > Rec. Programs > Programmed AE) is one more choice that you could try at night. Compared to Low Light, this program allows you to adjust more factors, including white balance, shutter speed, and an automatic gain limit. To control and test exposure (and consequently graininess) in Programmed AE mode, assign the AGC Limit setting to the CUSTOM key. To do so, press the CUSTOM key for two seconds, use the CUSTOM dial to select AGC, and press the CUSTOM key again.
To perfect your nighttime scene, successively test the limit at 6dB, 12dB, 18dB, and 24dB gain settings. Try running one set of tests with Slow Shutter set to OFF and a second set with Slow Shutter set to ON. You may also want to try one additional test using the Low Light program mode for comparison. The Low Light setting does not limit gain at 24dB and also introduces Auto Slow Shutter, so in nighttime conditions, it will probably deliver the brightest but most-degraded picture. You will need to see which produces the best results for your purposes and situation. Or, once you have found your best gain limit, you might visually compare Programmed AE to Spotlight and Night Scene as well as Low Light while in the program panel. (Choose FUNC > Rec. Programs and then select Programmed AE, Night Scene, Spotlight, or Low Light.)
Manual Exposure at Night
Of course, you obtain maximum control and the fewest unwanted fluctuations under manual exposure. For very low-light conditions, adjust your aperture and shutter speed to low values to transmit the maximum amount of light. (With the AUTO/M/CINEMA switch set to M, choose FUNC > Manual and set the f/stop and shutter speed, as well as the gain. Also turn on zebra patterns, set to 100 percent, and the waveform monitor.) Set the aperture to f/1.8 or slightly above. A setting of f/1.8 lets through the most light, but resolution and image quality improve at a somewhat higher setting, like f/2.0. This is a difference of one-third of a stop, which means you will need 33 percent more light or about 2dB more gain at f/2.0. If you zoom to telephoto, the effective aperture becomes f/2.8, which means you will need double the amount of light or an increase of 6dB in gain compared to remaining in wide angle.
Set the shutter speed to ![]() if you are shooting at 60i or PF30, or
if you are shooting at 60i or PF30, or ![]() if you are shooting at pf24 or 24p. If you are able to hold the camcorder very steady or use a tripod or monopod, you could set the shutter speed to
if you are shooting at pf24 or 24p. If you are able to hold the camcorder very steady or use a tripod or monopod, you could set the shutter speed to ![]() or
or ![]() to shoot in half the light. Or you could halve that again with a shutter speed of
to shoot in half the light. Or you could halve that again with a shutter speed of ![]() or
or ![]() if you are willing to accept blur and a step-frame appearance to motion.
if you are willing to accept blur and a step-frame appearance to motion.
You will set gain based on the value that just begins to produce zebra patterns on white or the value that keeps the peak curve in the waveform monitor for a white surface just under 100 percent (for example, at the 90-percent line). If the brightest part of the image is a source of light, then its peak curve can extend just above 100 percent as long as it does not flatten anything that should retain visible detail.
Because you lose light in telephoto, determine the gain setting on readings taken in wide angle. When you expose in wide angle, the image becomes darker when you zoom to telephoto. This is preferable, however, to initially setting the reading in telephoto and overexposing in wide angle. It looks more natural in a nighttime scene to lose some detail in dark areas than to burn out highlights.
Use both zebra patterns and the waveform monitor to judge exposure. In an otherwise dark scene, it is easy to burn out highlights. With the zebra pattern set to 100 percent, you can set an exposure based on placing the brightest part of the image at 100 percent. The waveform monitor provides even more information: exactly how high the peak of the brightness curve extends, how much headroom it has above that point, whether the peak clips (producing a flat top of the curve), and how much shadow detail is crushed in darkness (producing a flat bottom on the curve).
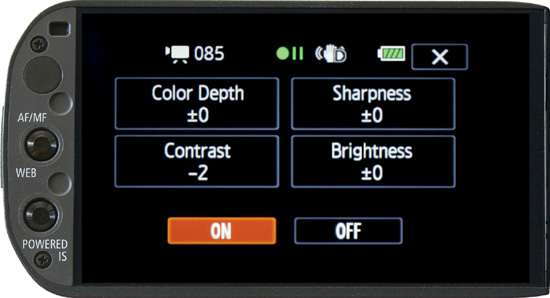
For some scenes, crushed shadows may look natural and justified at night. After all, it is nighttime and we don’t expect to see everything. But if shadow detail is important to you, instead of overexposing and clipping whites, you could try going to the Image Effects program panel and reducing contrast. (Choose FUNC > Image Effects and lower the Contrast setting, as shown in Figure 10.3.) Then return to the waveform monitor in manual exposure to see if more shadow detail appears on the waveform.
Figure 10.3 The Contrast setting under Image Effects.
Film Noir Lighting
In the 1940s, each of the major Hollywood studios produced about 50 features a year, and would contract with movie theaters to book a package of all 50 films instead of making films available individually. Each studio would make a half dozen high-budget “A” pictures and 40 or more low-budget “B” pictures to fill out the block-booking contracts. Many of the quickly made B pictures were pulp-fiction crime, detective, or domestic dramas that lent themselves to stylishly somber nighttime scenes, which depended on lighting instead of expensive sets. Light could evoke mood, mystery, or imbalance, and could transform the look of a scene through use of shadows, shafts of light, silhouettes, and characters moving from darkness to light and from light to darkness.
At the end of World War II, Hollywood B pictures flooded into Europe. The French called these movies “film noir” and considered them high art regardless of their low budgets and quick production schedules. Indeed, some of the most enduring films from 1941 to 1945 are noir classics: The Maltese Falcon (1941), Murder My Sweet (1944), Double Indemnity (1944), Laura (1944), Mildred Pierce (1945), and Detour (1945). Post–World War II film noir includes The Big Sleep (1946), The Killers (1946), Nightmare Alley (1947), Out of the Past (1947), They Live by Night (1949), The Asphalt Jungle (1950), Night and the City (1950), The Big Heat (1953), The Big Combo (1955), Kiss Me Deadly (1955), The Killing (1956), Sweet Smell of Success (1957), and Touch of Evil (1958).
The film noir genre often expressed anxiety, alienation, and moral ambiguity that resonated with the period of scarcity in World War II and the tension and paranoia of the cold war in the 1950s. These themes were expressed in a perfect form/content relationship through bleak, hard-edged lighting; ominous shadows; chiaroscuro; and dark angular compositions. Film noir died out around 1960 to 1964, as Hollywood moved toward predominantly color productions competing with the emergence of color television. But noir set a standard for how to evocatively light nighttime that still has its echoes today.
You can shoot in black and white with the G10/XA10 in the CINEMA mode, but you will have more options if you shoot in M mode and strip the scene of color in postproduction instead of in the camera, which is easy to do. In CINEMA mode, Filter 9 (black-and-white) cannot shoot at night as well as Spotlight, Night Scene, Low Light, or Programmed AE, or offer as much total control as M mode. All the CINEMA modes, including Filter 9 (black-and-white), allow various Rec. Program adjustments to provide partial or plus/minus manual exposure, but they are limited to a maximum gain of 18dB. You have more control over a black-and-white picture if you shoot it in M mode in color, particularly if you are shooting at nighttime and in low light. The Coen brothers’ black-and-white film The Man Who Wasn’t There (2001) was shot with color film and released in black and white.
A production does not have to be in black and white to share the aesthetics of film noir. Examples of “neo noir” include Martin Scorsese’s Taxi Driver (1976), in which cinematographer Michael Chapman evoked the sense of noir in color with a roving taxi on the night shift, steam from street vents, neon signs, blinking lights, storefronts, and street activity of the New York City nightscape. Cinematographer Jordan Cronenweth set a standard for noir in color with evocative shafts of light, backlight, smoke, and rain in the extensive night scenes of Blade Runner (1982). His son, cinematographer Jeff Cronenweth, continued the noir legacy with The Girl With the Dragon Tattoo (2011).
For many decades of television production, there was an argument that video needed a lot of light for an image to show up on home television sets viewed in a lit room. Producers argued that in television, shadows always needed fill light and dark scenes had to be avoided. Yet a series like The X Files, which aired from 1993 to 2002, proved the opposite. Commenting on The X-Files in an interview in the Archive of American Television, Emmy Award–winning cinematographer John Bartley said, “They thought it was crazy to go that dark, to get things down that far. Sometimes it’s a little nail-biting and you’ve got to make sure that it’s actually there—or something’s there.” Bartley often filmed agents Scully and Mulder from their shadow side, with a soft ¾ rear key light modeling the partially visible opposite side of their faces, in scenes with backgrounds painted with hard-edged light, angular shadows, and expanses of darkness. Film noir and neo noir provide a lighting vocabulary of how to expressively use light at night, even with a camcorder as small as the G10/XA10.
Nighttime Exteriors
Compared to shooting in direct sunlight, many cinematographers prefer nighttime exteriors. They no longer have the problem of interruptions from passing clouds or a limited window of time for the light to be in the right place as the sun’s angle drifts through the day. In addition, nighttime offers inherent expressive opportunities for modeling with hard light, creating and shaping shadows, and allowing parts of the frame to be dark, mysterious, or left to the spectator’s imagination.
You can create noir lighting with very limited resources. The contrasty, chiseled look is forged by strategically employing very few lights—often a single hard angular key light modeling one side of the subject with no corresponding fill light for the other side. One of the qualities of nighttime is there is less ambient light bouncing around, so there is less fill, and light may conceivably come from a single source such as a streetlamp. There is often an additional sliver of backlight to separate the unlit side of the subject from a dark, sparsely lit background.
Provided you have the instruments and the electricity, lighting a nighttime exterior offers the same element of control as studio lighting, with the ability to put light where you want it. Night lighting is often easier and has the possibility of achieving expressive results with fewer instruments because it usually needs very little fill light (if any), and vast areas can be selectively unlit.
Power for exterior lights can come from a rented portable generator (as it might for a Hollywood production). A 30-amp Honda generator rents for about $25 a day from a hardware store. This will be as noisy as a lawnmower, so it would be appropriate for scenes where the sound track can be replaced. A quiet “blimped” generator rented from a production house will cost much more.
But there are other solutions. Power can be supplied by a 120-volt extension cord for exteriors close enough to an outlet. For more remote locations, a 12-volt instrument like an LED500A or a Lowel Omni-light with a 12-volt quartz bulb can be powered from the cigarette lighter outlet from a car or from a portable car or motorcycle battery. A 12-volt 7AH (ampere-hour) generic sealed lead acid battery sells for as little as $11, and a 12-volt 9AH Bescor MM-9 battery pack with shoulder strap sells for $59. Lightweight LED instruments by Litepanels or the inexpensive Neewer CN-160 powered by lithium ion or AA alkaline batteries are also viable at close range. In makeshift situations, film students and low-budget independents often position a car off-screen so that its headlights throw light on the subject from an expressive angle.
Improving Night Images
You may want the stark look of neo noir or prefer a less stylized appearance with additional fill light to bring out more detail. Or, you may limit yourself to only available light at nighttime under streetlamps, at gas stations, or near storefronts. The low-light capabilities, multiple program modes, and manual overrides of the G10/XA10 are up to all of these tasks. For any of these situations, there are several considerations that will improve shooting at night. First of all, focus is more critical in low light. The lens is at its widest aperture, which produces the shallowest depth of field, and auto focus is more indecisive and less accurate in low light. So, if at all possible, this is a time for manual focus.
In auto exposure modes, the appropriate blackness of the dark parts of a nighttime composition can easily become grainy, gray, and degraded through the use of excessive gain. One way to avoid this is to use manual exposure or a programmed mode that allows you to set a limit on gain. Another is to find ways other than gain to bring up the exposure, such as reducing shutter speed, maximizing your aperture, or adding light. If you reduce shutter speeds to ![]() or
or ![]() of a second, you may need camera support to prevent softened images from hand-held motion blur. Support will certainly be needed for even slower shutter speeds.
of a second, you may need camera support to prevent softened images from hand-held motion blur. Support will certainly be needed for even slower shutter speeds.
The maximum aperture of the G10/XA10 in wide angle is f/1.8 (an excellent low-light aperture). But this becomes f/2.8 when you zoom to telephoto, a loss of 1![]() f/stops of light. Each adjacent f/stop represents a halving or doubling of light transmitted by the previous or next f/stop. The loss of light happens because telephoto intersects a narrower area of light and the physical aperture of the G10/XA10 lens cannot proportionally widen to compensate at the maximum setting. So, if you shoot wide open in very low light, wide angle transmits more than twice the light of telephoto.
f/stops of light. Each adjacent f/stop represents a halving or doubling of light transmitted by the previous or next f/stop. The loss of light happens because telephoto intersects a narrower area of light and the physical aperture of the G10/XA10 lens cannot proportionally widen to compensate at the maximum setting. So, if you shoot wide open in very low light, wide angle transmits more than twice the light of telephoto.
Here is a summary of recommendations for getting the highest quality images at night:
![]() Use a programmed or M mode for maximum control.
Use a programmed or M mode for maximum control.
![]() Use manual focus.
Use manual focus.
![]() Favor wide angle.
Favor wide angle.
![]() Consider
Consider ![]() or
or ![]() shutter speeds.
shutter speeds.
![]() Use a tripod or monopod for telephoto or slow shutter speeds.
Use a tripod or monopod for telephoto or slow shutter speeds.
![]() Expose for highlights and accept darkness as part of the composition.
Expose for highlights and accept darkness as part of the composition.
![]() Contain a white reference within the dark composition.
Contain a white reference within the dark composition.
![]() Set a gain limit to avoid a degraded composition.
Set a gain limit to avoid a degraded composition.
![]() Use chiaroscuro or backlight to separate figure from ground.
Use chiaroscuro or backlight to separate figure from ground.
![]() Add light when necessary.
Add light when necessary.
Lighting in a Car
The interior of a car can be illuminated by fluorescent or LED lights. A MiniFlo nine-inch fluorescent instrument is made by KinoFlo, the Academy Award–winning pioneer and innovator in location fluorescent lighting. It has a 12-volt dimmable ballast that can be powered by a car’s cigarette lighter outlet. The MiniFlo can be mounted on the car’s instrument panel, clipped to a visor, or positioned to shine through a sunroof or car window. It provides about 10½ footcandles at three feet. KinoFlo lighting systems are expensive; a kit with two nine-inch lamps is approximately $1,000.
Luckily, inexpensive LED instruments like the Neewer CN-126 and CN-160 can provide nearly comparable light for about $35 to $50. The CN-126 and CN-160 run on AA cells, have a built-in dimmer, and come with a photo shoe mount and a ¼-inch screw hole. In a car, you do not want to mount the LED on the camcorder because that would be the flattest, most self-conscious angle providing no modeling, not to mention the likelihood of filming an image of the lighting instrument reflected off one of the car windows. You can attach the LED light to the instrument panel, the sunroof, or a window with a suction grip or duct tape. Find a credible angle that provides adequate modeling and no reflection of itself reaching the camcorder. The built-in dimmer is very useful for finding the right level of intensity to balance with the exterior images of landscape, roadway, or city that pass by. If the area beyond the subject is dark, then some backlight should be applied with a second instrument if possible.
Driving at night with a bright light in the car can be a potential safety hazard. Take care that the angle and intensity of the light are not a distraction for the driver. In fiction films, a nighttime car interior is often shot while the car is actually being towed. With black surroundings, a scene shot within a moving car can be simulated using a stationary car rocked occasionally by assistants, along with panning additional lights across the car and a believable audio track of driving sounds. It could even be lit with 120-volt instruments on extension cords.
Infrared
CMOS and CCD photo sensors have an inherent sensitivity to infrared light, which is invisible to the human eye. To prevent unnatural colors, digital camcorders employ a built-in infrared cut-off filter to limit the spectrum to visible light. Engaging the XA10’s INFRARED switch retracts the cut-off filter and allows the camcorder to sense infrared in addition to visible light. Infrared capability is one of the differences between the XA10 and G10. Used in conjunction with the infrared LED light source in the XA10’s handle, it is possible to shoot video in complete darkness up to 20 feet away.
The XA10 records infrared as a black-and-white image or with a green “night vision” look. Rendering an IR image in full color would look unnatural because infrared is beyond the range of human perception and can never be accurately represented as a visual color. Surfaces that reflect IR radiation often look strange because they have a different tonal value than we are used to, and may reveal details that were less noticeable when illuminated with the visual spectrum. Green foliage often appears off-white under infrared, and warm objects may appear slightly brighter.
In 1997, the Sony Corporation introduced NightShot infrared functionality with full exposure control on some of its Hi8 camcorders. Certain materials, particularly dark ones, can transmit infrared radiation and consequently may look slightly transparent in infrared light. Under precisely the right conditions, it is sometimes possible for a camera to see a pattern or shape through cloth, sunglasses, or dark plastic sheeting that otherwise looks opaque to the human eye. News stories around the world hyped the idea that Sony’s cameras had “X-ray vision” that could see through people’s clothes and invaded individual privacy, although the actual effect was considerably less graphic or explicit. Under international pressure, Sony weakened the NightShot function on all subsequent camcorders. They also disabled manual exposure controls while in infrared mode, making it impossible to fine-tune the glowing, blooming outlines of the brightest parts of the picture.
Canon’s infrared system is designed with the same intentional limitations as Sony’s revised version of NightShot. Consequently, night-vision images of high photographic quality are not possible. But the XA10’s infrared function does truly enable you to capture video in apparent blackness, which can be invaluable under certain documentary and surveillance conditions. The degraded, voyeuristic, “night vision” look of infrared can also be exploited in fiction, personal media, and experimental work.
To operate in this mode, slide the INFRARED switch on the left side of the XA10 to ON. (This function is not available on the G10.) You must use the menu to enable the IR light in the XA10 handle, which turns on only when the IR switch is activated. To do so, choose FUNC > MENU > Camera icon > IR Light > ON.
The infrared emitter on the front of the handle is nearly invisible to the human eye, yet it provides enough light to capture video in otherwise total darkness at distances up to 20 feet. The fact that this light comes from such a close axis to the camcorder’s lens means that subjects are modeled very poorly under flat, direct illumination and the pupils of their eyes glow like demons. These problems can be considerably improved if the infrared light comes from a 45º or side angle instead of directly from the camera.
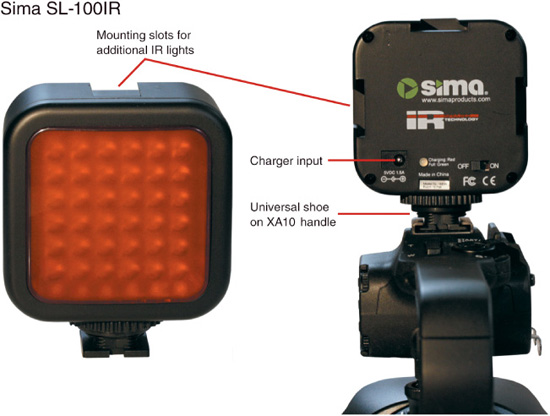
There are a number of portable infrared lights on the market that can be operated separately from the camera. The Polaroid Studio Series IR Night Light has 36 infrared LEDs and rechargeable batteries, and can be mounted on a camera, light stand, tripod, or monopod pole. For $39, it offers an alternative to the direct IR light from the Canon XA10 that can provide much better modeling. Its major limitation is that the batteries last for about 45 minutes to an hour per charge. Nearly identical is the Sima SL-100IR, shown in Figure 10.4. It also has 36 infrared LEDs and sells for $35 to $45. The SL-100IR contains a built-in lithium ion rechargeable battery with a similar discharge rate to the Polaroid, but it will also run on AC power. (Sima’s earlier models did not have the AC option.) For greater intensity and coverage, two or more SL-100IRs can be stacked or horizontally interlocked together. Another possibility is the Phantom Lite Illuminator ($95), which uses 25 high-intensity infrared LEDs and can run for up to 12 hours on a 9-volt battery. It lasts longer in the field and is brighter than the Sima SL-100IR, but its spread is more of a circular spotlight effect than Sima’s rectangular flood, which fits the 16×9 screen better. All three of these lights are much brighter than the single LED infrared emitter in the XA10 handle.
Figure 10.4 The Sima SL-100IR infrared light.
When you are in infrared mode, the letters IR appear in the upper left of the touchscreen. An icon next to the IR will indicate that the built-in IR light is on. IR will not operate in the CINEMA mode because the contrast, saturation, and hue settings that create the cinema look are irrelevant to infrared. A warning will come on the screen telling you to switch to M or AUTO. The M mode allows you to toggle between manual and auto focus, but no exposure controls are available. Images lit with the built-in IR light in complete darkness will be somewhat grainy and low contrast.
With an instrument like the Sima SL-100IR, grain will improve because of the higher IR light level, and contrast will improve with a better modeling angle. In addition to video, still photos can be taken in complete darkness in IR mode.