
Improving efficiency with contextual help
Detecting and fixing simple errors
Reducing keystrokes
Generating code
Navigating source code with bookmarks
One thing that Microsoft has long been good at is providing automated help as you write your code. Older versions of Visual Basic had a limited subset of this automated intelligence known as IntelliSense, but with the introduction of Visual Studio .NET, Microsoft firmly established the technology throughout the whole IDE. With recent releases of Visual Studio, IntelliSense has become so pervasive that it has been referred to as IntelliSense Everywhere.
This chapter illustrates the many ways in which IntelliSense helps you write your code. Among the topics covered are detecting and repairing syntax errors, harnessing contextual information, and variable name completion. You also learn how to set and use bookmarks in your code for easier navigation.
IntelliSense is the general term for automated help and actions in a Microsoft application. The most commonly encountered aspects of IntelliSense are those wavy lines you see under words that are not spelled correctly in Microsoft Word, or the small visual indicators in a Microsoft Excel spreadsheet that inform you that the contents of the particular cell do not conform to what was expected.
Even these basic indicators enable you to quickly perform related actions. Right-clicking a word with red wavy underlining in Word displays a list of suggested alternatives. Other applications have similar features.
The good news is that Visual Studio has had similar functionality for a long time. In fact, the simplest IntelliSense features go back to tools such as Visual Basic 6. With each release of Visual Studio, Microsoft has refined the IntelliSense features, making them more context-sensitive and putting them in more places so that you should always have the information you need right at your fingertips.
In Visual Studio 2010, the IntelliSense name is applied to a number of different features from visual feedback for bad code and smart tags for designing forms to shortcuts that insert whole slabs of code. These features work together to provide you with deeper insight, efficiency, and control of your code. Some of the features new to Visual Studio 2010, such as suggestion mode and Generate From Usage, are designed to support the alternative style of application development known as test-driven development (TDD).
The simplest feature of IntelliSense gives you immediate feedback about bad code in your code listings. Figure 7-1 shows one such example, in which an unknown data type is used to instantiate an object. Because the data type is unknown where this code appears, Visual Studio draws a red (C#) or blue (VB) wavy line underneath to indicate a problem.
Note
The formatting of this color feedback can be adjusted in the Fonts and Colors group of Options.
Hovering the mouse over the offending piece of code displays a tooltip to explain the problem. In this example the cursor was placed over the data type, with the resulting tooltip "The type or namespace name 'Customer' could not be found."
Visual Studio is able to look for this kind of error by continually precompiling the code you write in the background, and looking for anything that will produce a compilation error. If you were to add the Customer class to your project, Visual Studio would automatically process this and remove the IntelliSense marker.
Figure 7-2 displays the smart tag associated with the error. This applies only to errors for which Visual Studio 2010 can offer you corrective actions. Just below the problem code, a small blue (C#) or red (VB) rectangle is displayed. Placing the mouse cursor over this marker displays the smart tag action menu associated with the type of error — in this case the action menu provides options for generating your Customer class from what Visual Studio is able to determine from the way you have used it.
Note
The standard shortcut key used by all Microsoft applications to activate an IntelliSense smart tag is Shift+Alt+F10, but Visual Studio 2010 provides the more wrist-friendly Ctrl+. shortcut for the same action.
The smart tag technology found in Visual Studio is not solely reserved for the code window. In fact, Visual Studio 2010 also includes smart tags on visual components when you are editing a form or user control in Design view (see Figure 7-3).

When you select a control that has a smart tag, a small triangle appears at the top-right corner of the control itself. Click this button to open the smart tag Tasks list — Figure 7-3 shows the Tasks list for a standard TextBox control.
Note
The keyboard shortcuts for opening smart tags also work for visual controls.
The power of IntelliSense in Visual Studio 2010 becomes apparent as soon as you start writing code. As you type, various drop-down lists are displayed to help you choose valid members, functions, and parameter types, thus reducing the number of potential compilation errors before you even finish writing your code. Once you become familiar with the IntelliSense behavior, you'll notice that it can greatly reduce the amount of code you actually have to write. This can be a significant savings to developers using more verbose languages such as Visual Basic.
In Visual Studio 2010, IntelliSense appears almost as soon as you begin to type within the code window. Figure 7-4 illustrates the IntelliSense displayed during the creation of a For loop in Visual Basic. On the left side of the image, IntelliSense appeared as soon as the f was entered, and the list of available words progressively shrank as each subsequent key was pressed. As you can see, the list is made up of all the alternatives, whether they be statements, classes, methods, or properties, that match the letters entered (in this case those containing the word For).
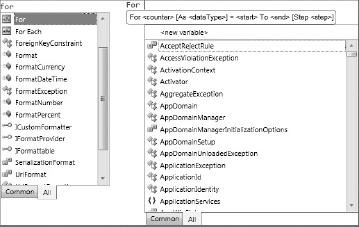
Notice the difference in the right-hand image of Figure 7-4, where a space has been entered after the word for. Now the IntelliSense list has expanded to include all the alternatives that could be entered at this position in the code. In addition, there is a tooltip that indicates the syntax of the For statement. Lastly, there is a <new variable> item just above the IntelliSense list. This is to indicate that it's possible for you to specify a new variable at this location.
Note
The <new variable> item appears only for Visual Basic users.
Although it can be useful that the IntelliSense list is reduced based on the letters you enter, this feature is a double-edged sword. Quite often you will be looking for a variable or member but won't quite remember what it is called. In this scenario, you might enter the first couple of letters of a guess and then use the scrollbar to locate the right alternative. Clearly, this won't work if the letters you have entered have already eliminated the alternative. To bring up the full list of alternatives, simply hit the Backspace key with the IntelliSense list visible.
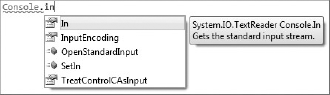
In previous versions of Visual Studio, IntelliSense has only been able to help you find members that began with the same characters that you typed into the editor. In Visual Studio 2010 this is no longer true. Now it is possible to find words that appear in the middle of member names as well. It does this by looking for word boundaries within the member names. Figure 7-5 shows an example in C# where typing Console.in will find In, InputEncoding, OpenStandardInput, SetIn, and TreatControlCAsInput but does not find LargestWindowHeight despite the fact that it contains the substring "in."
Note
If you know exactly what you are looking for, you can save even more keystrokes by typing the first character of each word in uppercase. As an example, if you type System.Console.OSI, then OpenStandardInput will be selected by IntelliSense.
If you find that the IntelliSense information is obscuring other lines of code, or you simply want to hide the list, you can press Esc. Alternatively, if you simply want to view what is hidden behind the IntelliSense list without closing it completely, you can hold down the Ctrl key. This makes the IntelliSense list translucent, enabling you to read the code behind it, as shown in Figure 7-6.

The IntelliSense list is not just for informational purposes. You can select an item from this list and have Visual Studio actually insert the full text into the editor window for you. You have a number of ways to select an item from the list. You can double-click the desired item with the mouse; you can use the arrow keys to change which item is highlighted and then press the Enter or Tab keys to insert the text; and finally, when an item is highlighted in the list it will automatically be selected if you enter a commit character. Commit characters are those that are not normally allowed within member names. Examples include parentheses, braces, mathematical symbols, and semicolons.
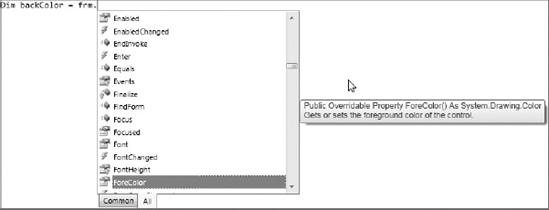
Because IntelliSense has been around for so long, most developers will be familiar with the member list that appears when you type the name of an object and immediately follow it by a period. This indicates that you are going to refer to a member of the object, and Visual Studio automatically displays a list of members available to you for that object (see Figure 7-7). If this is the first time you've accessed the member list for a particular object, Visual Studio simply shows the member list in alphabetical order with the top of the list visible. However, if you've used it before, it highlights the last member you accessed to speed up the process for repetitive coding tasks.
Figure 7-7 also shows another helpful aspect of the member list for Visual Basic programmers. The Common and All tabs (at the bottom of the member list) enable you to view either just the commonly used members or a comprehensive list.
By default, when Visual Studio 2010 shows the IntelliSense member list, one member is selected and as you type, the selection is moved to the item in the list that best matches the characters entered. If you press Enter, Space, or type one of the commit characters (such as an open parenthesis), the currently selected member is inserted into the editor window. This default behavior is known as "completion mode."
In most cases completion mode provides the desired behavior and can save you a great deal of typing, but it can be problematic for some activities. One such activity is test-driven development where references are frequently made to members that have not yet been defined. This causes IntelliSense to select members that you didn't intend it to and insert text that you do not want.
To avoid this issue Microsoft has introduced a new IntelliSense mode into Visual Studio 2010 called suggestion mode. When IntelliSense is in suggestion mode one member in the list will have focus but will not be selected by default. As you type, IntelliSense moves the focus indicator to the item that most closely matches the characters you typed, but it will not automatically select it. Instead, the characters that you type are added to the top of the IntelliSense list and if you type one of the commit characters or press Space or Enter, the exact string that you typed is inserted into the editor window.
Note
You can still make a selection from the IntelliSense list by using the arrow keys. Also, you can select the item that has focus in the member list by pressing the Tab key.
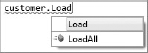
Figure 7-8 shows an example of the problem that suggestion mode is designed to address. On the left-hand side we are writing a test for a new method called Load on the CustomerData class. The CustomerData class does not have a method called Load yet but it does have a method called LoadAll.
On the right-hand side of Figure 7-8 we have typed Load followed by the open parenthesis character. IntelliSense has incorrectly assumed that we wanted the LoadAll method and has inserted it into the editor.
To avoid this behavior we can turn on suggestion mode by pressing Ctrl+Alt+Space. Now when we type Load it appears at the top of the IntelliSense list. When we type the open parenthesis character we get Load as originally intended (see Figure 7-9).
In addition to word and phrase completion, the IntelliSense engine has another feature known as stub completion. This feature can be seen in Visual Basic when you create a function by writing the declaration of the function and pressing Enter. Visual Studio automatically reformats the line, adding the appropriate ByVal keyword for parameters that don't explicitly define their contexts, and also adding an End Function line to enclose the function code. Another example can be seen when editing an XML document. When you type the open tag of a new element, Visual Studio automatically puts the closing tag in for you.
Visual Studio 2010 takes stub completion an extra step by enabling you to do the same for interface and method overloading. When you add certain code constructs such as an interface in a C# class definition, Visual Studio gives you the opportunity to automatically generate the code necessary to implement the interface. To show you how this works, the following steps outline a task in which the IntelliSense engine generates an interface implementation in a simple class:
Start Visual Studio 2010 and create a C# Windows Forms Application project. When the IDE has finished generating the initial code, open
Form1.csin the code editor.At the top of the file, add a
usingstatement to provide a shortcut to theSystem.Collectionsnamespace:using System.Collections;
Add the following line of code to start a new class definition:
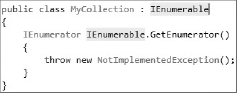
public class MyCollection: IEnumerable
As you type the
IEnumerableinterface, Visual Studio first adds a red wavy line at the end to indicate that the class definition is missing its curly braces, and then adds a smart tag indicator at the beginning of the interface name (see Figure 7-10).Hover your mouse pointer over the smart tag indicator. When the drop-down icon appears, click it to open the menu of possible actions, as shown in Figure 7-11.
Click either of the options to "implement interface 'IEnumerable'" and Visual Studio 2010 automatically generates the rest of the code necessary to implement the minimum interface definition. Because it detects that the class definition itself isn't complete, it also adds the braces to correct that issue at the same time. Figure 7-12 shows what the final interface will look like.

Event handlers can also be automatically generated by Visual Studio 2010. The IDE does this much as it performs interface implementation. When you write the first portion of the statement (for instance, myBase.OnClick +=), Visual Studio gives you a suggested completion that you can select simply by pressing Tab.
Rather than generating code from a definition that already exists, sometimes it is more convenient to generate the definition of a code element from the way you have used it. This is especially true if you practice test-driven development where you write tests for classes that have not been defined yet. It would be convenient to be able to generate the classes from the tests themselves and this is the purpose of the Generate From Usage feature in C# and Visual Basic.
To understand how you might use this in practice, the following steps outline the creation of a very simple Customer class by writing some client code that uses it and then generating the class from that usage:
Start Visual Studio 2010 and create a C# Command Line project. When the IDE is ready open the
Program.csfile.Update the
Mainmethod with the following code:C#
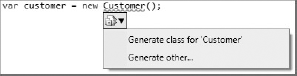
Customer c = new Customer
{
  FirstName = "Joe",
  LastName = "Smith"
};

Console.WriteLine(c.FullName);
c.Save();
You should see a red wiggly line underneath both instances of the class name
Customer. Right-click one of them and select Generate
For each property that does not exist, right-click it and select Generate
You can do the same for the
Savemethod by right-clicking and selecting Generate
Note
Though generated properties and classes can be used straight away, method stubs are generated to throw a NotImplementedException.
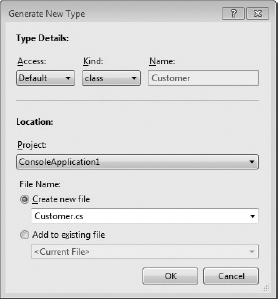
If the undefined code that you are trying to generate is a type, you will have the option to Generate Class or Generate Other. If you select Generate Other, the Generate New Type dialog is shown (see Figure 7-13). This dialog gives you more options to configure your new type including whether you want a class, enumeration, interface, or structure; whether the new type should be public, private, or internal; and where the new type should go.
In old versions of Microsoft development tools, such as Visual Basic 6, as you created the call to a function, IntelliSense would display the parameter information as you typed. Thankfully, this incredibly useful feature is still present in Visual Studio 2010.
The problem with the old way parameter information was displayed was that it would only be shown if you were actually modifying the function call. Therefore, you could see this helpful tooltip as you created the function call or when you changed it but not if you were just viewing the code. The result was that programmers sometimes inadvertently introduced bugs into their code because they intentionally modified function calls so they could view the parameter information associated with the calls.
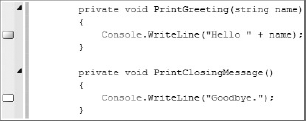
Visual Studio 2010 eliminates that risk by providing an easily accessible command to display the information without modifying the code. The keyboard shortcut Ctrl+Shift+Space displays the information about the function call, as displayed in Figure 7-14. You can also access this information through the Edit
Note
In Figure 7-14 the PrintGreeting method takes two parameters. The second parameter is optional and displays in square brackets with an assignment showing its default value if you don't provide one. VB programmers will be familiar with this syntax but it is new to C# 4.0.
In a similar vein, sometimes you want to see the information about an object or interface without modifying the code. The Ctrl+K, Ctrl+I keyboard shortcut displays a brief tooltip explaining what the object is and how it was declared (see Figure 7-15).
Note
The keyboard shortcuts for each VS2010 install depend on the settings selected (i.e. Visual Basic Developer, Visual C# Developer, and so on). All of the shortcut keys in this chapter are based on using the General Developer Profile setting.
You can also display this tooltip through the Edit
If you are building web applications, you will find yourself working in JavaScript to provide a richer client-side experience for your users. Unlike C# and Visual Basic, which are compiled languages, JavaScript is an interpreted language, which means that traditionally the syntax of a JavaScript program has not been verified until it is loaded into the browser. Although this can give you a lot of flexibility at run time, it requires discipline, skill, and a heavy emphasis on testing to avoid a large number of common mistakes.
In addition to this, while developing JavaScript components for use in a browser, you must keep track of a number of disparate elements. This can include the JavaScript language features themselves, HTML DOM elements, and handwritten and third-party libraries. Luckily Visual Studio 2010 is able to provide a full IntelliSense experience for JavaScript, which will help you to keep track of all of these elements and warn you of syntax errors.
As you type JavaScript into the code editor window, Visual Studio lists keywords, functions, parameters, variables, objects, and properties just as if you were using C# or Visual Basic. This works for built-in JavaScript functions and objects as well as those you define in your own custom scripts and those found in third-party libraries. Visual Studio is also able to detect and highlight syntax errors in your JavaScript code.
Note
Since Internet Explorer 3.0 Microsoft, has maintained its own dialect of JavaScript called JScript. Technically, the JavaScript tools in Visual Studio 2010 are designed to work with Jscript, so you will sometimes see menu options and window titles containing this name. In practice, the differences between the two languages are so minor that the tools work equally well with either one.
To prevent you from accidentally referring to JavaScript elements that are not available, Visual Studio 2010 builds up an "IntelliSense context" based on the location of the JavaScript block that you are editing. The context is made up of the following items:
The current script block. This includes inline script blocks for
.aspx,.ascx,.master,.html, and.htmfiles.Any script file imported into the current page via a
<script />element or a ScriptManager control. In this case the imported script file must have the.jsextension.Any script files that are referenced with a references directive (see the section "Referencing another JavaScript File" later in this chapter).
Any references made to XML Web Services.
The items in the Microsoft AJAX Library (if you are working in an AJAX-enabled ASP.NET web application).
Note
Visual Studio keeps track of files in the context and updates JavaScript IntelliSense whenever one of them changes. Sometimes this update may be pending and the JavaScript IntelliSense data will be out of date. You can force Visual Studio to update the JavaScript IntelliSense data by selecting Edit
Occasionally something will go wrong and Visual Studio will be unable to build a JavaScript IntelliSense context. Often, though, Visual Studio will be able to determine what caused the error and provide you with feedback that you can use to correct the issue. In Figure 7-16, Visual Studio has detected that we have made a reference to a JavaScript file that does not exist. When you add the file to the project, Visual Studio will detect its presence and remove the error indicator and error message. Although this error detection normally happens as a background process you can force Visual Studio to check a page by selecting Edit

Sometimes one JavaScript file builds upon the base functionality of another. When this happens they are usually referenced together by any page using them but have no direct reference explicitly defined. Because there is no explicit reference, Visual Studio 2010 is unable to add the file with the base functionality to the JavaScript IntelliSense context and you won't get full IntelliSense support.
To allow Visual Studio to discover the base file and add it to the context you can provide a reference to it by using a references directive. A references directive is a special kind of comment that provides information about the location of another file. You can use references directives to make a reference to any of the following:
Other JavaScript files: This includes
.jsfiles and JavaScript embedded in assemblies. It does not include absolute paths so the file you reference must be a part of the current project.Web Service (.asmx) files: These also must be a part of the current project and Web Service files in Web Application projects are not supported.
Pages containing JavaScript: One page may be referred to in this way. If any page is referenced, no other references can be made.
Following are some examples of references directives. These must appear before any other code in your JavaScript file.
JavaScript
// JavaScript file in current folder
/// <reference path="Toolbox.js" />

// JavaScript file in parent folder
/// <reference path="../Toolbox.js" />

// JavaScript file in a path relative to the root folder of the site
/// <reference path="~/Scripts/Toolbox.js" />

// JavaScript file embedded in Assembly
/// <reference name="Ajax.js" path="System.Web.Extensions, ..." />

// Web Service file
/// <reference path="MyService.asmx" />

// Standard Page
/// <reference path="Default.aspx" />
Note
A few restrictions exist on how far references directives will work. First, references directives that refer to a path outside of the current project are ignored. Second, references directives are not recursively evaluated so only those in the file currently being edited are used to help build the context. References directives inside other files in the context are not used.
Visual Studio 2010 sets up a number of default options for your experience with IntelliSense, but you can change many of these in the Options dialog if they don't suit your own way of doing things. Some of these items are specific to individual languages.
The first options to look at are in the Environment section under the Keyboard group. Every command available in Visual Studio has a very specific entry in the keyboard mapping list (see the Options dialog shown in Figure 7-17, accessible via Tools
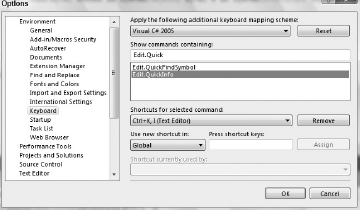
You can override the predefined keyboard shortcuts or add additional ones. The commands for the IntelliSense features are shown in Table 7-1.
Table 7.1. IntelliSense commands
COMMAND NAME | DEFAULT SHORTCUT | COMMAND DESCRIPTION |
|---|---|---|
| Ctrl+K, Ctrl+I | Displays the Quick Info information about the selected item |
| Ctrl+Space | Attempts to complete a word if there is a single match, or displays a list to choose from if multiple items match |
| Ctrl+Alt+Space | Toggles IntelliSense between suggestion and completion modes |
| Ctrl+Shift+Space | Displays the information about the parameter list in a function call |
| Ctrl+K, Ctrl+X | Invokes the Code Snippet dialog, from which you can select a code snippet to insert code automatically (see the next chapter) |
| Ctrl+K,Ctrl+M | Generates the full method stub from a template |
| None | Generates the abstract class definitions from a stub |
| None | Generates the explicit implementation of an interface for a class definition |
| None | Generates the implicit implementation of an interface for a class definition |
Use the techniques discussed in Chapter 3 to add additional keyboard shortcuts to any of these commands.
You can control how IntelliSense works on a global language scale (see Figure 7-18) or per individual language. In the General tab of the language group in the Options dialog, you want to change the Statement Completion options to control how member lists should be displayed, if at all.
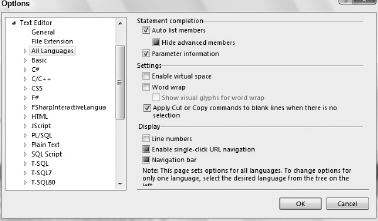
Besides the general IDE and language options for IntelliSense, some languages, such as C#, provide an additional IntelliSense tab in their own sets of options. Displayed in Figure 7-19, the IntelliSense for C# can be further customized to fine-tune how the IntelliSense features should be invoked and used.
First, you can turn off completion lists so they do not appear automatically, as discussed earlier in this chapter. Some developers prefer this because the member lists don't get in the way of their code listings. If the completion list is not to be automatically displayed, but instead only shown when you manually invoke it, you can choose what is to be included in the lists in addition to the normal entries, including keywords and code snippet shortcuts.
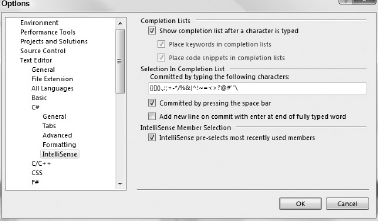
To select an entry in a member list, you can use any of the characters shown in the Selection In Completion List section, or optionally after the spacebar is pressed. Finally, as mentioned previously, Visual Studio automatically highlights the member in a list that was last used. You can turn this feature off for C# or just clear the history.
In addition to the basic aspects of IntelliSense, Visual Studio 2010 also implements extended IDE functionality that falls into the IntelliSense feature set. These features are discussed in detail in other chapters in this book, as referenced in the following discussion, but this section provides a quick summary of what's included in IntelliSense.
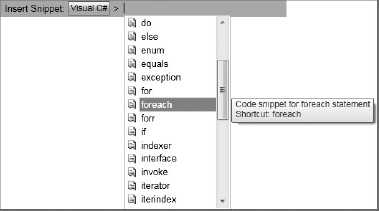
Code snippets are sections of code that can be automatically generated and pasted into your own code, including associated references and using statements, with variable phrases marked for easy replacement. To invoke the Code Snippets dialog, press Ctrl+K, Ctrl+X. Navigate the hierarchy of snippet folders (shown in Figure 7-20) until you find the one you need. If you know the shortcut for the snippet, you can simply type it and press Tab, and Visual Studio invokes the snippet without displaying the dialog. In Chapter 8, you see just how powerful code snippets are.
XML comments are described in Chapter 12 as a way of providing automated documentation for your projects and solutions. However, another advantage of using XML commenting in your program code is that Visual Studio can use it in its IntelliSense engine to display tooltips and parameter information beyond the simple variable-type information you see in normal user-defined classes.
You can also add your own IntelliSense schemas, normally useful for XML and HTML editing, by creating a correctly formatted XML file and installing it into the Common7Packagesschemasxml subfolder inside your Visual Studio installation directory (the default location is C:Program FilesMicrosoft Visual Studio 10.0). An example of this would be extending IntelliSense support for the XML editor to include your own schema definitions. The creation of such a schema file is beyond the scope of this book, but you can find schema files on the Internet by searching for "IntelliSense schema in Visual Studio."
Bookmarks in Visual Studio 2010 enable you to mark places in your code modules so you can easily return to them later. They are represented by indicators in the left margin of the code, as shown in Figure 7-21.
To toggle between bookmarked and not bookmarked on a line, use the shortcut Ctrl+K, Ctrl+K. Alternatively, you can use the Edit
Note
Remember that toggle means just that. If you use this command on a line already bookmarked, it removes the bookmark.
Figure 7-21 shows a section of the code editor window with two bookmarks set. The top bookmark is in its normal state, represented by a shaded blue rectangle. The lower bookmark has been disabled and is represented by a solid white rectangle. Disabling a bookmark enables you to keep it for later use while excluding it from the normal bookmark-navigation functions.
To enable or disable a bookmark use the Edit
Note
You may want to set up a shortcut for disabling and enabling bookmarks if you plan on using them a lot in your code management. To do so, access the Keyboard Options page in the Environment group in Options and look for Edit.EnableBookmark.
Along with the ability to add and remove bookmarks, Visual Studio provides a Bookmarks tool window, shown in Figure 7-22. You can display this tool window by pressing Ctrl+K, Ctrl+W or via the View Bookmark Window menu item. By default, this window is docked to the bottom of the IDE and shares space with other tool windows, such as the Task List and Find Results windows.

Figure 7-22 illustrates some useful features of bookmarks in Visual Studio 2010. The first feature is the ability it gives you to create folders that can logically group the bookmarks. In the example list, notice that a folder named Old Bookmarks contains a bookmark named Bookmark3.
To create a folder of bookmarks, click the New Folder icon in the toolbar along the top of the Bookmarks window (it's the second button from the left). This creates an empty folder (using a default name of Folder1, followed by Folder2, and so on) with the name of the folder in focus so that you can make it more relevant. You can move bookmarks into the folder by selecting their entries in the list and dragging them into the desired folder. Note that you cannot create a hierarchy of folders, but it's unlikely that you'll want to. Bookmarks can be renamed in the same way as folders, and for permanent bookmarks renaming can be more useful than accepting the default names of Bookmark1, Bookmark2, and so forth. Folders are not only a convenient way of grouping bookmarks; they also provide an easy way for you to enable or disable a number of bookmarks in one go, simply by using the checkbox beside the folder name.
To navigate directly to a bookmark, double-click its entry in the Bookmarks tool window. Alternatively, if you want to cycle through all of the enabled bookmarks defined in the project, use the Previous Bookmark (Ctrl+K, Ctrl+P) and Next Bookmark (Ctrl+K, Ctrl+N) commands. You can restrict this navigation to only the bookmarks in a particular folder by first selecting a bookmark in the folder and then using the Previous Bookmark in Folder (Ctrl+Shift+K, Ctrl+Shift+P) and Next Bookmark in Folder (Ctrl+Shift+K, Ctrl+Shift+N) commands.
The last two icons in the Bookmarks window are Toggle All Bookmarks, which can be used to disable (or re-enable) all of the bookmarks defined in a project, and Delete, which can be used to delete a folder or bookmark from the list.
Note
Deleting a folder also removes all the bookmarks contained in the folder. Visual Studio provides a confirmation dialog to safeguard against accidental loss of bookmarks. Deleting a bookmark is the same as toggling it off.
Bookmarks can also be controlled via the Bookmarks submenu, which is found in the Edit main menu. In Visual Studio 2010, bookmarks are also retained between sessions, making permanent bookmarks a much more viable option for managing your code organization.
Task lists are customized versions of bookmarks that are displayed in their own tool windows. The only connection that still exists between the two is that there is an Add Task List Shortcut command still in the Bookmarks menu. Be aware that this does not add the shortcut to the Bookmarks window but instead to the Shortcuts list in the Task List window.
IntelliSense functionality extends beyond the main code window. Various other windows, such as the Command and Immediate tool windows, can harness the power of IntelliSense through statement and parameter completion. Any keywords, or even variables and objects, known in the current context during a debugging session can be accessed through the IntelliSense member lists.
IntelliSense in all its forms enhances the Visual Studio experience beyond most other tools available to you. Constantly monitoring your keystrokes to give you visual feedback or automatic code completion and generation, IntelliSense enables you to be extremely effective at writing code quickly and correctly the first time. In the next chapter you dive into the details behind code snippets, a powerful addition to IntelliSense.
In this chapter you've also seen how you can set and navigate between bookmarks in your code. Becoming familiar with using the associated keystrokes will help you improve your coding efficiency.