
WHAT'S IN THIS CHAPTER?
Now that you're familiar with the general layout of Visual Studio 2010, it's time to learn how you can customize the IDE to suit your working style. In this chapter you learn how to manipulate tool windows, optimize the code window for maximum viewing space, and change fonts and colors to reduce developer fatigue.
As Visual Studio has grown, so too has the number of settings that you can adjust to optimize your development experience. Unfortunately, unless you've periodically spent time sifting through the Options dialog (Tools
A number of Visual Studio add-ins will add their own nodes to the Options dialog because this provides a one-stop shop for configuring settings within Visual Studio. Note also that some developer setting profiles, as selected in Chapter 1, show only a cut-down list of options. In this case, checking the Advanced checkbox shows the complete list of available options.
By default, when you open a new instance of Visual Studio 2010 you see what is known as the Start Page. You can adjust this behavior from the Environment
The reason that most developers stick with the Start Page is that it provides a useful starting point from which to jump to any number of actions. In the left image of Figure 3-1, you can see that there are links down the left side for connecting to Team Foundation Server and for creating or opening projects. There is also a list of recent projects allowing you to quickly open projects that you have recently been working on. Hovering the mouse over the left side of a project displays a horizontal pin. Clicking the pin changes the orientation to vertical to indicate that the project has been pinned to the Recent Projects list. Alternatively, you can right-click a project and either open the containing folder (useful if you want to locate the project on disk rather than actually opening it) or remove the project from the list. In the lower-left corner there are two checkboxes that control whether the Start Page is closed after opening a project and whether it's displayed at startup. If for whatever reason the Start Page is closed and you want to open it again, you can do so by selecting the View
On the right side of the Start Page are a series of tabs. The Get Started tab (the left image of Figure 3-1) contains various subsections on a variety of topics including Windows, Web, Office and the Cloud. Click on any of these to find information on how to get started working with these technologies and what's new in Visual Studio 2010.
On the Guidance and Resources tab (the center image of Figure 3-1) are links to topics pertaining to best practices, how-to's, and other reference material on designing, building, testing and deploying software using Visual Studio 2010.
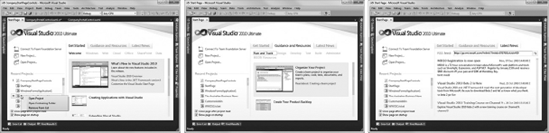
Finally, the Latest News tab (the right image of Figure 3-1) keeps you abreast of the latest happenings around Visual Studio 2010 and the .NET Framework. You can either use the default RSS feed or specify your own feed that you want to be displayed within the Start Page.
In Visual Studio 2010, the Start Page is in fact a WPF control that is hosted within the IDE shell. As such, it is possible to tailor the Start Page to feature information or actions that are relevant to you. Rather than modifying the default Start Page, Visual Studio supports user-specific or Custom Start Pages. By default, this features is disabled so before you can start customizing your Start Page you have to enable the Allow Custom Start Page checkbox on the Environment
Because the Start Page is just a WPF control, you could simply create a new WPF control project and build your page from scratch. However, in most cases it is much simpler to start with the default Start Page and tailor it to suit your needs. To do this you need to copy the default Start Page from where it is installed into your Documents folder.
Copy the contents of the directory
C:Program FilesMicrosoft Visual Studio 10.0Common7IDEStartPages<culture> into the directory C:Users<user name>DocumentsVisual Studio 10StartPages(you may need to create this folder because it may not exist by default).Double-click the project file
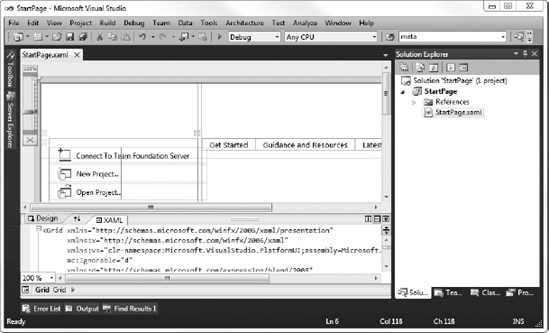
StartPage.csprojto open the project in Visual Studio 2010, as shown in Figure 3-2.
As you can see from Figure 3-2, you are able to modify the Start Page using either the WPF designer or directly in the XAML page. The XAML page is broken down into a number of sections. The best place to get started is where the TabItem tags are defined for the existing tabs. To create an additional tab, copy one of the existing tags and modify it to include your own content. For example, add the following tag after the Latest News tab to add information pertaining to your company.
XAML
<!-- Company Tab -->
<TabItem Header="Company" Height="Auto" x:Uid="Company_Tab"
         DataContext="{Binding Links.Content, Converter=
                       {StaticResource StringToXmlDataProviderConverter}}">
    <Grid>
        <Grid.RowDefinitions>
            <RowDefinition Height="Auto"></RowDefinition>
            <RowDefinition Height="*"></RowDefinition>
        </Grid.RowDefinitions>
        <TextBlock Foreground="#E8E8E8" Margin="15" TextWrapping="Wrap"
               x:Uid="Information_Paragraph" >
            The Company has put a lot of effort into writing this custom
Start Page so that you can quickly access information relevant to
your job, the projects you are working on etc.
</TextBlock>
</Grid>
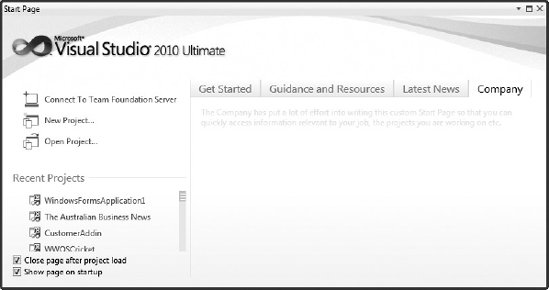
</TabItem>As soon as you save this change, if you click back to the Start Page tab in Visual Studio 2010 you will notice that your changes have already been applied, giving you a new Company tab, as shown in Figure 3-3.
Of course, if you want to do away with the default Start Page layout, you can remove any of the existing elements and replace it with your own layout, information, and functionality. To do this, select the elements either in the designer or the XAML page and delete them. Then use any of the WPF controls in your Toolbox to build your own Start Page interface.
To extend the functionality of the Start Page further you may want to execute code on particular events. The Start Page itself doesn't support having a code-behind file in which to code event handlers. However, you can encapsulate your functionality into a user control that can then be used on your Start Page.
With your Start Page project open, created in the previous section, add a new project in which to place the control you are going to create. To do this, select File
Rename
UserControl1.xamlto CompanyPortalControl.xaml in Solution Explorer.Double-click the
CompanyPortalControl.xamlfile in Solution Explorer to open it in the designer.Replace the XAML with the following markup that creates a button with a Click event handler.
XAML
<UserControl x:Class="CompanyStartPageControls.CompanyPortalControl"
             xmlns="http://schemas.microsoft.com/winfx/2006/xaml/presentation"
             xmlns:x="http://schemas.microsoft.com/winfx/2006/xaml">
    <Grid>
        <Button Click="LaunchWebsite">Company Website</Button>
    </Grid>
</UserControl>
Right-click the
CompanyPortalControl.xamlfile in Solution Explorer and select View Code.Replace the code with the following, which implements the
Clickevent handler for the button to launch the company web site.- VB
Class CompanyPortalControl Private Sub LaunchWebsite(ByVal sender As Object, ByVal e As RoutedEventArgs) System.Diagnostics.Process.Start("http://www.builttoroam.com") End Sub End Class- C#
namespace CompanyStartPageControls{
    public partial class CompanyPortalControl : UserControl{
        public CompanyPortalControl(){
            InitializeComponent();
        }
        private void LaunchWebsite(object sender, RoutedEventArgs e){
            System.Diagnostics.Process.Start(
                                 @"http://www.builttoroam.com");
        }
    }
}
You have now created a control with basic functionality encapsulated within it. Follow these steps to now use this control within your Start Page:
Right-click the StartPage project within Solution Explorer and select Add Reference. From the Projects tab, select the CompanyStartPageControls project and click OK.
Force a rebuild of your solution by selecting the Build

Double-click the
StartPage.xamlfile in Solution Explorer to open the designer.In the Toolbox you will now see a tab for CompanyStartPageControls, in which you will find your CompanyPortalControl. Drag this item onto the StartPage beneath the information about the Company. The Company TabItem XAML should now look like the following.
XAML
<!-- Company Tab -->
<TabItem Header="Company" Height="Auto" x:Uid="Company_Tab"
         DataContext="{Binding Links.Content, Converter=
                       {StaticResource StringToXmlDataProviderConverter}}">
    <Grid>
        <Grid.RowDefinitions>
            <RowDefinition Height="Auto"></RowDefinition>
            <RowDefinition Height="*"></RowDefinition>
        </Grid.RowDefinitions>
        <TextBlock Foreground="#E8E8E8" Margin="15" TextWrapping="Wrap"
               x:Uid="Information_Paragraph" >
            The Company has put a lot of effort into writing this custom
            Start Page so that you can quickly access information relevant to your
            job, the projects you are working on etc.
        </TextBlock>
        <my:CompanyPortalControl Grid.Row="1" HorizontalAlignment="Left"
                                 Margin="6,12,0,0" VerticalAlignment="Top" />
    </Grid>
</TabItem>
If you now save all files (Ctrl+Shift+S) and select the Start Page tab in Visual Studio 2010, you will see an error as the assembly containing your CompanyPortalControl cannot be found. To fix this issue, you need to copy the CompanyStartPageControls.dll into the c:Program FilesMicrosoft Visual Studio 10.0Common7IDEStartPageAssemblies directory. This directory doesn't exist by default, so you will need to create it prior to copying the assembly in there.
Once you have copied CompanyStartPageControls.dll, you need to restart Visual Studio. Your start page should display as shown in Figure 3-4.
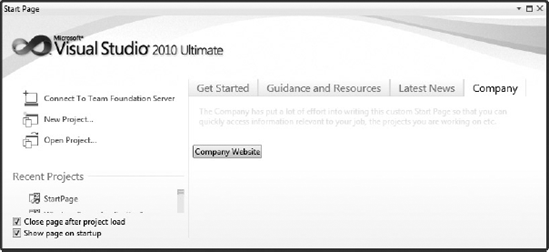
If you click the Company Website button, it will launch your company portal in your external web browser, directly from the Start Page.
If you are unfamiliar with Visual Studio, the behavior of the numerous tool windows may strike you as erratic, because they seem to appear in random locations and then come and go when you move between writing code (design time) and running code (run time). In actual fact, Visual Studio 2010 remembers the locations of tool windows in each of these modes. This way you can optimize the way you write and debug code.
As you open different items from the Solution Explorer, you'll see that the number of toolbars across the top of the screen varies depending on the type of file being opened. Each toolbar has a built-in association to specific file extensions so that Visual Studio knows to display the toolbar when a file with one of those extensions is opened. If you close a toolbar when a file is open that has a matching file extension, Visual Studio will remember this when future files with the same extension are opened.
Note
You can reset the association between toolbars and the file extensions via the Customize dialog (Tools
Once a tool window or toolbar has been closed it can be difficult to locate it again. Luckily, most of the most frequently used tool windows are accessible via the View menu. Other tool windows, mainly related to debugging, are located under the Debug menu.
All the toolbars available in Visual Studio 2010 are listed under the View
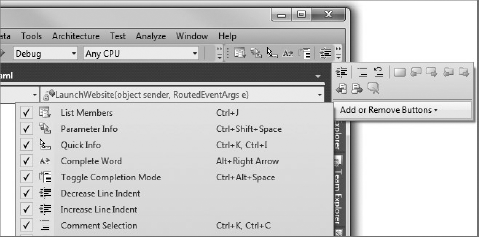
Once a toolbar is visible, you can customize which buttons are displayed, either via View
After opening multiple items you'll notice that you run out of room across the top of the editor space and that you can no longer see the tabs for all the items you have open. Of course, you can go back to the Solution Explorer window and select a specific item. If the item is already open it will be displayed without reverting to its saved state. However, it is still inconvenient to have to find the item in the Solution Explorer.
Luckily, Visual Studio 2010 has a number of shortcuts to the list of open items. As with most document-based applications, Visual Studio has a Windows menu. When you open an item its title is added to the bottom section of this menu. To display an open item just select the item from the Windows menu, or click the generic Windows item, which displays a modal dialog from which you can select the item you want.
Another alternative is to use the drop-down menu at the end of the tab area of the editor space. Figure 3-6 shows the drop-down list of open items from which you can select the item you want to access.
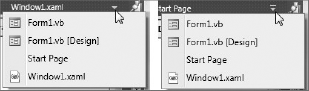
Figure 3-6 (right) is the same as Figure 3-6 (left) except for the drop-down icon. This menu also displays a down arrow, but this one has a line across the top. This line indicates that there are more tabs than can fit across the top of the editor space.
Another way to navigate through the open items is to press Ctrl+Tab, which displays a temporary window, as shown in Figure 3-7. It is a temporary window because when you release the Ctrl key it disappears. However, while the window is open you can use the arrow keys or press Tab to move among the open windows.
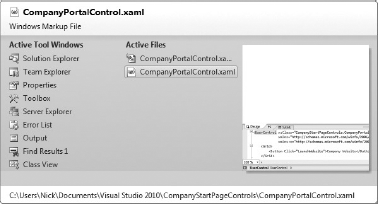
The Ctrl+Tab window is divided into three sections, which include the active tool windows, active files (this should actually be active items because it contains some items that don't correspond to a single file), and a preview of the currently selected item. As the number of either active files or active tool windows increases, the windows expand vertically until there are 15 items, at which point an additional column is formed.
Note
If you get to the point where you are seeing multiple columns of active files, you might consider closing some or all of the unused files. The more files Visual Studio 2010 has open, the more memory it uses and the slower it performs.
If you right-click the tab of an open item, you will see a hidden context menu that gives you a quick way to do common tasks such as save or close the file that's associated with the tab. Two particularly useful actions are Close All But This and the Open Containing Folder. These are self-descriptive as the former closes all tabs other than the one you clicked to get the context menu, while the latter opens the folder that contains the file in Windows Explorer. Now that all windows are dockable, there are also actions to Float or Dock as Tabbed Document, which are enabled depending on what state the tab is in.
Each tool window has a default position, which it will resume when it is opened from the View menu. For example, View
You will notice that as you unpin a tool window it slides back against the edge of the IDE, leaving visible a tag displaying the title of the tool window. This animation can be annoying and time-consuming when you have tool windows unpinned. On the Environment node of the Options dialog, you can control whether Visual Studio should automatically adjust the visual experience based on client performance. Alternatively, you can elect to uncheck the Enable rich client visual experience option.
Most developers accept the default location of tool windows, but occasionally you may want to adjust where the tool windows appear. Visual Studio 2010 has a sophisticated system for controlling the layout of tool windows. In Chapter 1 you saw how you could use the drop-down, next to the Pin and Close buttons at the top of the tool window, to make the tool window floating, dockable, or even part of the main editor space (using the Tabbed Document option).
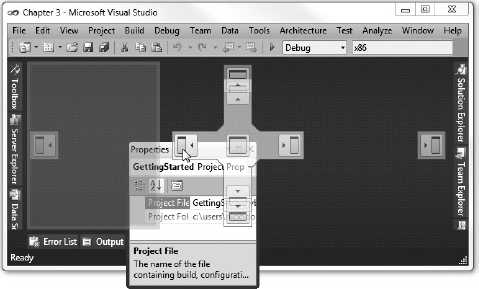
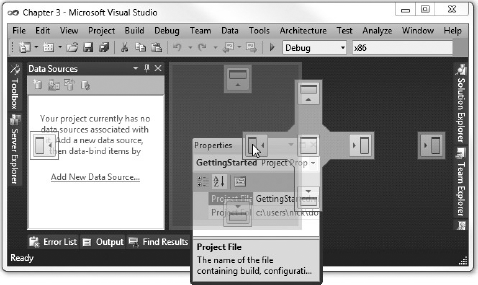
When a tool window is dockable, you have a lot of control over where it is positioned. In Figure 3-8 you can see the top of the Properties window, which has been dragged away from its default position at the right of the IDE. To begin dragging, you need to make sure the tool window is pinned and then click either the title area at the top of the tool window or the tab at the bottom of the tool window and drag the mouse in the direction you want the window to move. If you click in the title area you'll see that all tool windows in that section of the IDE will also be moved. Clicking the tab results in only the corresponding tool window moving.
As you drag the tool window around Visual Studio 2010, you'll see that translucent icons appear at different locations around the IDE. These icons are a useful guide to help you position the tool window exactly where you want. In Figure 3-9 the Data Sources tool window has been pinned against the left side. Now when the Properties window is positioned over the left icon of the center image, the blue shading again appears on the inside of the existing tool window. This indicates that the Properties tool window will be pinned to the right of the Data Sources tool window and visible if this layout is chosen. If the far left icon was selected, the Properties tool window would again be pinned to the left of the IDE, but this time to the left of the Data Sources window.
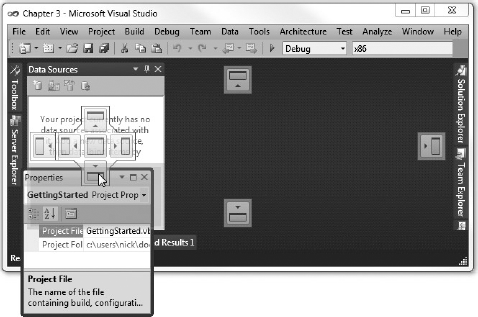
Alternatively, if the Properties tool window is dragged over the Data Sources tool window as in Figure 3-10, the center image will move over the existing tool window. This indicates that the Properties tool window will be positioned within the existing tool window area. As you drag the window over the different quadrants, you will see that the blue shading again indicates where the tool window will be positioned when the mouse is released. In Figure 3-10 it indicates that the Properties tool window will appear below the Data Sources tool window.
Note
It should be noted that if you have a large screen or multiple screens, it is worth spending time laying out the tool windows you use frequently. With multiple screens, using floating tool windows means that you can position them away from the main editor space, maximizing your screen real estate. If you have a small screen you may find that you continually have to adjust which tool windows are visible, so becoming familiar with the docking and layout options is essential.
Like most IDEs, Visual Studio 2010 has been built up around the central code-editing window. Over time, it has evolved and is now much more than a simple text editor. Though most developers will spend considerable time writing code in the editor space, an increasing number of designers are available for performing tasks such as building forms, adjusting project settings, and editing resources. Regardless of whether you are writing code or doing form design, you are going to spend a lot of your time within Visual Studio 2010 in the editor space. Because of this, it is important for you to know how to tweak the layout so you can work more efficiently.
Some of the first things that presenters change in Visual Studio are the fonts and colors used in the editor space, in order to make the code more readable. However, it shouldn't just be presenters who adjust these settings. Selecting fonts and colors that are easy for you to read and that aren't harsh on the eyes will make you more productive and enable you to code for longer without feeling fatigued. Figure 3-11 shows the Fonts and Colors node of the Options dialog, where you can make adjustments to the font, size, color, and styling of different display items. One thing to note about this node in the Options dialog is that it is very slow to load, so try to avoid accidentally clicking it.

To adjust the appearance of a particular text item within Visual Studio 2010, you first need to select the area of the IDE that it applies to. In Figure 3-11 the Text Editor has been selected, and has been used to determine which items should appear in the Display Items list. Once you have found the relevant item in this list, you can make adjustments to the font and colors.
Note
Some items in this list, such as Plain Text, are reused by a number of areas within Visual Studio 2010, which can result in some unpredictable changes when you tweak fonts and colors.
When choosing a font, remember that proportional fonts are usually not as effective for writing code as non-proportional fonts (also known as fixed-width fonts). As indicated in Figure 3-11, fixed-width fonts are distinguished in the list from the variable-width types so they are easy to locate.
When you are editing a file, Visual Studio 2010 automatically color-codes the code based on the type of file. For example, VB code highlights keywords in blue, variable names and class references are in black, and string literals are in red. In Figure 3-12 you can see that there is a line running up the left side of the code. This is used to indicate where the code blocks are. You can click the minus sign to condense the btnSayHello_Click method or the entire Form1 code block.
Various points about visual guides are illustrated in Figures 3-12 to 3-14. Those readers familiar with VB.NET will realize that Figure 3-12 is missing the end of the line where the method is set to handle the Click event of the btnSayHello button. This is because the rest of the line is being obscured by the edge of the code window. To see what is at the end of the line, the developer has to either scroll the window to the right or use the keyboard to navigate the cursor to the end of the line. In Figure 3-13, word wrap has been enabled via the Options dialog (see the Text


Unfortunately, enabling word wrapping can make it hard to work out which lines have been wrapped. Luckily, Visual Studio 2010 has an option (immediately below the checkbox to enable word wrapping in the Options dialog) that can display visual glyphs at the end of each line that will indicate a line has been wrapped to the next line, as you can see in Figure 3-14. In this figure you can also see two other visual guides. On the left, outside the code block markers, are line numbers. These can be enabled via the Line Numbers checkbox below both the Word Wrap and Visual Glyphs checkboxes. The other guide is the dots that represent space in the code. Unlike the other visual guides, this one can be enabled via the Edit
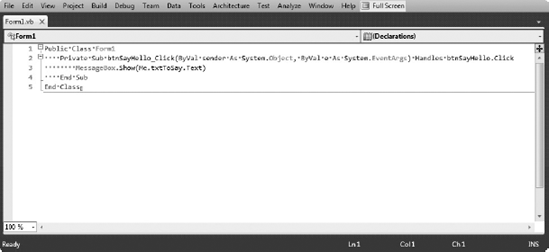
If you have a number of tool windows and multiple toolbars visible, you will have noticed that you quickly run out of space for actually writing code. For this reason, Visual Studio 2010 has a full-screen mode that you can access via the View
Note
If you are using multiple screens, full-screen mode can be particularly useful. Undock the tool windows and place them on the second monitor. When the editor window is in full-screen mode you still have access to the tool windows, without having to toggle back and forth. If you undock a code window this will not be set to full screen.
To enhance the experience of editing, Visual Studio 2010 uses line-level tracking to indicate which lines of code you have modified during an editing session. When you open a file to begin editing there will be no line coloring. However, when you begin to edit you will notice that a yellow mark appears next to the lines that have been modified. In Figure 3-16 you can see that the MessageBox line has been modified since this file was last saved.

When the file is saved, the modified lines will change to having a green mark next to them. In Figure 3-17 the first MessageBox line has changed since the file was opened, but those changes have been saved to disk. However, the second MessageBox line has not yet been saved.

Note
If you don't find tracking changes to be useful, you can disable this feature by unchecking the Text Editor
Many options that we haven't yet touched on can be used to tweak the way Visual Studio operates. Through the remainder of this chapter you will see some of the more useful options that can help you be more productive.
Visual Studio 2010 ships with many ways to perform the same action. Menus, toolbars, and various tool windows provide direct access to many commands, but despite the huge number available, many more are not accessible through the graphical interface. Instead, these commands are accessed (along with most of those in the menus and toolbars) via keyboard shortcuts.
These shortcuts range from the familiar Ctrl+Shift+S to save all changes, to the obscure Ctrl+Alt+E to display the Exceptions dialog window. As you might have guessed, you can set your own keyboard shortcuts and even change the existing ones. Even better, you can filter the shortcuts to operate only in certain contexts, meaning you can use the same shortcut differently depending on what you're doing.
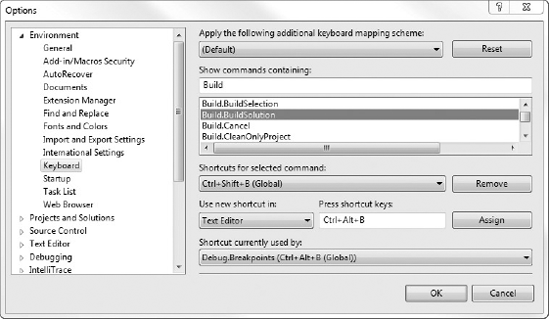
Figure 3-18 shows the Keyboard node in the Environment section of the Options dialog with the default keyboard mapping scheme selected. If you want to change to use a different keyboard mapping scheme, simply select it from the drop-down and hit the Reset button.
Note
The keyboard mapping schemes are stored as VSK files at C:Program FilesMicrosoft Visual Studio 10.0Common7IDE. This is the keyboard mapping file format used in versions of Visual Studio prior to Visual Studio 2005. To import keyboard mappings from Visual Studio 2005, use the import settings feature (see the end of this chapter); for earlier versions, copy the appropriate VSK file into the aforementioned folder, and you will be able to select it from the mapping scheme drop-down the next time you open the Options dialog.
The listbox in the middle of Figure 3-18 lists every command that is available in Visual Studio 2010. Unfortunately, this list is quite extensive and the Options dialog is not resizable, which makes navigating this list difficult. To make it easier to search for commands, you can filter the command list using the Show Commands Containing textbox. In Figure 3-18 the word Build has been used to filter the list down to all the commands starting with or containing that word. From this list the Build.BuildSolution command has been selected. Because there is already a keyboard shortcut assigned to this command, the Shortcuts for Selected Command drop-down and the Remove button have been enabled. It is possible to have multiple shortcuts for the same command, so the drop-down enables you to remove individual assigned shortcuts.
Note
Having multiple shortcuts is useful if you want to keep a default shortcut — so that other developers feel at home using your setup — but also add your own personal one.
The remainder of this dialog enables you to assign a new shortcut to the command you have selected. Simply move to the Press Shortcut Keys textbox and, as the label suggests, press the appropriate keys. In Figure 3-18 the keyboard chord Ctrl+Alt+B has been entered, but this shortcut is already being used by another command, as shown at the bottom of the dialog window. If you click the Assign button, this keyboard shortcut will be remapped to the Build.BuildSolution command.
To restrict a shortcut's use to only one contextual area of Visual Studio 2010, select the context from the Use New Shortcut In drop-down list. The Global option indicates that the shortcut should be applied across the entire environment, but we want this new shortcut to work only in the editor window, so the Text Editor item has been selected in Figure 3-18.
Note
Chapter 52 deals with macros that you can create and maintain to make your coding experience easier. These macros can also be assigned to keyboard shortcuts.
Several options relate to projects and solutions. The first of these is perhaps the most helpful — the default locations of your projects. By default, Visual Studio 2010 uses the standard Documents and Settings path common to many applications (see Figure 3-19), but this might not be where you'll want to keep your development work.
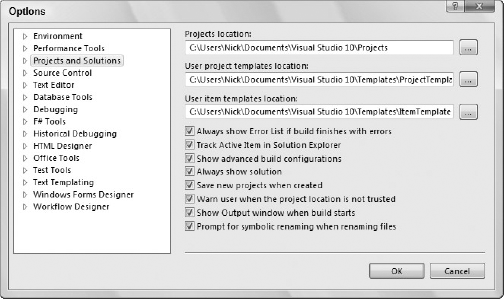
You can also change the location of template files at this point. If your organization uses a common network location for corporate project templates, you can change the default location in Visual Studio 2010 to point to this remote address rather than map the network drive.
You can adjust a number of other options to change how projects and solutions are managed in Visual Studio 2010. One of particular interest is Track Active Item in Solution Explorer. With this option enabled, the layout of the Solution Explorer changes as you switch among items to ensure the current item is in focus. This includes expanding (but not collapsing again) projects and folders, which can be frustrating on a large solution because you are continually having to collapse projects so that you can navigate.
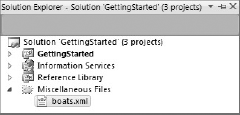
Another option that relates to solutions, but doesn't appear in Figure 3-19, is to list miscellaneous files in the Solution Explorer. Say you are working on a solution and you have to inspect an XML document that isn't contained in the solution. Visual Studio 2010 will happily open the file, but you will have to reopen it every time you open the solution. Alternatively, if you enable Environment Documents Show Miscellaneous Files in Solution Explorer via the Options dialog, the file will be temporarily added to the solution. The miscellaneous files folder to which this file is added is shown in Figure 3-20.
Note
Visual Studio 2010 will automatically manage the list of miscellaneous files, keeping only the most recent ones, based on the number of files defined in the Options dialog. You can get Visual Studio to track up to 256 files in this list, and files will be evicted based on when they were last accessed.
The Projects and Solutions
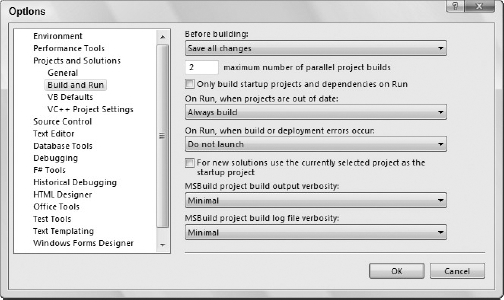
To reduce the amount of time it takes to build your solution, you may want to increase the maximum number of parallel builds that are performed. Visual Studio 2010 can build in parallel only those projects that are not dependent, but if you have a large number of independent projects this might yield a noticeable benefit. Be aware that on a single-core or single-processor machine this may actually increase the time taken to build your solution.
Figure 3-21 shows that projects will Always Build when they are out of date, and that if there are build errors the solution will not launch. Both these options can increase your productivity, but be warned that they eliminate dialogs letting you know what's going on.
Note
The last option worth noting in Figure 3-21 is MSBuild project build output verbosity. In most cases the Visual Studio 2010 build output is sufficient for debugging build errors. However, in some cases, particularly when building ASP.NET projects, you will need to increase verbosity to diagnose the build error. New to this version of the Visual Studio 2010 is the ability to control the log file verbosity independently of the output.
VB programmers have four compiler options that can be configured at a project or a file level. You can also set the defaults on the Projects and Solutions
Option Strict takes enforcing good programming practices one step further by forcing developers to explicitly convert variables to their correct types, rather than let the compiler try to guess the proper conversion method. Again, this results in fewer runtime issues and better performance.
Note
We advise strongly that you use Option Strict to ensure that your code is not implicitly converting variables inadvertently. If you are not using Option Strict, with all the new language features, you may not be making the most effective use of the language.
Once you have the IDE in exactly the configuration you want, you may want to back up the settings for future use. You can do this by exporting the IDE settings to a file that can then be used to restore the settings or even transfer them to a series of Visual Studio 2010 installations, so that they all share the same IDE setup.
Note
The Environment
To export the current configuration, select Tools
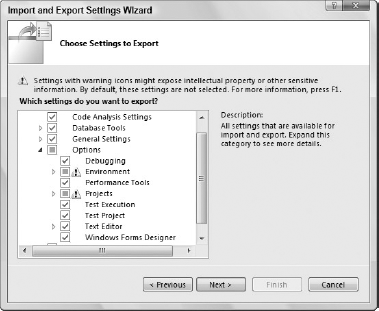
As shown in Figure 3-22, a variety of grouped options can be exported. The screenshot shows the Options section expanded, revealing that the Debugging and Projects settings will be backed up along with the Text Editor and Windows Forms Designer configurations. As the small exclamation icons indicate, some settings are not included in the export by default, because they contain information that may infringe on your privacy. You will need to select these sections manually if you want them to be included in the backup. Once you have selected the settings you want to export, you can progress through the rest of the wizard, which might take a few minutes depending on the number of settings being exported.
Importing a settings file is just as easy. The same wizard is used, but you select the Import option on the first screen. Rather than simply overwriting the current configuration, the wizard enables you to back up the current setup first.
You can then select from a list of preset configuration files — the same set of files from which you can choose when you first start Visual Studio 2010 — or browse to a settings file that you created previously. Once the settings file has been chosen, you can then choose to import only certain sections of the configuration, or import the whole lot.
The wizard excludes some sections by default, such as External Tools or Command Aliases, so that you don't inadvertently overwrite customized settings. Make sure you select these sections if you want to do a full restore.
Note
If you just want to restore the configuration of Visual Studio 2010 to one of the default presets, you can choose the Reset All Settings option in the opening screen of the wizard, rather than go through the import process.
This chapter covered only a core selection of the useful options available to you as you start to shape the Visual Studio interface to suit your own programming style; many other options are available. These numerous options enable you to adjust the way you edit your code, add controls to your forms, and even select the methods to use when debugging code.
The settings within the Visual Studio 2010 Options page also enable you to control how and where applications are created, and even to customize the keyboard shortcuts you use. Throughout the remainder of this book, you'll see the Options dialog revisited according to specific functionality such as compiling, debugging, and writing macros.