
Exploring the different ways to extend Microsoft Office
Creating a Microsoft Word document customization
Creating a Microsoft Outlook add-in
Launching and debugging an Office application
Packaging and deploying an Office application
Microsoft Office applications have always been extensible via add-ins and various automation techniques. Even Visual Basic for Applications (VBA), which was widely known for various limitations in accessing system files, had the capability to write applications that used an instance of an Office application to achieve certain tasks, such as Word's spell-checking feature.
When Visual Studio .NET was released in 2002, Microsoft soon followed with the first release of Visual Studio Tools for Office (known by the abbreviation VSTO, pronounced visto). This initial version of VSTO didn't really produce anything new except for an easier way of creating application projects that would use Microsoft Word or Microsoft Excel. However, subsequent versions of VSTO quickly evolved and became more powerful, allowing you to build more functional applications that ran on the Office platform.
The latest version of VSTO was shipped as part of Visual Studio 2010. It provides several enhancements over the previous version, including support for Office 2010, expanded support for the Ribbon user interface, and improved packaging and deployment functionality.
This chapter begins with a look at the types of applications you can build with VSTO. It then guides you through the process of creating a document-level customization to a Word document, including a custom Actions Pane. Following this, the chapter provides a walkthrough, showing how to create an Outlook add-in complete with an Outlook Form region. Finally, the chapter provides some important information regarding the debugging and deployment of Office applications.
As you would expect, the types of applications you can create using VSTO under Visual Studio has been updated since the previous version. You now have the ability to create applications that target the new Microsoft Office 2010 applications, as well as Microsoft Office 2007 applications.
As with the previous version, add-in applications can be created for almost every product in the Office suite including Excel, InfoPath, Outlook, PowerPoint, Project, Visio, and Word. In the case of Excel and Word, these solutions can either be attached to a single document or be loaded every time that application is launched.
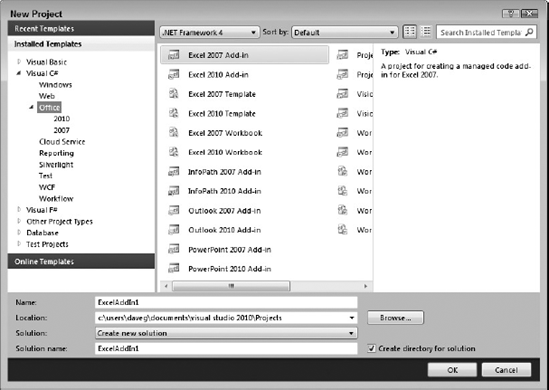
You can create a new Office application by selecting File
Two types of project templates are available for Office applications: document-level customizations and application-level add-ins.
A document-level customization is a solution that is based on a single document. To load the customization, an end user must open a specific document. Events in the document, such as loading the document or clicking buttons and menu items, can invoke event handler methods in the attached assembly. Document-level customizations can also be included with an Office template, which ensures that the customization is included when you create a new document from that template.
Visual Studio 2010 allows you to create document-level customizations for the following types of documents:
Using a document-level customization, you can modify the user interface of Word or Excel to provide a unique solution for your end users. For example, you can add new controls to the Office Ribbon or display a customized Actions Pane window.
Microsoft Word and Microsoft Excel also include a technology called smart tags, which enable developers to track the user's input and recognize when text in a specific format has been entered. Your solution can use this technology by providing feedback or even actions that the user could take in response to certain recognized terms, such as a phone number or address.
Visual Studio also includes a set of custom controls that are specific to Microsoft Word. Called content controls, they are optimized for both data entry and print. You see content controls in action later in this chapter.
Unlike a document-level customization, an application-level add-in is always loaded regardless of the document that is currently open. In fact, application-level add-ins will run even if the application is running with no documents open.
Earlier versions of VSTO had significant limitations when it came to application-level add-ins. For example, you could only create add-ins for Microsoft Outlook, and even then you could not customize much of the user interface.
Fortunately, in Visual Studio 2010 such restrictions do not exist, and you can create application-level add-ins for almost every product in the Microsoft Office suite, including Excel, InfoPath, Outlook, PowerPoint, Project, Visio, and Word. This applies equally to version 2007 and version 2010 of Office. You can create the same UI enhancements as you can with a document-level customization, such as adding new controls to the Office Ribbon.
You can also create a custom Task Pane as part of your add-in. Task Panes are very similar to the Action Panes that are available in document-level customization projects. However, custom Task Panes are associated with the application, not a specific document, and as such can be created only within an application-level add-in.
An Actions Pane, on the other hand, is a specific type of Task Pane that is customizable and is attached to a specific Word document or Excel workbook. You cannot create an Actions Pane in an application-level add-in.
Also included in Visual Studio 2010 is the ability to create custom Outlook form regions in Outlook add-in projects. Form regions are the screens that are displayed when an Outlook item is opened, such as a Contact or Appointment. You can either extend the existing form regions or create a completely custom Outlook form. Later in this chapter you walk through the creation of an Outlook 2010 add-in that includes a custom Outlook form region.
This section walks through the creation of a Word document customization. This demonstrates how to create a document-level customization complete with Word Content Controls and a custom Actions Pane.
Note
The example in this section uses Word 2010, which you must have installed locally in order to debug the project. If you only have Word 2007 installed, you can still follow the instructions and create a document-level customization using the Word 2007 project template. Any differences between Word 2010 and Word 2007 have been noted in the instructions.
When you create a document-level customization with Visual Studio 2010, you can either create the document from scratch or jump-start the design by using an existing document or template. A great source of templates, particularly for business-related forms, is the free templates available from Microsoft Office Online at http://office.microsoft.com/templates/.
Note
All of the templates available for download from the Office Online web site are provided in the older Word 97-2003 format (.dot). Unfortunately, some features, such as the Word Content Controls, are only available for documents that are saved with the newer Open XML format (.dotx). Therefore, you will need to ensure that the template is in the latest format if you wish to use all the available features.
This example uses the Employee warning notice that is available under the Forms, Employment category. When you download a template from the Office Online web site using Internet Explorer, you are prompted to save it to the default templates location. Once saved, Microsoft Word then opens with a new document based on the template. Save this new document to a convenient folder on your computer as a Word Template in the Open XML format (.dotx), as shown in Figure 19-2.

Next, launch Visual Studio 2010 and select File
Note
VSTO requires access to Visual Basic for Applications (VBA) even though the projects do not use VBA. Therefore, the first time you create an Office application you are prompted to enable access to VBA. You must grant this access even if you work exclusively in C#.
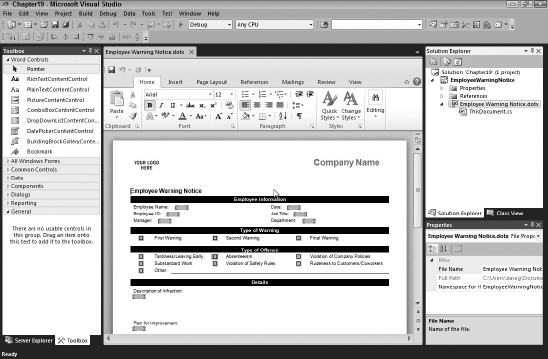
A few things are worth pointing out in Figure 19-3. First, you'll notice that along the top of the Designer is the Office Ribbon. This is the very same Ribbon that is displayed in Word, and you can use it to modify the layout and design of the Word document. Second, in the Solution Explorer to the right, the file that is currently open is called ThisDocument.cs (or ThisDocument.vb if you are using Visual Basic). You can right-click this file and select either View Designer to display the design surface for the document, currently shown in Figure 19-3, or View Code to open the source code behind this document in the code editor. Finally, in the Toolbox to the left, there is a tab group called Word Controls, which contains a set of controls that allow you to build rich user interfaces for data input and display.
To customize this form, first drag four PlainTextContentControl controls onto the design surface for the Employee Name, Employee ID, Job Title, and Manager. Rename these controls to txtEmpName, txtEmpID, txtJobTitle, and txtManager, respectively.
Next, drag a DatePickerContentControl for the Date field, and rename it to be dtDate. Then drag a DropDownListContentControl next to the Department field, and rename it ddDept.
Following this, drag a RichTextContentControl into the Details section of the document, and place it under the Description of Infraction label.
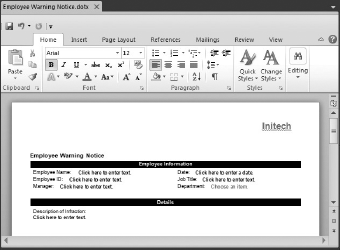
Finally, to clean up the document a little, remove the sections titled Type of Warning and Type of Offense, and all of the text that is below the RichTextContentControl you added. Once you have done this, your form should look similar to what is shown in Figure 19-4.
Before you run this project you will need to populate the Department drop-down list. Although you can do this declaratively via the Properties field, for this exercise you will perform it programmatically. Right-click the ThisDocument file in the Solution Explorer and select View Code to display the managed code that is behind this document. Two methods will be predefined: a function that is run during startup when the document is opened, and a function that is run during shutdown when the document is closed.
Add the following code for the ThisDocument_Startup method to populate the Department drop-down list:
- C#
private void ThisDocument_Startup(object sender, System.EventArgs e)
{
   ddDept.PlaceholderText = "Select your department";
   ddDept.DropDownListEntries.Add("Finance", "Finance", 0);
ddDept.DropDownListEntries.Add("HR", "HR", 1); ddDept.DropDownListEntries.Add("IT", "IT", 2); ddDept.DropDownListEntries.Add("Marketing", "Marketing", 3); ddDept.DropDownListEntries.Add("Operations", "Operations", 4); }
- VB
Private Sub ThisDocument_Startup() Handles Me.Startup
   ddDept.PlaceholderText = "Select your department"
   ddDept.DropDownListEntries.Add("Finance", "Finance", 0)
   ddDept.DropDownListEntries.Add("HR", "HR", 1)
   ddDept.DropDownListEntries.Add("IT", "IT", 2)
   ddDept.DropDownListEntries.Add("Marketing", "Marketing", 3)
   ddDept.DropDownListEntries.Add("Operations", "Operations", 4)
End Sub
You can now run the project in Debug mode by pressing F5. This compiles the project and opens the document in Microsoft Word. You can test out entering data in the various fields to obtain a feel for how they behave.
While you have the document open you may notice that in addition to entering text in the control fields that you added, you can also edit the surrounding text and even delete some of the controls. This is obviously not ideal in this scenario. Fortunately, Office and VSTO provide a way to prevent the document from undesirable editing. For this, you will need to show the Developer tab.
For Word 2010, click the File tab and then click the Options button. In the Word Options dialog window, select Customize Ribbon and then check the box next to Developer under the Main Tabs list.
For Word 2007, click the Office button and then click the Word Options button on the bottom of the screen. In the Word Options dialog window, check the box next to the Show Developer Tab in the Ribbon option.
When you stop debugging and return to Visual Studio, you will see a new tab on the toolbar above the Ribbon, as shown in Figure 19-5. This provides some useful functions for Office development-related tasks.

To prevent the document from being edited, you must perform a couple of steps. First, ensure that the Designer is open and then press Ctrl+A to select everything in the document (text and controls). On the Developer tab click Group
With this new group selected, open the Properties window and set the LockContentControl property to True. Now when you run the project you will find that the standard text on the document cannot be edited or deleted, and you can only input data into the content controls that you have added.
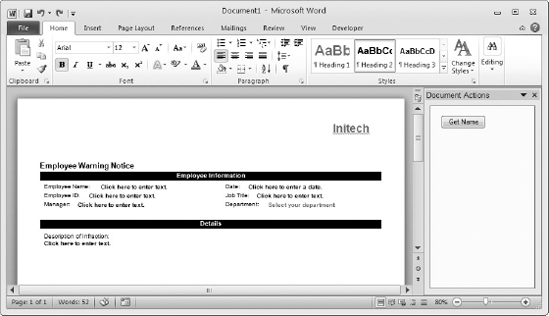
The final customization you will add to this document is an Actions Pane window. An Actions Pane is typically docked to one side of a window in Word, and can be used to display related information or provide access to additional information. For example, on an employee leave request form you could add an Actions Pane that retrieved and displayed the current employees' available leave balance.
Note
An Actions Pane, or custom Task Pane in the case of application-level add-ins, is nothing more than a standard user control. In the case of an Actions Pane, Visual Studio has included an item template; under the covers, however, this does little more than add a standard user control to the project with the Office namespace imported. For application-level add-ins there is no custom Task Panes item template, so you can simply add a standard user control to the project.
To add an Actions Pane to this document customization, right-click the project in the Solution Explorer and select Add
- C#
private void btnGetName_Click(object sender, EventArgs e)
{
    var myIdent = System.Security.Principal.WindowsIdentity.GetCurrent();
    Globals.ThisDocument.txtEmpName.Text = myIdent.Name;
}
- VB
Private Sub btnGetName_Click(ByVal sender As System.Object, _
                             ByVal e As System.EventArgs) _
                             Handles btnGetName.Click
Dim myIdent = System.Security.Principal.WindowsIdentity.GetCurrent() Globals.ThisDocument.txtEmpName.Text = myIdent.Name End Sub

The Actions Pane components are not added automatically to the document because you may want to show different Actions Panes, depending on the context users find themselves in when editing the document. However, if you have a single Actions Pane component and simply want to add it immediately when the document is opened, add the component to the ActionsPane.Controls collection of the document at startup, as demonstrated in the following code:
- C#
private void ThisDocument_Startup(object sender, System.EventArgs e) { this.ActionsPane.Controls.Add(newNameOfActionsPaneControl
- VB
Private Sub ThisDocument_Startup() Handles Me.Startup Me.ActionsPane.Controls.Add(newNameOfActionsPaneControl
For application-level add-ins, add the user control to the CustomTaskPanes collection.
The next time you run the project, it will display the document in Word with the Actions Pane window shown during startup, as shown in Figure 19-6.
This section walks through the creation of an add-in to Microsoft Outlook 2010. This will demonstrate how to create an application-level add-in that includes a custom Outlook form region for a Contact item.
Warning
Never develop Outlook add-ins using your production e-mail account! There's too much risk that you will accidentally do something that you will regret later, such as deleting all of the e-mail in your Inbox. With Outlook, you can create a separate mail profile; one for your normal mailbox and one for your test mailbox.
Before creating an Outlook add-in, it is worth understanding some basic concepts that are specific to Outlook development. Though there is a reasonable degree of overlap, Outlook has always had a slightly different programming model from the rest of the products in the Office suite.
The Outlook object model is a heavily collection-based API. The Application class is the highest-level class and represents the Outlook application. This can be directly accessed from code as a property of the add-in; this.Application in C# or Me.Application in Visual Basic. With the Application class you can access classes that represent the Explorer and Inspector windows.
An Explorer window in Outlook is the main window that is displayed when Outlook is first opened and displays the contents of a folder, such as the Inbox or Calendar. Figure 19-7 (left) shows the Calendar in the Explorer window. The Explorer class represents this window, and includes properties, methods, and events that can be used to access the window and respond to actions.
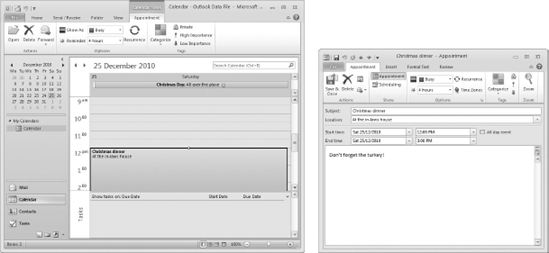
An Inspector window displays an individual item such as an e-mail message, contact, or appointment. Figure 19-7 (right) shows an Inspector window displaying an appointment item. The Inspector class includes properties and methods to access the window, and events that can be handled when certain actions occur within the window. Outlook form regions are hosted within Inspector windows.
The Application class also contains a Session object, which represents everything to do with the current Outlook session. This object provides you with access to the available address lists, mail stores, folders, items, and other Outlook objects. A mail folder, such as the Inbox or Calendar, is represented by a MAPIFolder class and contains a collection of items. Within Outlook, every item has a message class property that determines how it is presented within the application. For example, an e-mail message has a message class of IPM.Note and an appointment has a message class of IPM.Appointment.
Now that you understand the basics of the Outlook object model, you can create your first Outlook add-in. In Visual Studio 2010, select File
Note
If you only have Outlook 2007 installed, select the Outlook 2010 Add-In project instead.
Unlike a document-level customization, an application-level add-in is inherently code-based. In the case of a Word or Excel add-in, there may not even be a document open when the application is first launched. An Outlook add-in follows a similar philosophy; when you first create an Outlook add-in project, it will consist of a single nonvisual class called ThisAddIn.cs (or ThisAddIn.vb). You can add code here that performs some actions during startup or shutdown.
To customize the actual user interface of Outlook you can add an Outlook form region. This is a user control that is hosted in an Outlook Inspector window when an item of a certain message class is displayed.
To add a new Outlook form region, right-click the project in the Solution Explorer and select Add
The first step of the wizard asks you to either design a new form or import an Outlook Form Storage (.ofs) file, which is a form designed in Outlook. Select Design a New Form Region and click Next.
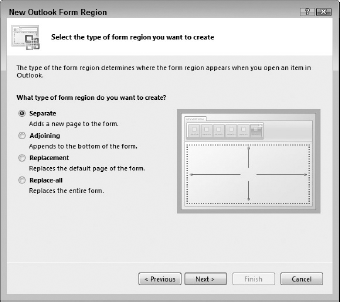
The second step in the wizard allows you to select what type of form region to create. The wizard provides a handy visual representation of each type of form region, as shown in Figure 19-8. Select the Separate option and click Next.
The next step in the wizard allows you to enter a friendly name for the form region, and, depending on the type of form region you've chosen, a title and description. This step also allows you to choose the display mode for the form region. Compose mode is displayed when an item is first being created, such as when you create a new e-mail message. Read mode is displayed when you subsequently open an e-mail message that has already been sent or received. Ensure that both of these checkboxes are ticked, enter Custom Details as the name, and click Next.
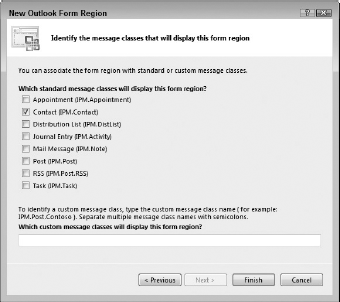
The final step in the wizard allows you to choose what message classes will display the form region. You can select from any of the standard message classes, such as mail message or appointment, or specify a custom message class. Select the Contact message class as shown in Figure 19-9 and click Finish to close the wizard.
Once the wizard exits, the new form region will be created and opened in the Designer. As mentioned earlier, an Outlook form region, like an Actions Pane and a Task Pane, is simply a user control. However, unlike an Actions Pane, it contains an embedded manifest that defines how the form region appears in Outlook. To access the manifest, ensure that the form is selected in the Designer and open the Properties window. This will show a property called Manifest, under which you can set various properties to how it appears. This property can also be accessed through code at run time.
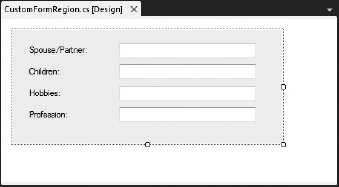
In this scenario you will use the Outlook form region to display some additional useful information about a Contact. The layout of an Outlook form region is created in the same way as any other user control. Drag four Label controls and four textbox controls onto the design surface and align them as shown in Figure 19-10. Rename the textbox controls txtPartner, txtChildren, txtHobbies, and txtProfession, and change the text on the labels to match these fields.
The ContactItem class contains a surprisingly large number of properties that are not obviously displayed in a standard Contact form in Outlook. In fact, with well over 100 contact-specific fields, there is a high chance that any custom property you want to display for a contact is already defined. In this case, the fields displayed on this form (spouse/partner, children, hobbies, and profession) are available as existing properties. You can also store a custom property on the item by adding an item to the UserProperties collection.
The code behind the form region will already have stubs for the FormRegionShowing and FormRegionClosed event handlers. Add the following code to those properties to access the current Contact item and retrieve and save these custom properties:
- C#
private void CustomFormRegion_FormRegionShowing(object sender, System.EventArgs e)
{
    var myContact = (Outlook.ContactItem)this.OutlookItem;
    this.txtPartner.Text = myContact.Spouse;
    this.txtChildren.Text = myContact.Children;
    this.txtHobbies.Text = myContact.Hobby;
    this.txtProfession.Text = myContact.Profession;
}
private void CustomFormRegion_FormRegionClosed(object sender, System.EventArgs e)
{
    var myContact = (Outlook.ContactItem)this.OutlookItem;
    myContact.Spouse = this.txtPartner.Text;
    myContact.Children = this.txtChildren.Text;
    myContact.Hobby = this.txtHobbies.Text;
    myContact.Profession = this.txtProfession.Text;
}
- VB
Private Sub CustomFormRegion_FormRegionShowing(ByVal sender As Object, _
                                               ByVal e As System.EventArgs) _
                                               Handles MyBase.FormRegionShowing
    Dim myContact = CType(Me.OutlookItem, Outlook.ContactItem)
    myContact.Spouse = Me.txtPartner.Text
    myContact.Children = Me.txtChildren.Text
    myContact.Hobby = Me.txtHobbies.Text
    myContact.Profession = Me.txtProfession.Text
End Sub
Private Sub CustomFormRegion_FormRegionClosed(ByVal sender As Object, _
                                              ByVal e As System.EventArgs) _
                                              Handles MyBase.FormRegionClosed
    Dim myContact = CType(Me.OutlookItem, Outlook.ContactItem)
    myContact.Spouse = Me.txtPartner.Text
    myContact.Children = Me.txtChildren.Text
    myContact.Hobby = Me.txtHobbies.Text
    myContact.Profession = Me.txtProfession.Text
End Sub
Press F5 to build and run the add-in in Debug mode. If the solution compiled correctly, Outlook will open with your add-in registered. Open the Contacts folder and create a new Contact item. To view your custom Outlook form region, click the Custom Details button in the Show tab group of the Office Ribbon. Figure 19-11 shows how the Outlook form region should appear in the Contact Inspector window.

You can debug Office applications by using much the same process as you would with any other Windows application. All the standard Visual Studio debugger features, such as the ability to insert breakpoints and watch variables, are available when debugging Office applications.
The VSTO run time, which is responsible for loading add-ins into their host applications, can display any errors that occur during startup in a message box or write them to a log file. By default, these options are disabled, and they can be enabled through environment variables.
To display any errors in a message box, create an environment variable called VSTO_SUPPRESSDISPLAYALERTS and assign it a value of 0. Setting this environment variable to 1, or deleting it altogether, will prevent the errors from being displayed.
To write the errors to a log file, create an environment variable called VSTO_LOGALERTS and assign it a value of 1. The VSTO run time will create a log file called <manifestname>.manifest.log in the same folder as the application manifest. Setting the environment variable to 0, or deleting it altogether, will stop errors from being logged.
When an application-level add-in is compiled in Visual Studio 2010, it automatically registers the add-in to the host application. Visual Studio will not automatically unregister the add-in from your application unless you run Build
To unregister the application you will need to open the Add-Ins window. Under Outlook 2010, select File
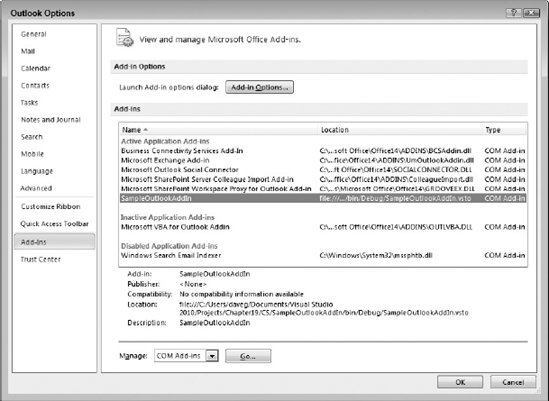
If it is registered and loaded, your application will be listed under the Active Application Add-ins list. Select COM Add-ins from the drop-down list at the bottom of the window and click the Go button. This brings up the COM Add-Ins window shown in Figure 19-13 that will allow you to remove your add-in from the application.

You can also disable your add-in by clearing the checkbox next to the add-in name in this window.
When developing Office applications, you will inevitably do something that will generate an unhandled exception and cause your add-in to crash. If your add-in happens to crash when it is being loaded, the Office application will disable it. This is called soft disabling.
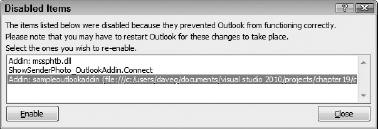
A soft-disabled add-in will not be loaded and will appear in the Trust Center (see Figure 19-12) under the Inactive Application Add-ins list. Visual Studio 2010 will automatically re-enable a soft-disabled add-in when it is recompiled. You can also use the COM Add-Ins window that was displayed earlier in Figure 19-13 to re-enable the add-in by ticking the checkbox next to the add-in name.
An add-in will be flagged to be hard disabled when it causes the host application to crash, or when you stop the debugger, while the constructor or the Startup event handler is executing. The next time the Office application is launched, you will be presented with a dialog box similar to the one shown in Figure 19-14. If you select Yes the add-in will be hard disabled.
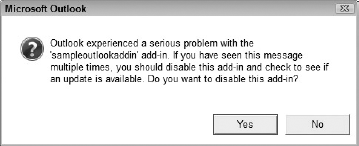
When an add-in is hard disabled it cannot be re-enabled from Visual Studio. If you attempt to debug a hard-disabled add-in, you will be presented with a warning message that the add-in has been added to the Disabled Items list and will not be loaded.
To remove the application from the Disabled Items list, start the Office application and open the Add-Ins window that was shown earlier in Figure 19-12 (File
The two main ways to deploy Office applications are either using a traditional MSI setup project or using the support for ClickOnce deployment that is built into Visual Studio 2010.
In earlier versions of VSTO, configuring code access security was a manual process. Although VSTO hides much of the implementation details from you, in the background it still needs to invoke COM+ code to communicate with Office. Because the Common Language Runtime (CLR) cannot enforce code access security for non-managed code, the CLR requires any applications that invoke COM+ components to have full trust to execute.
Fortunately, the ClickOnce support for Office applications that is built into Visual Studio 2010 automatically deploys with full trust. As with other ClickOnce applications, each time it is invoked it automatically checks for updates.
When an Office application is deployed it must be packaged with the required prerequisites. For Office applications, the following prerequisites are required:
Windows Installer 3.1
.NET Framework 4, .NET Framework 4 Client Profile, or .NET Framework 3.5
Visual Studio 2010 Tools for Office run time
If you are using version 3.5 of the .NET Framework you will also need to package the Microsoft Office primary interop assemblies (PIAs). A PIA is an assembly that contains type definitions of types implemented with COM. The PIAs for Office 2007 and Office 2010 are shipped with Visual Studio Tools for Office, and are automatically included as references when the project is created. In Figure 19-16 (left), you can see a reference to Microsoft.Office.Interop.Outlook, which is the PIA for Outlook 2010.
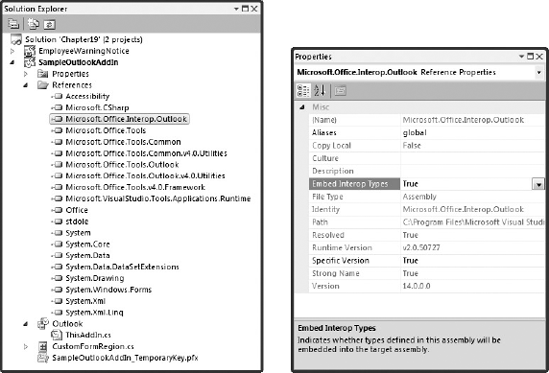
You do not need to deploy the PIAs with your application if you are using .NET Framework 4 because of a new feature called Type Equivalence. When Type Equivalence is enabled, Visual Studio will embed the referenced PIA as a new namespace within the target assembly. CLR then ensures that these types are considered equivalent when the application is executed.
Type Equivalence is enabled for individual references by setting the Embed Interop Types property to True, as shown in Figure 19-16 (right). Rather than include the entire interop assembly, Visual Studio will only embed those portions of the interop assemblies that an application actually uses. This results in smaller and simpler deployment packages.
More information on ClickOnce and MSI setup projects is available in Chapter 48.
This chapter introduced you to the major features in Visual Studio Tools for Office. It is now very easy to build feature-rich applications using Microsoft Office applications because the development tools are fully integrated into Visual Studio 2010. You can create .NET solutions that customize the appearance of the Office user interface with your own components at both the application level and the document level. This enables you to have unprecedented control over how end users interact with all of the products in the Microsoft Office suite.