
Setting up a development environment for SharePoint
Developing custom SharePoint components such as Web Parts, lists, and workflows
Debugging and testing SharePoint projects
Packaging and deploying SharePoint components
Over the past couple of years the level of interest — and number of deployments — in Microsoft SharePoint has reached the point where SharePoint is now one of Microsoft's fastest growing product lines.
SharePoint is really a collection of related products and technologies that broadly service the areas of document and content management, web-based collaboration, and search. SharePoint is also a very flexible application hosting platform, which allows you to develop and deploy everything from individual Web Parts to full-blown web applications.
Although it can be used to host web sites for anonymous external visitors, SharePoint is much more ideally suited for web sites that involve registered users, particularly those that service the needs of employees within an organization. SharePoint provides much of the low-level integration code that is often required in these environments including built-in authentication and authorization, integration with Microsoft Office, access to external data, provisioning of sites, and collaborative workflow.
This chapter runs through the SharePoint development tools in Visual Studio 2010, and demonstrates how to build, debug, and deploy SharePoint solutions.
Note
In addition to using Visual Studio 2010, you can create SharePoint solutions using the free SharePoint Designer 2010. SharePoint Designer provides a very different implementation approach by presenting the elements of a SharePoint solution in a high-level logical way that hides many of the underlying implementation details. It also includes some excellent WYSIWYG tools to browse and edit components in existing SharePoint sites. As such, SharePoint Designer is often considered the tool of choice for non-developers (IT Professionals and end-users). However, it is still useful to developers as certain development and configuration tasks, such as building page layouts and master pages, are much easier to perform using SharePoint Designer. Typically, you'll find more experienced SharePoint developers using both tools to provision their solutions.
One of the common complaints about previous versions of SharePoint has been the requirement to use Windows Server for the local development environment. This is because SharePoint 2007 and earlier could only run on a server operating system and you needed to have SharePoint running locally to perform any debugging and integration testing.
Fortunately, this has been addressed in SharePoint 2010. In addition to Windows Server 2008, you can install SharePoint on either Windows 7 or Windows Vista (Service Pack 1 or later). Unfortunately, you will need some reasonably powerful hardware for your local development machine. SharePoint 2010 requires a 64-bit operating system and a recommended 4GB of RAM for SharePoint Foundation and 6GB to 8GB of RAM for SharePoint Server.
Note
SharePoint 2010 was in Beta at the time of writing, and as such, some of the instructions may have changed in the final release. If any important changes are required, you will be able to find corrections and updated instructions at www.wrox.com. Just search for this book by the ISBN number 978-0-470-54865-3, and look for Chapter 24 under errata.
The installation of SharePoint is quite straightforward if you are targeting Windows Server. The setup ships with a Prerequisite Installer tool (PrerequisiteInstaller.exe), which checks and installs the required prerequisites. However, at the time of writing with SharePoint 2010 Beta 2, this tool does not run on Windows 7 or Windows Vista. If you are installing SharePoint 2010 onto one of these client operating systems you must install and configure a large number of prerequisites manually.
Regardless of which operating system you are using, you must first install the WCF Hotfix for Microsoft Windows. You can download it from the following links:
For Windows Vista or Windows Server 2008:
http://go.microsoft.com/fwlink/?linkID=160770For Windows 7 or Windows Server 2008 R2:
http://go.microsoft.com/fwlink/?LinkID=166231
Note
The following instructions assume that your copy of SharePoint is in the form of a self-extracting executable called SharePoint.exe for SharePoint Foundation or OfficeServer.exe for SharePoint Server. If instead you are installing from a CD/DVD of SharePoint you can skip the following step, because the contents and folder structure on the disc will be the same as the extracted files.
Begin by creating a folder for the installation files, for example c:SharePoint, and copy the setup executable to this folder. Next, extract the installation files by running the following from a command prompt (for SharePoint Foundation):
c:SharePointSharePoint.exe /extract:c:SharePoint
For SharePoint Server, replace SharePoint.exe with OfficeServer.exe.
If you are installing SharePoint on Windows Server you can now run the Prerequisite Installer tool (PrerequisiteInstaller.exe) and then proceed to the next section ("Installing SharePoint 2010"). Otherwise, if you are targeting Windows Vista or Windows 7, you must manually install the prerequisites as described in the remainder of this section.
The following prerequisites are required for Windows Vista only:
.NET Framework 3.5 SP1: If you have installed Visual Studio 2010 this will already be installed. Available via
professionalvisualstudio.com/link/1024A.Windows PowerShell 2.0: Available via
professionalvisualstudio.com/link/1024B.Windows Installer 4.5 Redistributable: Available via
professionalvisualstudio.com/link/1024C.
The following prerequisites are required for Windows 7 and Windows Vista:
Microsoft FilterPack 2.0: This is shipped with the SharePoint installation files. Run the installer package at
c:SharePointPrerequisiteInstallerFilesFilterPackFilterPack.msi.Microsoft Sync Framework: If you have installed Visual Studio 2010 this will already be installed. Available via
professionalvisualstudio.com/link/1024D.SQL Server 2008 Native Client: If you have installed Visual Studio 2010 this will already be installed. Available via
professionalvisualstudio.com/link/1024E.Windows Identity Foundation Runtime: Formerly known as codename "Geneva" Framework. Available via
professionalvisualstudio.com/link/1024F.ADO.NET Data Services: Select the run time only. Available via
professionalvisualstudio.com/link/1024G.Chart Controls: This is not required for SharePoint Foundation. Available via
professionalvisualstudio.com/link/1024H.Microsoft ADOMD.NET: This is not required for SharePoint Foundation. Available via
professionalvisualstudio.com/link/1024I.
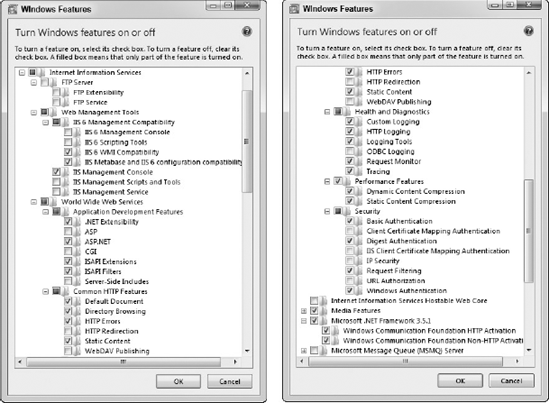
The final step is to enable all of the required Windows Features. Figure 24-1 lists the features that must be enabled using the Programs and Features Control Panel item. You can also download a batch script that will automatically enable these features from professionalvisualstudio.com/link/1024J.
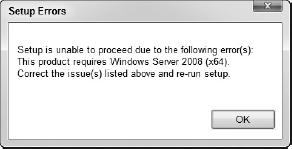
Now that the prerequisites have been installed you can install either SharePoint Foundation or SharePoint Server. If you are installing on Windows Server you can simply launch the installer, setup.exe. However, if you are installing to Windows 7 or Windows Vista you will see the error shown in Figure 24-2 if you try to run the installer.
To remove this limitation, you will need to edit the configuration file, config.xml, which is located in the c:SharePointfilesSetup folder. Add the following line to the <configuration> tag:
<Setting Id="AllowWindowsClientInstall" Value="True"/>
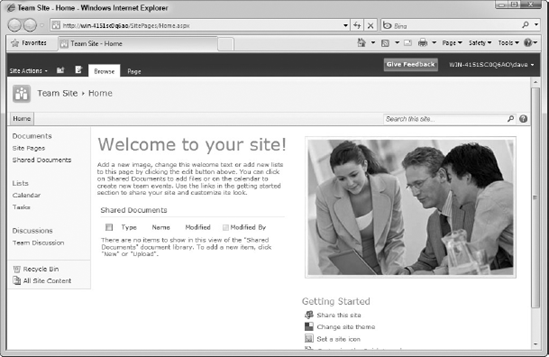
Once you have saved the configuration file, run setup.exe. Follow the instructions on the installer and select the Standalone installation (Install single server standalone using default settings). After the installer has completed, you will be prompted to run the SharePoint Products Configuration Wizard. Once the wizard has completed, the default SharePoint site will open in a new browser window, as shown in Figure 24-3.
The first time you peak under the covers at SharePoint it can be somewhat overwhelming. One reason for this is because so much of the terminology used by SharePoint is unfamiliar to web developers, even those who know ASP.NET inside out. Before you begin developing a SharePoint solution it's helpful to understand the meaning of SharePoint components such as content types, Features, event receivers, lists, workflows, and Web Parts.
The Server Explorer in Visual Studio 2010 has been enhanced to provide the ability to explore a SharePoint site and browse through its components. To connect to a SharePoint site, or develop and debug a SharePoint solution, you must run Visual Studio with administrator rights. Right-click the Visual Studio 2010 shortcut and select Run as Administrator.
Note
To always launch Visual Studio 2010 with administrator rights, right-click the shortcut and select Properties, and then select the Compatibility tab and check the Run This Program as an Administrator checkbox.
Open the Server Explorer by selecting View
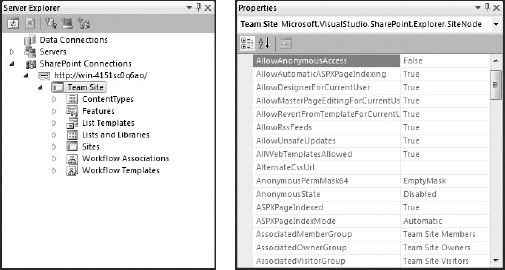
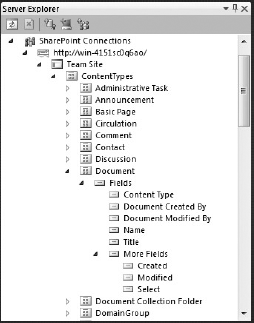
When you select a SharePoint component in the Server Explorer, the properties of that component will be listed in the Properties window. The Server Explorer provides read-only access to SharePoint. Figure 24-4 shows the Server Explorer and the properties for a SharePoint site.
Now that you've seen how to connect to and browse a SharePoint site, it's worth spending some time understanding some of the main concepts used in SharePoint.
Content types provide a way to define distinct types of SharePoint content, such as a document or an announcement. A content type has a set of fields associated with it that define the metadata of the content. For example, the Document content type shown in Figure 24-5 has fields such as the title and the date the document was last modified. A content type has properties that define settings such as the template to use for displaying, editing, or creating a new instance of that content type.
Features are a collection of resources that describe a logical set of functionality. For example, SharePoint ships with Features such as discussion lists, document libraries, and survey lists. Features contain templates, pages, list definitions, event receivers, and workflows. A Feature can also include resources such as images, JavaScript files, or CSS files.
Features also contain event receivers, which are event handlers that are invoked when a Feature is activated, deactivated, installed, uninstalled, or upgraded. Event receivers can also be created for other SharePoint items such as lists or SharePoint sites.
Lists are fundamental to SharePoint and are used almost everywhere. Features such as surveys, issues, and document libraries are all built upon lists. A list definition specifies the fields, forms, views (.aspx pages), and content types associated with the list. A concrete implementation of a list definition is called a list instance.
Workflows under SharePoint 2010 are used to automate business processes. SharePoint workflows are actually built upon the same workflow engine (Windows Workflow Foundation) that ships with .NET v3.5. Workflows can be associated with a particular SharePoint site, list, or content type.
Finally, Web Parts are web server controls that are hosted on a Web Part page in SharePoint. Users can personalize a Web Part page and choose to display one or more Web Parts on that page. Web Parts can display anything as simple as a static label that provides some content for a web page, through to a complete data entry form for submitting line of business data.
Now that you have some background on the main concepts behind SharePoint development, you can create your first SharePoint solution. In Visual Studio 2010 select File
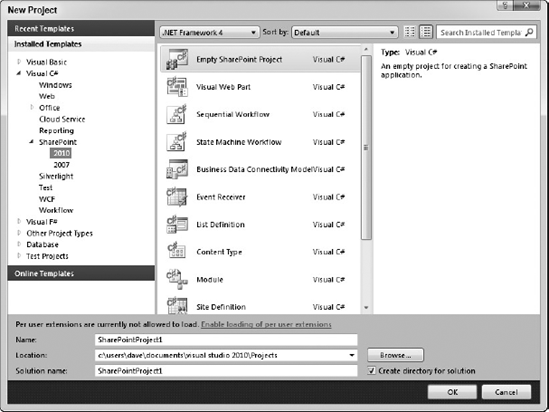
A number of SharePoint project templates ship with Visual Studio 2010. Most of the SharePoint components that can be created with these project templates can also be created as individual items in an existing SharePoint solution. For this reason, select a new Empty SharePoint Project.
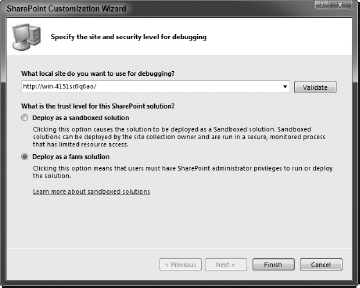
When you click OK, Visual Studio launches the SharePoint Customization Wizard, shown in Figure 24-7. You will be prompted to specify the site and a security level for debugging. Because it is not possible to debug SharePoint sites running on remote computers you will only be able to select a local SharePoint site. You must also select the trust level that the SharePoint solution will be deployed with during debugging. Select Deploy as a Farm Solution and click Finish.
Note
Sandboxed solutions run in a partially trusted environment with access to a limited subset of functionality. The sandbox environment monitors a range of performance-related measures including CPU execution time, memory consumption, and database query time. In addition, sandbox solutions cannot be activated unless they pass a validation process. This provides SharePoint administrators with the confidence that a rogue component won't impact the rest of the SharePoint environment.
When the SharePoint project is created you will notice two unique nodes listed in the Solution Explorer. These nodes are found in every SharePoint project and cannot be deleted, moved, or renamed.
The Features node can contain one or more SharePoint features. As mentioned in the previous section, a Feature is a collection of resources that describe a logical set of functionality. Any time you add a new item, such as a visual Web Part or a content type, it is added to a Feature under the Features node. Depending on the scope of the item, it will either be added to an existing Feature or a new Feature will be created. Features are discussed in the "Working with Features" section later in this chapter.
The Package node contains a single file that serves as the deployment mechanism for a SharePoint project. A package has a .wsp extension and is logically equivalent to an installer file. The package contains a set of Features, site definitions, and additional assemblies that are deployed to a SharePoint site. Packages are discussed in the "Packaging and Deployment" section later in this chapter.
To add a SharePoint component to this solution, right-click the project in the Solution Explorer and select Add
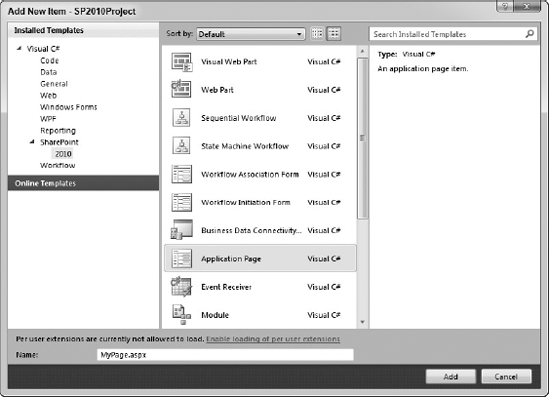
An application page is one of the two types of ASP.NET web pages that are found in SharePoint sites. Most of the pages that end users interact with in SharePoint are actually content pages. Visual Studio does not include a template for content pages. Instead, content pages are created and edited by tools such as the SharePoint Designer or using the SharePoint Foundation object model. Content pages can be added to a SharePoint page library, and they can also host dynamic Web Parts.
Note
The SharePoint Foundation 2010 object model consists of over 70 namespaces and provides an API that allows you to perform most administrative and user-tasks programmatically. The bulk of the classes are contained in the Microsoft.SharePoint.dll and Microsoft.SharePoint.Client.dll assemblies. These classes can only be used to work with a local SharePoint Foundation or SharePoint Server environment.
Although application pages cannot do many of the things that content pages can, they do have much better support for custom application code. For this reason, application pages are often used for non-user administration functions.
When the application page is added to the project it is not added to the root of the project. Instead, it is placed into a subfolder with the same name as your project, under a new folder called Layouts. The Layouts folder cannot be changed, but you can rename the subfolder at any time.
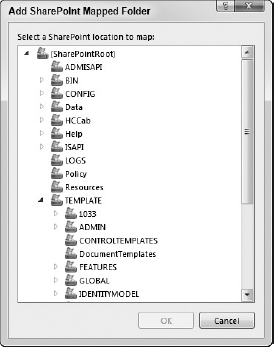
The Layouts folder is an example of a SharePoint Mapped Folder. A SharePoint Mapped Folder is essentially a shortcut to a standard SharePoint folder, and saves you from having to specify the full path to the folder in your SharePoint solution. You can add additional Mapped Folders to your project by right-clicking the project and selecting Add
Application pages are rendered using a SharePoint master page at run time and as such contain several ASP.NET Content controls as placeholders for different regions on the master page. You can add static content, standard HTML controls, and ASP.NET web controls onto an application page in addition to editing the code behind the page.
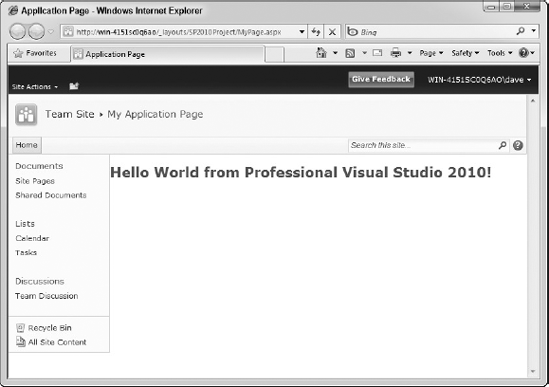
As with any other project type, press F5 to build and run the project in Debug mode. Visual Studio will automatically package and deploy the application page to the local SharePoint installation and then open the browser at the SharePoint site home page. You must manually navigate to the application page at http://ServerName/_layouts/ProjectName/MyPage.aspx to view it (see Figure 24-10). You can debug the application page in the same way you would debug any other ASP.NET web form.
This section walks you through the development activities associated with some of the more common SharePoint components.
Two types of Web Parts can be created in Visual Studio 2010: ASP.NET Web Parts (also known as Visual Web Parts) and SharePoint-based Web Parts.
ASP.NET Web Parts, which are new to SharePoint 2010, inherit from System.Web.UI.WebControls.WebParts.WebPart and can be used outside of SharePoint in any ASP.NET web application that implements the ASP.NET Web Parts functionality. However, ASP.NET Web Parts cannot be used in a sandboxed solution. Visual Studio 2010 includes a designer for ASP.NET Web Parts.
SharePoint-based Web Parts are a legacy control and inherit from the Microsoft.SharePoint.WebPartPages.WebPart class. SharePoint-based Web Parts can only be used in SharePoint sites. There is no designer support for SharePoint-based Web Parts in Visual Studio 2010. Instead, you must build up the design in code by overriding the CreateChildControls() or Render() methods.
ASP.NET Web Parts are recommended for new Web Part development. To create a new ASP.NET Web Part right-click the project in the Solution Explorer and select Add
Several files are added to the project when a new Web Part is created. MyWebPart.cs (or MyWebPart.vb if you are using VB) is the entry point for the Web Part and the class that is instantiated when the Web Part is loaded at run time. Elements.xml and MyWebPart.webpart are XML-based manifest files that provide metadata to SharePoint about the Web Part. Finally, MyWebPartUserControl.ascx is the .NET user control that provides the UI for the Web Part. This is where you should customize the layout and add web control and code-behind as required.
Once you have designed your Web Part and added the necessary logic, build and run the project. Visual Studio will automatically package and deploy the Web Part to the local SharePoint site. You can add the Web Part to an existing page in SharePoint by selecting Site Actions
Note
You can change the category that your Web Part appears under by editing the Elements.xml file.

Content types and lists are two of the fundamental building blocks of SharePoint and are used to implement many of the features that are provided out-of-the-box.
Create a new custom content type by right-clicking the project in the Solution Explorer and selecting Add
Next, create a custom field that can be used by the new content type. From the Add New Item dialog, select a new Empty Element, enter Owner as the name, and click Add. Add the following line of XML to the Elements.xml file that was created, within the <Elements> node:
<Field ID="{3BA8B2E2-4BEA-4305-ACD2-9511C5E45738}"
       Type="User"
       Name="Owner"
       DisplayName="Task Owner">
</Field>
Note
Each custom field that you create must have a unique ID. You can generate a new GUID within Visual Studio by selecting Tools
Now go back to the Elements.xml file for MyContentType. Add the following line of XML under the <FieldRefs> node so that the Owner custom field is available to the new content type:
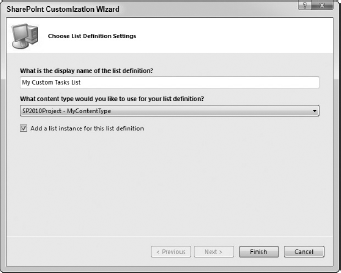
<FieldRef ID="{3BA8B2E2-4BEA-4305-ACD2-9511C5E45738}" Name="Owner"/>Next, create a new SharePoint list definition for this content type. From the Add New Item dialog, select a new List Definition From Content Type, specify MyCustomTasksList as the name, and click Add. Visual Studio will display the SharePoint Customization Wizard, as shown in Figure 24-12. Enter a display name, and then ensure that the custom content type that you created earlier is selected in the drop-down. Also confirm that the checkbox to add a list instance is checked.
Finally, you'll need to customize the list instance so that a useful title is displayed. By default, the title of list instance is ProjectName - ListInstanceName. Open the Elements.xml file under the list instance, ListInstance1, and edit the Title attribute in the XML. Save the file and press F5 to build and run the project.
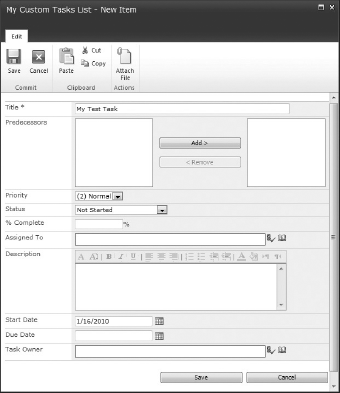
When the SharePoint site opens, you will see a new list in the left-hand column of the Home page. Click the list and then click the Items tab in the Ribbon. Click the New Item button to display the New Item dialog shown in Figure 24-13. Note the new custom field is shown at the bottom of the dialog.
Event receivers can be added to many different SharePoint types, including lists, items in a list, workflows, Features, and SharePoint site administrative tasks. This walkthrough adds a new event receiver to the custom list that was created in the previous section.
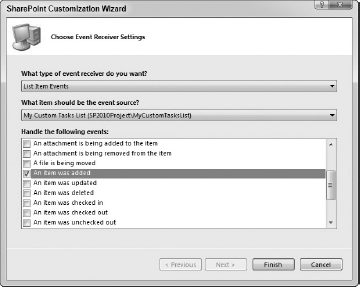
Begin by selecting a new Event Receiver from the Add New Item dialog. When you click Add, the SharePoint Customization Wizard is displayed, as shown in Figure 24-14. Select List Item Events Task as the type of event receiver and the custom task list as the event source. Tick the checkbox next to the An item was added event and click Finish.
Visual Studio will create the new event receiver as a class that inherits from the Microsoft.SharePoint.SPItemEventReceiver base class. The ItemAdded method will be overridden. Modify this by adding the following code that sets the Due Date of a new task to 5 days from the Start Date:
- C#
public override void ItemAdded(SPItemEventProperties properties)
{
    var startDate = DateTime.Parse(properties.ListItem["Start Date"].ToString());
    properties.ListItem["Due Date"] = startDate.AddDays(5);
    properties.ListItem.Update();
    base.ItemAdded(properties);
}
- VB
Public Overrides Sub ItemAdded(ByVal properties As SPItemEventProperties)
    Dim startDate = DateTime.Parse(properties.ListItem("Start Date").ToString())
    properties.ListItem("Due Date") = startDate.AddDays(5)
    properties.ListItem.Update()
    MyBase.ItemAdded(properties)
End Sub
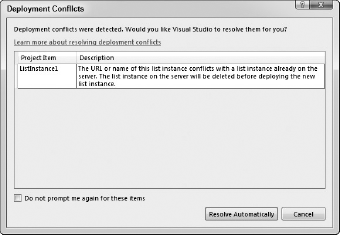
You may be prompted with a deployment conflict, shown in Figure 24-15, when you try to build and run the project. Check the option so that you are not prompted more than once and click Resolve Automatically.
Now when you add a new task to the custom tasks list the Due Date will be automatically set when the item is saved.
Visual Studio 2010 includes support for two types of SharePoint workflows: a sequential workflow and a state machine workflow.
A sequential workflow represents the workflow as a set of steps that are executed in order. For example, a document is submitted that generates an e-mail to an approver. The approver opens the document in SharePoint and either approves or rejects it. If approved, the document is published. If rejected, an e-mail is sent back to the submitter with the details of why it was rejected.
A state machine workflow represents the workflow as a set of states, transitions, and actions. You define the start state for the workflow and it will transition to a new state based on an event. For example, you may have states such as Document Created and Document Published, and events that control the transition to these states such as Document Submitted and Document Approved.
To create a new SharePoint workflow right-click the project in the Solution Explorer and select Add
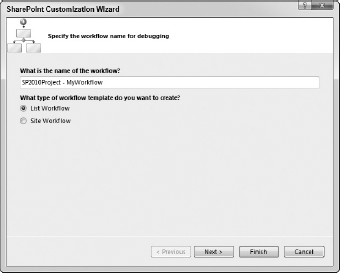
Visual Studio will launch the SharePoint Customization Wizard. On the first screen enter a meaningful name for the workflow and ensure the type of workflow template to create is set to List Workflow, as shown in Figure 24-16.
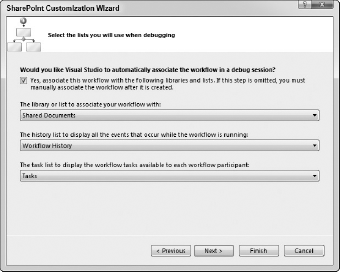
On the next screen, specify the automatic workflow association that should be created when a debug session is started. The default options, shown in Figure 24-17, will associate the workflow with the Shared Documents document library. Leave the defaults and click Next.
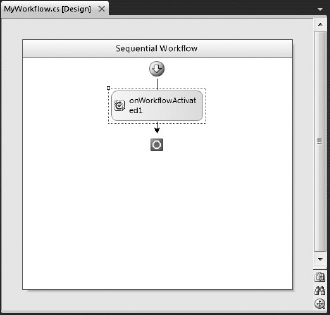
The final step in the SharePoint Customization Wizard is to specify how the workflow is started. Leave the defaults (manually started as well as when an item is created) and click Finish. Visual Studio will create the workflow and open it in the Workflow Designer, as shown in Figure 24-18.
Because workflows in SharePoint are built on the Windows Workflow engine, we won't spend time in this chapter exploring how you can customize the workflow. Instead, refer to Chapter 32 for a detailed look at Windows Workflow. One thing to note though: SharePoint 2010 workflows only run on version 3.5 of Windows Workflow.
You can test your workflow by running it against the local SharePoint installation. When you run the solution, Visual Studio will automatically package and deploy the workflow with the associations that were specified earlier. When you add a new document to the Shared Documents library the workflow will be invoked. You can debug the workflow by setting breakpoints in the code-behind and stepping through the execution in the same way you would any other Visual Studio project.
Features are primarily targeted at SharePoint Administrators and provide them with a way to manage related items. Every time you create an item in a SharePoint project it is added to a Feature.
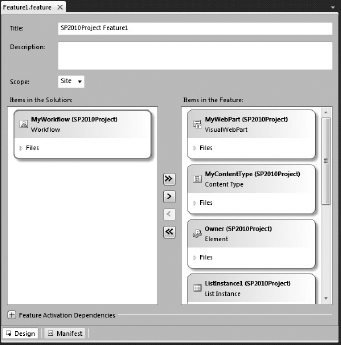
Features are stored under the Features node in your SharePoint project. Visual Studio includes a Feature Designer (shown in Figure 24-19), which is displayed when you double-click a Feature.
The Feature Designer allows you to set a title and description for the Feature that will be displayed in SharePoint. You can also set the scope of the Feature to an entire server farm, all web sites in a site collection, a specific web site, or all web sites in a web application.
You can choose to include or exclude certain items in a Feature with the Feature Designer. For example, in Figure 24-19, all SharePoint items in the project except for MyWorkflow have been included in the Feature. If you have more than one Feature in a project, you can also set dependencies that ensure one Feature cannot be activated unless another Feature has been.
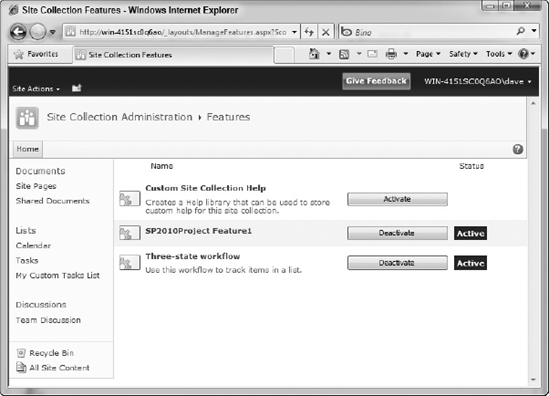
In SharePoint, Administrators can activate or deactivate Features using the Manage Site Features or Site Collection Features administration screens under Site Actions
SharePoint provides a custom packaging format called Windows SharePoint Package (WSP). WSP files can contain Features, site definitions, templates and application pages, and additional required assemblies. WSP files are created in the bin/debug or bin/release folder when you build a SharePoint solution with Visual Studio. The WSP file can then be installed on a remote SharePoint server by an administrator.
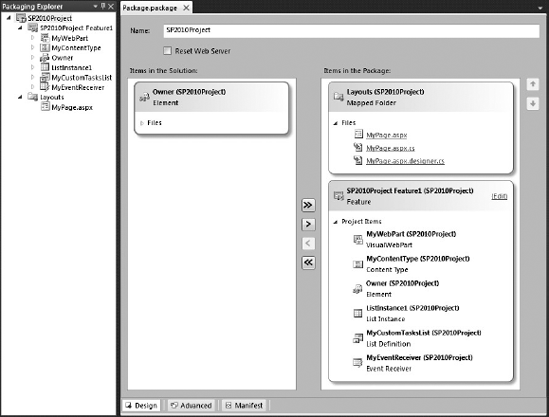
When you create a SharePoint project, a package definition file is also created in the project under the Packages node. The package definition file describes what should go into the WSP file. Visual Studio includes a Package Designer and Packaging Explorer tool window to assist with building packages. If you double-click the package file it opens the file with these design tools. Figure 24-21 shows a package file that includes an application page and a single Feature.
When you press F5 in a SharePoint project, Visual Studio is saving you a whole lot of time by automatically deploying all of the items in your project to the local SharePoint installation. The deployment steps are specified under a SharePoint-specific project property page, shown in Figure 24-22. To display this property page, right-click the project in the Solution Explorer and select Properties.
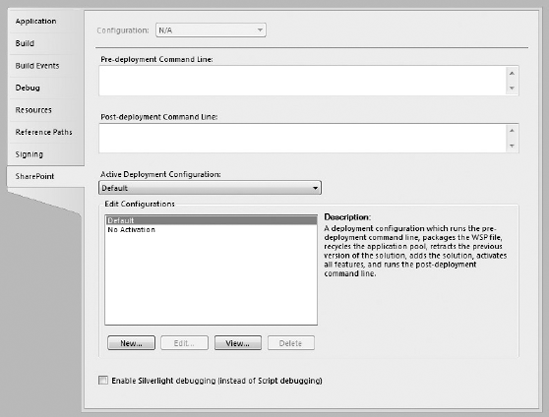
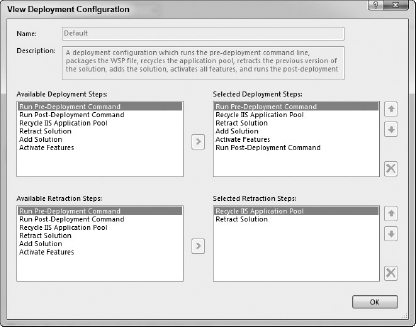
You can specify a command-line program or script to run before and after Visual Studio deploys the solution to the local SharePoint installation. The actual deployment steps are specified as a deployment configuration. Double-click the configuration in the Edit Configurations list to display the list of deployment steps. Figure 24-23 shows the default deployment configuration.
Finally, you can right-click a project in the Solution Explorer and select Retract to remove the SharePoint components from the local SharePoint installation.
In this chapter you learned how to build solutions for Microsoft SharePoint 2010. The development tools in Visual Studio 2010 allow you to easily develop Web Parts, workflows, custom lists, and complete web applications that run under SharePoint's rich hosting environment.
This chapter has just scratched the surface of what is possible with SharePoint 2010 development. If you are interested in diving deeper into this topic, visit the SharePoint Developer Center at http://msdn.microsoft.com/sharepoint, the SharePoint Dev Wiki at http://www.sharepointdevwiki.com, or pick up a copy of Professional SharePoint 2010 Development by Tom Rizzo, Reza Alirezaei, Jeff Fried, and Paul Swider.