
Understanding Windows Workflow Foundation
Creating a basic workflow
Hosting and executing a workflow
Hosting the workflow designer in your application
Windows Workflow Foundation (WF) is a powerful platform for designing and running workflows — a central tenet in many business applications. WF was introduced with the .NET Framework 3.0, and has been completely redesigned and rewritten for its .NET Framework 4.0 version to overcome some of the problems it had in its previous incarnations. Unfortunately, this has rendered it incompatible with workflows created in those previous versions, but leaving it a much more robust technology as a result. This chapter takes you through using the WF designer, and the process of creating and running workflows using WF.
Before discussing Windows Workflow, you should first examine exactly what workflow is. A workflow is essentially a model of the steps that form a business process. For example, this may incorporate document approvals, job status tracking, and so on.
A well-designed workflow requires a clear separation between the steps in the business process (the work to be done), and the business rules/logic that binds them (the flow).
Windows Workflow is a complete workflow solution, including both the design and the run time components required to design/create and run workflows. These workflows can then be hosted in an application, or exposed publicly as a service.
Note
One of the powerful features of WF is that you can host both the WF run time and the WF designer in your application, enabling end users to reconfigure workflows themselves through the WF designer hosted in your application.
Using WF requires you to break your business process into discrete tasks (known as activities), which can then be declaratively connected and controlled in a configurable workflow using the WF designer.
You can use WF in your own products, but you will also find it embedded in various Microsoft products, including Sharepoint and Windows Server AppFabric.
A common question raised by those who investigate WF is regarding why should they use it, rather than embed business logic directly in the code. It's a very valid question, and whether or not you should use it really comes down to the business problem that you are attempting to solve and the business process you need to model. This chapter covers some of the scenarios in which it might be appropriate to use WF, but you will first look at some of the benefits you would gain with using it.
One of the primary scenarios where you would achieve the most benefits from using WF is where you have a business process that frequently changes (or the rules within the business process frequently change). Alternatively, you may have an application that is deployed to different customers, each of whom has different business processes. The business logic/rules that form workflows in WF are defined declaratively rather than being embedded in code, which has the advantage of enabling the workflow to be reconfigured without requiring the application to be recompiled. This, combined with the ability to host the WF designer in your own application, enables you to design highly configurable applications.
Another scenario where using WF provides a lot of advantages is where you are modeling long-running processes. Some workflows can run from seconds, to minutes, hours, days, and even years. WF provides a framework for managing these long-running processes, enabling a workflow to be persisted while waiting for an event (rather than remaining memory resident), and able to be continued after a machine restart.
An advantage of being able to design and visualize your workflows in the WF designer is that the workflow diagram can be used as a form of documentation of the business process/logic. This diagram can be exported from the WF designer as an image, and used in documentation or presentations. This helps provide a high degree of transparency for the business process you are modeling.
Ultimately, it's not appropriate to use WF in all applications that incorporate a business process that requires modeling. If any of the benefits listed previously are core requirements in your application, you should seriously consider designing your workflows and activities using WF. However, if none of the listed benefits are necessary (nor likely to be in the future), it's really a decision you need to make based on whether you think it will improve the development practices of your team, and whether you believe that the imposition of such a framework will still provide more benefits through its use to outweigh the potential problems that it may create (which are not unheard of).
Before you get into the practical aspects of designing and executing workflows, you first run through some of the important concepts around workflows, and the terminology that is involved.
An activity is a discrete unit of work; that is, it performs a task. An activity doesn't have to just perform a single task — in fact an activity can contain other activities (known as a composite activity), which can each contain activities themselves, and so on. A workflow is an activity itself, and so are control flow activities (discussed shortly). You can think of an activity as the fundamental building block of workflows.
Activities can have input and output arguments, which enable the flow of data in and out of the activity, and can return a value. An activity can also have variables, which (like in code) store a value that any activities the activity contains can also get/set. The activity in which a variable is defined designates its scope.
Note
You can think of activities as being much like a method in regular code.
WF includes a base library of predefined activities that cover a wide variety of tasks, which you can use in your workflow. These include activities that:
Control execution flow (If, DoWhile, ForEach, Switch, and so on)
Provide messaging functionality (for communicating with services)
Persist the current workflow instance to a database
Provide transaction support
Enable collection management (add/remove items in a collection, clear a collection, and determine whether an item exists in the collection)
Provide error handling (try, catch, throw, rethrow)
Provide some primitive functionality (delays, variable assigning, write to console, and so on)
Of course, despite this wide range of predefined activities available to you, you will no doubt want to create custom activities to suit your own requirements, especially when you have complex logic to implement. These are written in code, will appear in the Toolbox in the WF designer, and you can drag and drop them into your workflow.
When creating your own custom activities, you have a number of custom activity types to choose from: Activity, CodeActivity, NativeActivity, and DynamicActivity (the custom activity inherits from one of these base classes).
Activities based on the Activity class are composed of other activities, and are designed visually in the WF designer. As previously stated, workflows are activities themselves, so your workflow is actually based on the Activity class. Activities composed in this manner can be used in other activities too.
An activity that is based on CodeActivity, as its name suggests, is an activity whose action(s)/logic is defined in code. This code is actually a class that inherits from CodeActivity and overrides the Execute method in which the code to be executed should be placed.
Activities don't necessarily have to be executed synchronously, blocking the continuing execution of the workflow while performing a long-running task, or waiting for an operation to complete, a response or input to be received, or an event to be raised. You can create asynchronous activities by inheriting from the AsyncCodeActivity class. This is much like the CodeActivity class, except rather than having a single Execute method to be overridden, it has a BeginExecute and an EndExecute method instead. When an asynchronous activity is executed, it will do so on a separate thread from the scheduler and return immediately. It can then continue to execute without blocking the execution of the main workflow. The scheduler that invoked it will be notified when it has completed executing.
Note
Note that a workflow cannot be persisted or be unloaded while an asynchronous activity is executing.
An activity that is based on the NativeActivity class is much like one that inherits from CodeActivity, but whereas CodeActivity is limited to interacting with arguments and variables, NativeActivity has full access to all the functionality exposed by the workflow run time (which passes it a NativeActivityContext object that provides it with this access). This includes the ability to schedule and cancel child activity execution, aborting activity execution, access to activity bookmarks, and scheduling and tracking functions.
Control flow activities are used to control the flow of activities — essentially providing the binding between them that organizes them into a workflow and forming the logic/rules of the process being modeled. Control flow activities are just standard activities themselves, but designed to control the execution/flow of the activities it contains (by scheduling the execution of those activities).
There are two primary types of control flow activities (essentially workflow types): Sequence and Flowchart. A Sequence executes the activities that it contains (as its name suggests) in sequence. It's not possible to go backward and return to a previous step in a sequence; execution can only move forward through the sequence. A Flowchart, however, enables the execution to return to a previous step, making it more suited to decision making (that is, business) processes than sequences.
If you've worked with previous versions of WF, you will note that there is no longer a state machine control flow activity. There is, however, expected to be an out-of-band release of a state machine control flow activity at some stage in the near future.
You are not limited to using a single control flow activity in a workflow — because they are activities, you can mix and match them as required in the same workflow.
Expressions are VB code (only) that return a value, and are used in the designer to control the values of variables and arguments. You can think of them much like formulas in, say, Excel. Expressions are generally bound to an activity's input arguments, used to set the value of variables, or used to define conditions on activities (such as the If activity).
The workflow run time (also known as the scheduler) is the engine that takes a workflow definition file and executes it in the context of a host application. The host application starts a given workflow in the workflow run time using the WorkflowInvoker, the WorkflowApplication, or the WorkflowServiceHost classes.
The WorkflowInvoker class is used in a "hands off" approach to executing the workflow, leaving the workflow run time to handle the entire execution of the workflow. The WorkflowApplication class is used when requiring a "hands on" approach to executing the workflow (such as resuming a persisted instance), enabling the execution to be controlled by the host. The WorkflowServiceHost class is used when hosting the workflow as a service to be used by client applications.
A bookmark marks a place in the workflow, from which its execution can be resumed at a later point in time. Bookmarks enable a workflow instance to be "paused" while it's waiting for input to be received, specifying a point from which it will be resumed when that input has been received. A bookmark is given a name and specifies a callback function, pinpointing the activity that is currently executing and specifying the method in the activity that should be called when the workflow is resumed.
Creating a bookmark stops the workflow from executing, and releases the workflow thread (although the workflow isn't complete, but simply paused), enabling the workflow to be persisted and unloaded. The host is then tasked with capturing the input that the workflow is waiting on, and resuming that workflow's instance execution again from the bookmark position (passing in any data to the callback method received from the awaited input).
Bookmarks are particularly useful in long-running processes where the workflow is waiting for an input to be received, that potentially may not be received for quite some time. In the meantime, it releases the resources that it's using (freeing them up for use by other workflows), and its state can be persisted to disk (if required).
Persistence enables the current state of a workflow instance and its metadata (including the values of in-scope variables, arguments, bookmark data, and so on) to be serialized and saved to a data store (known as an instance store) by a persistence provider, to be retrieved and resumed at a later point in time. To persist a workflow instance, the workflow execution must be idle (such as if it's waiting for input), and a bookmark must be defined to mark the current execution point in the workflow.
Persistence is particularly important when you have long-running workflows, where you want to be able to unload workflows that are idle and waiting for input, or if the machine/server may restart in the times that the workflow is idle, or if the execution may even continue on a different server (such as in a server farm).
Note
Note that the workflow itself is not persisted to the instance, only its state. You need to be aware of the consequences of modifying the workflow while instances are still alive and persisted, and cater accordingly.
WF comes with a default persistence provider called SqlWorkflowInstanceStore that handles persisting a workflow instance to a SQL Server database. You can also create your own custom persistence provider by inheriting from the InstanceStore class.
You have two ways to persist a workflow instance. One is to use the predefined Persist activity from the Toolbox in your workflow, which will persist the workflow instance when executed by the run time. The other option is for the host to register an event handler for the PersistableIdle event, which is raised by the run time when the workflow instance is idle (but not yet complete). The host can then choose whether or not to persist the workflow instance, returning a value from the PersistIdleAction enumeration that will tell the run time what it should do.
WF enables you to implement tracking in your workflows, where various aspects of the execution of a workflow can be logged for analysis. Tracking provides transparency over your workflow, enabling you to see what it has done in the past and its current execution state by the workflow run time emitting tracking records.
You can specify the granularity at which the tracking records will be emitted by configuring a tracking profile, which can be defined either in the App.config file or through code. This will enable you to specify which tracking records you want the workflow run time to emit. The types of tracking records that can be emitted include workflow life cycle records (such as when a workflow starts or finishes), activity life cycle records (such as when an activity is scheduled or completes, or when an error occurs), bookmark resumption records, and custom tracking records (which you can emit from your custom activities). These tracking records can include associated data, such as the current values of variables and arguments.
Where tracking records are written is determined by specifying a tracking participant. By default, the WF run time emits tracking records to the Windows Event Log. You can create your own tracking participants if you, for example, want to write tracking records to a different source, such as a database.
You can also trace the execution of a workflow for troubleshooting and diagnostic purposes, which makes use of the standard .NET trace listeners. Tracing can be configured in the App.config file.
Start by opening the New Project dialog and navigating to the Workflow category under your favorite language (as shown in Figure 32-1).
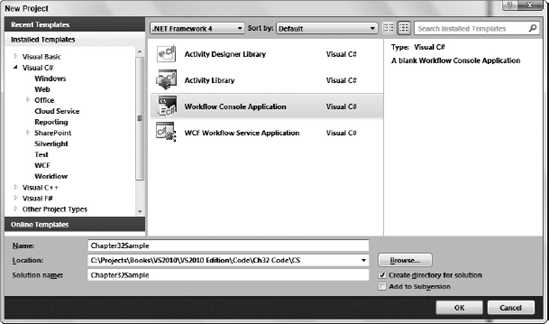
As you can see, you have four project types to choose from as follows:
Activity Designer Library: Enables you to create and maintain a reusable library of activity designers to customize how their corresponding activities look and behave in the WF designer.
Activity Library: Creates a project that enables you to create and maintain a reusable library of activities (consisting of other activities) that you can then use in your workflows. Think of it much like a class library but for workflows.
Workflow Console Application: Creates an empty workflow hosted in a console application.
WCF Workflow Service Application: Creates a workflow hosted and publicly exposed as a WCF service.
Note
You aren't limited to hosting workflows in a console application or WCF service — you can also host them in other platforms such as Windows Forms, WPF, or ASP.NET applications. Add a workflow to an existing project using the Add New Item dialog and selecting Activity from the Workflow category (there is no Workflow item, because a workflow is essentially an activity itself, containing other activities).
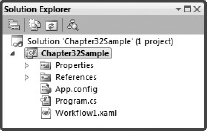
For the sample project, you will use the simplest option to get up and running, by using the Workflow Console Application project template. As you can see from Figure 32-2, the project it generates is very simple, containing Program.cs/Module1.vb and Workflow1.xaml. The Program class (for C# developers), or Module1 module (for VB developers), as found in any console application, contains the entry point for the application (that is, the static/shared Main method), which is automatically configured to instantiate and execute the workflow. The Workflow1.xaml file is the file where you will define your workflow.
Note
Note that the workflow file is a XAML file — a file format you may recognize because it is used to define user interfaces in WPF and Silverlight. However, in this case it is used to declaratively define a workflow. You can view and edit the underlying XAML for a workflow by right-clicking the file and selecting View Code from the context menu.
Before you do anything else, compile and run the application as is to see the result. You should find that a console window briefly appears before the application automatically ends (because it is not currently configured to actually do anything).
The name Workflow1.xaml isn't very meaningful, so you will no doubt want to change that to something more appropriate. Unfortunately Visual Studio doesn't help you much in this respect (unlike with forms and classes), because changing the filename will not automatically change the class created behind the scenes for the workflow, nor will it change any references to the class when you change its name in the designer. For example, to rename the workflow and its corresponding class to SimpleProcessWorkflow, you will need to:
Change the name of the file (in the Solution Explorer).
Change the name of the corresponding class (by clicking the design surface, and assigning the name to the
Nameproperty in the Properties tool window).Change all existing references to the workflow class. In this case where you haven't done anything with your project as yet, the only reference will be in the
Programclass (for C# developers) orModule1module (for VB developers), which will need to be updated accordingly. Note that the class name will not appear in IntelliSense and will indicate an error when you enter it, if you have not compiled the project after changing the class name (because it's only then that the compiler will regenerate the class).
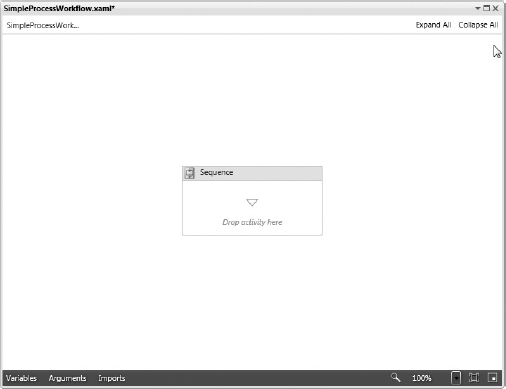
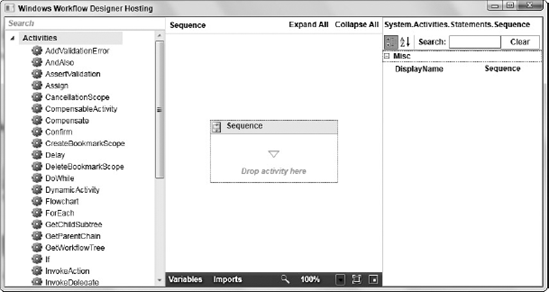
The WF designer enables you to drop control flow activities and standard activities (from the Toolbox) on a workflow design surface, and connect them to form the workflow. It's much like building a form where you drop controls from the Toolbox onto the design surface, but in this case you are building a workflow. When you first create the project, the empty workflow is displayed in the designer, as shown in Figure 32-3.
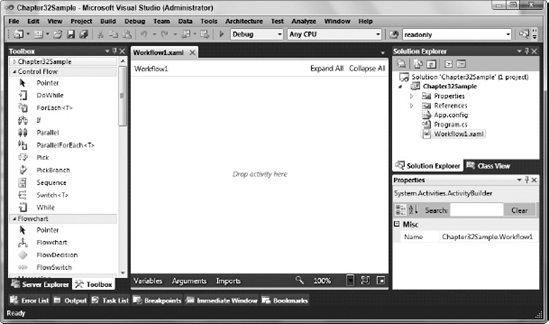
At the bottom of the designer, you will note the three hyperlink buttons: Variables, Arguments, and Imports. Clicking one of these buttons pops up a pane at the bottom of the designer that will enable to you modify their respective configurations.
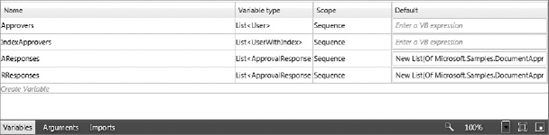
Variables can be defined for use by activities within a given scope (which is defined by a parent activity to which the variables are attached). Add a variable by simply popping up the Variables pane (as shown in Figure 32-4), clicking in the area that says Create Variable, and entering a name for it. You can set the type for the variable by clicking in the Variable Type column and selecting the type from the drop-down list. If the type that you need doesn't appear in the list, you can click the Browse for Types item, which will pop up a dialog enabling you to type in the qualified name of the type, or navigate through the referenced assemblies tree to find it. Clicking in the Scope column displays a drop-down list that will allow you to modify the scope of the variable (by selecting the activity it belongs to). This activity and its child activities will therefore have access to the variable. Clicking in the Default column enables you to enter an expression (in VB code) that will set the default value of the variable.
Note
Note that the default value column accepts expressions rather than values. If you want to assign a value to the variable rather than an expression you will need to enter the literal value, not simply the value itself. The literal values for numeric values are identical, but if the variable is a string, you will need to enclose it in double quotes. This also applies when setting the default value of arguments.
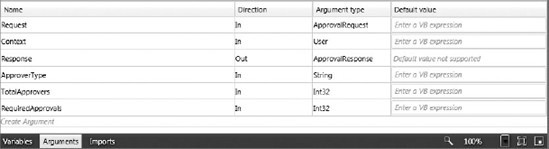
The Arguments pane (as shown in Figure 32-5) enables you to define the input and output arguments for an activity (which enable the flow of data in and out of the activity). There are four types of arguments (that is, argument directions): Input arguments, Output arguments, In/Out arguments, and Property arguments.
Input arguments can conceptually be considered the same as passing parameters into methods by value in regular code.
Output arguments can conceptually be considered the same as output parameters in methods in regular code, whose values are set in the method and returned to the caller.
In/Out arguments can conceptually be considered the same as passing parameters into methods by reference in regular code.
Property arguments can conceptually be considered the same as assigning property values on an object in regular code.
Add an argument by simply popping up the Arguments pane, clicking in the area that says Create Argument, and entering a name for it. Specify the type of argument by clicking in the Direction column and selecting a type from the drop-down list. You can set the type for the argument by clicking in the Argument Type column and selecting the type from the drop-down list. As with variables, you can also assign an expression to the default value of the argument (for In and Property arguments only).
Note
Note that activities can also have a return value.
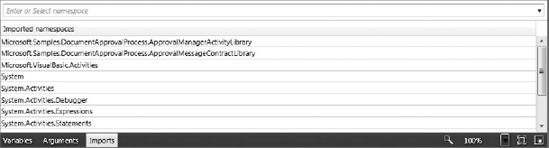
The Imports pane (as shown in Figure 32-6) enables you to import namespaces (the same as defining using statements in C#) for use in expressions. At the top of the panel is a combo box where you can type a namespace to import and add to the list, or select a namespace from the drop-down list.
Workflows can become quite large and potentially unwieldy as they increase in complexity, but luckily the WF designer contains a few tools to help you manage and navigate through the model. You will find that some activities have an icon in their top-right corner, enabling you to roll them up to just display their title (that is, collapse them), or to expand them if they are collapsed. Because you can nest activities within activities (and so on), potentially creating rather deep and complex hierarchies, it can be useful to hide some of this complexity by collapsing activities when you are not actively editing them. Collapsing activities can reduce the amount of space they take in the workflow diagram, and can also be used to hide the complexity of the hierarchy of sub-activities contained within them. You can then expand the activities again by clicking this same icon (whose arrows will have changed direction according to the state of the activity).
In the top-right corner of the designer, you will find an Expand All hyperlink button and a Collapse All hyperlink button (both of which change to read Restore when clicked). It can often be useful to "roll up" the entire workflow (using the Collapse All hyperlink button) to its top-level activities, from which you can then drill down through specific activities by expanding them as required to follow a specific logical path. In addition, you can also use the Expand All hyperlink button to expand all the activities that form the workflow, enabling you to get a picture of the full extent of the workflow.
You can zoom in and out of the view of the workflow using the drop-down list in the bottom-right side of the designer (that lists zoom percentages), and clicking the magnifying glass icon to its left resets the view back to 100%. The icon to the right of the drop-down list will automatically select a zoom level that will enable the entire workflow to be fitted within the visible area of the designer window (without requiring you to scroll).
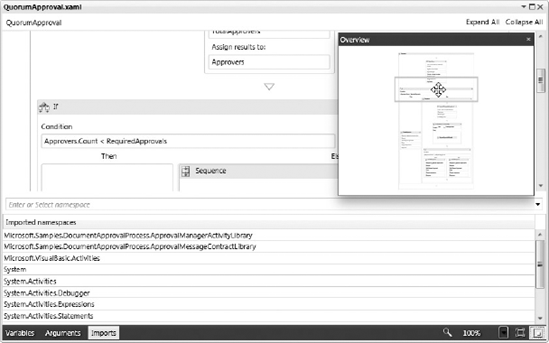
When you have a large workflow with activities you don't want to collapse, with it far too big to fit entirely in the visible area of the designer window, you can make use of the Overview window by clicking the rightmost icon in the bottom-right side of the designer. This will pop up a window in the designer (as shown in Figure 32-7) that enables you to pan around the workflow by clicking and dragging the orange rectangle (representing the visible portion of the workflow in the designer) around to display the part of the workflow that you want to currently view.
As previously discussed, one of the advantages of using WF is that the diagram of the workflow can be used as a form of documentation for your business process/logic/rules. It can often be useful to place this diagram in documentation or presentations, and the way to do this is quite easy. Right-click anywhere on the design surface. Two items appear in the context menu that you can use for this purpose: Save as Image and Copy as Image. Selecting the Copy as Image menu item copies a picture of the entire diagram to the clipboard, whereas the Save as Image menu item shows a dialog box enabling you to save the diagram to your choice of a JPEG, PNG, GIF, or XPS document. You can then paste the diagram into your document or presentation (if you copied it to the clipboard), or import it if you had saved it to disk.
This section walks through the process of creating a very simple workflow that demonstrates a number of the features of WF. For this example, you will simply be writing output to the console window and receiving input from the user, but doing so in a workflow rather than regular code.
The first thing you want to do is to drop a control flow activity onto the designer that will schedule the execution of the activities that it contains. For this example, you will use a Sequence activity for this purpose. You will find the Sequence activity under the Control Flow category in the Toolbox. Drag and drop it into your SimpleProcessWorkflow workflow, as demonstrated in Figure 32-8.
At this point, it would be useful to give it a meaningful name — click in its header and change it to SimpleProcessSequence. You can also simply select the activity and set its DisplayName property in the Properties tool window.
For this initial example, you'll get the workflow to execute a do/while loop that will write a message to the console five times. To do this, you then need to drop a DoWhile activity into the Sequence activity from the Control Flow category in the Toolbox. Once you've done that, you will find that both the new activity and the Sequence activity are now displaying as invalid (a red icon with an exclamation mark appears in the right side of the headers of both activities). This is because an expression needs to be assigned to the condition of the DoWhile activity before it can be considered valid.
Note
If you attempt to compile the application that has an invalid activity, it will still compile but when you try to run it you will receive a run time error. You can, however, see a list of all the validation errors in a workflow as errors in the Error List tool window.
Because you want to place more than one activity in the DoWhile activity, add a Sequence activity as its child. Call this sequence WriteHelloWorldSequence.
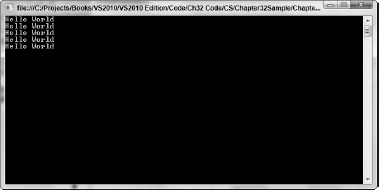
Now find the WriteLine activity in the Toolbox (under the Primitives category), and drag and drop that into the WriteHelloWorldSequence activity. To make it write Hello World to the output each time it's executed, set its Text argument to "Hello World" (with the argument accepting an expression and being a string value that you are assigning, you need to assign it as a literal value by enclosing it in quotes).
So that the output can be seen more easily, drop a Delay activity (from the Primitives category in the Toolbox) into the WriteHelloWorldSequence activity, following the WriteLine activity. The Delay activity's Duration argument accepts a TimeSpan type — you'll use an expression to specify its value as 200 milliseconds because it's more readable than the literal value:
TimeSpan.FromMilliseconds(200)
To control the number of times this loop will execute, add a variable called Counter to the SimpleProcessSequence activity (which will be available to all the activities in the sequence). Select the SimpleProcessSequence activity and pop up the Variables pane. Click where it says Create Variable, enter Counter as its name, a type of Int32, and a default value of 0.
Back in the DoWhile activity, you can now specify the following expression as its condition:
Counter < 5
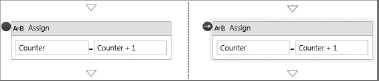
The final step is to actually increment the Counter variable. Add an Assign activity (from the Primitives category in the Toolbox) to the sequence (following the Delay activity), setting its To argument to Counter, and its Value argument to Counter + 1.
Your simple workflow is now complete, and should look like Figure 32-9.

Now you can run your application, which will execute the workflow with the results shown in Figure 32-10.
Now create a custom activity whose work is defined in code to get input from the user. Add a new item to your project, select the Code Activity item template from the Workflow category in the Add New Item dialog (as shown in Figure 32-11), and call it UserInput.

This creates a class that inherits from System.Activities.CodeActivity, and overrides the Execute method into which you can write the code that this activity will execute. It also includes a sample input argument called Text (defined as a property on the class), which you can delete because this activity won't require any inputs (also delete the line of code in the Execute method that retrieves its value).
This activity will obtain input from the user that other activities in the workflow can use. You can return the value either as an output argument or as a return value. Either way is acceptable, so for this example return the value.
To return a value, instead of inheriting from the CodeActivity class you will need to inherit from its generic version instead (into which you pass the type that the activity will return). Change the class to inherit from the generic CodeActivity class, passing in the type of the return value. Change the Execute method to return a type instead of void (C# developers), or to a function that returns a type (VB developers). Then it's simply a case of returning the value returned from the Console.ReadLine() function in the Execute method:
- VB
Public NotInheritable Class UserInput Inherits CodeActivity(Of String) Protected Overrides Function Execute(ByVal context As CodeActivityContext) _ As String Return Console.ReadLine() End Function End Class- C#
public sealed class UserInput : CodeActivity<string>
{
    protected override string Execute(CodeActivityContext context)
    {
        return Console.ReadLine();
    }
}
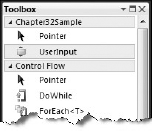
If you switch back now to the workflow in the designer, you will find that the activity is nowhere to be found in the Toolbox. However, once you compile your project, it will appear in the Toolbox, under the category with the same name as your project, as shown in Figure 32-12.
Drop the activity from the Toolbox into your workflow, in the main SimpleProcessSequence sequence activity after the DoWhile activity. You will note that there is no nice designer user interface for the activity (just a simple block), but you could design one by creating an activity designer for it. However a discussion of this is beyond the scope of this chapter.
When you select it, the Properties tool window will have a property called Result, in which an expression to work with the return value of the Execute method in the activity can be specified. What you want to do is assign the return value to a variable, which activities following it in the sequence can use. Create a new variable in the Variables pane called UserInputValue with a type of String. In the Properties tool window, you can now simply set UserInputValue as the expression for the Result property, which will assign the return value from the activity to the UserInputValue variable. You can prove this works by adding a WriteLine activity following the UserInput activity that then writes the value of this variable back out to the console.
If you inspect the Main method (the entry point of the application) in the Program.cs file (for C# developers) or Module1.vb (for VB developers) you will find the code used to execute the workflow:
- VB
WorkflowInvoker.Invoke(New SimpleProcessWorkflow())
- C#
WorkflowInvoker.Invoke(new SimpleProcessWorkflow());
This is making use of the WorkflowInvoker class to invoke the workflow, which, as described earlier in this chapter, has no control over the actual execution of the workflow other than simply initiating its execution.
If you want more control over the execution of a workflow, however (such as if you need to resume execution from a bookmark, or persist/unload a workflow), you will need to turn to the WorkflowApplication class to invoke your workflow instead. Basic use of the WorkflowApplication class to invoke a workflow and handle its Complete event is as follows:
- VB
Dim syncEvent As New AutoResetEvent(False) Dim app As New WorkflowApplication(New SimpleProcessWorkflow()) app.Completed = Function(args) Console.WriteLine("Workflow instance has completed!") Thread.Sleep(1000) syncEvent.Set() Return Nothing End Function app.Run() syncEvent.WaitOne()- C#
AutoResetEvent syncEvent = new AutoResetEvent(false);

WorkflowApplication app = new WorkflowApplication(new SimpleProcessWorkflow());

app.Completed = (e) =>
{
    Console.WriteLine("Workflow instance has completed!");
    Thread.Sleep(1000);
    syncEvent.Set();
};

app.Run();
syncEvent.WaitOne();
Note
Note that you will need to add an Imports/using statement to the System.Threading namespace at the top of the file for the code snippets above to work.
This code assigns a delegate that will be run when the workflow has completed executing. Because the Run method returns immediately, you will wait for the workflow to complete executing before continuing (and exiting the application) using the WaitOne method on a AutoResetEvent, which is notified in the Completed handler that it can enable the thread execution to continue.
Note
Although we are referring to "events" here, you'll note from the code snippets that they aren't events at all. Instead, they are properties to which you can assign delegates. However, for the purposes of simplifying their description we'll continue to refer to them as events.
Executing a workflow via the WorkflowApplication class actually invokes it on a background thread, with the Run method returning immediately. The host can attach event handlers to various events raised by the WorkflowApplication class (such as when a workflow instance has completed, is idle, thrown an unhandled exception, and so on), and also gains the ability to abort/cancel/terminate a workflow instance, load one from a instance store, persist it, unload it, and resume from a bookmark.
You can pass input arguments into a workflow, and obtain output argument values from it. Input arguments are exposed as properties from your workflow class, so assign values to these before invoking the workflow. Output arguments are returned in a dictionary (which is the return value of the WorkflowInvoker.Invoke method), each having a string key with the name of the argument, and a corresponding object value that you can cast to the appropriate type.
As previously noted, workflows/activities are XAML files. By default, the XAML file is compiled into the application (as a resource), but what if you want to take advantage of the fact that you can reconfigure a workflow without recompiling the application? In that case, you would have to have the XAML file as a content file in your project instead, and dynamically load it into your application from file. This is where the ActivityXamlServices class is useful. Load the XAML file as an activity using the ActivityXamlServices class, and then invoke (that is, execute) the activity that it returns with the WorkflowInvoker or WorkflowApplication class:
- VB
Dim activity As Activity = ActivityXamlServices.Load("SimpleProcessWorkflow.xaml") WorkflowInvoker.Invoke(activity)- C#
Activity activity = ActivityXamlServices.Load("SimpleProcessWorkflow.xaml");
WorkflowInvoker.Invoke(activity);
Note
Loading and executing a workflow from a file becomes a little more complicated when it uses custom activities (such as the UserInput activity), because the run time will need a reference to the assemblies containing those custom activities so it can use them. However, going into this further is beyond the scope of this chapter.
In addition to having a rich designer support for building workflows, WF also includes debugging capabilities. To define a breakpoint in a workflow, simply select the activity and press F9, or select Breakpoint
As in a normal debugging session, in a workflow you step through code using shortcut keys. Pressing F10 steps through the workflow, and pressing F11 steps into the current activity. You can view the values of variables currently in scope in the Locals tool window.
Of course, your custom code activities can be debugged as normal by setting breakpoints in the code editor and stepping through the code.
Having a well-defined testing framework is extremely important in business applications, with it especially vital that the underlying business logic for the application is well covered with tests. Therefore, it is essential with your workflow being at the core of your business logic that it should be testable too. Luckily, this is indeed possible, and you can use your favorite unit testing framework — going so far as to use Test Driven Development (TDD) practices if you want. As discussed in the "Executing a Workflow" section, by using the WorkflowInvoker.Invoke method to execute your workflow, you can pass input argument values into the workflow and obtain the resulting output argument values (in a dictionary). Therefore, testing your workflow is as easy as supplying input argument values and asserting that the corresponding output argument values are as expected.
One of the benefits in having a declarative configurable workflow is that it can be reconfigured at will to support changing business requirements without the application needing to be recompiled. This means (in theory) that an end user given the right tools (that is, the WF designer) should be able to modify the workflow without requiring a developer to be involved (creating custom activities is a different story, however). Of course it's probably asking too much to have a casual end user use the WF designer and modify a workflow without training — it really is a tool designed to be used by developers. That said, with a little training, IT-savvy users (such as business analysts and so on) could successfully take on this task.
If this is the case, it is quite easy to host the WF designer in your own application and expose it to the end user for modification. The WF designer is a WPF component that you can host in your own WPF applications, making it available to the users to modify a workflow as required. You can also host the WF designer in Windows Forms using the WPF interoperability described in Chapter 18. This chapter, however, will focus on hosting it natively in a WPF application.
Note
The coverage of this topic assumes you have some experience working with WPF and XAML. See Chapter 18 for more information on these topics.
Create a new WPF project, called WFDesignerHost. Add the following assembly references to the project:
System.Activities.dll
System.Activities.Core.Presentation.dll
System.Activities.Presentation.dll
You will also need to add a reference to any assemblies that contain custom activities that you want to be used in the workflows through your application.
The designer has three main (separate) components: the Toolbox, the Properties window, and the designer surface. Let's create a user interface that instantiates and displays the three of these.
Open up the MainWindow.xaml file and set the name of the Grid control to WFLayoutGrid. Also add three columns to this Grid (you will no doubt want to define some appropriate widths for these columns at a later point in time). Host the Toolbox in the first column, the designer surface in the second, and the Properties window in the third. The Toolbox can be created either declaratively in XAML or in code, but the designer surface and Properties window can only be created in code. For the purpose of this example, you'll create all three of these controls in code.
Open up the code behind the MainWindow.xaml file. Import the following namespaces:
- VB
Imports System.Activities
Imports System.Activities.Core.Presentation
Imports System.Activities.Presentation
Imports System.Activities.Presentation.Toolbox
Imports System.Activities.Statements
Imports System.Linq
Imports System.Reflection
Imports System.Windows
Imports System.Windows.Controls
- C#
using System;
using System.Activities;
using System.Activities.Core.Presentation;
using System.Activities.Presentation;
using System.Activities.Presentation.Toolbox;
using System.Activities.Statements;
using System.Linq;
using System.Reflection;
using System.Windows;
using System.Windows.Controls;
First, you need to register the designer metadata:
- VB
Private Sub RegisterMetadata() Dim metaData As New DesignerMetadata() metaData.Register() End Sub- C#
private void RegisterMetadata()
{
    DesignerMetadata metaData = new DesignerMetadata();
    metaData.Register();
}
Now add the Toolbox to the page. You will find that the Toolbox is not automatically populated with activities — instead you need to populate it yourself with the activities you want to make available to the user. The following code handles this by creating an instance of the Toolbox and adding all the activities in the same assembly as the Sequence activity to it.
- VB
Private Sub AddToolboxControl(ByVal parent As Grid, ByVal row As Integer, ByVal column As Integer) Dim toolbox As New ToolboxControl() Dim category As New ToolboxCategory("Activities") toolbox.Categories.Add(category) Dim query = From type In Assembly.GetAssembly(GetType(Sequence)).GetTypes() Where type.IsPublic AndAlso Not type.IsNested AndAlso Not type.IsAbstract AndAlso Not type.ContainsGenericParameters AndAlso (GetType(Activity).IsAssignableFrom(type) OrElse GetType(IActivityTemplateFactory).IsAssignableFrom(type)) Order By type.Name Select New ToolboxItemWrapper(type) query.ToList().ForEach(Function(item) category.Add(item) Return Nothing End Function) Grid.SetRow(toolbox, row) Grid.SetColumn(toolbox, column) parent.Children.Add(toolbox) End Sub- C#
private void AddToolboxControl(Grid parent, int row, int column)
{
    ToolboxControl toolbox = new ToolboxControl();

    ToolboxCategory category = new ToolboxCategory("Activities");
    toolbox.Categories.Add(category);

    var query = from type in Assembly.GetAssembly(typeof(Sequence)).GetTypes()
                where type.IsPublic &&
!type.IsNested && !type.IsAbstract && !type.ContainsGenericParameters && (typeof(Activity).IsAssignableFrom(type) || typeof(IActivityTemplateFactory).IsAssignableFrom(type)) orderby type.Name select new ToolboxItemWrapper(type); query.ToList().ForEach(item => category.Add(item)); Grid.SetRow(toolbox, row); Grid.SetColumn(toolbox, column); parent.Children.Add(toolbox); }
Now you add the designer and the Properties window (both are controls returned from instantiating the WorkflowDesigner class):
- VB
Private Sub AddDesigner(ByVal parent As Grid, ByVal designerRow As Integer, ByVal designerColumn As Integer, ByVal propertiesRow As Integer, ByVal propertiesColumn As Integer) Dim designer As New WorkflowDesigner() designer.Load(New Sequence()) Grid.SetRow(designer.View, designerRow) Grid.SetColumn(designer.View, designerColumn) parent.Children.Add(designer.View) Grid.SetRow(designer.PropertyInspectorView, propertiesRow) Grid.SetColumn(designer.PropertyInspectorView, propertiesColumn) parent.Children.Add(designer.PropertyInspectorView) End Sub- C#
private void AddDesigner(Grid parent, int designerRow, int designerColumn,
                                      int propertiesRow, int propertiesColumn)
{
    WorkflowDesigner designer = new WorkflowDesigner();
    designer.Load(new Sequence());

    Grid.SetRow(designer.View, designerRow);
    Grid.SetColumn(designer.View, designerColumn);
    parent.Children.Add(designer.View);

    Grid.SetRow(designer.PropertyInspectorView, propertiesRow);
    Grid.SetColumn(designer.PropertyInspectorView, propertiesColumn);
    parent.Children.Add(designer.PropertyInspectorView);
}
Now call these three functions from the window's New method/constructor, like so:
- VB
Public Sub New() InitializeComponent() RegisterMetadata() AddToolboxControl(WFLayoutGrid, 0, 0) AddDesigner(WFLayoutGrid, 0, 1, 0, 2) End Sub- C#
public MainWindow()
{
    InitializeComponent();

    RegisterMetadata();
    AddToolboxControl(WFLayoutGrid, 0, 0);
    AddDesigner(WFLayoutGrid, 0, 1, 0, 2);
}
Now you can run the project and test it. Your final user interface should look something like Figure 32-14 (which can, of course, be improved upon by spending some time styling the page).
In this chapter, you learned that Windows Workflow is a means of defining a business process, which is especially useful to use when you have a business process that changes frequently or is a long running process. You also learned how to create and run a basic workflow, and how to host the workflow designer in your own application. Windows Workflow is quickly becoming the standard for implementing workflows on the Microsoft platform, enabling you to reuse the skills you have gained here to also build workflows in the various products that support it.