
Language Integrated Queries (LINQ) was designed to provide a common programming model for querying data. In this chapter you see how you can take some very verbose, imperative code and reduce it to a few declarative lines. This enables you to make your code more descriptive rather than prescriptive; that is, describing what you want to occur, rather than detailing how it should be done.
Although LINQ provides an easy way to filter, sort, and project from an in-memory object graph, it is more common for the data source to be either a database or a file type, such as XML. In this chapter you are introduced to LINQ to XML, which makes working with XML data dramatically simpler than with traditional methods such as using the document object model, XSLT, or XPath. You also learn how to use LINQ to SQL to work with traditional databases, such as SQL Server, allowing you to write LINQ statements that will query the database, pull back the appropriate data, and populate .NET objects that you can work with. In Chapter 29 you are introduced to the ADO.NET Entity Framework for which there is also a LINQ provider. This means that you can combine the power of declarative queries with the fidelity of the Entity Framework to manage your data object life cycle.
One of the key tenets of LINQ is the ability to abstract away the query syntax from the underlying data store. LINQ sits behind the various .NET languages such as C# and VB and combines various language features, such as extension methods, type inferences, anonymous types, and Lambda expressions, to provide a uniform syntax for querying data.
A number of LINQ-enabled data sources come with Visual Studio 2010 and the .NET Framework 4.0: Objects, DataSets, SQL, Entities, and XML; each with its own LINQ provider that's capable of querying the corresponding data source. LINQ is not limited to just these data sources, and providers are available for querying all sorts of other data sources. For example, there is a LINQ provider for querying SharePoint. In fact, the documentation that ships with Visual Studio 2010 includes a walkthrough on creating your own LINQ provider.
In this chapter you see some of the standard LINQ operations as they apply to standard .NET objects. You'll then see how these same queries can be applied to both XML and SQL data sources. As you will see, the syntax for querying the data remains constant, with only the underlying data source changing.
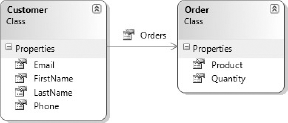
Instead of walking through exactly what LINQ is, this section starts with an example that demonstrates some of the savings that these queries offer. The scenario is one in which a researcher is investigating whether or not there is a correlation between the length of a customer's name and the customer's average order size by analyzing a collection of customer objects. The relationship between a customer and the orders is a simple one-to-many relationship as shown in Figure 28-1.
In the particular query you are examining, the researchers are looking for the average Milk order for customers with a first name greater than or equal to five characters, ordered by the first name:
- C#
private void OldStyleQuery(){
    Customer[] customers = BuildCustomers();
    List<SearchResult> results = new List<SearchResult>();
    SearchForProduct matcher = new SearchForProduct() { Product = "Milk" };
    foreach (Customer c in customers){
        if (c.FirstName.Length >= 5){
            Order[] orders = Array.FindAll(c.Orders, matcher.ProductMatch);
            if (orders.Length > 0){
                SearchResult cr = new SearchResult();
                cr.Customer = c.FirstName + " " + c.LastName;
                foreach (Order o in orders){
                    cr.Quantity += o.Quantity;
cr.Count++; } results.Add(cr); } } } results.Sort(CompareSearchResults); ObjectDumper.Write(results, Writer); }
- VB
Private Sub OldStyleQuery()
    Dim customers As Customer() = BuildCustomers()

    Dim results As New List(Of SearchResult)
    Dim matcher As New SearchForProduct() With {.Product = "Milk"}

    For Each c As Customer In customers
        If c.FirstName.Length >= 5 Then
            Dim orders As Order() = Array.FindAll(c.Orders, _
                                           AddressOf matcher.ProductMatch)
            If orders.Length > 0 Then
                Dim cr As New SearchResult
                cr.Customer = c.FirstName & " " & c.LastName
                For Each o As Order In orders
                    cr.Quantity += o.Quantity
                    cr.Count += 1
                Next
                results.Add(cr)
             End If
         End If
    Next
    results.Sort(AddressOf CompareSearchResults)

    ObjectDumper.Write(results, Writer)
End Sub
Before we jump in and show how LINQ can improve this snippet, let's examine how this snippet works. The opening line calls out to a method that simply generates Customer objects. This will be used throughout the snippets in this chapter. The main loop in this method iterates through the array of customers searching for those customers with a first name longer than five characters. Upon finding such a customer, you use the Array.FindAll method to retrieve all orders where the predicate is true. Prior to the introduction of anonymous methods you couldn't supply the predicate function inline with the method. As a result, the usual way to do this was to create a simple class that could hold the query variable (in this case, the product, Milk) that you were searching for, and that had a method that accepted the type of object you were searching through, in this case an Order. With the introduction of Lambda expressions, you can now rewrite this line:
- C#
var orders = Array.FindAll(c.Orders, order=>order.Product =="Milk");
- VB
Dim orders = Array.FindAll(c.Orders,
                           Function(o As Order) o.Product = "Milk")
Here you have also taken advantage of type inferencing to determine the type of the variable orders, which is of course still an array of orders.
Returning to the snippet, once you have located the orders you still need to iterate through them and sum up the quantity ordered and store this, along with the name of the customer and the number of orders. This is your search result, and as you can see you are using a SearchResult object to store this information. For convenience, the SearchResult object also has a read-only Average property, which simply divides the total quantity ordered by the number of orders. Because you want to sort the customer list, you use the Sort method on the List class, passing in the address of a comparison method. Again, using Lambda expressions, this can be rewritten as an inline statement:
- C#
results.Sort((r1, r2) => string.Compare(r1.Customer, r2.Customer));
- VB
results.Sort( Function(r1 as SearchResult, r2 as SearchResult) _
                                         String.Compare(r1.Customer, r2.Customer))
The last part of this snippet is to print out the search results. This is using one of the samples that ships with Visual Studio 2010 called ObjectDumper. This is a simple class that iterates through a collection of objects printing out the values of the public properties. In this case the output would look like Figure 28-2.

As you can see from this relatively simple query, the code to do this in the past was quite prescriptive and required additional classes in order to carry out the query logic and return the results. With the power of LINQ you can build a single expression that clearly describes what the search results should be.
This section introduces you to a number of the query operations that make up the basis of LINQ. If you have written SQL statements, these will feel familiar, although the ordering and syntax might take a little time to get used to. You can use a number of query operations, and numerous reference web sites provide more information on how to use them. For the moment, you will focus on those operations necessary to improve the search query introduced at the beginning of this chapter.
Unlike SQL, where the first statement is Select, in LINQ the first statement is typically From. One of the key considerations in the creation of LINQ was providing IntelliSense support within Visual Studio 2010. If you've ever wondered why there is no IntelliSense support in SQL Management Studio for SQL Server 2005 for writing queries, this is because to determine what to select, you need to know where the data is coming from. By reversing the order of the statements, LINQ is able to generate IntelliSense as soon as you start typing.
As you can see from the tooltip in Figure 28-3, the From statement is made up of two parts, <element> and <collection>. The latter is the source collection from which you will be extracting data, and the former is essentially an iteration variable that can be used to refer to the items being queried. This pair can then be repeated for each source collection.
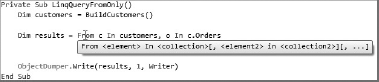
In this case you can see you are querying the customers collection, with an iteration variable c, and the orders collection c.Orders using the iteration variable o. There is an implicit join between the two source collections because of the relationship between a customer and that customer's orders. As you can imagine, this query will result in the cross-product of items in each source collection. This will lead to the pairing of a customer with each order that this customer has.
Note that you don't have a Select statement, because you are simply going to return all elements, but what does each result record look like? If you were to look at the tooltip for results, you would see that it is a generic IEnumerable of an anonymous type. The anonymous type feature is heavily used in LINQ so that you don't have to create classes for every result. If you recall from the initial code, you had to have a SearchResult class in order to capture each of the results. Anonymous types mean that you no longer have to create a class to store the results. During compilation, types containing the relevant properties are dynamically created, thereby giving you a strongly typed result set along with IntelliSense support. Though the tooltip for results may report only that it is an IEnumerable of an anonymous type, when you start to use the results collection you will see that the type has two properties, c and o, of type Customer and Order, respectively. Figure 28-4 displays the output of this code, showing the customer-order pairs.

Note
C# actually requires a Select clause to be present in all LINQ, even if you are returning all objects in the From clause.
In the previous code snippet the result set was a collection of customer-order pairs, when in fact what you want to return is the customer name and the order information. You can do this by using a Select statement in a way similar to the way you would when writing a SQL statement:
- C#
private void LinqQueryWithSelect(){
    var customers = BuildCustomers();
    var results = from c in customers
                  from o in c.Orders
                  select new{c.FirstName,
                             c.LastName,o.Product,o.Quantity};
    ObjectDumper.Write(results, Writer);
}
- VB
Private Sub LinqQueryWithSelect()
    Dim customers = BuildCustomers()

    Dim results = From c In customers, o In c.Orders
                  Select c.FirstName, c.LastName, o.Product, o.Quantity

    ObjectDumper.Write(results, Writer)
End Sub
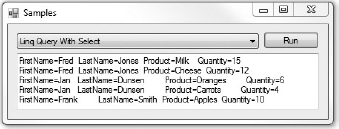
Now when you execute this code the result set is a collection of objects that have FirstName, LastName, Product, and Quantity properties. This is illustrated in the output shown in Figure 28-5.
So far all you have seen is how you can effectively flatten the customer-order hierarchy into a result set containing the appropriate properties. What you haven't done is filter these results so that they only return customers with a first name greater than or equal to five characters, and who are ordering Milk. The following snippet introduces a Where statement, which restricts the source collections on both these axes:
- C#
private void LinqQueryWithWhere(){
    var customers = BuildCustomers();

    var results = from c in customers
from o in c.Orders where c.FirstName.Length >= 5 && o.Product == "Milk" select new { c.FirstName, c.LastName, o.Product, o.Quantity }; ObjectDumper.Write(results, Writer); }
- VB
Private Sub LinqQueryWithWhere()
    Dim customers = BuildCustomers()

    Dim results = From c In customers, o In c.Orders
                  Where c.FirstName.Length >= 5 And
                        o.Product = "Milk"
                  Select c.FirstName, c.LastName, o.Product, o.Quantity

    ObjectDumper.Write(results, Writer)
End Sub
The output of this query is similar to the previous one in that it is a result set of an anonymous type with the four properties FirstName, LastName, Product, and Quantity.
You are getting close to your initial query, except that your current query returns a list of all the Milk orders for all the customers. For a customer who might have placed two orders for Milk, this will result in two records in the result set. What you actually want to do is to group these orders by customer and take an average of the quantities ordered. Not surprisingly, this is done with a Group By statement, as shown in the following snippet:
- C#
private void LinqQueryWithGroupingAndWhere(){
    var customers = BuildCustomers();

    var results = from c in customers
                  from o in c.Orders
                  where c.FirstName.Length >= 5 &&
                        o.Product == "Milk"
                  group o by c into avg
                  select new { avg.Key.FirstName, avg.Key.LastName,
                               avg = avg.Average(o => o.Quantity) };
    ObjectDumper.Write(results, Writer);
}
- VB
Private Sub LinqQueryWithGroupingAndWhere()
    Dim customers = BuildCustomers()

    Dim results = From c In customers, o In c.Orders _
                  Where c.FirstName.Length >= 5 And _
                        o.Product = "Milk" _
                  Group By c Into avg = Average(o.Quantity) _
                  Select c.FirstName, c.LastName, avg

    ObjectDumper.Write(results)
End Sub
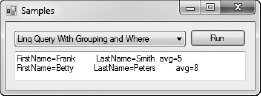
What is a little confusing about the Group By statement is the syntax that it uses. Essentially, what it is saying is "group by dimension X" and place the results "Into" an alias that can be used elsewhere. In this case the alias is avg, which will contain the average you are interested in. Because you are grouping by the iteration variable c, you can still use this in the Select statement, along with the Group By alias. Note that the C# example is slightly different in that although the grouping is still done on c, you then have to access it via the Key property of the alias. Now when you run this you get the output shown in Figure 28-6, which is much closer to your initial query.
You still need to tidy up the output so that you are returning a well-formatted customer name and an appropriately named average property, instead of the query results, FirstName, LastName, and avg. You can do this by customizing the properties that are contained in the anonymous type that is created as part of the Select statement projection. Figure 28-7 shows how you can create anonymous types with named properties.
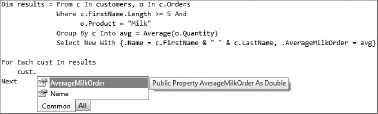
This figure also illustrates that the type of the AverageMilkOrder property is indeed a Double, which is what you would expect based on the use of the Average function. It is this strongly typed behavior that can really assist you in the creation and use of rich LINQ statements.
The last thing you have to do with the LINQ statement is to order the results. You can do this by ordering the customers based on their FirstName property, as shown in the following snippet:
- C#
private void LinqQueryWithGroupingAndWhere(){
    var customers = BuildCustomers();

    var results = from c in customers
                  from o in c.Orders
                  orderby c.FirstName
                  where c.FirstName.Length >= 5 &&
                        o.Product == "Milk"
                  group o by c into avg
                  select new { Name = avg.Key.FirstName + " " + avg.Key.LastName,
                               AverageMilkOrder = avg.Average(o => o.Quantity) };
    ObjectDumper.Write(results, Writer);
}
- VB
Private Sub FinalLinqQuery()
    Dim customers = BuildCustomers()

    Dim results = From c In customers, o In c.Orders
                  Order By c.FirstName
                  Where c.FirstName.Length >= 5 And
                        o.Product = "Milk
                  Group By c Into avg = Average(o.Quantity)
                  Select New With {.Name = c.FirstName & " " & c.LastName,
                                   .AverageMilkOrder = avg}

    ObjectDumper.Write(results)
End Sub
One thing to be aware of is how you can easily reverse the order of the query results. Here you can do this either by supplying the keyword Descending (Ascending is the default) at the end of the Order By statement, or by applying the Reverse transformation on the entire result set:
Order By c.FirstName Descending
or
ObjectDumper.Write(results.Reverse)
As you can see from the final query you have built up, it is much more descriptive than the initial query. You can easily see that you are selecting the customer name and an average of the order quantities. It is clear that you are filtering based on the length of the customer name and on orders for Milk, and that the results are sorted by the customer's first name. You also haven't needed to create any additional classes to help perform this query.
One of the things you should be aware of with LINQ is that the queries are not executed until they are used. In fact, each time you use a LINQ query you will find that the query is re-executed. This can potentially lead to some issues in debugging and some unexpected performance issues if you are executing the query multiple times. In the code you have seen so far, you have declared the LINQ statement and then passed the results object to the ObjectDumper, which in turn iterates through the query results. If you were to repeat this call to the ObjectDumper, it would again iterate through the results.
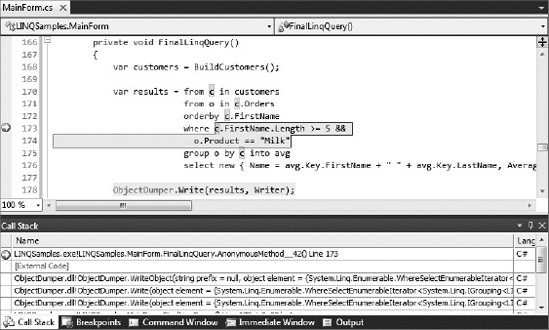
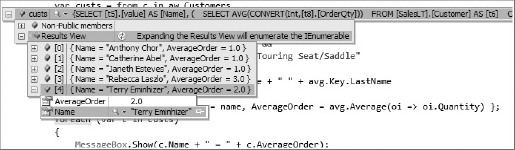
Unfortunately, this delayed execution can mean that LINQ statements are hard to debug. If you select the statement and insert a breakpoint, all that will happen is that the application will stop where you have declared the LINQ statement. If you step to the next line, the results object will simply state that it is an "In-Memory Query." In C# the debugging story is slightly better because you can actually set breakpoints within the LINQ statement. As you can see from Figure 28-8, the breakpoint on the conditional statement has been hit. From the call stack you can see that the current execution point is no longer actually in the FinalQuery method; it is in fact within the ObjectDumper.Write method.
If you need to force the execution of a LINQ you can call ToArray or ToList on the results object. This will force the query to execute, returning an Array or List of the appropriate type. You can then use this array in other queries, reducing the need for the LINQ to be executed multiple times.
Note
When setting a breakpoint within a LINQ in C# you need to place the cursor at the point you want the breakpoint to be set and press F9 (or use the right-click context menu to set a breakpoint), rather than clicking in the margin. Clicking in the margin sets a breakpoint on the whole LINQ, which is not what you want.
If you have ever worked with XML in .NET, you will recall that the object model isn't as easy to work with as you would imagine. For example, to create even a single XML element you need to have an XmlDocument:
Dim x as New XmlDocument
x.AppendChild(x.CreateElement("Customer"))
As you will see when you start to use LINQ to query and build XML, this object model doesn't allow for the inline creation of elements. To this end, a new XML object model was created that resides in the System.Xml.Linq assembly presented in Figure 28-9.
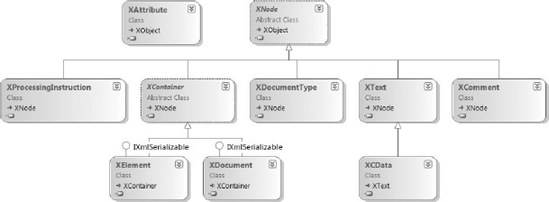
As you can see from Figure 28-9, there are classes that correspond to the relevant parts of an XML document: XComment, XAttribute, and XElements. The biggest improvement is that most of the classes can be instantiated by means of a constructor that accepts Name and Content parameters. In the following C# code, you can see that an element called Customers has been created that contains a single Customer element. This element, in turn, accepts an attribute, Name, and a series of Order elements.
- C#
XElement x = new XElement("Customers",
                          new XElement("Customer",
                                       new XAttribute("Name","Bob Jones"),
new XElement("Order", new XAttribute("Product", "Milk"), new XAttribute("Quantity", 2)), new XElement("Order", new XAttribute("Product", "Bread"), new XAttribute("Quantity", 10)), new XElement("Order", new XAttribute("Product", "Apples"), new XAttribute("Quantity", 5)) ) );
Though this code snippet is quite verbose and it's hard to distinguish the actual XML data from the surrounding .NET code, it is significantly better than with the old XML object model, which required elements to be individually created and then added to the parent node.
Note
While it is possible to write the same code in VB using the XElement and XAttribute constructors, the support for XML literals (as discussed in the next section) makes this somewhat redundant.
One of the biggest innovations in the VB language is the support for XML literals. As with strings and integers, an XML literal is treated as a first-class citizen when you are writing code. The following snippet illustrates the same XML generated by the previous C# snippet as it would appear using an XML literal in VB:
VB
Dim cust = <Customers>
               <Customer Name="Bob Jones">
                   <Order Product="Milk" Quantity="2"/>
                   <Order Product="Bread" Quantity="10"/>
                   <Order Product="Apples" Quantity="5"/>
               </Customer>
           </Customers>
Not only do you have the ability to assign an XML literal in code, you also get designer support for creating and working with your XML. For example, when you enter the > on a new element, it will automatically create the closing XML tag for you. Figure 28-10 illustrates how the Customers XML literal can be condensed in the same way as other code blocks in Visual Studio 2010.
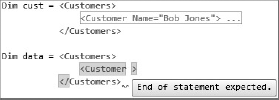
You can also see in Figure 28-10 that there is an error in the XML literal being assigned to the data variable. In this case there is no closing tag for the Customer element. Designer support is invaluable for validating your XML literals, preventing run time errors when the XML is parsed into XElement objects.
Unfortunately, C# doesn't have native support for XML literals, which makes generating XML a painful process, even with the new object model. Luckily, there is a time-saving add-in that will paste an XML snippet from the clipboard into the code window as a series of XElement objects. This can make a big difference if you have to create XML from scratch. The add-in, PasteXmlAsLinq in the LinqSamples folder, is available in the C# samples that ship with Visual Studio 2010. Simply open the sample in Visual Studio 2010, build the solution, navigate to the output folder, and copy the output files (namely PasteXmlAsLinq.Addin and PasteXmlAsLinq.dll) to the add-ins folder for Visual Studio 2010. When you restart Visual Studio 2010 you will see a new item, Paste XML as XElement, in the Edit menu when you are working in the code editor window, as you can see in Figure 28-11.

Note
Visual Studio 2010 looks in a variety of places, defined in the Options dialog (Tools menu), for add-ins. Typically, it looks in an add-ins folder located beneath the Visual Studio root documents directory. For example: C:usersusernameDocumentsVisual Studio 2010Addins. If the Addins folder doesn't exist, you may need to create it.
To work with this add-in, all you need to do is to create the XML snippet in your favorite XML editor. In Figure 28-12 we have used XML Notepad, which is a freely available download from www.microsoft.com, but you can also use the built-in XML editor within Visual Studio 2010.
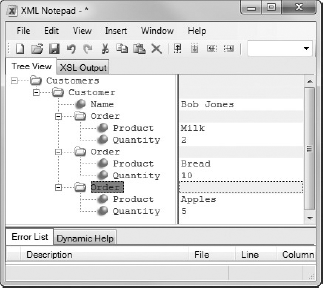
Once you have created the XML snippet, copy it to the clipboard (for example, by pressing Ctrl1C). Then place your cursor at the point at which you want to insert the snippet within Visual Studio 2010 and select Paste XML as XElement from the Edit menu. (Of course, if you use this option frequently you may want to assign a shortcut key to it so that you don't have to navigate to the menu.) The code generated by the add-in will look similar to the following:
- C#
XElement xml = new XElement("Customers",
                   new XElement("Customer",
                       new XAttribute("Name", "Bob Jones"),
                           new XElement("Order",
                               new XAttribute("Product", "Milk"),
                               new XAttribute("Quantity", "2")
), new XElement("Order", new XAttribute("Product", "Bread"), new XAttribute("Quantity", "10") ), new XElement("Order", new XAttribute("Product", "Apples"), new XAttribute("Quantity", "5") )));
Although creating XML using the new object model is significantly quicker than previously possible, the real power of the new object model comes when you combine it with LINQ in the form of LINQ to XML (XLINQ). By combining the rich querying capabilities with the ability to create complex XML in a single statement, you can now generate entire XML documents in a single statement. Let's continue with the same example of customers and orders. In this case you have an array of customers, each of whom has any number of orders. What you want to do is create XML that lists the customers and their associated orders. You'll start by creating the customer list, and then introduce the orders.
To begin with, create an XML literal that defines the structure you want to create:
- C#
XElement customerXml = new XElement("Customers", new XElement("Customer", new XAttribute("Name", "Bob Jones")));- VB
Dim customerXml = <Customers>
                      <Customer Name="Bob Jones">
                      </Customer>
                  </Customers>
Although you can simplify this code by condensing the Customer element into <Customer Name="Bob Jones" />, you're going to be adding the orders as child elements, so you will use a separate closing XML element.
If you have multiple customers, the Customer element is going to repeat for each one, with Bob Jones being replaced by different customer names. Before you deal with replacing the name, you first need to get the Customer element to repeat. You do this by creating an expression hole, using a syntax familiar to anyone who has worked with ASP:
- C#
XElement customerXml = new XElement("Customers", from c in customers select new XElement("Customer", new XAttribute("Name", "Bob Jones")));- VB
Dim customerXml = <Customers>
                      <%= From c In customers _
                          Select <Customer Name="Bob Jones">
                                 </Customer> %>
                  </Customers>
Here you can see that in the VB code, <%= %> has been used to define the expression hole, into which a LINQ statement has been added. This is not required in the C# syntax because the LINQ statement just becomes an argument to the XElement constructor. The Select statement creates a projection to an XML element for each customer in the Customers array, based on the static value "Bob Jones". To change this to return each of the customer names you again have to use an expression hole. Figure 28-13 shows how Visual Studio 2010 provides rich IntelliSense support in these expression holes.

The following snippet uses the loop variable Name so that you can order the customers based on their full names. This loop variable is then used to set the Name attribute of the customer node.
- C#
XElement customerXml = new XElement("Customers",
                           from c in customers
                           let name = c.FirstName + " " + c.LastName
                           orderby name
                           select new XElement("Customer",
                                  new XAttribute("Name", name),
                                      from o in c.Orders
                                      select new XElement("Order",
                                             new XAttribute("Product", o.Product),
                                             new XAttribute("Quantity",
                                                            o.Quantity))));
- VB
Dim customerXml = <Customers>
                      <%= From c In customers _
                          Let Name = c.FirstName & " " & c.LastName _
                          Order By Name _
                          Select <Customer Name=<%= Name %>>
                                     <%= From o In c.Orders _
                                         Select
                                          <Order
                                                Product=<%= o.Product %>
                                                Quantity=<%= o.Quantity %>
                                                     /> %>
                                         </Customer> %>
                          </Customers>
The other thing to notice in this snippet is that you have included the creation of the Order elements for each customer. Although it would appear that the second, nested LINQ statement is independent of the first, there is an implicit joining through the customer loop variable c. Hence, the second LINQ statement is iterating through the orders for a particular customer, creating an Order element with attributes Product and Quantity.
As you can see, the C# equivalent is slightly less easy to read but is by no means more complex. There is no need for expression holes, because C# doesn't support XML literals; instead, the LINQ statement just appears nested within the XML construction. For a complex XML document this would quickly become difficult to work with, which is one reason VB now includes XML literals as a first-class language feature.
In addition to enabling you to easily create XML, LINQ can also be used to query XML. The following Customers XML is used in this section to discuss the XLINQ querying capabilities:
<Customers>
    <Customer Name="Bob Jones">
        <Order Product="Milk" Quantity="2"/>
        <Order Product="Bread" Quantity="10"/>
        <Order Product="Apples" Quantity="5"/>
    </Customer>
</Customers>
The following two code snippets show the same query using VB and C#, respectively. In both cases the customerXml variable (an XElement) is queried for all Customer elements, from which the Name attribute is extracted. The Name attribute is then split over the space between names, and the result is used to create a new Customer object.
- C#
var results = from cust in customerXml.Elements("Customer")
              let  nameBits = cust.Attribute("Name").Value.Split(' ')
              select new Customer() {FirstName = nameBits[0],
                                     LastName=nameBits[1] };
- VB
Dim results = From cust In customerXml.<Customer>
              Let nameBits = [email protected](" "c)
              Select New Customer() With {.FirstName = nameBits(0),
                                          .LastName = nameBits(1)}
As you can see, the VB XML language support extends to enabling you to query elements using .<elementName> and attributes using .@attributeName. Figure 28-14 shows the IntelliSense for the customerXml variable, which shows three XML query options.

You have seen the second and third of these options in action in the previous query to extract attribute and element information, respectively. The third option enables you to retrieve all sub-elements that match the supplied element. For example, the following code retrieves all orders in the XML document, irrespective of which customer element they belong to:
Dim allOrders = From cust In customerXml.<Order>
                Select New Order With {.Product = cust.@Product,
.Quantity = CInt(cust.@Quantity)}Although VB enables you to query XML using elements and attributes, it doesn't actually provide any validation that you have entered the correct element and attribute names. To reduce the chance of entering the wrong names, you can import an XML schema, which will extend the default IntelliSense support to include the element and attribute names. You import an XML schema as you would any other .NET namespace. First you need to add a reference to the XML schema to your project, and then you need to add an Imports statement to the top of your code file.
Note
Unlike other import statements, an XML schema import can't be added in the Project Properties Designer, which means you need to add it to the top of any code file in which you want IntelliSense support.
If you are working with an existing XML file but don't have a schema handy, manually creating an XML schema just so you can have better IntelliSense support seems like overkill. Luckily, the VB team has included the XML to Schema Inference Wizard in Visual Studio 2010. Once installed, this wizard enables you to create a new XML schema based on an XML snippet or XML source file, or from a URL that contains the XML source. In this example, you're going to start with an XML snippet that looks like the following:
<c:Customers xmlns:c="http://www.professionalvisualstudio.com/chapter28/customers">
    <c:Customer Name="Bob Jones">
        <c:Order Product="Milk" Quantity="2" />
        <c:Order Product="Cereal" Quantity="10" />
    </c:Customer>
    <c:Customer Name="Alastair Kelly">
        <c:Order Product="Milk" Quantity="9" />
        <c:Order Product="Bread" Quantity="7" />
    </c:Customer>
</c:Customers>

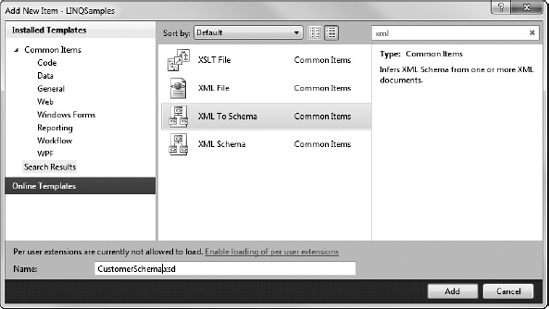
Note that unlike the previous XML snippets, this one includes a namespace — this is necessary, because the XML schema import is based on importing a namespace (rather than importing a specific XSD file). To generate an XML schema based on this snippet, start by right-clicking your project in the Solution Explorer and selecting Add New Item. With the XML to Schema Inference Wizard installed, there should be an additional XML To Schema item template, as shown in Figure 28-15.
Selecting this item and clicking OK prompts you to select the location of the XML from which the schema should be generated. Select the Type or Paste XML button and paste the customers XML snippet from earlier into the text area provided. Once you click OK, this generates the CustomersSchema.xsd file containing a schema based on the XML resources you have specified. The next step is to import this schema into your code file by adding an Imports statement to the XML namespace, as shown in Figure 28-16.
Figure 28-16 also contains an alias, c, for the XML namespace, which will be used throughout the code for referencing elements and attributes from this namespace. In your XLINQs you will now see that when you press < or @, the IntelliSense list will contain the relevant elements and attributes from the imported XML schema. In Figure 28-17, you can see these new additions when you begin to query the customerXml variable. If you were in a nested XLINQ statement (for example, querying orders for a particular customer), you would see only a subset of the schema elements (that is, just the c:Order element).

Note
It is important to note that importing an XML schema doesn't validate the elements or attributes you use. All it does is improve the level of IntelliSense available to you when you are building your XLINQ.
You may be thinking that we are about to introduce you to yet another technology for doing data access. In fact, what you will see is that everything covered in this chapter extends the existing ADO.NET data access model. LINQ to SQL is much more than just the ability to write LINQ statements to query information from a database. It provides an object to a relational mapping layer, capable of tracking changes to existing objects and allowing you to add or remove objects as if they were rows in a database.
Let's get started and look at some of the features of LINQ to SQL and the associated designers on the way. For this section you're going to use the AdventureWorksLT sample database (downloadable from http://professionalvisualstudio.com/link/1029A). You're going to end up performing a similar query to what you've seen earlier in the chapter, which was researching customers with a first name greater than or equal to five characters and the average order size for a particular product. Earlier, the product was Milk, but because you are dealing with a bike company you will use the "HL Touring Seat/Saddle" product instead.
For the purpose of this chapter you will be using a normal Visual Basic Windows Forms application from the New Project dialog. You will also need to create a Data Connection to the AdventureWorksLT database (covered in Chapter 27). The next step is to add new LINQ to SQL Classes item, named AdventureLite.dbml, from the Add New Item dialog. This will create three files which will be added to your project. These are AdventureLite.dbml, which is the mapping file; AdventureLite.dbml.layout, which like the class designer is used to lay out the mapping information to make it easier to work with; and finally, AdventureLite.designer.vb, which contains the classes into which data is loaded as part of LINQ to SQL.
Note
These items may appear as a single item, AdventureLite.dbml, if you don't have the Show All Files option enabled. Select the project and click the appropriate button at the top of the Solution Explorer tool window.
Unfortunately, unlike some of the other visual designers in Visual Studio 2010 that have a helpful wizard to get you started, the LINQ to SQL designer initially appears as a blank design surface, as you can see in the center of Figure 28-18.
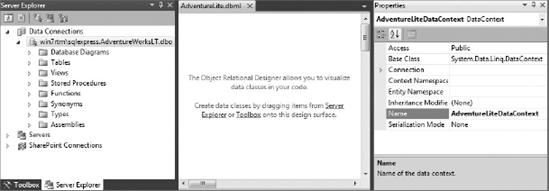
On the right side of Figure 28-18, you can see the properties associated with the main design area, which actually represents a DataContext. If you were to compare LINQ with ADO.NET, a LINQ statement equates approximately to a command, whereas a DataContext roughly equates to the connection. It is only roughly because the DataContext actually wraps a database connection in order to provide object life cycle services. For example, when you execute a LINQ to SQL statement it is the DataContext that ends up executing the request to the database, creating the objects based on the return data and then tracking those objects as they are changed or deleted.
If you have worked with the class designer you will be at home with the LINQ to SQL designer. As the instructions in the center of Figure 28-18 indicate, you can start to build your data mappings by dragging items from the Server Explorer (or manually creating them by dragging the item from the Toolbox). In your case you want to expand the Tables node, select the Customer, SalesOrderHeader, SalesOrderDetail, and Product tables, and drag them onto the design surface. You will notice from Figure 28-19 that a number of the classes and properties have been renamed to make the object model easier to read when you are writing LINQ statements. This is a good example of the benefits of separating the object model (for example, Order or OrderItem) from the underlying data (in this case, the SalesOrderHeader and SalesOrderDetail tables). Because you don't need all the properties that are automatically created, it is recommended that you select them in the designer and delete them. The end result should look like Figure 28-19.
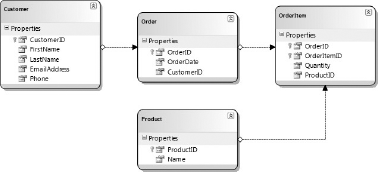
It is also worth noting that you can modify the details of the association between objects. Figure 28-20 shows the Properties tool window for the association between Product and OrderItem. Here we have set the generation of the Child Property to False because we won't need to track back from a Product to all the OrderItems. We have also renamed the Parent Property to Product to make the association more intuitive (although note that the name in the drop-down at the top of the Properties window uses the original SQL Server table names).
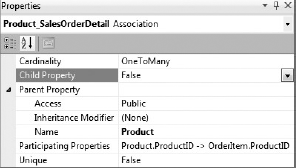
As you can see, you can control whether properties are created that can be used to navigate between instances of the classes. Though this might seem quite trivial, if you think about what happens if you attempt to navigate from an Order to its associated OrderItems, you can quickly see that there will be issues if the full object hierarchy hasn't been loaded into memory. For example, in this case if the OrderItems aren't already loaded into memory, LINQ to SQL intercepts the navigation, goes to the database, and retrieves the appropriate data in order to populate the OrderItems.
The other property of interest in Figure 28-20 is the Participating Properties. Editing this property launches an Association Editor window where you can customize the relationship between two LINQ to SQL classes. You can also reach this dialog by right-clicking the association on the design surface and selecting Edit Association. If you drag items from Server Explorer onto the design surface, you are unlikely to need the Association Editor. However, it is particularly useful if you are manually creating a LINQ to SQL mapping, because you can control how the object associations align to the underlying data relationships.
In the previous chapters you have seen enough LINQ statements to understand how to put together a statement that filters, sorts, aggregates, and projects the relevant data. With this in mind, examine the following LINQ to SQL snippet:
- C#
public void SampleLinqToSql(){
    using (var aw = new AdventureLiteDataContext()){

        var custs = from c in aw.Customers
                    from o in c.Orders
                    from oi in o.OrderItems
                    where c.FirstName.Length>=5 &&
                          oi.Product.Name == "HL Touring Seat/Saddle"
                    group oi by c into avg
                    let name = avg.Key.FirstName + " " + avg.Key.LastName
                    orderby name
                    select new { Name = name,
                                 AverageOrder = avg.Average(oi => oi.Quantity) };
        foreach (var c in custs){
            MessageBox.Show(c.Name + " = " + c.AverageOrder);
        }
    }
}
- VB
Using aw As New AdventureLiteDataContext
    Dim custs = From c In aw.Customers, o In c.Orders, oi In o.OrderItems
                Where c.FirstName.Length >= 5 And
                      oi.Product.Name = "HL Touring Seat/Saddle"
                Group By c Into avg = Average(oi.Quantity)
                Let Name = c.FirstName & " " & c.LastName
                Order By Name
                Select New With {Name, .AverageOrder = avg}

    For Each c In custs
        MessageBox.Show(c.Name & " = " & c.AverageOrder)
    Next
End Using
The biggest difference here is that instead of the Customer and Order objects existing in memory before the creation and execution of the LINQ statement, now all the data objects are loaded at the point of execution of the LINQ statement. The AdventureLiteDataContext is the conduit for opening the connection to the database, forming and executing the relevant SQL statement against the database, and loading the return data into appropriate objects.
You will also note that the LINQ statement has to navigate through the Customers, Orders, OrderItems, and Product tables in order to execute the LINQ statement. Clearly, if this were to be done as a series of SQL statements, it would be horrendously slow. Luckily, the translation of the LINQ statement to SQL commands is done as a single unit.
Note
There are some exceptions to this; for example, if you call ToList in the middle of your LINQ statement this may result in the separation into multiple SQL statements. Though LINQ to SQL does abstract you away from having to explicitly write SQL commands, you still need to be aware of the way your query will be translated and how it might affect your application performance.
To view the actual SQL that is generated, you can use the QueryVisualizer sample that ships with Visual Studio 2010 (located in the LinqSamples folder of the CSharpSamples.zip file found at C:Program FilesMicrosoft Visual Studio 10.0Samples1033). Open and build this sample and drop the generated file, LinqToSqlQueryVisualizer.dll, into your visualizers folder (typically c:Users<username>DocumentsVisual Studio 2010Visualizers). When you restart Visual Studio 2010 you will be able to make use of this visualizer to view the actual SQL that is generated by LINQ to SQL for your LINQ statement. Figure 28-21 illustrates the default data tip for the same LINQ to SQL statement in C# (VB is the same, except you don't see the generated SQL in the first line of the data tip).
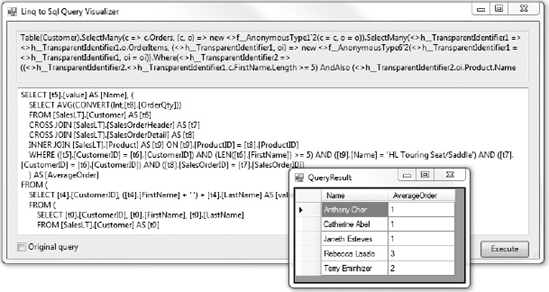
After adding the visualizer you will see the magnifying glass icon in the first line of the data tip. Clicking this opens up the LINQ to SQL Debug Visualizer so that you can see the way your LINQ to SQL statement is translated to SQL. Figure 28-22 illustrates this visualizer showing the way that the query is parsed by the compiler in the top half of the screen, and the SQL statement that is generated in the lower half of the screen. Clicking the Execute button displays the QueryResult window (inset into Figure 28-22) with the output of the SQL statement. Note that you can modify the SQL statement, allowing you to tweak it until you get the correct results set. This can quickly help you correct any errors in your LINQ statement.
You can see from the earlier code snippet that the DataContext acts as the conduit through which LINQ to SQL queries are processed. To get a better appreciation of what the DataContext does behind the scenes, let's look at inserting a new product category into the AdventureWorksLT database. Before you can do this you will need to add the ProductCategory table to your LINQ to SQL design surface. In this case you don't need to modify any of the properties, so just drag the ProductCategory table onto the design surface. Then to add a new category to your database, all you need is the following code:
- C#
using(var aw = new AdventureLiteDataContext()){
    var cat = new ProductCategory();
    cat.Name = "Extreme Bike";
    aw.ProductCategories.InsertOnSubmit(cat);
    aw.SubmitChanges();
}
- VB
Using aw As New AdventureLiteDataContext
    Dim cat As New ProductCategory
    cat.Name = "Extreme Bike"
    aw.ProductCategories.InsertOnSubmit(cat)
    aw.SubmitChanges()
End Using
This code inserts the new category into the collection of product categories held in memory by the DataContext. When you then call SubmitChanges on the DataContext it is aware that you have added a new product category so it will insert the appropriate records. A similar process is used when making changes to existing items. In the following example you retrieve the product category you just inserted using the Contains syntax. Because there is likely to be only one match, you can use the FirstOrDefault extension method to give you just a single product category to work with:
- C#
using (var aw = new AdventureLiteDataContext()){
    var cat = (from pc in aw.ProductCategories
               where pc.Name.Contains("Extreme")
               select pc).FirstOrDefault();
    cat.Name = "Extreme Offroad Bike";
    aw.SubmitChanges();
}
- VB
Using aw As New AdventureLiteDataContext
    Dim cat = (From pc In aw.ProductCategories
               Where pc.Name.Contains("Extreme")).FirstOrDefault
    cat.Name = "Extreme Offroad Bike"
    aw.SubmitChanges()
End Using
Once the change to the category name has been made, you just need to call SubmitChanges on the DataContext in order for it to issue the update on the database. Without going into too much detail the DataContext essentially tracks changes to each property on a LINQ to SQL object so that it knows which objects need updating when SubmitChanges is called. If you want to delete an object, you simply need to obtain an instance of the LINQ to SQL object, in the same way as for doing an update, and then call DeleteOnSubmit on the appropriate collection. For example, to delete a product category you would call aw.ProductCategories.DeleteOnSubmit(categoryToDelete), followed by aw.SubmitChanges.
One of the questions frequently asked about LINQ to SQL is whether you can use your own stored procedures in place of the run time-generated SQL. The good news is that for inserts, updates, and deletes you can easily specify the stored procedure that should be used. You can also use existing stored procedures for creating instances of LINQ to SQL objects. Let's start by adding a simple stored procedure to the AdventureWorksLT database. To do this, right-click the Stored Procedures node under the database connection in the Server Explorer tool window and select Add New Stored Procedure. This opens a code window with a new stored procedure template. In the following code you have selected to return the five fields that are relevant to your Customer object:
CREATE PROCEDURE dbo.GetCustomers
AS
BEGIN
    SET NOCOUNT ON
    SELECT c.CustomerID, c.FirstName, c.LastName, c.EmailAddress, c.Phone
    FROM SalesLT.Customer AS c
END;
Once you have saved this stored procedure it will appear under the Stored Procedures node. If you now open up the AdventureLite LINQ to SQL designer, you can drag this stored procedure across into the right-hand pane of the design surface. In Figure 28-23 you can see that the return type of the GetCustomers method is set to Auto-generated Type. This means that you will only be able to query information in the returned object. Ideally, you would want to be able to make changes to these objects and be able to use the DataContext to persist those changes back to the database.
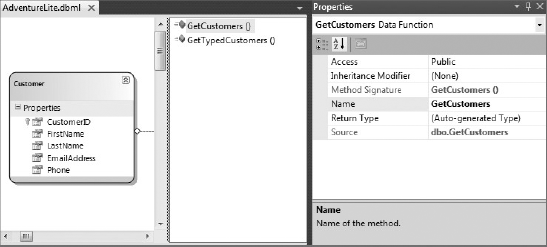
The second method, GetTypedCustomers, actually has the Return Type set as the Customer class. To create this method you can either drag the GetCustomers stored procedure to the right pane, and then set the Return Type to Customer, or you can drag the stored procedure onto the Customer class in the left pane of the design surface. The latter will still create the method in the right pane, but it will automatically specify the return type as the Customer type.
Note
Note that you don't need to align properties with the stored procedure columns, because this mapping is automatically handled by the DataContext. This is a double-edged sword: clearly it works when the column names map to the source columns of the LINQ to SQL class but it may cause a run time exception if there are missing columns or columns that don't match.
Once you have defined these stored procedures as methods on the design surface, calling them is as easy as calling the appropriate method on the DataContext:
- C#
using (var aw = new AdventureLiteDataContext()){
    var customers = aw.GetCustomers();
    foreach (var c in customers){
        MessageBox.Show(c.FirstName);
    }
}
- VB
Using aw As New AdventureLiteDataContext
    Dim customers = aw.GetCustomers

    For Each c In customers
        MsgBox(c.FirstName)
    Next
End Using
Here you have seen how you can use a stored procedure to create instances of the LINQ to SQL classes. If you instead want to update, insert, or delete objects using stored procedures, you follow a similar process except you need to define the appropriate behavior on the LINQ to SQL class. To begin with, create an insert stored procedure for a new product category:
CREATE PROCEDURE dbo.InsertProductCategory
(
@categoryName nvarchar(50),
@categoryId int OUTPUT
)
AS
BEGIN
INSERT INTO SalesLT.ProductCategory (Name) VALUES (@categoryName)
SELECT @categoryId=@@identity
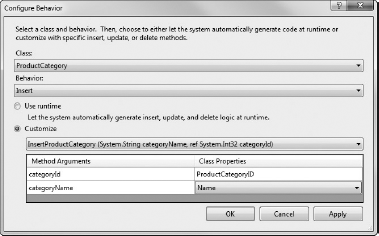
END;Following the same process as before, you need to drag this newly created stored procedure from the Server Explorer across into the right pane of the LINQ to SQL design surface. Then in the Properties tool window for the ProductCategory class, modify the Insert property. This will open the dialog shown in Figure 28-24. Here you can select whether you want to use the run time-generated code or customize the method that is used. In Figure 28-24 the InsertProductCategory method has been selected. Initially, the Class Properties will be unspecified, because Visual Studio 2010 wasn't able to guess at which properties mapped to the method arguments. It's easy enough to align these to the id and name properties. Now when the DataContext goes to insert a ProductCategory it will use the stored procedure instead of the run time-generated SQL statement.
The important thing to remember when using DataBinding with LINQ to SQL objects is that they are in fact normal .NET objects. This means that you can create a new object data source via the Data Sources tool window. In the case of the examples you have seen so far, you would go through the Add New Data Source Wizard, selecting just the Customer object. Because the Order and OrderItem objects are accessible via the navigation properties Orders and then OrderItems, you don't need to explicitly add them to the Data Source window.
Once you have created the object data source (see the left side of Figure 28-25), you can then proceed to drag the nodes onto your form to create the appropriate data components. Starting with the Customer node, use the drop-down to specify that you want a DataGridView, then drag it onto your form. Next, you need to specify that you want the Orders (a child node under Customer) to appear as details and then drag this to the form as well. You will notice that you don't get a binding navigator for this binding source, so from the Toolbox add a BindingNavigator to your form and set its BindingSource property to be the OrdersBindingSource that was created when you dragged over the Orders node. Lastly, you want to display all the OrderItems in a DataGridView, so use the drop-down to set this and then drag the node onto the form. After doing all this you should end up with something similar to Figure 28-25. Note that we have also included a button that you will use to load the data and we have laid the Order information out in a panel to improve the layout.
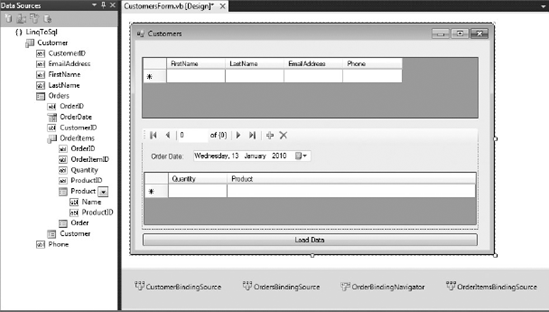
One of the things you will have noticed is that the columns on your OrderItems data grid don't match those in Figure 28-25. By default, you will get Quantity, Order, and Product columns. Clearly, the last two columns are not going to display anything of interest, but you don't really have an easy way to display the Name of the product in the order with the current LINQ to SQL objects. Luckily, there is an easy way to effectively hide the navigation from OrderItem to Product so that the name of the product will appear as a property of OrderItem.
You do this by adding your own property to the OrderItem class. Each LINQ to SQL class is generated as a partial class, which means that extending the class is as easy as right-clicking the class in the LINQ to SQL designer and selecting View Code. This generates a custom code file, in this case AdventureLite.vb (or AdventureLite.cs), and includes the partial class definition. You can then proceed to add your own code. In the following snippet we have added the Product property that will simplify access to the name of the product being ordered:
- C#
partial class OrderItem{
    public string ProductName{
        get{
            return this.Product.Name;
        }
    }
}
- VB
Partial Class OrderItem
    Public ReadOnly Property ProductName() As String
        Get
            Return Me.Product.Name
        End Get
    End Property
End Class
For some reason this property, perhaps because it is added to a second code file, will not be detected by the Data Sources tool window. However, you can still bind the Product column to this property by manually setting the DataPropertyName field in the Edit Columns dialog for the data grid.
The last thing to do is to actually load the data when the user clicks the button. To do this you can use the following code:
- C#
private void btnLoadData_Click(object sender, EventArgs e){
    using (var aw = new AdventureLiteDataContext()){
var cust = aw.Customers; this.customerBindingSource.DataSource = cust; } }- VB
Private Sub btnLoad_Click(ByVal sender As System.Object, _
                          ByVal e As System.EventArgs) Handles btnLoad.Click
    Using aw As New AdventureLiteDataContext
        Dim custs = From c In aw.Customers
        Me.CustomerBindingSource.DataSource = custs
    End Using
End Sub
You will notice that your application will now run, and when the user clicks the button the customer information will be populated in the top data grid. However, no matter which customer you select, no information will appear in the Order information area. The reason for this is that LINQ to SQL uses lazy loading to retrieve information as it is required. Using the data visualizer you were introduced to earlier, if you inspect the query in this code you will see that it contains only the customer information:
SELECT [t0].[CustomerID], [t0].[FirstName], [t0].[LastName], [t0].[EmailAddress],
[t0].[Phone]
FROM [SalesLT].[Customer] AS [t0]
You have two ways to resolve this issue. The first is to force LINQ to SQL to bring back all the Order, OrderItem, and Product data as part of the initial query. To do this, modify the button click code to the following:
- C#
private void btnLoadData_Click(object sender, EventArgs e){ using (var aw = new AdventureLiteDataContext()){ var loadOptions =new System.Data.Linq.DataLoadOptions(); loadOptions.LoadWith<Customer>(c=>c.Orders); loadOptions.LoadWith<Order>(o=>o.OrderItems); loadOptions.LoadWith<OrderItem>(o=>o.Product); aw.LoadOptions = loadOptions; var cust = aw.Customers; this.customerBindingSource.DataSource = cust; } }- VB
Private Sub btnLoad_Click(ByVal sender As System.Object,
                          ByVal e As System.EventArgs) Handles btnLoad.Click
    Using aw As New AdventureLiteDataContext
        Dim loadOptions As New System.Data.Linq.DataLoadOptions
loadOptions.LoadWith(Of Customer)(Function(c As Customer) c.Orders) loadOptions.LoadWith(Of Order)(Function(o As Order) o.OrderItems) loadOptions.LoadWith(Of OrderItem)(Function(oi As OrderItem) _ oi.Product) aw.LoadOptions = loadOptions Dim custs = From c In aw.Customers Me.CustomerBindingSource.DataSource = aw.Customers End Using End Sub
Essentially what this code tells the DataContext is that when it retrieves Customer objects it should forcibly navigate to the Orders property. Similarly, the Order objects navigate to the OrderItems property, and so on. One thing to be aware of is that this solution could perform really badly if there are a large number of customers. In fact as the number of customers and orders increases, this will perform progressively worse, so this is not a great solution; but it does illustrate how you can use the LoadOptions property of the DataContext.
The other alternative is to not dispose of the DataContext. You need to remember what is happening behind the scenes with DataBinding. When you select a customer in the data grid, this will cause the OrderBindingSource to refresh. It tries to navigate to the Orders property on the customer. If you have disposed of the DataContext, there is no way that the Orders property can be populated. So the better solution to this problem is to change the code to the following:
- C#
private AdventureLiteDataContext aw = new AdventureLiteDataContext();
private void btnLoadData_Click(object sender, EventArgs e){
    var cust = aw.Customers;
    this.customerBindingSource.DataSource = cust;
}
- VB
Private aw As New AdventureLiteDataContext()
Private Sub btnLoad_Click(ByVal sender As System.Object, _
                          ByVal e As System.EventArgs) Handles btnLoad.Click
    Dim custs = From c In aw.Customers
    Me.CustomerBindingSource.DataSource = custs
End Sub
Because the DataContext will still exist, when the binding source navigates to the various properties, LINQ to SQL will kick in, populating these properties with data. This is much more scalable than attempting to populate the whole customer hierarchy when the user clicks the button.
While the intent behind LINQ was to make code more readable, in a lot of cases it has made writing and debugging queries much harder. The fact that LINQ expressions are only executed when the results are iterated can lead to confusion and unexpected results. One of the most useful tools to have by your side when writing LINQ expressions is Joseph Albahari's LINQPad (www.linqpad.net). Figure 28-26 illustrates how you can use the editor in the top-right pane to write expressions.

In the lower-right pane you can see the output from executing the expression. You can tweak your LINQ expression to get the correct output without having to build and run your entire application.
In this chapter you were introduced to Language Integrated Queries (LINQ), a significant step toward a common programming model for data access. You can see that LINQ statements help to make your code more readable, because you don't have to code all the details of how the data should be iterated, the conditional statements for selecting objects, or the code for building the results set.
You were also introduced to the new XML object model, the XML language integration within VB, how LINQ can be used to query XML documents, and how Visual Studio 2010 IntelliSense enables a rich experience for working with XML in VB.
Finally, you were introduced to LINQ to SQL and how you can use it as a basic object-relational mapping framework. Although you are somewhat limited in being able only to map an object to a single table, it can still dramatically simplify working with a database.
In the next chapter you see how powerful LINQ is as a technology when you combine it with the ADO.NET Entity Framework to manage the life cycle of your objects. With much more sophisticated mapping capabilities, this technology will dramatically change the way you will work with data in the future.