
Creating DataSets
Connecting visual controls to a DataSet with DataBinding
How BindingSource and BindingNavigator controls work together
Chaining BindingSources and using the DataGridView
Using Service and Object data sources
A large proportion of applications use some form of data storage. This might be in the form of serialized objects or XML data, but for long-term storage that supports concurrent access by a large number of users, most applications use a database. The .NET Framework includes strong support for working with databases and other data sources. This chapter examines how to use DataSets to build applications that work with data from a database.
In the second part of this chapter you see how to use DataBinding to connect visual controls to the data they are to display. You see how they interact and how you can use the designers to control how data is displayed.
The examples in this chapter are based on the sample AdventureWorksLT database that is available as a download from http://professionalvisualstudio.com/link/1029A.
The .NET Framework DataSet is a complex object that is approximately equivalent to an in-memory representation of a database. It contains DataTables that correlate to database tables. These in turn contain a series of DataColumns that define the composition of each DataRow. The DataRow correlates to a row in a database table. It is also possible to establish relationships between DataTables within the DataSet in the same way that a database has relationships between tables.
One of the ongoing challenges for the object-oriented programming paradigm is that it does not align smoothly with the relational database model. The DataSet object goes a long way toward bridging this gap, because it can be used to represent and work with relational data in an object-oriented fashion. However, the biggest issue with a raw DataSet is that it is weakly typed. Although the type of each column can be queried prior to accessing data elements, this adds overhead and can make code very unreadable. Strongly typed DataSets combine the advantages of a DataSet with strong typing (in other words, creating strongly typed properties for all database fields) to ensure that data is accessed correctly at design time. This is done with the custom tool MSDataSetGenerator, which converts an XML schema into a strongly typed DataSet, essentially replacing a lot of run time type checking with code generated at design time. In the following code snippet, you can see the difference between using a raw DataSet, in the first half of the snippet, and a strongly typed DataSet, in the second half:
- VB
'Raw DataSet
Dim nontypedAwds As DataSet = RetrieveData()
Dim nontypedcustomers As DataTable = nontypedAwds.Tables("Customer")
Dim nontypedfirstcustomer As DataRow = nontypedcustomers.Rows(0)
MessageBox.Show(nontypedfirstcustomer.Item("FirstName"))

'Strongly typed DataSet
Dim awds As AdventureWorksLTDataSet = RetrieveData()
Dim customers As AdventureWorksLTDataSet.CustomerDataTable = awds.Customer
Dim firstcustomer As AdventureWorksLTDataSet.CustomerRow = customers.Rows(0)
MessageBox.Show(firstcustomer.FirstName)
- C#
// Raw DataSet
DataSet nontypedAwds = RetrieveData();
DataTable nontypedcustomers = nontypedAwds.Tables["Customer"];
DataRow nontypedfirstcustomer = nontypedcustomers.Rows[0];
MessageBox.Show(nontypedfirstcustomer["FirstName"].ToString());

// Strongly typed DataSet
AdventureWorksLTDataSet awds = RetrieveData();
AdventureWorksLTDataSet.CustomerDataTable customers = awds.Customer;
AdventureWorksLTDataSet.CustomerRow firstcustomer =
                    customers.Rows[0] as AdventureWorksLTDataSet.CustomerRow;
MessageBox.Show(firstcustomer.FirstName);
Using the raw DataSet, both the table lookup and the column name lookup are done using string literals. As you are likely aware, string literals can be a source of much frustration and should be used only within generated code, and preferably not at all.
You can manually create a strongly typed DataSet by creating an XSD using the XML schema editor. To create the DataSet, you set the custom tool value for the XSD file to be the MSDataSetGenerator. This will create the designer code file that is needed for strongly typed access to the DataSet.
Manually creating an XSD is difficult and not recommended unless you really need to; luckily in most cases, the source of your data will be a database, in which case Visual Studio 2010 provides a wizard that you can use to generate the necessary schema based on the structure of your database. Through the rest of this chapter, you see how you can create data sources and how they can be bound to the user interface. To get started, create a new project called CustomerObjects, using the Windows Forms Application project template.
Note
Although this functionality is not available for ASP.NET projects, a workaround is to perform all data access via a class library.
To create a strongly typed DataSet from an existing database, select Add New Data Source from the Data menu, and follow these steps:
The first step in the Data Source Configuration Wizard is to select the type of data source to work with — a Database, Service, Object, or SharePoint data source. In this case, you want to work with data from a database, so select the Database icon and click Next.
With the introduction of the ADO.NET Entity Framework there are now two different data models that you can choose to represent the mapping between database data and .NET entities, being a Dataset or an Entity Data Model. The Entity Framework is covered in Chapter 29. Double-click the Dataset icon to continue.
The next screen prompts you to select the database connection to use. To create a new connection, click the New Connection button, which opens the Add Connection dialog. The attributes displayed in this dialog are dependent on the type of database you are connecting to. By default, the SQL Server provider is selected, which requires the Server name, authentication mechanism (Windows or SQL Server), and Database name in order to proceed. There is a Test Connection that you can use to ensure you have specified valid properties.
After you specify a connection, it is saved as an application setting in the application configuration file.
When the application is later deployed, the connection string can be modified to point to the production database. This process can often take longer than expected to ensure that various security permissions line up. Because the connection string is stored in the configuration file as a string without any schema, it is quite easy to make a mistake when making changes to it. In Chapter 37 you learn more about connection strings and how you can customize them for different data sources.
Note
A little-known utility within Windows can be used to create connection strings, even if Visual Studio is not installed. Known as the Data Link Properties dialog, you can use it to edit Universal Data Link files, files that end in .
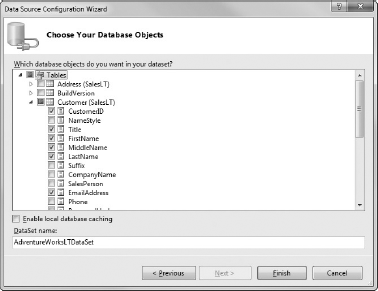
udl.When you need to create or test a connection string, you can simply create a new text document, rename it tosomething.udl, and then double-click it. This opens the Data Link Properties dialog, which enables you to create and test connection strings for a variety of providers. Once you have selected the appropriate connection, this information will be written to the UDL file as a connection string, which can be retrieved by opening the same file in Notepad. This can be particularly useful if you need to test security permissions and resolve other data connectivity issues.After specifying the connection, the next stage is to specify the data to be extracted. At this stage you are presented with a list of tables, views, stored procedures, and functions from which you can select what to include in the DataSet. Figure 27-1 shows the final stage of the Data Source Configuration Wizard with a selection of columns from the Customer table in the AdventureWorksLT database. Checking the Enable Local Database Caching checkbox gives you offline, or disconnected, support for working with your data. This makes use of Synchronization Services for ADO.NET to synchronize data between your application and the database, and is covered in more detail in Chapter 34.
Note
You will probably want to constrain the DataSet so it doesn't return all the records for a particular table. You can do this after creating the DataSet, so for the time being simply select the information you want to return. The editor's design makes it easier to select more information here and then delete it from the designer, rather than create it afterwards.
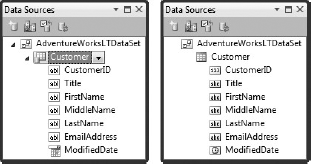
Click Finish to add the new DataSet to the Data Sources window, shown in Figure 27-2, where you can view all the information to be retrieved for the DataSet. Each column is identified with an icon that varies depending on the data type of the column. In the left image (displayed when using a design surface) the icons represent the default visual control that will be used to represent the column; in the right image (displayed when in a code window) the icons indicate the data type.
The Data Source Configuration Wizard uses the database schema to guess the appropriate .NET type to use for the DataTable columns. In cases where the wizard gets information wrong, it can be useful to edit the DataSet without the wizard. To do this, right-click the DataSet in the Data Sources window and select Edit DataSet with Designer from the context menu. Alternatively, you can open the Data Sources window by double-clicking the XSD file in the Solution Explorer window. This opens the DataSet editor in the main window, as shown in the example in Figure 27-3.
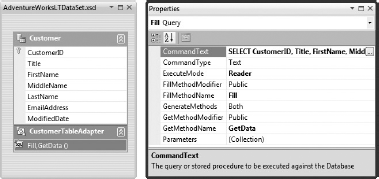
Here you start to see some of the power of using strongly typed DataSets. Not only has a strongly typed table (Customer) been added to the DataSet, you also have a CustomerTableAdapter. This TableAdapter is used for selecting from and updating the database for the DataTable to which it is attached. If you have multiple tables included in the DataSet, you will have a TableAdapter for each. Although a single TableAdapter can easily handle returning information from multiple tables in the database, it becomes difficult to update, insert, and delete records.
As you can see in Figure 27-3, the CustomerTableAdapter has been created with Fill and GetData methods, which are called to extract data from the database. The following code shows how you can use the Fill method to populate an existing strongly typed DataTable, perhaps within a DataSet. Alternatively, the GetData method creates a new instance of a strongly typed DataTable:
VB
Dim ta As New AdventureWorksLTDataSetTableAdapters.CustomerTableAdapter

'Option 1 - Create a new CustomerDataTable and use the Fill method
Dim customers1 As New AdventureWorksLTDataSet.CustomerDataTable
ta.Fill(customers1)

'Option 2 - Use the GetData method which will create a CustomerDataTable for you
Dim customers2 As AdventureWorksLTDataSet.CustomerDataTable = ta.GetData
In Figure 27-3, the Fill and GetData methods appear as a pair because they make use of the same query. The Properties window can be used to configure this query. A query can return data in one of three ways: using a text command (as the example illustrates), a stored procedure, or TableDirect (where the contents of the table name specified in the CommandText are retrieved). This is specified in the CommandType field. Although the CommandText can be edited directly in the Properties window, it is difficult to see the whole query and easy to make mistakes. Clicking the ellipsis button (at the top right of Figure 27-3) opens the Query Builder window, shown in Figure 27-4.
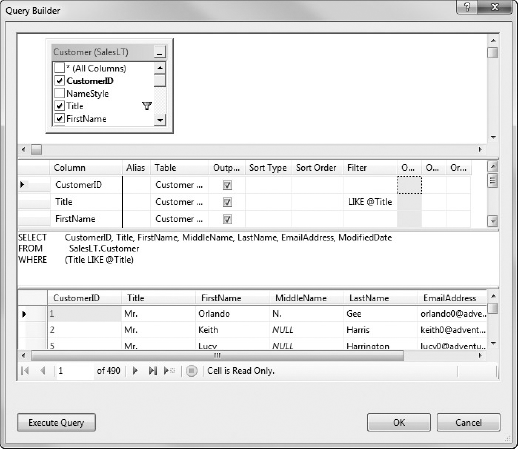
The Query Builder dialog is divided into four panes. In the top pane is a diagram of the tables involved in the query, and the selected columns. The second pane shows a list of columns related to the query. These columns are either output columns, such as FirstName and LastName, or a condition, such as the Title field, or both. The third pane is, of course, the SQL command that is to be executed. The final pane includes sample data that can be retrieved by clicking the Execute Query button. If there are parameters to the SQL statement (in this case, @Title), a dialog is displayed, prompting for values to use when executing the statement.
To change the query, you can make changes in any of the first three panes. As you move between panes, changes in one field are reflected in the others. You can hide any of the panes by unchecking that pane from the Panes item of the right-click context menu. Conditions can be added using the Filter column. These can include parameters (such as @Title), which must start with the @ symbol.
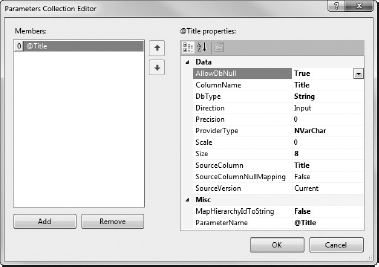
Returning to the DataSet designer, and the Properties window associated with the Fill method, click the ellipsis to examine the list of parameters. This shows the Parameters Collection Editor, as shown in Figure 27-5. Occasionally, the Query Builder doesn't get the data type correct for a parameter, and you may need to modify it using this dialog.
Also from the Properties window for the query, you can specify whether the Fill and/or GetData methods are created, using the GenerateMethods property, which has values Fill, Get, or Both. You can also specify the names and accessibility of the generated methods.
The most common type of application is one that retrieves data from a database, displays the data, allows changes to be made, and then persists those changes back to the database. The middle steps that connect the in-memory data with the visual elements are referred to as DataBinding. DataBinding often becomes the bane a of developer's existence because it has been difficult to get right. Most developers at some stage or another have resorted to writing their own wrappers to ensure that data is correctly bound to the controls on the screen. Visual Studio 2010 dramatically reduces the pain of getting two-way DataBinding to work. The examples used in the following sections again work with the AdventureWorksLT sample database. For simplicity, you'll work with a single Windows application, but the concepts discussed here can be extended over multiple tiers.
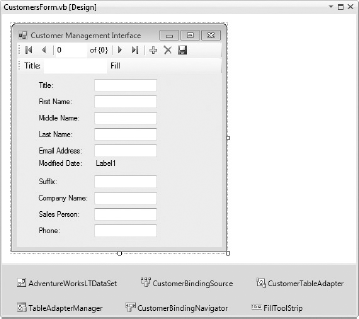
In this example, you build an application to assist you in managing the customers for AdventureWorks. To begin, you need to ensure that the AdventureWorksLTDataSet contains the Customer and Address tables. (You can reuse the AdventureWorksDataSet from earlier by clicking the Configure Dataset with Wizard icon in the Data Source window and editing which tables are included in the DataSet.) With the form designer (any empty form in your project will do) and Data Sources window open, set the mode for the Customer table to Details using the drop-down list. Before creating the editing controls, tweak the list of columns for the Customer table. You're not that interested in the CustomerID, NameStyle, PasswordHash, PasswordSalt, or rowguid fields, so set them to None (again using the drop-down list for those nodes in the Data Sources window). ModifiedDate should be automatically set when changes are made, so this field should appear as a label, preventing the ModifiedDate from being edited.
Now you're ready to drag the Customer node onto the form design surface. This will automatically add controls for each of the columns you have specified. It will also add a BindingSource, a BindingNavigator, an AdventureWorksDataSet, a CustomerTableAdapter, a TableAdapter Manager, and a ToolStrip to the form as shown in Figure 27-6.
At this point you can build and run this application and navigate through the records using the navigation control, and you can also take the components apart to understand how they interact. Start with the AdventureWorksDataSet and the CustomerTableAdapter, because they carry out the background grunt work of retrieving information and persisting changes to the database. The AdventureWorksDataSet that is added to this form is actually an instance of the AdventureWorksDataSet class that was created by the Data Source Configuration Wizard. This instance will be used to store information for all the tables on this form. To populate the DataSet, call the Fill method. If you open the code file for the form, you will see that the Fill command has been called from the Click event handler of the Fill button that resides on the toolstrip.
- VB
Private Sub FillToolStripButton_Click(ByVal sender As Object,
                                      ByVal e As EventArgs) _
                                              Handles FillToolStripButton.Click
    Try
        Me.CustomerTableAdapter.Fill(Me.AdventureWorksLTDataSet.Customer,
                                     TitleToolStripTextBox.Text)
    Catch ex As System.Exception
        System.Windows.Forms.MessageBox.Show(ex.Message)
    End Try
End Sub
- C#
private void fillToolStripButton_Click(object sender, EventArgs e){
    try{
        this.customerTableAdapter.Fill(
            this.adventureWorksLTDataSet.Customer, titleToolStripTextBox.Text);
    }
    catch (System.Exception ex){
        System.Windows.Forms.MessageBox.Show(ex.Message);
    }
}
As you extend this form, you'll add a TableAdapter for each table within the AdventureWorksDataSet that you want to work with.
The next item of interest is the CustomerBindingSource that was automatically added to the non-visual part of the form designer. This control is used to wire up each of the controls on the design surface with the relevant data item. In fact, this control is just a wrapper for the CurrencyManager. However, using a BindingSource considerably reduces the number of event handlers and custom code that you have to write. Unlike the AdventureWorksDataSet and the CustomerTableAdapter — which are instances of the strongly typed classes with the same names — the CustomerBindingSource is just an instance of the regular BindingSource class that ships with the .NET Framework.
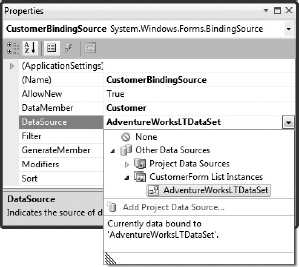
Take a look at the properties of the CustomerBindingSource so you can see what it does. Figure 27-7 shows the Properties window for the CustomerBindingSource. The two items of particular interest are the DataSource and DataMember properties. The drop-down list for the DataSource property is expanded to illustrate the list of available data sources. The instance of the AdventureWorksDataSet that was added to the form is listed under CustomerForm List Instances. Selecting the AdventureWorksDataSet type under the Project Data Sources node creates another instance on the form instead of reusing the existing DataSet. In the DataMember field, you need to specify the table to use for DataBinding. Later, you'll see how the DataMember field can be used to specify a foreign key relationship so you can show linked data.
So far you have specified that the CustomerBindingSource will bind data in the Customer table of the AdventureWorksDataSet. What remains is to bind the individual controls on the form to the BindingSource and the appropriate column in the Customer table. To do this you need to specify a DataBinding for each control. Figure 27-8 shows the Properties grid for the FirstNameTextBox, with the DataBindings node expanded to show the binding for the Text property.
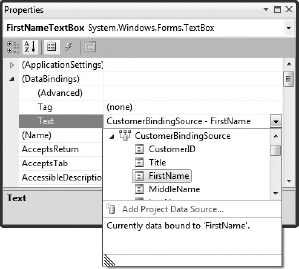
From the drop-down list you can see that the Text property is being bound to the FirstName field of the CustomerBindingSource. Because the CustomerBindingSource is bound to the Customer table, this is actually the FirstName column in that table. If you look at the designer file for the form, you can see that this binding is set up using a new Binding, as shown in the following snippet:
Me.FirstNameTextBox.DataBindings.Add(
                    New System.Windows.Forms.Binding("Text",
                                                     Me.CustomerBindingSource,
                                                     "FirstName", True))
A Binding is used to ensure that two-way binding is set up between the Text field of the FirstNameTextBox and the FirstName field of the CustomerBindingSource. The controls for the other controls all have similar bindings between their Text properties and the appropriate fields on the CustomerBindingSource.
When you run the current application you will notice that the Modified Date value is displayed as in the default string representation of a date, for example, "13/10/2004." Given the nature of the application, it might be more useful to have it in a format similar to "Friday, 13 October 2004." To do this you need to specify additional properties as part of the DataBinding. Select the ModifiedDateLabel1 and in the Properties tool window, expand the DataBindings node and select the Advanced item. This opens up the Formatting and Advanced Binding dialog as shown in Figure 27-9.
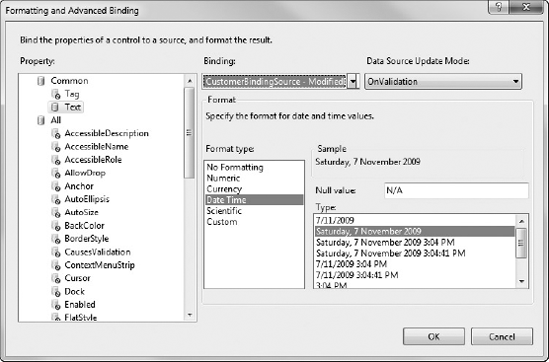
In the lower portion of Figure 27-9 you can see that we have selected one of the predefined formatting types, Date Time. This then presents another list of formatting options in which "Saturday, 7 November 2009" has been selected — this is an example of how the value will be formatted. In this dialog we have also provided a Null value, "N/A," which will be displayed if there is no Modified Date value for a particular row. In the following code you can see that three additional parameters have been added to create the DataBinding for the Modified Date value:
VB
Me.ModifiedDateLabel1.DataBindings.Add(
             New System.Windows.Forms.Binding("Text",
                        Me.CustomerBindingSource,
                        "ModifiedDate", True,
                        System.Windows.Forms.DataSourceUpdateMode.OnValidation,
                        "N/A", "D"))
The OnValidation value simply indicates that the data source will be updated when the visual control has been validated. This is actually the default and is only specified here so that the next two parameters can be specified. The "N/A" is the value you specified for when there was no Modified Date value, and the "D" is actually a shortcut formatting string for the date formatting you selected.
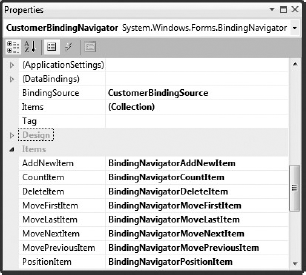
Although the CustomerBindingNavigator component, which is an instance of the BindingNavigator class, appears in the non-visual area of the design surface, it does have a visual representation in the form of the navigation toolstrip that is initially docked to the top of the form. As with regular toolstrips, this control can be docked to any edge of the form. In fact, in many ways the BindingNavigator behaves the same way as a toolstrip in that buttons and other controls can be added to the Items list. When the BindingNavigator is initially added to the form, a series of buttons are added for standard data functionality, such as moving to the first or last item, moving to the next or previous item, and adding, removing, and saving items.
What is neat about the BindingNavigator is that it not only creates these standard controls, but also wires them up for you. Figure 27-10 shows the Properties window for the BindingNavigator, with the Data and Items sections expanded. In the Data section you can see that the associated BindingSource is the CustomerBindingSource, which will be used to perform all the actions implied by the various button clicks. The Items section plays an important role, because each property defines an action, such as AddNewItem. The value of the property defines the ToolStripItem to which it will be assigned — in this case, the BindingNavigatorAddNewItem button.
Behind the scenes, when this application is run and this button is assigned to the AddNewItem property, the OnAddNew method is wired up to the Click event of the button. This is shown in the following snippet, extracted using Reflector from the BindingNavigator class. The AddNewItem property calls the WireUpButton method, passing in a delegate to the OnAddNew method:
VB
Public Property AddNewItem As ToolStripItem
    Get
        If ((Not Me.addNewItem Is Nothing) AndAlso Me.addNewItem.IsDisposed) Then
Me.addNewItem = Nothing
End If
Return Me.addNewItem
End Get
Set(ByVal value As ToolStripItem)
Me.WireUpButton(Me.addNewItem, value, _
New EventHandler(AddressOf Me.OnAddNew))
End Set
End Property
Private Sub OnAddNew(ByVal sender As Object, ByVal e As EventArgs)
If (Me.Validate AndAlso (Not Me.bindingSource Is Nothing)) Then
Me.bindingSource.AddNew
Me.RefreshItemsInternal
End If
End Sub
Private Sub WireUpButton(ByRef oldButton As ToolStripItem, _
ByVal newButton As ToolStripItem, _
ByVal clickHandler As EventHandler)
If (Not oldButton Is newButton) Then
If (Not oldButton Is Nothing) Then
RemoveHandler oldButton.Click, clickHandler
End If
If (Not newButton Is Nothing) Then
AddHandler newButton.Click, clickHandler
End If
oldButton = newButton
Me.RefreshItemsInternal
End If
End SubThe OnAddNew method performs a couple of important actions. First, it forces validation of the active field, which is examined later in this chapter. Second, and the most important aspect of the OnAddNew method, it calls the AddNew method on the BindingSource. The other properties on the BindingNavigator also map to corresponding methods on the BindingSource, and it is important to remember that the BindingSource, rather than the BindingNavigator, does the work when it comes to working with the data source.
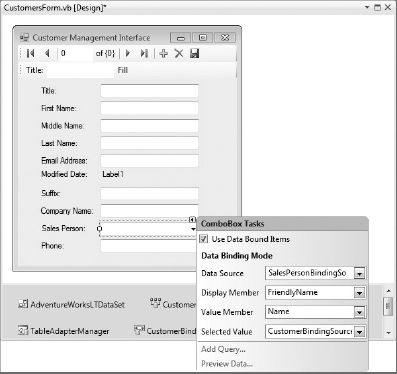
Now that you have seen how the BindingSource works, it's time to improve the user interface. At the moment, the Sales Person is being displayed as a textbox, but this should actually be limited to just the sales staff at AdventureWorks. As such, instead of a textbox, it would be much better to have the list of staff displayed as a drop-down box from which the user can select.
Start by removing the SalesPersonTextBox from the form. Next, add a ComboBox control from the toolbox. With the new ComboBox selected, note that a smart tag is attached to the control. Expanding this tag and checking the Use Data Bound Items checkbox opens the Data Binding Mode options, as shown in Figure 27-11.
You need to define four things to get the DataBinding to work properly. The first is the data source for the list of staff the user should be able to select from. Unfortunately, the list of staff is not contained in a database table (this may be the case if the list of staff comes from a separate system such as Active Directory). For the purpose of this example the list staff is defined by a fixed array of SalesPerson objects.
- VB
Public Class SalesPerson
    Public ReadOnly Property FriendlyName
        Get
            Return Name.Replace("adventure-works", String.Empty)
        End Get
    End Property

   Public Property Name As String

    Public Shared Function Staff() As SalesPerson()
        Return {
            New SalesPerson() With {.Name = "adventure-workspamela0"},
            New SalesPerson() With {.Name = "adventure-worksdavid8"},
            New SalesPerson() With {.Name = "adventure-worksjillian0"},
            New SalesPerson() With {.Name = "adventure-worksgarrett1"},
            New SalesPerson() With {.Name = "adventure-worksjae0"},
            New SalesPerson() With {.Name = "adventure-workslinda3"},
            New SalesPerson() With {.Name = "adventure-worksjosé1"},
            New SalesPerson() With {.Name = "adventure-worksmichael9"},
            New SalesPerson() With {.Name = "adventure-worksshu0"}
        }
End Function End Class

- C#
public class SalesPerson{
    public string FriendlyName{
        get{
           return Name.Replace(@"adventure-works", String.Empty);
        }
    }

    public string Name { get; set; }
    public static SalesPerson[] Staff(){
        return new SalesPerson[]{
                        new SalesPerson() {Name= @"adventure-workspamela0"},
                        new SalesPerson() {Name= @"adventure-worksdavid8"},
                        new SalesPerson() {Name= @"adventure-worksjillian0"},
                        new SalesPerson() {Name= @"adventure-worksgarrett1"},
                        new SalesPerson() {Name= @"adventure-worksjae0"},
                        new SalesPerson() {Name= @"adventure-workslinda3"},
                        new SalesPerson() {Name= @"adventure-worksjosé1"},
                        new SalesPerson() {Name= @"adventure-worksmichael9"},
                        new SalesPerson() {Name= @"adventure-worksshu0"}
                    };
    }
}
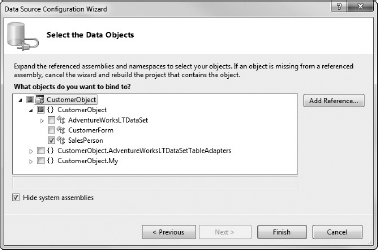
Expanding the Data Source drop-down allows you to select from any of the existing project data sources. Although the list of staff, returned by the Staff method on the SalesPerson class, is contained in the project, it can't yet be used as a data source. First, you need to add a new Object data source to your project. You can do this directly from the Data Source drop-down by selecting the Add Project DataSource link. This displays the Data Source Configuration Wizard as you saw earlier in this chapter. However, this time you will select Object as the type of data source. You will then have to select which object(s) you want to include in the data source, as shown in Figure 27-12.
When you select SalesPerson and click Finish the data source will be created and automatically assigned to the Data Source property of the Sales Person drop-down. The Display Member and Value Member properties correspond to which properties on the SalesPerson object you want to be displayed and used to determine the selected item. In this case, the SalesPerson defines a read-only property, FriendlyName (which simply removes the adventure-works prefix), which should be displayed in the drop-down. However, the Value property needs to be set to the Name property so that it matches the value specified in the SalesPerson field in the Customer table. Lastly, the Selected Value property needs to be set to the SalesPerson property on the CustomerBindingSource. This is the property that is get/set to determine the Sales Person specified for the displayed Customer.
Although you have wired up the Sales Person drop-down list, if you run what you currently have, there would be no items in this list, because you haven't populated the SalesPersonBindingSource. The BindingSource object has a DataSource property, which you need to set in order to populate the BindingSource. You can do this in the Load event of the form:
- VB
Private Sub CustomerForm_Load(ByVal sender As Object,
                              ByVal e As EventArgs) Handles MyBase.Load
        Me.SalesPersonBindingSource.DataSource = SalesPerson.Staff
End SubPrivate
- C#
private void CustomerForm_Load(object sender, EventArgs e){
    this.salesPersonBindingSource.DataSource = SalesPerson.Staff();
}
Now when you run the application, instead of having a textbox with a numeric value, you have a convenient drop-down list from which to select the SalesPerson.
Now that you have a usable interface, you need to add support for making changes and adding new records. If you double-click the Save icon on the CustomerBindingNavigator toolstrip, the code window opens with a code stub that would normally save changes to the Customer table. As you can see in the following snippet, there are essentially three steps: the form is validated, each of the BindingSources has been instructed to end the current edit, and then the UpdateAll method is called on the TableAdapterManager:
- VB
Private Sub CustomerBindingNavigatorSaveItem_Click(ByVal sender As Object,
                                                   ByVal e As System.EventArgs) _
                                     Handles CustomerBindingNavigatorSaveItem.Click
    Me.Validate()
Me.CustomerBindingSource.EndEdit() Me.TableAdapterManager.UpdateAll(Me.AdventureWorksLTDataSet) End Sub- C#
private void customerBindingNavigatorSaveItem_Click(object sender, EventArgs e){
    this.Validate();
    this.customerBindingSource.EndEdit();
    this.tableAdapterManager.UpdateAll(this.adventureWorksLTDataSet);
}
This code will run without modification but it won't update the ModifiedDate field to indicate the Customer information has changed. You need to correct the Update method used by the CustomerTableAdapter to automatically update the ModifiedDate field. Using the DataSet designer, select the CustomerTableAdapter, open the Properties window, expand the UpdateCommand node, and click the ellipsis button next to the CommandText field. This opens the Query Builder dialog that you used earlier in this chapter. Uncheck the boxes in the Set column for the rowguid row (because this should never be updated). In the New Value column, change @ModifiedDate to getdate() to automatically set the modified date to the date on which the query was executed. This should give you a query similar to the one shown in Figure 27-13.

With this change, when you save a record the ModifiedDate will automatically be set to the current date.
You now have a sample application that enables you to browse and make changes to an existing set of individual customers. The one missing piece is the capability to create a new customer. By default, the Add button on the BindingNavigator is automatically wired up to the AddNew method on the BindingSource, as shown earlier in this chapter. In this case, you actually need to set some default values on the record that is created in the Customer table. To do this, you need to write your own logic behind the Add button.
The first step is to remove the automatic wiring by setting the AddNewItem property of the CustomerBindingNavigator to (None), otherwise, you will end up with two records being created every time you click the Add button. Next, double-click the Add button to create an event handler for it. You can then modify the default event handler as follows to set initial values for the new customer, as well as create records in the other two tables:
- VB
Private Sub BindingNavigatorAddNewItem_Click(ByVal sender As System.Object, ByVal e As System.EventArgs) _ Handles BindingNavigatorAddNewItem.Click Dim drv As DataRowView 'Create record in the Customer table drv = TryCast(Me.CustomerBindingSource.AddNew, DataRowView) Dim customer = TryCast(drv.Row, AdventureWorksLTDataSet.CustomerRow) customer.rowguid = Guid.NewGuid customer.PasswordHash = String.Empty customer.PasswordSalt = String.Empty customer.ModifiedDate = Now customer.FirstName = "<first name>" customer.LastName = "<last name>" customer.NameStyle = False Me.CustomerBindingSource.EndEdit() End Sub- C#
private void bindingNavigatorAddNewItem_Click(object sender, EventArgs e){
    DataRowView drv;

    //Create record in the Customer table
    drv = this.customerBindingSource.AddNew() as DataRowView;
    var customer = drv.Row as AdventureWorksLTDataSet.CustomerRow;
    customer.rowguid = Guid.NewGuid();
    customer.PasswordHash = String.Empty;
    customer.PasswordSalt = String.Empty;
    customer.ModifiedDate = DateTime.Now;
    customer.FirstName = "<first name>";
    customer.LastName = "<last name>";
    customer.NameStyle = false;
    this.customerBindingSource.EndEdit();
}
From this example, it seems that you are unnecessarily setting some of the properties — for example, PasswordSalt and PasswordHash being equal to an empty string. This is necessary to ensure that the new row meets the constraints established by the database. Because these fields cannot be set by the user, you need to ensure that they are initially set to a value that can be accepted by the database. Clearly, for a secure application, the PasswordSalt and PasswordHash would be set to appropriate values.
Running the application with this method instead of the automatically wired event handler enables you to create a new Customer record using the Add button. If you enter values for each of the fields, you can save the changes.
In the previous section, you added functionality to create a new customer record. If you don't enter appropriate data upon creating a new record — for example, if you don't enter a first name — this record will be rejected when you click the Save button. The schema for the AdventureWorksDataSet contains a number of constraints, such as FirstName can't be null, which are checked when you perform certain actions, such as saving or moving between records. If these checks fail, an exception is raised. You have two options. One, you can trap these exceptions, which is poor programming practice, because exceptions should not be used for execution control. Alternatively, you can preempt this by validating the data prior to the schema being checked. Earlier in the chapter, when you learned how the BindingNavigator automatically wires the AddNew method on the BindingSource, you saw that the OnAddNew method contains a call to a Validate method. This method propagates up and calls the Validate method on the active control, which returns a Boolean value that determines whether the action will proceed. This pattern is used by all the automatically wired events and should be used in the event handlers you write for the navigation buttons.
The Validate method on the active control triggers two events — Validating and Validated — that occur before and after the validation process, respectively. Because you want to control the validation process, add an event handler for the Validating event. For example, you could add an event handler for the Validating event of the FirstNameTextBox control:
- VB
Private Sub FirstNameTextBox_Validating(ByVal sender As System.Object, _ ByVal e As System.ComponentModel.CancelEventArgs) _ Handles FirstNameTextBox.Validating Dim firstNameTxt As TextBox = TryCast(sender, TextBox) If firstNameTxt Is Nothing Then Return e.Cancel = (firstNameTxt.Text = String.Empty) End Sub- C#
private void firstNameTextBox_Validating(object sender, CancelEventArgs e){
    var firstNameTxt = sender as TextBox;
    if (firstNameTxt == null) return;
    e.Cancel = (firstNameTxt.Text == String.Empty);
}
Though this prevents users from leaving the textbox until a value has been added, it doesn't give them any idea why the application prevents them from proceeding. Luckily, the .NET Framework includes an ErrorProvider control that can be dragged onto the form from the Toolbox. This control behaves in a manner similar to the tooltip control. For each control on the form, you can specify an Error string, which, when set, causes an icon to appear alongside the relevant control, with a suitable tooltip displaying the Error string. This is illustrated in Figure 27-14, where the Error string is set for the FirstNameTextBox.
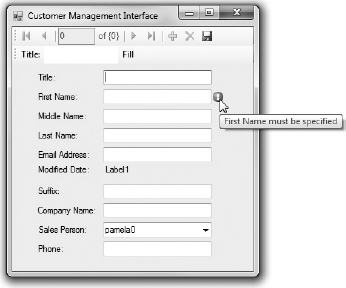
Clearly, you want only to set the Error string property for the FirstNameTextBox when there is no text. Following from the earlier example in which you added the event handler for the Validating event, you can modify this code to include setting the Error string:
- VB
Private Sub FirstNameTextBox_Validating(ByVal sender As System.Object, _ ByVal e As System.ComponentModel.CancelEventArgs) _ Handles FirstNameTextBox.Validating Dim firstNameTxt As TextBox = TryCast(sender, TextBox) If firstNameTxt Is Nothing Then Return e.Cancel = (firstNameTxt.Text = String.Empty) If String.IsNullOrWhiteSpace(firstNameTxt.Text) Then Me.ErrorProvider1.SetError(firstNameTxt, "First Name must be specified") Else Me.ErrorProvider1.SetError(firstNameTxt, Nothing) End If End Sub- C#
private void firstNameTextBox_Validating(object sender, CancelEventArgs e){
    var firstNameTxt = sender as TextBox;
    if (firstNameTxt == null) return;
    e.Cancel = (firstNameTxt.Text == String.Empty);

    if (String.IsNullOrEmpty(firstNameTxt.Text)){
        this.errorProvider1.SetError(firstNameTxt, "First Name must be specified");
    }
    else{
        this.errorProvider1.SetError(firstNameTxt, null);
    }
}
You can imagine that having to write event handlers that validate and set the error information for each of the controls can be quite a lengthy process. Rather than having individual validation event handlers for each control, you may want to rationalize them into a single event handler that delegates the validation to a controller class. This helps ensure your business logic isn't intermingled within your user interface code.
At the moment, you have a form that displays some basic information about a customer. However, it is missing some of her address information, namely her Main Office and/or Shipping addresses. If you look at the structure of the AdventureWorksLT database you will notice that there is a many-to-many relationship between the Customer and Address tables, through the CustomerAddress linking table. The CustomerAddress has a column AddressType that indicates the type of address. While this structure supports the concept that multiple Customers may have the same address, the user interface you have built so far is only interested in the address information for a particular customer. If you simply add all three of these tables to your DataSet you will not easily be able to use data binding to wire up the user interface. As such it is worth customizing the generated DataSet to merge the CustomerAddress and Address tables into a single entity.
Open up the DataSet designer by double-clicking the AdventureWorksLTDataSet.xsd in the Solution Explorer. Select the AddressTableAdapter, which you should already have from earlier in the chapter, expand out the SelectCommand property in the Properties tool window, and then click the ellipses next to the CommandText property. This will again open up the Query Builder. Currently, you should only have the Address table in the diagram pane. Right-click in that pane, select Add Table, and then select the CustomerAddress table. Check all fields in the CustomerAddress table except AddressID and then go to the Criteria pane and change the Alias for the rowguid and ModifiedDate columns coming from the CustomerAddress table. The result should look similar to Figure 27-15.
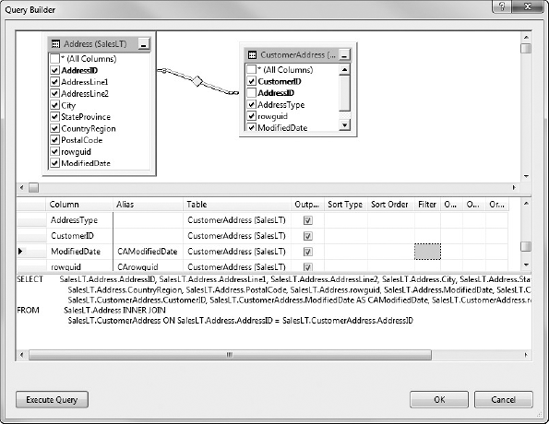
When you click the OK button you will be prompted to regenerate the Update and Insert statements. The code generator can't handle multiple table updates so will fail regardless of which option you select. This means that you need to manually define the update, insert, and delete statements. You can do this by defining stored procedures within the AdventureWorksLT database and then to update the CommandType and CommandText for the relevant commands in the AddressTableAdapter as shown in Figure 27-16.
Now that your DataSet contains both Customer and Address DataTables, the only thing missing is the relationship connecting them. As you have customized the Address DataTable the designer hasn't been able to automatically create the relationship. To create a relation, right-click anywhere on the DataSet design surface and select Add

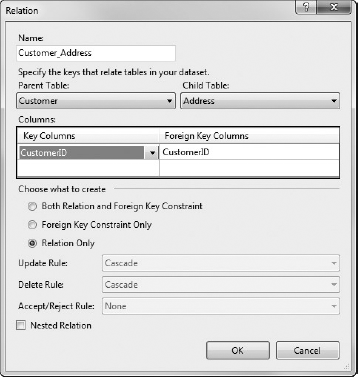
In accordance with the way the Address DataTable has been created by combining the CustomerAddress and Address tables, make the Customer DataTable the parent and the Address the child. When you accept this dialog you will see a relationship line connecting the two DataTables on the DataSet design surface.
After completing the setup of the DataSet with the Customer and Address DataTables you are ready to data bind the Address table to your user interface. So far you've been working with simple input controls such as textboxes, drop-down lists, and labels, and you've seen how the BindingNavigator enables you to scroll through a list of items. Sometimes it is more convenient to display a list of items in a grid. This is where the DataGridView is useful, because it enables you to combine the power of the BindingSource with a grid layout.
In this example, you extend the Customer Management interface by adding address information using a DataGridView. Returning to the Data Sources window, select the Address node from under the Customer node. From the drop-down list, select DataGridView and drag the node into an empty area on the form. This adds the appropriate BindingSource and TableAdapter to the form, as well as a DataGridView showing each of the columns in the Address table, as shown in Figure 27-18.
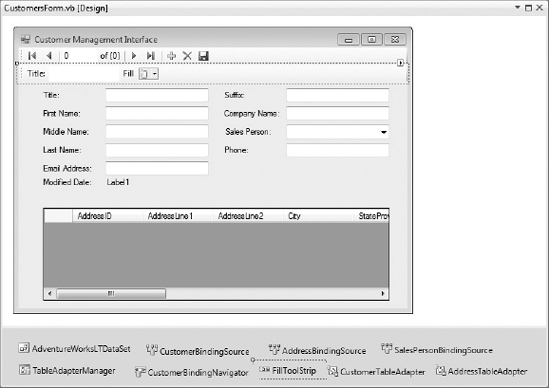
If you recall from earlier, the CustomerBindingSource has the AdventureWorksLTDataSet as its DataSource, with the Customer table set as the DataMember. This means that controls that are data bound using the CustomerBindingSource are binding to a field in the Customer table. If you look at the AddressBindingSource you will see that its DataSource is actually the CustomerBindingSource, with its DataMember set to Customer_Address, which is the relationship you created between the two DataTables. As you would expect, any control being data bound using the AddressBindingSource is binding to a field in the Address table. However, the difference is that unlike the CustomerBindingSource, which returns all Customers, the AddressBindingSource is only populated with the Addresses that are associated with the currently selected Customer.
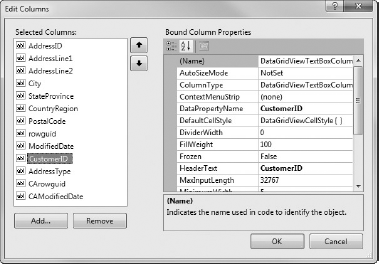
Unlike working with the Details layout, when you drag the DataGridView onto the form it ignores any settings you might have specified for the individual columns. Instead, every column is added to the grid as a simple text field. To modify the list of columns that are displayed, you can either use the smart tag for the newly added DataGridView or select Edit Columns from the right-click context menu. This will open the Edit Columns dialog (shown in Figure 27-19), in which columns can be added, removed, and reordered.
After specifying the appropriate columns, the finished application can be run, and the list of orders will be visible for each customer in the database.
In this chapter you have been working with a strongly typed DataSet that contains a number of rows from the Customer table, based on a Title parameter. So far the example has only had one tier, which is the Windows Forms application itself. In this section you see how you can use Visual Studio 2010 to build a multi-tier application.
Start by creating two new projects, CustomerBrowser (Windows Forms Application) and CustomerService (ASP.NET Web Service Application). Change the Application Type of the initial project to Class Library by double-clicking the Properties node in Solution Explorer and then changing the Application type field on the Application tab.
Note
Because this section involves working with ASP.NET applications, it is recommended that you run Visual Studio 2010 in Administrator mode if you are running Windows Vista. This will allow the debugger to be attached to the appropriate process.
In the Web Service project, you will add a reference to the class library project. You also need to modify the Service class file so it has two methods, in place of the default HelloWorld web method:
- VB
Imports System.Web.Services
Imports System.Web.Services.Protocols
Imports System.ComponentModel
Imports CustomerObject

<System.Web.Services.WebService(Namespace:="http://tempuri.org/")> _
<System.Web.Services.WebServiceBinding(ConformsTo:=WsiProfiles.BasicProfile1_1)> _
<ToolboxItem(False)> _
Public Class CustomerService
    Inherits System.Web.Services.WebService

    <WebMethod()> _
    Public Function RetrieveCustomers(ByVal Title As String) _
                      As AdventureWorksLTDataSet.CustomerDataTable
        Dim ta As New AdventureWorksLTDataSetTableAdapters.CustomerTableAdapter
        Return ta.GetData(Title)
    End Function

    <WebMethod()> _
    Public Sub SaveCustomers(ByVal changes As Data.DataSet)
        Dim changesTable As Data.DataTable = changes.Tables(0)
        Dim ta As New AdventureWorksLTDataSetTableAdapters.CustomerTableAdapter
        ta.Update(changesTable.Select)
    End Sub
End
- C#
namespace CustomerService{
    [WebService(Namespace = "http://tempuri.org/")]
    [WebServiceBinding(ConformsTo = WsiProfiles.BasicProfile1_1)]
    [System.ComponentModel.ToolboxItem(false)]
    public class CustomerService : System.Web.Services.WebService{
        [WebMethod]
        public AdventureWorksLTDataSet.CustomerDataTable RetrieveCustomers
                                                             (string title){
            var ta = new CustomerObject.AdventureWorksLTDataSetTableAdapters.
                                                 CustomerTableAdapter();
            return ta.GetData(title);
        }

        [WebMethod()]
        public void SaveCustomers(DataSet changes){
            var changesTable = changes.Tables[0] as DataTable;
            var ta = new CustomerObject.AdventureWorksLTDataSetTableAdapters.
                                                 CustomerTableAdapter();
            ta.Update(changesTable.Select());
        }
    }
}
The first web method, as the name suggests, retrieves the list of customers based on the Title that is passed in. In this method, you create a new instance of the strongly typed TableAdapter and return the DataTable retrieved by the GetData method. The second web method is used to save changes to a DataTable, again using the strongly typed TableAdapter. As you will notice, the DataSet that is passed in as a parameter to this method is not strongly typed. Unfortunately, the generated strongly typed DataSet doesn't provide a strongly typed GetChanges method, which will be used later to generate a DataSet containing only data that has changed. This new DataSet is passed into the SaveCustomers method so that only changed data needs to be sent to the web service.
These changes to the web service complete the server side of the process, but your application still doesn't have access to this data. To access the data from your application, you need to add a data source to the application. Again, use the Add New Data Source Wizard, but this time select Service from the Data Source Type screen. To add a Web Service Data Source you then need to click Advanced, followed by Add Web Reference. Clicking the "Web services in this solution" link displays a list of web services available in your solution. The web service that you have just been working on should appear in this list. When you click the hyperlink for that web service, the Add Reference button is enabled, as shown in Figure 27-20.
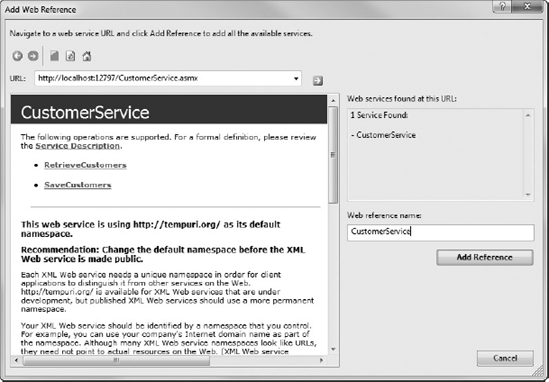
Note
If an error is displayed when clicking the hyperlink you may need to build and run the ASP.NET Web Service Application project. This starts the service running so that the schema information can be correctly extracted by the Add Web Reference dialog.
Clicking the Add Reference button adds an AdventureWorksDataSet to the Data Sources window under the CustomerService node. Expanding this node, you will see that the data source is very similar to the data source you had in the class library.
To actually view the data being returned via the web service, you need to add some controls to your form. Open the form so the designer appears in the main window. In the Data Sources window, click the Customer node and select Details from the drop-down. This indicates that when you drag the Customer node onto the form, Visual Studio 2010 will create controls to display the details of the Customer table (for example, the row contents), instead of the default DataGridView. Next, select the attributes you want to display by clicking them and selecting the control type to use. When you drag the Customer node onto the form, you should end up with the layout similar to Figure 27-21.
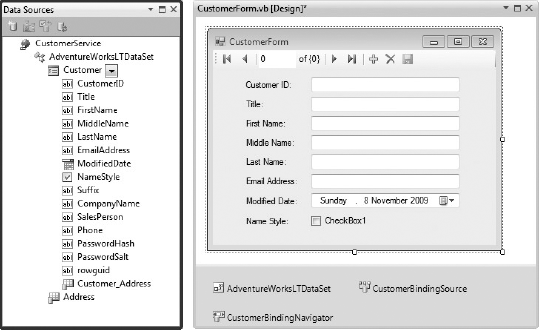
In addition to adding controls for the information to be displayed and edited, a Navigator control has also been added to the top of the form, and an AdventureWorksDataSet and a CustomerBindingSource have been added to the non-visual area of the form.
The final stage is to wire up the Load event of the form to retrieve data from the web service, and to add the Save button on the navigator to save changes. Right-click the save icon and select Enabled to enable the Save button on the navigator control, and then double-click the save icon to generate the stub event handler. Add the following code to load data and save changes via the web service you created earlier:
- VB
Public Class CustomerForm
    Private Sub CustomerForm_Load(ByVal sender As System.Object,
                                  ByVal e As System.EventArgs) Handles Me.Load
Me.CustomerBindingSource.DataSource = _ My.WebServices.CustomerService.RetrieveCustomers("%mr%") End Sub Private Sub CustomerBindingNavigatorSaveItem_Click _ (ByVal sender As System.Object, ByVal e As System.EventArgs) Handles CustomerBindingNavigatorSaveItem.Click Me.CustomerBindingSource.EndEdit() Dim ds = CType(Me.CustomerBindingSource.DataSource, _ CustomerService.AdventureWorksLTDataSet.CustomerDataTable) Dim changesTable As DataTable = ds.GetChanges() Dim changes As New DataSet changes.Tables.Add(changesTable) My.WebServices.CustomerService.SaveCustomers(changes) End Sub End Class
- C#
private void CustomersForm_Load(object sender, EventArgs e){
    var service = new CustomerService.CustomerService();
    this.CustomerBindingSource.DataSource = service.RetrieveCustomers("%mr%"); ;
}

private void CustomerBindingNavigatorSaveItem_Click(object sender, EventArgs e){
    this.CustomerBindingSource.EndEdit();
    var ds = this.CustomerBindingSource.DataSource
                      as CustomerService.AdventureWorksLTDataSet.CustomerDataTable;
    var changesTable = ds.GetChanges();
    var changes = new DataSet();
    changes.Tables.Add(changesTable);
    var service = new CustomerService.CustomerService();
    service.SaveCustomers(changes);
}
To retrieve the list of customers from the web service, all you need to do is call the appropriate web method — in this case, RetrieveCustomers. Pass in a parameter of %mr%, which indicates that only customers with a Title containing the letters "mr" should be returned. The Save method is slightly more complex, because you have to end the current edit (to make sure all changes are saved), retrieve the DataTable, and then extract the changes as a new DataTable. Although it would be simpler to pass a DataTable to the SaveCustomers web service, only DataSets can be specified as parameters or return values to a web service. As such, you can create a new DataSet and add the changed DataTable to the list of tables. The new DataSet is then passed into the SaveCustomers method. As mentioned previously, the GetChanges method returns a raw DataTable, which is unfortunate because it limits the strongly typed data scenario.
This completes the chapter's coverage of the strongly typed DataSet scenario, and provides you with a two-tiered solution for accessing and editing data from a database via a web service interface.
This chapter provided an introduction to working with strongly typed DataSets. Support within Visual Studio 2010 for creating and working with strongly typed DataSets simplifies the rapid building of applications. This is clearly the first step in the process of bridging the gap between the object-oriented programming world and the relational world in which the data is stored.
Hopefully this chapter has given you an appreciation for how the BindingSource, BindingNavigator, and other data controls work together to give you the ability to rapidly build data applications. Because the new controls support working with either DataSets or your own custom objects, they can significantly reduce the amount of time it takes you to write an application.