
WHAT'S IN THIS CHAPTER?
Creating installers for your projects
Customizing the installation process
Verifying the presence of application prerequisites
Installing Windows Services
Deploying projects over the web with ClickOnce
Updating ClickOnce projects
One area of software development that is often overlooked is how to deploy the application. Building an installer is a simple process and can transform your application from an amateur utility to a professional tool. This chapter looks at how you can build a Windows Installer for any type of .NET application.
Visual Studio 2010 also includes support for a ClickOnce deployment, which can be used to build applications that can be dynamically updated. This is particularly important for rich client applications that periodically need updating, because it solves the problem of how to roll out those updates.
Windows Installer has been a standard part of Windows since Windows 2000. It is the component that manages the installation, maintenance, and removal of software packages. Visual Studio 2010 comes with a rich user interface for building installation packages for a variety of different applications that target the Windows Installer infrastructure. This chapter demonstrates building installers for desktop applications and windows services. The next chapter contains information about packaging and deploying web applications.
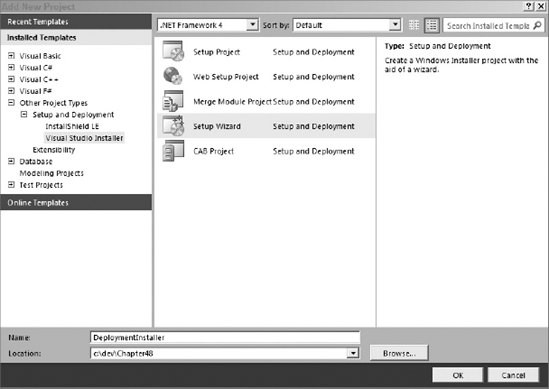
To build an installer with Visual Studio 2010, you need to add an additional project to the application that you want to deploy. Figure 48-1 shows the available setup and deployment project types. The Setup Project should be used for Windows Forms or service applications, and the Web Setup Project should be used for ASP.NET web sites or web services. If you want to build an installer that will be integrated into a larger installer, you may want to build a merge module. Alternatively, a CAB Project can be used to create a package that can be deployed via a web browser. The Setup Wizard steps you through the process of creating the correct project for the type of application you're deploying.
Note
Web Setup Projects are covered in the next chapter.
In this case, you are going to use the Setup Wizard to create an installer for a simple C# Windows Forms Application, CallCentre. After acknowledging the Setup Wizard splash screen, the first decision is specifying whether you want to create an installer or a redistributable package. For an installer, you need to choose between a Windows application or a web application installer. The basic difference is that the Windows application installer places the application in the appropriate folder within Program Files, whereas the web application installer creates a virtual directory under the root folder for the specified web site. In the case of a redistributable package, the choice is between a merge module, which can be integrated into a larger installer, or a CAB file.
Note
A merge module is a special type of installer that contains the instructions for installing a shared component. Once a merge module has been created, it can be included within a number of installers providing re-use and simplified maintenance. Merge modules must be included within an installer file. They cannot be installed by themselves.
A CAB project produces a collection of .cab files, which contain a set of compressed files. The .cab files can be downloaded individually or opened from a number of disks. Typically, the contents of the .cab files are copied to the local file system when the installer runs.
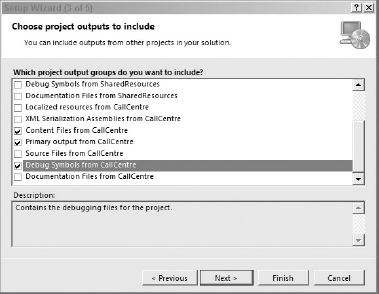
Regardless of the type of deployment project you are creating, the next step in the Setup Wizard is the most important because it determines the set of files to be deployed. Figure 48-2 shows the third screen in the Setup Wizard, which prompts you to select which files or project outputs will be included in the deployment project. In this case, the primary output for your CallCentre Application has been selected, because you want to include the main executable and any assemblies on which this executable depends. The Content Files item has also been selected, which will include any files with the build action set to Content. In the remaining step in the Setup Wizard, you can choose to add files that were not part of any existing project. For example, this might include release notes, licensing information, getting started samples, or documentation and README files.
Note
Occasionally you may choose to deploy debug symbols with your application, because this can aid you in diagnosing a failing application in production. However, it is not generally deemed a good practice to do this, because you should incorporate sufficient logging or other diagnostic instrumentation for this purpose.
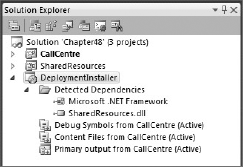
Once the deployment project has been created, it is added to the Solution Explorer, as shown in Figure 48-3. Although you didn't explicitly add any files or output from the SharedResources class library to the deployment project, it has been added as a detected dependency. If the dependencies are guaranteed to exist on the target computer, they can be manually excluded from the deployment project by selecting the Exclude item from the right-click context menu. For example, if this were an add-in for another application that already has a copy of the SharedResources assembly, you could exclude that from the dependency list. The resulting installer would be smaller, and thus easier to deploy.
Note
If the dependencies between your projects vary, it may be necessary to force a recalculation of these dependencies. You can do this by selecting Refresh Dependencies from the right-click shortcut menu on the Detected Dependencies node.
When a deployment project (DeploymentInstaller) is selected, a number of new icons appear across the top of the Solution Explorer window, as shown in Figure 48-3. Unlike other project types, where the project properties appear in the main editor area, clicking the first icon (Properties) opens the Property Pages dialog, as shown in Figure 48-4. This can be used to customize how the deployment module is built. This dialog can also be accessed via the Properties item on the right-click context menu for the deployment project in the Solution Explorer.
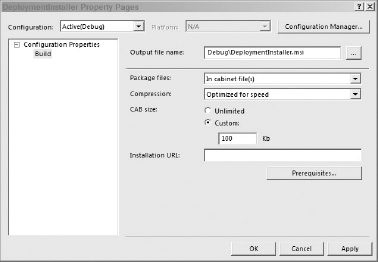
By default, the Package Files property is set to "In setup file," so all executables and associated dependencies are placed into the .msi file that is created. The deployment project also creates a Setup.exe file that checks for minimum requirements, such as the presence of the .NET Framework, prior to calling the .msi file to install the application. Although the compression can be adjusted to optimize for file size, including everything into a single distributable might be an issue for large projects. An alternative, as shown in Figure 48-4, is to package the application into a series of CAB files. In this scenario, the size of the CAB file is limited to 100Kb, which will aid deployment over a slow network. Another scenario where this would be useful is if you were planning to deploy your application via CD or DVD, and your application exceeded the capacity of a single disc.
The final property on this page is the Installation URL. If you are planning to deploy your application via a web site, you can elect to package everything into a single file, in which case you do not need to specify the Installation URL, because you can simply add a reference to the Setup.exe file to the appropriate web site and a user can install the application simply by clicking the link. Alternatively, you can package your application into smaller units that can be incrementally downloaded. To do this, you must specify the Installation URL from which they will be installed.
As just discussed, the default deployment project creates a Setup.exe file. The Prerequisites button opens a dialog like the one shown in Figure 48-5, where you can configure the behavior of this file. You can indicate that a setup file should not be created, in which case the application can be installed by double-clicking the .msi file. This, of course, removes the initial check to ensure that the .NET Framework has been installed.
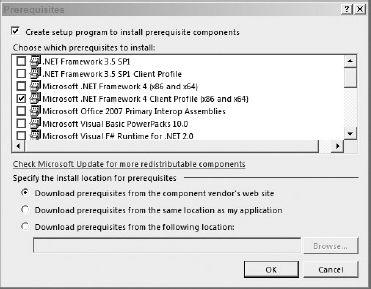
In addition to the .NET Framework, you can also specify that other components, such as SQL Server Compact 3.5, need to be installed. These checks will be carried out, and the user prompted to install any missing components before the main installer file is invoked. Depending on how you want to deploy your application, having all the prerequisites in the same location as your application may be useful and will eliminate time spent looking for the appropriate download.
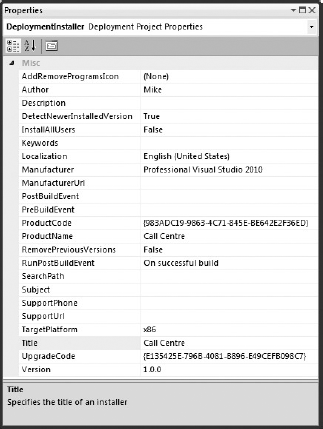
Returning to the Solution Explorer and your DeploymentInstaller project (and just to confuse matters), there is an additional Properties window for deployment projects that can be opened by selecting the appropriate project and pressing F4. This opens the standard Properties window, shown in Figure 48-6, which can be used to tailor the deployment details for the application it is installing.
The properties for the deployment project shown on this screen configure the appearance, icons, and behavior of the installation wizard. It is highly recommended that you adjust these properties so your application is easily identifiable in the Add/Remove Programs dialog, and so that the installation looks professional rather than half-finished. As you can see from Figure 48-7, some of these properties are used to tailor the installer dialog.

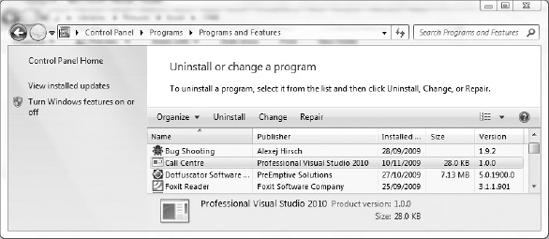
Once the application has been installed, some of these properties also appear in the Programs and Features dialog (Add/Remove Programs under Windows 7) accessible via the Control Panel, as shown in Figure 48-8. Here you can see the AddRemoveProgramsIcon, the ProductName, and the Manufacturer properties. You can display more properties by right-clicking the header bar and selecting More.
Note
In order to test your installer, you can select the Install (and subsequently Uninstall) item from the shortcut menu that is displayed when you right-click the setup Project in the Solution Explorer. If this option is disabled, you may need to build the setup Project first.
The remaining icons at the top of the Solution Explorer are used to customize what is included in the deployment package. In addition to the shortcut icons, these views of the deployment project can be accessed via the View item on the right-click context menu. Start with the File System view, which indicates where files will be installed on the target machine. By default, the primary output for a Windows application is added to the Application Folder, as shown in Figure 48-9. Selecting this node and looking at the Properties window shows that this folder has a default location of [ProgramFilesFolder][Manufacturer][ProductName]. This location is made up of three predefined installation variables: ProgramFilesFolder, Manufacturer, and ProductName, which will be evaluated and combined during installation. As you can see in Figure 48-7, the installation wizard allows users to change this location when they install the application.
Earlier, you saw that the CallCentre Application had a dependency on the SharedResources assembly. In Figure 48-9 this assembly has been removed from the Application Folder and placed instead in the Global Assembly Cache Folder. When this application is installed, the main executable will be installed in the relevant directory under Program Files, but the SharedResources assembly will be installed in the Global Assembly Cache so it is available to any .NET application. To achieve this, you first need to create the new folder in the File System view by selecting the Global Assembly Cache Folder from the Add Special Folder item on the right-click context menu. You can install files to a number of other special folders as part of the installer. The next step is to move the SharedResources assembly to the Global Assembly Cache by selecting the assembly in the right pane of the File System view and changing the Folder property from Application Folder to Global Assembly Cache Folder. Alternatively, you can drag the item from the Application Folder to the Global Assembly Cache Folder.

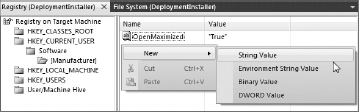
In addition to installing files on the target machine, you can also add keys to the registry. Some developers argue for and other developers argue against the use of the registry. Although it can provide a convenient store for per-user configuration information, the application settings with user scope are an alternative that makes them easier to manage. The Registry view, as shown in Figure 48-10, can be used to add registry keys and values. To add a new key, right-click the appropriate node in the Registry tree and select Add Key from the context menu. To add a new value, select the appropriate key in the Registry tree and select the type of value from the New item on the right-click context menu off the right pane shown in Figure 48-10. The Name and Value can then be set using the Properties window.
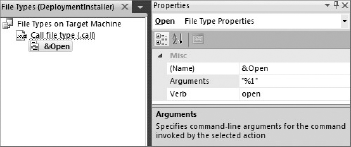
Figure 48-11 shows the File Types view of the deployment project. This view is used to add file extensions that should be installed. For example, in this case you are installing the extension .call. You can specify an icon for this type of file, as well as specify the executable that should be called for this file type. In most cases this will be the primary output for your application. To add a new file type, right-click the root node of the File Types tree and select Add File Types from the context menu. This creates a node for the new file type and for the default action (in bold) for that file type. For the .call extension, the default action is Open, and it can be executed by double-clicking a file of the appropriate file type. The Open action also appears, again in bold, in the right-click context menu for a file with the .call extension. You can add other actions for this file type by selecting Add Action from the right-click context menu for the file type. An alternative action can be made the default by selecting Set as Default from that action's context menu. You can change the order in which the actions appear in the context menu by moving the action up or down in the tree.
.NET applications can be autonomous so that their list of dependencies may only contain the .NET Framework. However, web applications require IIS, and more complex applications may require SQL Server to be installed. You can check for these dependencies by using a launch condition via the view shown in Figure 48-12. By default, the .NET Framework is added to this launch condition. Previously you saw that Setup.exe also did a check for the .NET Framework and would install it if it was not found. Launch conditions are embedded in the .msi file and, unlike conditions in the Setup.exe file, are validated even if the .msi file is installed directly. The only limitation is that the launch conditions only provide a warning message and a URL reference for more information. In the case of the .NET framework launch condition, this message and URL are already provided for you.

Note
When the Setup.exe file checks for the .NET Framework it is limited to searching for or installing a specific version. The .NET Framework launch condition can be configured to detect a specific version as well, but if your application is able to target multiple versions, you can instead set the Version property of the launch condition to Any. This allows your application to be deployed as long as there is any version of the .NET Framework installed.
The tree in the left pane of Figure 48-12 is actually split into two sections. The top half of the tree is used to specify searches to be performed on the target machine. Searches can be carried out for files, for installed components or applications, and for registry values. Properties for a file search include the search folder, version and modification dates, and file size. To search for an installed component, you need to know the Component ID, which is embedded in the .msi file used to install the product. This information can be retrieved using a product such as Orca, which is included in the Windows SDK Components for Windows Installer Developers that you can download from the Microsoft web site (www.microsoft.com/downloads/). A registry search requires properties indicating the key, name, and value to search for. In each of these cases, the search needs to be assigned a Property identifier. If the search is successful, the installer property with that identifier is True.
The Property identifiers assigned to searches on the target machine can be used by a launch condition in the lower half of the tree. As you can see in Figure 48-12, there are conditions that check for the .NET Framework, as well as a custom launch condition. The Condition property is set to a logical AND operation across the three search results. If any of the searches fail, the associated property identifier is replaced with False, making the whole logical expression false. This will prevent the application from installing, and a warning message will be displayed.
Note that some other views have a Condition property for some of the tree nodes. For example, in the File System view, each file or output has a Condition property that can be specified. If this condition fails, the file is not installed on the target machine. In each of these cases the syntax of the Condition property must be valid for the MsiEvaluateCondition function that is called as part of the installation process. This function accepts standard comparison operators, such as equals (=), not equals (<>), less than (<), and greater than (>), as well as Boolean operators NOT, AND, OR, and XOR. There are also some predefined Windows installer properties that can be included in the condition property. The following is a subset of the full list, which you can find in the documentation for the Windows Installer SDK:
ComputerName: Target computer nameVersionNT: Version of Windows on the target computerVersionNT64: The same value asVersionNTbut this property is only set for 64-bit operating systemsServicePackLevel: The service pack that has been installedLogonUser: The username of the current userAdminUser: Whether the current user has administrative privilegesCOMPANYNAME: The company name, as specified in the installation wizardUSERNAME: The username, asspecifiedin the installation wizard
One of the main reasons for creating an installer is to make the process of deploying an application much smoother. To do this, you need to create a simple user interface into which an end user can specify values. This might be the installation directory or other parameters that are required to configure the application. Clearly, the fewer steps in the installer the easier the application will be to install. However, it can be better to prompt for information during the installation than for the user to later sit wondering why the application is not working. The User Interface view, shown in Figure 48-13, enables you to customize the screens that the user sees as part of the installation process.
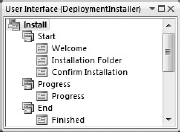
Two user interfaces are defined in this view: the standard installation and an Administrative install (not visible). Both processes follow the same structure: Start, where you typically collect information from the user before installing the product; Progress, used for providing a visual cue as to the installation's progress; and End, at which point the user is presented with a summary of the installation. The Administrative install is typically used when a network setup is required, and can be invoked by calling msiexec with the /a flag.
You can customize either of the installation processes by adding and/or removing dialogs from the user interface tree. To add a new dialog, right-click any of the three stages in the installation process and select Add Dialog from the context menu. This displays a list of the predefined dialogs from which you can choose. Each of the dialogs has a different layout; some are used for accepting user input and others are used to display information to the user. Input controls are allocated a property identifier so that the value entered during the installation process can be used later in the process. For example, a checkbox might be used to indicate whether the tools for a product should be installed. A condition could be placed on an output in the File System view so the tools are installed only if the checkbox is enabled.
It is often necessary to perform some actions either before or after the application is installed. To do this, you can create a custom action to be executed as part of the install or uninstall process. Adding a custom action entails creating the code to be executed and linking the appropriate installer event so that the code is executed. Custom actions use an event model similar to what Windows components use to link the code that you write to the appropriate installer event. To add a custom action to an installer event, you need to create a class that inherits from the Installer base class. This base class exposes a number of events for which you can write event handlers. Because writing custom installer actions is quite a common task, the Add New Item dialog includes an Installer Class template item under the General node. The new class (added to the SharedResources project) opens using the component designer, as shown in Figure 48-14.
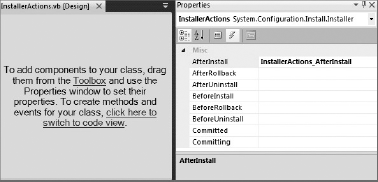
From the Events tab of the Properties window, select the installer event for which you want to add an event handler. If no event handler exists, a new event handler will be created and opened in the code window. The following code is automatically generated when an event handler is created. A simple message box is inserted to notify the user that the AfterInstall event handler has completed:
- C#
using System.ComponentModel; using System.Configuration.Install; using System.Windows.Forms; public partial class InstallerActions { public InstallerActions() { InitializeComponent() } private void InstallerActions_AfterInstall(object sender, InstallEventArgs e) {MessageBox.Show("Installation process completed!");} }
- VB
Imports System.ComponentModel Imports System.Configuration.Install Imports System.Windows.Forms Public Class InstallerActions Public Sub New() MyBase.New() InitializeComponent() End Sub Private Sub InstallerActions_AfterInstall(ByVal sender As Object, _ ByVal e As InstallEventArgs) _ Handles Me.AfterInstallMessageBox.Show("Installation process completed!")End Sub End Class
As with forms and other components, the rest of this class is stored in a designer class file where the partial InstallerActions class inherits from the Installer class and is attributed with the RunInstaller attribute. This combination ensures that this class is given the opportunity to handle events raised by the installer.
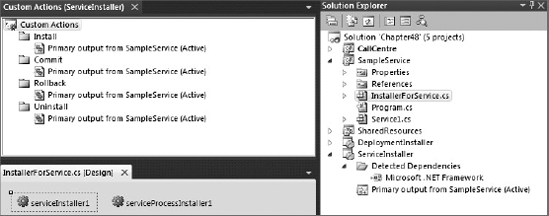
The InstallerActions class you have just created was added to the SharedResources assembly. For the events to be wired up to the InstallerActions class, the installer needs to know that there is a class that contains custom actions. To make this association, add the SharedResources assembly to the Custom Actions view for the deployment project by right-clicking any of the nodes shown in Figure 48-15 and selecting Add Custom Action from the context menu. In this case, you want to wire up the SharedResources. In Figure 48-15, this association has been made only for the Install action. If you want to wire up the Custom Action class for all of the actions, you need to add the custom action to the root Custom Actions node.
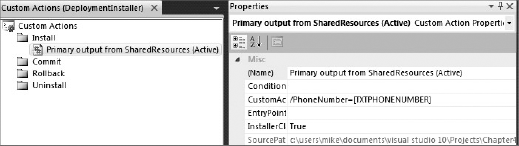
To complete this discussion, understand that it is important to be able to pass information collected from the user during the Start phase of the installation process to the custom action. Unfortunately, because the custom action is invoked after the installer has finished, you have to use a special channel to pass installer properties to the custom action event handler. In the Custom Actions view (refer to Figure 48-15), select Properties Window from the right-click context menu for the Primary output node. The CustomActionData property is used to define name/value pairs that will be sent through to the custom installer. For example, you might have /PhoneNumber= "+1 425 001 0001", in which case you can access this value in the event handler as follows:
- C#
private void CustomActions_AfterInstall(object sender, InstallEventArgs e)
{
  MessageBox.Show("Number: " + this.Context.Parameters["PhoneNumber"].ToString());
}
- VB
Private Sub CustomActions_AfterInstall(ByVal sender As Object, _
                                       ByVal e As InstallEventArgs) _
                                                            Handles Me.AfterInstall
    MessageBox.Show("Number: " & Me.Context.Parameters("PhoneNumber").ToString)
End Sub
Of course, hard-coded values are not a good idea and it would be better if this were a user-specified value. To use a property defined in the installer user interface, replace the specified string with the property identifier in square brackets. For example, /PhoneNumber=[TXTPHONENUMBER] would include the text in the TXTPHONENUMBER textbox.
You can create an installer for a Windows Service the same way you would create an installer for a Windows application. However, a Windows Service installer not only needs to install the files into the appropriate location, but it also needs to register the service so it appears in the services list. You can do this using the ServiceInstaller and ServiceProcessInstaller components from the System.ServiceProcess namespace (you'll probably need to add these to the Toolbox, because they are not visible by default). An instance of each of these components needs to be dragged onto the designer surface of a custom installer, as shown in Figure 48-16.
The ServiceInstaller class is used to specify the display name (the name of the service as it will appear in the Windows services list), the service name (the name of the service class that will be executed when the service is run), and the startup type (whether it is manually started or automatically started when Windows starts up). For each service you want to install, you need to create a separate instance of the ServiceInstaller class, specifying a different display and service name. Only a single instance of the ServiceProcessInstaller class is required, which is used to specify the account information that the service(s) will run as. In the following example, the InstallerForService constructor specifies that the class Service1 should be installed as a service, and that it should automatically start using the NetworkService account:
- C#
[RunInstaller(true)]
public partial class InstallerForService : System.Configuration.Install.Installer
{
  const string SERVICE_DISPLAY_NAME = "My Generic Service";
  const string START_AFTER_INSTALL = "STARTAFTERINSTALL";
  const string NET_PROCESS_NAME = "Net";
  const string NET_START = "Start "{0}"";
  const int NET_WAIT_TIMEOUT = 5000;
  const string NET_WAIT_ERROR = "WARNING: Process took longer than " +
    "expected to start, it may need to be restarted manually";


  public InstallerForService()
{ InitializeComponent(); serviceInstaller1.DisplayName = SERVICE_DISPLAY_NAME; serviceInstaller1.ServiceName = typeof(Service1).ToString(); serviceInstaller1.StartType = ServiceStartMode.Automatic; serviceProcessInstaller1.Account = ServiceAccount.NetworkService; } private void InstallerForService_AfterInstall(object sender, InstallEventArgs e) { var startString = Context.Parameters[START_AFTER_INSTALL]; if (startString == "") return; var shouldStart = Boolean.Parse(startString); if (!shouldStart) return; var proc = Process.Start(CreateNetStartProcessInfo()); if (!proc.WaitForExit(NET_WAIT_TIMEOUT)) MessageBox.Show(NET_WAIT_ERROR); } private ProcessStartInfo CreateNetStartProcessInfo() { return new ProcessStartInfo(NET_PROCESS_NAME, String.Format(NET_START, SERVICE_DISPLAY_NAME)) { WindowStyle = ProcessWindowStyle.Hidden }; } }
- VB
Public Class InstallerForService

    Const SERVICE_DISPLAY_NAME = "My Generic Service"
    Const START_AFTER_INSTALL = "STARTAFTERINSTALL"
    Const NET_PROCESS_NAME = "Net"
    Const NET_START = "Start ""{0}"""
    Const NET_WAIT_TIMEOUT = 5000
    Const NET_WAIT_ERROR = "WARNING: Process took longer than " &
      "expected to start, it may need to be restarted manually"


    Public Sub New()
        MyBase.New()

        'This call is required by the Component Designer.
InitializeComponent() 'Add initialization code after the call to InitializeComponent ServiceInstaller1.DisplayName = SERVICE_DISPLAY_NAME ServiceInstaller1.ServiceName = GetType(Service1).ToString ServiceInstaller1.StartType = ServiceStartMode.Automatic ServiceProcessInstaller1.Account = ServiceAccount.NetworkService End Sub Private Sub InstallerForService_AfterInstall(ByVal sender As System.Object, ByVal e As System.Configuration.Install.InstallEventArgs) _ Handles MyBase.AfterInstall Dim startString = Context.Parameters(START_AFTER_INSTALL) If startString = "" Then Return Dim shouldStart = Boolean.Parse(startString) If Not shouldStart Then Return Dim proc = Process.Start(CreateNetStartProcessInfo()) If Not proc.WaitForExit(NET_WAIT_TIMEOUT) Then MessageBox.Show(NET_WAIT_ERROR) End If End Sub Private Function CreateNetStartProcessInfo() As ProcessStartInfo Dim startInfo = New ProcessStartInfo(NET_PROCESS_NAME, String.Format(NET_START, SERVICE_DISPLAY_NAME)) startInfo.WindowStyle = ProcessWindowStyle.Hidden Return startInfo End Function End Class
Also included in this listing is an event handler for the AfterInstall event that is used to start the service on completion of the installation process. By default, even when the startup is set to automatic, the service will not be started by the installer. However, when uninstalling the service, the installer does attempt to stop the service.
The user interface for this deployment project includes a Checkboxes (A) dialog using the User Interface view for the project. Refer to Figure 48-13 for a view of the default user interface. Right-click the Start node and select Add Dialog from the context menu. Highlight the dialog titled Checkboxes (A) from the Add Dialog window and click OK. This inserts the new dialog at the end of the installation process. The order of the dialogs can be adjusted using the Move Up/Down items from the right-click context menu on the nodes in the User Interface window.
Selecting Properties Window from the right-click context menu on the new dialog brings up the Properties window. Set the property identifier for Checkbox1 to STARTAFTERINSTALL and then set the Visible property for the remaining checkboxes to false. As discussed earlier in the chapter, you also needed to add /STARTAFTERINSTALL=[STARTAFTERINSTALL] to the CustomActionData property for the assembly in the Custom Actions view of the deployment project. With this user input you can decide whether to start the service when the installer completes.
Using a Windows installer is a sensible approach for any application development. However, deploying an installer to thousands of machines, and then potentially having to update them, is a daunting task. Although management products help reduce the burden associated with application deployment, web applications often replace rich Windows applications because they can be dynamically updated, affecting all users of the system. ClickOnce, introduced in version 2.0 of the .NET Framework, enables you to build self-updating Windows applications. This section shows you how to use Visual Studio 2010 to build applications that can be deployed and updated using ClickOnce.
To demonstrate the functionality of ClickOnce deployment, this section uses the same application used to build the Windows Installer, CallCentre, which simply displays an empty form. To deploy this application using ClickOnce, select the Publish option from the right-click context menu of the project. This opens the Publish Wizard, which guides you through the initial configuration of ClickOnce for your project.
The first step in the Publish Wizard allows you to select a location to deploy to. You can choose to deploy to a local web site, an FTP location, a file share, or even a local folder on your machine. Clicking Browse opens the Open Web Site dialog, which assists you in specifying the publishing location.
The next step asks you to specify where the users are expecting to install the application from. The default option is for users to install from a CD or DVD-ROM disc. More commonly, you will want to install from a file share on a corporate intranet or a web site on the Internet. Note that the location you publish to and the location the users install from can be different. This can very useful while testing new releases.
The contents of the final step will change depending on the installation option selected. If your application will be installed from a CD or DVD-ROM, this step asks if the application should automatically check for updates. If this option is enabled you must provide a location for the application to check. In the case that your users will be installing from a file share or web site, it is assumed that the application will update from the location that it was originally installed from. Instead, the final question relates to whether or not the application will be available offline. If the offline option is selected, an application shortcut is added to the Start menu and the application can be removed in the Add/Remove programs dialog in the operating system. The user will be able to run the application even if the original installation location is no longer available. If the application is only available online, no shortcut is created and the users have to visit the install location every time they want to run the application.
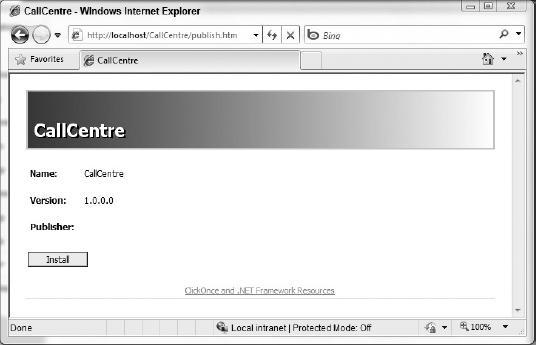
The last screen in the wizard allows you to verify the configuration before publishing the application. After the application has been published, you can run the Setup.exe bootstrap file that is produced to install the application. If you are installing from a web site, you will get a default.htm file generated as well. This file, shown in Figure 48-17, uses some JavaScript to detect a few dependencies and provides an Install button that launches the Setup.exe.
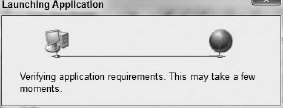
Clicking the Install button at this location displays a dialog prompting you to run or save Setup.exe. Selecting Run (or running Setup.exe from a different kind of install) shows the Launching Application dialog, shown in Figure 48-18, while components of your application are being retrieved from the installation location.
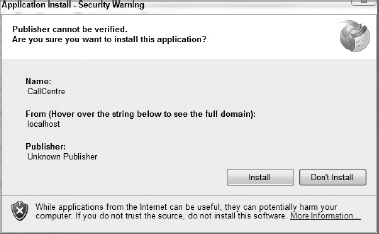
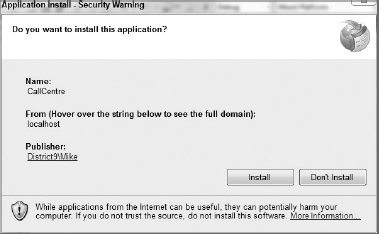
After information about the application has been downloaded, a security warning is launched, as shown in Figure 48-19. In this case, the security warning is raised because, although the deployment manifest has been signed, it has been signed with a certificate that is not known on the machine on which it is being installed.
Note
The deployment manifest of a ClickOnce application is an XML file that describes the application to be deployed along with a reference to the current version. Although it is not required, each deployment manifest can be signed by the publisher to provide the manifest with a strong name. This prevents the manifest from being tampered with after it is deployed.
Three options are available when it comes to signing the deployment manifest. By default, Visual Studio 2010 creates a test certificate to sign the manifest, which has the format application name_TemporaryKey.pfx and is automatically added to the solution (this happens when the application is first published using the Publish Now button). Though this certificate can be used during development, it is not recommended for deployment. The other alternatives are to purchase a third-party certificate, from a company such as VeriSign, or to use the certificate server within Windows Server to create an internal certificate.
The advantage of getting a certificate from a well-known certificate authority is that it can automatically be verified by any machine. Using either the test certificate or an internal certificate requires installation of that certificate in the appropriate certificate store. Figure 48-20 shows the Signing tab of the Project Properties window, where you can see that the ClickOnce manifest is being signed with a certificate that has been generated on the local computer. An existing certificate can be used by selecting it from the store or from a file. Alternatively, another test certificate can be created.

If you want your application to install with a known publisher, you need to add the test certificate into the root certificate store on the machine on which you're installing the product. Because this also happens to be the deployment machine, you can do this by clicking More Details. This opens a dialog that outlines the certificate details, including the fact that it can't be authenticated. (If you are using the certificate created by default by Visual Studio 2010, you will need to use the Select from File button to re-select the generated certificate, and then use the More Details button. There seems to be an issue here, in that the details window does not show the Install Certificate button without this additional step.) Clicking Install Certificate enables you to specify that the certificate should be installed into the Trusted Root Certification Authorities store. This is not the default certificate store, so you need to browse for it. Because this is a test certificate, you can ignore the warning that is given, but remember that you should not use this certificate in production. Now when you publish your application and try to install it, you will see that the dialog has changed, looking similar to the one shown in Figure 48-21.
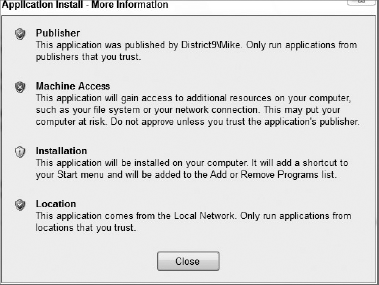
Although you have a known publisher, you are still being warned that additional security permissions need to be granted to this application in order for it to execute. Clicking the rather minimalist More Information hyperlink opens a more informative dialog, shown in Figure 48-22. As with the security coding within Windows Server 2008 and Windows 7, there are three icons: green for positive security, red for potential security weaknesses, and yellow for informative or best practice guidance.
ClickOnce deployment manifests are rated on four security dimensions. You've just seen how you can specify a well-known publisher, critical for safe installation of an application. By default, ClickOnce publishes applications as full trust applications, giving them maximum control over the local computer. This is unusual, because in most other cases Microsoft has adopted a security-first approach. To run with full trust, the application requires additional security permissions, which might be exploited. The Sample Application will be available online and offline; and though this isn't a major security risk, it does modify the local file system. Lastly, the location from which the application is being installed is almost as important as the publisher in determining how dangerous the application might be. In this case, the application was published within the local network so it is unlikely to be a security threat.
Because this application doesn't really do anything, you can decrease the trust level that the application requires. As shown in Figure 48-23, this application is made a partial trust application based on the Local Intranet zone. This changes the Machine Access icon to green, leaving only the Installation icon yellow. Unfortunately, the only way you can get this to be green would be to not install the application, which means that it would not be available offline.

Ideally, you would like to be able to bypass the Application Install dialog and have the application automatically be granted appropriate permissions. You can do this by adding the certificate to the Trusted Publishers store. Even for well-known certificate authorities, in order for the application to install automatically, the certificate needs to be added to this store. With this completed, you will only see the progress dialog as the application is downloaded, rather than the security prompt in Figure 48-21.
Once installed, the application can be launched either by returning to the installation URL (Figure 48-17) or by selecting the shortcut from the newly created Start Menu folder with the same name as the application.
At some point in the future you might make a change to your application — for example, you might add a button to the simple form you created previously. ClickOnce supports a powerful update process that enables you to publish the new version of your application in the same way you did previously, and existing versions can be upgraded the next time they are online. As long as you are content with the current set of options, the update process is just the Publish process. When using the Publish Wizard to update an existing application, all of the values previously used to publish the application are preconfigured for you.
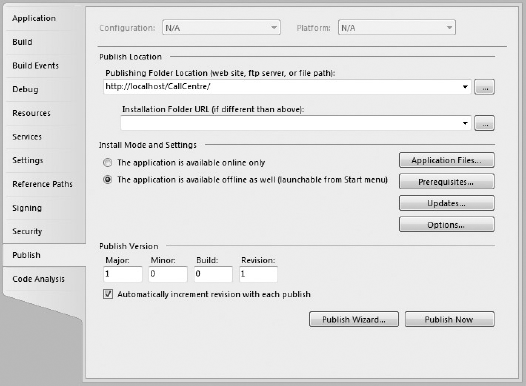
You can check the settings in the Publish tab of the Project Properties designer (Figure 48-24). The designer shows the publish location, the installation location, and the install mode of the application. There is also a setting for the Publish Version. This value is not shown in the Publish Wizard, but by default this version starts at 1.0.0.0 and increments the right-most number every time the application is published.
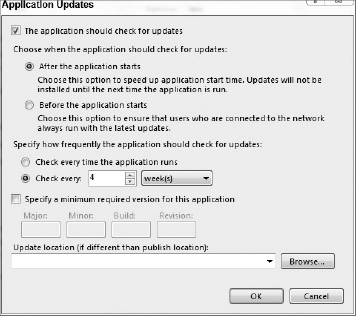
Along the right are a number of buttons that bring up more advanced options, most of which are not exposed by the wizard. The Application Updates dialog (Figure 48-25) allows you to configure how the application updates itself. In Figure 48-25, the application will update once a month after it has started. You can also specify a minimum required version, which will prevent older clients from executing until they are updated.
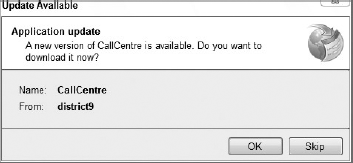
With this change, now when you publish a new version of your application, any existing users will be prompted to update their application to the most recent version, as shown in Figure 48-26.
One of the most powerful features of ClickOnce deployment is that it tracks a previous version of the application that was installed. This means that at any stage, not only can it do a clean uninstall, but it can also roll back to the earlier version. The application can be rolled back or uninstalled from the Programs and Features list from the Control Panel.
Note
Note that for users to receive an update they do need to be able to contact the original deployment URL when the application performs the check for a new version (in this case when the application starts). You can also force all users to upgrade to a particular version (that is, they won't get prompted) by specifying the minimum required version in the Application Updates dialog (Figure 49-25).
This chapter walked you through the details of building installers for various types of applications. Building a good-quality installer can make a significant difference in how professional your application appears. ClickOnce also offers an important alternative for those who want to deploy their application to a large audience, and with the changes introduced with version 3.5 of the .NET Framework, it can now be used for a much wider range of applications.