7
Blocks and Gutenberg
WordPress is known for being the best software for publishing to the web, and a major reason for that is its inclusion of an absolutely brilliant visual editor, known as TinyMCE. TinyMCE is without a doubt the world's most popular open source, web‐based, what‐you‐see‐is‐what‐you‐get (WYSIWYG) editor. It has been the paper on which millions of authors have inked their online publications since the earliest versions of WordPress, and many people have switched to WordPress over the years because of it.
WHAT IS GUTENBERG?
While WordPress and TinyMCE were gaining in popularity, several smaller, competing editors were developed and found much success, even surpassing TinyMCE's abilities. These other editors provided web tools to empower authors to simultaneously write great content and make it look like something that had been handcrafted by artisans. WordPress could not do that on its own. It required shortcodes, widgets, and themes—sometimes several of them together or combined—to accomplish what services like Squarespace and Wix were doing without any additional configuration or complexity.
So, the WordPress project decided it was time for a change to its tried and trusty publishing experience—a change that would blur the lines between web publishing and web design. WordPress decided to implement modern coding techniques and approaches that had otherwise been far outside the realm of what WordPress had been known for up until then.
Called Gutenberg and released in WordPress version 5.0, this new approach to online publishing would shy away from simply mimicking a word processor and instead become a “block‐based editor,” with each block having its own customizable set of attributes and allowing for much simpler manipulation of more complex types of media and components. Instead of needing to write custom code and relying on plugins to provide their own difficult‐to‐discover and bespoke shortcode tags, you can use Gutenberg blocks. These blocks are organized into categories and provide a consistent and familiar set of interface elements that users can use to quickly and easily create relatively sophisticated page layouts alongside their words.
This new editor is named after Johannes Gutenberg, the German inventor known for introducing movable type printing to Europe in the 1430s and kickstarting the beginning of the printing revolution. Johannes' multiple contributions to the printing and publishing process are credited for being the catalyst to the knowledge‐based economy we live in today, helping all humans around the world share their words more freely and easily than had ever been previously possible. Needless to say, the name is deeply rooted in the importance of publishing words.
When this new editing experience was finally shipped to the world, Gutenberg was not very well received. Unlike Johannes' movable type, not everyone immediately saw the benefits of such a drastic shift in publishing priorities and interfaces. In fact, a plugin that was released alongside WordPress 5.0 that brings back the Classic Editor continues to be one of the most popularly installed plugins. It even spawned a fork of WordPress called ClassicPress that garnered early support because it did not use Gutenberg. However, as Gutenberg has improved and as WordPress charges forward with it, developer momentum is increasing.
The team of talented folks currently creating Gutenberg estimate that it is about 10 percent complete. The next two major milestones to hit include merging with the Customizer and ultimately including full‐site customization. Much has already changed since Gutenberg was first released, and while folks have already had a difficult time keeping up with the pace of development, it is unlikely to slow down for the next few years.
It is largely understood in the WordPress community that this block‐based editing experience is the future of WordPress. Ready or not, if you are (or are aspiring to be) a WordPress professional, you need to know how to use it and how to extend it because you will eventually need to fully embrace and support it. As of WordPress 5.3, all of the built‐in widgets and shortcodes have block equivalents, so you could theoretically create a complete site using only blocks and nothing else. That really is the goal for future versions of WordPress, and we are currently seeing the beginning of that future take shape.
This chapter is focused on the block‐based editing experience known as Gutenberg. It attempts to explain in relatively simple terms several new concepts that even many seasoned WordPress professionals are likely to be unfamiliar with. It ends with you building your own dynamic block in what is currently the most professional way possible.
TOURING GUTENBERG
To best work with Gutenberg, you first need to understand what it looks like. In this section, we will draw your attention to specific areas of Gutenberg so that they are familiar to you later when you need to start interacting with them in your own custom code.
By now, you should have a comfortable development environment running where you can freely experiment. If for whatever reason you don't, you are in luck because the WordPress project hosts its own interactive Gutenberg demonstration at https://wordpress.org/gutenberg.
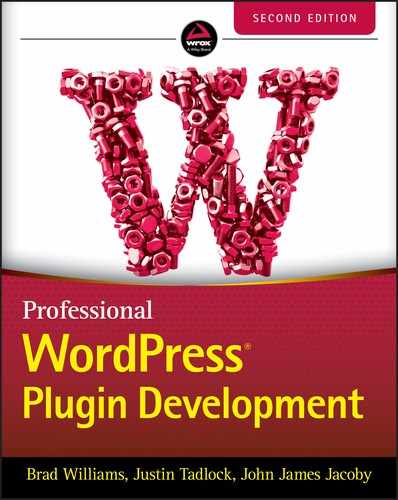
Before we get too far ahead, let's take a look at what the Classic Editor looks like (Figure 7‐1).
If you've ever used WordPress before, this interface should probably look pretty familiar. The prominent title, columns, meta boxes, strong borders, and a generous amount of padding around everything are clues we are looking at the Classic Editor.
Compare the Classic Editor interface to Figure 7‐2, which shows what the block‐based Gutenberg editor looks like.
At first glance, there are a lot of similarities, but as you start to look more closely, you will start to notice quite a few major differences. There is no formatting toolbar. The Add Media button is completely missing. All of the individual meta box sections are collapsed instead of open. Finally, there are a bunch of totally new icons and symbols to learn about.
Starting at the top left of the toolbar, hover over the + icon and click it, and you'll see the Block Library menu, as shown in Figure 7‐3.
Here is your first look into all of the blocks that come packaged with WordPress. Anytime you see a + icon (in the toolbar or in the content area), clicking it will reveal some version of this menu and expose the Block Library. By the end of this chapter, you'll have added your own block into the Block Library with your own custom functionality!
Collapsing the Most Used section will reveal all the various categories that all the different blocks are registered with. We aren't going to go through all of them together, but you can quickly see what they are in Figure 7‐4.
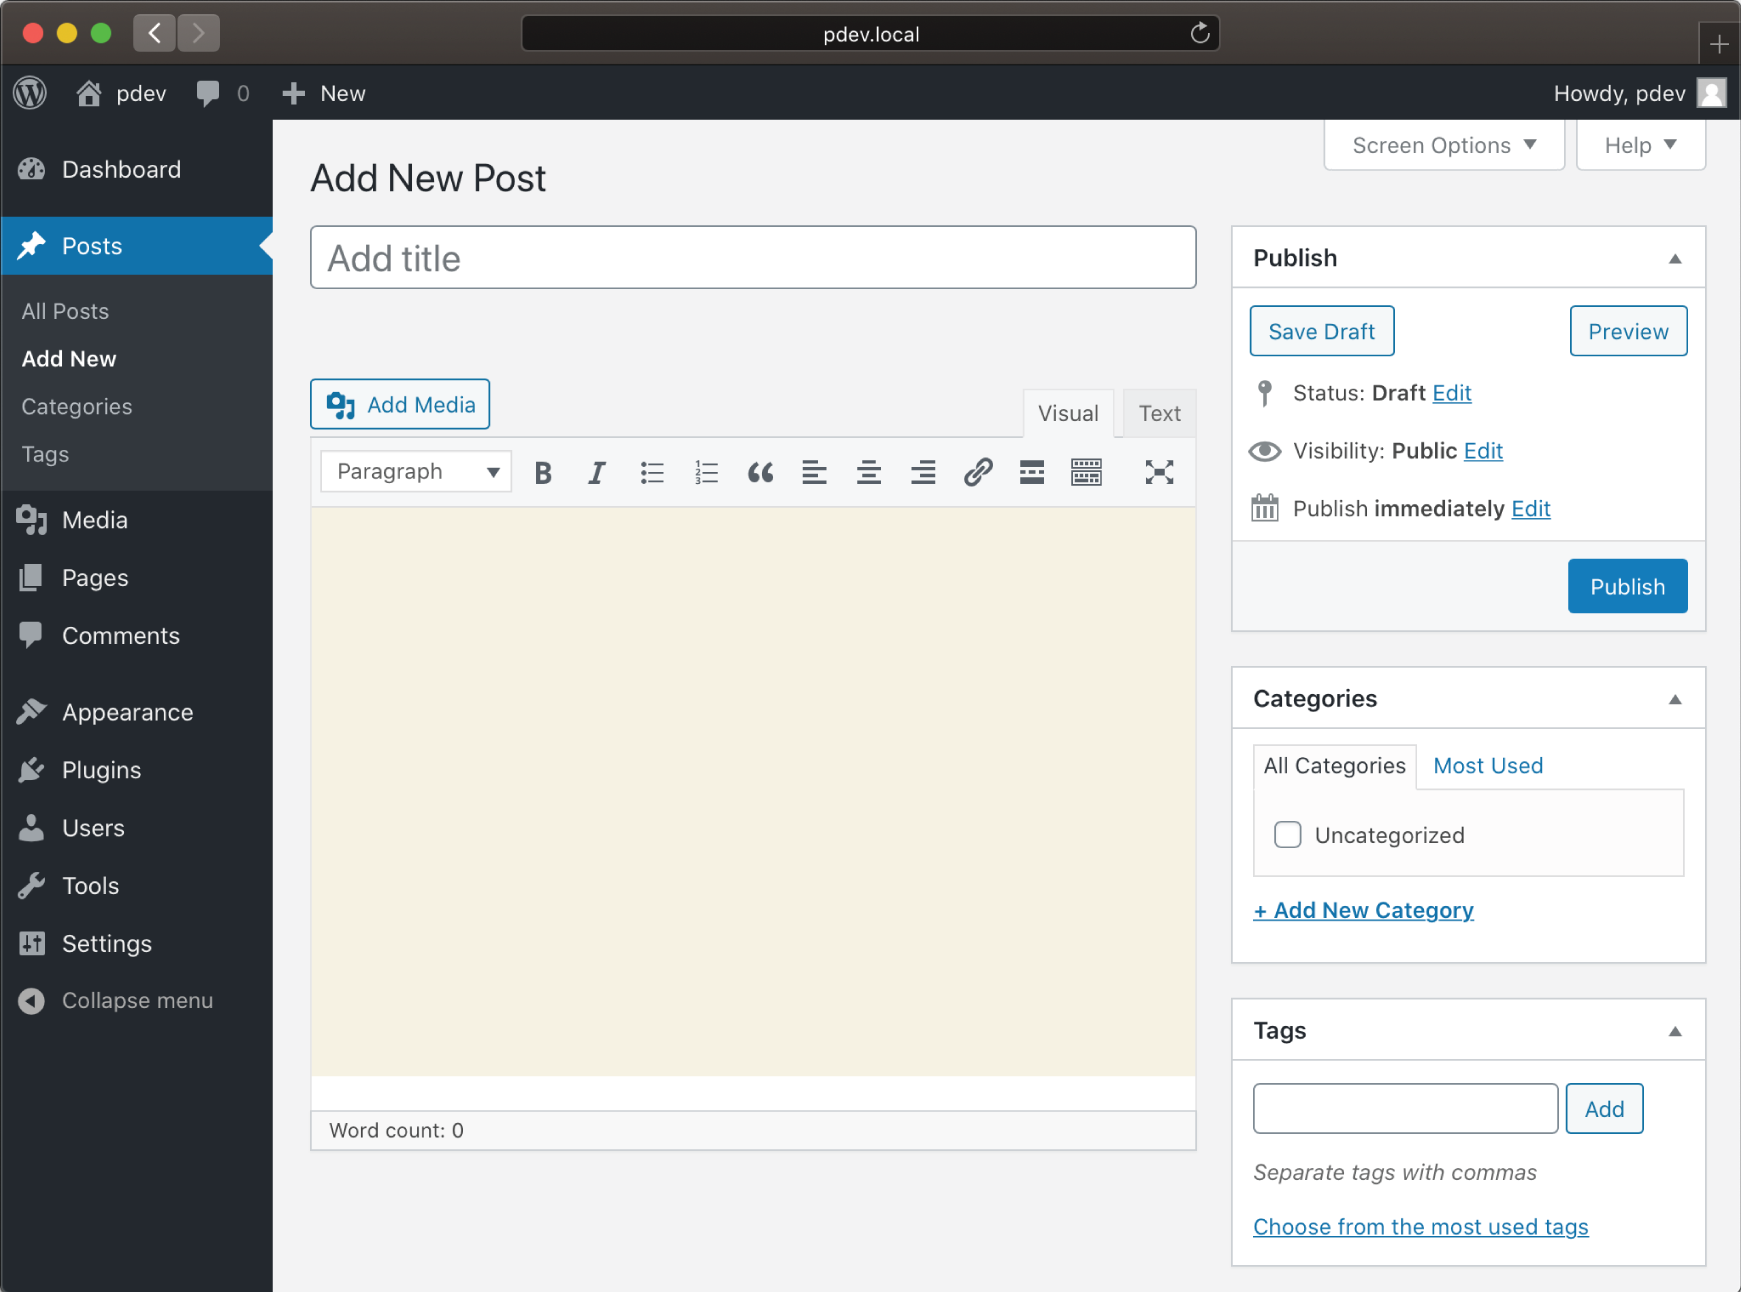
FIGURE 7‐1: Classic Editor, not covered in this chapter
Next to the + icon in the toolbar are Undo and Redo buttons, a Structure button that shows some quick statistics (such as word count and block count), and a Block Navigation button that reveals a neat hierarchy view of the entire document (this will make more sense once you've composed a complex post or page).
On the top‐right side, you'll notice the same Preview and Publish buttons you've always had, only here they're broken out from the sidebar or meta box and now are always available in the formatting toolbar. Pretty convenient!
The gear icon will show and hide the sidebar, which is a terribly generic name for what is ultimately a document and block inspector interface. In this sidebar is where you can find all of the various attributes for the entire post or for a single block if you happen to have focused on one at the time.
Next to the gear icon is a vertical ellipsis icon; clicking it will reveal some view options for the entire editing experience, as shown in Figure 7‐5.
Choosing view settings is ultimately a matter of user preference, and you should feel comfortable clicking through all of these and checking them out. These settings will not impact any of what we are going to be working on going forward.
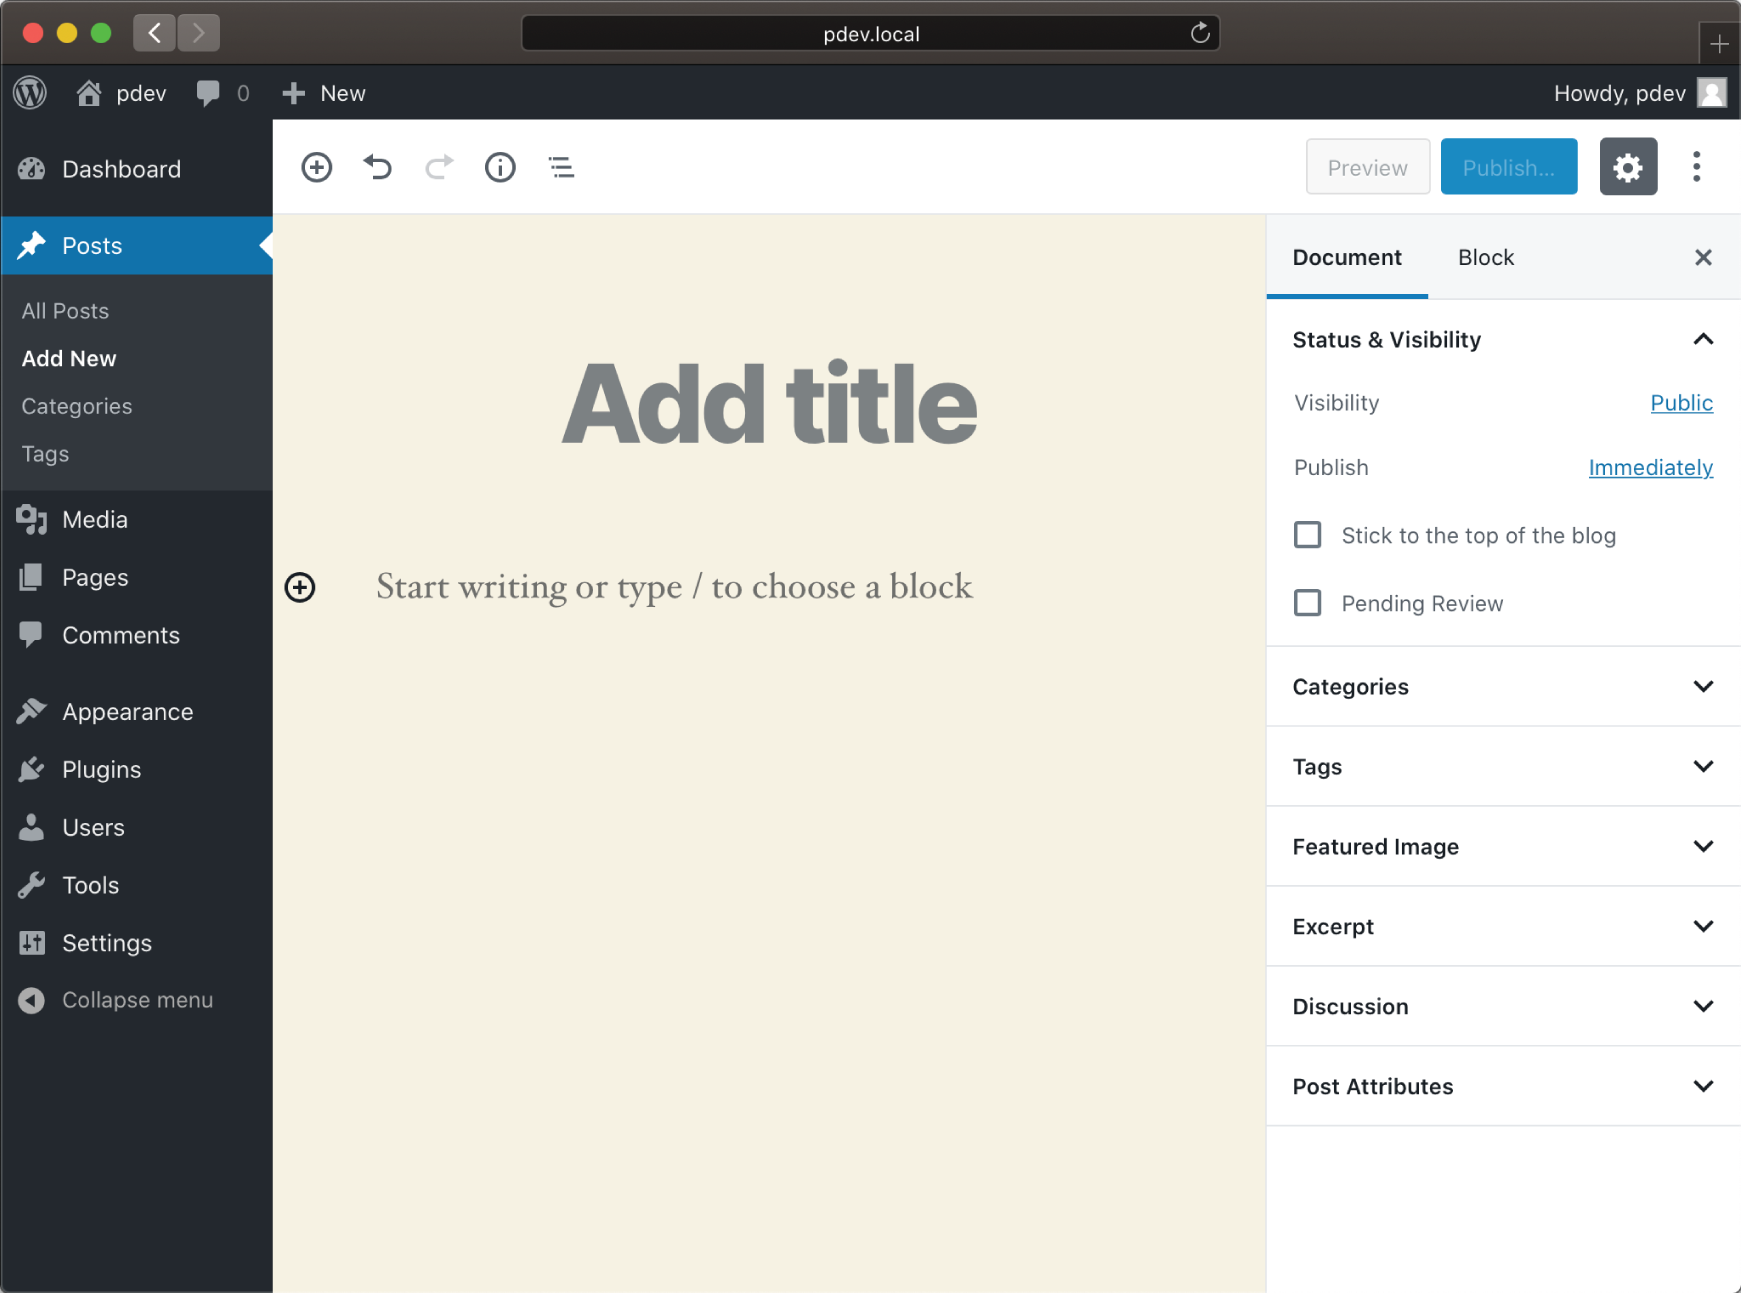
FIGURE 7‐2: Gutenberg
A lot of folks seem to like having a persistent formatting toolbar, as it reminds them of the Classic Editor. The reason we like it is because it eliminates a lot of visual noise when navigating around posts with many blocks, so we recommend giving it a try.
Figure 7‐6 shows what it's like to edit the “Hello world!” blog post. You can see in the sidebar that the Document menu is showing various subsections that expose certain document properties, many of which should look familiar from the Classic Editor.
Figure 7‐7 shows the sidebar's Block menu, and the first paragraph block is selected in the post content on the left, giving us our first look at the revamped formatting toolbar.
The formatting toolbar changes depending on what kind of block is selected and what properties it has available to it. Certain types of blocks can easily be converted into other types of blocks, while others can only be what they are. You can also use the formatting toolbar to apply formatting to specific words within the block content.
The sidebar's Block menu briefly describes the block type, and you will see all of the properties for that block that can be changed and applied, all while viewing the results visually and in real time in the content area.

FIGURE 7‐3: Block Library menu
As you have seen during this brief tour, a lot has changed, and a lot has stayed the same. Gutenberg is similar enough to look familiar but foreign enough to feel just a little bit intimidating—maybe even a little bit confusing at times—especially if you have 10 years' worth of muscle memory behind you with the Classic Editor!
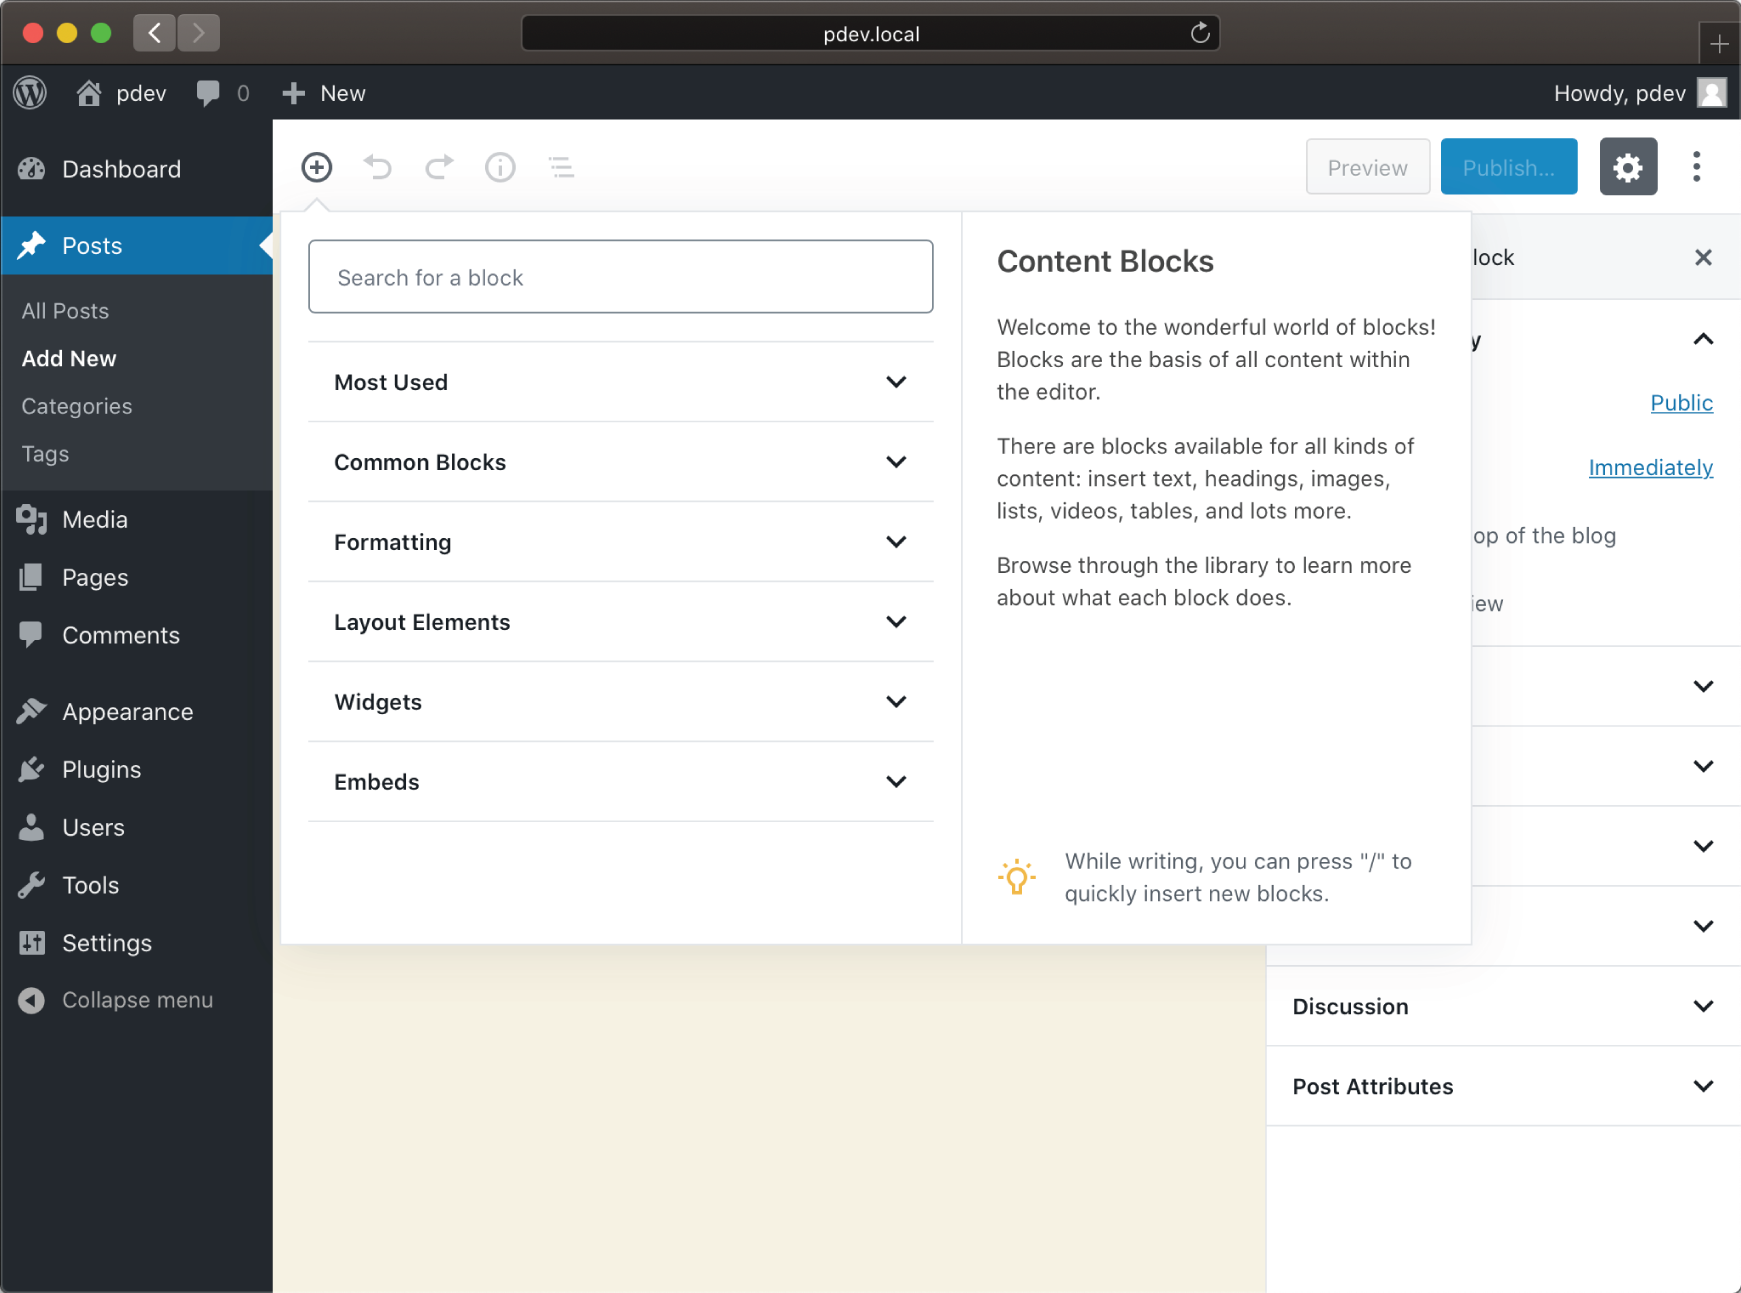
FIGURE 7‐4: Categories of blocks
PRACTICAL EXAMPLES
A few of the more popular WordPress plugins available in the WordPress.org Plugin Directory have taken the initiative to introduce their own custom blocks to support this new Gutenberg editor.
In this section, we will show you a few of those plugins so you can get some inspiration from what other professionals are already doing with it.
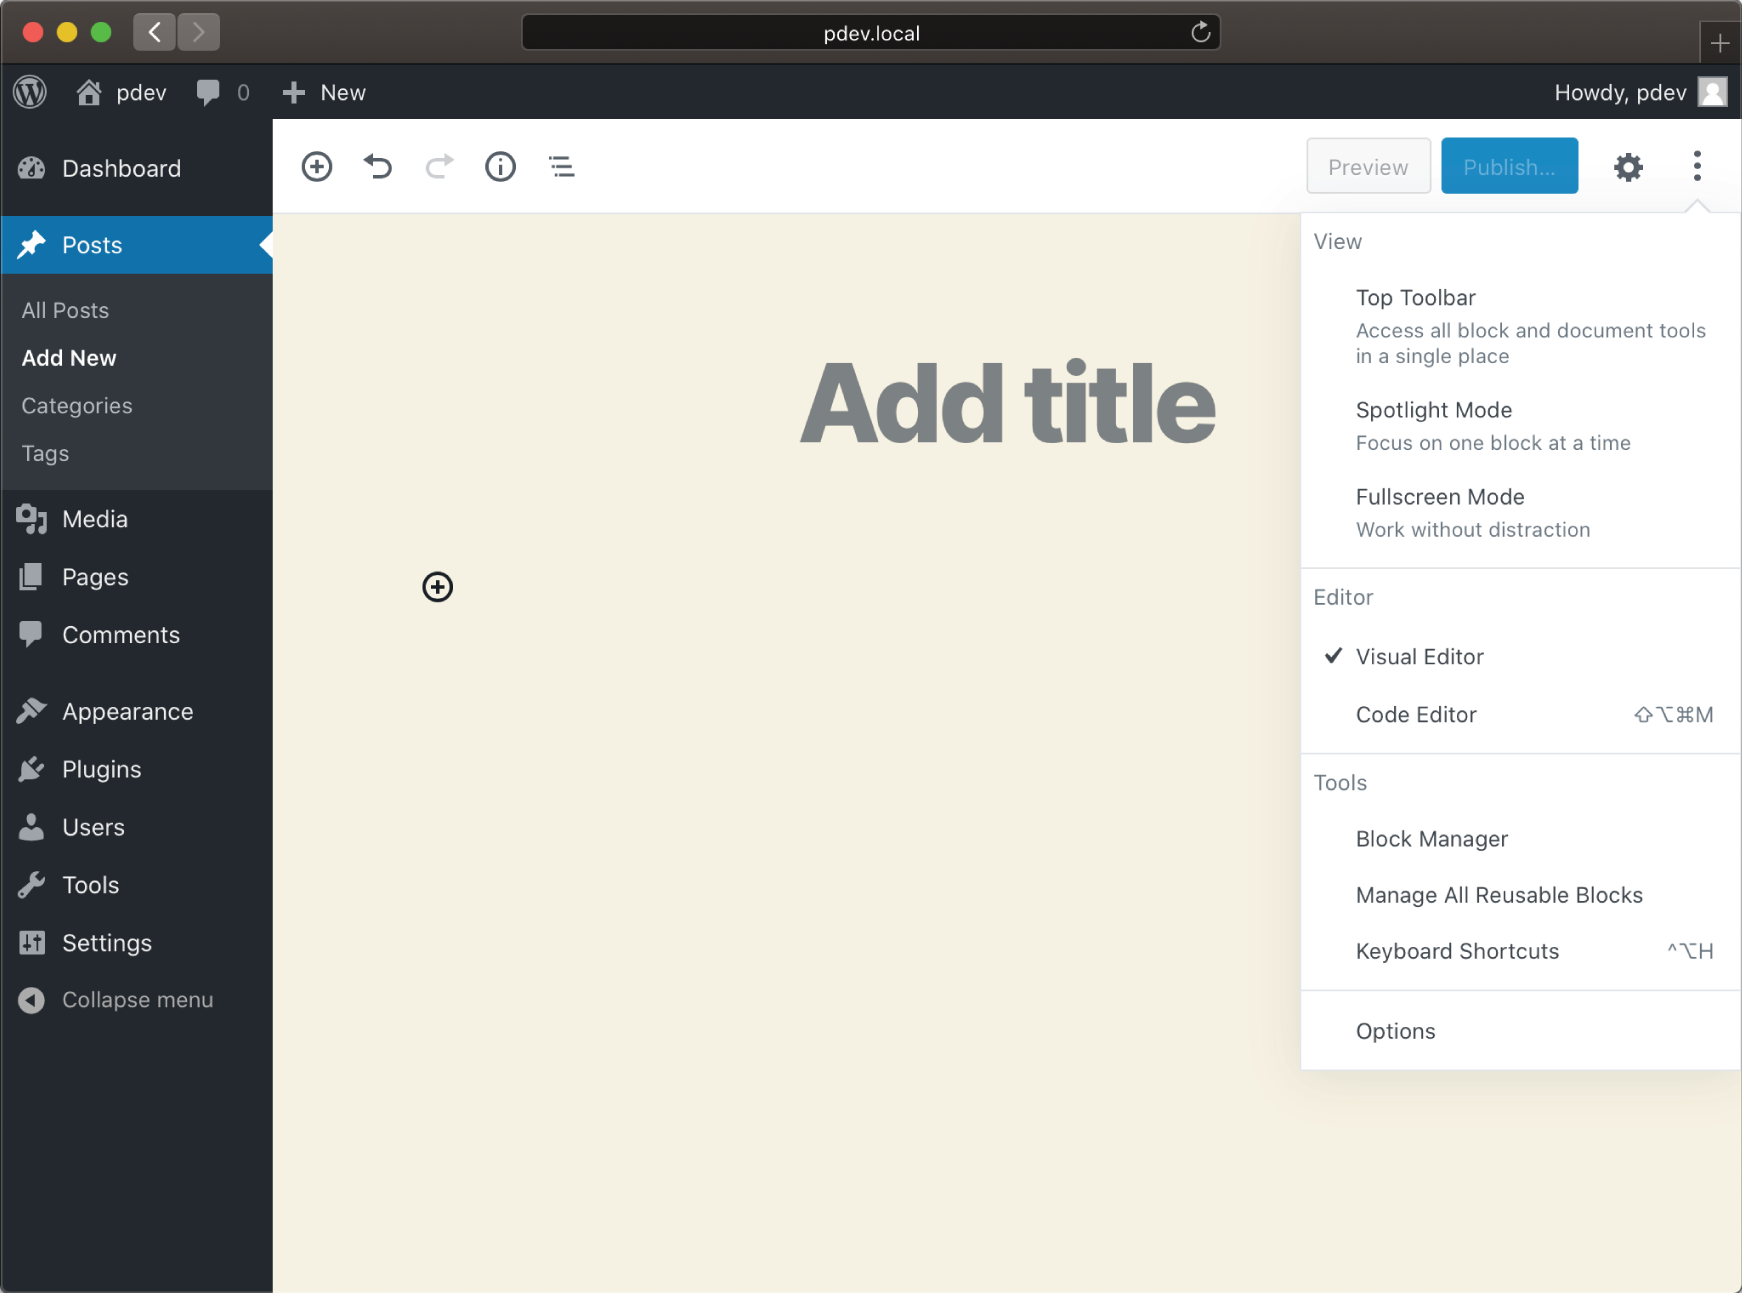
FIGURE 7‐5: View options
WooCommerce
With more than 5 million installations and a team of more than 100 people working on it, the folks at Automattic were able to crank out a bunch of really useful blocks for WooCommerce right away, as shown in Figure 7‐8.
WooCommerce comes with more than a dozen custom blocks for users to pick from to help them lay out their product pages. WooCommerce uses its signature purple for its iconography, which is available as an icon attribute when registering blocks.
Figure 7‐9 shows off the Newest Products block, and as you can see in the sidebar, it comes complete with quite a few editable block properties.

FIGURE 7‐6: Sidebar's Document menu
The Events Calendar
Modern Tribe took a completely different approach to supporting the block‐based editor with its plugin called Events Calendar. It is completely owning the “add new event” experience on its own admin area pages, as shown in Figure 7‐10.
These custom blocks are available only on Event Calendar's Add New page, and the content area comes preloaded with all of the blocks you need to set up an event; all you as a user need to do is fill in some fields and hit Publish to call it done. Pretty neat!
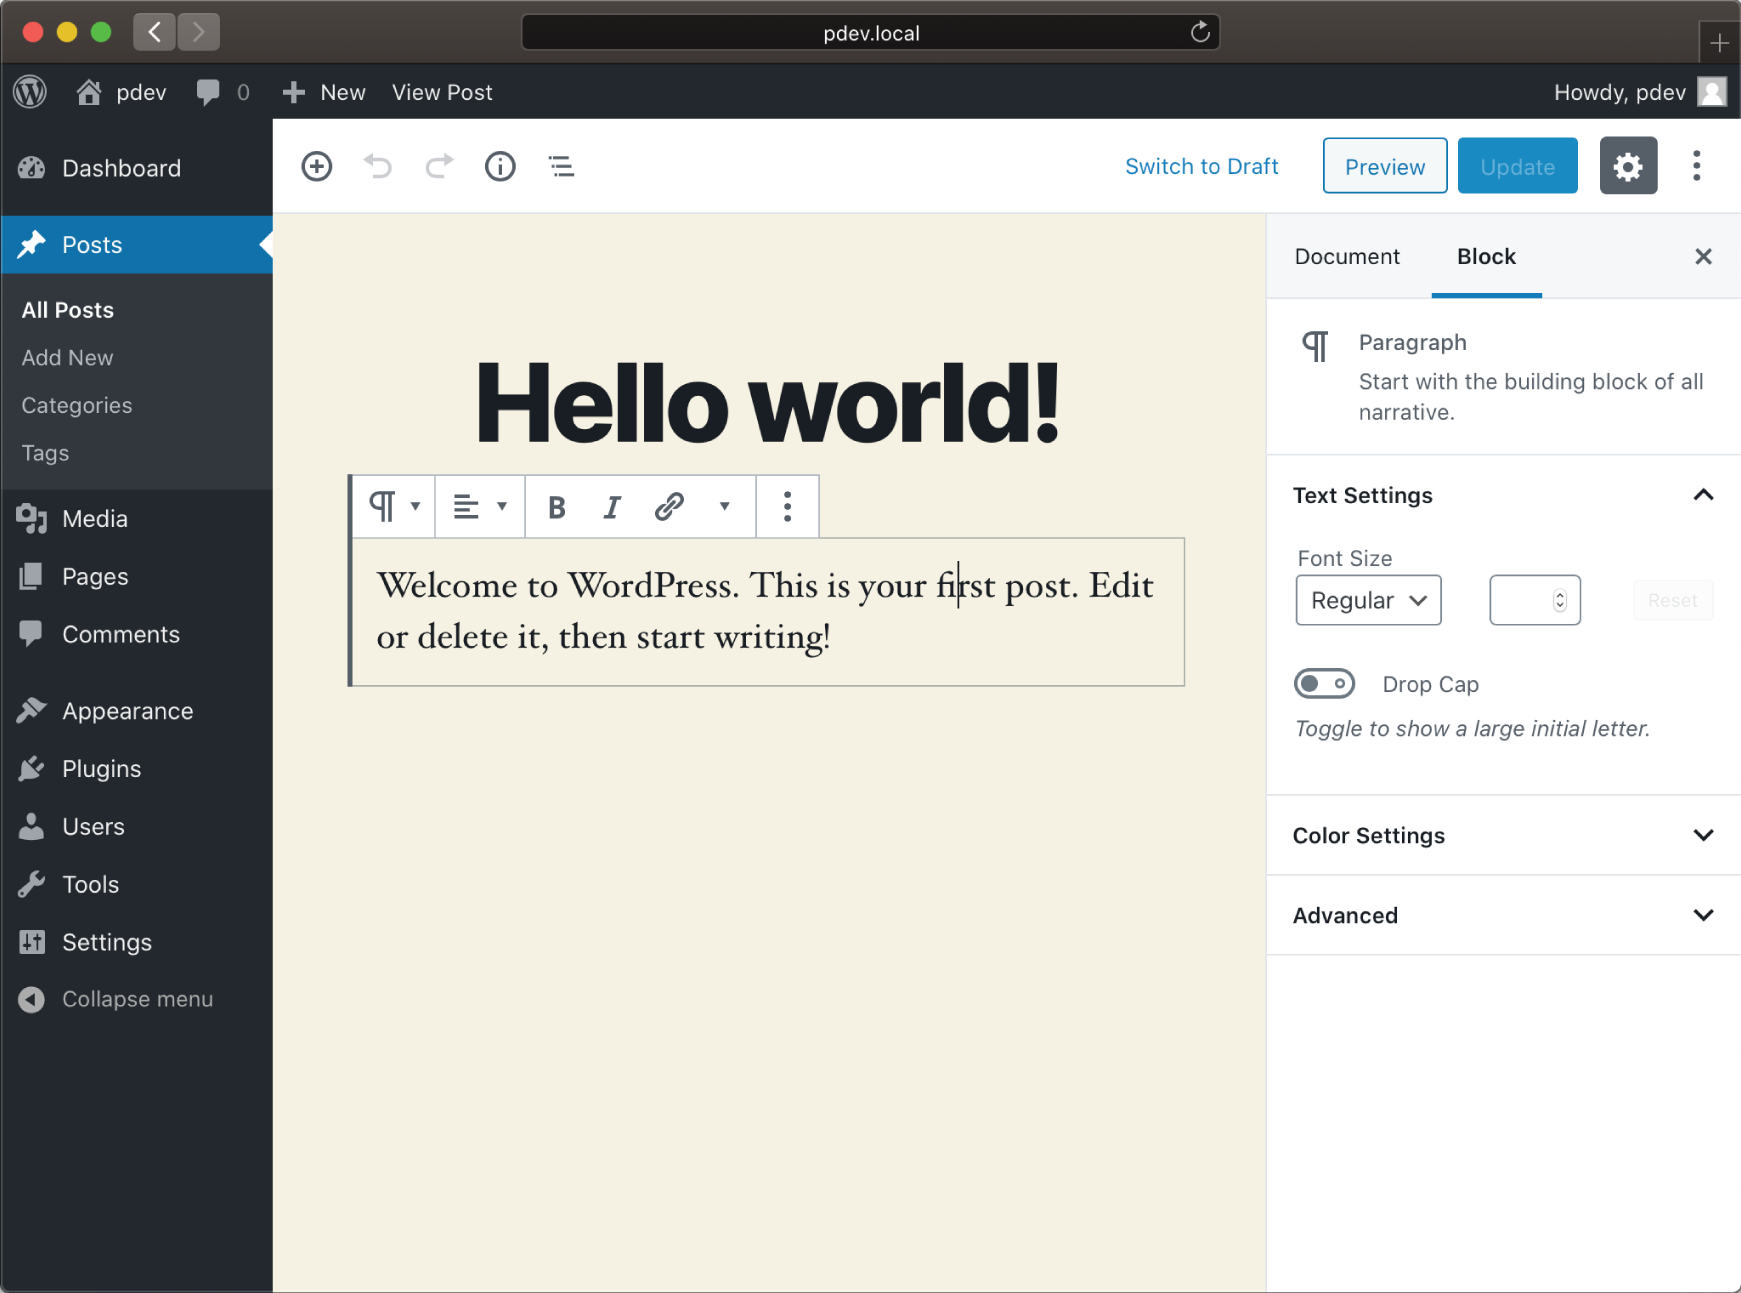
FIGURE 7‐7: Sidebar's Block menu and formatting toolbar
Event Calendar does not use custom icon colors like WooCommerce did. Instead, it uses a few of its own custom icons, which have been assigned and used in a number of different, creative ways.
Post Type Switcher
While the Post Type Switcher plugin does not include its own blocks, it does support the block‐based Gutenberg editor with a simple but familiar interface. See Figure 7‐11.
The Post Type Switcher plugin adds a new Status & Visibility setting to the sidebar's Document menu, allowing for user‐facing post types to be switched to other user‐facing post types that the current user has adequate capabilities to switch to.
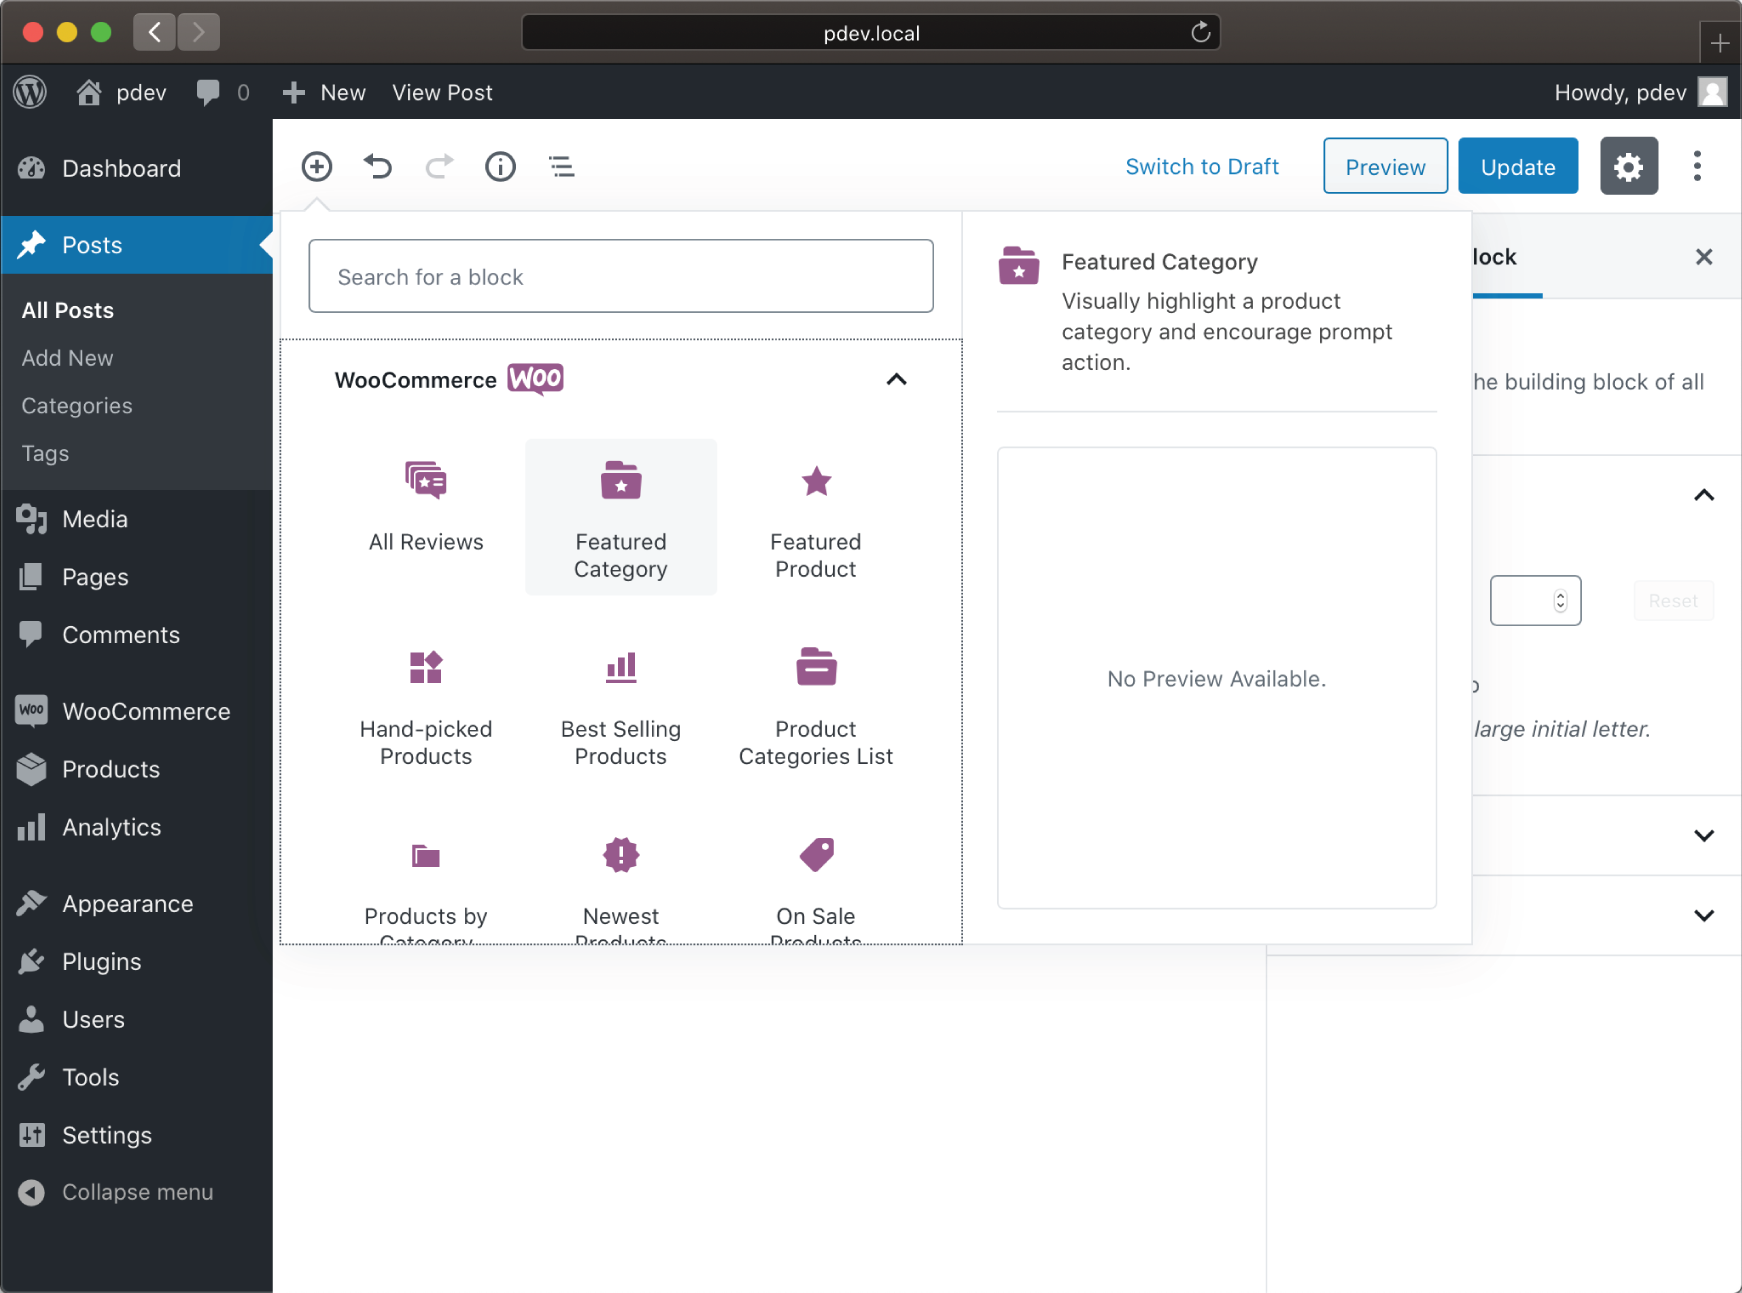
FIGURE 7‐8: WooCommerce blocks
By building in support for Gutenberg, this plugin helps maintain user confidence that it is being maintained and kept up‐to‐date with the latest versions of WordPress.
As a professional plugin developer, keeping your plugins up‐to‐date with the latest version of WordPress is important. We've talked about it in previous chapters, but it is especially true for major new features like Gutenberg.
TECHNOLOGY STACK OF GUTENBERG
Gutenberg's block‐based editing experience is built using nearly 100 percent JavaScript. From start to finish, the only PHP in it is the bare minimum that is necessary to bridge its functionality with WordPress. The rest of the (relatively huge and not getting smaller) codebase is a self‐contained and fully compiled JavaScript web application, which just happens to also run inside WordPress pretty darn well.

FIGURE 7‐9: Newest Products block
The world of modern JavaScript is going to be completely unrecognizable to your average WordPress and PHP developer. In the following sections, we will briefly describe all of the various tools that are necessary for a professional plugin developer to get started making your own custom block.
In addition, it's important to remember that WordPress.org has a living handbook that will always have up‐to‐date instructions on how to make custom blocks:
https://developer.wordpress.org/block-editor
JavaScript
Alongside HTML and CSS, JavaScript is one of the core technologies of the web, and it allows websites to be interactive rather than static. You've created .js files before and have used some jQuery in Chapter 6, so you've definitely written some JavaScript, but probably nothing like what you are about to write.
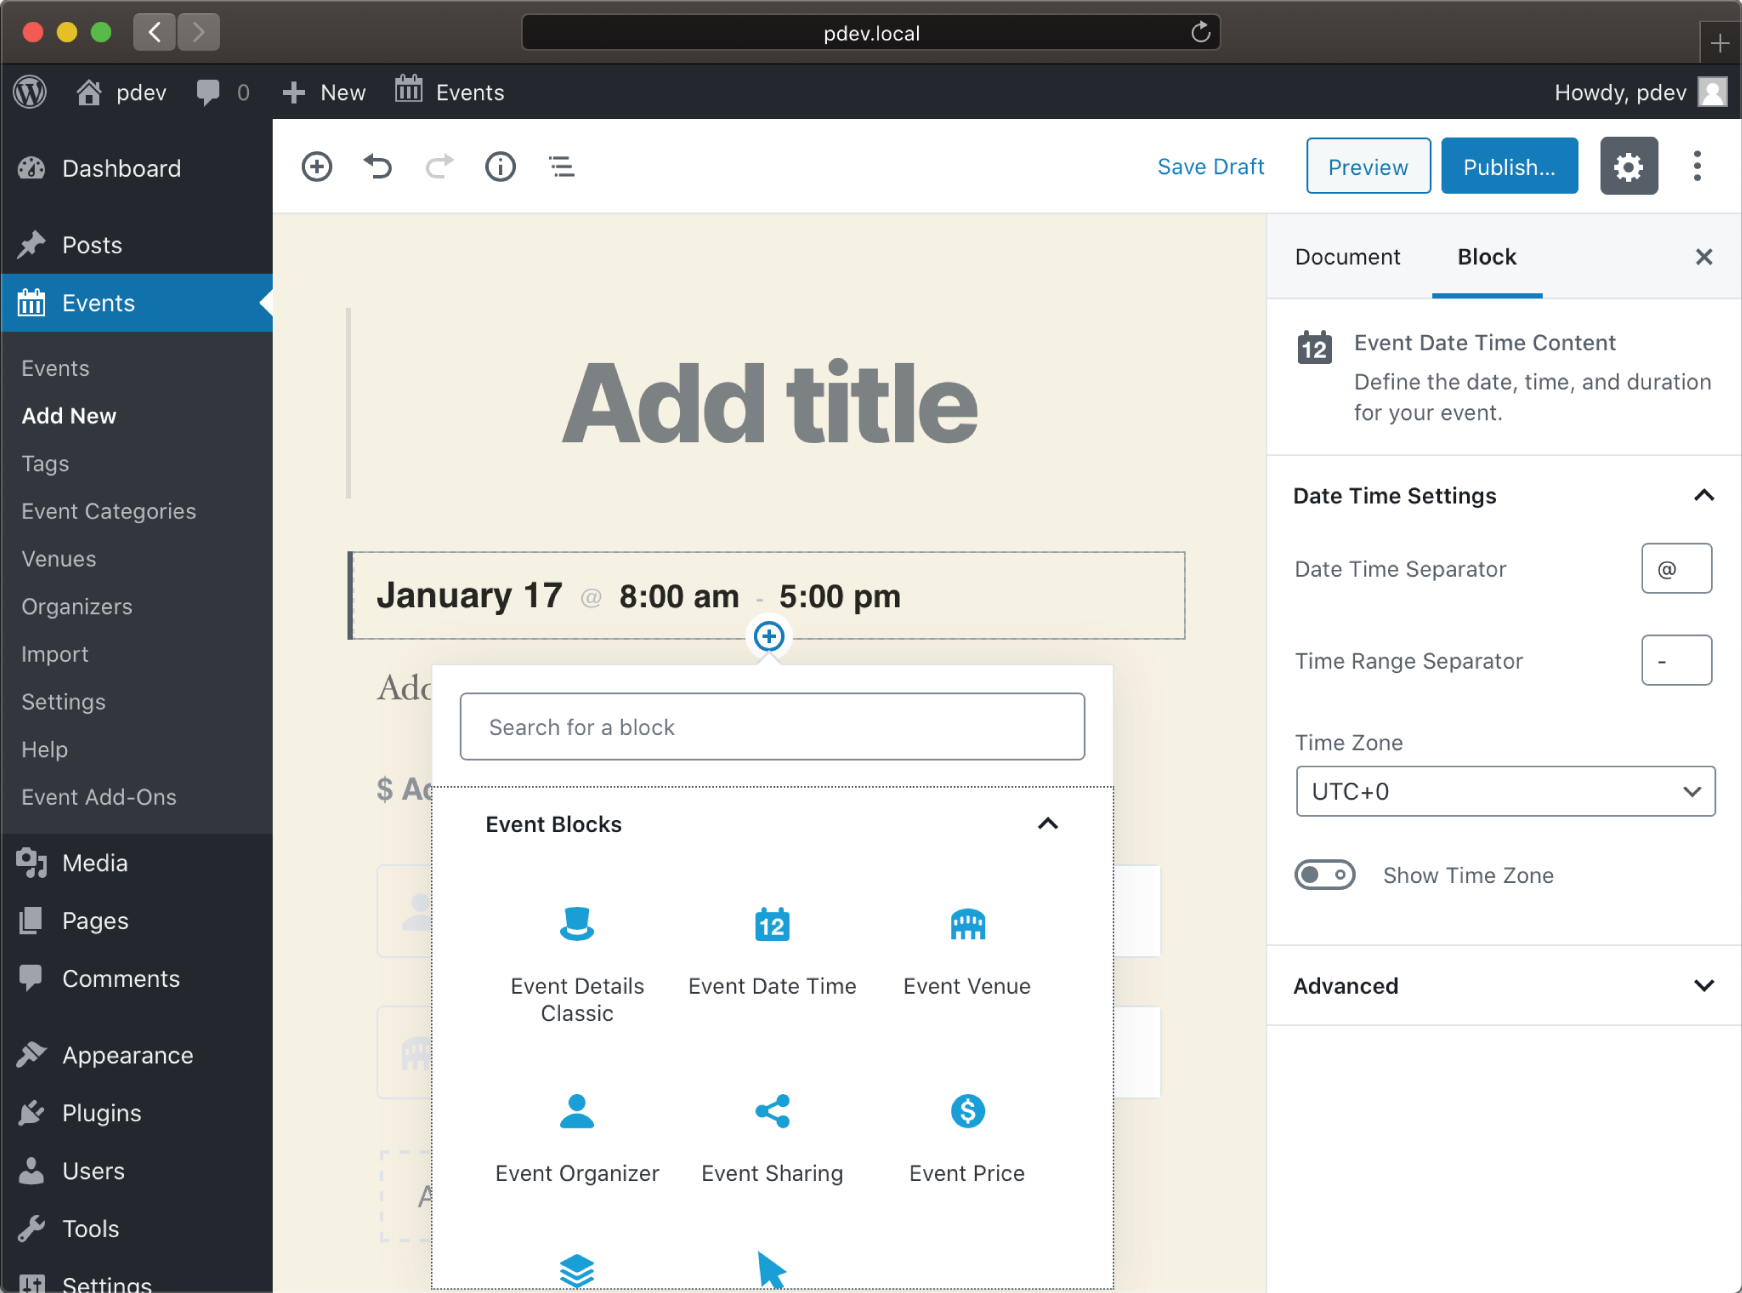
FIGURE 7‐10: Event Calendar blocks
Vanilla JavaScript is commonly used to refer to plain JavaScript, or JavaScript that does not rely on any framework (such as jQuery) to run. It is important that you at least be familiar with many of the basic syntactical requirements of vanilla JavaScript (being able to use basic variables, arrays, objects, and so on).
There are dozens of great books available that focus entirely on JavaScript, as well as good online resources. You can learn more about the organizations behind JavaScript and ECMAScript at http://www.ecma-international.org.
PHP
Many of the original WordPress core blocks have PHP variants that can be found in the wp‐includes/blocks directory, though they do have JavaScript that accompanies this PHP. There are several helper functions in wp‐includes/blocks.php, screen methods such as is_block_editor(), and admin area pages written in PHP that exist solely to support the block‐based Gutenberg editor.

FIGURE 7‐11: Post Type Switcher plugin
Depending on the needs of your plugin or application, you may still want to use some hybrid Ajax approach with PHP callbacks to handle any of the server‐side validation that might be necessary.
You can learn more about the PHP language, project, and community at https://www.php.net.
Node.js
Node.js is a runtime environment, similar to Nginx or Apache, and allows for the creation of web servers and networking tools using JavaScript. Unlike PHP, Node.js requests are nonblocking and can run concurrently or in parallel.
Node.js has a huge selection of modules, including a package manager (npm), to help make managing packages easy. It has governance and many large corporate sponsors. Much of the JavaScript we will write will require Node.js in some fashion.
Read all about Node.js at https://nodejs.org.
webpack
webpack is a JavaScript module bundler, taking modules with dependencies and generating static assets representing those modules. It is not JavaScript‐specific but will be used for JavaScript and our purposes here.
It also allows for “code splitting” to improve the performance of a bundle of modules and assets.
We'll be using webpack to compile all of our JavaScript into a single file, just like Gutenberg does.
Learn more about webpack at https://webpack.js.org.
Babel
Babel is a JavaScript compiler that allows developers to write the most modern syntax version of JavaScript and that converts that code into something that is backward compatible for older browsers and environments.
It includes polyfills for missing JavaScript features and source code transformations to mutate code during the build process and is completely pluggable and debuggable with source maps and more.
We'll be using Babel to write ES6 and JSX (both covered in the following sections) and trust that it will get converted into vanilla JavaScript that all modern browsers can interpret.
React
React is a JavaScript library invented and sponsored by Facebook and is used for building user interfaces that inherently understand how to “react” when source data changes.
It allows us to build encapsulated components that are in complete control of their own states, keeping their logic in JavaScript and keeping their states out of the DOM.
We'll be writing all of our front‐end, user‐facing interfaces as React components.
JSX
JSX is a syntax extension to JavaScript that is particularly useful with React, as it can be used to quickly produce React “elements.”
Do not make the same mistake we did and confuse this JSX with another JavaScript project named JSX that does something entirely different.
We'll be touching on JSX in React only briefly, so we encourage you to explore it in greater detail on your own at https://reactjs.org/docs/introducing-jsx.html.
ES6
ES6, also known as ECMAScript 2015, is the most widely adopted and recommended flavor of ECMAScript in use today and across this entire technology stack. We'll be writing this style of JavaScript when building our React components.
Just like JavaScript, ECMAScript is primarily used for client‐side scripting in the web browser and is also gaining popularity for server‐side applications and services because of Node.js.
We recommend visiting this website for more information on ES6: http://es6-features.org.
“HELLO WORLD!” BLOCK
This should probably go without saying by now, but even getting something as simple as your typical “Hello world!” type of block working is going to require at least a little bit of finesse. This is because we have a few different systems we need to talk to, spanning a few different dependency trees, including a basic user interface.
To get things moving quickly, we're going to write a small but effective plugin to help you make your first custom block.
Create the directory wp‐content/plugins/pdev.
PHP
We are going to need a way to activate our plugin and enqueue our JavaScript. Type the contents of Listing 7‐1 in a file named pdev.php.
JavaScript
We are also going to need register our custom block type so it shows up in the Block Library. Type the contents of Listing 7‐2 in a file named pdev.src.js.
webpack
It's way easier to rely on webpack to handle the dependencies that our plugin must have on wp‐blocks and wp‐element, so we are going to create a simple configuration file to help us.
We need webpack to know where our source file is, where the build file should be, and what modules and presets we are going to use. In our case, we simply need env and react.
Type the contents of Listing 7‐3 in a file named webpack.config.js.
Command Line
Using your favorite command‐line interface, navigate to the directory we just created, and type the following:
npm initYou will be prompted to enter a bunch of information, but you can leave everything empty since this is just a simple example.
Next we need to introduce our own “build” command so that npm knows exactly what it is expected to do. We'll do that by editing the package.json file that the previous command created for use and adding it so that the scripts portion looks like this:
"scripts": {"test": "echo "Error: no test specified" && exit 1","build": "webpack"},
Next we need to install a few specific Node.js modules using npm (Babel, webpack, and React):
npm install --save-dev webpack webpack-cli babel-loader @babel/preset-react @babel/core @babel/preset-env
Lastly, type the following:
npm run buildYour terminal should match what is in Figure 7‐12, indicating that webpack finished successfully.

FIGURE 7‐12: webpack finishing successfully
Activation
Now go activate this plugin and edit (or add) a post. You should now see our “Hello world!” block in the Block Library, as shown in Figure 7‐13.
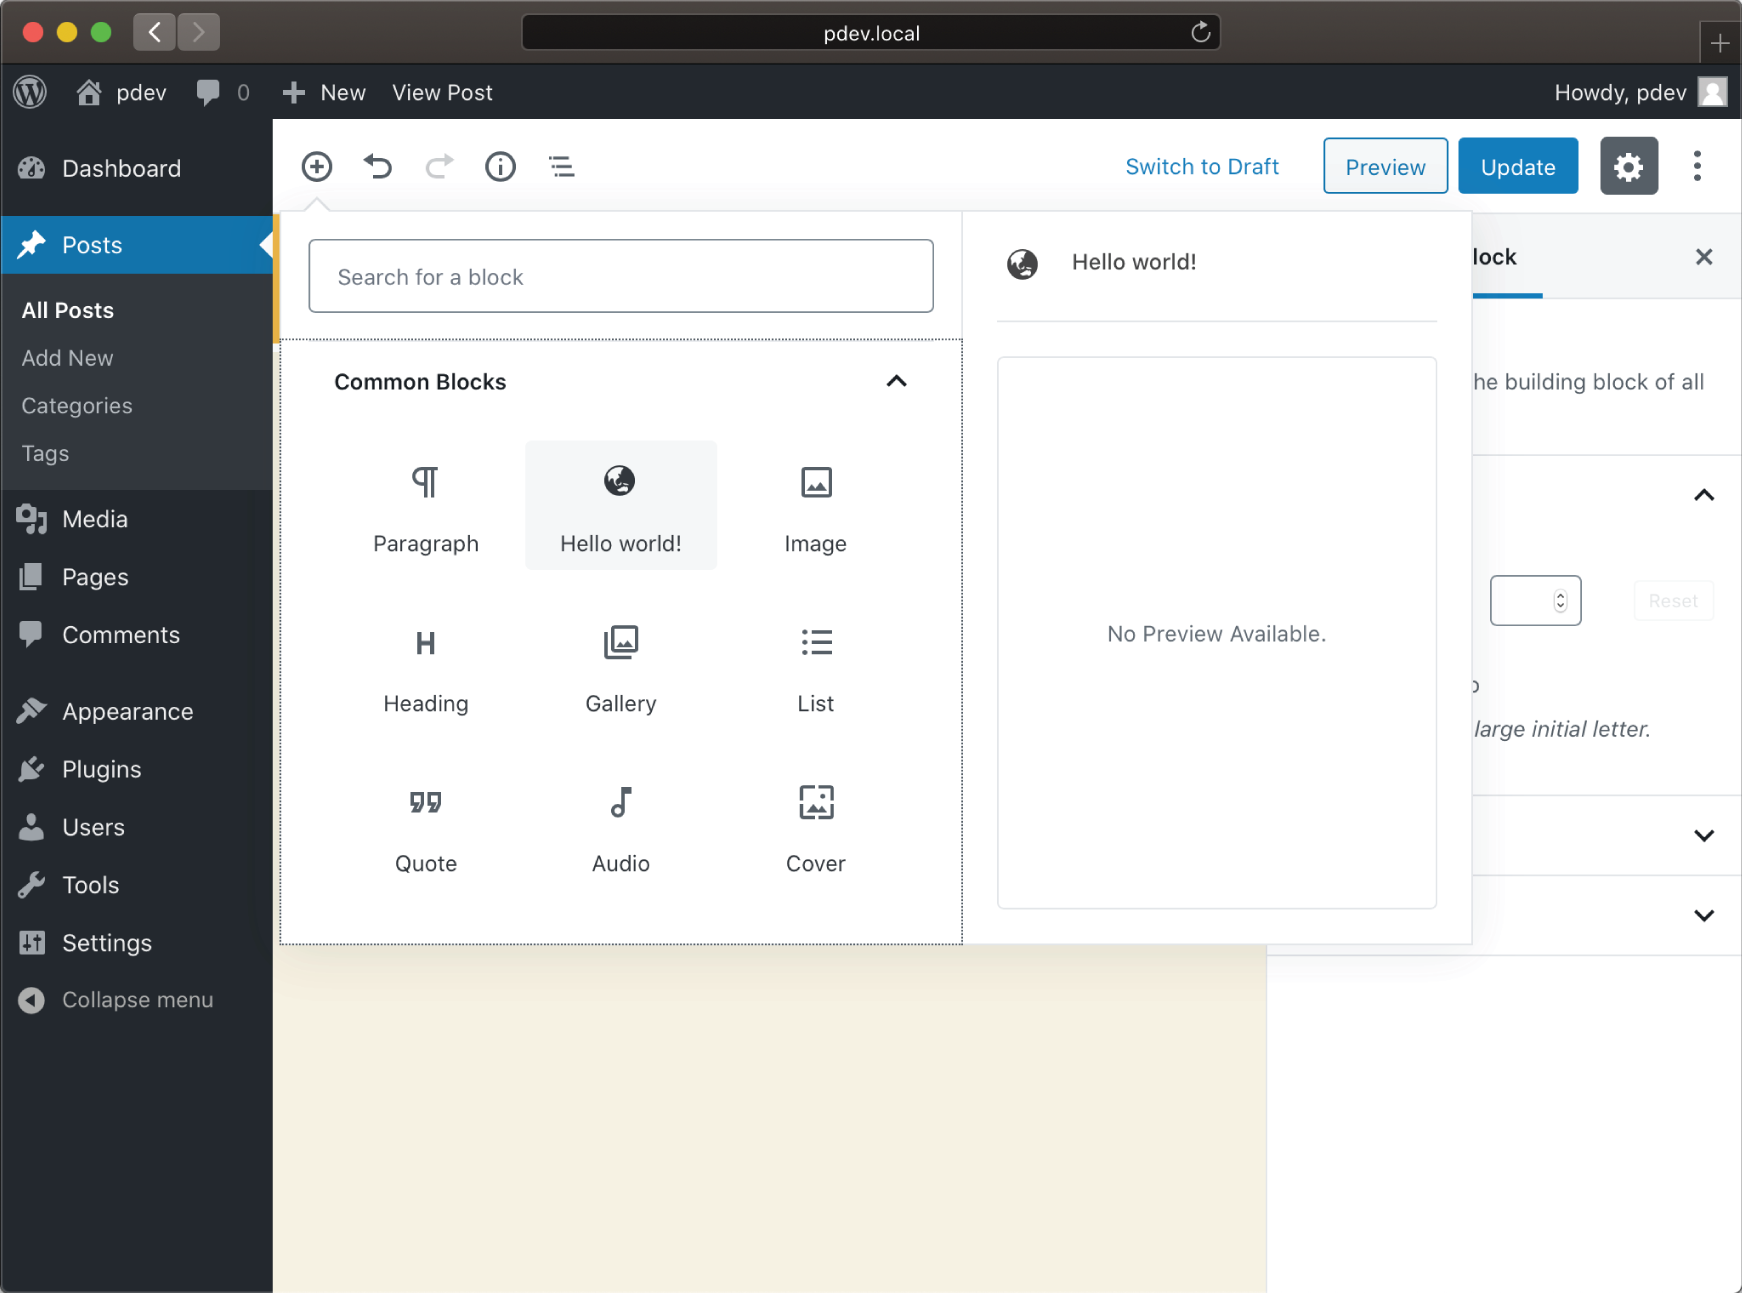
FIGURE 7‐13: Our “Hello world!” block in the Block Library
Selecting our block will look like Figure 7‐14.
Wrap‐Up
Voilà! You've just created your first Gutenberg block. It's simple, but it's also a little bit scary, because you really need to depend on a bunch of new tooling to compile and generate the necessary JavaScript for you.
Like we said earlier, you technically could write your own 100 percent vanilla JavaScript, but once you do, you'll learn just how painful that is to repeat multiple times. Soon you'll be back to looking at webpack and Babel and React all over again, so it really is best to start out using at least some of the tools.

FIGURE 7‐14: Selecting our new block
WP‐CLI SCAFFOLDING
The WordPress command‐line interface, called WP‐CLI, provides scaffolding for many different things, and all versions going forward will now support simple scaffolding for blocks.
The one caveat to using this approach currently is that the JavaScript it produces is not ES6, but rather ES5. This is expected to change to ES6 at a later date, but keep this in mind as you use it and explore the code it creates.
You can get a complete list of properties from the WordPress.org developer handbook at
https://developer.wordpress.org/cli/commands/scaffold/block
Plugin
Create a plugin called pdev2 using the following command:
wp scaffold plugin pdev2This creates the wp‐content/plugins/pdev2 directory and creates a bunch of common default configuration files that are useful for plugins to have.
Blocks
Next let's create two blocks, as shown here:
wp scaffold block foo --title="Foo" --plugin=pdev2wp scaffold block bar --title="Bar" --plugin=pdev2
This creates two subdirectories in the plugin directory, one for each block. Inside those directories are an index.js file, used to register the block type, and two separate CSS files, one for editor styles and another for theme styles.
Includes
You'll need to manually include the block files in the main plugin file, so open wp‐content/plugins/pdev2/pdev2.php and replace this:
// Your code starts here.with the following:
include __DIR__ . '/blocks/foo.php';include __DIR__ . '/blocks/bar.php';
Activation
Visit your admin area's Plugins page and activate your pdev2 plugin. Do the same as you did earlier and edit (or add) a post, as shown in Figure 7‐15.
Figure 7‐16 shows what the block that the WP‐CLI scaffolding generated for you looks like in the Gutenberg editor.
Wrap‐Up
Wasn't that easy? By using four commands and editing a single file, you got two custom blocks generated for you, without you even needing to worry about doing any of that complicated tooling stuff (aside from using WP‐CLI).
Maybe you're wondering why we spent so much time on tooling simply to have you avoid using it in this section; well, we felt that it was important to communicate how complicated creating a block is. This will give you an immediate appreciation for why many of these tools are actually incredibly useful.
Tooling isn't really part of the WordPress PHP development best practices yet, though it is definitely becoming the status quo as more themes and plugins introduce their own Composer support. If you're like many other professional WordPress plugin developers and you haven't really experienced much in the way of dependency management or code compilation, you'll get a good primer in this book where it makes sense.

FIGURE 7‐15: Editing a post
CREATE‐GUTEN‐BLOCK TOOLKIT
create‐guten‐block is a zero‐configuration toolkit to develop WordPress Gutenberg blocks in a matter of minutes; this means without configuring React, webpack, modern JavaScript (ES6, ES7), ESLint, Babel, and so on.
Because it essentially requires zero configuration, you can always update the underlying project without any changes in your own code. It includes support for React, JSX, ES6, webpack, auto‐prefixed CSS, a build script, and hassle‐free updates.
create‐guten‐block is the Gutenberg block equivalent of create‐react‐app, aptly named what it is, which suddenly makes a lot of sense, right? It is the clear winner when it comes to taking the majority of the pain away from creating a custom block.
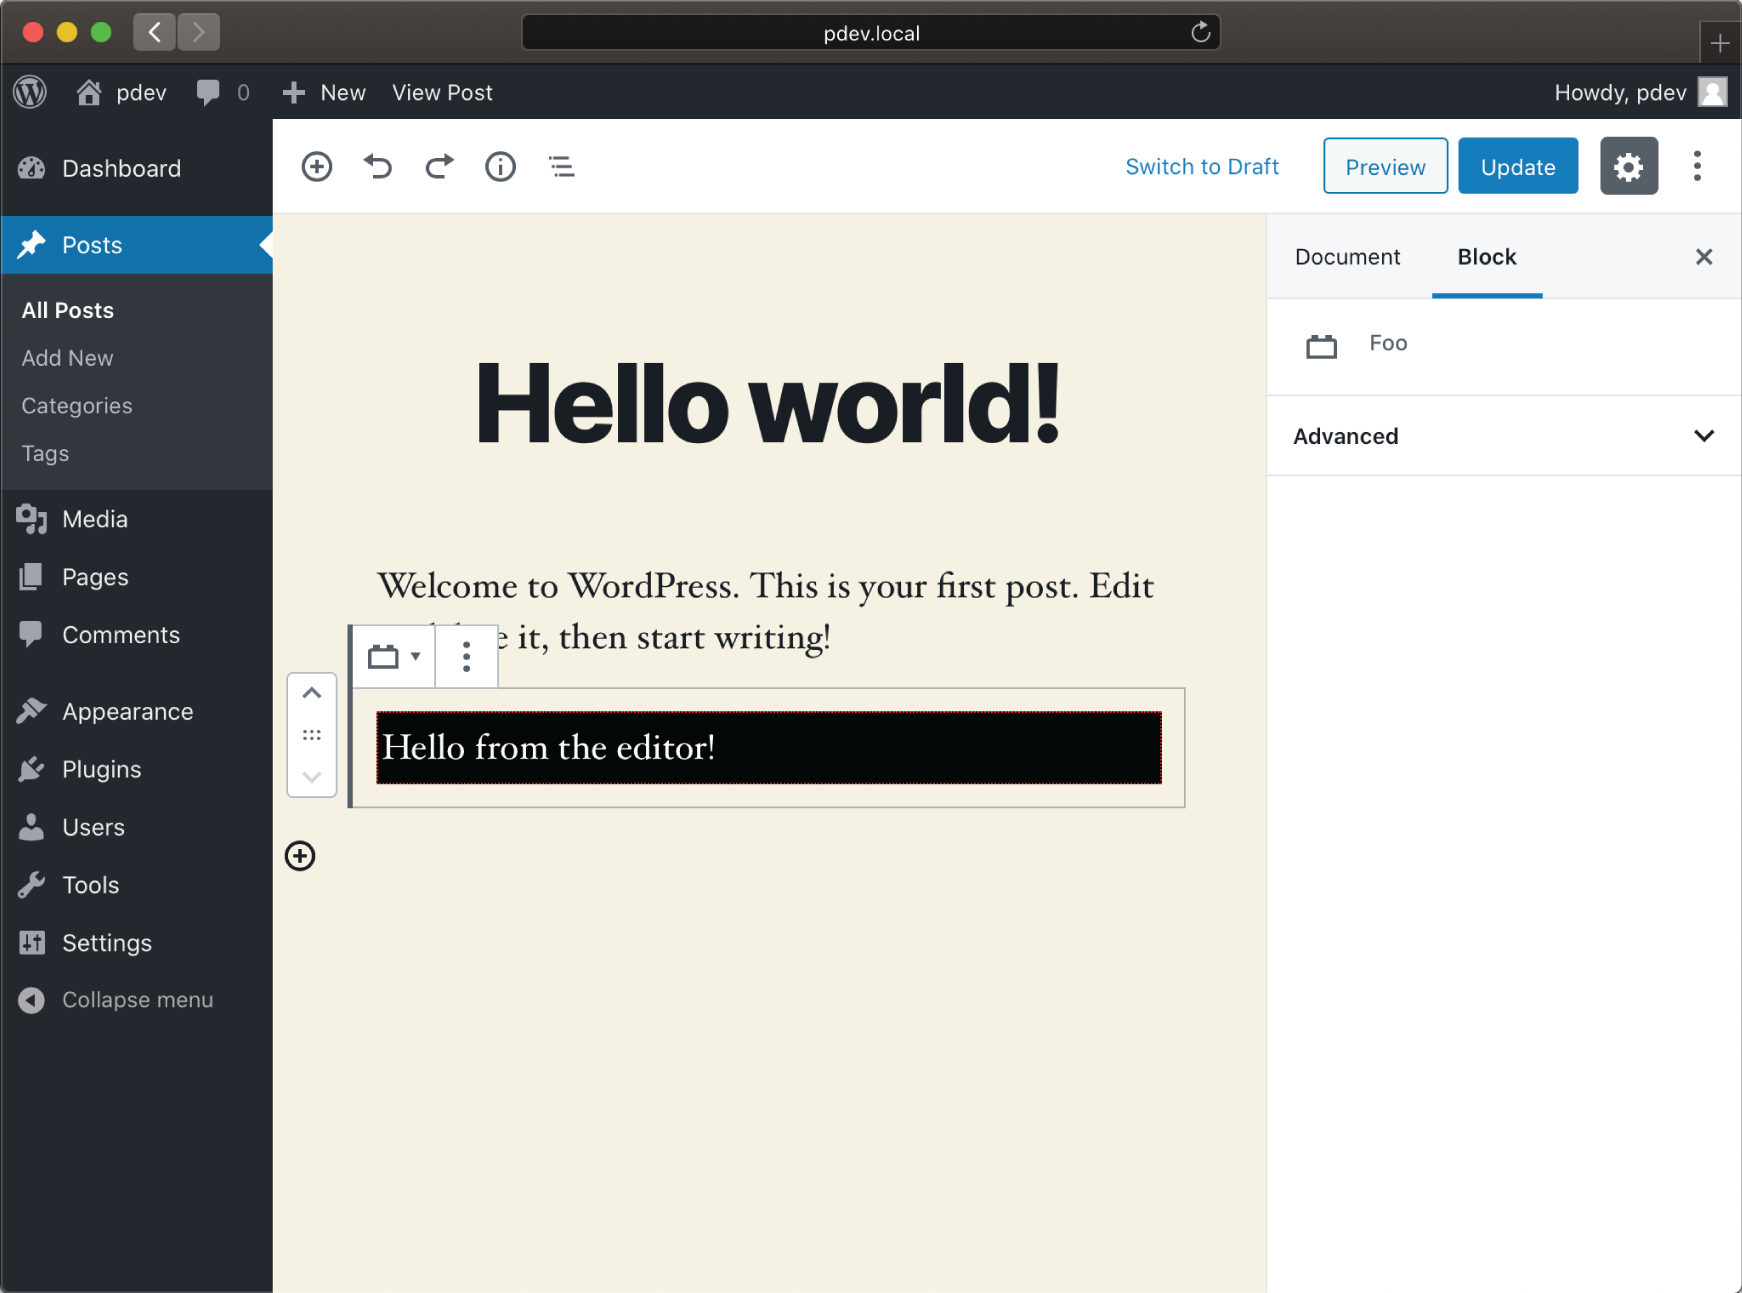
FIGURE 7‐16: WP‐CLI scaffold generated
Installation
Created and maintained by Ahmad Awais, the create‐guten‐block project has really great documentation, so we're going to send you over there for the instructions. Don't worry, we'll wait here.
https://github.com/ahmadawais/create-guten-block#getting-started
You should see the series of screens shown in Figures 7‐19.
Activation
As you did previously, activate the my‐block plugin from within your Plugins page and edit (or add) a post. You will see what is shown in Figures 7‐20 and 7‐21.
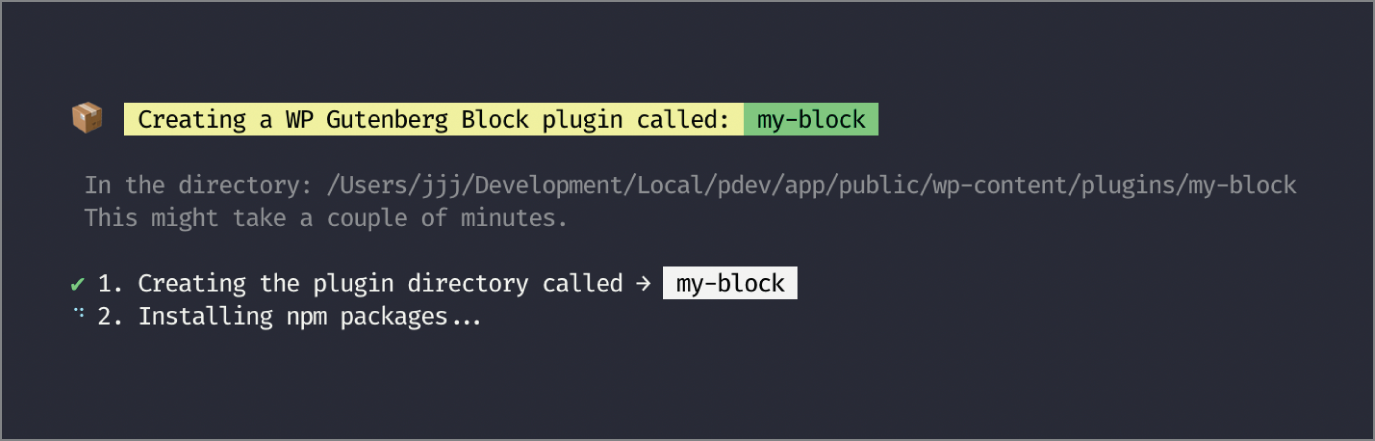


FIGURE 7‐19: Build Step 3

FIGURE 7‐20: My Block in Block Library
Wrap‐Up
We have a plugin and a block ready to go. We have all of the tooling set up that we could possibly ask for. The sky is the limit now.
BLOCK DIRECTORY
On the roadmap for WordPress 5.5 (by the end of the year 2020) is a Block Directory on WordPress.org much like there is already a Plugin Directory.
The idea is to provide a centralized hub for developers to share their blocks with everyone who is running WordPress, as well as making finding them a breeze. As we're writing this, the only way to discover new blocks is by installing plugins that already have blocks in them, usually by chance or through some kind of referral. Early days!
The Block Directory is still in the design and conception stage, so there aren't any screenshots worth sharing here quite yet. Instead, we're including a few links to the relevant conversations that are happening so you can keep an eye on this going forward:

FIGURE 7‐21: My Block in Content Area
https://make.wordpress.org/design/2019/04/02/call-for-design-installing-blocks-from-within-gutenberg
https://make.wordpress.org/design/2019/04/26/block-library-installing-blocks-from-within-gutenberg
https://make.wordpress.org/design/2019/12/19/block-directory-in-wp-admin-v1
SUMMARY
Remember, just because Gutenberg is designed to make a user's life easy does not mean it is designed to make a professional plugin developer's life easy. Really, the opposite is true: the less a user needs to do, the more a developer needs to do for them behind the scenes!
JavaScript is an immensely powerful environment. Blocks are the future of WordPress, and blocks require JavaScript, so the future of WordPress is JavaScript, no doubt about it.