10
Scheduled Tasks
When developing plugins, you will sometimes need to execute functions on a schedule. WordPress provides such a task scheduler within the core code. In this chapter, you will learn how to schedule events, remove events from the schedule, and set custom schedule intervals. You will also learn from practice use cases.
WHAT IS CRON?
The term cron comes from the time‐based task scheduler available in Unix systems. The cron system provided in core WordPress, while named the same, is not a true cron system in that sense. It is an event scheduler. However, it doesn't run on the system at all times. Events execute only when there's a page load.
Cron in WordPress is used to schedule jobs such as checking for new versions of WordPress, checking for plugin or theme updates, and publishing scheduled posts.
How Is Cron Executed?
Unlike a Unix‐based system, cron in WordPress does not constantly run on the server, looking for jobs to execute. WordPress, and thus its cron system, runs only when an admin or front‐end page is loaded on your website. When a page is visited, WordPress will automatically check if there are any cron tasks that it needs to execute. Because of how this system works, any visit to the website can trigger a scheduled task, regardless of whether it is from a human visitor or a bot.
The downside of how WordPress cron works is that it can never be 100 percent precise. For example, if you have a post scheduled to go live at 8 a.m. and no visitors come to your site until 10 a.m., then your post will not be published until 10 a.m.
As you can see, WordPress cron is more of a simulation of cron rather than a system‐based cron. In general, it still serves most plugin needs.
SCHEDULING CRON EVENTS
You can schedule two types of cron events in WordPress: single and recurring. A single event only ever runs one time and will not run again until it is rescheduled. A recurring event is a task that runs on a schedule and repeats until it is unscheduled.
Scheduling a Recurring Event
When scheduling an event to execute with cron, what you are actually doing is creating a custom action hook (see Chapter 5, “Hooks”). When scheduling the event with the cron scheduler, that hook is what gets registered with WordPress. When an event comes up in the schedule, any actions (functions) attached to that hook will be executed.
WordPress provides the wp_schedule_event() function for scheduling custom events.
<?phpwp_schedule_event(int $timestamp,string $recurrence,string $hook,array $args = []);
The function accepts four parameters.
$timestamp: A Unix timestamp for when you want the event to occur.$recurrence: How often the events should recur. The default available options are'hourly','twicedaily', and'daily'.$hook: The action hook name to execute for the event.$args: An array of arguments to pass to the hook's callback function.
Now you will build an example plugin to learn the basics of how to schedule tasks. First, create a registration callback for your plugin and schedule an hourly event during the callback.
<?phpregister_activation_hook( __FILE__, 'pdev_cron_activation' );function pdev_cron_activation() {$args = ['[email protected]'];if ( ! wp_next_scheduled( 'pdev_hourly_email', $args ) ) {wp_schedule_event( time(), 'hourly', 'pdev_hourly_email', $args );}}
If you look closely at the code, you can see a couple of things happening in the pdev_cron_activation() registration function. The first thing is the call to wp_next_scheduled(), which is a dual‐purpose function. Prior to scheduling an event, you should always check that it isn't already registered.
The function's first purpose is to check whether an event is scheduled for the custom hook (
pdev_hourly_email) that you have registered. If no event is scheduled, the function returns false. If the event is registered, the function will return the Unix timestamp of the next event in the schedule.
The next important item to note is that the $hook and $args parameters passed into wp_next_scheduled() and wp_schedule_event() must match exactly. The $args parameter is used to identify the event when there are multiple events on the same hook.
The next step in building the plugin involves adding an action on the custom action hook you created by scheduling an event. This works like any other action hook. Your callback function simply needs to execute whatever code it needs. For this example, when you scheduled the event, you passed an array of a single parameter, which was an email address. You use that address to send off an email.
<?phpadd_action( 'pdev_hourly_email', 'pdev_send_email' );function pdev_send_email( $email ) {wp_mail(sanitize_email( $email ),'Reminder','Hey, remember to do that important thing!');}
At this point, you have successfully built a cron task. Every hour, WordPress will fire off an email to remind you to do something.
Take a look at the entire code to see how it works as a plugin, shown here:
<?php/*** Plugin Name: Cron Recurring Event* Plugin URI: http://example.com/* Description: Sends an email every hour.* Author: WROX* Author URI: http://wrox.com*/register_activation_hook( __FILE__, 'pdev_cron_activation' );function pdev_cron_activation() {$args = ['[email protected]'];if ( ! wp_next_scheduled( 'pdev_hourly_email', $args ) ) {wp_schedule_event( time(), 'hourly', 'pdev_hourly_email', $args );}}add_action( 'pdev_hourly_email', 'pdev_send_email' );function pdev_send_email( $email ) {wp_mail(sanitize_email( $email ),'Reminder','Hey, remember to do that important thing!');}
Scheduling a Single Event
Cron is most useful for recurring events. The power of a cron system is typically the ability to have events recur. You probably won't need to schedule single events often. However, WordPress provides the ability to schedule events that run once and are automatically removed from the cron schedule. To schedule a single event, use the wp_schedule_single_event() function.
<?phpwp_schedule_single_event( int $timestamp, string $hook, array $args = [] );
The function accepts three parameters.
-
$timestamp: A Unix timestamp for when you want the event to occur -
$hook: The action hook name to execute for the event -
$args: An array of arguments to pass to the hook's callback function
As you should notice, the parameters are similar to the wp_schedule_event() function with the difference being that wp_schedule_single_event() has no parameter for setting how often the event occurs. This is because the event runs only once at the scheduled time.
Now you will build a simple plugin that sends off the same email from the previous section on recurring events. Like before, you will start by registering an event when the plugin is activated.
<?phpregister_activation_hook( __FILE__, 'pdev_cron_single_activation' );function pdev_cron_single_activation() {$args = ['[email protected]'];if ( ! wp_next_scheduled( 'pdev_single_email', $args ) ) {wp_schedule_single_event( time() + 3600, 'pdev_single_email', $args );}}
Instead of using time() to set the timestamp, the example code uses time() + 3600, which is an hour in seconds. That schedules the event to happen one hour from the time the plugin is activated.
Since this is a single event, try sending an email to thank the user for using your plugin. You use an action hook in the same way that you would for a recurring event.
add_action( 'pdev_single_email', 'pdev_send_email_once' );function pdev_send_email_once( $email ) {wp_mail(sanitize_email( $email ),'Plugin Name - Thanks','Thank you for using my plugin! If you need help with it, let me know.');}
Now take a look at the plugin's full source code.
<?php/*** Plugin Name: Cron Single Event* Plugin URI: http://example.com/* Description: Sends a scheduled email once.* Author: WROX* Author URI: http://wrox.com*/register_activation_hook( __FILE__, 'pdev_cron_single_activation' );function pdev_cron_single_activation() {$args = ['[email protected]'];if ( ! wp_next_scheduled( 'pdev_single_email', $args ) ) {wp_schedule_single_event( time() + 3600, 'pdev_single_email', $args );}}add_action( 'pdev_single_email', 'pdev_send_email_once' );function pdev_send_email_once( $email ) {wp_mail(sanitize_email( $email ),'Plugin Name - Thanks','Thank you for using my plugin! If you need help with it, let me know.');}
Unscheduling an Event
When you schedule a cron task, WordPress stores that task in the wp_options table in the database. This means any scheduled tasks added by your plugin will not be removed when your plugin is deactivated or uninstalled. Because the task is still registered, WordPress can't execute it because the plugin code is no longer available.
As a plugin author, it is your responsibility to always clean up after yourself, which includes removing any events you have scheduled. To properly unschedule an event, use the wp_unschedule_event() WordPress function.
<?phpwp_unschedule_event( int $timestamp, string $hook, array $args = [] );
This function accepts three parameters.
-
$timestamp: A Unix timestamp that matches the scheduled event's timestamp -
$hook: The action hook name for the event -
$args: An array of arguments to pass to the original event
Imagine that you had a previously scheduled event registered that looked like the following example:
<?phpwp_schedule_event( time(), 'hourly', 'pdev_example_event' );
To remove this event, you need to get the timestamp via the wp_next_scheduled() function. If that function returns a timestamp, then you can unschedule the event via wp_unschedule_event().
<?php$timestamp = wp_next_scheduled( 'pdev_example_event' );if ( $timestamp ) {wp_unschedule_event( $timestamp, 'pdev_example_event' );}
Now you will build a full plugin that schedules an event when the plugin is activated and unschedule that same event when the plugin is deactivated.
<?php/*** Plugin Name: Cron Scheduled Event* Plugin URI: http://example.com/* Description: Example of scheduling and unscheduling an event.* Author: WROX* Author URI: http://wrox.com*/register_activation_hook( __FILE__, 'pdev_cron_example_activation' );function pdev_cron_activation() {if ( ! wp_next_scheduled( 'pdev_example_event' ) ) {wp_schedule_event( time(), 'hourly', 'pdev_example_event' );}}register_deactivation_hook( __FILE__, 'pdev_cron_example_deactivation' );function pdev_cron_example_deactivation() {$timestamp = wp_next_scheduled( 'pdev_example_event' );if ( $timestamp ) {wp_unschedule_event( $timestamp, 'pdev_example_event' );}}add_action( 'pdev_example_event', 'pdev_example_email' );function pdev_example_email() {wp_mail('[email protected]','Reminder','Hey, remember to do that important thing!');}
Specifying Your Own Cron Intervals
WordPress has three default options for cron intervals: hourly, twicedaily, and daily. However, you are not limited to those intervals if you need to schedule tasks. To create a custom interval, create a custom filter for the cron_schedules filter hook.
<?phpadd_filter( 'cron_schedules', 'pdev_cron_schedules' );function pdev_cron_schedules( $schedules ) {$schedules['weekly'] = ['interval' => 604800,'display' => 'Once Weekly'];return $schedules;}
The cron_schedules filter hook passes an array of schedules and expects an array to be returned. The pdev_cron_schedules() filter adds a custom filter to the array of schedules. The $schedules variable stores all the cron schedules available in WordPress. You can manipulate this array like any other array before returning it. However, you should avoid removing any of the default items in the array provided by WordPress because other plugins may rely on them.
The $schedules variable is an associative array that expects specific keys for each item in the array. The name of your custom cron interval should be the array key. In this case, it is weekly. You can now use the weekly option when scheduling events.
The value for the cron interval should be an array that contains two specific keys and their corresponding values. The first key, interval, must be an integer that represents the number of seconds between intervals. The preceding code set this interval at 608400, which is a week in seconds. The second key, display, is a human‐readable name for the interval, which may be displayed by cron‐management plugins.
To use the custom interval, you can add it as the second parameter in wp_schedule_event(), as shown in the following code snippet:
<?phpwp_schedule_event( time(), 'weekly', 'pdev_custom_event' );
Viewing Scheduled Cron Events
WordPress does not have a built‐in way to view cron jobs. The average user wouldn't understand cron, so it makes sense that it is not included in the default user interface. However, as a plugin developer, you can build an admin page that lists all scheduled events.
The first step to doing this is creating a new plugin folder named plugin‐scheduled‐events with a file named plugin.php that contains the following code:
<?php/*** Plugin Name: View Scheduled Events* Plugin URI: http://example.com/* Description: View cron tasks via the admin.* Author: WROX* Author URI: http://wrox.com*/require_once plugin_dir_path( __FILE__ ) . 'View.php';$pdev_scheduled = new PDEVScheduledEventsView();$pdev_scheduled->boot();
This code is just a basic bootstrap file that launches the plugin and the View class. Now, create a View.php file in the same folder with an empty class.
<?phpnamespace PDEVScheduledEvents;class View {// Class methods go here.}
Now that you have set up the basics of your plugin, you need to add boot() and submenuPage() methods. The first method “boots” the class by adding an action to the WordPress admin_menu hook. The second method is the callback function for the action hook, which adds a custom submenu page under the “Tools” screen in the WordPress admin.
public function boot() {add_action( 'admin_menu', [ $this, 'submenuPage'] );}public function submenuPage() {add_submenu_page('tools.php','Scheduled Events','Scheduled Events','manage_options','pdev-scheduled-events',[ $this, 'template' ]);}
The next step of the process is adding a template() method, which is the callback defined as the last parameter of add_submenu_page() in the preceding code. This method will output the HTML for the scheduled events page in the admin.
The first thing you need to do in the template() method is set up some variables. First, you need to get the cron array stored in the WordPress database via the _get_cron_array() function. The second variable are the schedules (cron intervals) via wp_get_schedules(). You also need to set a variable with a date format, which will be used for creating a human‐readable date and time.
<?phppublic function template() {$cron = _get_cron_array();$schedules = wp_get_schedules();$date_format = 'M j, Y @ G:i';?><!-- Place HTML code here. --><?php }
After setting up the necessary variables, create the HTML wrapper, a page heading, and a table with a header and empty body. Use the following code to replace the placeholder HTML comment in the template() method:
<div class="wrap"><h1 class="wp-heading-inline">Scheduled Events</h1><table class="widefat fixed striped"><thead><th>Next Run (GMT/UTC)</th><th>Schedule</th><th>Hook</th></thead><tbody></tbody></table></div>
From this point, you will build out the table body's rows and columns using the variables you gathered at the top of the template() method. Add the following code within the <tbody> element:
<?php foreach ( $cron as $timestamp => $hooks ) : ?><?php foreach ( (array) $hooks as $hook => $events ) : ?><?php foreach ( (array) $events as $event ) : ?><tr><td><?php echo date_i18n($date_format,wp_next_scheduled( $hook )); ?></td><td><?php if ( $event['schedule'] ) : ?><?php echo esc_html($schedules[ $event['schedule'] ]['display']); ?><?php else : ?>Once<?php endif; ?></td><td><code><?php echo esc_html( $hook ); ?></code></td></tr><?php endforeach; ?><?php endforeach; ?><?php endforeach; ?>
Now take a closer look at the full View.php class file as it all comes together, shown here:
<?phpnamespace PDEVScheduledEvents;class View {public function boot() {add_action( 'admin_menu', [ $this, 'submenuPage'] );}public function submenuPage() {add_submenu_page('tools.php','Scheduled Events','Scheduled Events','manage_options','pdev-scheduled-events',[ $this, 'template' ]);}public function template() {$cron = _get_cron_array();$schedules = wp_get_schedules();$date_format = 'M j, Y @ G:i';?><div class="wrap"><h1 class="wp-heading-inline">Scheduled Events</h1><table class="widefat fixed striped"><thead><th>Next Run (GMT/UTC)</th><th>Schedule</th><th>Hook</th></thead><tbody><?php foreach ( $cron as $timestamp => $hooks ) : ?><?php foreach ( (array) $hooks as $hook => $events ) : ?><?php foreach ( (array) $events as $event ) : ?><tr><td><?php echo date_i18n($date_format,wp_next_scheduled( $hook )); ?></td><td><?php if ( $event['schedule'] ) : ?><?php echo esc_html($schedules[ $event['schedule'] ]['display']); ?><?php else : ?>Once<?php endif; ?></td><td><code><?php echo esc_html( $hook ); ?></code></td></tr><?php endforeach; ?><?php endforeach; ?><?php endforeach; ?></tbody></table></div><?php }}
Now you've built a plugin for displaying scheduled events. Once activated on the website, you can find the Scheduled Events page under the Tools menu in the WordPress admin. It should look similar to Figure 10‐1.
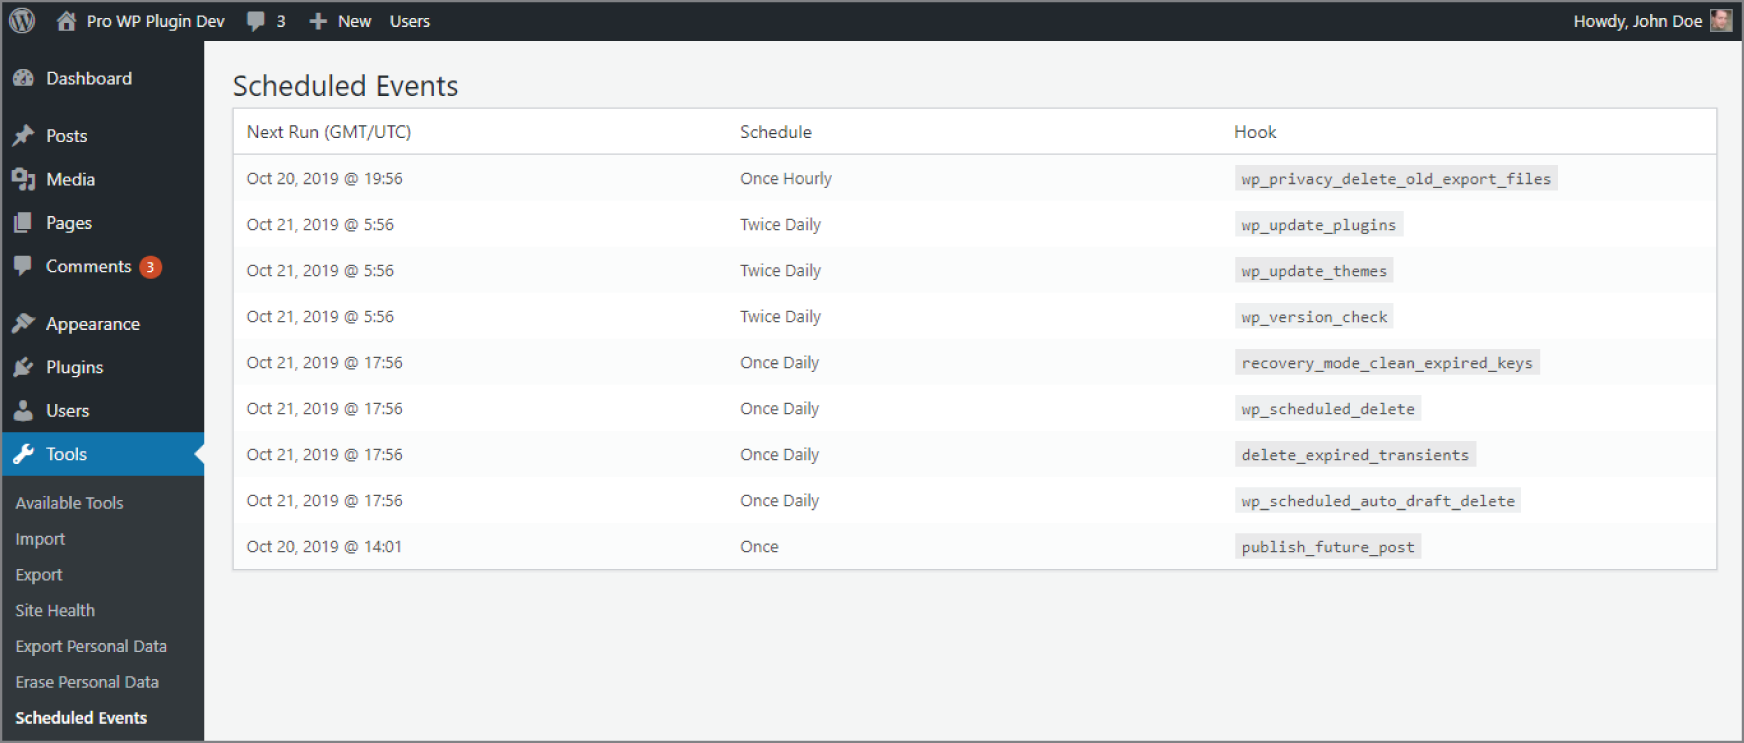
FIGURE 10‐1: Scheduled Events page
TRUE CRON
As discussed earlier in this chapter, the WordPress cron system is not a true cron because it runs based on page requests and not a timed interval via the server. However, you can set up a true cron if you need scheduled tasks to run precisely at the time they are scheduled.
Before setting up a true cron, you must disable cron in WordPress by adding the following code to your wp‐config.php file:
define( 'DISABLE_WP_CRON', true );This line disables WordPress from loading its wp‐cron.php file, which is used to look for cron tasks to execute. Once you've disabled WordPress cron, you will need to set up another method to execute cron on the server. Such a system is outside the scope of this book.
One common method is using wget to load wp‐cron.php on a schedule. If you are running a Linux‐based server, a true cron will already exist. You can schedule tasks using the crontab command. If you are running a Windows‐based server, you will need to install wget. The wget command to execute tasks would look like the following:
wget http://www.example.com/wp-cron.phpWordPress looks for all scheduled cron tasks and executes them as needed when wget requests wp‐cron.php.
PRACTICAL USE
Now that you have an understanding of the foundational elements of cron, it is time to put that newfound knowledge to practical use. In this section, you will learn how to build plugins for real‐world use cases.
The Blog Pester Plugin
Assume that you have a user who wants to write blog posts more regularly. This person has a hard time reminding themselves to log into their WordPress install and write a new blog post. They have commissioned you to write a plugin that will remind them to write something if there are no new posts every three days. This is a perfect use case for cron because it is based on a timed interval.
Create a new file called plugin‐blog‐pester.php. Then create an activation hook for the plugin, which will register the new cron task.
register_activation_hook( __FILE__, 'pdev_pester_activate' );function pdev_pester_activate() {if ( ! wp_next_scheduled( 'pdev_pester_event' ) ) {wp_schedule_event( time(), 'daily', 'pdev_pester_event' );}}
The preceding code creates a hook called pdev_pester_event. This hook is scheduled to fire once every day. You will later add a custom action to it to handle the check and send the reminder.
Remember that any recurring cron task that you schedule should always be removed when your plugin is no longer active. You will be a good citizen within the development community and remove the cron task with a custom deactivation hook so that WordPress will not look for it when running cron.
register_deactivation_hook( __FILE__, 'pdev_pester_deactivate' );function pdev_pester_deactivate() {$timestamp = wp_next_scheduled( 'pdev_pester_event' );if ( false !== $timestamp ) {wp_unschedule_event( $timestamp, 'pdev_pester_event' );}}
With the basics out of the way, you can start building out the functionality for the custom plugin. What you need to do is add a custom callback function (action) to pdev_pester_event. That function must first check to see whether there have been any posts published in the past three days. If not, the plugin must send an email to remind the site owner.
add_action( 'pdev_pester_event', 'pdev_pester_check' );function pdev_pester_check() {global $wpdb;// Query the latest published post date.$query = "SELECT post_dateFROM $wpdb->postsWHERE post_status = 'publish'AND post_type = 'post'ORDER BY post_dateDESC LIMIT 1";$latest_post_date = $wpdb->get_var( $wpdb->prepare( $query ) );// Check if latest post is older than three days.// If it is, send email reminder.if ( strtotime( $latest_post_date ) <= strtotime( '-3 days' ) ) {$email = '[email protected]';$subject = 'Blog Reminder';$message = 'Hey! You have not written a blog post in three days!';wp_mail( $email, $subject, $message );}}
The preceding code first runs a custom database query for the latest post date (see Chapter 4, “Security and Performance,” to learn more about database queries). It then uses the PHP strotime() function to compare dates. This function will accept any date or textual English date time. It then returns a Unix timestamp, which makes it easy to compare the two dates because they are in the same format. In the previous code, you are comparing the $latest_post_date variable from the database to the timestamp for three days ago, which is written as '‐3 days'. If the latest post date is less than or equal to the value of '‐3 days', the post is older than three days. At that point, it is simply a matter of populating the email variables and firing off the reminder email via the wp_mail() function.
All that is left is filling in the plugin header. Review the following to see what the full plugin should look like:
<?php/*** Plugin Name: Blog Pester* Plugin URI: http://example.com/* Description: Sends a reminder email if no posts have been written in three days.* Author: WROX* Author URI: http://wrox.com*/register_activation_hook( __FILE__, 'pdev_pester_activate' );function pdev_pester_activate() {if ( ! wp_next_scheduled( 'pdev_pester_event' ) ) {wp_schedule_event( time(), 'daily', 'pdev_pester_event' );}}register_deactivation_hook( __FILE__, 'pdev_pester_deactivate' );function pdev_pester_deactivate() {$timestamp = wp_next_scheduled( 'pdev_pester_event' );if ( false !== $timestamp ) {wp_unschedule_event( $timestamp, 'pdev_pester_event' );}}add_action( 'pdev_pester_event', 'pdev_pester_check' );function pdev_pester_check() {global $wpdb;// Query the latest published post date.$query = "SELECT post_dateFROM $wpdb->postsWHERE post_status = 'publish'AND post_type = 'post'ORDER BY post_dateDESC LIMIT 1";$latest_post_date = $wpdb->get_var( $wpdb->prepare( $query ) );// Check if latest post is older than three days.// If it is, send email reminder.if ( strtotime( $latest_post_date ) <= strtotime( '-3 days' ) ) {$email = '[email protected]';$subject = 'Blog Reminder';$message = 'Hey! You have not written a blog post in three days!';wp_mail( $email, $subject, $message );}}
Deleting Post Revisions Weekly
WordPress saves a post revision in the posts table in the database each time you save a post or page. This can quickly get out of hand and bloat the size of your database. It is a good idea to purge these revisions once in a while. What you will do is create a plugin that schedules a weekly cron task that deletes all post revisions from the database if those revisions are older than 30 days.
For this plugin, create a new plugin‐clean‐revisions.php file. Like in the previous plugin example, create both an activation function that will schedule a cron task and a deactivation function that will remove it.
register_activation_hook( __FILE__, 'pdev_clean_rev_activate' );function pdev_clean_rev_activate() {if ( ! wp_next_scheduled( 'pdev_clean_rev_event' ) ) {wp_schedule_event( time(), 'weekly', 'pdev_clean_rev_event' );}}register_deactivation_hook( __FILE__, 'pdev_clean_rev_deactivate' );function pdev_clean_rev_deactivate() {$timestamp = wp_next_scheduled( 'pdev_clean_rev_event' );if ( false !== $timestamp ) {wp_unschedule_event( $timestamp, 'pdev_clean_rev_event' );}}
One important thing to note is that the pdev_clean_rev_event hook will run once a week. Because weekly is not a value available in the default WordPress cron schedules array, you need to filter the schedules and add in the custom weekly option.
add_filter( 'cron_schedules', 'pdev_clean_rev_cron_schedules' );function pdev_clean_rev_cron_schedules( $schedules ) {$schedules['weekly'] = ['interval' => 604800,'display' => 'Once Weekly'];return $schedules;}
The preceding code merely tells WordPress that you want to run an event every 604800 seconds, once every week, via a custom filter on the cron_schedules filter hook. You can review custom schedules in the “Specifying Your Own Cron Intervals” section earlier in this chapter.
Now you must add a custom action to the pdev_clean_rev_event hook for it to fire each week.
add_action( 'pdev_clean_rev_event', 'pdev_clean_rev_delete' );function pdev_clean_rev_delete() {global $wpdb;$sql = "DELETE a,b,cFROM $wpdb->posts arrayLEFT JOIN $wpdb->term_relationships b ON (a.ID = b.object_id)LEFT JOIN $wpdb->postmeta c ON (a.ID = c.post_id)WHERE a.post_type = 'revision'AND DATEDIFF( now(), a.post_modified )> 30";$wpdb->query( $wpdb->prepare( $sql ) );}
The $sql variable stores the custom query to be executed. It joins the posts table with the term_relationships and postmeta tables. The reason for this is that data related to post revisions is stored in all three tables. When deleting the post revision, you must also delete any taxonomy term relationships and post metadata stored for each revision.
While there are no variables defined for this particular query, it is still good practice to wrap $sql in $wpdb‐>prepare() when running database queries. If you change the code in the future, it will already be in place. Essentially, it is something you should always do. Finally, you pass the SQL query into $wpdb‐>query(), which runs the query and deletes all revisions older than 30 days along with their accompanying data.
Once you add your plugin header at the top of the file, you will have a fully functioning plugin. Now take a moment to review the full plugin code, shown here:
<?php/*** Plugin Name: Clean Revisions* Plugin URI: http://example.com/* Description: Removes post revisions older than 30 days every week.* Author: WROX* Author URI: http://wrox.com*/register_activation_hook( __FILE__, 'pdev_clean_rev_activate' );function pdev_clean_rev_activate() {if ( ! wp_next_scheduled( 'pdev_clean_rev_event' ) ) {wp_schedule_event( time(), 'weekly', 'pdev_clean_rev_event' );}}register_deactivation_hook( __FILE__, 'pdev_clean_rev_deactivate' );function pdev_clean_rev_deactivate() {$timestamp = wp_next_scheduled( 'pdev_clean_rev_event' );if ( false !== $timestamp ) {wp_unschedule_event( $timestamp, 'pdev_clean_rev_event' );}}add_filter( 'cron_schedules', 'pdev_clean_rev_cron_schedules' );function pdev_clean_rev_cron_schedules( $schedules ) {$schedules['weekly'] = ['interval' => 604800,'display' => 'Once Weekly'];return $schedules;}add_action( 'pdev_clean_rev_event', 'pdev_clean_rev_delete' );function pdev_clean_rev_delete() {global $wpdb;$sql = "DELETE a,b,cFROM $wpdb->posts arrayLEFT JOIN $wpdb->term_relationships b ON (a.ID = b.object_id)LEFT JOIN $wpdb->postmeta c ON (a.ID = c.post_id)WHERE a.post_type = 'revision'AND DATEDIFF( now(), a.post_modified )> 30";$wpdb->query( $wpdb->prepare( $sql ) );}
The Delete Comments Plugin
Imagine that you wanted to build a plugin that would automatically delete spam or moderated comments from the database after they have been around for a while. You also want to release this plugin to the general public for others to use on their sites.
The previous two practical examples in this chapter primarily explored scheduled tasks in isolation. They work well as small, one‐off plugins for a single website. However, in a plugin that you are building for public release for many users, you will want to include more advanced capabilities, such as adding custom plugin options that users can change.
Start by creating a new plugin‐delete‐comments.php file for your new plugin. You will build an entire plugin in this file.
Because this plugin has custom database options, the first thing you need to think about is what those options will be. By default, you want to delete old spam comments. However, users might want to delete old comments held in moderation. That's one option. You also think deleting comments older than 15 days is a good idea, but there is no need to limit to that number. Providing an option to change the number of days is a good second option.
Your plugin will need to access these options multiple times. It is good practice to create a wrapper function that will return an array of all the options.
function pdev_delete_comments_options() {return get_option( 'pdev_delete_comments', ['status' => 'spam','days' => 15] );}
This code looks for an option in the database named pdev_delete_comments, which stores all of the plugin's options in a single array. It also passes along default values in case the option has not yet been stored in the database. The status option returns the default status (
spam) that you want to delete comments by. The days option returns the default number of days (
15).
With the initial code for the options in place, it is time to register settings with WordPress by adding a callback to the admin_init action hook.
add_action( 'admin_init', 'pdev_delete_comments_init' );function pdev_delete_comments_init() {// Register settings on the discussion screen.register_setting('discussion','pdev_delete_comments');// Register comment status field.add_settings_field('pdev_comment_status','Comment Status to Delete','pdev_comment_status_field','discussion','default');// Register days field.add_settings_field('pdev_comment_days','Delete Comments Older Than','pdev_comment_days_field','discussion','default');// Schedule the cron event if not scheduled.if ( ! wp_next_scheduled( 'pdev_delete_comments_event' ) ) {wp_schedule_event( time(), 'daily', 'pdev_delete_comments_event' );}}
The first thing the preceding code does is register a custom setting named pdev_delete_comments to the discussion page. The discussion string is a unique ID to let WordPress know that you want to add custom settings to the Discussion screen under the Settings menu in the WordPress admin. Because the plugin that you are building is related to comments, this is the ideal place to add its settings. You can learn more about registering settings in Chapter 3, “Dashboard and Settings.”
The next two blocks of code in the function register custom settings fields. This tells WordPress that the plugin has two callback functions, pdev_comment_status_field() and pdev_comment_days_field(), that will output the HTML on the settings screen.
The final code block in the function is where you get to start applying what you have learned in this chapter about cron. Like you should always do before registering a new cron event, check that it has not yet been scheduled. The previous code adds a hook named pdev_delete_comments_event that will fire once each day.
The next step in building the plugin is creating the callback functions for the settings fields.
function pdev_comment_status_field() {$options = pdev_delete_comments_options();$status = $options['status']; ?><select name="pdev_delete_comments[status]"><option value="spam" <?php selected( $status, 'spam' ); ?>>Spam</option><option value="moderated" <?php selected( $status, 'moderated' ); ?>>Moderated</option></select><?php }function pdev_comment_days_field() {$options = pdev_delete_comments_options();$days = absint( $options['days'] );printf('<input type="number" name="pdev_delete_comments[days]" value="%s">',esc_attr( $days ));}
The pdev_comments_status_field() function outputs a <select> element with an option to choose between spam or moderated comments. Take note of the selected() function, which is a core WordPress helper function for forms. It will automatically output the selected attribute by checking whether the $status variable is equal to the <option> field's value.
The pdev_comment_days_field() function outputs a basic number input. It uses absint() when defining the $days variable to make sure the number of days is a positive integer.
With this code in place, you should see the output on the Settings ➪ Discussion screen in the WordPress admin that is shown in Figure 10‐2.

FIGURE 10‐2: Number output
At this point, you need to add an action to the cron hook registered earlier. The action will handle deleting comments.
add_action( 'pdev_delete_comments_event', 'pdev_delete_comments_task' );function pdev_delete_comments_task() {global $wpdb;$options = pdev_delete_comments_options();$status = $options['status'];$days = absint( $options['days'] );// Set default comment_approved value to spam.$comment_approved = 'spam';// If moderated status, WordPress stores this as '0'.if ( 'moderated' !== $status ) {$comment_approved = '0';}// Build and run the query to delete comments.$sql = "DELETE FROM $wpdb->commentsWHERE ( comment_approved = '$comment_approved' )AND DATEDIFF( now(), comment_date )> %d";$wpdb->query( $wpdb->prepare( $sql, $days ) );}
The previous code runs a database query to delete comments based on the options selected by the user from the Discussion admin page. It deletes comments based on the comment_approved field, which is the field in the $wpdb‐>comments table for storing the comment's status. It also checks how old the comment is in comparison to the moment it is run. If older than the number of days set by the user, the comment is deleted.
WordPress is more than 15 years old, which means it has some odd legacy bits in the system. That is why the comment_approved field for moderated comments in the database is stored as '0' while spam comments are stored as 'spam'. Because of this, the preceding code creates a new variable named $comment_approved to define the proper value for the comment_approved database field.
One final step left. Don't forget one of the most crucial aspects of scheduling tasks in WordPress. Make sure to delete anything you have scheduled. Add in a deactivation hook that unschedules pdev_delete_comments_event.
register_deactivation_hook( __FILE__, 'pdev_delete_comments_deactivate' );function pdev_delete_comments_deactivate() {$timestamp = wp_next_scheduled( 'pdev_delete_comments_event' );if ( false !== $timestamp ) {wp_unschedule_event( $timestamp, 'pdev_delete_comments_event' );}}
You have now built a comment‐deletion plugin! Review the following code for a look at the plugin in its entirety:
<?php/*** Plugin Name: Delete Comments* Plugin URI: http://example.com/* Description: Deletes old spam or moderated comments on a schedule.* Author: WROX* Author URI: http://wrox.com*/function pdev_delete_comments_options() {return get_option( 'pdev_delete_comments', ['status' => 'spam','days' => 15] );}add_action( 'admin_init', 'pdev_delete_comments_init' );function pdev_delete_comments_init() {// Register settings on the discussion screen.register_setting('discussion','pdev_delete_comments');// Register comment status field.add_settings_field('pdev_comment_status','Comment Status to Delete','pdev_comment_status_field','discussion','default');// Register days field.add_settings_field('pdev_comment_days','Delete Comments Older Than','pdev_comment_days_field','discussion','default');// Schedule the cron event if not scheduled.if ( ! wp_next_scheduled( 'pdev_delete_comments_event' ) ) {wp_schedule_event( time(), 'daily', 'pdev_delete_comments_event' );}}function pdev_comment_status_field() {$options = pdev_delete_comments_options();$status = $options['status']; ?><select name="pdev_delete_comments[status]"><option value="spam" <?php selected( $status, 'spam' ); ?>>Spam</option><option value="moderated" <?php selected( $status, 'moderated' ); ?>>Moderated</option></select><?php }function pdev_comment_days_field() {$options = pdev_delete_comments_options();$days = absint( $options['days'] );printf('<input type="number" name="pdev_delete_comments[days]" value="%s">',esc_attr( $days ));}add_action( 'pdev_delete_comments_event', 'pdev_delete_comments_task' );function pdev_delete_comments_task() {global $wpdb;$options = pdev_delete_comments_options();$status = $options['status'];$days = absint( $options['days'] );// Set default comment_approved value to spam.$comment_approved = 'spam';// If moderated status, WordPress stores this as '0'.if ( 'moderated' !== $status ) {$comment_approved = '0';}// Build and run the query to delete comments.$sql = "DELETE FROM $wpdb->commentsWHERE ( comment_approved = '$comment_approved' )AND DATEDIFF( now(), comment_date )> %d";$wpdb->query( $wpdb->prepare( $sql, $days ) );}register_deactivation_hook( __FILE__, 'pdev_delete_comments_deactivate' );function pdev_delete_comments_deactivate() {$timestamp = wp_next_scheduled( 'pdev_delete_comments_event' );if ( false !== $timestamp ) {wp_unschedule_event( $timestamp, 'pdev_delete_comments_event' );}}
SUMMARY
Cron is a powerful tool that is often underused by plugin developers. It creates a lot of interesting possibilities. Understanding how cron works can allow you to build out more advanced features for your plugin users. Now it is time to start thinking about all the things you can do with it.