3
Dashboard and Settings
ADDING MENUS AND SUBMENUS
Many plugins you create need some type of menu item, which generally links to your plugin's settings page where users can configure your plugin options. WordPress features two methods for adding a plugin menu: a top‐level menu or a submenu item.
Creating a Top‐Level Menu
The first menu method for your plugin to explore in WordPress is a new top‐level menu, which is added to the Dashboard menu list. For example, Settings is a top‐level menu. A top‐level menu is common practice for any plugin that needs multiple option pages. To register a top‐level menu, you use the add_menu_page() function.
<?php add_menu_page( page_title, menu_title, capability, menu_slug, function,icon_url, position ); ?>
The add_menu_page() function accepts the following parameters:
-
page_title: Title of the page as shown in the<title>tags. -
menu_title: Name of your menu displayed on the Dashboard. -
capability: Minimum capability required to view the menu. -
menu_slug: Slug name to refer to the menu; should be a unique name. -
function: Function to be called to display the page content for the item. -
icon_url: URL to a custom image to use as the menu icon. Also supports thedashiconshelper class to use a font icon (e.g.dashicons‐chart‐pie). -
position: Location in the menu order where it should appear.
Now create a new menu for your plugin to see the menu process in action. Use the admin_menu action hook to trigger your menu code. This is the appropriate hook to use whenever you create menus and submenus in your plugins.
<?phpadd_action( 'admin_menu', 'pdev_create_menu' );function pdev_create_menu() {//create custom top-level menuadd_menu_page( 'PDEV Settings Page', 'PDEV Settings','manage_options', 'pdev-options', 'pdev_settings_page','dashicons-smiley', 99 );}?>
As you can see, the admin_menu action hook calls your custom pdev_create_menu() function. Next you need to call the add_menu_page() function to register the custom menu in WordPress. Set the name of your menu to PDEV Settings, require that the user has manage_options capabilities (that is, is an administrator), and set the callback function to pdev_settings_page(). You also set the menu icon to use the built‐in smiley dashicon (covered in detail later in this chapter). The final parameter is the menu position, which defines where the menu will appear within the WordPress Dashboard's left menu.
The result is a custom registered menu as shown in Figure 3‐1.
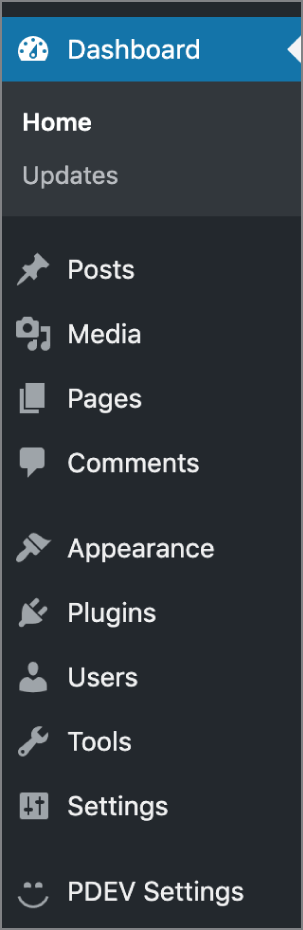
FIGURE 3‐1: Custom registered menu
Adding a Submenu
Now that you have a new top‐level menu created, create some submenus for it, which are menu items listed below your top‐level menu. For example, Settings is a top‐level menu, whereas General, listed below Settings, is a submenu of the Settings menu. To register a submenu, use the add_submenu_page() function.
<?php add_submenu_page( parent_slug, page_title, menu_title, capability,menu_slug, function ); ?>
The add_submenu_page() function accepts the following parameters:
-
parent_slug: Slug name for the parent menu (menu_slugpreviously defined) -
page_title: Title of the page as shown in the<title>tags -
menu_title: Name of your submenu displayed on the Dashboard -
capability: Minimum capability required to view the submenu -
menu_slug: Slug name to refer to the submenu; should be a unique name -
function: Function to be called to display the page content for the item
Now that you know how submenus are defined, you can add one to your custom top‐level menu.
<?phpadd_action( 'admin_menu', 'pdev_create_menu' );function pdev_create_menu() {//create custom top-level menuadd_menu_page( 'PDEV Settings Page', 'PDEV Settings','manage_options', 'pdev-options', 'pdev_settings_page','dashicons-smiley', 99 );//create submenu itemsadd_submenu_page( 'pdev-options', 'About The PDEV Plugin', 'About','manage_options', 'pdev-about', 'pdev_about_page' );add_submenu_page( 'pdev-options', 'Help With The PDEV Plugin','Help', 'manage_options', 'pdev-help', 'pdev_help_page' );add_submenu_page( 'pdev-options', 'Uninstall The PDEV Plugin','Uninstall', 'manage_options', 'pdev-uninstall', 'pdev_uninstall_page' );}?>
The preceding code creates three submenus for your custom top‐level menu: About, Help, and Uninstall, as shown in Figure 3‐2. Each of these submenu items links to a different custom function that can contain any code you want to use for that submenu page.

FIGURE 3‐2: Submenus
Adding a Menu Item to an Existing Menu
If your plugin requires only a single options page, you may not need to create a custom top‐level menu. Instead, you can simply add a submenu to an existing menu, such as the Settings menu.
WordPress features many different functions to add submenus to the existing default menus in WordPress. One of these functions is the add_options_page() function. Now explore how the add_options_page() function works to add a submenu item to the Settings menu.
<?php add_options_page( page_title, menu_title, capability, menu_slug, function); ?>The add_options_page() function accepts the following parameters:
-
page_title: Title of the page as shown in the<title>tags -
menu_title: Name of your submenu displayed on the Dashboard -
capability: Minimum capability required to view the submenu -
menu_slug: Slug name to refer to the submenu; should be a unique name -
function: Function to be called to display the page content for the item
Now add a submenu item to the Settings menu.
<?phpadd_action( 'admin_menu', 'pdev_create_submenu' );function pdev_create_submenu() {//create a submenu under Settingsadd_options_page( 'PDEV Plugin Settings', 'PDEV Settings', 'manage_options','pdev_plugin', 'pdev_plugin_option_page' );}?>
The preceding code adds a submenu labeled PDEV Settings under the Settings menu, as shown in Figure 3‐3. Set the page title to PDEV Plugin Settings, set the capability to manage_options so that only administrators can view it, and set the function pdev_plugin_option_page() to be called when the submenu is clicked.

FIGURE 3‐3: Submenu labeled PDEV Settings
The following is a list of all available submenu functions in WordPress:
-
add_dashboard_page: Adds a submenu to the Dashboard menu -
add_posts_page: Adds a submenu to the Posts menu -
add_media_page: Adds a submenu to the Media menu -
add_links_page: Adds a submenu to the Links menu -
add_pages_page: Adds a submenu to the Pages menu -
add_comments_page: Adds a submenu to the Comments menu -
add_theme_page: Adds a submenu to the Appearance menu -
add_plugins_page: Adds a submenu to the Plugins menu -
add_users_page: Adds a submenu to the Users menu -
add_management_page: Adds a submenu to the Tools menu -
add_options_page: Adds a submenu to the Settings menu
To use any of these functions, simply swap out the function name in the code shown earlier.
PLUGIN SETTINGS
Now that you've learned how to create menus and submenus in the WordPress Dashboard, it's time to create a settings page for your plugin. WordPress enables easy access to the database to store and retrieve data, such as options end users can modify and save in settings pages or internal information plugins you need to know. You'll learn how to save and fetch this data using the Options API and internal WordPress functions.
THE OPTIONS API
The Options API is a set of functions that enable easy access to the database where WordPress, plugins, and themes save and fetch needed information.
Options are stored in a database table named, by default,
wp_options and can be text, integers, arrays, or objects. For example, WordPress keeps in this table the title of your blog, the list of active plugins, the news articles displayed on the Dashboard, or the time to check if a new version is available.
You'll now learn how to use the functions to access, update, and save options: add_option(), update_option(), get_option(), and delete_option().
Saving Options
You start by saving your first plugin option, which will be named pdev_plugin_color and have a value of red. The function call to do so is the following:
<?phpadd_option( 'pdev_plugin_color', 'red' );?>
The add_option()function accepts the following parameters:
-
option: Name of the option to add -
value: Value of the option you are adding -
deprecated: Description, which is no longer used -
autoload: Whether to load the option when WordPress starts
The first parameter is your option name. It is crucial that you make it unique and self‐explanatory.
- Unique: It will never conflict with internal existing or future WordPress options or with settings that might be created by another plugin.
- Self‐explanatory: Name it so that it's obvious it's a plugin setting and not something created by WordPress.
The second parameter is the option value that can be practically anything a variable can hold: string, integer, float number, Boolean, object, or array.
Saving an Array of Options
Every option saved adds a new record in WordPress’ option table. You can simply store several options at once, in one array. This avoids cluttering the database and updates the values in a single MySQL query for greater efficiency and speed.
$options = array('color' => 'red','fontsize' => '120%','border' => '2px solid red');update_option( 'pdev_plugin_options', $options );
Saving your plugin options in one array rather than individual records can have a huge impact on WordPress’ loading time, especially if you save or update many options. Most of the time, PHP code executes fast, but SQL queries usually hinder performance, so save them whenever possible.
Updating Options
Now that you know how to create a new option for your plugin, let's look at updating that option value. To handle this, you'll use the update_option()function. As an example, let's update the color of your new plugin setting from red to blue.
<?phpupdate_option( 'pdev_plugin_color', 'blue' );?>
The update_option()function accepts the following parameters:
-
option: Name of the option to update -
value: Value of the option you are updating -
autoload: Whether to load the option when WordPress starts
The difference between add_option() and update_option() is that the first function does nothing if the option name already exists, whereas update_option() checks if the option already exists before updating its value and creates it if needed.
Retrieving Options
To fetch an option value from the database, use the function get_option().
<?php$pdev_plugin_color = get_option( 'pdev_plugin_color' );?>
The first thing to know about get_option() is that if the option does not exist, it will return false. The second thing is that if you store Booleans, you might get integers in return.
The get_option()function accepts the following parameters:
-
option: Name of the option to retrieve -
default: Value to return if the option does not exist. The default return value isfalse.
As an illustration of this behavior, consider the following code block that creates a couple of new options with various variable types:
<?phpupdate_option( 'pdev_bool_true', true );update_option( 'pdev_bool_false', false );?>
You can now retrieve these options, along with another one that does not exist, and see what variable types are returned, shown as an inline comment below each get_option() call:
<?phpvar_dump( get_option( 'nonexistent_option' ) );// bool(false)var_dump( get_option( 'pdev_bool_true' ) );// string(1) "1"var_dump( get_option( 'pdev_bool_false' ) );// bool(false)?>
To avoid an error when checking option values, you should store true and false as 1 and 0. This means also that you need to strictly compare the return of get_option() with Boolean false to check if the option exists.
<?php//set the option as trueupdate_option( 'pdev_plugin_enabled', 1 );if( get_option( 'pdev_plugin_enabled' ) == false ) {// option has not been defined yet// ...echo 'NOT DEFINED YET';} else {// option exists// ...echo 'OPTION EXISTS!';}?>
You can also specify what value you want to be returned if the option is not found in the database, with a second option parameter to get_option(), like in the following example:
<?php$option = get_option( 'pdev_plugin_option', 'Option not found' );?>
Loading an Array of Options
You have seen that saving multiple options in a single array is best practice. A complete example of saving and then getting values from one array would be as follows:
<?php// To store all of them in a single function call:$options = array('color' => 'red','fontsize' => '120%','border' => '2px solid red');update_option( 'pdev_plugin_options', $options );// Now to fetch individual values from one single call:$options = get_option( 'pdev_plugin_options' );// Store individual option values in variables$color = $options[ 'color' ];$fontsize = $options[ 'fontsize' ];$border = $options[ 'border' ];?>
Saving and retrieving options enclosed in an array has another advantage: variable Boolean types within the array are preserved. Consider the following example:
<?phpadd_option( 'pdev_test_bool', array('booltrue' => true,'boolfalse' => false));?>
Now get the option value from the database with var_dump( get_option( 'test_bool' ) ). See how Boolean types are retained, contrary to the previous example:
// output resultvar_dump( get_option( 'pdev_test_bool' ) );array(2) {["booltrue"] => bool(true)["boolfalse"]=> bool(false)}
Deleting Options
Now that you understand how to create, update, and retrieve options, let's look at deleting an option. Deleting an option needs a self‐explanatory function call.
<?phpdelete_option( 'pdev_plugin_options' );?>
This function call returns false if the option to delete cannot be found and returns true otherwise. You will mostly delete options when writing uninstall functions or files (see Chapter 2).
The Autoload Parameter
By default, all the options stored in the database are fetched by a single SQL query when WordPress initializes and then caches. This applies to internal WordPress core settings and options created and stored by plugins.
This is efficient behavior: no matter how many get_option() calls you issue in your plugins, they won't generate extra SQL queries and slow down the whole site. Still, the potential drawback of this autoload technique is that rarely used options are always loaded in memory, even when not needed. For instance, there is no point in fetching backend options when a reader accesses a blog post.
To address this issue when saving an option for the first time, you can specify its autoload behavior, as in the following example:
<?phpadd_option( 'pdev_plugin_option', $value, '', $autoload );?>
Note the empty third parameter: This is a parameter that was deprecated several WordPress versions ago and is not needed any more. Any value passed to it will do; just be sure not to omit it.
The fourth parameter is what matters here. If $autoload is anything but 'no' (or simply not specified), option pdev_plugin_option will be read when WordPress starts, and subsequent get_option() function calls will not issue any supplemental SQL query. Setting $autoload to 'no' can invert this: this option will not be fetched during startup of WordPress, saving memory and execution time, but it will trigger an extra SQL query the first time your code fetches its value.
Of course, specifying the autoload parameter upon creation of an option does not change the way you fetch, update, or delete its value.
Segregating Plugin Options
A function to initiate your plugin options, run on plugin activation as covered in Chapter 2, could then look like the following:
<?phpfunction pdev_plugin_create_options() {// front-end options: autoloadedadd_option( 'pdev_plugin_options', array('color' => 'red','fontsize' => '120%','border' => '2px solid red'));// back-end options: loaded only if explicitly neededadd_option( 'pdev_plugin_admin_options', array('version' => '1.0','donate_url' => 'https://example.com/','advanced_options' => '1'),'', 'no' );}?>
Again, don't forget the empty third parameter before the autoload value. This might seem a bit convoluted, and actually it is for so few options set. This professional technique makes sense if your plugin features dozens of options, or options containing long text strings.
Toggling the Autoload Parameter
The autoload parameter is set when an option is created with add_option() and is not supposed to change afterward. With this said, if you believe that it would improve your plugin's efficiency to modify the autoload behavior, it is possible and easy: simply delete and then re‐create the option with an explicit autoload parameter.
<?phpfunction pdev_plugin_recreate_options() {// get old value$old = get_option( 'pdev_plugin_admin_options' );// delete then recreate without autoloaddelete_option( 'pdev_plugin_admin_options' );add_option( 'pdev_plugin_admin_options', $old, '', 'no' );}?>
THE SETTINGS API
Options can be internally created and updated by your plugin (for instance, storing the time stamp of the next iteration of a procedure). But they are also frequently used to store settings the end user will modify through your plugin administration page.
When creating or updating user‐defined options for a plugin, relying on the Settings API can make your code both simpler and more efficient.
Benefits of the Settings API
Dealing with user inputs introduces new constraints in the option process: you need to design a user interface, monitor form submissions, handle security checks, and validate user inputs. To easily manage these common tasks, WordPress wraps the option functions into a comprehensive Settings API.
The Settings API enables you to handle these simple tasks:
- Tell WordPress that you are going to use some new options and how you want them displayed.
- Specify a function that will sanitize user inputs.
while WordPress transparently manages for you these cumbersome and repetitive parts:
- Draw most of the option page itself.
- Monitor form submission and handle
$_POSTdata. - Create and update options if needed.
- Wield all the required security measures and hidden fields for nonces, covered in detail in Chapter 4, “Security and Performance.”
Now it's time to dissect the Settings API; you'll learn to use it through a step‐by‐step example.
Settings API Functions
The Settings API functions consist of three steps:
- Tell WordPress the new settings you want it to manage for you. Doing so adds your settings into a list of authorized options (also known as whitelisting).
- Define the settings (text areas, input boxes, and any HTML form element) and how they will be visually grouped together in sections.
- Tell WordPress to display your settings in an actual form.
But first, you create a setting management page for your plugin.
Creating the Plugin Administration Page
The plugin page will be located at Settings ➪ PDev Settings:
<?php// Add a menu for our option pageadd_action( 'admin_menu', 'pdev_plugin_add_settings_menu' );function pdev_plugin_add_settings_menu() {add_options_page( 'PDEV Plugin Settings', 'PDEV Settings', 'manage_options','pdev_plugin', 'pdev_plugin_option_page' );}// Create the option pagefunction pdev_plugin_option_page() {?><div class="wrap"><h2>My plugin</h2><form action="options.php" method="post"></form></div><?php}?>
This page is empty for now. You will add form inputs later. Creating pages for plugins is covered in detail earlier in the “Plugin Settings” section of this chapter, so refer to it for more explanation about this code.
Registering New Settings
The next step is to register your new settings. The function you need here is register_setting() and three parameters, used as follows:
<?phpregister_setting( option group, option name, args );?>
The register_setting()function accepts the following parameters:
-
option_group: Group name for your settings. -
option_name: Name of an option to sanitize and save. -
args: Data used to describe the setting when registered.-
type: Type of data associated with this setting. Valid values arestring,boolean,integer, andnumber. -
description: Description of the data for this setting. -
sanitize_callback: Callback function to sanitize the option's value. -
show_in_rest: Whether the data with this setting should be included in the REST API. -
default: Default value when callingget_option().
-
Now let's register your plugin settings using the register_setting() function. The first parameter you'll set is the setting group name, and the second parameter is the option name as you would use it in a get_option() call. The group name can be anything actually, but it's just simpler to name it the same as the option that will get stored in the database.
The third parameter is an array of additional arguments defining the type of data. In this case, it's a string and references your callback function, here named pdev_plugin_validate_options(), that will be passed all the settings saved in your form. You'll define this function later.
<?php$args = array('type' => 'string','sanitize_callback' => 'pdev_plugin_validate_options','default' => NULL);register_setting( 'pdev_plugin_options', 'pdev_plugin_options', $args );?>
Defining Sections and Settings
Now define what the settings will be more precisely by using the function add_settings_field() and how they will be visually grouped with the function add_settings_section().
<?phpadd_settings_section( id, title, callback, page );add_settings_field( id, title, callback, page, section, args );?>
The first function call, add_settings_section(), defines how the section on the page will show. The four required parameters it uses follow:
-
id: HTML ID tag for the section -
title: Section title text that will show within an<H2>tag -
callback: Name of the callback function that will echo some explanations about that section -
page: Settings page on which to show the section (that is, the?page=pdev_pluginpart of the page URL)
The second function call, add_settings_field(), describes how to add the form input. Its required parameters follow:
-
id: HTML ID tag for the section -
title: Formatted title of the field, which is displayed as the label for the field on output -
callback: Name of the callback function that will echo the form field -
page: Settings page on which to show the section -
section: Section of the settings page in which to show the field, as defined previously by theadd_settings_section()function call -
args: Additional arguments used when outputting the field
Now let's implement these new functions for your plugin settings as follows:
<?phpadd_settings_section('pdev_plugin_main','PDEV Plugin Settings','pdev_plugin_section_text','pdev_plugin');add_settings_field('pdev_plugin_name','Your Name','pdev_plugin_setting_name','pdev_plugin','pdev_plugin_main');
You now need to define two simple callback functions: one to display a few explanations about the section and one to output and fill the form field.
<?php// Draw the section headerfunction pdev_plugin_section_text() {echo '<p>Enter your settings here.</p>';}// Display and fill the Name form fieldfunction pdev_plugin_setting_name() {// get option 'text_string' value from the database$options = get_option( 'pdev_plugin_options' );$name = $options['name'];// echo the fieldecho "<input id='name' name='pdev_plugin_options[name]'type='text' value='" . esc_attr( $name ) . "'/>";}?>
This second function call fetches the option value name that is stored in an array.
When outputting the HTML input field, note its name. This is how you tell the browser to pass this value back into an array with the same name as the option you'll save, as defined earlier in the register_setting() function call. Any field that has not been previously registered and whitelisted will be ignored by WordPress.
You'll also notice you are using the esc_attr() function. This is used to escape the HTML attribute value for display. You'll learn more about this in Chapter 4.
Validating User Input
There is still one callback function to define, pdev_plugin_validate_options(), as mentioned earlier when registering the settings.
In this example, users are asked to enter text, so your validation function simply makes sure that the input contains only letters.
<?php// Validate user input (we want text and spaces only)function pdev_plugin_validate_options( $input ) {$valid = array();$valid['name'] = preg_replace('/[^a-zA-Zs]/','',$input['name'] );return $valid;}?>
To validate the user input as letters only, a simple pattern matching (also known as regular expression) that strips all other characters is used here. This regex pattern also supports spaces between names.
This function is passed the $_POST data as a parameter. For enhanced security, start creating a new empty array named $valid and collect in this array only the values you are expecting. This way, if for some reason an unanticipated field is submitted in the form, your function not only validates the information you want but also blocks everything else. Refer to Chapter 4 for more tips and functions about data validation.
Rendering the Form
Now that you have defined these function calls, it's time to use them. At the beginning of this step‐by‐step example, you created an empty page. Go back to that and add the form fields and a Submit button.
// Create the option pagefunction pdev_plugin_option_page() {?><div class="wrap"><h2>My plugin</h2><form action="options.php" method="post"><?phpsettings_fields( 'pdev_plugin_options' );do_settings_sections( 'pdev_plugin' );submit_button( 'Save Changes', 'primary' );?></form></div><?php}
The settings_fields() function call references the whitelisted option you have declared with register_setting(). The only required parameter is the settings group name. This should match the group name used in register_setting(). It takes care of the hidden fields, security checks, and form redirection after it has been submitted.
The second function call, do_settings_sections(), outputs all the sections and form fields you have previously defined. The only required parameter for this function is the slug name of the page whose settings sections you want to output.
The final function is submit_button(), which will display the form submission button. This function is extremely handy when building any form in WordPress and accepts the following parameters:
-
text: Text displayed on the button. -
type: Type and CSS class or classes of the button. -
name: HTML name of the button. -
wrap: Boolean that defines whether the output button should be wrapped in a paragraph tag. Defaults to true. -
other_attributes: Additional attributes that should be output with the button, such as atabindex.
An alternative method is using the get_submit_button() function. This function supports the same parameters, but instead of displaying the button, it will return the submit button. This is useful if you are compiling a form but not ready to fully display it yet.
All Done!
Notice how little HTML you have laid down, and yet the plugin page is now complete and functional. This is a major reason this Settings API is rock solid: you focus on features and let WordPress create all the HTML with relevant tags and classes, handle the data submission, and escape strings before inserting them to the database.
Wrapping It Up: A Complete Plugin Management Page
Some of the function calls used here need to be hooked into WordPress actions such as admin_init. Let's recapitulate all the steps covered bit by bit into a full‐fledged plugin.
<?php/*Plugin Name: Settings API examplePlugin URI: https://example.com/Description: A complete and practical example of the WordPress Settings APIAuthor: WROXAuthor URI: http://wrox.com*/// Add a menu for our option pageadd_action( 'admin_menu', 'pdev_plugin_add_settings_menu' );function pdev_plugin_add_settings_menu() {add_options_page( 'PDEV Plugin Settings', 'PDEV Settings', 'manage_options','pdev_plugin', 'pdev_plugin_option_page' );}// Create the option pagefunction pdev_plugin_option_page() {?><div class="wrap"><h2>My plugin</h2><form action="options.php" method="post"><?phpsettings_fields( 'pdev_plugin_options' );do_settings_sections( 'pdev_plugin' );submit_button( 'Save Changes', 'primary' );?></form></div><?php}// Register and define the settingsadd_action( 'admin_init', 'pdev_plugin_admin_init' );function pdev_plugin_admin_init(){$args = array('type' => 'string','sanitize_callback' => 'pdev_plugin_validate_options','default' => NULL);// Register our settingsregister_setting( 'pdev_plugin_options', 'pdev_plugin_options', $args );// Add a settings sectionadd_settings_section('pdev_plugin_main','PDEV Plugin Settings','pdev_plugin_section_text','pdev_plugin');// Create our settings field for nameadd_settings_field('pdev_plugin_name','Your Name','pdev_plugin_setting_name','pdev_plugin','pdev_plugin_main');}// Draw the section headerfunction pdev_plugin_section_text() {echo '<p>Enter your settings here.</p>';}// Display and fill the Name form fieldfunction pdev_plugin_setting_name() {// get option 'text_string' value from the database$options = get_option( 'pdev_plugin_options' );$name = $options['name'];// echo the fieldecho "<input id='name' name='pdev_plugin_options[name]'type='text' value='" . esc_attr( $name ) . "'/>";}// Validate user input (we want text and spaces only)function pdev_plugin_validate_options( $input ) {$valid = array();$valid['name'] = preg_replace('/[^a-zA-Zs]/','',$input['name'] );return $valid;}?>
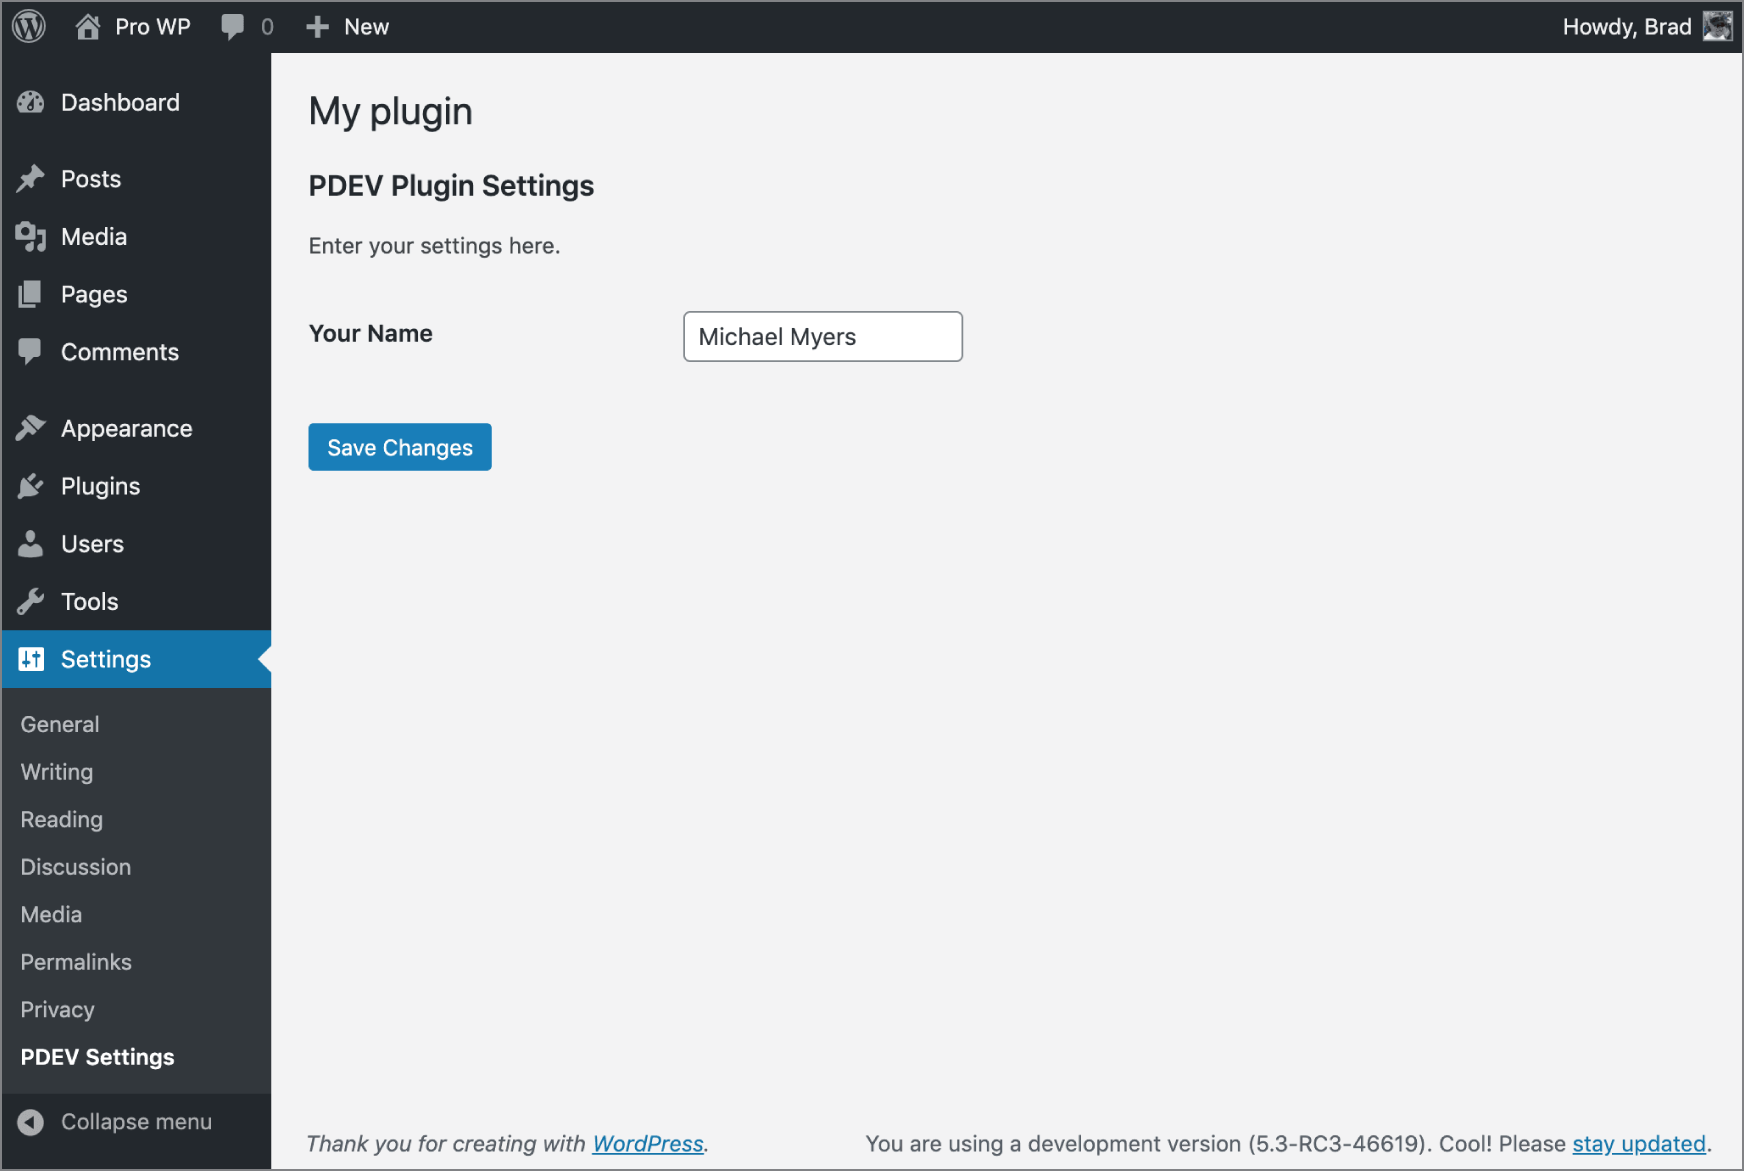
FIGURE 3‐4: Plugin management page
Activate this plugin and head to Settings ➪ PDEV Settings. You'll see a similar interface to the one shown in Figure 3‐4.
Improving Feedback on Validation Errors
The validation function you've previously defined could be slightly improved by letting the users know they have entered an unexpected value and that it has been modified so that they can pay attention to it and maybe amend their input.
The relatively unknown function add_settings_error() of the Settings API can handle this case. Here's how it is used:
<?phpadd_settings_error( setting, code, message, type );?>
This function call registers an error message that displays to the user. add_settings_error() accepts the following parameters:
-
setting: Title of the setting to which this error applies -
code: Slug name to identify the error, which is used as part of the HTML ID tag -
message: Formatted message text to display, which is displayed inside styled<div>and<p>tags -
type: Type of message,errororupdate
You can improve the validating function with a user notice if applicable, as shown here:
<?phpfunction pdev_plugin_validate_options( $input ) {$valid['name'] = preg_replace('/[^a-zA-Zs]/','',$input['name'] );if( $valid['name'] !== $input['name'] ) {add_settings_error('pdev_plugin_text_string','pdev_plugin_texterror','Incorrect value entered! Please only input letters and spaces.','error');}return $valid;}?>
The function now compares the validated data with the original input and displays an error message if they differ (see Figure 3‐5).

FIGURE 3‐5: Error message
Expanding with Additional Field Types
You've now covered the different ways to create a settings page using the WordPress Settings API. Let's expand on that by adding additional form field types to your settings page. This is a more real‐world example showing how elaborate your settings page could be. At the end of this section, you'll review the entire plugin code as a whole.
First, you need to define additional settings fields using the add_settings_field() function. The following example updates the registration of those fields in your custom pdev_plugin_admin_init() function:
// Register and define the settingsadd_action('admin_init', 'pdev_plugin_admin_init');function pdev_plugin_admin_init(){//define the setting args$args = array('type' => 'string','sanitize_callback' => 'pdev_plugin_validate_options','default' => NULL);//register our settingsregister_setting( 'pdev_plugin_options', 'pdev_plugin_options', $args );//add a settings sectionadd_settings_section('pdev_plugin_main','PDEV Plugin Settings','pdev_plugin_section_text','pdev_plugin');//create our settings field for nameadd_settings_field('pdev_plugin_name','Your Name','pdev_plugin_setting_name','pdev_plugin','pdev_plugin_main');//create our settings field for favorite holidayadd_settings_field('pdev_plugin_fav_holiday','Favorite Holiday','pdev_plugin_setting_fav_holiday','pdev_plugin','pdev_plugin_main');//create our settings field for beast modeadd_settings_field('pdev_plugin_beast_mode','Enable Beast Mode?','pdev_plugin_setting_beast_mode','pdev_plugin','pdev_plugin_main');}
As you can see in the preceding code sample, you register two new form fields for Favorite Holiday and Beast Mode. Both call custom functions for displaying each field on your settings page. Let's look at the pdev_plugin_setting_fav_holiday() function first.
// Display and select the favorite holiday select fieldfunction pdev_plugin_setting_fav_holiday() {// Get option 'fav_holiday' value from the database// Set to 'Halloween' as a default if the option does not exist$options = get_option( 'pdev_plugin_options', [ 'fav_holiday' => 'Halloween' ] );$fav_holiday = $options['fav_holiday'];// Define the select option values for favorite holiday$items = array( 'Halloween', 'Christmas', 'New Years' );echo "<select id='fav_holiday' name='pdev_plugin_options[fav_holiday]'>";foreach( $items as $item ) {// Loop through the option values// If saved option matches the option value, select itecho "<option value='" .$item. "' ".selected( $fav_holiday, $item, false ).">" . esc_html( $item ) ."</option>";}echo "</select>";}
This example registers a new select drop‐down field allowing the user to select their favorite holiday. First, you call get_option() to load the current setting value, if it exists. If the value does not exist, meaning the user has not selected and saved the selection yet, the default is set to Halloween. Next you set the $items variable to an array of available holiday options to choose from.
Now it's time to loop through the available holiday options and display each one in the drop‐down field. We're using the WordPress core function selected(), which compares two values and, if they match, returns selected="selected", which will select that option value in the drop‐down.
Now let's look at the custom function for displaying the radio button field, pdev_plugin_setting_beast_mode().
// Display and set the Beast Mode radio button fieldfunction pdev_plugin_setting_beast_mode() {// Get option 'beast_mode' value from the database// Set to 'disabled' as a default if the option does not exist$options = get_option( 'pdev_plugin_options', [ 'beast_mode' => 'disabled' ] );$beast_mode = $options['beast_mode'];// Define the radio button options$items = array( 'enabled', 'disabled' );foreach( $items as $item ) {// Loop the two radio button options and select if set in the option valueecho "<label><input ".checked( $beast_mode, $item, false )."value= '" . esc_attr( $item ) . "' name='pdev_plugin_options[beast_mode]'type='radio'/>" . esc_html( $item ) . "</label><br/>";}}
This example registers a new radio button field allowing the user to select if they want to enable beast mode or not. Again, you'll use get_option() to load the current setting value, and if it doesn't exist, the default value disabled is set. Next, you'll define the two values in the $items array. Now you need to loop through the two options displaying the radio button. The checked() function is used to compare the saved value against the display value and, if they are the same, to input checked="checked" on the radio button form field.
Now that you have registered two new settings fields and created the custom functions to display both fields, you need to update your validate function to accept those values and sanitize them as needed.
// Validate user input for all three optionsfunction pdev_plugin_validate_options( $input ) {// Only allow letters and spaces for the name$valid['name'] = preg_replace('/[^a-zA-Zs]/','',$input['name'] );if( $valid['name'] !== $input['name'] ) {add_settings_error('pdev_plugin_text_string','pdev_plugin_texterror','Incorrect value entered! Please only input letters and spaces.','error');}// Sanitize the data we are receiving$valid['fav_holiday'] = sanitize_text_field( $input['fav_holiday'] );$valid['beast_mode'] = sanitize_text_field( $input['beast_mode'] );return $valid;}
The only update here is to run the two new option values through the sanitize_text_field() WordPress function to sanitize the user‐inputted data. Even though the values are hard‐coded in the form, that doesn't stop a user from modifying the frontend form code and posting unknown data to these setting fields. You'll cover this more in Chapter 4.
That's it! You now have a more robust settings page for your plugin. Let's review the entire plugin source code with your new settings fields.
<?php/*Plugin Name: Settings API example - Multiple FieldsPlugin URI: https://example.com/Description: A complete and practical example of the WordPress Settings APIAuthor: WROXAuthor URI: http://wrox.com*/// Add a menu for our option pageadd_action( 'admin_menu', 'pdev_plugin_add_settings_menu' );function pdev_plugin_add_settings_menu() {add_options_page( 'PDEV Plugin Settings', 'PDEV Settings', 'manage_options','pdev_plugin', 'pdev_plugin_option_page' );}// Create the option pagefunction pdev_plugin_option_page() {?><div class="wrap"><h2>My plugin</h2><form action="options.php" method="post"><?phpsettings_fields( 'pdev_plugin_options' );do_settings_sections( 'pdev_plugin' );submit_button( 'Save Changes', 'primary' );?></form></div><?php}// Register and define the settingsadd_action('admin_init', 'pdev_plugin_admin_init');function pdev_plugin_admin_init(){// Define the setting args$args = array('type' => 'string','sanitize_callback' => 'pdev_plugin_validate_options','default' => NULL);// Register our settingsregister_setting( 'pdev_plugin_options', 'pdev_plugin_options', $args );// Add a settings sectionadd_settings_section('pdev_plugin_main','PDEV Plugin Settings','pdev_plugin_section_text','pdev_plugin');// Create our settings field for nameadd_settings_field('pdev_plugin_name','Your Name','pdev_plugin_setting_name','pdev_plugin','pdev_plugin_main');// Create our settings field for favorite holidayadd_settings_field('pdev_plugin_fav_holiday','Favorite Holiday','pdev_plugin_setting_fav_holiday','pdev_plugin','pdev_plugin_main');// Create our settings field for beast modeadd_settings_field('pdev_plugin_beast_mode','Enable Beast Mode?','pdev_plugin_setting_beast_mode','pdev_plugin','pdev_plugin_main');}// Draw the section headerfunction pdev_plugin_section_text() {echo '<p>Enter your settings here.</p>';}// Display and fill the Name text form fieldfunction pdev_plugin_setting_name() {// Get option 'text_string' value from the database$options = get_option( 'pdev_plugin_options' );$name = $options['name'];// Echo the fieldecho "<input id='name' name='pdev_plugin_options[name]'type='text' value='" . esc_attr( $name ) . "'/>";}// Display and select the favorite holiday select fieldfunction pdev_plugin_setting_fav_holiday() {// Get option 'fav_holiday' value from the database// Set to 'Halloween' as a default if the option does not exist$options = get_option( 'pdev_plugin_options', [ 'fav_holiday' => 'Halloween' ] );$fav_holiday = $options['fav_holiday'];// Define the select option values for favorite holiday$items = array( 'Halloween', 'Christmas', 'New Years' );echo "<select id='fav_holiday' name='pdev_plugin_options[fav_holiday]'>";foreach( $items as $item ) {// Loop through the option values// If saved option matches the option value, select itecho "<option value='" . esc_attr( $item ) . "'".selected( $fav_holiday, $item, false ).">" . esc_html( $item ) ."</option>";}echo "</select>";}// Display and set the Beast Mode radio button fieldfunction pdev_plugin_setting_beast_mode() {// Get option 'beast_mode' value from the database// Set to 'disabled' as a default if the option does not exist$options = get_option( 'pdev_plugin_options', [ 'beast_mode' => 'disabled' ] );$beast_mode = $options['beast_mode'];// Define the radio button options$items = array( 'enabled', 'disabled' );foreach( $items as $item ) {// Loop the two radio button options and select if set in the option valueecho "<label><input " . checked( $beast_mode, $item, false ) . "value='" . esc_attr( $item ) . "' name='pdev_plugin_options[beast_mode]'type='radio'/> " . esc_html( $item ) . "</label><br/>";}}// Validate user input for all three optionsfunction pdev_plugin_validate_options( $input ) {// Only allow letters and spaces for the name$valid['name'] = preg_replace('/[^a-zA-Zs]/','',$input['name'] );if( $valid['name'] !== $input['name'] ) {add_settings_error('pdev_plugin_text_string','pdev_plugin_texterror','Incorrect value entered! Please only input letters and spaces.','error');}// Sanitize the data we are receiving$valid['fav_holiday'] = sanitize_text_field( $input['fav_holiday'] );$valid['beast_mode'] = sanitize_text_field( $input['beast_mode'] );return $valid;}?>
Adding Fields to an Existing Page
You have seen how to create a new custom settings page for a plugin and its associated entry in the administration menus. Doing so makes sense if your plugin features a lot of settings and its administration page shows a lot of content.
Sometimes, though, it is not worth adding a new menu entry for just one or a few plugin options. Here again the Settings API will prove to be useful, allowing plugin setting fields to easily be added to the existing WordPress setting pages.
How It Works
Two internal functions, do_settings_sections() and do_settings_fields(), are triggered to draw sections and fields that have been previously registered, like you did in the example plugin.
Each core setting page calls these two functions, so you can hook into them if you know their slug name.
Adding a Section to an Existing Page
Your previous plugin was adding a whole new section and its input field on a stand‐alone page. You now modify it to insert this content into WordPress’ Privacy Settings page.
<?php$args = array('type' => 'string','sanitize_callback' => 'pdev_plugin_validate_options','default' => NULL);register_setting( 'reading', 'pdev_plugin_options', $args );add_settings_section('pdev_plugin_options','PDEV Plugin Settings','pdev_plugin_section_text','reading');add_settings_field('pdev_plugin_text_string','Your Name','pdev_plugin_setting_name','reading','pdev_plugin_options');?>
Notice that the first parameter passed in the register_setting() function call is set to reading. This function now adds your custom section into the reading section, which is located within the Reading Settings page, as shown in Figure 3‐6. Replace all reading instances with media, and your section will be appended at the end of the Media Settings page.

FIGURE 3‐6: Section appended
You still need to whitelist this setting, with register_setting(). Omitting this step would make WordPress ignore the setting when submitting the form.
Adding Only Fields
Of course, it can even make sense to add just one field and no section header to an existing page. Now modify the function in the previous example as shown here:
<?phpfunction pdev_plugin_admin_init(){$args = array('type' => 'string','sanitize_callback' => 'pdev_plugin_validate_options','default' => NULL);register_setting( 'reading', 'pdev_plugin_options', $args );add_settings_field('pdev_plugin_text_string','Your Name','pdev_plugin_setting_name','reading','default');}?>
Your singular field will be added to the default field set of the reading section, as shown in Figure 3‐7.
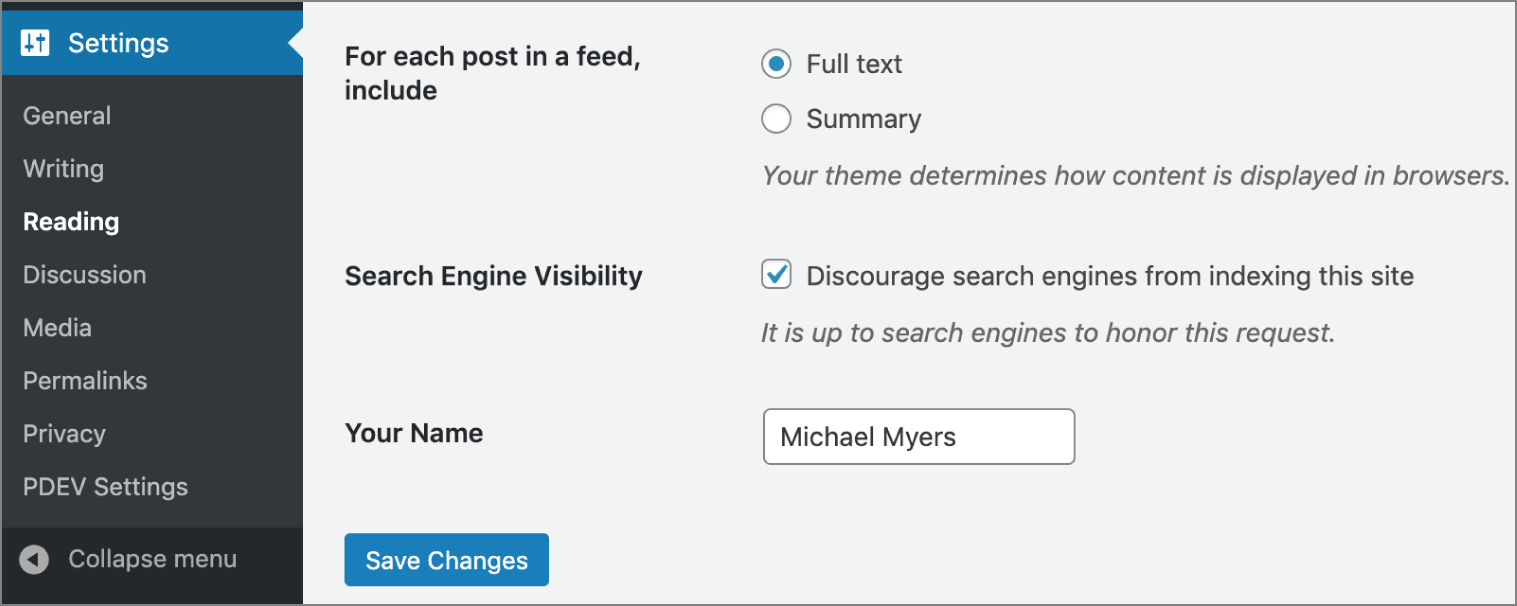
FIGURE 3‐7: Singular field
WordPress’ Sections and Setting Fields
To add a section to an existing page or a field to an existing section, all you need to know is the slug name of the page. Table 3‐1 includes every section and field set names found in the WordPress Settings pages.
TABLE 3-1: List of Core Sections and Fields
| WORDPRESS’ SETTINGS PAGES | SECTION NAMES | FIELD SET NAMES |
| General Settings ( options‐general.php) |
general |
default |
| Writing Settings ( options‐writing.php) |
writing |
default remote_publishing post_via_email |
| Reading Settings ( options‐reading.php) |
reading |
default |
| Discussion Settings ( options‐discussion.php) |
discussion |
default avatars |
| Media Settings ( options‐media.php) |
media |
default embeds uploads |
| Permalink Settings ( options‐permalink.php) |
permalink |
optional |
User Interface Concerns
Electing to add your plugin settings to a separate page or to a core WordPress page is often a matter of choosing the right user interface for the right end user.
When working on a site for a client, you may focus on delivering a key‐in‐hand CMS solution and not on explaining what is WordPress and what is a plugin extending its features. Adding your plugin settings to a core Settings page can enhance its integration into WordPress’ backend because it won't appear different from other core settings. From the client's point of view, your plugin is a core element just as any other built‐in feature.
On the contrary, if you intend to make your plugin available for download, you can target people who probably understand the concept of adding new features to a core set. These people will naturally search for a custom menu where they can manage your plugin. If you opt for adding fields to an existing page, be sure to explicitly tell users about it, for instance in the plugin documentation.
Removing Settings
As a professional plugin developer, it's important to create a high‐quality experience for your users, which includes tasks that are rarely noticed. In this case you're going to learn how to remove settings that your plugin has created when it is uninstalled in WordPress.
You're going to use register_uninstall_hook(), which was covered in Chapter 2, “Plugin Framework.” First you need to register your uninstall function as shown here:
register_uninstall_hook( __FILE__, 'pdev_plugin_uninstall' );Next you'll use the unregister_setting() function of the Settings API. The unregister_setting()function accepts the following parameters:
-
option_group: Settings group name used during registration -
option_name: Name of the option to unregister
You can simply grab these two values from when you registered your settings group. Let's look at the full function in action.
// Deregister our settings group and delete all optionsfunction pdev_plugin_uninstall() {// Clean de-registration of registered settingunregister_setting( 'pdev_plugin_options', 'pdev_plugin_options' );// Remove saved options from the databasedelete_option( 'pdev_plugin_options' );}
The unregister_setting() function will unregister your settings group from WordPress. You also need to remove the value from the database using delete_option(). Remember you are using the uninstall hook, which means this code will be executed only if the plugin is uninstalled. If the plugin is deactivated, the options will remain and be available should the user decide to reactivate the plugin.
KEEPING IT CONSISTENT
They say consistency is one of the principles of good UI design. Creating a plugin for WordPress is no different, and it's a best practice to make your plugin match the WordPress user interface as closely as possible. This helps keep the interface consistent for end users and can make your plugin more professional by providing a solid user experience from the start.
One of the primary advantages to using the WordPress Settings API is that the UI design elements are handled for you. The headers, description text, form fields, buttons, and notices are all styled exactly as the rest of the WordPress Dashboard. It's also future‐proof, meaning if the WordPress admin design and styles are updated in a future version, your plugin will automatically use the updated styling.
WordPress features many different styles that you can easily use in your plugin. In this section, you'll learn how to use the styling available in WordPress for your plugins. To demonstrate, create a simple plugin with a settings page.
<?phpadd_action( 'admin_menu', 'pdev_styling_create_menu' );function pdev_styling_create_menu() {//create custom top-level menuadd_menu_page( 'Testing Plugin Styles', 'Plugin Styling','manage_options', __FILE__, 'pdev_styling_settings' );}?>
Throughout this section, you'll modify the pdev_styling_settings() function.
Using the WordPress UI
The most important part of using the WordPress styles is to wrap your plugin in the class wrap div.
<div class="wrap">Plugin Page</div>
This class sets the stage for all admin styling.
Headings
WordPress has custom styles available for all heading tags. Now look at how those heading tags display:
<?phpfunction pdev_styling_settings() {?><div class="wrap"><h1>My Plugin</h1><h2>My Plugin</h2><h3>My Plugin</h3><h4>My Plugin</h4><h5>My Plugin</h5><h6>My Plugin</h6></div><?php}?>
Each heading is slightly smaller than the previous, as shown in Figure 3‐8. The main heading should always be an <h1>, and any subsequent headings should (likely) be bumped one level up. There should be no skipped levels. This is important for accessibility support as most screen readers will start with the <h1> tag and progress down from there.
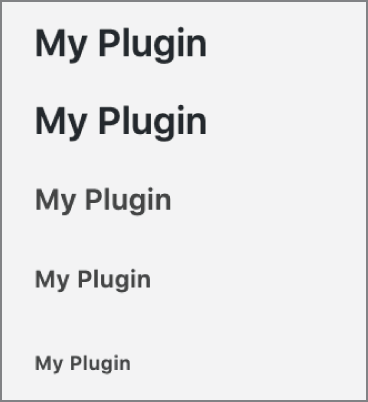
FIGURE 3‐8: Heading levels
Dashicons
WordPress features its own open source font icon library called Dashicons. These icons (or dashicons) are used throughout the WordPress Dashboard and are available to use easily in your plugins.
As an example, let's add some fun dashicons to your various plugin headers.
<h1><span class="dashicons dashicons-smiley"></span> My Plugin</h1><h2><span class="dashicons dashicons-visibility"></span> My Plugin</h2><h3><span class="dashicons dashicons-universal-access"></span> My Plugin</h3><h4><span class="dashicons dashicons-buddicons-replies"></span> My Plugin</h4><h5><span class="dashicons dashicons-businesswoman"></span> My Plugins</h5><h6><span class="dashicons dashicons-thumbs-up"></span> My Plugin</h6>
You simply add a custom dashicons class to your <span> tag to identify the dashicon you'd like to display. In this example you're using a span tag, but they can be added to additional HTML tags as well, such as a paragraph tag. The preceding code generates the icons shown in Figure 3‐9.

FIGURE 3‐9: Dashicons
It's important to note that dashicons are automatically loaded within the WordPress Dashboard, but not on the frontend of the website. If you'd like to use dashicons on the public side, you'll need to enqueue the dashicon script, as shown here:
<?phpadd_action( 'wp_enqueue_scripts', 'pdev_load_dashicons_front_end' );function pdev_load_dashicons_front_end() {wp_enqueue_style( 'dashicons' );}?>
Now your plugin has a clean header and uses the Plug icon.
For more information and a complete list of all Dashicons available, see the official resource at https://developer.wordpress.org/resource/dashicons.
Messages
When an action occurs in your plugin, such as saving settings, it's important to display a message to the user verifying whether the update was successful. WordPress features some different styles for displaying these messages.
<?phpfunction pdev_styling_settings() {?><div class="notice notice-error is-dismissible"><p>There has been an error.</p></div><div class="notice notice-warning is-dismissible"><p>This is a warning message.</p></div><div class="notice notice-success is-dismissible"><p>This is a success message.</p></div><div class="notice notice-info is-dismissible"><p>This is some information.</p></div><?php}?>
As you can see, there are four different types of notices supported: error, warning, success, and info. Notice the class, is‐dismissible, included in the outer <div> element. This class makes the admin notice “dismissable,” meaning a small x is displayed, and when it's clicked, the notice will disappear. When an admin notice is not dismissible, the only way to remove it is to reload the page.
These styles will generate the messages shown in Figure 3‐10.
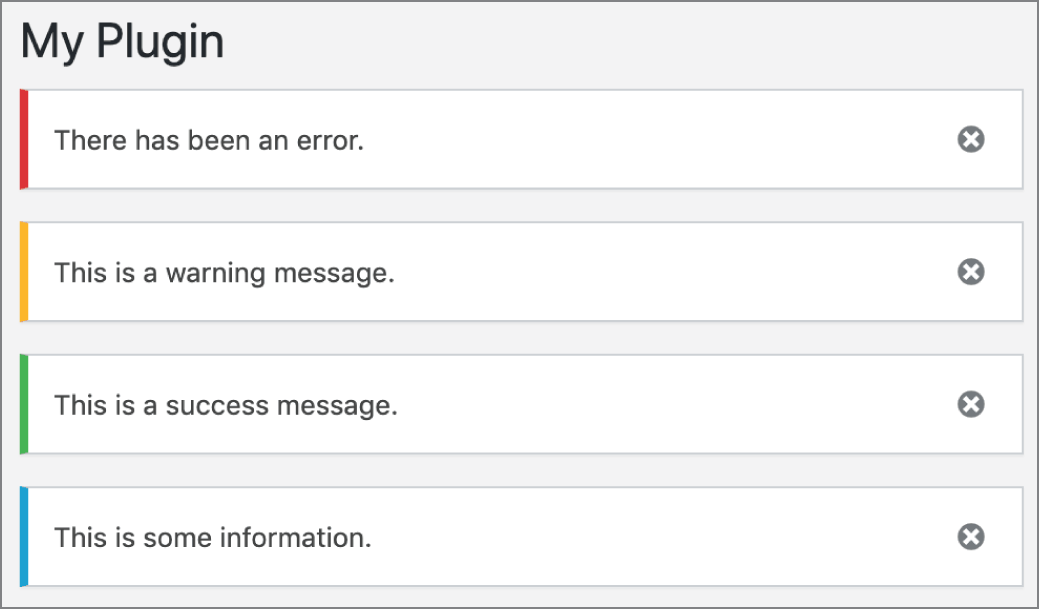
FIGURE 3‐10: Dismissable notices
Buttons
As discussed earlier, the easiest method for adding a form submission button is using the submit_button() function. However, there's no reason you can't manually create form buttons using the preset WordPress admin stylings. When manually adding buttons to your form, you can take advantage of multiple classes. The first two you use are the button‐primary and button‐secondary classes. These classes style your buttons to match the WordPress UI.
<p><input type="submit" name="Save" value="Save Options"/><input type="submit" name="Save" value="Save Options"class="button-primary"/></p><p><input type="submit" name="Secondary" value="Secondary Button"/><input type="submit" name="Secondary" value="Secondary Button"class="button-secondary"/></p>
This example demonstrates a standard unstyled button as compared to the WordPress styled button. As you can tell, the WordPress‐styled button looks familiar and uses the proper styling, as shown in Figure 3‐11.
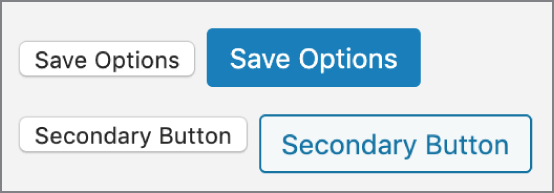
FIGURE 3‐11: WordPress‐styled button
Links can also take the form of a button by using the appropriate class.
<a href="#">Search</a><a href="#" class="button-primary">Search Primary</a><a href="#" class="button-secondary">Search Secondary</a>
This example shows how a standard <a href> link can be styled to look like a button, as shown in Figure 3‐12. To normal users, they would never know these are regular text links because they look just like a button.

FIGURE 3‐12: Link styled to look like a button
Form Fields
WordPress has a special table class just for forms called form‐table. This class is used on all WordPress Dashboard forms, including every Settings page. This is a useful class when creating any type of options in your plugin.
<div class="wrap"><?php screen_icon( 'plugins' ); ?><h2>My Plugin</h2><form method="POST" action=""><table class="form-table"><tr valign="top"><th scope="row"><label for="fname">First Name</label></th><td><input maxlength="45" size="25" name="fname"/></td></tr><tr valign="top"><th scope="row"><label for="lname">Last Name</label></th><td><input id="lname" maxlength="45" size="25" name="lname"/></td></tr><tr valign="top"><th scope="row"><label for="color">Favorite Color</label></th><td><select name="color"><option value="orange">Orange</option><option value="black">Black</option></select></td></tr><tr valign="top"><th scope="row"><label for="featured">Featured?</label></th><td><input type="checkbox" name="favorite"/></td></tr><tr valign="top"><th scope="row"><label for="gender">Gender</label></th><td><input type="radio" name="gender" value="male"/> Male<input type="radio" name="gender" value="female"/> Female</td></tr><tr valign="top"><th scope="row"><label for="bio">Bio</label></th><td><textarea name="bio"></textarea></td></tr><tr valign="top"><td><input type="submit" name="save" value="Save Options"class="button-primary"/><input type="submit" name="reset" value="Reset"class="button-secondary"/></td></tr></table></form></div>
Using the form‐table can give your options a familiar look to your plugin users. This makes for a better user experience, as shown in Figure 3‐13.
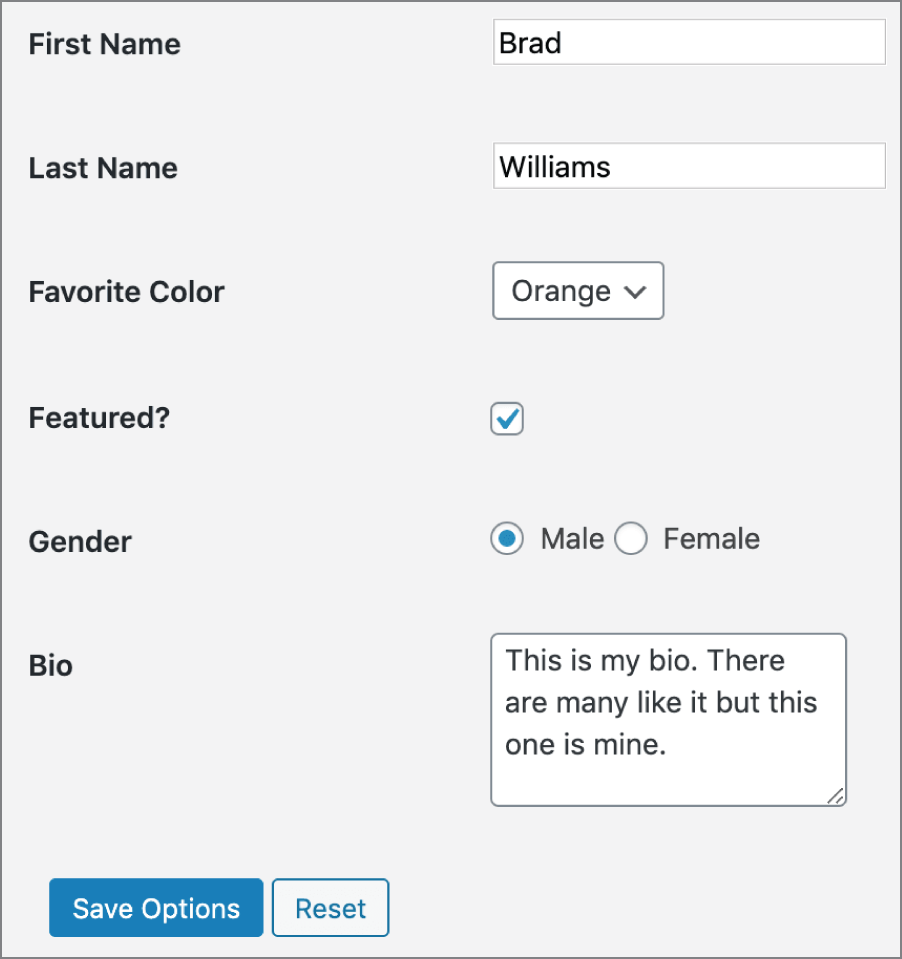
FIGURE 3‐13: WordPress‐like options
Tables
HTML tables are a great way to display rows and columns of data in an easy‐to‐read layout. Tables can easily be styled in WordPress using the widefat class.
<table class="widefat"><thead><tr><th>Name</th><th>Favorite Holiday</th></tr></thead><tfoot><tr><th>Name</th><th>Favorite Holiday</th></tr></tfoot><tbody><tr><td>Brad Williams</td><td>Halloween</td></tr><tr><td>Ozh Richard</td><td>Talk Like a Pirate</td></tr><tr><td>Justin Tadlock</td><td>Christmas</td></tr></tbody></table>
The widefat class has specific styles set for the thead and tfoot HTML tags. This styles the header and footer of your table to match all other tables on the Dashboard. The class can also style all table data, as shown in Figure 3‐14.
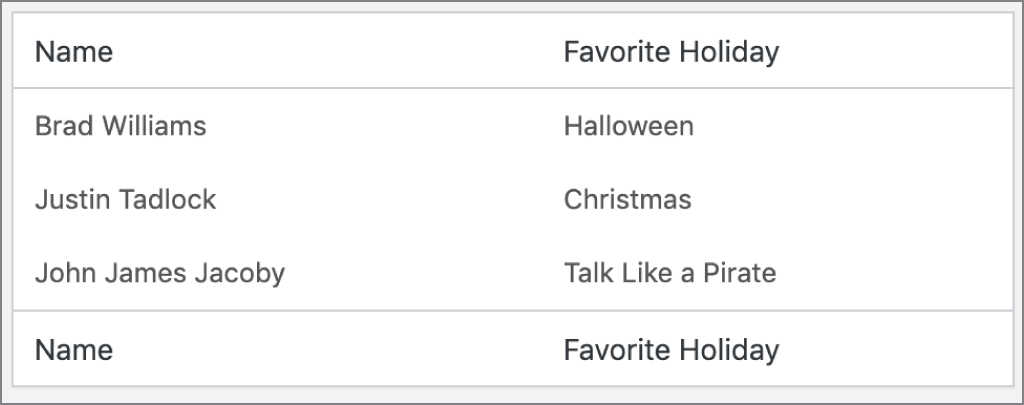
FIGURE 3‐14: Table style
Pagination
If your plugin contains a list of records, you may have a need for pagination, which is the method to break lists of data into multiple pages and have links to load each individual page. This helps reduce the load times and makes it a much cleaner user experience to navigate through the data. Would you rather view 500 records on a page or 10 pages with 50 records on each page?
WordPress has a few different classes to style your pagination. The following is an example:
<div class="tablenav"><div class="tablenav-pages"><span class="displaying-num">Displaying 1-20 of 69</span><span class="page-numbers current">1</span><a href="#" class="page-numbers">2</a><a href="#" class="page-numbers">3</a><a href="#" class="page-numbers">4</a><a href="#" class="next page-numbers">»</a></div></div>
First, you need to wrap your pagination links in the tablenav and tablenav‐pages div classes. The displaying‐num class styles the records you view. The page‐numbers class styles the page links in the familiar WordPress format. Adding current or next to the link class can add some unique styles to those elements, as shown in Figure 3‐15.

FIGURE 3‐15: Pagination style
Keeping your plugin design consistent with the WordPress user interface can reduce your plugins' learning curve because users will feel comfortable with the design and styles used. This can also make your plugins' design future‐proof. If the WordPress core styles change down the road, your plugins' design will also change to match the new user interface, and you won't need to edit a single line of code!
SUMMARY
This chapter covered many different methods for integrating your plugin in WordPress. You certainly won't use every method discussed in every plugin you develop, but it's essential to understand what's available for use in your plugin.