8
Content
Posts represent the content of a site in WordPress. In other content management systems, posts are often called content. However, WordPress has a legacy of starting as a blogging system, so the terminology stuck. Content is what makes a website a website. It is the most important aspect of the site from the user's perspective because it is the thing that they are building.
Taxonomies in WordPress are a way to classify or categorize posts. Metadata is additional information about a specific post. By combining these two features with posts, you can create any type of website imaginable.
Throughout this chapter, you will work on building a single plugin that houses a user's book collection. The post types, metadata, and taxonomies covered in this chapter contribute to the overall plugin. Nearly every snippet of code provided in the chapter contributes to the plugin by providing a view of how the topics presented work together to manage content.
One important note when dealing with content is that posts, metadata, and taxonomies are typically controlled by themes on the frontend of the site. Depending on what you are building, you may not always have complete control over how the content is output. WordPress theme development is outside the scope of this book, but learning how themes work within the WordPress environment will strengthen your skill set and make you a better developer. In Chapter 14, “The Kitchen Sink,” you will learn more about how plugins can display posts on the frontend.
CREATING CUSTOM POST TYPES
Out of the box, WordPress has several predefined post types that allow users to create and manage the content on their site. These types of content are all the average blogger will ever need.
- Post: Blog posts typically presented in order from newest to oldest on the homepage and archives.
- Page: Top‐level, hierarchical types of content such as About, Contact, and a myriad of other pages.
- Attachment: Media attached to other post types, such as image, audio, and video files.
- Revision: Revisions of other post types used as a backup system in case a user needs to revert to an older copy.
- Nav menu item: Items added to nav menus using WordPress’ built‐in menu management system.
- Reusable block: One or more blocks from the block editor. When a user saves these reusable blocks, they are stored internally as a post.
As you can see, most of these post types do not match what you might typically think of when thinking of a “post.” Posts can really mean any type of content. For anything beyond a basic site or blog, other post types are necessary for running sites that don't fit within with this predefined mold. WordPress enables plugin developers to create content types to handle nearly any scenario.
Post Type Possibilities
Custom post types have been available since WordPress 3.0. Over the years, plugin developers have used the system to build a plethora of plugins that do things the creators likely didn't think possible. It shifted WordPress from just being a blogging platform to one of the most robust content management systems in the world. Some plugin developers have launched multimillion‐dollar businesses from a starting point of a single custom post type.
You can use custom post types in WordPress to define any type of content. The following is a sample list of ideas, but you should not feel limited to anything but your own imagination:
- Book collection
- Testimonials
- eCommerce products
- Famous quotes
- Event calendar
- Music database
- Image slideshows
- Forums
Registering a Post Type
WordPress makes it easy for plugin developers to create new post types with little code. Before diving in, you need to understand the main function for creating post types and its arguments.
register_post_type
WordPress provides the register_post_type(
) function to create new post types for a site. It is simple to use and gives plugin developers a ton of flexibility by simply configuring its arguments.
<?phpregister_post_type( string $post_type, array|string $args = [] );
The function returns a post type object (
WP_Post_Type) and accepts two parameters.
-
$post_type: The name of the post type. This should contain only lowercase alphanumeric characters, underscores, and hyphens. The string has a maximum limit of 20 characters. -
$args: An array of arguments that configure the post type and how it should be handled within WordPress.
WordPress has more than two dozen arguments for the $args parameter, some that have their own subarguments. Each argument provides unique functionality that helps define how your post type will work within the WordPress environment. You can view the entire list via https://developer.wordpress.org/reference/functions/register_post_type. New options are added over time, so always be sure to reference that list on major updates.
Registering the Book Collection Post Type
Now that you have a basic understanding of how the register_post_type() function works, it is time to create your first post type. This is the first step in creating the book collection plugin that you will put together throughout this chapter.
The first step is to create a new folder named plugin‐book‐collection in your test environment's wp‐content/plugins folder. Then create a plugin.php file with the following code in it:
<?php/*** Plugin Name: Book Collection* Plugin URI: http://example.com/* Description: A plugin for managing a book collection.* Author: WROX* Author URI: http://wrox.com*/// Load custom post type functions.require_once plugin_dir_path( __FILE__ ) . 'post-types.php';
This is the primary plugin file. For the purposes of the Book Collection plugin, you will use it to load the various files needed throughout this chapter. The first file is related to registering post types. Now create a post‐types.php file in your plugin folder.
The first thing you will do with this new file is create a basic custom post type named book. The following code snippet has a basic outline of what such a post type might look like. However, you can change the arguments to suit your needs.
<?phpadd_action( 'init', 'pdev_book_collection_post_types' );function pdev_book_collection_post_types() {register_post_type( 'book', [// Post type arguments.'public' => true,'publicly_queryable' => true,'show_in_rest' => true,'show_in_nav_menus' => true,'show_in_admin_bar' => true,'exclude_from_search' => false,'show_ui' => true,'show_in_menu' => true,'menu_icon' => 'dashicons-book','hierarchical' => false,'has_archive' => 'books','query_var' => 'book','map_meta_cap' => true,// The rewrite handles the URL structure.'rewrite' => ['slug' => 'books','with_front' => false,'pages' => true,'feeds' => true,'ep_mask' => EP_PERMALINK,],// Features the post type supports.'supports' => ['title','editor','excerpt','thumbnail']] );}
The previous code adds a relatively basic post type that works similarly to WordPress posts. It relies on the built‐in UI (
show_ui argument), adds a book collection archive (
has_archive argument), creates some custom rewrite URL rules (
rewrite argument), and adds the features that it supports (
supports argument).
Note that the pdev_book_collection_post_types() function is an action that is executed on the init action hook. Post types should always be registered on this hook.
Setting Post Type Labels
If you activate the plugin at this point, you will get a new top‐level admin menu for managing books. What you might notice is that all of the text labels refer to “posts” instead of “books.” That is not a user‐friendly custom post type. You would not want a user to see a View Post link when what you really want them to see is a View Book link, for example.
If you do not set custom labels, WordPress will automatically fall back to the “page” post type labels for hierarchical post types and the “post” post type labels for nonhierarchical types.
To set custom labels, you need to add the labels argument to the $args array (second parameter) for register_post_type(). The labels argument should look similar to the following:
// Text labels.'labels' => ['name' => 'Books','singular_name' => 'Book','add_new' => 'Add New','add_new_item' => 'Add New Book','edit_item' => 'Edit Book','new_item' => 'New Book','view_item' => 'View Book','view_items' => 'View Books','search_items' => 'Search Books','not_found' => 'No books found.','not_found_in_trash' => 'No books found in Trash.','all_items' => 'All Books','archives' => 'Book Archives','attributes' => 'Book Attributes','insert_into_item' => 'Insert into book','uploaded_to_this_item' => 'Uploaded to this book','featured_image' => 'Book Image','set_featured_image' => 'Set book image','remove_featured_image' => 'Remove book image','use_featured_image' => 'Use as book image','filter_items_list' => 'Filter books list','items_list_navigation' => 'Books list navigation','items_list' => 'Books list','item_published' => 'Book published.','item_published_privately' => 'Book published privately.','item_reverted_to_draft' => 'Book reverted to draft.','item_scheduled' => 'Book scheduled.','item_updated' => 'Book updated.']
There are at least 30 possible labels at the time this book was written. However, WordPress expands these labels from time to time as new features are added or things change with the software. You can find the most up‐to‐date list of labels for the current version of WordPress at https://developer.wordpress.org/reference/functions/get_post_type_labels.
If you activate the plugin at this point, you should see a new Books admin menu and screen, as shown in Figure 8‐1.

FIGURE 8‐1: Books admin menu and screen
Using Custom Capabilities
When building a custom post type, you almost always want to register custom permissions for who can perform what actions. WordPress has a role and capability system for handling permissions, which you will learn more about in Chapter 9, “Users and User Data.” If you add custom capabilities to your post type, the admin screen will not appear for the post type unless your user account has the appropriate capabilities.
For custom post types, it is simply a matter of registering the capabilities as an argument when calling register_post_type(). If no custom capabilities are set, WordPress will revert to the “page” post type capabilities for hierarchical post types and “post” capabilities for nonhierarchical types.
The simplest and most effective way to create a suite of capabilities for your book post type is to assign a value to the capability_type argument, as shown in the following snippet:
'capability_type' => 'book',Generally, you want to use the post type name as the capability name to keep things simple. By adding the preceding code to the arguments array for the post type, WordPress will create the following capabilities:
-
edit_book -
read_book -
delete_book -
create_books -
edit_books -
edit_others_books -
edit_private_books -
edit_published_books -
publish_books -
read_private_books -
delete_books -
delete_private_books -
delete_published_books -
delete_others_books
You may have picked up something different with the first three capabilities in the previous list (
edit_book, read_book, delete_book). They are in singular form rather than plural. Generally, a singular form represents what is called a meta capability in WordPress. Meta capabilities do something for a specific object, such as a post (book in this case). These capabilities are not assigned to roles and are determined dynamically by mapping them to the other (primitive) capabilities based on the current scenario.
By default, WordPress has automatic mapping disabled. It is rare that you will want this disabled because it will mean having to write a custom mapping filter on the core map_meta_cap filter hook. Instead, you want to enable mapping by setting the map_meta_cap argument to true, as shown in the following code:
'map_meta_cap' => true,The preceding code will save you a lot of frustration attempting to manipulate how meta caps work manually.
For most post types, you will only ever need to set the capability_type and map_meta_cap arguments. However, there are scenarios where you will need more fine‐tuned control over the individual capabilities for the post type. In those cases, you will need to set the capabilities argument for register_post_type(). This will essentially give you manual control over what capability_type can do automatically.
The following code snippet is one example of how you could set up your book post type capabilities:
'capabilities' => ['edit_post' => 'edit_book','read_post' => 'read_book','delete_post' => 'delete_book','create_posts' => 'create_books','edit_posts' => 'edit_books','edit_others_posts' => 'edit_others_books','edit_private_posts' => 'edit_private_books','edit_published_posts' => 'edit_published_books','publish_posts' => 'publish_books','read_private_posts' => 'read_private_books','read' => 'read','delete_posts' => 'delete_books','delete_private_posts' => 'delete_private_books','delete_published_posts' => 'delete_published_books','delete_others_posts' => 'delete_others_books'],
You don't have to stick to a specific formula with custom post types. Your plugin can mix these up. It can set the same capability for multiple capability options. Or it can set the same capability for each option. For example, you can set each of these capabilities to manage_books if you know only certain users will have permission to manage all book collection posts.
Another capability you can set is do_not_allow if you don't want to allow access to a specific task. Generally, you wouldn't use this, but some situations may call for it, such as setting edit_others_posts to do_not_allow so that no user can edit posts created by other users.
WordPress sometimes adds new capabilities to post types. It does not happen often, but it is necessary if something changes with the software. You can view the most updated list of post type capabilities at https://developer.wordpress.org/reference/functions/get_post_type_capabilities.
Attaching Existing Taxonomies
In some cases, you may be building a post type in which you want to use an existing taxonomy. You can easily set this via the taxonomies argument within the $args array for register_post_type(). For example, WordPress has two general taxonomies for blog posts, category and post_tag, that you may want to use. However, you are not limited to taxonomies created by WordPress. Your post type can use taxonomies created by other plugins too.
Suppose that you wanted to add post tags to book posts. You would set this as shown in the following code:
'taxonomies' => ['post_tag'],
By adding this to your $args array for register_post_type(), a new Tags submenu item will be added after your Books menu item in the admin, as shown in Figure 8‐2.
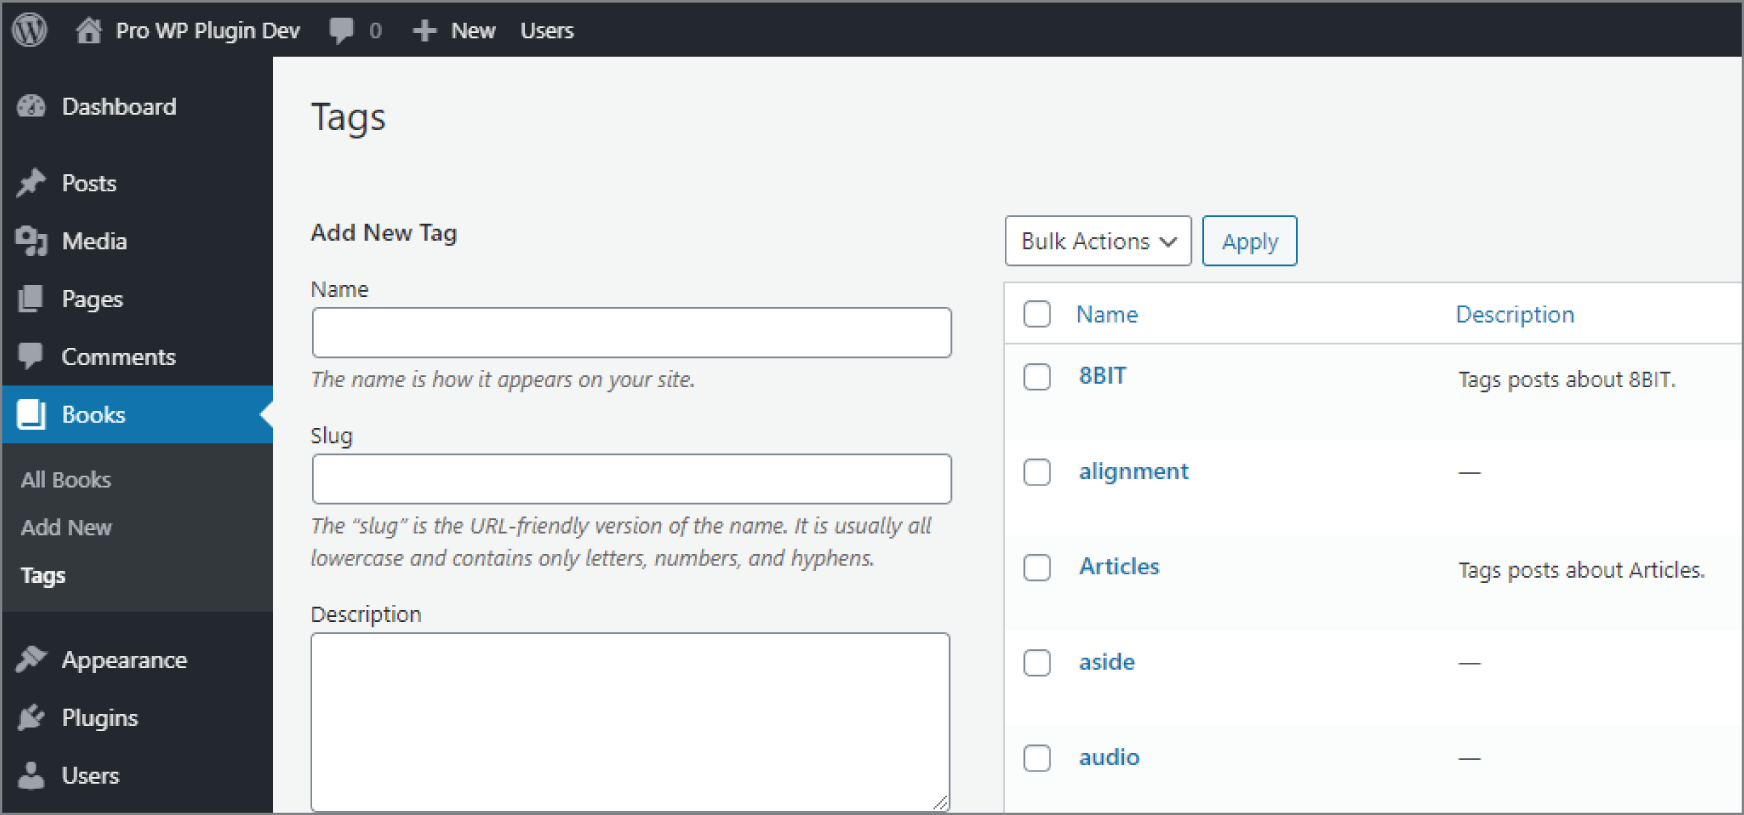
FIGURE 8‐2: Tags submenu item
You will learn how to add custom taxonomies specifically for your post type in the “Creating Custom Taxonomies” section later in this chapter.
POST METADATA
In WordPress, posts can have additional information attached to them. This information is called post metadata, or post meta for short. It is stored in the $wpdb‐>postmeta table in the database.
Plugins can create, update, and delete meta values in an unlimited number of ways. Traditionally, this is done via a meta box, which you will learn more about in the “Meta Boxes” section of this chapter.
Because you are building a plugin in this chapter for a user to store their book collection, think about the types of metadata related to books. The following are some things you may consider as additional information for the plugin that you are building:
- International Standard Book Number (ISBN)
- Book author
- Goodreads review link
- Amazon affiliate link
- Star rating system
It is important to remember that metadata is not an ideal way to group or categorize posts. The taxonomy system discussed later in this chapter is better for handling features such as categorizing books by genre, for example.
Registering Post Metadata
While it is not strictly a requirement (many plugins skip this step), it is good practice to register any type of metadata your plugin uses with WordPress. To register metadata for a specific post type, you use the register_post_meta() function.
<?phpregister_post_meta( string $post_type, string $meta_key, array $args );
The function accepts the following parameters:
-
$post_type: The name of the post type -
$meta_key: A unique key for storing and retrieving the meta value -
$args: An array of optional arguments for further defining the metadata
The following are the possible arguments that can be defined:
-
type: The type of data allowed for the meta value.'string','boolean','integer', and'number'are valid. -
description: A human‐readable description for the meta that may be used. -
single: A Boolean value for whether the meta key has one value per object or an array of values. -
sanitize_callback: A callback function or method when sanitizing the metadata. -
auth_callback: A callback function or method to perform when running meta capability checks to determine whether the user can add, edit, or delete. -
show_in_rest: Whether the metadata is considered public and can be shown via the REST API.
For your book collection plugin, suppose you wanted to keep things simple and allow the user to add the book author's name. You can always register additional metadata later. Create a new file in your plugin folder named post‐meta.php and make sure to load it from your primary plugin.php file. Now add the following code to your new file:
<?phpadd_action( 'init', 'pdev_books_register_meta' );function pdev_books_register_meta() {register_post_meta( 'book', 'book_author', ['single' => true,'show_in_rest' => true,'sanitize_callback' => function( $value ) {return wp_strip_all_tags( $value );}] );}
The previous code registers a new bit of meta for post objects named book_author. It defines a post type of book. It also has a single meta value attached to it. However, you may decide to allow for multiple authors for each book and change the single argument to false.
Adding Post Metadata
WordPress provides the add_post_meta() function for adding new metadata to a specific post. The function accepts four parameters.
<?phpadd_post_meta( int $post_id, string $meta_key, mixed $meta_value,bool $unique = false );
-
$post_id: The ID of the post to add metadata to. -
$meta_key: The metadata key to add meta value(s) to. -
$meta_value: The value attributed to the meta key. Multiple meta values may be added to a single key. -
$unique: Whether the meta value provided should be the only meta value. Iftrue, there will be only a single meta value. Iffalse, multiple meta values can be added. By default, this parameter is set tofalse.
Now that you know how the parameters work for add_post_meta(), you can insert some metadata to a specific post. Suppose you have a book post with the ID of 100. The book is The Way of Kings, which was written by Brandon Sanderson. You could attach him as the author with the following code:
<?phpadd_post_meta( 100, 'book_author', 'Brandon Sanderson', true );
If you were adding multiple authors to a book, such as for The President Is Missing by Bill Clinton and James Patterson, you would need to make two calls to add_post_meta(). You must also change the $unique parameter to false. The book post ID in the following example is 200:
<?phpadd_post_meta( 200, 'book_author', 'Bill Clinton', false );add_post_meta( 200, 'book_author', 'James Patterson', false );
Retrieving Post Metadata
WordPress makes it easy to get post metadata for display or to use in other PHP functions. To retrieve post metadata, use the get_post_meta() function, which accepts three parameters.
<?phpget_post_meta( int $post_id, string $key = '', bool $single = false );
-
$post_id: The ID of the post to get the metadata for. -
$meta_key: The meta key name to retrieve meta value(s) for. -
$single: Whether to return a single meta value (true) or return an array of values (false). By default, this parameter is set tofalse.
Suppose you wanted to get the book author for The Way of Kings from the previous section on adding post metadata. You know the post ID (
100) and the meta key (
book_author). You can use the following snippet to return a single author:
<?php$book_author = get_post_meta( 100, 'book_author', true );// Brandon Sanderson
How you handle this for multiple values will be slightly different because get_post_meta() will return an array if you set the $single parameter to false. Now get the authors of The President Is Missing, which you added in the previous section, and output the author names as a list.
<?php$book_authors = get_post_meta( 200, 'book_author', false );echo '<ul>';foreach ( $book_authors as $author ) {printf('<li>%s</li>',esc_html( $author ));}echo '</ul>';
The previous code will result in the following HTML output:
<ul><li>Bill Clinton</li><li>James Patterson</li></ul>
Updating Post Metadata
WordPress provides the ability to update post metadata too. You can use the update_post_meta() function to update a preexisting meta value, completely overwrite all meta values for a given key, or add new metadata if it does not exist for a post. Many developers use it in lieu of add_post_meta() because it is simpler to use a function that adds or updates metadata.
<?phpupdate_post_meta( int $post_id, string $meta_key, mixed $meta_value, mixed$prev_value = '' );
-
$post_id: The post ID to update meta value(s) for. -
$meta_key: The meta key to update meta value(s) for. -
$meta_value: The new meta value to add to the meta key. -
$prev_value: The previous meta value to overwrite. If this parameter is not set, all meta values will be overwritten in favor of the$meta_valueparameter.
Suppose that the user misspelled Brandon Sanderson's name on their first attempt of adding a book author for The Way of Kings. They used an e instead of an a for his first name. It is simply a matter of adding the new meta value and passing along the old meta value via the $prev_value parameter.
<?phpupdate_post_meta( 100, 'book_author', 'Brandon Sanderson', 'Brendon Sanderson' );
Because there is only a single book author in this case, you don't actually have to pass the previous value. You can update the book author as shown in the following code snippet:
<?phpupdate_post_meta( 100, 'book_author', 'Brandon Sanderson' );
Remember that not setting the $prev_value parameter will wipe out all meta values associated with the book_author meta key. When you have multiple values for the key, it is often best to update individual values by passing the $prev_value into the function. This will ensure that you do not inadvertently delete metadata that you do not intend to delete.
Deleting Post Metadata
There are scenarios in which you will need to delete post metadata completely or to delete a single meta value from a given meta key. WordPress makes this process simple for developers with the delete_post_meta() function.
<?phpdelete_post_meta( int $post_id, string $meta_key, mixed $meta_value = '' );
The function accepts three parameters.
-
$post_id: The post ID to delete metadata for. -
$meta_key: The meta key to delete one or more values for. -
$meta_value: The meta value to delete for the given meta key. If this parameter is not set, all meta values for the meta key will be deleted.
In the previous sections, you added, retrieved, and updated the author for The Way of Kings, which has a post ID of 100. To delete all authors attached to the book, you would use the following code:
<?phpdelete_post_meta( 100, 'book_author' );
However, the book entry for The President Is Missing, which has an ID of 200, has two authors. Using the same method shown previously would delete both authors. If you wanted to delete only a single author from the book, you need to know the exact value and input it as the third parameter. Suppose you wanted to delete Bill Clinton, one of the authors. Use the following code, which would leave the second author attached to the post:
<?phpdelete_post_meta( 200, 'book_author', 'Bill Clinton' );
META BOXES
In the “Post Metadata” section of this chapter, you learned how to handle post metadata via code. However, knowing the appropriate functions will not help your plugin users without an interface. That is where meta boxes come into play. They provide a way for your plugin users to interact with metadata.
As a plugin developer, it is important to note that the long‐term future of meta boxes is a bit uncertain. With the introduction of the block editor, which is covered in Chapter 7, “Blocks and Gutenberg,” developers are encouraged to use the block editor system to handle post metadata. There is no hard deadline for whether or when meta boxes will be deprecated or removed altogether from WordPress. The APIs related to the editor are also constantly being improved. It is important to keep this in mind when deciding how to present metadata options to users.
What Is a Meta Box?
Meta boxes are “boxes” within the post editing screen that allow users to edit metadata. Technically, anything can exist within a meta box. You can use PHP or JavaScript to output any arbitrary HTML output, but the most common use case is building form fields for users to edit custom metadata from plugins. In essence, meta boxes are a UI element.
Adding a Custom Meta Box
To add a custom meta box to the post editing screen, you use the add_meta_box() function.
<?phpadd_meta_box(string $id,string $title,callable $callback,string|array|WP_Screen $screen = null,string $context = 'advanced',string $priority = 'default',array $callback_args = null);
The function accepts the following parameters.
-
$id: A unique ID for the meta box. -
$title: A text label shown at the top of the meta box. -
$callback: A function or class method that will output the meta box content. -
$screen: The screen or screens to output the meta box on. For post meta boxes, this is the name of the post type. -
$context: Where to output the meta box by default on the editor screen.'advanced','normal', and'side'are valid values. -
$priority: The priority of the meta box in comparison to other boxes. Valid values are'default','high', and'low'. -
$callback_args: An optional array of custom data to pass as the second parameter to your callback function or method.
Meta boxes need to be registered on a specific hook. Generally, you could register them on the add_meta_boxes hook. However, for custom post types, it is best to register on the add_meta_boxes_{$post_type} hook, where $post_type is the name of the specific post type.
For the plugin that you are building along in this chapter, you need to create a new file named meta‐boxes.php in your plugin folder and load it, as shown in the following snippet from your main plugin.php file:
require_once plugin_dir_path( __FILE__ ) . 'meta-boxes.php';In your new meta‐boxes.php file, use the following code to register a new meta box on the add_meta_boxes_book hook:
<?phpadd_action( 'add_meta_boxes_book', 'pdev_book_register_meta_boxes' );function pdev_book_register_meta_boxes() {add_meta_box('pdev-book-details','Book Details','pdev_book_details_meta_box','book','advanced','high');}
As you can see, it is just a simple call to add_meta_box() within the function attached to the action hook. It registers a new meta box with an ID of pdev‐book‐details. Most of the parameters can be configured to your preference. The most important parameter from the function is the callback function, pdev_book_details_meta_box, which handles the output of the meta box content.
A meta box can contain any number of form fields, but for this meta box, let's stick with outputting a field for the user to enter a single book author. In your plugin's meta‐boxes.php file, add the following callback function for the meta box:
function pdev_book_details_meta_box( $post ) {// Get the existing book author.$author = get_post_meta( $post->ID, 'book_author', true );// Add a nonce field to check on save.wp_nonce_field( basename( __FILE__ ), 'pdev-book-details' ); ?><p><label>Book Author:<br/><input type="text" name="pdev-book-author"value="<?php echo esc_attr( $author ); ?>"/></label></p><?php }
One thing you should note about the previous code is the $post parameter for the pdev_book_details_meta_box() function. This parameter is automatically passed into the callback function for meta boxes and is the WP_Post object for the post.
The first thing the preceding code does is get the current book author value attached to the book and assign it to the $author variable. If this is a new post or an author has not yet been set, the value will be an empty string.
The second bit of code is a call to wp_nonce:field(), which outputs a hidden HTML form field with a nonce value. You will later check this value for security purposes when saving metadata to the database. Nonces are covered in more detail in Chapter 4, “Security and Performance.”
The final thing the function does is output a text input field to allow the plugin user to enter a book author's name. The value attribute is an escaped copy of the $author variable.
Saving Meta Box Data
Creating a custom meta box is one part of a two‐part process of handling the user experience aspect of manipulating post metadata. The second part is adding, updating, and/or deleting metadata when a post is saved. This is the point where everything you learned in the “Post Metadata” section of this chapter becomes useful in practice.
To save metadata from your custom meta box fields, you need to find the appropriate hook. There are several hooks that fire during the post‐saving procedure, and many theme authors rely directly on the save_post hook. However, it is not always the best option because it runs for every post type. Instead, when you are saving metadata for only a specific post type, use the save_post_{$post_type} hook where $post_type is the name of the post type. Aside from their different names and when they are fired, the two hooks are identical.
<?phpdo_action( "save_post_{$post_type}", int $post_id, WP_Post $post, bool $update );
The hook passes up to three parameters:
-
$post_id: The ID of the post currently being saved -
$post: The post object for the current post -
$update: A Boolean that determines if the current post is being updated (true) or is a new post being saved for the first time (false)
For saving the book author, you need to add a custom action to the save_post_book action hook and require the first two parameters, $post_id and $post, which provided necessary data.
Append the following code snippet to your meta‐boxes.php file in your book plugin folder:
add_action( 'save_post_book', 'pdev_book_save_post', 10, 2 );function pdev_book_save_post( $post_id, $post ) {// Verify the nonce before proceeding.if (! isset( $_POST['pdev-book-details'] ) ||! wp_verify_nonce( $_POST['pdev-book-details'], basename( __FILE__ ) )) {return;}// Bail if user doesn't have permission to edit the post.if ( ! current_user_can( 'edit_post', $post_id ) ) {return;}// Bail if this is an Ajax request, autosave, or revision.if (wp_is_doing_ajax() ||wp_is_post_autosave( $post_id ) ||wp_is_post_revision( $post_id )) {return;}// Get the existing book author if the value exists.// If no existing book author, value is empty string.$old_author = get_post_meta( $post_id, 'book_author', true );// Strip all tags from posted book author.// If no value is passed from the form, set to empty string.$new_author = isset( $_POST['pdev-book-author'] )? wp_strip_all_tags( $_POST['pdev-book-author'] ): '';// If there's an old value but not a new value, delete old value.if ( ! $new_author && $old_author ) {delete_post_meta( $post_id, 'book_author' );// If the new value doesn't match the new value, add/update.} elseif ( $new_value !== $old_value ) {update_post_meta( $post_id, 'book_author', $new_value );}}
The preceding code can essentially be broken into three sections. The first section of the code is running several checks to determine whether to proceed. Once the code runs through its checks, the second section gets the data it needs. Finally, it can move on to saving or deleting metadata.
The most important check comes first, which verifies that the nonce field created in the previous “Adding a Custom Meta Box” section is valid. The second check determines whether the current user has permission to edit the post at all. The third check is kind of a stock check that you should add when saving metadata. Posts are saved in all sorts of situations in WordPress, even when not on the edit post screen. Therefore, you must determine that the post is not being saved as part of an Ajax request, auto‐save is not running, and the post is not a revision.
After all the checks have passed, the previous code grabs the existing book author metadata via the get_post_meta() function. If no value exists in the database, the function will return an empty string. Then, it checks $_POST['pdev‐book‐author'] to get the new book author posted from the HTML text input box. That data must be run through a sanitizing function to make sure it is safe. In this case, wp_strip_all_tags() works because there is no need for HTML.
After getting both the old and new book author metadata, it is a simple matter of running a conditional check to determine what to do with the data. If the new meta value is empty and an old value exists, use delete_post_meta() to delete it. Else, if the new value does not equal the old value, use update_post_meta() to update it. Also, remember that update_post_meta() will add a new meta value if it does not yet exist.
CREATING CUSTOM TAXONOMIES
Taxonomies are a way to group or categorize objects in WordPress. Technically, they can group any type of object, such as posts, comments, or users. However, the majority of plugins use taxonomies to group posts together.
WordPress ships with several taxonomies by default.
- Category: A hierarchical taxonomy used to categorize blog posts
- Post Tag: A nonhierarchical taxonomy used to tag blog posts
- Link Category: A nonhierarchical taxonomy used to categorize links
- Nav Menu: A nonhierarchical taxonomy that represents navigation menus and groups nav menu items
The true power of custom taxonomies is creating them to use alongside custom post types. Often, it is necessary to create custom taxonomies with post types so that users have a way to organize individual posts of the post type.
Understanding Taxonomies
To understand how taxonomies work, you must first understand that an individual taxonomy is a group of terms. Each term within the taxonomy is what technically groups posts together.
In this chapter, you are creating a new custom post type: book. A user would use the book post type to organize their personal collection of books. Your plugin user will likely want some way to organize their book collection into groups. This is where custom taxonomies fit into the picture. Some possible taxonomies for books follow:
- Genre (fantasy, romance, science fiction)
- Format (hardcover, paperback, digital)
- Publisher (Wiley, Tor Books)
- Form (novel, novella)
Each of these taxonomies would enable users to label their books with information that further defines the content. Essentially, taxonomies provide clearer organization and definition for the content.
This section focuses on creating the genre taxonomy for the book post type, which you created earlier in this chapter.
Registering a Custom Taxonomy
WordPress makes it easy for plugin developers to register a custom taxonomy with a single function. Like registering a custom post type, it is simply a matter of calling the function and adding custom parameters.
register_taxonomy
WordPress provides the register_taxonomy() function for registering a new taxonomy with the system. This function enables you to create a new taxonomy and set it up by using custom arguments that define how the taxonomy should be handled within WordPress.
<?phpregister_taxonomy( string $taxonomy, array|string $object_type, array|string$args = [] );
The function accepts three parameters.
-
$taxonomy: The name of your plugin's taxonomy. This should contain only alphanumeric characters and underscores. -
$object_type: A single object or an array of objects to add the taxonomy to. For post objects, this is the post type name. -
$args: An array of arguments that defines how WordPress should handle your taxonomy.
There are many flags that you can set for the $args parameter, which is more than can be covered in this chapter. You can view all arguments via the developer documentation: https://developer.wordpress.org/reference/functions/register_taxonomy.
Registering the Genre Taxonomy
Now that you've reviewed the register_taxonomy() parameters and arguments, it is time to use that knowledge to create new taxonomies.
First, you need to create a new taxonomies.php file within your plugin folder. Then, append the following line of code to your primary plugin.php file to load it:
require_once plugin_dir_path( __FILE__ ) . 'taxonomies.php';The next code snippet will register a hierarchical taxonomy named genre, which users can use to organize their book collection. Add the following code to your taxonomies.php plugin file:
<?phpadd_action( 'init', 'pdev_books_register_taxonomies' );function pdev_books_register_taxonomies() {register_taxonomy( 'genre', 'book', [// Taxonomy arguments.'public' => true,'show_in_rest' => true,'show_ui' => true,'show_in_nav_menus' => true,'show_tagcloud' => true,'show_admin_column' => true,'hierarchical' => true,'query_var' => 'genre',// The rewrite handles the URL structure.'rewrite' => ['slug' => 'genre','with_front' => false,'hierarchical' => false,'ep_mask' => EP_NONE],// Text labels.'labels' => ['name' => 'Genres','singular_name' => 'Genre','menu_name' => 'Genres','name_admin_bar' => 'Genre','search_items' => 'Search Genres','popular_items' => 'Popular Genres','all_items' => 'All Genres','edit_item' => 'Edit Genre','view_item' => 'View Genre','update_item' => 'Update Genre','add_new_item' => 'Add New Genre','new_item_name' => 'New Genre Name','not_found' => 'No genres found.','no_terms' => 'No genres','items_list_navigation' => 'Genres list navigation','items_list' => 'Genres list',// Hierarchical only.'select_name' => 'Select Genre','parent_item' => 'Parent Genre','parent_item_colon' => 'Parent Genre:']] );}
After you add the preceding code, you'll be presented with a new submenu item under the Books menu item in the admin, labeled Genres. You also have a new meta box for assigning genres to individual books, as shown in Figure 8‐3. WordPress will automatically generate this meta box.
Assigning a Taxonomy to a Post Type
Rather than registering a custom taxonomy, sometimes you may need to assign a taxonomy to a post type. If your plugin creates the taxonomy, you would do this with the register_taxonomy() function. If your plugin is creating a custom post type but needs to add an existing taxonomy, you would use the taxonomy argument for register_post_type(). However, there are scenarios where you either need or can choose to use an alternative solution.
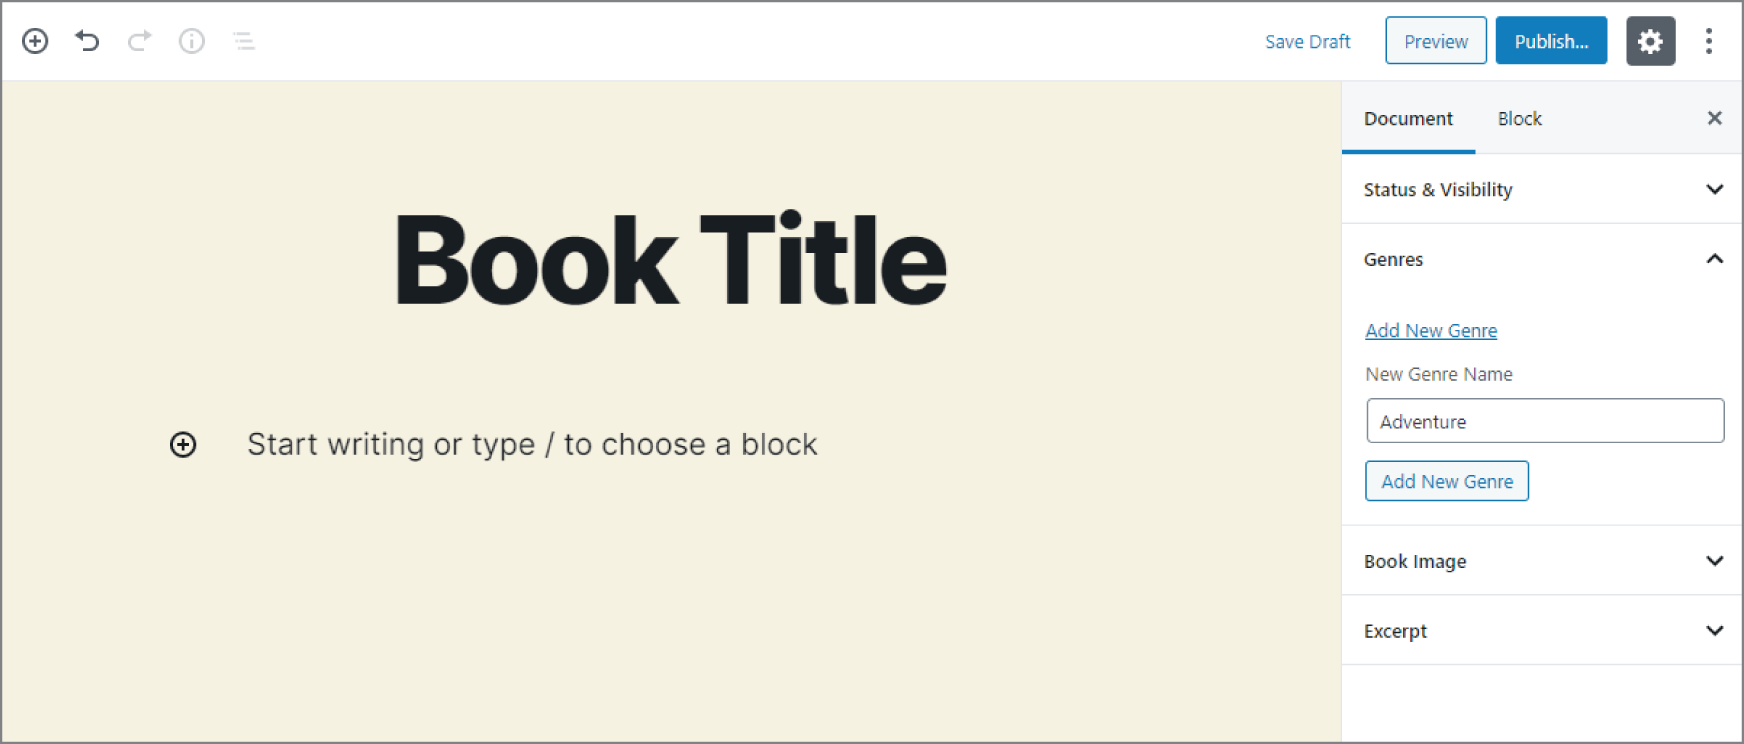
FIGURE 8‐3: Genres submenu
WordPress provides the register_taxonomy_for_object_type() function, which enables you to set a taxonomy on any object type, which will typically be a specific post type.
<?phpregister_taxonomy_for_object_type( string $taxonomy, string $object_type );
The function accepts two parameters.
-
$taxonomy: The name of the taxonomy your plugin will add to the object type. -
$object_type: The name of the object type to add the taxonomy to. Most of the time, this will be a post type.
Suppose you are working for a client who has an existing plugin that already registers the genre taxonomy you added in the “Registering a Custom Taxonomy” section of this chapter. Instead of registering the taxonomy in your plugin, you can simply add the taxonomy to your new book post type, as shown in the next code snippet:
<?phpadd_action( 'init', 'pdev_add_genres_to_books' );function pdev_add_genres_to_books() {register_taxonomy_for_object_type( 'genre', 'book' );}
USING CUSTOM TAXONOMIES
Like with custom post types, taxonomies are most often output via WordPress theme template files. However, there are scenarios where your plugin may need to use taxonomy functions for displaying information.
Retrieving a Taxonomy
When you register a custom taxonomy with WordPress, it generates a new WP_Taxonomy object and stores the value globally with all the other taxonomy objects. In some cases, you may need to retrieve information about a registered taxonomy. The object's public properties are the arguments supplied for the $args array when you first registered the taxonomy with register_taxonomy().
The get_taxonomy() function allows you to get a specific WP_Taxonomy object. The function accepts a single parameter of $taxonomy, which should be the name of the taxonomy.
<?phpget_taxonomy( string $taxonomy );
Suppose you need to display the singular name label for the genre taxonomy that you registered. You would use the following code to get the taxonomy object and display this label:
<?php// Get the genre taxonomy object.$genre = get_taxonomy( 'genre' );// Prints "Genre".echo $genre->labels->singular_name;
Using a Taxonomy with Posts
When using taxonomy with posts, you will generally be listing the taxonomy terms for the given post alongside some or all of the content of the post. This would allow viewers to note there is a taxonomy for the post and allow them to find related posts by a given taxonomy term.
WordPress provides the the_terms() function for displaying a specific post's terms.
<?phpthe_terms(int $post_id,string $taxonomy,string $before = '',string $sep = ', ',string $after = '');
The function accepts five parameters.
-
$id: The ID of the post to list the taxonomy's terms for. -
$taxonomy: The name of the taxonomy to list terms for. -
$before: Content to display before the list of terms. -
$sep: Any string of text or HTML to separate individual terms in the list. This defaults to a comma followed by a space. -
$after: Content to display after the list of terms.
The the_terms() function is a wrapper function for get_the_term_list(). The former function displays the list of terms for the taxonomy, and the latter returns them for use in PHP. Their parameters are identical.
Assuming you want to display the genres of the book post currently being viewed, you would use the following:
<?phpthe_terms(get_the_ID(),'genre','<div class="pdev-book-genres">',', ','</div>');
If you needed to return the value instead of immediately printing it to the screen, use the next code snippet:
<?php$genres = get_the_term_list(get_the_ID(),'genre','<div class="pdev-book-genres">',', ','</div>');
Taxonomy Conditional Tags
WordPress has a few conditional tags for taxonomies. Conditional tags check a specific condition and return true if the condition is met or false if the condition is not met.
taxonomy_exists
The taxonomy_exists() function checks whether a taxonomy has been registered with WordPress. It accepts a single parameter of $taxonomy, which should be the name of the taxonomy you're checking.
<?phptaxonomy_exists( string $taxonomy );
Suppose you wanted to check whether the genre taxonomy exists before attempting to register a custom taxonomy of your own. You can use the following code to determine whether to register a custom taxonomy or register an existing taxonomy to your book post type:
<?phpadd_action( 'init', 'pdev_maybe_register_genre' );function pdev_maybe_register_genre() {if ( taxonomy_exists( 'genre' ) ) {register_taxonomy_for_object_type( 'genre', 'book' );} else {register_taxonomy( 'genre', 'book' );}}
is_taxonomy_hierarchical
The is_taxonomy_hierarchical() function determines whether a given taxonomy is hierarchical. It accepts a single parameter of $taxonomy, which should be the name of the taxonomy.
<?phpis_taxonomy_hierarchical( string $taxonomy );
Imagine that you wanted to display a list of terms using the wp_list_categories() function if a taxonomy was hierarchical but a tag cloud using the wp_tag_cloud() function if the taxonomy was flat. You could run an if/
else check with the result of the is_taxonomy_hierarchical() function as the condition to check.
<?php$taxonomy = 'genre';// If taxonomy is hierarchical, print list.if ( is_taxonomy_hierarchical( $taxonomy ) ) {printf('<ul>%s</ul>',wp_list_categories( ['taxonomy' => $taxonomy,'title_li' => '','echo' => false] ));// If taxonomy is flat, print tag cloud.} else {printf('%s',wp_tag_cloud( ['taxonomy' => $taxonomy,'echo' => false] ));}
is_tax
The is_tax() function determines whether a site visitor is on a term archive page on the frontend of the site. The function would more appropriately be named something like is_taxonomy_term_archive(), which is what it actually checks. However, is_tax() is a legacy function name that WordPress has stuck with.
When using no parameters, the function simply checks whether the visitor is on any taxonomy term archive. However, you may optionally set one or both of its parameters for a more specific check.
<?phpis_tax( string|array $taxonomy = '', int|string|array $term = '' );
The following two parameters are accepted:
-
$taxonomy: The name of the taxonomy to check for -
$term: The name of the term from the taxonomy to check for
With the next snippet of code, you display one of three messages depending on the condition that is true. You first check to see whether the visitor is on the fantasy genre archive page. If that is not the case, you check to see whether the visitor is on any genre archive page. Finally, if the first two checks fail, you check whether the visitor is on any taxonomy term archive page.
<?php// If viewing a specific genre archive.if ( is_tax( 'genre', 'fantasy' ) ) {echo 'You are viewing the fantasy genre archive';// If viewing any genre term archive.} elseif ( is_tax( 'genre' ) ) {echo 'You are viewing a genre archive';// If viewing any taxonomy term archive.} elseif ( is_tax() ) {echo 'You are viewing a taxonomy term archive.';}
A POST TYPE, POST METADATA, AND TAXONOMY PLUGIN
Throughout this chapter, you have been building the pieces of a book collection plugin. This plugin allows users to input the books they own, add the book author's name, and organize the books by genre. It is a simple plugin that you can further expand upon to make a more advanced book collection plugin. You can also use it as a template to create other custom post types, metadata, and taxonomies.
Review what the full plugin code should look like when it is finished. Each file of the plugin should be within the plugin‐book‐collection folder.
The primary plugin.php file, which loads the other plugin files, should look like the following:
<?php/*** Plugin Name: Book Collection* Plugin URI: http://example.com/* Description: A plugin for managing a book collection.* Author: WROX* Author URI: http://wrox.com*/// Load custom post type functions.require_once plugin_dir_path( __FILE__ ) . 'post-types.php';require_once plugin_dir_path( __FILE__ ) . 'post-meta.php';require_once plugin_dir_path( __FILE__ ) . 'meta-boxes.php';require_once plugin_dir_path( __FILE__ ) . 'taxonomies.php';
The post‐types.php file, which registers the book post type, should look like the next snippet:
<?phpadd_action( 'init', 'pdev_book_collection_post_types' );function pdev_book_collection_post_types() {register_post_type( 'book', [// Post type arguments.'public' => true,'publicly_queryable' => true,'show_in_rest' => true,'show_in_nav_menus' => true,'show_in_admin_bar' => true,'exclude_from_search' => false,'show_ui' => true,'show_in_menu' => true,'menu_icon' => 'dashicons-book','hierarchical' => false,'has_archive' => 'books','query_var' => 'book','map_meta_cap' => true,// The rewrite handles the URL structure.'rewrite' => ['slug' => 'books','with_front' => false,'pages' => true,'feeds' => true,'ep_mask' => EP_PERMALINK,],// Features the post type supports.'supports' => ['title','editor','excerpt','thumbnail'],// Text labels.'labels' => ['name' => 'Books','singular_name' => 'Book','add_new' => 'Add New','add_new_item' => 'Add New Book','edit_item' => 'Edit Book','new_item' => 'New Book','view_item' => 'View Book','view_items' => 'View Books','search_items' => 'Search Books','not_found' => 'No books found.','not_found_in_trash' => 'No books found in Trash.','all_items' => 'All Books','archives' => 'Book Archives','attributes' => 'Book Attributes','insert_into_item' => 'Insert into book','uploaded_to_this_item' => 'Uploaded to this book','featured_image' => 'Book Image','set_featured_image' => 'Set book image','remove_featured_image' => 'Remove book image','use_featured_image' => 'Use as book image','filter_items_list' => 'Filter books list','items_list_navigation' => 'Books list navigation','items_list' => 'Books list','item_published' => 'Book published.','item_published_privately' => 'Book published privately.','item_reverted_to_draft' => 'Book reverted to draft.','item_scheduled' => 'Book scheduled.','item_updated' => 'Book updated.']] );}
Next, check the post‐meta.php file, which registers the custom post metadata.
<?phpadd_action( 'init', 'pdev_books_register_meta' );function pdev_books_register_meta() {register_post_meta( 'book', 'book_author', ['single' => true,'show_in_rest' => true,'sanitize_callback' => function( $value ) {return wp_strip_all_tags( $value );}] );}
Then, review your meta box code in the meta‐boxes.php file, which creates the UI for the user to enter and save their book metadata.
<?phpadd_action( 'add_meta_boxes_book', 'pdev_book_register_meta_boxes' );function pdev_book_register_meta_boxes() {add_meta_box('pdev-book-details','Book Details','pdev_book_details_meta_box','book','advanced','high');}function pdev_book_details_meta_box( $post ) {// Get the existing book author.$author = get_post_meta( $post->ID, 'book_author', true );// Add a nonce field to check on save.wp_nonce_field( basename( __FILE__ ), 'pdev-book-details' ); ?><p><label>Book Author:<br/><input type="text" name="pdev-book-author"value="<?php echo esc_attr( $author ); ?>"/></label></p><?php }add_action( 'save_post_book', 'pdev_book_save_post', 10, 2 );function pdev_book_save_post( $post_id, $post ) {// Verify the nonce before proceeding.if (! isset( $_POST['pdev-book-details'] ) ||! wp_verify_nonce( $_POST['pdev-book-details'], basename( __FILE__ ) )) {return;}// Bail if user doesn't have permission to edit the post.if ( ! current_user_can( 'edit_post', $post_id ) ) {return;}// Bail if this is an Ajax request, autosave, or revision.if (wp_is_doing_ajax() ||wp_is_post_autosave( $post_id ) ||wp_is_post_revision( $post_id )) {return;}// Get the existing book author if the value exists.// If no existing book author, value is empty string.$old_author = get_post_meta( $post_id, 'book_author', true );// Strip all tags from posted book author.// If no value is passed from the form, set to empty string.$new_author = isset( $_POST['pdev-book-author'] )? wp_strip_all_tags( $_POST['pdev-book-author'] ): '';// If there's an old value but not a new value, delete old value.if ( ! $new_author & $old_author ) {delete_post_meta( $post_id, 'book_author' );// If the new value doesn't match the new value, add/update.} elseif ( $new_value !== $old_value ) {update_post_meta( $post_id, 'book_author', $new_value );}}
Finally, review the taxonomies.php file, which is used for registering the custom genre taxonomy for organizing books in the collection.
<?phpadd_action( 'init', 'pdev_books_register_taxonomies' );function pdev_books_register_taxonomies() {register_taxonomy( 'genre', 'book', [// Taxonomy arguments.'public' => true,'show_in_rest' => true,'show_ui' => true,'show_in_nav_menus' => true,'show_tagcloud' => true,'show_admin_column' => true,'hierarchical' => true,'query_var' => 'genre',// The rewrite handles the URL structure.'rewrite' => ['slug' => 'genre','with_front' => false,'hierarchical' => false,'ep_mask' => EP_NONE],// Text labels.'labels' => ['name' => 'Genres','singular_name' => 'Genre','menu_name' => 'Genres','name_admin_bar' => 'Genre','search_items' => 'Search Genres','popular_items' => 'Popular Genres','all_items' => 'All Genres','edit_item' => 'Edit Genre','view_item' => 'View Genre','update_item' => 'Update Genre','add_new_item' => 'Add New Genre','new_item_name' => 'New Genre Name','not_found' => 'No genres found.','no_terms' => 'No genres','items_list_navigation' => 'Genres list navigation','items_list' => 'Genres list',// Hierarchical only.'select_name' => 'Select Genre','parent_item' => 'Parent Genre','parent_item_colon' => 'Parent Genre:']] );}
Now you have built a fully functional plugin that makes use of custom post types, post metadata, and taxonomies. This is just the beginning, though. There is an entire world of possibilities when it comes to building custom content solutions for your plugins. Use this plugin as a basic template to explore building custom content of your own.
SUMMARY
This chapter represents a small sampling of what's possible with custom post types, post metadata, and taxonomies. The biggest lesson you should take away is that you can use WordPress to create and manage literally any type of content you can imagine. The platform isn't simply limited to blog posts and pages.
The information presented in this chapter reveals many possibilities for plugin developers. You can make plugins for public use to give thousands of people new ways to manage content, or you can use these tools for custom client websites that have unique content needs.