14
The Kitchen Sink
WordPress has changed a lot over the years. In the first edition of this book, many of the sections in this chapter had their own chapters. However, some of these topics are not as important to WordPress plugin development today as they once were. Other sections of this chapter cover smaller things that did not have a home anywhere else in this book.
In this chapter, you will be getting the “kitchen sink”; everything and anything not covered elsewhere is here. Much of this chapter will be high‐level overviews of topics you may find yourself exploring further on your own.
QUERYING AND DISPLAYING POSTS
Generally speaking, WordPress will automatically query posts from the database on a given page view. Then, the user's theme will display the posts in the layout the theme designer has chosen. Theme development is outside the scope of what you are learning from this book on developing plugins. However, there is some crossover, and you will need to query and display posts from time to time.
In this section of the chapter, you will learn some use cases for displaying posts in the context of the plugin, get an overview of how to query posts from the database, and learn about the all‐important loop for outputting posts. At the end of the day, posts are just data. This means you could do anything you need with the data and not be limited to the examples presented here.
Use Case for Displaying Posts
As you learned in Chapter 8, “Content,” you can create any post type. Therefore, your plugins are not limited to simply displaying blog posts. In that chapter, you built a “book” post type for your plugin user to store their book collection. Imagine the many ways you could potentially output such a collection.
The following are examples of how you might want to output book posts:
- Display recently added book titles in a standard list
- Create a gallery of thumbnails for books, a bookshelf of sorts
- Generate a list of books based on their genre
- Output a random selection of books from the collection to visitors
There are also various ways that you can provide the user access for outputting these things:
- Use a PHP function to manually put in a theme template (not user‐friendly)
- Build a widget (see the “Widgets” section of this chapter)
- Create a shortcode (see the “Shortcodes” section of this chapter)
- Add a block for the block editor (see Chapter 7, “Blocks and Gutenberg”)
Because WordPress is transitioning toward everything being block‐based in the coming years, building a custom block is the ideal method to present such options to the user. However, having a backup option, such as a widget or shortcode, makes sense too. Not all users are currently using the block editor. If building a public plugin, it can be nice to offer a range of options for your plugin's users.
WP_Query Overview
To display posts, you must first query them from the database. WordPress has several functions for querying posts. However, they all eventually run through the WP_Query class. Most of the time, you will want to directly interact with this class instead of using one of the wrapper functions. It will keep things simple.
Take a look at the constructor method for the class:
<?phpWP_Query::__construct( string|array $query = '' );
The method takes a single parameter of $query, which can be a query string or array of parameters for querying posts. There are dozens of possible parameters, which can be found in the developer documentation: https://developer.wordpress.org/reference/classes/wp_query/#parameters.
The simplest way to query a set of blog posts is the following:
<?php$query = new WP_Query();
That code will return an object that includes the number of posts set in the user's post‐per‐page setting via the Reading Settings admin screen. By default, this is 10 posts.
Suppose you wanted to query five “book” posts in alphabetical order. You would need to set the post_type, posts_per_page, order, and orderby parameters.
<?php$query = new WP_Query( ['post_type' => 'book','posts_per_page' => 5,'order' => 'ASC','orderby' => 'title'] );
While there are dozens of possible parameters, these four are some of the most commonly used.
Querying posts from the database does not actually display posts. What it does is set up the posts so that you can then use the returned object how you want.
The Loop
The loop in WordPress is just a fancy of way of saying to check whether any posts are available from a post query and to loop through them. Technically, the actual loop is a PHP while loop that loops through the found posts. However, the terminology usually colloquially refers to the if statement surrounding the loop too.
A typical loop looks like the following within a theme template:
<?php if ( have_posts() ) : ?><?php while ( have_posts() ) : the_post(); ?><!-- Post is output here. --><?php endwhile; ?><?php endif; ?>
It is not the most elegant code for displaying posts, but this method has been a part of the platform for well over a decade. In the preceding code, there are two primary functions in use: have_posts() and the_post(). The former serves as a conditional for the if statement and iterator for the while loop. The latter sets up the current post's data via the global $post variable, which is an instance of a WP_Post object.
Developers familiar with other templating systems will likely find this method of displaying posts a little old‐school. However, WordPress tends to favor backward compatibility above all else.
Both have_posts() and the_post() are wrapper functions for WP_Query methods and should be used only in the main query and loop for a page. In the context of a plugin, you will reference the methods as $query‐>have_posts() and $query‐>the_post(), respectively. Take a look at the following example to see what the loop might look like in a plugin:
<?phpif ( $query->have_posts() ) {while ( $query->have_posts() ) {$query->the_post();}}// Reset post data.wp_reset_postdata();
You probably noticed that an extra function call to wp_reset_postdata() was appended to the previous code example. This is also another peculiarity about displaying posts in WordPress. Any time you create a custom query and loop through the posts, you need to reset the global post data. Remember that $query‐>the_post() sets up a global $post variable? That must be reset to the original page's post data, and the wp_reset_postdata() function does that. Failing to run this reset could mean that your plugin stomps on data, which may result in breaking the current global posts query or causing other plugins to not work.
If you remember some of these basic rules and gotchas, you will be OK. It's not the prettiest system ever invented, but it does get the job done.
In the previous section on querying posts, you built a query for grabbing the five most recent books added to the site in alphabetical order. Take that query and combine it with a loop for outputting the book titles as a list.
<?php// Query 5 books in alphabetical order.$query = new WP_Query( ['post_type' => 'book','posts_per_page' => 5,'order' => 'ASC','orderby' => 'title'] );// Check if there are any posts before output.if ( $query->have_posts() ) {// Open list tag if posts are found.echo '<ul>';// Loop through the found posts.while ( $query->have_posts() ) {$query->the_post();// Display the book title as list items.the_title( '<li>', '</li>' );}// Close list tag.echo '</ul>';}// Reset post data.wp_reset_postdata();
The preceding code does everything you learned. You first query the posts you want. Then, you check whether any posts were found. If so, you loop through the found posts and display them. The only new concept the code presented was the function the_title(), which is a basic template tag that outputs the current post's title (global $post‐>post_title).
Now you will build a blog post query and loop that displays posts in a more common <article> wrapper element. This query will list the five most recent posts by date.
<?php$query = new WP_Query( ['post_type' => 'post','posts_per_page' => 5,'order' => 'DESC','orderby' => 'date'] );// Check if there are any posts before output.if ( $query->have_posts() ) {// Loop through the found posts.while ( $query->have_posts() ) {$query->the_post(); ?><article class="post"><h2 class="post-title"><a href="<?php the_permalink(); ?>"><?php the_title(); ?></a></h2><div class="post-content"><?php the_content(); ?></div></article><?php }}// Reset post data.wp_reset_postdata();
As you can see, nothing is different about the basic query and loop code other than the parameters passed to WP_Query. The real difference is with the HTML output, which uses template tags for outputting post data. Template tags are basic PHP functions generally reserved for themes, but you can use them when needed in plugins. The full list of template tags is available at https://developer.wordpress.org/themes/references/list-of-template-tags.
In the next section, you will learn how to turn custom queries and post loops into a practical example via the Shortcode API.
SHORTCODES
Shortcodes are WordPress‐specific code that enables you to do nifty things with little effort, such as embed content or create objects that would normally require code that is too complicated for the average end user to piece together. In this section, you'll learn how to create simple shortcodes to allow your plugin users to enhance their posts.
What Shortcodes Are
The Shortcode API enables creating simple macro codes, sometimes also referred to as bbcodes for their similarity with a popular syntax in various forums and bulletin boards.
Essentially, a shortcode is a simple tag syntax between square brackets, such as [example], used in post content. When rendered on the front end, the shortcode is dynamically replaced with a more complex and user‐defined content.
Out of the box, WordPress registers several shortcodes that you can use. For example, when you upload multiple images to a post, you can drop the [gallery] shortcode in the post editor. This shortcode will be replaced with a nicely formatted gallery of your images when viewing the post on the front end.
WordPress out of the box registers shortcodes you can use. When you upload multiple images attached to a given post, you can simply insert [gallery] in your post, and this shortcode will be replaced with a nicely formatted gallery of your images.
The following are the default shortcodes registered by WordPress. You should consider these shortcode tag names as off‐limits and not register a tag with the same name.
-
wp_caption -
caption -
gallery -
playlist -
audio -
video -
embed
When registering a shortcode, you should follow a few rules. First, it is good practice to always prefix the shortcode tag with a prefix unique to your plugin. For the purposes of the shortcodes in this chapter, you will use pdev_. Therefore, a custom gallery shortcode might be [
pdev_gallery].
You must also avoid square braces, angle braces, ampersands, forward slashes, whitespace, nonprintable characters, and quotation marks. Even hyphens can cause issues if the pre‐hyphen characters match between two different shortcodes, which causes a conflict between the two. In general, it is best to stick with alphanumeric characters and underscores in shortcode tags.
Here are some examples of shortcodes that follow best practices:
-
[pdev_post_list] -
[pdev_featured_image] -
[pdev_lightbox_gallery]
Basically, don't go out of your way to make difficult names. The idea is that shortcodes should be “short” and easy‐to‐remember tags that users can drop into their post content. Don't make it hard for them or yourself.
Register Custom Shortcodes
In this section, you will learn how to register shortcodes. WordPress provides a simple function named add_shortcode() that allows plugin authors to register custom shortcodes.
<?phpadd_shortcode( string $tag, callable $callback );
The function accepts two parameters.
-
$tag: The shortcode tag name covered in the previous section -
$callback: A callback function or class method that renders the shortcode output on the front end
In most cases, shortcodes should be registered on WordPress’ init action hook. The following is a quick example of registering an example shortcode that outputs a simple “Hello, world.” message:
<?phpadd_action( 'init', function() {add_shortcode( 'pdev_hello_world', function() {return 'Hello, world.';} );} );
Building a Simple Shortcode
Now, start thinking about a more practical example. Remember how you output a post list in the “Querying and Displaying Posts” section of this chapter? That would make for a perfect example of a simple shortcode.
Start by defining what posts you want to query and display. Keeping this simple, grab the last 10 posts published to the site. Then, you create an unordered HTML list of the posts.
Now create a new plugin file named plugin‐post‐list‐shortcode.php with the following code:
<?php/*** Plugin Name: Post List Shortcode* Plugin URI: http://example.com/* Description: Output the last 10 posts via the [pdev_post_list] shortcode.* Author: WROX* Author URI: http://wrox.com*/add_action( 'init', 'pdev_register_post_list_shortcodes' );// Register shortcodes.function pdev_register_post_list_shortcodes() {add_shortcode( 'pdev_post_list', 'pdev_post_list_shortcode' );}// Shortcode callback function.function pdev_post_list_shortcode() {// Create empty string for content.$html = '';// Query last 10 posts.$query = new WP_Query( ['post_type' => 'post','posts_per_page' => 10,'order' => 'DESC','orderby' => 'date'] );// Check if there are any posts before output.if ( $query->have_posts() ) {// Open list tag if posts are found.$html .= '<ul>';// Loop through the found posts.while ( $query->have_posts() ) {$query->the_post();// Add list item with linked post title.$html .= sprintf('<li><a href="%s">%s</a></li>',esc_url( get_permalink() ),the_title( '', '', false ));}// Close list tag.$html .= '</ul>';}// Reset post data.wp_reset_postdata();// Return shortcode HTML.return $html;}
The big difference with outputting a post list and creating a shortcode for handling a post list is that the shortcode callback must return a string instead of output. As you can see in the preceding plugin code, everything to be output was assigned to the $html variable and returned in the shortcode callback.
After activating the plugin, add the following code to any post via the post‐editing screen in the admin:
[pdev_post_list /]That will output a simple post list, as shown in Figure 14‐1.

FIGURE 14‐1: Simple post list
Building a Shortcode with Parameters
The shortcode in the previous section did not provide the user with much control. It can only ever output a simple post list. However, the shortcode system allows you to create custom parameters so that users can modify what the shortcode outputs.
When accepting parameters, they will be passed as an array of arguments as the first parameter of the shortcode callback, which would look like the following:
<?phpfunction pdev_shortcode_callback( $attr ) {return '';}
When accepting attributes, you should always parse them against an array of defaults because users will not always pass along data for each. WordPress provides the shortcode_atts() function for parsing the attributes.
<?phpshortcode_atts( array $pairs, array $attr, string $shortcode = '' );
The function returns the parsed attributes. It accepts three parameters.
-
$pairs: The list of supported attributes and their default values. -
$attr: The attributes passed into the shortcode callback to merge with the defaults. -
$shortcode: The name of the shortcode. If provided, it creates a filter hook namedshortcode_atts_{$shortcode}that other plugin developers may filter.
Now you will build a [pdev_custom_posts] shortcode that outputs a list of posts just like the [pdev_post_list] shortcode from the previous section. However, the new shortcode will allow the user to define the post_type, posts_per_page, order, and orderby parameters.
Create a new plugin‐custom‐posts‐shortcode.php file with the following code:
<?php/*** Plugin Name: Custom Posts Shortcode* Plugin URI: http://example.com/* Description: Output posts via the [pdev_custom_posts] shortcode.* Author: WROX* Author URI: http://wrox.com*/add_action( 'init', 'pdev_register_custom_posts_shortcodes' );// Register shortcodes.function pdev_register_custom_posts_shortcodes() {add_shortcode( 'pdev_custom_posts', 'pdev_custom_posts_shortcode' );}// Shortcode callback function.function pdev_custom_posts_shortcode( $attr ) {// Create empty string for content.$html = '';// Parse attributes.$attr = shortcode_atts(['post_type' => 'post','posts_per_page' => 10,'order' => 'DESC','orderby' => 'date'],$attr,'pdev_custom_posts');// Sanitize attributes before proceeding.// Make sure post type exists.$attr['post_type'] = post_type_exists( $attr['post_type'] )? $attr['post_type']: 'post';// Posts per page should be an integer.$attr['posts_per_page'] = intval( $attr['posts_per_page'] );// Only allow ascending or descending.$attr['order'] = in_array( $attr['order'], [ 'ASC', 'DESC' ] )? $attr['order']: 'DESC';// Strip tags from orderby.$attr['orderby'] = wp_strip_all_tags( $attr['orderby'] );// Query last 10 posts.$query = new WP_Query( ['post_type' => $attr['post_type'],'posts_per_page' => $attr['posts_per_page'],'order' => $attr['order'],'orderby' => $attr['orderby']] );// Check if there are any posts before output.if ( $query->have_posts() ) {// Open list tag if posts are found.$html .= '<ul>';// Loop through the found posts.while ( $query->have_posts() ) {$query->the_post();// Add list item with linked post title.$html .= sprintf('<li><a href="%s">%s</a></li>',esc_url( get_permalink() ),the_title( '', '', false ));}// Close list tag.$html .= '</ul>';}// Reset post data.wp_reset_postdata();// Return shortcode HTML.return $html;}
As you can see, the code is similar to the earlier post list shortcode you built. The major difference is that it accepts several parameters and parses them with a set of defaults via the shortcode_atts() function. Then, each parameter is sanitized to make sure it is safe and/or valid.
When you enter the following into the post editor, it will list five pages in alphabetical order:
[pdev_custom_posts post_type="page" posts_per_page="5" order="ASC"orderby="title" /]
End users can mix and match which parameters they use or even choose not to use any of the parameters. You could take this example of a simple post list shortcode even further and allow users to set more parameters if you want. However, keep in mind that shortcodes should be simple to use.
Building a Shortcode with Content
In the two previous shortcode examples, you built what are generally called self‐closing shortcodes, meaning that the shortcode closes itself with a / character before the closing ] bracket. Some shortcodes can accept content within. Take a look at the following examples to see the difference:
// Self-closing shortcode:[pdev_example_1 /]// Shortcode with content:[pdev_example_2]Example content.[/pdev_example_2]
Not all shortcodes must accept content, but it is an option if you need the functionality for your plugin. If allowing content for your plugin's shortcode, the content is passed as the second parameter for the shortcode callback function.
Suppose you wanted to create a pullquote function for allowing users to define a quote in their post. You decide to build a [pdev_pullquote] shortcode to handle formatting the HTML for your plugin users.
Create a new file named plugin‐pullquote‐shortcode.php with the following code:
<?php/*** Plugin Name: Pullquote Shortcode* Plugin URI: http://example.com/* Description: Outputs a quote via the [pdev_pullquote] shortcode.* Author: WROX* Author URI: http://wrox.com*/add_action( 'init', 'pdev_register_pullquote_shortcodes' );// Register shortcodes.function pdev_register_pullquote_shortcodes() {add_shortcode( 'pdev_pullquote', 'pdev_pullquote_shortcode' );}// Shortcode callback function.function pdev_pullquote_shortcode( $attr, $content = '' ) {// Bail if there is no content.if ( ! $content ) {return '';}// Return formatted content.return sprintf('<blockquote class="pdev-pullquote">%s</blockquote>',wpautop( wp_kses_post( $content ) ));}
The shortcode callback function from the preceding code does two things. First, it checks whether there is any content because this particular shortcode requires the user to enter some content. If no content is passed in, it returns an empty string.
If the user does define custom content, that content is sanitized and wrapped in custom HTML. You could take this concept further and add custom styles or allow for custom attributes as you learned in the previous section.
Now try adding the following to the post editor:
[pdev_pullquote]"Professional WordPress Plugin Development" is the greatest book ever![/pdev_pullquote]
On the front end of the site, WordPress will properly output the shortcode as the following HTML:
<blockquote class="pdev-pullquote"><p>"Professional WordPress Plugin Development" is the greatest book ever!</p></blockquote>
Shortcode Tips
Shortcodes are a great way to put a lot of power in the hands of average users and allow them to output complex and dynamic content. To guarantee the best end‐user experience, you must keep in mind two important principles as a plugin author.
- Make things simple and foolproof.
- Remember that shortcodes are dynamic.
Think Simplicity for the User
As a plugin user, it is awesome to add new features to one's blog and to be able to write a simple shortcode that outputs more complex content. However, it can be cumbersome to remember the shortcode parameter syntax. Often, users end up with the impression that they are learning a new markup language.
Remember the [pdev_custom_posts] shortcode earlier in this chapter? It allows users to input between one and four parameters. You will have to decide whether all of the options are too much for your users.
This may also be different depending on what your goal is. Do you really want to simply offer a post or page list option? You may consider splitting the shortcode into separate [pdev_post_list] and [pdev_page_list] shortcodes. You may also cut back on parameters. For example, are the order and orderby parameters necessary?
Allowing lots of options is neat, but you don't want your users constantly checking the plugin documentation. This can make for a bad experience. Instead, make things simple and foolproof so that users can use your plugin instinctively.
Remember That Shortcodes Are Dynamic
Shortcode output is dynamically generated. This means that every time WordPress displays a post, the post content is parsed, and the shortcodes are replaced with the returned result of their callback function.
Replacements like those you coded in this chapter are lightning fast. You don't have to worry about WordPress’ performance when you register new shortcodes.
Performance should be a consideration if your shortcodes pull information either from the database or from remote websites.
- In the first case, your code will issue extra SQL queries, which can hinder performance on slow web hosts.
- In the second case, your shortcode will perform external HTTP requests that could slow down the whole page rendering, while WordPress is awaiting the remote server response to parse.
In such cases, you should consider caching the result of your shortcode. See Chapter 4 for more information on caching data.
Look under the Hood
Besides using add_shortcode() to register new shortcodes, the Shortcode API has other interesting functions and capabilities. In this section, you will learn how to make use of these extra features.
remove_shortcode()
You can dynamically unregister a shortcode using the remove_shortcode() function. It is important to note that this function must be called after the shortcode has been registered for it to work.
remove_shortcode( 'shortcode_tag_name' );remove_all_shortcodes()
Similarly, you can dynamically unregister all registered shortcodes using the remove_all_shortcodes() function. Technically, this function simply resets the global $shortcode_tags to an empty array.
strip_shortcodes()
The function strip_shortcodes() strips registered shortcodes from string content. Imagine the following content with the [pdev_example] shortcode. It will be stripped from output.
<?php$content = 'Hello, world! [pdev_example]';echo strip_shortcodes( $content );
do_shortcode()
The do_shortcode() function searches string content passed into it for shortcodes and processes them. By default, WordPress uses do_shortcode() as a filter on the post content (
the_content filter hook), which is why shortcodes in post content are automatically processed.
However, you are not limited to just the post content. Plugins and even themes can create “shortcode‐aware” areas via custom settings if they want.
Imagine your plugin had a custom database option named pdev_custom_content (see Chapter 3, “Dashboard and Settings,” for information on how to create plugin settings). You want to allow the user to enter some basic text and also allow for shortcodes. On output of the option, you merely need to wrap the database value in the do_shortcode() function.
<?php$content = get_option( 'pdev_custom_content', 'Some default text.' );echo do_shortcode( $content );
You can take this even further if you want and have shortcodes that are able to process other shortcodes. Earlier in this chapter, you learned how to build a shortcode with content. It is possible for that shortcode's content to also have shortcodes.
Consider the following post content with nested shortcodes:
[pdev_example]This shortcode has [another_shortcode /] within it.[/pdev_example]For the [another_shortcode] tag to be processed, the [pdev_example] shortcode must allow for it by running its content through do_shortcode(). The following code snippet shows how this is possible:
<?phpadd_shortcode( 'pdev_example', function( $attr, $content = '' ) {return do_shortcode( $content );} );
By default, WordPress will not process nested shortcodes. The preceding code is the only way to allow for it. At some point in the shortcode callback function, the returned content must be run through do_shortcode().
WIDGETS
Widgets are a great way to give the users of your plugin an easy method to display your plugin information or data. WordPress features a Widgets API for creating and interacting with widgets. In this section, you explore how to create widgets, add and save widget options, and display plugin information in the widget output.
Creating a Widget
You create all widgets in WordPress by extending the WP_Widget class. To understand how the widget class works, it's helpful to look at an overview of what the typical widget class looks like.
<?phpnamespace PDEV;use WP_Widget;class MyWidget extends WP_Widget {// Sets up the widget.public function __construct() {}// Displays the widget.public function widget() {}// Outputs widget options form.public function form() {}// Callback on widgets update to save options.public function update() {}}
As you can see, the custom widget subclass features multiple methods for your widget, each with a specific purpose.
Now it's time to create a widget for your plugin. For this first widget, you create a simple text‐based widget to save and display your favorite movie and song. It is a simple example that demonstrates how to save text data in a WordPress widget.
First, create a new folder for your plugin named plugin‐favorites‐widget and put a new file within it named plugin.php. Then, set up your plugin header.
<?php/*** Plugin Name: Favorites Widget* Plugin URI: http://example.com/* Description: Allows the user to enter their favorite movie and song.* Author: WROX* Author URI: http://wrox.com*/
To register custom widgets, you use the widgets_init action hook. This hook is triggered after the default widgets have been registered in WordPress.
namespace PDEVFavorites;add_action( 'widgets_init', function() {require_once plugin_dir_path( __FILE__ ) . 'Widget.php';register_widget( __NAMESPACE__ . 'Widget' );} );
This code attaches a simple anonymous function to the widgets_init hook. When the hook is fired by WordPress, your code loads a Widget.php class file, which will hold our custom widget. It then registers the widget with WordPress via the register_widget() function, which accepts a single parameter of the widget's class name.
Now that you have the plugin set up and are attempting to load a Widget.php file, go ahead and create that file within your plugin folder. You will now create the actual code to make your widget work.
You need to extend the WP_Widget class by creating a new class with the unique name you defined when you registered your widget. Start by using the basic template from earlier.
<?phpnamespace PDEVFavorites;use WP_Widget;class Widget extends WP_Widget {// Sets up the widget.public function __construct() {}// Displays the widget.public function widget() {}// Outputs widget options form.public function form() {}// Callback on widgets update to save options.public function update() {}}
From this point, you need to set up the widget via the constructor method. Here, you will define some widget options with WordPress.
// Sets up the widget.public function __construct() {// Set up the widget options.$widget_options = array('classname' => 'pdev-favorites','description' => 'Displays your favorite movie and song.','customize_selective_refresh' => true);// Create the widget.parent::__construct('pdev-favorites','Favorites: Movie and Song',$widget_options);}
There are two primary things you need to do when setting up your widget. The first is to set the $widget_options array. For this, you can pass a custom classname, add a textual description of the widget, and set the customize_selective_refresh option, which tells WordPress whether to provide a live preview of changes to the widget without refreshing the entire page in the customizer. Unless you are doing some advanced JavaScript stuff that interferes with selective refresh in the customizer, you should set this to true.
For the final step of setting up the widget, you must call the parent class’ __construct() method. The first parameter should be a unique ID for your widget. The second parameter is the widget title. And, the third parameter is the $widget_options array that you set up earlier.
Now, you can get down to the business of handling the front‐end widget output. Besides the constructor method, the widget() method is the only method required for creating a widget. The form() and update() methods that you will add later are required only for widgets that have custom options.
Update your widget class’ widget() method with the following code:
// Displays the widget.public function widget( $sidebar, $instance ) {// Open the sidebar widget wrapper.echo $sidebar['before_widget'];// Output the widget title if set.if ( ! empty( $instance['title'] ) ) {// Open the sidebar widget title wrapper.echo $sidebar['before_title'];// Apply filters and output widget title.echo apply_filters( 'widget_title', $instance['title'], $instance,$this->id_base );// Close the sidebar widget title wrapper.echo $sidebar['after_title'];}// Output favorite movie and song in a list.echo '<ul>';printf('<li>Favorite Movie: %s</li>',! empty( $instance['movie'] ) ? esc_html( $instance['movie'] ) : 'None');printf('<li>Favorite Song: %s</li>',! empty( $instance['song'] ) ? esc_html( $instance['song'] ) : 'None');echo '</ul>';// Close the sidebar widget wrapper.echo $sidebar['after_widget'];}
The first thing you should notice is the two parameters passed into the method.
-
$sidebar: This parameter includes necessary data about the sidebar, which has generally been registered by the theme. You will need it to output the appropriate HTML tags so that it doesn't break the theme on the front end. -
$instance: This parameter houses the data about the specific instance of the widget that is being output (widgets can be used multiple times, which creates separate instances). Primarily, you need this data for any widget options set by the user.
The first and last things all widgets should do is print the $sidebar['before_widget'] and $sidebar['after_widget'] variables, respectively. These variables are the opening and closing HTML tags for the sidebar the widget is being displayed in.
The next important thing is the widget title. Not all widgets have titles, but it is generally good practice to allow the user to decide whether they want to add a title and provide an option for this. When displaying the title, it is important to apply the core WordPress widget_title filter hook so that other plugins can manipulate this. Take special note of the format of this hook and make sure to pass all data as shown in the following snippet so that it is available to filters:
echo apply_filters( 'widget_title', $instance['title'], $instance, $this->id_base );Use the $sidebar['before_title'] and $sidebar['after_title'] variables before and after outputting the title, respectively. Like the widget wrapper, this will wrap the title in the registered sidebar's widget title HTML.
After outputting the title, you simply need to add in your widget's custom output. In the preceding code, you made a simple list to output the user's favorite movie and song. Remember that the $instance array contains all of the widget options data. So, $instance['movie'] and $instance['song'] are both available for use.
Now you will add a settings form for your widget. It will include fields for a title, favorite movie, and favorite song. Replace the form() method in your widget class with the following code:
// Outputs widget options form.public function form( $instance ) {$instance = wp_parse_args((array) $instance,['title' => 'Favorites','movie' => '','song' => '']); ?><p><label>Title:<inputtype="text"class="widefat"name="<?php echo $this->get_field_name( 'title' ); ?>"value="<?php echo esc_attr( $instance['title'] ); ?>"/></label></p><p><label>Movie:<inputtype="text"class="widefat"name="<?php echo $this->get_field_name( 'movie' ); ?>"value="<?php echo esc_attr( $instance['movie'] ); ?>"/></label></p><p><label>Song:<inputtype="text"class="widefat"name="<?php echo $this->get_field_name( 'song' ); ?>"value="<?php echo esc_attr( $instance['song'] ); ?>"/></label></p><?php }
The form() method accepts a single parameter of $instance. Just like the widget() method from earlier, this is an array of settings for this specific instance of the widget.
The first thing you should do with the $instance variable is to parse it against an array of defaults. This will make sure that each key/value pair is set for the $instance array and not result in an undefined index error in the case that a key doesn't exist.
From that point, it is simply a matter of outputting a basic HTML form. There are two major things you must do to ensure that your form is correct. The first is to add an appropriate name attribute to form fields for this particular instance of the widget. WordPress provides the WP_Widget::get_field_name() method (use as $this‐>get_field_name()) for returning the correct value for this attribute. You merely need to reference it and pass in the widget setting name as the first parameter.
The second requirement is that the value attribute for form fields must use the $instance variable. For example, if you wanted to output the correct title setting value, you would need to reference $instance[‘title’].
The final step of creating your widget is handling the update() method, which is executed when widget settings are saved. This method is important because it is the point where you sanitize settings before they are stored in the database.
Replace the update() method in your widget class with the following code:
// Callback on widgets update to save options.public function update( $new_instance, $old_instance ) {// Create empty array to store sanitized data.$instance = [];// Sanitize data from widget form.$instance['title'] = sanitize_text_field( $new_instance['title'] );$instance['movie'] = sanitize_text_field( $new_instance['movie'] );$instance['song'] = sanitize_text_field( $new_instance['song'] );// Return sanitized data.return $instance;}
The update() method accepts two parameters.
-
$new_instance: The new widget settings array set by the user before being saved to the database. -
$old_instance: The previously saved widgets settings. You will not need this array most of the time, but it is available if you need to work with the old data.
The first thing you should do is create a clean, empty $instance array that will house all of your sanitized options. You will return this array after sanitizing.
In the preceding code, the widget title, favorite movie, and favorite song settings are all sanitized via the sanitize_text_field() function. Because all of these options are basic text fields, this function keeps things simple. Keep in mind that you should always sanitize or validate based on the specific type of data that you are expecting. For more information on properly sanitizing data, see Chapter 4.
Congratulations! You have now successfully built your first widget. Take a look at what it should look like from the Widgets admin screen in Figure 14‐2.

FIGURE 14‐2: Widgets admin screen
After placing it in a sidebar, it should look similar to Figure 14‐3 on the front end.

FIGURE 14‐3: Favorites list
Now review the full widget plugin code that you have put together. Your plugin‐favorites‐widget/plugin.php file should look like the following:
<?php/*** Plugin Name: Favorites Widget* Plugin URI: http://example.com/* Description: Allows the user to enter their favorite movie and song.* Author: WROX* Author URI: http://wrox.com*/namespace PDEVFavorites;add_action( 'widgets_init', function() {require_once plugin_dir_path( __FILE__ ) . 'Widget.php';register_widget( __NAMESPACE__ . 'Widget' );} );
The plugin‐favorites‐widget/Widget.php file should look like this final snippet:
<?phpnamespace PDEVFavorites;use WP_Widget;class Widget extends WP_Widget {// Sets up the widget.public function __construct() {// Set up the widget options.$widget_options = array('classname' => 'pdev-favorites','description' => 'Displays your favorite movie and song.','customize_selective_refresh' => true);// Create the widget.parent::__construct('pdev-favorites','Favorites: Movie and Song',$widget_options);}// Displays the widget.public function widget( $sidebar, $instance ) {// Open the sidebar widget wrapper.echo $sidebar['before_widget'];// Output the widget title if set.if ( ! empty( $instance['title'] ) ) {// Open the sidebar widget title wrapper.echo $sidebar['before_title'];// Apply filters and output widget title.echo apply_filters('widget_title',$instance['title'],$instance,$this->id_base);// Close the sidebar widget title wrapper.echo $sidebar['after_title'];}// Output favorite movie and song in a list.echo '<ul>';printf('<li>Favorite Movie: %s</li>',! empty( $instance['movie'] ) ? esc_html( $instance['movie'] ) : 'None');printf('<li>Favorite Song: %s</li>',! empty( $instance['song'] ) ? esc_html( $instance['song'] ) : 'None');echo '</ul>';// Close the sidebar widget wrapper.echo $sidebar['after_widget'];}// Outputs widget options form.public function form( $instance ) {$instance = wp_parse_args((array) $instance,['title' => 'Favorites','movie' => '','song' => '']); ?><p><label>Title:<inputtype="text"class="widefat"name="<?php echo $this->get_field_name( 'title' ); ?>"value="<?php echo esc_attr( $instance['title'] ); ?>"/></label></p><p><label>Movie:<inputtype="text"class="widefat"name="<?php echo $this->get_field_name( 'movie' ); ?>"value="<?php echo esc_attr( $instance['movie'] ); ?>"/></label></p><p><label>Song:<inputtype="text"class="widefat"name="<?php echo $this->get_field_name( 'song' ); ?>"value="<?php echo esc_attr( $instance['song'] ); ?>"/></label></p><?php }// Callback on widgets update to save options.public function update( $new_instance, $old_instance ) {// Create empty array to store sanitized data.$instance = [];// Sanitize data from widget form.$instance['title'] = sanitize_text_field( $new_instance['title'] );$instance['movie'] = sanitize_text_field( $new_instance['movie'] );$instance['song'] = sanitize_text_field( $new_instance['song'] );// Return sanitized data.return $instance;}}
DASHBOARD WIDGETS
WordPress also features a Dashboard Widgets API. You can use this API to create custom widgets on the Dashboard screen in the WordPress admin. Dashboard widgets can be anything, but their purpose is generally informational to help the user in some capacity. This can be data about your plugin or perhaps an RSS feed that points to tutorials on your website.
Some plugin authors use dashboard widgets to advertise products and services. For many users, this is seen as spammy. Going overboard here can lead to a poor reputation in the community. It is best to leave any ads to your plugin's own admin screens and not place them on a screen unrelated to your plugin.
Dashboard widgets should not be confused with the Widgets API discussed earlier in this chapter. While the two share a similar name, they are nothing alike.
Creating Dashboard Widgets
To create your dashboard widget, you use the wp_add_dashboard_widget() function.
<?phpwp_add_dashboard_widget(string $widget_id,string $widget_name,callable $callback,callable $control_callback = null,array $callback_args = null);
The function accepts the following parameters:
-
$widget_id: The CSS ID added to the widget's HTML wrapper. -
$widget_name: The title displayed for the widget header. -
$callback: Function, method, or other callable for displaying your widget's content. -
$control_callback: Function, method, or other callable for outputting the form controls for the widget. This is necessary only for widgets with settings. -
$callback_args: Optional array of arguments to pass to the widget callback function.
To create a dashboard widget, use the wp_dashboard_setup action hook. This hook is executed directly after the default dashboard widgets have been initialized, but prior to them being displayed.
Now register a new dashboard widget as shown in the following snippet:
add_action( 'wp_dashboard_setup', 'pdev_simple_dashboard_register' );// Registers dashboard widgets.function pdev_simple_dashboard_register() {wp_add_dashboard_widget('pdev-simple-dashboard','Plugin: Report Bugs','pdev_simple_dashboard_display');}
The preceding code adds the pdev_simple_dashboard_register() action to the wp_dashboard_setup hook. It then registers a new dashboard widget via the wp_add_dashboard_widget() function. The first parameter is a unique ID for the widget and set to pdev‐simple‐dashboard. It is then given a title of “Plugin: Report Bugs.” The third parameter sets the pdev_simple_dashboard_display() function as the callback for displaying the actual widget.
Now that your dashboard widget is registered, you need to set up the custom function to display a message to your users.
// Dashboard widget callback.function pdev_simple_dashboard_display() {echo '<p>Please contact [email protected] to report bugs.</p>';}
You now have a custom dashboard widget with a simple message displayed to your users, as shown in Figure 14‐4. The Dashboard Widget API automatically makes your widget draggable and collapsible and even adds your widget to the Screen Options tab so that users can easily hide it if they choose.

FIGURE 14‐4: Custom dashboard widget
Now review the plugin code in its entirety.
<?php/*** Plugin Name: Simple Dashboard Widget* Plugin URI: http://example.com/* Description: Example plugin of a simple dashboard widget.* Author: WROX* Author URI: http://wrox.com*/add_action( 'wp_dashboard_setup', 'pdev_simple_dashboard_register' );// Registers dashboard widgets.function pdev_simple_dashboard_register() {wp_add_dashboard_widget('pdev-simple-dashboard','Plugin: Report Bugs','pdev_simple_dashboard_display'}// Dashboard widget callback.function pdev_simple_dashboard_display() {echo '<p>Please contact [email protected] to report bugs.</p>';}
Creating a Dashboard Widget with Options
Now that you understand dashboard widgets, you can create a more advanced widget that stores an option value. Dashboard widgets can store options, making them easily customizable by the user. If a dashboard widget has any options, a Configure link is displayed when you hover over the widget title.
The dashboard widget in this example enables you to set a custom RSS feed URL and display the contents of that feed.
<?phpadd_action( 'wp_dashboard_setup', 'pdev_advanced_dashboard_register' );// Registers dashboard widgets.function pdev_advanced_dashboard_register() {wp_add_dashboard_widget('pdev-advanced-dashboard','Custom Feed','pdev_advanced_dashboard_display','pdev_advanced_dashboard_control');}
Notice that the wp_add_dashboard_widget() function has the fourth parameter set, in this example pdev_advanced_dashboard_control(), which is the control callback. This is the function that displays your widget setting field and saves the data entered as an option for your widget.
Next you need to create the pdev_advanced_dashboard_display() function to display the custom RSS feed in your widget.
// Dashboard widget callback.function pdev_advanced_dashboard_display() {// Get widget option.$feed_url = get_option( 'pdev_dashboard_feed_url' );// If no feed, set to the WordPress.org news feed.if ( ! $feed_url ) {$feed_url = 'https://wordpress.org/news/feed';}// Open HTML wrapper.echo '<div class="rss-widget">';// Output RSS feed list.wp_widget_rss_output(esc_url_raw( $feed_url ),['title' => 'RSS Feed News','items' => 5,'show_summary' => true,'show_author' => false,'show_date' => true]);// Close HTML wrapper.echo '</div>';}
The first two lines retrieve the RSS feed URL, which is stored as an option in the database. Chapter 3 covers plugin settings and options in more detail.
Next, the widget uses the wp_widget_rss_output() function to retrieve the RSS feed and display it. This handy little function is great for retrieving and displaying RSS feeds in WordPress. The widget defines the RSS URL, sets the title to RSS Feed News, sets the number of posts to show to 5, and includes a few other options.
Now that you have the widget display, you need to create the control callback function, pdev_advanced_dashboard_control(). This function adds the form field to your widget and can also save the value entered by the user.
// Dashboard widget control callback.function pdev_advanced_dashboard_control() {// Check if option is set before saving.if ( isset( $_POST['pdev_dashboard_feed_url'] ) ) {// Update database option.update_option('pdev_dashboard_feed_url',esc_url_raw( $_POST['pdev_dashboard_feed_url'] ));}// Get widget option.$feed_url = get_option( 'pdev_dashboard_feed_url' ); ?><p><label>RSS Feed URL:<inputtype="text"name="pdev_dashboard_feed_url"class="widefat"value="<?php echo esc_url( $feed_url ); ?>"/></label></p><?php }
The first task the function handles is saving the widget option. You should always check to verify that the POST value exists prior to saving it using the isset() PHP function. Next you sanitize the value of $_POST['pdev_dashboard_feed_url'] using the esc_url_raw() function before saving the option to the database via update_option(). The esc_url_raw() function will properly format the URL and make sure it does not have any illegal characters.
Once the widget option is saved, you need to display the widget form field so that your users can enter the RSS feed URL they want displayed. First, retrieve the widget option from the database if it exists so you can display it in the form field. Next create a simple text input named pdev_dashboard_feed_url. Notice that the value is set to $feed_url, which is storing the RSS feed URL value entered by the user.
You now have a custom dashboard widget that stores a custom RSS feed URL and displays the latest two posts to the user, as shown in Figure 14‐5.
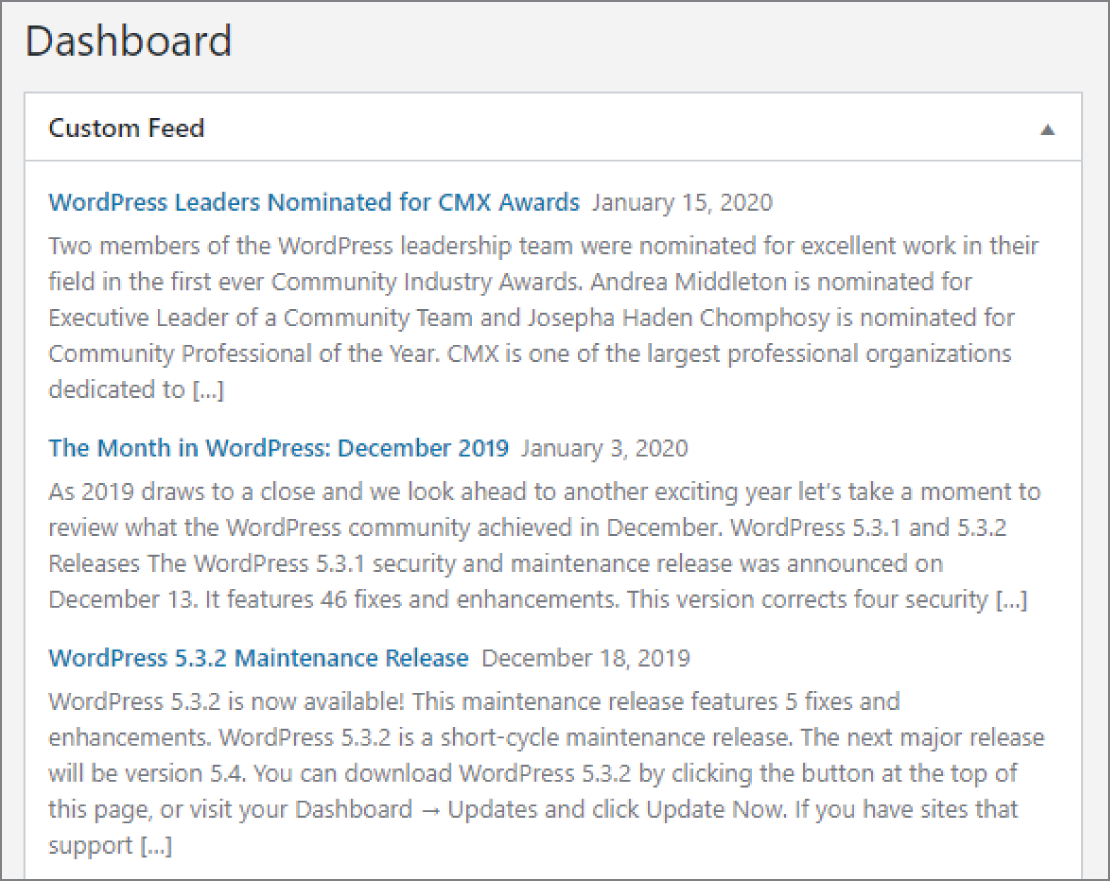
FIGURE 14‐5: Custom dashboard widget
Now look at the full source for the custom RSS feed dashboard widget.
<?php/*** Plugin Name: Advanced Dashboard Widget* Plugin URI: http://example.com/* Description: Example plugin of a advanced dashboard widget with options.* Author: WROX* Author URI: http://wrox.com*/add_action( 'wp_dashboard_setup', 'pdev_advanced_dashboard_register' );// Registers dashboard widgets.function pdev_advanced_dashboard_register() {wp_add_dashboard_widget('pdev-advanced-dashboard','Custom Feed','pdev_advanced_dashboard_display','pdev_advanced_dashboard_control');}// Dashboard widget callback.function pdev_advanced_dashboard_display() {// Get widget option.$feed_url = get_option( 'pdev_dashboard_feed_url' );// If no feed, set to the WordPress.org news feed.if ( ! $feed_url ) {$feed_url = 'https://wordpress.org/news/feed';}// Open HTML wrapper.echo '<div class="rss-widget">';// Output RSS feed list.wp_widget_rss_output(esc_url_raw( $feed_url ),['title' => 'RSS Feed News','items' => 5,'show_summary' => true,'show_author' => false,'show_date' => true]);// Close HTML wrapper.echo '</div>';}// Dashboard widget control callback.function pdev_advanced_dashboard_control() {// Check if option is set before saving.if ( isset( $_POST['pdev_dashboard_feed_url'] ) ) {// Update database option.update_option('pdev_dashboard_feed_url',esc_url_raw( $_POST['pdev_dashboard_feed_url'] ));}// Get widget option.$feed_url = get_option( 'pdev_dashboard_feed_url' ); ?><p><label>RSS Feed URL:<inputtype="text"name="pdev_dashboard_feed_url"class="widefat"value="<?php echo esc_url( $feed_url ); ?>"/></label></p><?php }
REWRITE RULES
The Rewrite API is often considered one of the trickiest areas in WordPress and is certainly one of the least documented on the web. This section first gives you some background information on why URLs are rewritten, then explains how to do this in WordPress, and finally shows you a couple real‐world scenarios in which you can leverage the Rewrite API.
Unfortunately, given the restraints of publishing, it is impossible to provide a full deep‐dive into all of the possibilities with the Rewrite API. Instead, consider this section more of a high‐level overview to start you down the path of custom rewrite rules.
Why Rewrite URLs
Dynamic sites use URLs that generate content from query string parameters. These URLs are often rewritten to resemble URLs for static pages on a site with a subdirectory hierarchy. For example, the URL to a wiki page might be http://example.com/index.php?title=rewrite-url and be actually rewritten to http://example.com/rewrite-url. A request to this latter, prettier URL will be transparently rewritten by the web server to the former URL.
This introductory section familiarizes you with the concept of “pretty permalinks” (sometimes called “fancy URLs” in web applications) and URL rewriting in general and specifically in WordPress.
Permalink Principles
Web applications and sites can have two completely different audiences: human readers and search engines. Online resources should be friendly to both.
Search Engine Friendly
Suppose you have coded a complete online store for a client, with various products and categories. From a programmer's perspective, each URL of the site would be similar to http://example.com/shop.php?action=display&category=12&subcat=4. This URL easily maps to variables that can then typically fetch information from a database or perform actions.
The problem with that URL is that search engines may index it or just index http://example.com/shop.php, which may not even return something intelligible.
User Friendly
As a human user, you want a URL to be easy to understand and, if possible, memorable. For instance, consider these two URLs that would actually display the same product page:
example.com/shop.php?action=display&category=123&product_id=42example.com/shop/shirts/wordpress-blue/
The first URL is long and cryptic, whereas the second one is shorter and self‐explanatory.
Even when URLs are not obscure like the first one, having a directory‐like structure makes it much more understandable. The following two URLs would, for instance, point to the same page on a WordPress‐powered site.
Apache's mod_rewrite
Web server developers have imagined ways to rewrite URLs, from something programmatically convenient (
shop.php?product=100) to something user and search engine friendly (
/buy/wordpress‐shirt/). This section highlights how this is done with the Apache web server, but other web server software (Lighttpd, Nginx, IIS, and so on) all have similar techniques.
The key module for permalinks in Apache is mod_rewrite, a module that enables defining rewrite rules typically found in the .htaccess file. A classic rewrite rule consists of the following code block:
<IfModule mod_rewrite.c>RewriteEngine onRewriteRule [ pattern] [ substitution ] [ optional flag(s) ]</IfModule>
The pattern and substitution parameters can use regular expressions. Consider the following rewrite rule:
RewriteRule /buy/([^/]+)/ /shop.php?product=$1 [L]Now, when a client requests a URL that starts with /buy/ followed several times by a character that is not a slash (
[^/]+) and then a slash, the web server internally redirects the request to /shop.php and passes the parameter product with the value caught inside the parentheses of the pattern.
If you want to learn more about mod_rewrite and URL rewriting in a non‐WordPress environment, you can read a thorough guide at https://www.sitepoint.com/guide-url-rewriting/.
URL Rewriting in WordPress
A typical WordPress URL such as /2020/03/hello‐world/ doesn't match an actual physical path on the web server. (No “hello‐world” directory is in a “03” directory, which is in a “2020” folder.) At some point, the URL was rewritten.
When installed, WordPress creates an .htaccess file in its root directory that contains the following block:
<IfModule mod_rewrite.c>RewriteEngine OnRewriteBase /RewriteRule ^index.php$ - [L]RewriteCond %{REQUEST_FILENAME} !-fRewriteCond %{REQUEST_FILENAME} !-dRewriteRule . /index.php [L]</IfModule>
This mod_rewrite directive contains a conditional rewrite rule, which tells the web server the following:
- If the request is
index.php, redirect to this file and don't try to match any other rewrite rule. (The[L]flag stands for Last.) - Check whether the request is not a file (
%{REQUEST_FILENAME} !‐f) and not a directory (%{REQUEST_FILENAME} !‐d). - Then rewrite the URL to
index.phpand don't try to apply another rewrite rule.
This .htaccess directive redirects requests such as /2020/page/6/ to /index.php. This means that practically all requests in the front‐end area of a WordPress site are internally redirected to index.php, which then has to guess how to interpret the request. Enter the Rewrite API.
How WordPress Handles Queries
You now know that when a visitor loads a WordPress‐powered page, the file actually loaded is index.php. For example, if you request http://example.com/2020/01/hello-world/, WordPress internally redirects this URL into http://example.com/index.php?p=1 and eventually fetches from the database data for the post with ID 1. How is the translation from a URL to a MySQL query done?
The following section explains what magic happens when the web server displays a WordPress‐powered page and how plugins can interfere with this process.
Overview of the Query Process
You need to understand how and when events occur within WordPress because this can highlight the parts where your plugin can interfere with the process. You can now dissect the flow of events when a page is requested and determine which files are included and which functions are called.
- The root
index.phpfile is loaded, as per the.htaccessrewrite rule, and loads the filewp‐blog‐header.php. - This file loads
wp‐load.php, which searches and includeswp‐config.php, which will in turn loadwp‐settings.php, which includes the function files, active plugins, and then pluggable functions. - Two new objects are instantiated:
$wp_queryand$wp_rewrite. You learn about these later. - A few other files are loaded, such as translation files and the theme's functions file.
WordPress is now fully loaded and plugins can start interacting, but it doesn't yet know what to display and what page has been requested. Let's get back to
wp‐blog‐header.php. After everything is loaded, this file calls the functionwp(), which starts the magic—the methodWP::parse_request().The
parse_request()method from theWPclass prepares everything WordPress needs to know to understand the page request. - This function fetches the list of all the registered rewrite rules. Just as previously explained with
mod_rewrite, it consists of a list of pattern/replacement pairs, to tell WordPress that/category/tutorials/page/2/actually means/index.php?category_name=tutorials&paged=2. - The function goes through each rewrite rule, compares it to the requested URL, and tries to find a match. If no match is eventually found, this is a 404 error.
At this point, if the page is not a 404 error, WordPress now has a permalink translation pattern with query variable placeholders, such as
index.php?category_name=<string>&paged=<number>. It now needs to get the values of these query variables. - The function
parse_request()now obtains the list of the registered query variables. For each variable, it checks whether a value has been set by the permalink pattern, byPOST, or byGETsubmission. - Now, WordPress knows everything it needs to convert the initial URL request into a proper MySQL database query, get post data, load the required theme template, and display the requested page.
Two expressions may have caught your attention in the preceding flow: “registered rewrite rules” and “registered query variables.” If at some point these are registered, then there must be a way for plugins to change things.
The Rewrite Object
The $wp_rewrite object is the first object you mess with when playing with the Rewrite API. Let's take a look at its content. Using a simple print_r( $GLOBALS['wp_rewrite'] ) displays the following information:
WP_Rewrite Object (...[permalink_structure] => /%year%/%postname%/[use_trailing_slashes] => 1...[rules] => Array ([category/(.+?)/?$]=> index.php?category_name=$matches[1][tag/([^/]+)/page/?([0-9]{1,})/?$]=> index.php?tag=$matches[1]&paged=$matches[2][tag/([^/]+)/?$]=> index.php?tag=$matches[1][(.+?)/trackback/?$]=> index.php?pagename=$matches[1]&tb=1...)[endpoints] => Array ()...)
Some of the preceding properties should already be familiar to you. The rules array contains the list of all registered rewrite rules. The $rewrite object contains all the information related to the permalink structure of your site, such as the complete set of rewrite rules that were fetched at the previous flow or the list of registered feeds and their URL structure.
The Query Object
Similarly and before you learn how to alter it, take an inside look at the global $wp_query object, with a print_r() call when requesting the page /2020/01/hello‐world/ on a WordPress‐powered site.
WP_Query Object ([query_vars] => Array ([page] => 0[year] => 2020[month] => 01[name] => hello-world...)...[is_single] => 1[is_preview] =>[is_page] =>...[query] => Array ([year] => 2020[name] => hello-world)...)
The $wp_query object defines the list of authorized query variables that can be matched by the rewrite rules and collects all the information needed to translate the initial page request into a MySQL query.
What Plugins Can Do
Using functions of the Rewrite API, plugins can interfere with the $wp_rewrite and $wp_query objects, for instance to perform the following actions as you will learn in the next section, “Practical Uses”:
- Create your own rewrite rules and define how WordPress will interpret them
- Integrate a WordPress site with non‐WordPress pages and keep a consistent URL pattern and site layout
- Create a custom feed with a custom feed permalink
Now that you know the underlying concepts of the Rewrite API, it's time for you to write actual code.
Practical Uses
You will now dive into some practical examples and code for real‐world scenarios. In this section, you will learn to do the following:
- Leverage the Rewrite API to easily generate an arbitrary number of subpages under the hierarchy of one parent page
- Define a custom permalink structure to easily integrate non‐WordPress content into a WordPress‐powered site
Rewriting a URL to Create a List of Shops
You've just redesigned the site of your latest client, a big retail company with dozens of stores across the country. You now have to list these stores within the website. You could manually create a separate page for each store, which could take untold hours. Or, you can create one page at http://example.com/shops/ and automatically make WordPress understand that http://example.com/shops/city-name needs to display the information page for the store located in that city. The latter option is much cleaner.
The function that creates a new rewrite rule is add_rewrite_rule(), which needs three arguments: a string defining the URL pattern to be matched, another string for the URL replacement, and where to place the rule relative to other rules (top or bottom). In your Rewrite Rules Shop plugin, write the following:
<?php// Add rewrite rules.add_action( 'init', 'pdev_list_stores_add_rules' );function pdev_list_stores_add_rules() {add_rewrite_rule('stores/?([^/]*)','index.php?pagename=stores&store_id=$matches[1]','top');}
This internally redirects all requests to the URL stores/something/ to the page Stores with an additional parameter, that is, index.php?pagename=stores&store_id=something.
Now you need to add the new store_id parameter to the list of registered query variables.
<?php// Add the store_id query var so that WP recognizes it.add_filter( 'query_vars', 'pdev_list_stores_query_var' );function pdev_list_stores_query_var( $vars ) {$vars[] = 'store_id';return $vars;}
So far, you have modified the list of defined rewrite rules held in the $wp_rewrite object and the list of authorized query variables, kept in the $wp_query object. You're almost there!
The trick with rewrite rules is that when they are modified, you need to tell WordPress to refresh and rebuild the list. To do this, you can either visit the Permalink Settings screen in the admin area or use the function flush_rewrite_rules(). You can do this on plugin activation and plugin deactivation.
// Add the rewrite rule and flush on activation.add_action( __FILE__, 'pdev_list_stores_activate' );function pdev_list_stores_activate() {pdev_list_stores_add_rules();flush_rewrite_rules();}// Flush rewrite rules on deactivation.register_deactivation_hook( __FILE__, 'pdev_list_stores_deactivate' );function pdev_list_stores_deactivate() {flush_rewrite_rules();}
Note these best practices when adding new rewrite rules:
- On plugin activation, add the rule and flush.
- On
init, also add the rule, in case another plugin flushes the rules. - Don't flush rules on every page request (for example, hooking in
init); that would cause unnecessary overhead. - On plugin deactivation, flush the rules again to clear the list.
Now review the fully functional plugin code, shown here:
<?php/*** Plugin Name: Rewrite Rules Shop* Plugin URI: http://example.com/* Description: Adds a rewrite rule to list stores as children of the Stores page.* Author: WROX* Author URI: http://wrox.com*/// Add the rewrite rule and flush on activation.add_action( __FILE__, 'pdev_list_stores_activate' );function pdev_list_stores_activate() {pdev_list_stores_add_rules();flush_rewrite_rules();}// Flush rewrite rules on deactivation.register_deactivation_hook( __FILE__, 'pdev_list_stores_deactivate' );function pdev_list_stores_deactivate() {flush_rewrite_rules();}// Add rewrite rules.add_action( 'init', 'pdev_list_stores_add_rules' );function pdev_list_stores_add_rules() {add_rewrite_rule('stores/?([^/]*)','index.php?pagename=stores&store_id=$matches[1]','top');}// Add the store_id query var so that WP recognizes it.add_filter( 'query_vars', 'pdev_list_stores_query_var' );function pdev_list_stores_query_var( $vars ) {$vars[] = 'store_id';return $vars;}
That's it for the plugin part. Now http://example.com/stores/greenville/ redirects to the Stores WordPress parent page with the additional internal parameter store_id.
How this is displayed on the front end will be determined by the active WordPress theme's templates. Theme development is outside the scope of this book. You can learn more about theme template development at https://developer.wordpress.org/themes/basics/template-files/.
Creating a New Permalink Structure and Integrating Non‐WordPress Pages
In the previous plugin, you created a WordPress page to handle URLs rewritten to it. You can now create other rewrite rules using a different approach.
The client you're working with already has a product listing script and wants you to integrate it in its new website you created for them. You can make WordPress handle all requests to http://example.com/shop/something/ and use the existing listing script.
On the Permalink Settings screen in the WordPress admin, you can define custom permalinks using tags such as %year% or %monthnum%. You will now define a new %product% tag and use it in the permalink structure of the site.
// Add rewrite rules.add_action( 'init', 'pdev_product_permalinks_add_rules' );function pdev_product_permalinks_add_rules() {// Add rewrite tag.add_rewrite_tag( '%product%', '([^/]+)' );// Add permastruct.add_permastruct( 'product', 'shop/%product%' );}
The first function call, add_rewrite_tag(), defines the tag and what can match it. Here, the tag %product% matches one or more characters that are not a forward slash, using the regular expression ([^/]+). This function call also registers a new query variable with the same name product.
The add_permastruct() function describes a new permalink structure. It accepts two parameters: an arbitrary name for the structure and how URLs and tags should be formed.
Now look at the rewrite rules that have been added to the $wp_rewrite object and its rules property:
[shop/([^/]+)/feed/(feed|rdf|rss|rss2|atom)/?$]=> index.php?product=$matches[1]&feed=$matches[2][shop/([^/]+)/(feed|rdf|rss|rss2|atom)/?$]=> index.php?product=$matches[1]&feed=$matches[2][shop/([^/]+)/page/?([0-9]{1,})/?$]=> index.php?product=$matches[1]&paged=$matches[2][shop/([^/]+)/?$]=> index.php?product=$matches[1]
Example URLs matching these rewrite rules could be the following.
http://example.com/shop/something/feed/rss2/http://example.com/shop/stuff/atom/http://example.com/shop/thing/page/3/http://example.com/shop/item/
These URLs can internally redirect to the following:
http://example.com/index.php?product=something&feed=rss2http://example.com/index.php?product=stuff&feed=atomhttp://example.com/index.php?product=thing&paged=3http://example.com/index.php?product=item
Using just two function calls, you created a completely new permalink structure that can handle pagination and feed generation!
Now that requests to /shop/something/ successfully redirect to /index.php?product=something, you can integrate the existing product listing script. In the following code, the actual script integration is commented out and replaced with simple output on the front end.
// Output product script on front end.add_action( 'template_redirect', 'pdev_products_display' );function pdev_products_display() {if ( $product = get_query_var( 'product' ) ) {// Includes the client's product script.// include display-product.php;printf('Searching for product: %s?',esc_html( $product ));exit();}}
By hooking into the early action 'template_redirect', you can hijack the normal page display and, if the product query variable is set, include the shop listing script. Don't forget to use exit() so that WordPress does not try to further handle the page display and output a 404 error.
To test for pagination or feed generation, you can also check the values of get_query_var( 'paged' ) and get_query_var( 'feed' ).
You must also flush the rewrite rules on activation and deactivation. Then, you will be done with the plugin.
// Add the rewrite rule and flush on activation.add_action( __FILE__, 'pdev_product_permalinks_activate' );function pdev_product_permalinks_activate() {pdev_product_permalinks_rules();flush_rewrite_rules();}// Flush rewrite rules on deactivation.register_deactivation_hook( __FILE__, 'pdev_product_permalinks_deactivate' );function pdev_product_permalinks_deactivate() {flush_rewrite_rules();}
Now review the full plugin code.
<?php/*** Plugin Name: Product Permalinks* Plugin URI: http://example.com/* Description: Adds custom product rewrite tag and permastruct.* Author: WROX* Author URI: http://wrox.com*/// Add the rewrite rule and flush on activation.add_action( __FILE__, 'pdev_product_permalinks_activate' );function pdev_product_permalinks_activate() {pdev_product_permalinks_rules();flush_rewrite_rules();}// Flush rewrite rules on deactivation.register_deactivation_hook( __FILE__, 'pdev_product_permalinks_deactivate' );function pdev_product_permalinks_deactivate() {flush_rewrite_rules();}// Add rewrite rules.add_action( 'init', 'pdev_product_permalinks_add_rules' );function pdev_product_permalinks_add_rules() {// Add rewrite tag.add_rewrite_tag( '%product%', '([^/]+)' );// Add permastruct.add_permastruct( 'product', ''shop/%product%' );}// Output product script on front end.add_action( 'template_redirect', 'pdev_products_display' );function pdev_products_display() {if ( $product = get_query_var( 'product' ) ) {// Includes the client's product script.// include display-product.php;printf('Searching for product: %s?',esc_html( $product ));exit();}}
THE HEARTBEAT API
The Heartbeat API is a little‐used, basic server polling API included in WordPress. It allows plugins to send, receive, and process data in almost real time.
What Is the Heartbeat API?
When a page is loaded, the Heartbeat API creates an interval (also called a pulse or tick). By default, this interval runs every 15 seconds. Like a human heartbeat, the Heartbeat API ticks every so often, albeit a little slower.
The tick provides an opportunity for plugins to latch onto the API and run custom code. Because the heartbeat is running practically in real time, it is almost entirely served via client‐side JavaScript.
Using the Heartbeat API
When using the Heartbeat API, plugins can attach events on the client side (JavaScript) for sending data and processing the response from the server. On the server side, plugins can receive data and send a response to the client side.
Sending Data
On the heartbeat‐send event, you can use JavaScript to send any data back to the server that you want. This can come from user input or anywhere. Take a look at the following code snippet that generates a random number and sends it:
jQuery( document ).on( 'heartbeat-send', function ( event, data ) {// Send a random number to the server.data.pdev_random_number = Math.random();} );
To pass custom data to the server, you simply need to add a new item to the data object, which is the second parameter for your callback function. In the preceding code, you generated a random number and added it via data.pdev_random_number.
Receiving and Responding to Data
On the server side, you have the option of handling the data. You can skip this step if you do not need to run any server‐side code to work with the data. However, this can be useful for sanitizing, validating, or even saving data to the database.
For your random number generated via JavaScript, you now add a filter on the heartbeat_received hook. The filter will sanitize the data and store it in the database.
add_filter( 'heartbeat_received', 'pdev_random_number_received', 10, 2 );function pdev_random_number_received( $response, $data ) {// Bail if no plugin data sent.if ( empty( $data['pdev_random_number'] ) ) {return $response;}// Sanitize the data.$response['pdev_random_number'] = floatval( $data['pdev_random_number'] );// Update database option:update_option('pdev_heartbeat_random_number',$response['pdev_random_number']);// Return the response.return $response;}
Processing the Response
Once the data is sent back to the server, it gets sent back to the client side. From this point, you can do anything you want via JavaScript. This could be something as simple as updating onscreen data, logging the response, or creating an alert popup.
Now create a simple alert popup, attached to the heartbeat‐tick event.
jQuery( document ).on( 'heartbeat-tick', function ( event, data ) {// If no data, bail.if ( ! data.pdev_random_number ) {return;}alert( 'The random number is ' + data.pdev_random_number );} );
The previous code first checks whether your plugin's data was sent. If so, it uses JavaScript's built‐in alert() to display a message.
Full Heartbeat API Plugin
Now, you will put all of the preceding code into a complete plugin. Create a new plugin‐heartbeat‐random‐number folder to house your PHP and JavaScript files.
Then, create a new file named plugin.php with the following code. Note that it loads the heartbeat.js file on the wp_enqueue_scripts hook, which is the front‐end hook for loading JavaScript files.
<?php/*** Plugin Name: Heartbeat Random Number* Plugin URI: http://example.com/* Description: Generates and saves a random number using the Heartbeat API.* Author: WROX* Author URI: http://wrox.com*/// Load heartbeat.js file.add_action( 'wp_enqueue_scripts', 'pdev_random_number_scripts' );function pdev_random_number_scripts() {wp_enqueue_script('pdev-heartbeat-random-number',plugin_dir_url( __FILE__ ) . 'heartbeat.js',[ 'heartbeat', 'jquery' ],null,true);}// Receive data from heartbeat.add_filter( 'heartbeat_received', 'pdev_random_number_received', 10, 2 );function pdev_random_number_received( $response, $data ) {// Bail if no plugin data sent.if ( empty( $data['pdev_random_number'] ) ) {return $response;}// Sanitize the data.$response['pdev_random_number'] = floatval( $data['pdev_random_number'] );// Update database option.update_option('pdev_heartbeat_random_number',$response['pdev_random_number']);// Return the response.return $response;}
Finally, create a heartbeat.js file within the plugin folder with the following code:
jQuery( document ).on( 'heartbeat-send', function ( event, data ) {// Send a random number to the server.data.pdev_random_number = Math.random();} );jQuery( document ).on( 'heartbeat-tick', function ( event, data ) {// If no data, bail.if ( ! data.pdev_random_number ) {return;}alert( 'The random number is ' + data.pdev_random_number );} );
SUMMARY
We named this chapter “The Kitchen Sink” for a reason. It contains a lot of information on several different subjects that didn't have a more appropriate home in another chapter or were not important enough for their own chapter with how WordPress plugins are built today. Some of the items like widgets and shortcodes, especially shortcodes, could be obsolete in a year or two. Other topics like the Rewrite API and the Heartbeat API are useful but not used by many plugins. And, subjects like querying posts and building dashboard widgets are still useful today but didn't warrant full chapters.
Regardless of the topic, you should now have a good high‐level overview of each item to carry you forward in your plugin development journey.