
Creating Layouts
We’ll use two layouts in this app, one for the main landing page and the other for each of the rows to display airport status information. Let’s start with the design of the first one.
In the Project pane, under app/res/layout, you’ll see the file activity_main.xml—it was created by the IDE when the project was created. Double click this file name and take a look at the layout. You can view and edit the layout using the Design view, or directly view and edit the XML document using the Text view. Let’s edit the layout from the Design view.
The Android Studio provides powerful ways to add various widgets to the layout. Start by deleting the TextView with the words Hello World from the middle of the layout. Then from the Text section under the Palette, drag and drop a TextView onto the layout. On the right pane, change the text value for the newly placed widget from TextView to Airport Code. In the right pane, above the text box that you changed, take note of a rectangle with four + symbols around it. Click the top + and change the number that appears to 48. Likewise, click the left + and change the number to 16. These changes tell the newly added widget to be placed at 16dp from the left and 48dp from the top.
Next, drag and drop Plain Text from the Text section of Palette to the right of the previously placed TextView. This new widget is an object of an EditText. Change the ID to airportCode. Provide a three-letter code for the text box next to Hint. Click + in the sequence left, top, and right, and enter the values 8, 32, and 88, respectively. In the Attributes pane, scroll down to find the text label and remove the Name value in the text box next to the label.
Now, click the Buttons section in the palette and place a Button next to EditText. Change the ID to addAirportCode, the value for text from Button to Add. Click the + symbols on the left, top, and right, and change the values to 8, 32, and 8, respectively.
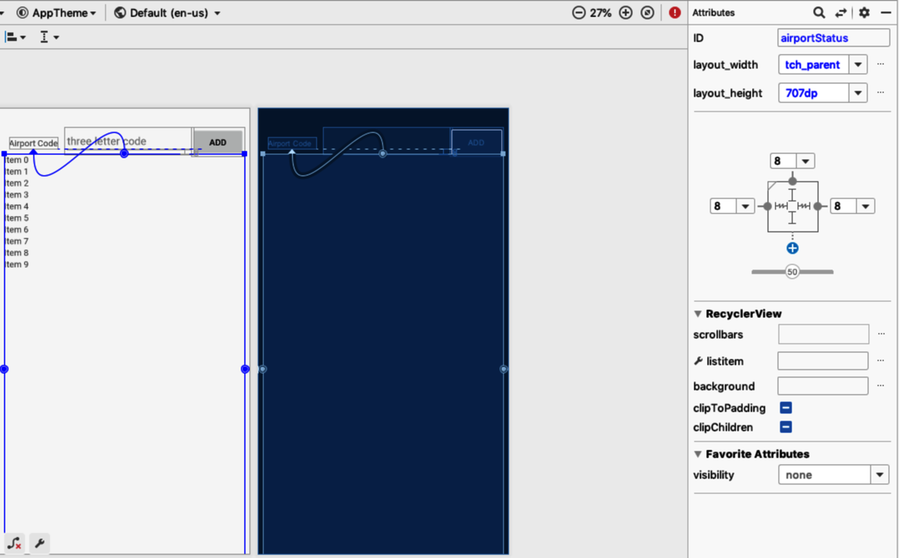
We’ll use a RecyclerView to display the status of the airports. Under Palette, click Common, and drag and drop RecyclerView to right below the TextView we placed before. Enter airportStatus for the ID, and change the layout_width value to match_parent. Click the + symbols at the left, top, and right, and key in the number 8 for each.
Once you place the four components, the design view of the layout in activity_main.xml will look like this:
Next, let’s create a layout for a row to represent an airport’s status. The number of rows in the RecyclerView will change dynamically based on the number of airports the user is interested in. But each row should conform to the same structure, even though each will display different airport information. To make this easy, we’ll create a template layout for the row.
In the Project pane, under app/res, right click layout, which is the parent node of activity_main.xml. Select New, and select Layout resource file. Key in “airport_info” for File name: and click the OK button. In this layout, we’ll create a TableRow that contains four TextViews to hold the details about an airport.
Before adding any widgets to this layout, change the value for the android:layout_height attribute (in the android.support.constraint.ConstraintLayout element) to wrap_content. This ensures that a row doesn’t occupy the entire RecyclerView and provides space for multiple rows to be visible.
In the Design view, drag and drop a TableRow from the Layouts section under Palette to the airport_info layout. Change the value for layout_width to 400dp and the value for layout_height to match_parent. Click the left and the right + symbols, and change both the values to 0.
We’ll next place four TextViews into the TableRow, one at a time. Let’s start with the first one.
Drag and drop a TextView into the TableRow. Change the ID of the newly placed TextView to airportCode. Set the value to Code for the text property. Change the layout_width to 0dp and the value for layout_weight to 5.
Create a second TextView with ID set to airportName, value for the text property set to Name, layout_width to 0dp, and layout_weight to 20.
For the third TextView, set ID to airportTemperature, text to Temp, layout_width to 0dp, and layout_weight to 10.
Finally, for the fourth TextView, set ID to airportDelay, text to u23F3, layout_width to 0dp, and layout_weight to 2. The value for the text is unicode for an hour-glass icon to represent a delay.
The layout_weight properties instruct that the TextView components be arranged within the row so that the name gets the lion’s share of space, the temperature data gets the next maximum space, the code occupies less, and the delay take up the least amount of relative space.
When you’re done, the file airport_info.xml should look like this:
| | <?xml version="1.0" encoding="utf-8"?> |
| | <android.support.constraint.ConstraintLayout |
| | xmlns:android="http://schemas.android.com/apk/res/android" |
| | xmlns:app="http://schemas.android.com/apk/res-auto" |
| | xmlns:tools="http://schemas.android.com/tools" |
| | android:layout_width="match_parent" |
| | android:layout_height="wrap_content"> |
| | |
| | <TableRow |
| | android:layout_width="400dp" |
| | android:layout_height="match_parent" |
| | tools:layout_editor_absoluteY="8dp" |
| | app:layout_constraintStart_toStartOf="parent" |
| | app:layout_constraintEnd_toEndOf="parent"> |
| | |
| | <TextView |
| | android:text="Code" |
| | android:layout_width="0dp" |
| | android:layout_height="wrap_content" |
| | android:id="@+id/airportCode" |
| | android:layout_weight="5"/> |
| | |
| | <TextView |
| | android:text="Name" |
| | android:layout_width="0dp" |
| | android:layout_height="wrap_content" |
| | tools:layout_editor_absoluteY="0dp" |
| | tools:layout_editor_absoluteX="134dp" |
| | android:id="@+id/airportName" |
| | android:layout_weight="20"/> |
| | |
| | <TextView |
| | android:text="Temp" |
| | android:layout_width="0dp" |
| | android:layout_height="wrap_content" |
| | tools:layout_editor_absoluteY="0dp" |
| | tools:layout_editor_absoluteX="134dp" |
| | android:id="@+id/airportTemperature" |
| | android:layout_weight="10"/> |
| | |
| | <TextView |
| | android:text="u23F3" |
| | android:layout_width="0dp" |
| | android:layout_height="wrap_content" |
| | tools:layout_editor_absoluteY="0dp" |
| | tools:layout_editor_absoluteX="134dp" |
| | android:id="@+id/airportDelay" |
| | android:layout_weight="2"/> |
| | </TableRow> |
| | </android.support.constraint.ConstraintLayout> |
Save the changes and get ready to write the code for the UI activity.