Chapter 7. Managing QuickBooks Files
When company ledgers were made of paper, you had to be careful not to tear the pages or spill coffee on them. Today’s electronic books require their own sort of care and feeding. Protecting your QuickBooks files is essential, not only because your books tell the financial story of your company, but because computers are notorious for chewing up data in all sorts of ways.
QuickBooks files have a few advantages over their paper-based relatives. Most importantly, you can make copies of your company files for safekeeping. (QuickBooks can also create a special copy of your company file so you and your accountant can both work on it at the end of the year; see Sharing the Company File with Your Accountant to learn how.) If several people work on your QuickBooks file simultaneously, you’ll learn when and how to switch from multi-user mode to single-user mode so you can perform the file housekeeping tasks that require dedicated access. This chapter focuses on the most important things you can do with your QuickBooks files: backing up and copying them. It also explains why and how to verify, condense, and delete your files, which you’ll do less often, if ever.
Switching Between Multi-User and Single-User Mode
In QuickBooks, some maintenance tasks require that only one person have access to the company file. For these tasks, you change a company file to single-user mode. You have to be in single-user mode to merge or delete accounts and items, export data from a company file, and save or open an accountant’s copy of your company file. Single-user mode can also speed up time-consuming tasks like running humongous reports.
Some tasks that required single-user mode in QuickBooks 2008 and earlier versions, such as backups, now run contentedly while several people work in a company file. You can verify data (Verifying Your QuickBooks Data) while a company file is in multi-user mode, but others can’t work on the file, and the verification isn’t as thorough as one running in single-user mode.
The good news is you don’t have to remember which tasks demand single-user mode. QuickBooks advises you to switch modes if you try to perform a single-user mode task when the company file is chugging away in multi-user mode. Because everyone else has to close the company file before you can switch it to single-user mode, you may find it easiest to wait until no one else is working on the company file (early in the morning or after work, say).
Here’s how you switch from multi-user mode to single-user mode:
If your single-user task can’t wait until off-hours, ask everyone else to close the company file you want to work on.
Exiting QuickBooks is another way to close a company file.
When everyone else has closed the company file, open it in QuickBooks. (Choose File → Open Previous File, and then choose the company file in the submenu.)
If the company file doesn’t appear on the Open Previous File submenu, choose File → “Open or Restore Company”. In the “Open or Restore Company” dialog box, select the “Open a company file” option, and then click Next. In the “Open a Company” dialog box, navigate to the folder where you store the company file, and double-click the file name.
Choose File → “Switch to Single-user Mode”. In the message box that appears telling you the file is in single-user mode, click OK.
QuickBooks closes all open windows before it switches to single-user mode. After you click OK, it reopens the windows and you’re ready to work solo on the company file.
After you finish your single-user task, switch back to multi-user mode by choosing File → “Switch to Multi-user Mode”. When the message box appears telling you the file is in single-user mode, click OK.
You’ll see all the windows in QuickBooks close. After you click OK, the windows reappear and the company file is back in multi-user mode.
Don’t forget to tell your colleagues that they can log back into the company file.
Backing Up Files
If you already have a backup procedure for all your company data, the QuickBooks Backup command might seem at first glance as useful as your appendix. Your companywide backups regularly squirrel your data files away in a safe place, ready to rescue you should disaster strike. Still, the QuickBooks Backup command can complement even the most robust backup plan. And if you run a mom-and-pop business, online backups let you back up all of your data without hiring an IT staff. Here are some ways you can put QuickBooks Backup to work:
Backing up one QuickBooks company file. Before you experiment with a new QuickBooks feature, you don’t want to back up all your data—just the company file. If the experiment goes terribly wrong, you can restore your backup and try a different approach. You can also call on the QuickBooks Backup command when you’ve worked hard on your company file, say by entering hundreds of inventory items in one long session, and the thought of losing that work makes you queasy. In both of these situations, running a QuickBooks manual backup creates a backup file immediately.
Scheduling backups of your QuickBooks data. If you have trouble remembering to back up your work, QuickBooks’ automatic backups have your back. You can set QuickBooks up to automatically back up a company file after you’ve opened it a certain number of times. If you mangle your data or it gets corrupted in some way, you can use one of these backups to recover. If QuickBooks is the only program on your computer—so your company file is the only data that you want to back up—the program can run company file backups automatically according to the schedule you specify. For example, QuickBooks can automatically back up your company file Tuesdays through Saturdays at 2:00 a.m.
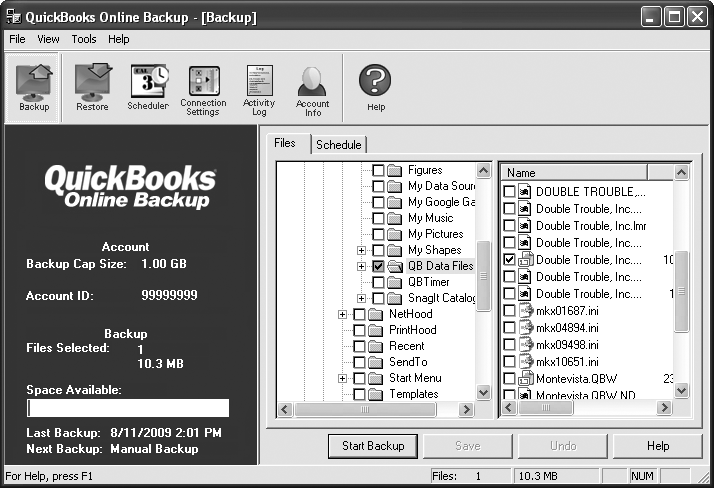
Backing up your data online. Online backups are a handy alternative to setting up your own backup plan—scheduling regular backups, rotating backup media, storing backups offsite, and so on. You can select which data you want to back up and when. When the backups run, your backup files are encrypted and stored at secure data centers managed by IT professionals. If you don’t have IT staff to back up your data and keep it secure, the price you pay may be worth every penny. See the box on Backing Up to Your Computer Right Away to learn more.
Tip
QuickBooks 2010 packs more backup into smaller files than earlier versions of the program. But even in QuickBooks 2010, backup files still aren’t much smaller than company files—20 to 25 percent, depending on what you store in your company file.
Whether you want to set up options for your backups, schedule backups, or run a backup immediately, open the QuickBooks Backup dialog box using either of the following methods:
Choose File → “Save Copy or Backup”.
On the icon bar, click Backup. (If you don’t see the Backup icon, which looks like a floppy disk, click the double right arrows on the right end of the icon bar, and then choose Backup on the drop-down menu that appears. If the Backup command is nowhere to be found on the icon bar, choose Customize Icon Bar on the drop-down menu. See Building Your Favorites Menu to learn how to add commands to the icon bar.)
Note
What and how often you back up are up to you (or your company’s system administrators). It depends on what information you feel you can’t afford to lose and how much data you’re willing to recreate in case of a disaster.
Choosing Standard Settings for Your Backups
For each company file that you back up, you can choose settings for when, where, and how many backups QuickBooks creates. These standard settings are great timesavers and make for more consistent backups. For example, you can tell QuickBooks to ask you about backing up your data after you’ve closed the company file a specific number of times. Or, you can automatically append the date and time that you run the backup to the name of the backup file. You choose these settings once for each company file, and QuickBooks uses them for every backup of that file until you change the settings.
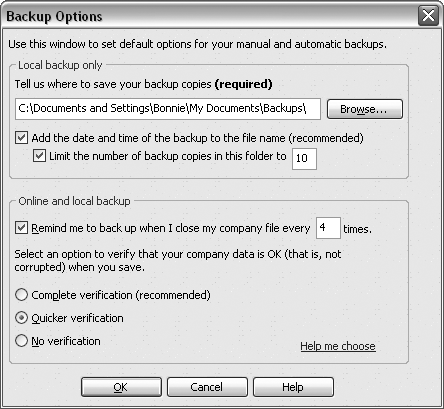
To choose the backup settings you want, choose File → “Save Copy or Backup”. In the “Save Copy or Backup” dialog box, select the “Backup copy” option, and then click Next. In the “Do you want to save your backup copy locally or online?” screen, click Options. The Backup Options dialog box, shown in Figure 7-1 lays out your choices for backing up the current company file.
Here are the settings and what they’re good for:
Where to save backup copies. If you’d rather not search for backups accidentally saved to unconventional locations, choose a location for your backups. To tell QuickBooks to store the backup file in the same folder each time, click Browse. QuickBooks opens the “Browse for Folder” dialog box. Navigate to the folder or removable media device on your computer or network, and then click OK.
The “Browse for Folder” dialog box doesn’t let you create a new folder. If you want to save your backups in a folder that doesn’t exist, click Cancel and create the new folder in Windows Explorer. Then, in the Backup Options dialog box, click Browse.
Note
Saving a backup file to the same hard drive where your company file is stored won’t help you if your hard disk crashes. To protect your data from human error and hardware failure, back up your file to a different hard drive or to removable media like a CD, DVD, or USB thumb drive. If you choose a location on the same hard drive as your company file and click OK in the Backup Options dialog box, QuickBooks asks you if you want to change the location. When a company-wide backup transfers data to removable media every night, backing up your company file to a hard drive is fine for protection during the day. In this case, click “Use this location”. To choose another location, click Change Location, which throws you back into the Backup Options dialog box. Click Browse, and then choose another hard disk or another location on your network.
Append a timestamp to the filename. If you want to make sure that you never overwrite a backup file, turn on the “Add the date and time of the backup to the file name (recommended)” checkbox. When QuickBooks creates the backup file, it tacks on a timestamp to the end of the filename prefix; for example Double Trouble, Inc (Backup Sep 25, 2010 11 30 PM).qbb. Unless you make multiple backups within a minute of each other, you can be sure that your filenames are unique.
Limit the number of backup copies. Regular backups can consume a lot of disk space. By turning on the “Limit the number of backup copies in this folder to” checkbox and typing a number, QuickBooks takes care of deleting older backup files. If you back up your files to an insatiable hard disk, you can save as many as 99 backup files before QuickBooks starts deleting older ones.
Get a reminder to back up. If you want QuickBooks to remind you to back up your file every so often, in the “Online and local backup” section, turn on the “Remind me to back up when I close my company file every _ times” checkbox. When you’ve closed the company file the number of times you specified, QuickBooks displays the Automatic Backup message box. If you decide to bypass this automatic backup, click No. To create a backup of your company file, click Yes, which takes you to the QuickBooks Backup dialog box so you can run a manual backup.
Note
The “Remind me to back up when I close my company file every _ times” checkbox in the Backup Options dialog box sounds a lot like the “Save backup copy automatically when I close my company file every _ times” checkbox that goes with scheduled backups (Scheduling backups for a single company file), but the two do different things. The checkbox in the Backup Options dialog box tells QuickBooks to ask you if you want to back up your file after you’ve closed it that many times. On the other hand, the checkbox for scheduled backups tells QuickBooks to create a back up automatically—without asking—after you close the file that many times.
Choose how thoroughly to verify. In the “Online and local backup” section, QuickBooks automatically selects the “Complete verification (recommended)” option, which scrutinizes your backup file to make sure that the data you save isn’t corrupt. You can speed up the verification process (at the risk of some corrupted data slipping through) by selecting the “Quicker verification” option. For high speed—and higher risk—select “No verification”.
Backing Up to Your Computer Right Away
If you just spent four hours of tedious typing to create a few dozen new customers in QuickBooks, you definitely want to save that work. To run a backup right away, here’s what you do:
If you want to back up your file to removable media like a CD, DVD, or tape, put the disc or tape in the drive now.
Although you don’t have to put the media in until just before you click Save, you may as well do it now so you don’t forget.
Choose File → “Save Copy or Backup”.
The “Save Copy or Backup” dialog box opens with a trio of options for the different types of copies you can make. QuickBooks selects the “Backup copy” option automatically, which is what you want. (You’ll learn about the “Portable company file” option later in this chapter. See Sharing the Company File with Your Accountant for more on accountant’s copies.)
With the “Backup copy” option selected, click Next.
The next screen has options for saving your backup online or on your computer.
Select the “Local backup” option and then click Next.
You can select the “Online backup” option to create an online backup immediately. QuickBooks’ online backup service isn’t free, but it has its advantages, as you learned on Backing Up to Your Computer Right Away.
In the “When do you want to save your backup copy?” screen, select the “Save it now” option, and then click Next.
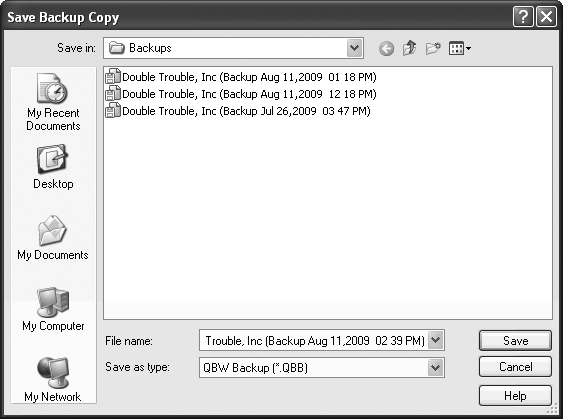
The Save Backup Copy dialog box opens. QuickBooks chooses the folder you specified in QuickBooks’ backup options (Choosing Standard Settings for Your Backups), as Figure 7-3 shows. If you want to save the file somewhere else, browse to the folder.
Figure 7-3. QuickBooks automatically fills in the “File name” box with the same filename prefix as your company file and adds a timestamp to show when you made the backup. For example, if you’re backing up your DoubleTrouble.qbw file, the backup file prefix is something like “DoubleTrouble (Backup Aug 09,2008 05 28 PM)”. In the “Save as type” box, the program automatically fills in QBW Backup (*.QBB).Click Save.
The Working message box shows progress as QuickBooks verifies the data and creates the backup. You know the backup is complete when the QuickBooks Information dialog box shows you the file that you backed up and the backup file you created. Click OK to close the dialog box.
Automated QuickBooks Backups
QuickBooks can back up your data without your help in two different ways—automatically or scheduled. This section explains the differences and how you set each one up:
Automatic backup. An automatic backup runs after you close a company file a specific number of times, which is great for protecting the work you do in a few back-to-back QuickBooks sessions. You simply close the company file at the end of a session and QuickBooks immediately creates a backup if this session hit the magic number.
Scheduled backups. You can also schedule QuickBooks backups to run at a specific date and time (typically when you aren’t around). A scheduled backup for a single company file is ideal when your QuickBooks data is the only data on your computer or you want to backup your books more often than your other data. Otherwise, you’re better off using your operating system’s backup utility (or an online backup service) to schedule a backup that captures all your data.
Setting up automatic backups
Automatic backups require a bit of upfront setup. You tell QuickBooks where you want to store the automatic backup files and the number of sessions between backups. From then on, they spawn themselves quietly in the background. Here’s how you set this up:
Choose File → “Save Copy or Backup”. In the “Save Copy or Backup” dialog box, select the “Backup copy” option, and then click Next.
The “Do you want to save your backup copy locally or online?” screen appears.
Select the “Local backup” option, and then click Next.
The “When do you want to save your backup copy?” screen appears.
To set up a backup schedule, select the “Only schedule future backups” option, and then click Next.
The screen displays the settings to define both automatic backups and scheduled backups, as shown in Figure 7-4.
Turn on the “Save backup copy automatically when I close my company file every _ times” checkbox. In the text box, type the number of sessions you want in between automatic backups.
For example, if you type 5, QuickBooks creates an automatic backup when you close the company file the fifth time since the last backup.
Figure 7-4. To change the location and other details about the automatic backups, in the “Save Copy or Backup” dialog box, click Options. See Backing Up to Your Computer Right Away to learn about the settings you can choose.Click Finish.
QuickBooks starts counting. After you’ve completed the number of sessions you specified, the QuickBooks Automatic Backup message box appears telling you that it’s creating the automatic backup as promised.

The file naming convention that QuickBooks uses for automatic backup files is:
ABU_0_<company name> <date stamp> <time stamp>
For example, the first automatic backup file might be ABU_0_Double Trouble, Inc Sep 22, 2010 05 17 PM (ABU stands for “automatic backup”). However, when QuickBooks creates the next automatic backup, QuickBooks renames the file that begins with ABU_0 to start with ABU_1, (ABU_1_Double Trouble, Inc Sep 22, 2010 05 17 PM, for example) and renames the ABU_1 file to start with ABU_2. With this system, you always know that the file that starts with ABU_0 is the most recent automatic backup.
Scheduling backups for a single company file
Although most companies back up all of their computers on a regular schedule, you can set up a scheduled backup for your QuickBooks company file for an extra layer of safety. If you back up your data only every other day, for example, you may want to back up your company file every night, and a QuickBooks scheduled backup is the ideal way to do it. Here’s how you schedule backups:
Choose File → “Save Copy or Backup”. In the “Save Copy or Backup” dialog box, select the “Backup copy” option, and then click Next.
The “Do you want to save your backup copy locally or online?” screen appears.
Select the “Local backup” option, and then click Next.
The “When do you want to save your backup copy?” screen appears.
To set up a backup schedule, select the “Only schedule future backups” option, and then click Next.
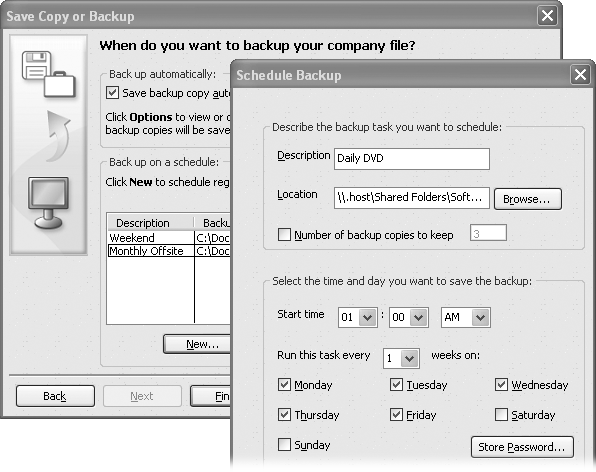
If you want to make a backup right away as well as set up the schedule, select the “Save it now and schedule future backups” option. Either way, the screen includes a table showing scheduled backups you’ve already set up, plus each backup’s description, storage location, status, and next occurrence, as shown in Figure 7-5.
To set up a schedule, below the table, click New.
QuickBooks opens the Schedule Backup dialog box with all the options you need to set up a regularly scheduled backup.
Figure 7-5. You won’t need more than a few scheduled backups. For instance, you can create one scheduled backup to save your data every weeknight from Monday through Thursday; a second scheduled backup might save a weekly backup every Saturday night. Finally, you could set up a third scheduled backup to run once a month on Saturday to create a backup on a DVD that you can store offsite.In the Description box, type a meaningful name for the scheduled backup, like Monthly.
When you finish defining the schedule, the description appears in the table in the “Save Copy or Backup” dialog box. Consider including the frequency of the backup and where to find the backup (such as the network drive or offsite location).
The easiest way to specify the backup location is to click Browse.
QuickBooks opens the “Browse for Folder” dialog box. To choose a folder, hard drive, or other location on your computer, expand the My Computer entry, and then choose the backup location you want. If you want to store the backup on another computer on your network, expand the My Network Places entry, and then choose the backup location.
Warning
If you’ve scheduled backups, don’t turn off your computer when you go home, or your backup won’t work. If you back up to a hard drive on another computer, you have to leave that computer running, too. If you back up to any kind of removable media, be sure to place a blank disk or tape in the drive before you leave the office.
If you back up your company file to a hard drive and don’t want to overwrite your last backup each time the scheduled backup runs, turn on the “Number of backups to keep” checkbox and, in the box to the right of the label, type the number of previous backups you want to keep.
When you turn on this checkbox, QuickBooks uses the filename SBU_0_<company name> <date stamp> <time stamp>. For example, a scheduled backup file might be SBU_0_Double Trouble, Inc Sep 24, 2008 01 00 AM (SBU stands for “scheduled backup”). Each time QuickBooks creates a new scheduled backup file, it renames the previous backups to the next number in the list, and then replaces the SBU_0 file with the new backup. For example, if you keep four backups, the SBU_2 backup becomes the SBU_3 file; the SBU_1 file becomes the SBU_2 file; the SBU_0 backup file becomes the SBU_1 file; and the new backup becomes the new SBU_0 file.
In the “Start time” boxes, choose the time you want the backup to run.
The “Start time” boxes work on a 12-hour clock, so you specify the hour, minutes, and a.m. or p.m.
It’s easy to confuse midnight and noon on a 12-hour clock: midnight is 12 a.m.; noon is 12 p.m. Avoid this gotcha by running your scheduled backups at 11 p.m., 1 a.m., or later.
To set up the frequency for the backup, in the “Run this task every _ weeks on” box, type the number of weeks that you want between backups, and then turn on the checkboxes for each day of the week on which you want the backup to happen.
For example, for your daily backups, in the “Run this task every _ weeks on” box, type 1, and then turn on the checkbox for each weekday.
Click Store Password, and then type your Windows user name and password.
With your user name and password stored, QuickBooks can log into the computer to run the backup.
When you’re done, click OK. QuickBooks adds the scheduled backup to your list of scheduled backups.
Restoring Backups
Having backup files can reduce your adrenaline level in a number of situations:
You merge two customers into one by mistake or make another type of major faux pas that you want to undo.
Your company file won’t open, which can happen if the file’s been damaged by a power outage or power surge.
Your hard disk crashes and takes all your data with it.
You recently assigned a password to your administrator login and can’t remember what it is.
QuickBooks 2010 includes a utility that restores backup files to a format you can use in earlier versions of the program—for example, if you decide to switch back to QuickBooks 2009. The box on the next page tells you why and how to use the Restore Backup File For Earlier QuickBooks Version command.
Warning
Hard disk crashes used to be dramatic events accompanied by impressive grinding noises. With today’s smaller hard disks, crashes can be deceptively quiet. If you hear odd sounds emanating from your computer—little chirps or squeaks, for instance—stop what you’re doing immediately. Take it to a computer repair shop to see if they can fix it or recover your data. If you shut down your computer and it won’t reboot because of a disk crash, a data recovery company can sometimes recover some of your data, but the price is usually in the thousands of dollars. If smoke wafts from your computer, don’t bother with shutting down. Just pull the plug and get that puppy to a repair shop.
Here’s how to restore a QuickBooks backup when you need to recover from a mistake or damaged data:
If you backed up your data to removable media, put the disk containing your backup in the appropriate drive.
If you backed up your data to another hard drive on your computer or on a network, you need access to that drive. For example, if the shared network drive that you used is offline, you’ll have to reconnect to it before restoring your backup. If you need some guidance on how to reconnect an offline drive, consult your operating system’s online help or refer to a copy of Windows XP Pro: The Missing Manual or Windows Vista: The Missing Manual.
Choose File → “Open or Restore Company”.
If the No Company Open window is visible, you can also click “Open or restore an existing company”.
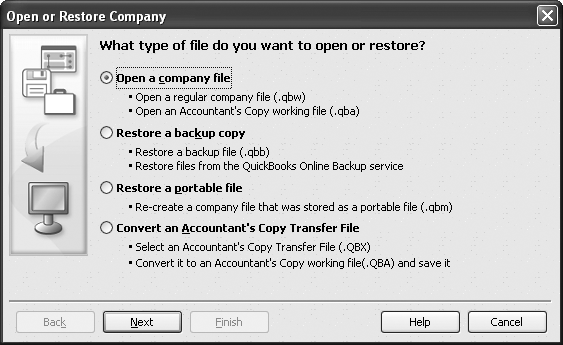
Either method opens the “Open or Restore Company” dialog box, as shown in Figure 7-6.
In the “Open or Restore Company” dialog box, select the “Restore a backup copy” option, and then click Next.
The “Is the backup copy stored locally or online?” screen appears.
Figure 7-6. Similar to when you create backups, you have to tell QuickBooks that you want to restore a backup file and where that file is. From this dialog box, you can open a regular company file, restore a backup, restore a portable file (Opening a Portable Company File), or convert an accountant’s copy (Merging Accountant Changes into Your Company File).Select the “Local backup” option, and then click Next.
The Open Backup Copy dialog box opens to your standard backup folder.
Double-click the name of the backup file you want to restore.
You can navigate to the folder or removable media where your backup file is saved and double-click the filename. Or, select the filename in the list, and then click Open.
Back in the “Open or Restore Company” dialog box, the “Where do you want to restore the file?” screen makes it clear that you need to choose the location carefully. Click Next. In the “Save Company File as” dialog box, choose the folder where you want to restore the file.
If you restore the backup to your regular company file folder, you run the risk of overwriting your existing company file. If that’s what you want, fine. If it’s not, that file may be gone for good.
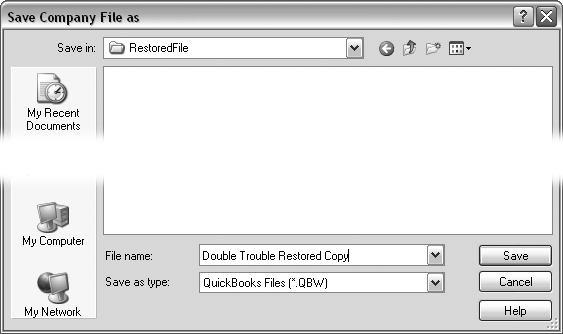
In the “File name” box, type a new name, as shown in Figure 7-7.
The dialog box opens to the folder where you store your company files (Setting Up QuickBooks on a Network). QuickBooks fills in the “File name” box with the company file’s name (minus the timestamp). If you want to replace a company file that’s corrupt or has evidence of your big gaffe, you can keep the file name the program fills in.
Figure 7-7. To restore the file without overwriting the existing company file, choose another folder. In the “File name” box, consider adding unique text like Try 2 or Restore Sept 20 to the end of the name.Tip
If you give a restored file a different name as a precaution—Double Trouble Copy, for example—you can trick QuickBooks into renaming the file after you’re sure it’s the one you want. Create a manual backup of the file. Then, immediately restore it with the company file name you want (Double Trouble in this example).
Click Save.
If you’re restoring a backup of a company file that already exists, QuickBooks warns you that you’re about to overwrite an existing file. If the original file is corrupt or won’t open for some reason, click Yes because that’s exactly what you want to do. You’ll have to type Yes once more to confirm that you want to delete the file. It’s better to take these precautions than to overwrite the wrong file and have to dig out yet another backup.
If the restored file has a password, you have to log in, just as you do in a regular company file. When you see the message that says your data has been restored successfully, click OK to open the company file and reenter any transactions that the backup doesn’t have.
Note
If restoring a backup copy from removable media (CD, DVD, USB thumb drive, Zip disk, or floppy) doesn’t work, try copying the contents of the backup media to your hard drive and restoring the backup file from there. If the restore still doesn’t work, your backup file is probably damaged. Try restoring the next most recent backup.
If none of your backups work, Intuit offers data recovery services to extract data from your backup files. The service isn’t free, but it might be cheaper than rebuilding your entire company file. To arrange for this service, choose Help → Support. On the QuickBooks Support web page, click Contact Us in the menu bar. Follow the instructions on the page to submit a request for technical support.
Sending Company Files to Others
In the past, QuickBooks company files were unwieldy to transport. To give a copy to your accountant, you needed a lightning-fast Internet connection, a CD or DVD, or a forklift. But QuickBooks now has portable company files, a slim file format that flies through the email ether and slips effortlessly into removable media like USB thumb drives and CDs. You can now email a portable company file to your accountant so she can take a quick look or transfer the file to a colleague in another office before you head out on vacation. If you intend to work on the company file at the same time as your accountant and want to merge her changes into your copy, create an Accountant’s Copy (Sharing the Company File with Your Accountant) instead of a portable copy. But, before you transmit your file electronically, be sure you’ve added a password to it so nobody else can intercept it and access your financial data.
For example, a company file that’s 10 MB in size turns into a portable company file of less than 1 MB. Portable company files come with a .qbm file extension, but QuickBooks converts them to regular company files with a .qbw file extension when you open them.
Note
If the person you send the file to is going to make any changes and send the file back, she needs a login or the administrator password. Remember that this password lets her use any and every QuickBooks feature on your file, so don’t give it out to just anybody.
Creating a Portable Company File
Creating a portable company file is just a wee bit more complicated than saving a file. Here are the steps:
Choose File → “Save Copy or Backup”.
You can also click Backup in the icon bar, but the “Save Copy or Backup” command may be easier to remember because it has the word “Copy” in its name.
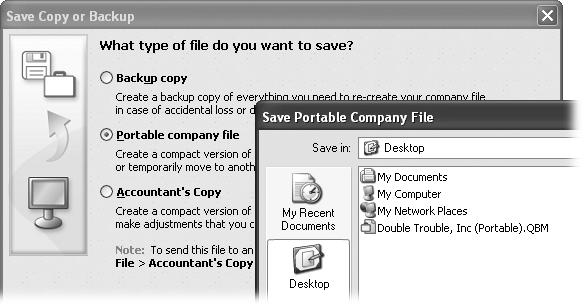
In the “Save Copy or Backup” dialog box, select the “Portable company file” option, shown in Figure 7-8 and then click Next.
QuickBooks fills in the “File name” box with the name of your company file followed by “(Portable)”, and fills in the “Save as type” box with QuickBooks Portable Company Files (*.QBM).
If you want to use a different filename, change the name in the “File name” box, and then click Save.
The “Close and reopen” dialog box tells you that you need to close and reopen your company file to create a portable file.
Click OK to create the file.
A QuickBooks Information message box lets you know when QuickBooks finishes creating the portable company file. Click OK to reopen your company file in QuickBooks.
Feel free to view the portable company file in Windows Explorer and admire its sleek size.
Opening a Portable Company File
Opening a portable company file is almost identical to restoring a backup file, except for a few different label names. QuickBooks essentially converts the portable format file into a full-size, bona fide company file. Here’s what you do:
Choose File → “Open or Restore Company”.
If the No Company Open window is visible, you can click “Open or restore an existing company.” Either method opens the Open or Restore Company dialog box.
In the “Open or Restore Company” dialog box, select the “Restore a portable file” option, and then click Next.
QuickBooks opens the Open Portable Company File dialog box to the last folder you selected for portable company files.
Figure 7-8. Unlike the Save Backup Copy dialog box, the Save Portable Company File dialog box opens to your computer’s desktop the first time around. If you want to save the file to a folder, choose the folder. From then on, QuickBooks opens the Save Portable Company File dialog box to the last folder you selected.Double-click the portable file you want to restore (or select the filename and then click Open).
QuickBooks sets the “Files of type” box to QuickBooks Portable Company Files (*.QBM) so the dialog box list shows only portable company files.
Back in the “Open or Restore Company” dialog box, the “Where do you want to restore the file?” screen makes it clear that you should choose the location carefully. Click Next.
If you restore the portable file to your regular company file folder, you’ll over-write your existing company file. If that’s what you want, fine. Otherwise, be sure to choose another folder or another filename.
In the “Save Company File as” dialog box, choose the folder to which you want to restore. In the “File name” box, type a new name.
The dialog box opens to the folder you last chose for portable files. If you want to replace your company file, choose the folder that holds your everyday company file. QuickBooks fills in the “File name” box with the last restored file name you used.
Click Save.
If you’re restoring a portable file for a company file that already exists, QuickBooks warns you that you’re about to overwrite an existing file. If that’s what you want, click Yes. You’ll have to type Yes once more to confirm that you want to delete the existing file.
The Working message box shows its progress (restoring a portable file can take several minutes). When the file is ready, the QuickBooks Login dialog box appears (or the file opens if you don’t use a password).
Verifying Your QuickBooks Data
QuickBooks files hiccup now and then. Perhaps you worked through a spectacular thunderstorm and a power spike zapped a bit of your company file. Fortunately, the QuickBooks Verify Data utility can scan your company files and tell you whether your file has suffered any damage. It’s a good idea to run the Verify Data utility every so often, just to make sure that your company file is OK. How often you run this utility depends on how hard you work your company file, but monthly verifications are in order for most companies. The utility is indispensable, though, if you notice any of the following symptoms:
Invalid Protection Faults or Fatal Errors. If these types of errors appear when you run QuickBooks, you almost certainly have a damaged data file.
Discrepancies on reports.Your Balance Sheet doesn’t show all your accounts, or transactions show negative values instead of positive ones.
Tip
If the totals in your reports don’t seem right, first check that the report dates are correct and that you’re using the correct cash or accrual accounting setting (see Preferences That Apply to Every Company Report).
Missing transactions and names. Transactions or names that you’re sure you entered don’t appear in reports or lists.
Running the Verify Data Utility
Whether you’re just giving your company file a checkup or you see signs of problems, the Verify Data utility is easy to use. To run the utility, choose File → Utilities → Verify Data. (If any windows are open, click OK to give QuickBooks permission to close them.) When the utility’s done, you’ll see one of two possible outcomes:
If QuickBooks displays a message that it detected no problems with your data, your file is healthy.
If you see the message “Your data has lost integrity,” your company file has some problems. QuickBooks displays instructions for running the Rebuild Data utility, which tries to repair the damage. Read on to learn what to do.
Reviewing Problems
If your company file has “lost integrity,” the Verify Data utility writes any errors it finds to a file named QBWIN.log. Before you run the Rebuild Data utility, take a look at this log file to review your company file’s problems. You need a map to find the folder that contains these log files. Fortunately, you can open the file with the Windows Notepad program. Here’s how:
In Windows Explorer, go to the folder where QuickBooks stores QBWIN.log.
In Windows Vista, it’s C:Users<your user name>AppDataLocalIntuit QuickBookslog20.0.
In Windows XP, it’s C:Documents and Settings<your user name>Local Settings Application DataIntuitQuickBookslog20.0.
To open the log file, double-click its name.
The file opens in Windows Notepad, and you can use Notepad commands to move around the file, as shown in Figure 7-9. If the file doesn’t open, launch Notepad, choose File → Open, and double-click the QBWIN.log filename. The most recent addition to the file is at the very end.

Running the Rebuild Data Utility
If your file is damaged, the Rebuild Data utility tries to fix it. Unfortunately, it can also make matters worse. Intuit recommends that you run the Rebuild Data utility only if an Intuit technical support person tells you to. Always make a backup of your company file before trying to rebuild it. Take extra care to prevent overwriting your previous backups—those files might be your only salvation if the rebuild doesn’t work.
To run the Rebuild Data utility, choose File → Utilities → Rebuild Data. When the utility finishes, close your company file and reopen it, which refreshes the lists in your data file so you can see if the problems are gone.
Run the Verify Data utility once more after you run the Rebuild Data utility to see if any damage remains. If this second Verify Data run still shows errors, restore a recent backup of your company file.
Cleaning Up Data
As you add transactions and build lists in QuickBooks, your company file gets larger. Although larger company files aren’t too big of a hassle, you might be alarmed when your company file reaches hundreds of megabytes. Plus, if you use CDs to back up your file, your backups will start to take up too much valuable time and storage space. The Clean Up Company Data command creates an archive file and deletes obsolete list items and transactions prior to the date you choose.
Warning
The Clean Up Company Data wizard removes the audit trail information for transactions that the cleanup deletes. So if you’re watching transaction activity, print an Audit Trail report first, and, as always, back up your company file.
When QuickBooks cleans up data, it replaces the detailed transactions prior to your specified date with general journal entries that summarize the deleted transactions by month. As a result, some of your financial detail is no longer available for running reports, filing taxes, and other accounting activities. Still, there are a couple of compelling reasons to do a data cleanup:
You no longer refer to old transactions. If you’ve used QuickBooks for years, you probably don’t need the finer details from eight or more years ago. And if you ever do need details from the past, you can open an archive file to run reports.
You have obsolete list items. Cleaning up a company file can remove list items that you don’t use, like customers you no longer sell to. This option comes in handy if you’re nearing the limit on the number of names (Creating a New Customer).
Note
If the Clean Up Company Data command isn’t the housekeeper you hoped for, you can always start a fresh company file. That way, you can export all the lists from your existing company file (Exporting lists to a text file) and import them (Importing a Delimited File) into the new file, so you start with lists but no transactions. Set your account opening balances (Viewing Account Names and Numbers) to the values for the start date of the new file. If you want to copy transactions from the old file to the new, try the QIF to IIF Convertor for QuickBooks (www.bigredconsulting.com) to transfer transactions from one QuickBooks file to another.
An archive file created by the Clean Up wizard is a regular company file that contains all of your transactions, but it’s read-only, so you can’t inadvertently enter new transactions. If QuickBooks runs into trouble cleaning up your file, it automatically pulls transaction details from the archive file.
Note
It’s counterintuitive, but an archive copy is not a backup file, so it won’t let you use the QuickBooks Restore command to replace a corrupt company file. Even with an archive copy, you still need to back up your data.
If you decide to clean up your company file, here’s what you can expect to find afterward:
General journal entries summarize deleted transactions. QuickBooks replaces all the deleted transactions that happened during each month with one general journal entry. For example, instead of 20 separate invoices for the month of June, you’ll see one journal entry transaction with the total income for June for each income account.
Note
If you see other transactions for the same month, QuickBooks wasn’t able to delete those transactions for some reason. For example, QuickBooks won’t delete unpaid invoices or other transactions with an open balance, nor will it delete any transactions marked “To be printed” (Choosing How to Send the Invoice) or ones that you haven’t reconciled (Reconciling Transactions).
Inventory adjustments reflect the average cost of items. QuickBooks removes inventory transactions that are complete, such as invoices that have been paid in full. When QuickBooks finds an inventory transaction that it can’t condense (perhaps because the payment is outstanding), it keeps all the inventory transactions from that date forward. Because inventory transactions use the average cost of inventory items, QuickBooks also adds an inventory adjustment to set the average cost of the inventory items as of that date.
Reports might not include the details you want. You can still generate summary reports using condensed data because QuickBooks can incorporate the information in the monthly general journal entries. Likewise, sales tax reports still include the information about your sales tax liabilities. However, detailed reports won’t include transaction details before the cutoff date you choose for condensing the file (see below). Cash accounting reports (see Accounting Basics—The Important Stuff) aren’t accurate because they need the dates for detailed transactions.
Payroll for the current year remains. QuickBooks keeps payroll transactions for the current year and the previous year regardless of the cutoff date you choose for condensing the file.
QuickBooks deletes estimates for closed jobs. If a job has any status other than Closed, QuickBooks keeps the estimates for that job.
QuickBooks keeps time data that you haven’t billed. QuickBooks keeps any time you’ve tracked that’s billable but that you haven’t yet billed to your customers. Also, if you pay employees by the time they work, QuickBooks keeps data for time for which you haven’t compensated your employees.
Running the Clean Up Company File Tool
If you’re ready to clean up your company file, first consider when to do it. The cleaning process can take several hours for a large company file, and a slow computer or a small amount of memory exacerbates the problem. You might want to clean your company file at the end of a workday so it can run overnight.
Here’s how to condense a company file:
Choose File → Utilities → Clean Up Company Data.
If you’ve created budgets in QuickBooks, you’ll see a message that the clean up might remove budget data. You can export your budget before you clean up your data and then import the budget back into your company file after cleanup (Copying Budgets and Creating What-if Budgets). If the loss of some budget data doesn’t scare you, click Yes. The Clean Up Company Data dialog box opens.
Select the “Remove transactions as of a specific date” option.
The “Remove transactions as of a specific date” option removes old transactions and other things like unused accounts and items. The “Remove ALL transactions” option removes transactions but keeps your preferences, lists, and service subscriptions—such as payroll—intact. You won’t use this option often, but it comes in handy if, for example, you wanted to offer your clients a template company file that contains typical list entries, but without any transactions.
In the “Remove closed transactions on or before” box, type or select the ending date for the period you want to condense.
If you use a QuickBooks Payroll Service for your payroll (Applying for a Payroll Service), you can’t clean up data for the current year. Besides, QuickBooks won’t let you clean up transactions that are later than the closing date on your company file (Accounting). Choosing a date at least two years in the past ensures that you can compare detailed transactions for the current year and the previous year. For example, if it’s March 1, 2010, consider using December 31, 2007 or earlier as your cutoff date.
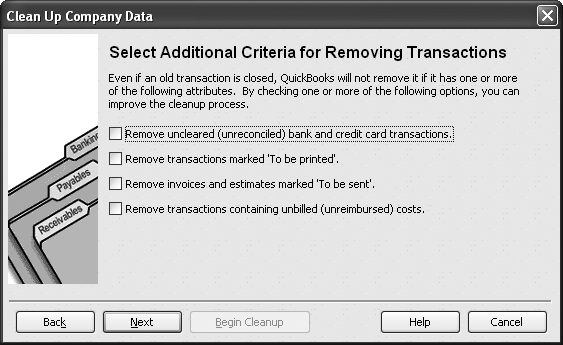
Click Next to advance to the “Select Additional Criteria for Removing Transactions” screen. If you want QuickBooks to remove transactions that the clean up process would normally leave alone, turn on the appropriate checkboxes. Click Next.
Figure 7-10 shows your choices. Before you turn on these checkboxes, carefully review your company file to make sure you won’t delete transactions that you want to keep. Click Next.
In the “Select Unused List Items To Remove” screen, turn on the appropriate checkboxes if you want QuickBooks to delete list items no longer referenced in the cleaned up file. Then click Next.
Accounts, customers, vendors, other names, and invoice items might become orphans when you delete old transactions they’re linked to. You can neaten your file by removing these list items, which now have no links to the transactions that still remain. But keep in mind that you might still work with one of these vendors or customers later.
Figure 7-10. The Clean Up Company File tool includes settings to remove transactions that it would normally leave alone—like transactions marked “To be printed” that you don’t need to print. If you have very old, unreconciled transactions, invoices, or estimates marked “To be sent,” or transactions with unreimbursed costs, turn on these checkboxes to remove them during the cleanup.If seeing all the To Do notes you’ve completed gives you a sense of accomplishment, leave the “‘Done’ To Do notes” checkbox turned off. But to show only To Do notes that you haven’t completed, turn this checkbox on.
On the “Proceed with cleanup?” screen, click Begin Cleanup.
If you’re not sure of the options you chose, or if you have any doubts about cleaning up your file, click Back to return to a previous screen, or click Cancel to exit without taking any action.
When you click Begin Cleanup, QuickBooks tells you that it’ll back up your file before condensing the transactions. Click OK when you’re ready to back up and clean up your data. QuickBooks first creates a backup file of your data. Then, it creates the archive file (a QuickBooks company file, not a backup file; see Cleaning Up Data) in the same folder as your original company file. The file name for the archive copy has the format “Archive Copy mm-dd-yyyy <company name>.qbw”, where “mm” represents the month, “dd” the day, and “yyyy” the year that you created the file.
As QuickBooks proceeds with the cleanup process, it scans your data three times. You might see dialog boxes wink on and off in rapid succession; then again, you might not see anything happen for a while if your file is large. But if your hard disk is working, the cleanup process is still in progress. Be patient and resist clicking Cancel. When the cleanup is complete, QuickBooks displays a message telling you so.
Cleaning Up After Deleting Files
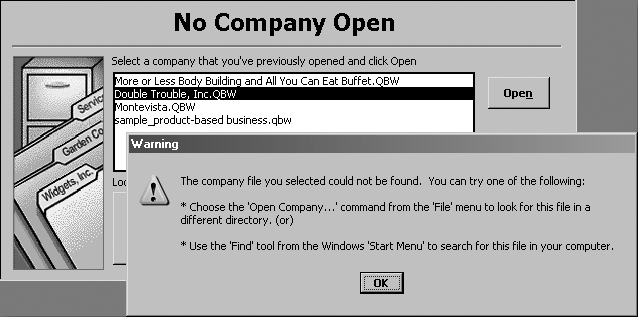
Although QuickBooks lets you delete transactions (which is risky because doing so makes it easier for people to embezzle), the program doesn’t give you a command for deleting company files. If someone else takes over responsibility for your non-profit’s accounting, or if you want to get rid of a practice file you no longer use, you can easily delete the company file right in Windows. But you’ll still have some housekeeping to do to remove all references to that file from QuickBooks. A deleted company file will still appear in the list of previously opened files (Figure 7-11), but QuickBooks won’t be able to find the file if you choose that entry. Here’s how you eliminate those stale entries:
In Windows Explorer, navigate to the folder where your QuickBooks company files are stored. Right-click the company file you want to delete.
What you look for depends on how you’ve set up your folder view. If your folder shows the full names of your files, look for a file with a .qbw file extension, such as DoubleTrouble, Inc.qbw. If the folder includes a Name column and a Type column, the type you want is QuickBooks Company File.
Files with .qbx extensions represent accountant’s copies. Files with .qbb file extensions are backup copies of your company files. If you delete the company file, go ahead and delete the backup and accountant’s copies as well.
On the shortcut menu, choose Delete.
Windows displays the Confirm File Delete message box. Click Yes to move the file to the Recycle Bin. If you have second thoughts, click No to keep the file.
Tip
If you find that you always seem to need a file the day after you delete it, get in the habit of backing up files before you delete them.
Figure 7-11. If you double-click the name of a file that QuickBooks can’t find, the program suggests that you choose File → Open Company and then look for the file in another directory, or that you use Windows’ Find command. If you know that the file doesn’t exist, simply click OK, and then select another file.In QuickBooks, to eliminate the deleted company file from the list that you see when you choose File → Open Previous Company, you first have to open another company file.
If QuickBooks displays the No Company Open window, open the company file that you typically work with by double-clicking it.
To clear out old companies in the previously opened file list, you need to reset the number of companies displayed in the No Company Open window. To do this, choose File → Open Previous Company → “Set number of previous companies”.
In the “How many companies do you want to list (1 to 20)?” box, type 1, and then click OK. When you choose File → Open Previous Company again, you’ll notice that only one company appears—the company file you opened last. In the No Company Open window, the “Select a company that you’ve previously opened and click Open” list also contains only the last file you opened.
Now that you’ve removed the deleted company file from these lists, you can reset the number of previously opened companies. With a company file open, choose File → Open Previous Company → “Set number of previous companies”.
In the “How many companies do you want to list (1 to 20)?” box, type the number of companies you’d like to see in the list, and then click OK.
As you open different company files, QuickBooks displays these files in the No Company Open window and on the Open Previous Company menu.