One of the easiest ways to sense the presence of objects is to use a sonar sensor. Before adding this capability to your system, here's a little tutorial on sonar sensors. Sonar sensors use ultrasonic sound to calculate the distance from an object. The sound wave travels out from the sensor, as illustrated in the following figure:

The device emits a sound wave 10 times a second. If an object obstructs these waves, the waves will reflect off of the object and then return to the sensor, as shown in the following figure:

The sensor then measures the returning waves. It uses the time difference between when the sound wave was emitted and when it returned in order to measure its distance from the object.
There are several choices if you want to use a sonar sensor to sense the distance. The first option is to use a sonar sensor that connects to the USB port. The following is an image of a USB sonar sensor:

This is the USB-ProxSonar-EZ sensor and can be purchased directly from MaxBotix or on Amazon. There are several models, each has a different distance specification. However, they all work in the same way. There is an inexpensive solution that can be connected to the GPIO of the Raspberry Pi. The following is an image of this sort of inexpensive sonar sensor:

This sensor is less expensive and easy to use. Although it takes a bit of processing power to coordinate the efforts of timing to send and receive signals, the Raspberry Pi 2 Model B has the processing power needed.
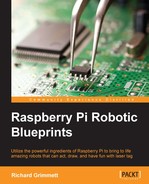
There are two ways to connect the sensor to Raspberry Pi. You can connect it directly to the motor controller board, as discussed earlier in this chapter. If you are going to do that, there is special connector for the sonar sensor. Here is an image:
To use this connector, simply connect the Vcc pin on the sensor to the 5V pin on the board, the Trig pin on the sensor to the T pin on the board, the Echo pin on the sensor to the E pin on the board, and the Gnd pin on the sensor to the GND pin on the board. You can then use the library for the motor controller board and simply call the rr.get_distance() function.
The following are the steps to set up this sonar sensor to sense the distance in case you want to connect it directly to Raspberry Pi's GPIO:
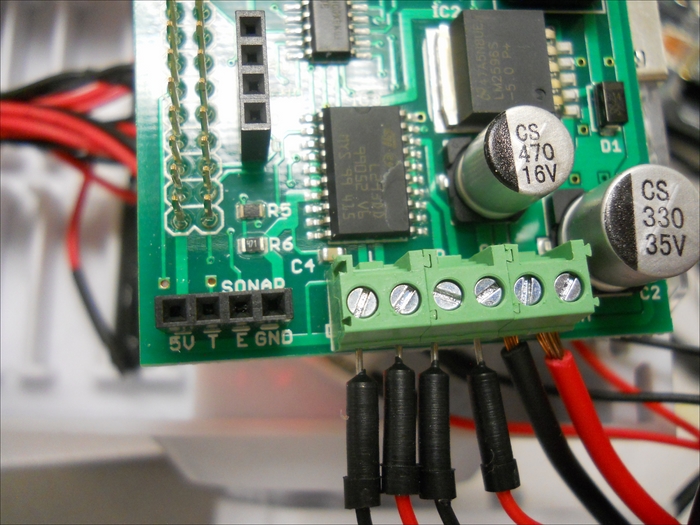
- Connect it to the GPIO pins on the Raspberry Pi. The first step is to understand the GPIO pins for the Raspberry Pi 2 Model B. Here is a diagram of the layout of the pins:
In this case, you'll need to connect to the 5 volt connection of the Raspberry Pi pin 2. You also need to connect to the GND, which is pin 6 on Raspberry Pi. Pin 16 is used as an output trigger pin and Pin 18 (GPIO24) as an input to time the echo from the sonar sensor.
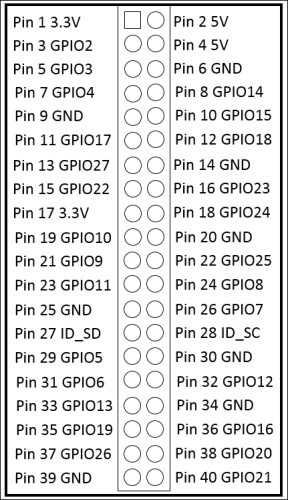
- Now that you know the pins you have to connect to, you'll connect the sonar sensor. There is a problem, as you can't connect the 5 volt return from the sonar sensor directly to the Raspberry Pi GPIO pins, they want 3.3 volts. You need to build a voltage divider that will reduce the 5 volts to 3.3 volts. This can be done with two resistors, which are connected as shown in the following diagram:

For more information on how the voltage divider works in this configuration, refer to http://www.modmypi.com/blog/hc-sr04-ultrasonic-range-sensor-on-the-raspberry-pi. The combination of these two resistors will reduce the voltage to the desired levels. You may want to put all of this on a small breadboard, as shown in the following:
Finally, connect the sensor to the Raspberry Pi, like this:

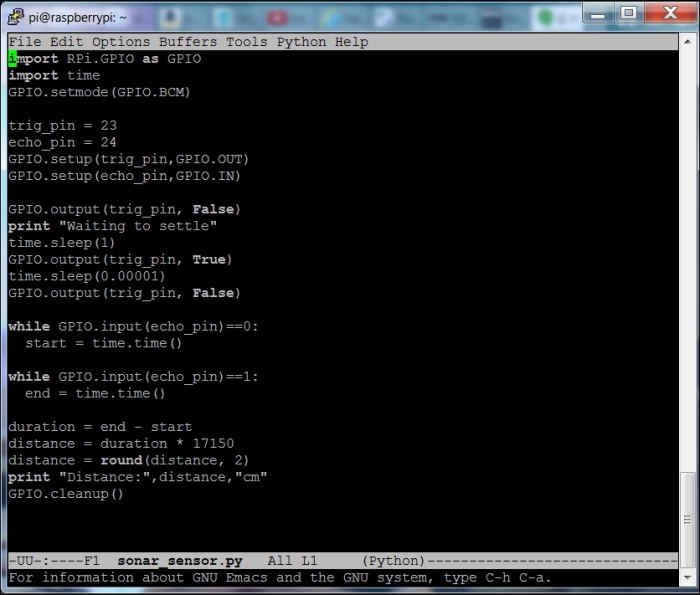
- Now that the device is connected, you'll need a bit of code to read in the value; make sure it is settled (a stable measurement), and then convert it to distance. Here is the Python code for this program:
- Now you should be able to run the program and get a result, as shown in the following screenshot:

Using this type of sonar sensor provides an inexpensive way to find objects. The final step is to turn this code into a library so that you can call it from the main vehicle program, as shown in the following screenshot:

You can now use this functionality to detect objects when you do your path planning capabilities later in the chapter.