
8
Administering Systems Remotely
When working with systems, once the server has been installed, and many times, even during the installation itself, administration can be performed remotely. Once a machine has been installed, the tasks that need to be performed during its life cycle are not that different from the ones that have already been performed.
In this chapter, we will cover, from a connection point of view, how to connect to remote systems, transfer files, and automate the connection so that it can be scripted and make it resilient if issues arise with the network link. Administration tasks that can be performed on the system are the same as the ones we described in previous chapters, such as installing software, configuring additional networking settings, and even managing users.
Since administering a system requires privileged credentials, we will focus on the available tools that are considered to be secure to perform such connections, as well as how to use them to encapsulate other traffic.
In addition, we will add a brief introduction to Ansible as an automation tool for system administration to present some of the basics of it and show how can be used for managing at scale.
We will cover the following topics:
- SSH and OpenSSH overview and base configuration
- Enabling root access via SSH (and when not to do it)
- Accessing remote systems with SSH
- Key-based authentication with SSH
- Remote file management with SCP/rsync
- Advanced remote management—SSH tunnels and SSH redirections
- Remote terminals with tmux
- Introduction to Ansible automation
By covering these topics, we will be able to master remote system access and bring our administration skills to the next level.
Let’s start by talking about the SSH protocol and the OpenSSH client and server in the next section.
Technical requirements
You can continue using the virtual machine (VM) that we created at the beginning of this book in Chapter 1, Getting RHEL Up and Running. Any additional packages that are required will be indicated in the text. Any additional files that are required for this chapter can be downloaded from https://github.com/PacktPublishing/Red-Hat-Enterprise-Linux-RHEL-9-Administration.
SSH and OpenSSH overview and base configuration
SSH is an acronym for Secure Shell Host. It started to spread by replacing traditional Telnet usage, which was a remote login protocol that used no encryption for connecting to hosts, so the credentials that were used for logging in were transmitted in plain text. This means that anyone who had a system between the user terminal and the remote server could intercept the username and password and use that information to connect to remote systems. This is similar to what happens when credentials are transmitted to a web server via Hypertext Transfer Protocol (HTTP) and not HTTP Secure (HTTPS).
With SSH, a secure channel is created between the client and the target host, even if the connection is performed over untrusted or insecure networks. Here, the SSH channel that’s created is secure and no information is leaked.
OpenSSH provides both a server and a client (the openssh-server and openssh-clients packages) in Red Hat Enterprise Linux (RHEL) that can be used to connect to and allow connections from remote hosts.
Tip
Knowing everything is not possible, so it is really important for Red Hat Certified System Administrator (RHCSA)-certified individuals (and even later certifications, if you followed that path) to be resourceful. We already know how to install packages and how to check the manual (man) pages that are installed by them, but we can also use those packages to find the necessary configuration files. This skill can be used to find the possible configuration files we need to edit to configure a service or a client. Remember to use rpm –ql package to review the list of files provided by a package if you cannot remember which one to use.
The default configuration for both the client and server allows connections, but there are many options that can be tuned.
OpenSSH server
OpenSSH is a free implementation based on the last free SSH version that was created by OpenBSD members and updated with all the relevant security and features. It has become a standard in many operating systems, both as a server and as a client, to make secure connections between them.
The main configuration file for the OpenSSH server is located at /etc/ssh/sshd_config (and you can use man sshd_config to get detailed information about the different options). Some of the most widely used options are listed here:
- AcceptEnv: Defines which environment variables that have been set by the client will be used on the remote host (for example, locale, terminal type, and so on).
- AllowGroups: A list of groups a user should be a member of to get access to the system.
- AllowTcpForwarding: Allows us to forward ports using the SSH connection (we will discuss this later in this chapter, in the Advanced remote management – SSH tunnels and SSH redirections section).
- DisableForwarding: This takes precedence over other forwarding options, making it easier to restrict the service.
- AuthenticationMethods: Defines which authentication methods can be used, such as disabling password-based access.
- Banner: Files to send to the connecting user before authentication is allowed. This defaults to no banner, which might also reveal who is running the service that might be providing too much data to possible attackers.
- Ciphers: A list of valid ciphers to use when you’re interacting with the server. You can use + or – to enable or disable them.
- ListenAddress: The hostname or address and port where the sshd daemon should be listening for incoming connections.
- PasswordAuthentication: This defaults to yes and can be disabled to block users from interactively connecting to the system unless a public/private key pair is used.
- PermitEmptyPasswords: Allows accounts with no password to access the system (the default is no).
- PermitRootLogin: Defines how login works for the root user—for example, to avoid the root user from connecting remotely with a password. The default setting is prohibit-password—that is, only SSH keys can be used.
- Port: Related to ListenAddress, this defaults to 22. This is the port number where the sshd daemon listens for incoming connections.
- Subsystem: Configures the command for the external subsystem. For example, it is used with sftp for file transfers.
- X11Forwarding: This defines whether X11 forwarding is permitted so that remote users can open graphical programs on their local display by tunneling the connection.
The following screenshot shows the options that are installed by our system while we’re removing comments (note—there are other folders that can keep configurations; make sure to check /etc/ssh/sshd_config.d/, /etc/ssh/sshd_config, and /etc/crypto-policies/back-ends/opensshserver.config for additional settings):

Figure 8.1 – Default values at installation time defined in /etc/ssh/sshd_config
We’ll check the client part of the configuration in the next section.
OpenSSH client
The client part of OpenSSH is configured system-wide via the /etc/ssh/ssh_config file and the files in the /etc/ssh/ssh_config.d/ folder. They are also configured via each user ~/.ssh/config file.
Usually, the system-wide file just contains some comments, not actual settings, so we will be focusing on the per-user configuration file and command-line parameters.
One example entry in our ~/.ssh/config file could look like this:
Host jump
    Hostname jump.example.com
    User root
    Compression yes
    StrictHostKeyChecking no
    GSSAPIAuthentication yes
    GSSAPIDelegateCredentials yes
    GSSAPIKeyExchange yes
    ProxyCommand connect-proxy -H squid.example.com:3128 %h %p
    ControlPath ~/.ssh/master-%r@%h:%p
    ControlMaster auto
In the previous example, we defined an entry named jump (that we can use with ssh jump) that will connect the root username to the jump.example.com host.
This is a basic setting, but we’re also defining that we’ll be using a helper program in ProxyCommand that will make use of a proxy server on squid.example.com on port 3128 to connect to the %h host and %p port to reach our target system. Additionally, we’re making use of Compression and using ControlMaster with additional GSSAPI authentication.
One feature that has security implications is StrictHostKeyChecking. When we connect to a host for the first time, keys are exchanged between the client and the host, and the server identifies itself with the keys that are used. If they’re accepted, they will be stored in the .ssh/known_hosts file at the user’s home.
If the remote host key is changed, a warning will be printed on the ssh client’s terminal and the connection will be refused, but when we set StrictHostKeyChecking to no, we will accept any key that’s sent by the server, which might be useful if we’re using a test system that gets redeployed frequently (and thus, generating a new host key). It is not recommended to be used in general, since it protects us from a server being replaced and also someone impersonating the server we want to connect to with a server that—for example—logs usernames and passwords to access our system later.
In the next section, we will learn about accessing remote systems with SSH.
Enabling root access via SSH (and when not to do it)
As we introduced in the previous section, there are some options that directly affect the access as root to the system, as shown in the following example:
PermitRootLogin
PasswordAuthentication
Depending on your security requirements, there might be better options or combinations to use, so let’s discuss some scenarios.
It’s common to set some requirements such as not allowing root login, which can be set via PermitRootLogin no in the sshd configuration file (/etc/ssh/sshd_config). This enforces that every user willing to become root will need to first SSH into the system with another user, and once connected, use su or sudo to switch to the root user.
Alternatively, you can use PermitRootLogin prohibit-password, which will only allow connections to the system as root when using public key authentication (ahead in this chapter).
Probably, the worst case is to set PermitRootLogin yes as this will allow access to the root account via ssh using passwords.
In general, allowing access with SSH empowers remote attackers to use password-testing tools to try getting into the system, but also allowing them to use root makes it even easier, as they can attempt to log in directly as a privileged user.
If you still need to use passwords for your users or root, there are third-party tools such as fail2ban that can help you secure your system a bit more, as those utilities can be configured to block the Internet Protocol (IP) addresses of users trying to brute-force the password after some failed attempts (but still, they might use proxies or other ways to get into the system).
My recommendation, whenever possible, would be to only allow root login when using private keys (prohibit-password), and in general, consider disabling any kind of passwords with PasswordAuthenticaton no as this will also protect other users, allowing them only to use their generated private key to access the system, especially to servers.
Let’s learn a bit more about the different ways to reach systems in the next sections.
Accessing remote systems with SSH
SSH, as we mentioned earlier in this chapter, is a protocol that’s used to connect to remote systems. In general, the syntax, in its most basic form, is just executing ssh host within a terminal.
The ssh client will then initiate a connection to the ssh server on the target host, using the username of the currently logged-in user by default, and will try to reach the remote server on port 22/tcp, which is the default for the SSH service.
In the following screenshot, we can see the closest server to our localhost system, which means we will be connecting to our own server:
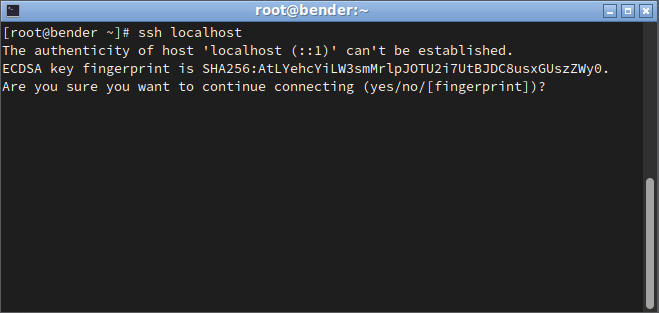
Figure 8.2 – Initiating an SSH connection to localhost
In the preceding screenshot, we can see how the first interaction with the server prints the fingerprint of the server to authenticate it. This is what was discussed in the OpenSSH client section; that is, StrictHostKeyChecking. Once accepted, if the host key changes, the connection will be denied until we manually remove the older key from the .ssh/known_hosts file to confirm that we’re aware of the server change.
Let’s add the key and try again. The output is shown in the following screenshot:
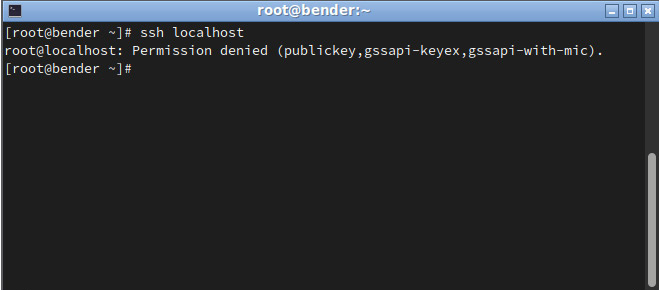
Figure 8.3 – Initiating an SSH connection to localhost denied
On our second attempt, the connection failed, but let’s examine the output; that is, Permission denied (publickey,gssapi-keyex,gssapi-with-mic). What does it mean? If we pay attention, password isn’t listed, which means that we cannot connect to this host via a password prompt (which comes from setting PasswordAuthentication to no, which we defined in the /etc/ssh/sshd_config file).
In the following screenshot, we can see that once we set PasswordAuthentication to yes, the system asks for the password, which is not echoed on the screen. Once validated, we get a shell prompt so that we can start typing in commands:
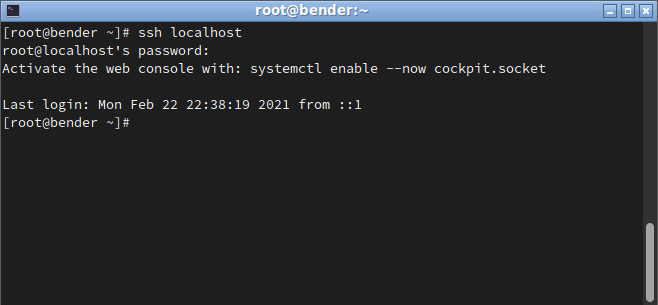
Figure 8.4 – SSH connection completed
In general, password authentication can be a security risk as the keyboard might be intercepted, someone might be looking over your shoulder, a brute-force attack might be used against the accounts, and so on. Due to this, it’s common practice to at least disable it for the root user, meaning that someone trying to log in to the system should know the username and password of a user, and from there, use the system tools to become root.
Let’s learn how to log in to remote systems that have passwords disabled by using authentication keys.
Key-based authentication with SSH
One big advantage of SSH connections is that commands can be given to be executed on remote hosts—for example, to grab updated data that can be used for monitoring without requiring a specific agent on the host.
Having to provide login details on each connection is not something that we could consider an improvement to the user experience (UX), but SSH also allows us to create a key pair that can be used for authentication to remote systems so that no password or credential input is required.
The keys contain two parts: one that is public and must be configured in each host we want to connect to, and one that is private and must be secured as it will be used to identify us while we’re trying to connect to remote hosts.
It is not necessary to say that this entire process happens over the encrypted connection created by SSH. So, using SSH and compression will also make our connections faster versus other legacy methods such as Telnet, which is unencrypted.
First of all, let’s create one key pair for authentication.
Tip
It is recommended to have at least one key pair per user so that each user can have keys based on the roles when they’re connecting to servers. Even if the keys can be shared for users in a role, it’s better to have each user have their own set so that keys can be revoked individually. For example, we can keep several ssh key pairs to be used in different roles, such as personal systems, production systems, lab systems, and so on. Having to specify the key pair for connecting is also an extra security measure: we cannot connect to production systems unless we use the production key pair.
To create a key pair, we can use the ssh-keygen tool, which has several options for the key we are creating, as shown in the following screenshot:
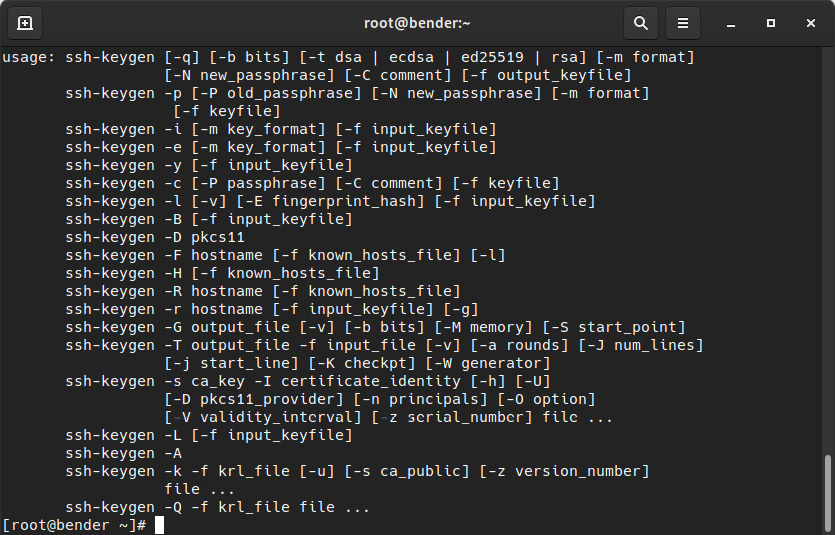
Figure 8.5 – ssh-keygen options
When no arguments are provided, by default, it will create a key for the current user and ask for a password for the key. When we use the defaults and provide no values, we get an output similar to the one shown in the following screenshot:
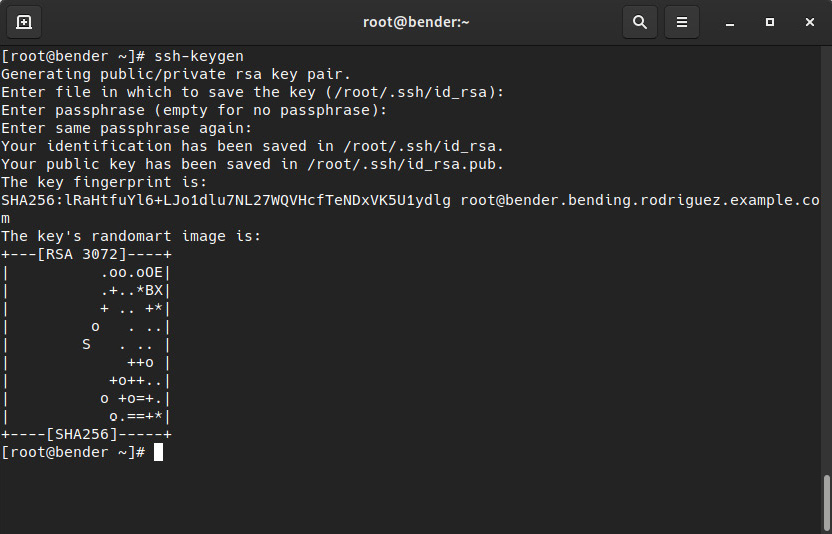
Figure 8.6 – ssh-keygen execution creating a Rivest-Shamir-Adleman (RSA) key pair under ~/.ssh/{id_rsa,id_rsa.pub}
From this point on, this system has created a key pair for the root user, and it has stored the two pieces of it in the same folder, which is .ssh by default. The public one contains the.pub suffix, while the other contains the private key.
How do we use them? If we look inside the .ssh folder in our home directory, we can see several files: we have an authorized_keys file and a known_hosts file, in addition to the key pair we have just created. The authorized_keys file will contain one entry per line. This contains the public keys that can be used to log in to this system for this user.
Tip
The vast range of options that can be used with authorized_keys goes further than adding just regular keys—you can also define commands to execute, expiry times for keys, remote hosts that can be used to connect so that only those hosts will be able to use that key successfully, and much more. Again, man sshd is your friend, so check out the AUTHORIZED_KEYS FILE FORMAT section there to learn about more complex setups.
To simplify how keys are set up on remote systems, we have the ssh-copy-id utility, which connects via ssh to the remote host. This will ask for the ssh password and install the available public keys on our system. However, this requires the system to have password authentication enabled.
The alternate method consists of manually appending our public key to that file (.ssh/authorized_keys), as shown in the following screenshot:
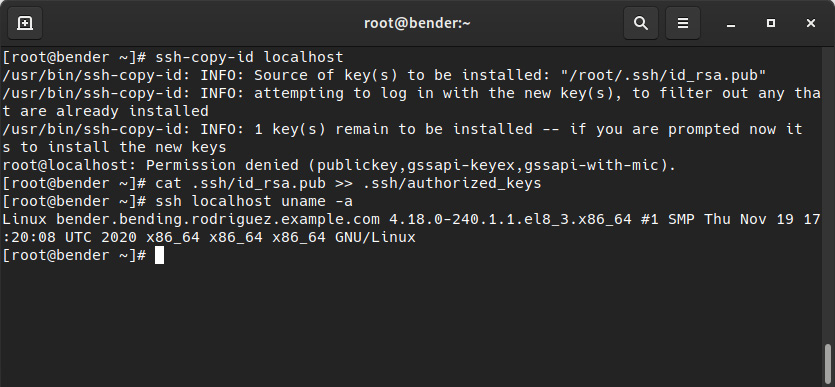
Figure 8.7 – ssh-copy-id failure and manual authorization of the private key
The first line has attempted to use ssh-copy-id, but since we had password authentication enabled, it tried to copy our public key and failed. Then, we appended the public key using >> to the authorized_keys file. Finally, we demonstrated how to connect to localhost with ssh and execute a command without a password.
Important note
The permissions for the .ssh folder and the authorized_keys file must not be too wide open (for example, 777). If they are, the ssh daemon will reject them as someone could have appended new keys and tried to gain access without really being a legitimate user of the system. The .ssh folder should be set to 0700 permissions and the private keys such as id_rsa should be set to 0600 permissions.
What has just happened opens a new world of automation. Using the keys being exchanged between our system and the remote hosts, we can now connect remotely to them to run commands interactively or to script commands to be executed on remote hosts. We can check the results in our terminal. Let’s consider this simple script, for a system load average check, which is available at https://github.com/PacktPublishing/Red-Hat-Enterprise-Linux-RHEL-9-Administration/blob/main/chapter-08-remote-systems-administration/loadaverage-check.sh:
#!/usr/bin/bash
for system in host1 host2 host3 host4;
do
    echo "${system}: $(ssh ${system} cat /proc/loadavg)"
done
In this example, we’re running a loop to connect to four systems and then outputting the name and the load average of that system, as shown in the following screenshot:
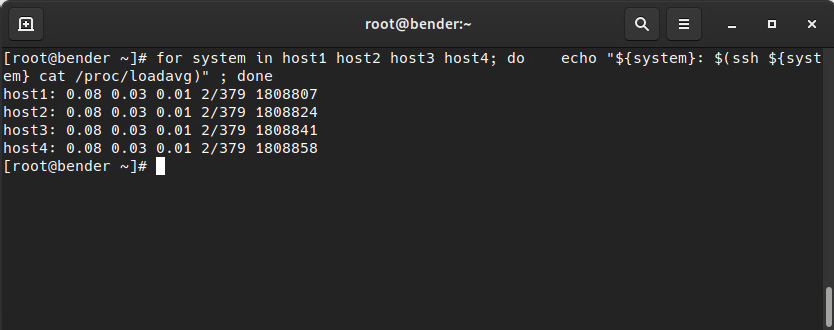
Figure 8.8 – Passwordless login to four hosts to check their load average
As we can see, we quickly grabbed the information from four hosts over ssh. If you want to test this in your environment, you might want to put into practice what we learned about creating entries in the /etc/hosts file, which points to 127.0.0.1 for the hostnames we want to try, so that the connection goes to your own practice system, as we explained in Chapter 6, Enabling Network Connectivity.
Now, think about the different options we have for administering our systems remotely, as follows:
- Check IPs for a range of hosts
- Install updates or add/remove one package
- Check the local time in case the system has drifted
- Restart one service after adding a new user to the system
Many more options exist, but these are the main ones.
Of course, there are more suitable tools for remotely administering systems and ensuring that errors are detected and handled properly, such as using Ansible, but in this case, for simple tasks, we are good to go.
Previously, we created a key and replied with <ENTER> when we were asked for a password. What if we had typed one in? We’ll look at this in the next section.
SSH agent
If we have decided to create an SSH key with a password to protect it (good choice), we will need to input the passphrase each time we want to use the key, so in the end, it might be as insecure as having to type in the password, as someone might be checking over our shoulder. To overcome this, we can use a program called ssh-agent that temporarily keeps the passphrase in memory. This is convenient and reduces the chances of someone watching while you type in your key.
When you’re using a graphical desktop, such as GNU Network Object Model Environment (GNOME), as provided by RHEL, the agent might be already set up to start at session login. In the event that you’re using a console (local or remote), the agent must be started manually by executing ssh-agent.
When ssh-agent is executed, it will output some variables that must be set in our environment so that we can make use of it, as shown in the following screenshot:
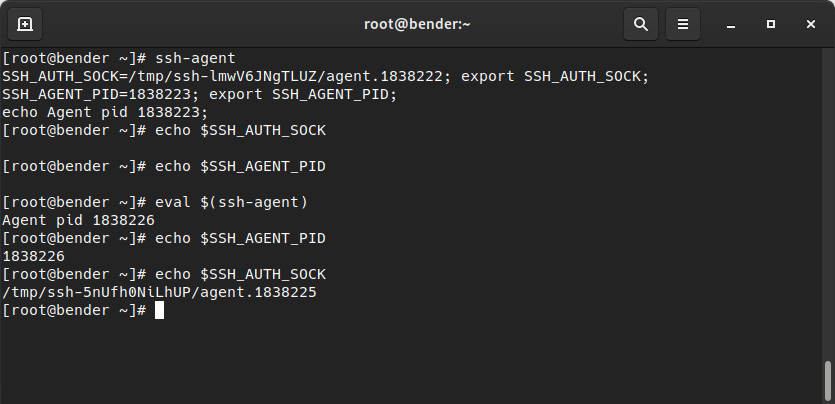
Figure 8.9 – ssh-agent being used to set the required variables
As shown in the preceding screenshot, before being executed, or just while we’re executing the agent, the variables are undefined. However, if we were to execute eval $(ssh-agent), we would accomplish the goal of having the variables defined and ready to use.
The next step is to add keys to the agent. This can be accomplished with the ssh-add command, which can be used without parameters or by specifying the key to be added. If the key requires a password, it will prompt you for it. Once we’re done, we might be able to use that key to log in to the systems with the passphrase that’s being cached until we exit the session that executed the agent, thus clearing the passphrase from memory.
The following screenshot shows the command that was used to generate a new key pair with a password. Here, we can see that the only difference is that we’re storing it in a file named withpass versus what we did earlier in this chapter:
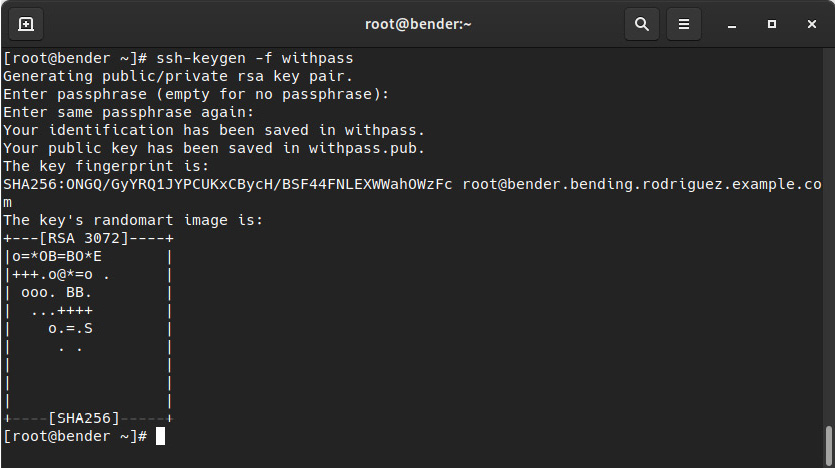
Figure 8.10 – Creating an additional ssh key pair with a password
We can see how to connect to our localhost (using the key that has a password defined). In the screenshot we can see how connection fails and once we use the key interactively or we load it into the agent (after the logout) it allows to connect without asking for the password as it’s cached byt the agent:
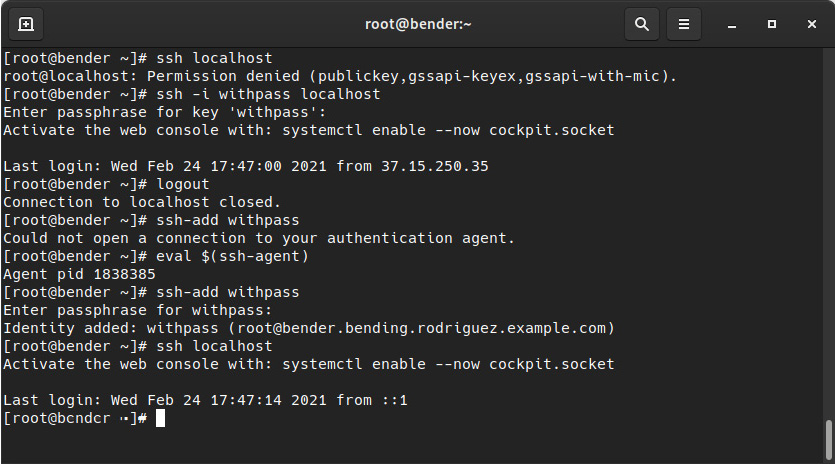
Figure 8.11 – Using ssh-agent to remember our passphrase
To make this clearer, let’s analyze what’s happening, as follows:
- First, we ssh to the host. Permission is denied as the default key we used was removed from authorized_keys.
- We ssh again, but while defining the identity file (the key pair) to connect to, as we can see, we’re asked for the passphrase for the key, not for logging in to the system.
- Then, we log out and the connection is closed.
- Next, we try to add the key, and we get an error because we have not set the environment variables for the agent.
- As instructed when we introduced the agent, we execute the command for loading the environment variables for the agent in the current shell.
- When we retry adding the key with ssh-add withpass, the agent asks for our passphrase.
- When we finally ssh to the host, we can connect without a password as the key is in memory for our key pair.
Here, we have achieved two things: we now have an automated/disattended method to connect to systems and have ensured that only authorized users will know the passphrase to unlock them.
We’ll learn how to do remote file management in the next section!
Remote file management with SCP/rsync
Similar to telnet, which was replaced with ssh on many devices and systems, using insecure solutions for file transfer is being reduced. By default, the File Transfer Protocol (FTP) uses Transmission Control Protocol (TCP) port 21, but since communication happened in plain text, it was a perfect target for intercepting credentials. FTP is still used today, mostly for serving files on servers that only allow anonymous access and wish to move to more secure options.
SSH usually enables two interfaces for copying files: scp and sftp. The first one is used in a similar way to the regular cp command, but here, we’re accepting remote hosts as our target or source, while sftp uses a client approach similar to the traditional ftp command that interacts with FTP servers. Just remember that in both cases, the connection is encrypted and happens over port 22/tcp on the target host.
We’ll dig into scp in the next section.
Transferring files with an OpenSSH secure file copy
The scp command, which is part of the openssh-clients package, allows us to copy files between systems using the ssh layer for the whole process. This allows us to securely transfer a file’s contents, plus all the automation capabilities that were introduced by key-pair login, to various systems.
To set up this example, we will have to relax the PasswordAuthentication setting in /etc/ssh/sshd_config allowing us to use a password to copy the keys that we’ll be creating for the users, as shown in the following screenshot:
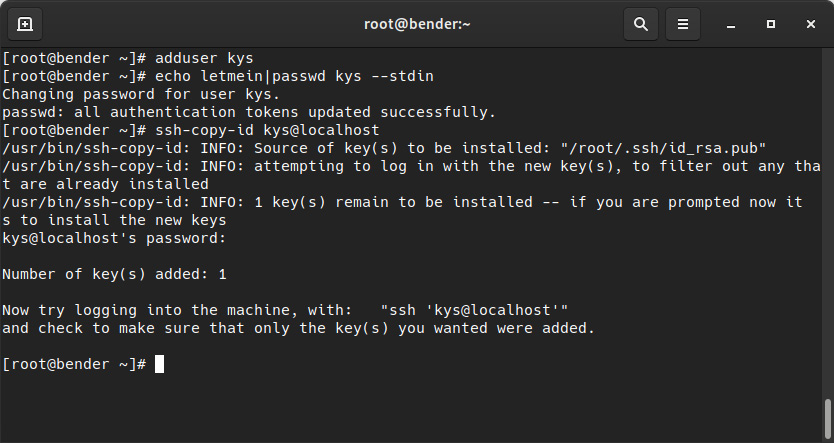
Figure 8.12 – Preparing our system with an additional user to practice file transfers
You can find the preceding commands in a script available at https://github.com/PacktPublishing/Red-Hat-Enterprise-Linux-RHEL-9-Administration/blob/main/chapter-08-remote-systems-administration/create-kys-user.sh.
Once a user has been created and the key has been copied, we can start testing! (Note—remember to always secure created keys.)
Earlier in this chapter, we created a key named withpass with a public counterpart at withpass.pub. To provide the key to the newly created user, we can copy both files to the kys user via the following command:
scp withpass* kys@localhost:
Let’s analyze each part of the command using this template:
scp source target
In our case, source is indicated with withpass.*, which means that it will select all files starting with the withpass string.
Our target value is a remote host. Here, the username is kys, the host is localhost, and the folder you should store the files in is the default one—usually, the home folder of the user indicated (the one with an empty path after the : symbol).
In the following screenshot, we can see the output of the command and the validation we can perform later via remote execution:
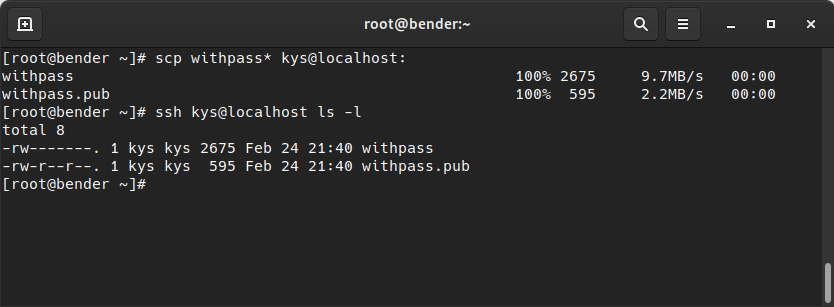
Figure 8.13 – Copying SCP files to a remote path and validating the files that have been copied
In the preceding screenshot, you can also check that the files that were owned by the root user are copied. The copied ones are owned by the kys user, so the file’s contents are the same, but since the creator on the target is the kys user, files have their ownership.
We can also make more complex copies by indicating remote files first and local paths as targets so that we download files to our system, or even copy files across remote locations for both the origin and target (unless we specify the –3 option, they will go directly from origin to target).
Tip
Time for a reminder! man scp will show you all the available options for the scp command, but since it is based on ssh, most of the options we use with ssh are available, as well as the host definitions we made in the .ssh/config file.
We’ll explore the sftp client in the next section.
Transferring files with sftp
Compared to scp, which can be scripted in the same way we can script with the regular cp command, sftp has an interactive client for navigating a remote system. However, it can also automatically retrieve files when a path containing files is specified.
To learn about the different commands that are available, you can invoke the help command, which will list the available options, as shown in the following screenshot:
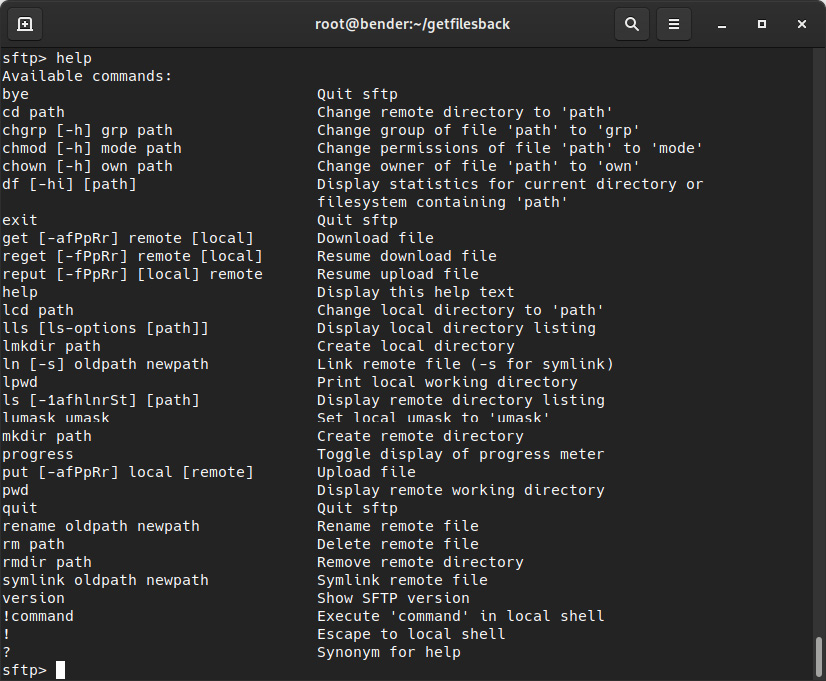
Figure 8.14 – Available sftp interactive mode commands
Let’s look at an example of this with the help of the following screenshot:
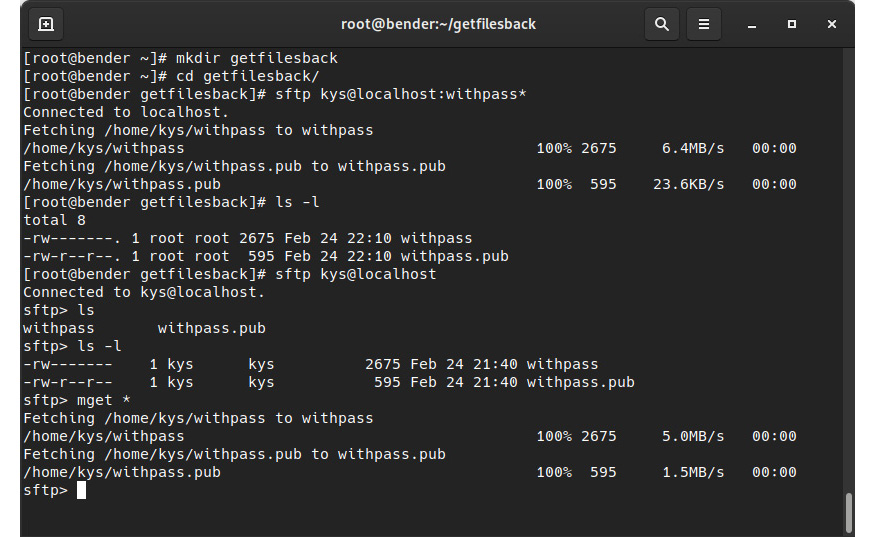
Figure 8.15 – Both modes of operation with sftp: automated transfer or interactive transfer
In this example, we’ve created a local folder to be our work folder, called getfilesback. First, we have invoked sftp with a remote path with the files we’ve identified. Here, sftp has automatically transferred the files and has stopped executing. The files we have received are now the property of our user.
In the second command, when we invoke sftp with the user and host and we enter interactive mode, we can execute several commands, similar to what we can do on a remote shell session. Finally, using the mget command with the * wildcard character, we transferred the files to our local system.
In both cases, the files have been transferred from the remote system to our local system, so our goal has been accomplished. However, using scp requires knowing the exact path of the files you want to transfer. On the other hand, it might be a bit more user-friendly to navigate the system using the ls and cd commands within the sftp interactive client until we reach the files we want to transfer if we can’t remember the path.
Now, let’s learn how to quickly transfers files and trees with rsync.
Transferring files with rsync
Although we can use the –r option of scp to transfer files recursively, scp only handles the full copy of the file, which is not ideal if we are just keeping some folders in sync across systems.
In 1996, rsync was launched, and many systems implemented it by using a dedicated server that was listening to client connections. This was to allow trees to be synchronized with files, which was done by copying over the differences between the files. Here, parts of the source and destination were compared to see whether there were differences that should be copied over.
With ssh, and with the rsync package installed on both the client and the server, we can take advantage of the secure channel that’s created by ssh and the faster synchronization provided by rsync.
The difference between using the rsync daemon and using ssh is the syntax for the source or destination, which either uses the rsync:// protocol or :: after the hostname. In other cases, it will use ssh, or even the local filesystem.
The following screenshot shows us mentioning the schema for Uniform Resource Locators (URLs) via the rsync –help command:

Figure 8.16 – The rsync command’s help output
Now, let’s review some of the useful options we can use with rsync, as follows:
- -v: Provides more verbose output during the transfer
- -r: Recurses into directories
- -u: Update—only copies files that are newer than the ones at the target
- -a: Archive (this includes several options, such as –rlptgoD)
- -X: Preserves extended attributes
- -A: Preserves access control lists (ACLs)
- -S: Sparse—sequences of nulls will be converted into sparse blocks
- --preallocate: Claims the space that’s required for files before transferring them
- --delete-during: Deletes files on the target that are not hosted during the copy
- --delete-before: Deletes files on the target that are not hosted before the copy
- --progress: Shows progress information on the copy (copied files versus total files)
The rsync algorithm breaks the file into chunks and calculates checksums for each chunk that’s transmitted to the source. They are then compared to the ones for local files. We are only allowed to share the differences between the source and the target. rsync doesn’t check the modification file date and size by default, so if the file has changed without changes being left in both, the change might not be detected unless a checksum check is forced for each file candidate to be transferred.
Let’s look at this basic example: rsync –avr getfilesback/ newfolder/ will copy the files in the local getfilesback/ folder to newfolder/ by showing a progress update, but only for updated files, as shown in the following screenshot:
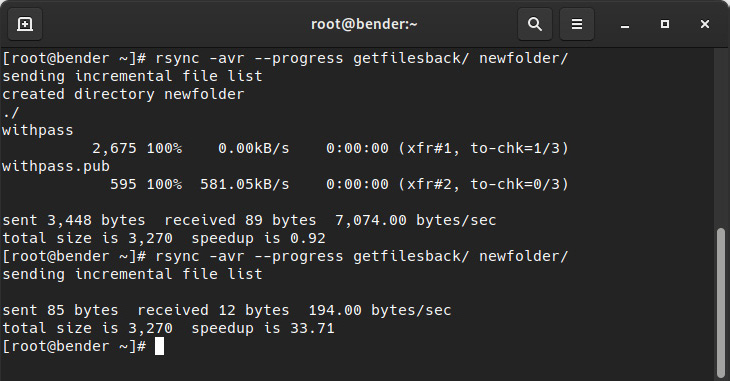
Figure 8.17 – The rsync operation being used on the same source/destination, repeated to illustrate transfer optimization
As we can see, the second operation just sent 85 bytes and received 12 bytes. This is because there was a little checksum operation happening internally to validate across the folders as the files hadn’t been changed. The same output can be obtained if we use the remote target approach with rsync -avr --progress getfilesback/ root@localhost:newfolder/, but in this case, ssh transport will be used.
Let’s get some bigger sample files and compare them by checking out a Git repository at some point in time, transferring the files, then updating to the latest version to simulate work on the repository. Then, we will synchronize again.
First, let’s install git if it’s not installed and check out a sample repository by executing the following code (note that we should make sure that the required repositories must be available—for example, with subscription-manager repos --enable="rhel-9-for-x86_64-baseos-rpms"):
dnf –y install git # install git in our system
git clone https://github.com/citellusorg/citellus.git # clone a repository over https
cd citellus # to enter into the repository folder
git reset HEAD~400 # to get back 400 commits in history
At this point, we have a folder with files ready for transfer. Once we’ve done this, we’ll execute git pull to sync with the latest changes and use rsync again to copy the differences with rsync –avr –progress /root/citellus/ root@localhost:newfolder/. Later, we’ll additionally use the --delete modifier to remove any files that no longer exist on the source.
Let’s check out the sequence shown in the following screenshot:
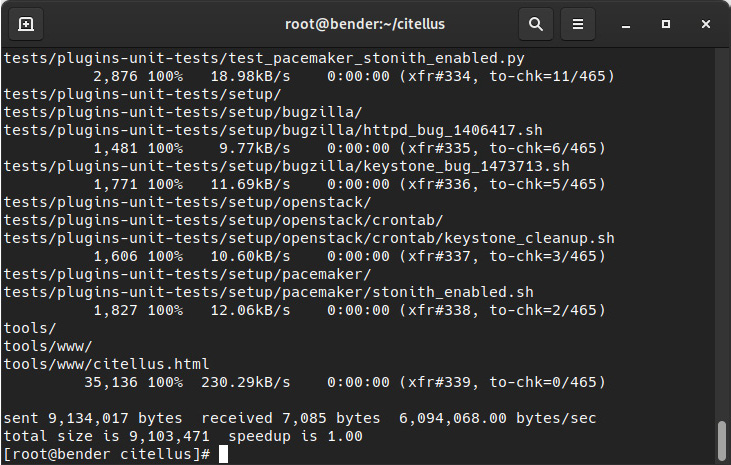
Figure 8.18 – Synchronizing the git folder to a new folder with rsync
In the preceding screenshot, pay attention to the speedup that’s reported in the latest line of the command.
Now, let’s execute git pull to get the 400 changes we were missing and repeat rsync. We will get an output similar to this:
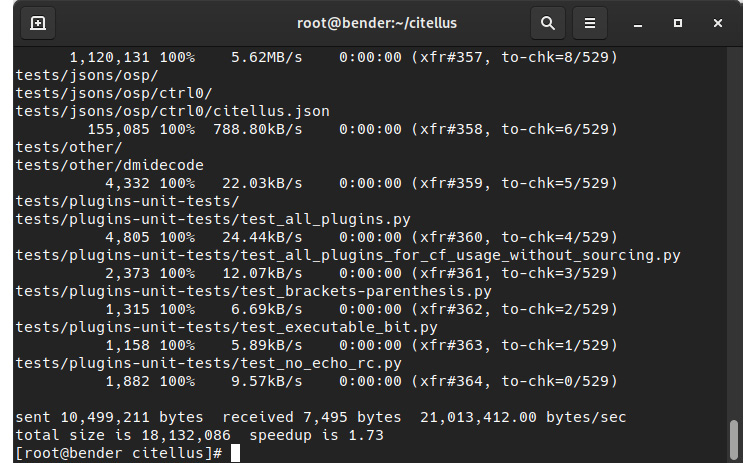
Figure 8.19 – Using rsync again to copy over the differences
In the preceding screenshot, pay attention to the speedup reported in the last line so that you can compare it with the previous one.
From this sequence of screenshots, we can check the last numbers for the total bytes that were sent to see the improvement in transfer, along with some of the files that were received (because we added the –v modifier to get verbose output and --progress).
The biggest advantage comes when a copy is performed over slower network links and it’s performed periodically—for example, as a way to copy to an offsite copy for backup purposes. This is because rsync will only copy the changes, update the newer files that have been modified on the source, and allow us to use compression over the ssh channel. For example, the Linux kernel at https://www.kernel.org/ can be mirrored using rsync.
In the next section, we will dig into a very interesting feature of SSH to make connecting to servers with no direct access easy.
Advanced remote management – SSH tunnels and SSH redirections
SSH has two really powerful features; that is, SSH tunnels and SSH redirections. When an SSH connection is established, it can not only be used to send commands to the remote host and let us work on them as if they were our local system, but we can also create tunnels that interconnect our systems.
Let’s try to imagine a scenario that is common in many companies, where a virtual private network (VPN) is used to reach the internal network with all the services and servers, but with SSH instead of a regular VPN.
So, let’s put some context into this imaginary scenario.
We can use a host that gets external traffic for ssh redirected from our internet router to the ssh service in that system. So, in brief, our router gets connections on port 22 via TCP, and the connection is forwarded to our server. We will be naming this server bastion in this exercise.
With this in place, our common sense tells us that we will be able to reach that bastion host via SSH, even if we can use other tools or even ssh it to connect to other systems later.
Can we connect directly to other hosts in the internal network? The answer is yes, because, by default, SSH allows us to use TCP forwarding (sshd_config setting AllowTcpForwarding), which empowers us, as remote login users, to create port redirections and even a Socket Secure (SOCKS) proxy to be used for our connections.
For example, we can create a tunnel using that bastion host to reach our internal mail server via the Internet Message Access Protocol (IMAP) and Simple Mail Transfer Protocol (SMTP) protocols by just executing the following code:
ssh –L 10993:imap.example.com:993 –L 10025:smtp.example.com:25 user@bastionhost
This command will listen on local ports 10993 and 10025. All the connections that are performed there will be tunneled until bastionhost connects those to imap.example.com at port 993 and smtp.example.com at port 25. This allows our local system to configure our email account using those custom ports and use localhost as the server, and still be able to reach those services.
Tip
Ports under 1024 are considered privileged ports, and usually, only the root user can bind services to those ports. That’s why we use them for our redirection ports 10025 and 10093 so that those can be used by a regular user instead of requiring the root user to perform the ssh connection. Pay attention to ssh messages when you’re trying to bind to local ports in case those are in use, as the connections might fail. Furthermore, you can use additional -v, -vv, and -vvv modifiers to increase verbosity.
Additionally, from the target server’s point of view, the connections will appear as if they originated in the bastion server as this is the one effectively performing the connections.
When the list of open ports starts to grow, it is better to go back to what we explained at the beginning of this chapter: the ~/.ssh/config file can hold the host definition, along with the redirections we want to create, as shown in this example:
Host bastion
    ProxyCommand none
    Compression yes
    User myuser
    HostName mybastion.example.com
    Port 330
    LocalForward 2224 mail.example.com:993
    LocalForward 2025 smtp.example.com:25
    LocalForward 2227 ldap.example.com:389
    DynamicForward 9999
In this example, when we are connecting to our bastion host (via ssh bastion), we are automatically enabling Compression, setting the host to connect to mybastion.example.com at port 330, and defining port forwarding for our imap, smtp, and ldap servers and one dynamic forward (SOCKS proxy) at port 9999. If we have different identities (key pairs), we can also define the one we wish to use via the IdentityFile configuration directive for each host, or even use wildcards such as Host *.example.com to automatically apply those options to hosts ending in that domain that have no specific configuration stanza.
Note
Sometimes, while using ssh, scp, or sftp, the goal is to reach a system that is accessible from a bastion host. Other port forwarding is not needed here—only reaching those systems is required. In this case, you can use the handy –J command-line option (equivalent to defining a ProxyJump directive) to use that host as a jump host to the final target you want to reach. For example, ssh –J bastion mywebsiteserver.example.com will transparently connect to bastion and jump from there to mywebsiteserver.example.com.
In the next section, we will learn how to protect ourselves from network issues with our remote connections and get the most out of our remote terminal connection.
Remote terminals with tmux
tmux is a terminal multiplexer, which means that it allows us to open and access several terminals within a single screen. A good analogy is a window manager in a graphical desktop that allows us to open several windows so that we can switch contexts while using only one monitor.
tmux also allows us to detach and reattach to the sessions, so it’s the perfect tool in case our connection drops. Think, for example, about performing a software upgrade on a server. If for whatever reason, the connection drops, it will be equivalent to abruptly stopping the upgrade process in whichever status it was in at that moment, which can lead to bad consequences. However, if the upgrade was launched inside tmux, the command will continue executing, and once the connection is restored, the session can be reattached and the output will be available to be examined.
First of all, let’s install it on our system via dnf –y install tmux. This line will download the package and make the tmux command available. Bear in mind that the goal of tmux is not to install it on our system (even if this is useful) but for it to be available on the servers we connect to, to get that extra layer of protection in case a disconnection happens. So, it’s a good habit to get used to installing it on all the servers we connect to.
In the following screenshot, we can see what tmux looks like with the default configuration after executing tmux on a command line:

Figure 8.20 – tmux default layout after execution
As shown in the preceding screenshot, it hasn’t changed a lot of the view of our terminal except for the status bar in the lower part of the window. This shows some information about the host, such as its name, time, date, and a list of open windows, with 0:bash being the active one, as denoted by the asterisk (*) symbol.
There are lots of combinations for using tmux, so let’s get familiar with some of them that will cover the initial use case, as follows:
- Run tmux to create a new session
- Run tmux at to attach to a previous session (for example, after reconnecting to a host)
- Run tmux at –d to attach to a previous session and detach other connections from it
Once we’re inside tmux, there is a whole world of commands we can use that are preceded by the Ctrl + B keys. Let’s view some important ones here (remember that Ctrl + B must be pressed before you use the next item in the list):
- ?: Displays inline help about the shortcuts to use
- c: Creates a new window
- n/p: Go to the next/previous window
- d: Detaches the tmux session
- 0-9: Go to the window numbered with the pressed number
- ,: Renames windows
- “: Splits the pane top/bottom
- %: Splits the pane right/left
- space: Switches to the next layout
- &: Kills the window
- pg down/pg up: Go higher or lower in the window history
- Arrow keys: Select the pane in the direction of the pressed key
Let’s look at an example in action in the following screenshot:
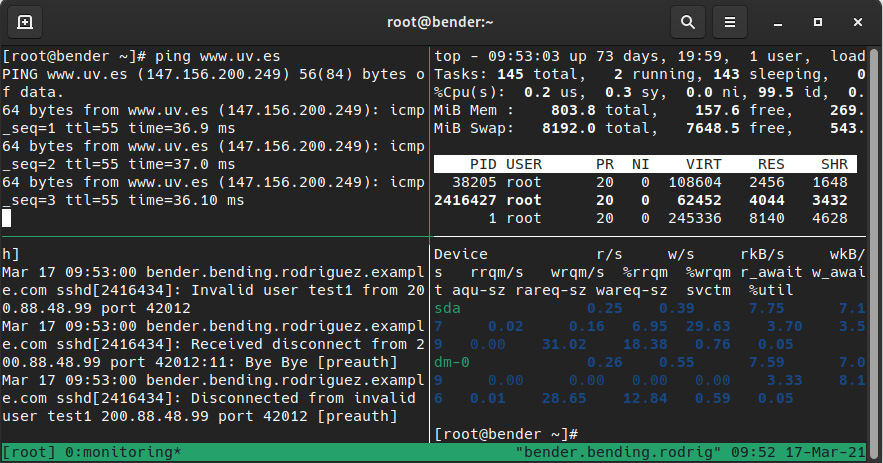
Figure 8.21 – tmux with four panes running different commands inside the same window
As we can see, there are several commands running at the same time—top, journalctl –f, iostat –x, and ping—so this is a good way to monitor a system while operations are being performed on it.
Additionally, one of the advantages is that tmux can be scripted, so if we are using one layout while administering systems, we can copy that script and execute it as soon as we connect to them so that we can enjoy the same layout and even the commands being executed.
You can find the following code with extra comments and descriptions at https://github.com/PacktPublishing/Red-Hat-Enterprise-Linux-RHEL-9-Administration/blob/main/chapter-08-remote-systems-administration/term.sh if you want to try it on your system:
#!/bin/bash
SESSION=$USER
tmux -2 new-session -d -s $SESSION # create new session
tmux select-window -t $SESSION:0  # select first window
tmux rename-window -t $SESSION "monitoring" #rename to monitoring
tmux split-window –h #split horizontally
tmux split-window –v #split vertically
tmux split-window –h # split again horizontally
tmux select-layout tiled #tile panes
tmux selectp –t1 # select pane 1
tmux send-keys "top" C-m #run top by sending the letters + RETURN
tmux selectp –t2 # select pane 2
tmux send-keys "journalctl -f" C-m # run journalctl
tmux selectp –t3 # select pane 3
tmux send-keys "iostat -x" C-m # run iostat
tmux selectp –t0 #select the pane without commands executed
Once the session with tmux has been set, we can attach the session we’ve just created and configured by executing tmux, which will show a layout similar to the one shown in the preceding screenshot.
Introduction to Ansible automation
As defined on its website at https://www.ansible.com: Ansible is a foundation for building and operating automation across an organization.
In this section, we will see at a very introductory level how Ansible can be used to automate some tasks across different hosts.
Ansible uses YAML Ain’t Markup Language (YAML) files to define a set of tasks named playbooks that act over a set of hosts in an inventory. For each host, the tasks define the status desired and Ansible connects by default over SSH, executes the required actions, and then removes the files that were uploaded for the execution. It requires no daemon or agent to execute, and as the playbooks are text-based, they are the perfect candidate for a version control system (VCS) taking care of the changes, and so on.
For installing Ansible, we’ll execute dnf install ansible-core rhel-system-roles, which will trigger the installation of the core and several dependencies required for it.
Inventory
The inventory is one of the fundamental pieces of Ansible. It defines a set of hosts that will be acted on, that can be grouped, and so on, and it could either be a text file or be dynamically generated out of some program execution, also allowing us to build dynamic sets based on the tasks, locations, and so on.
An example inventory could look like this:
[shellservers]
localhost
In this example, a group named shellservers that contains a host reachable by localhost is defined.
Playbook
A playbook uses a set of modules that perform different tasks. Some of them might have some other requirements—for example, a module to interact with firewalld will require the firewalld package and some libraries to be available—and others are part of the base set of included tools in any system.
Let’s see an example here:
---
- hosts: all
  user: root
  tasks:
   - name: Print host name
     debug:
       msg: "{{ ansible_hostname }}"
Note
This file is available at the GitHub repository at https://github.com/PacktPublishing/Red-Hat-Enterprise-Linux-RHEL-9-Administration/blob/main/chapter-08-remote-systems-administration/hostname.yaml.
Now, let’s execute it against our host using the ansible-playbook command with ansible-playbook -i localhost, hostname.yaml, as illustrated in the following screenshot:
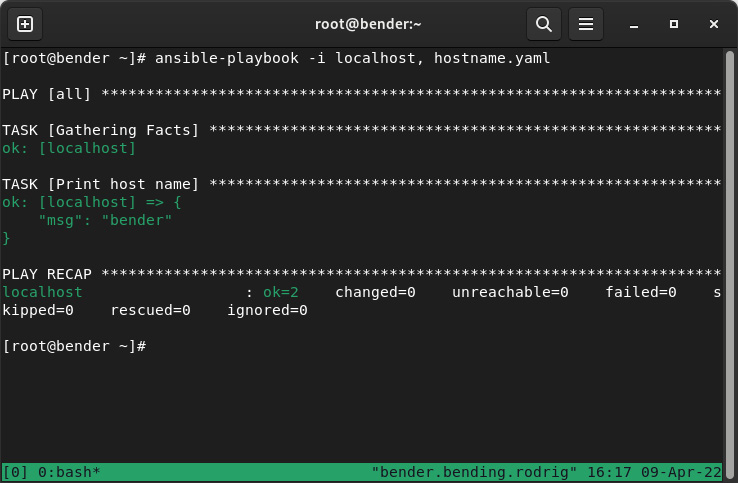
Figure 8.22 – Ansible playbook execution
In the preceding screenshot, we can see that first, we provided the inventory on the command line. Also, note that there’s a comma after the hostname—this is on purpose as we’re using an inventory not based on a file.
When Ansible execution started, several sections show the output, and one of the first is Gathering Facts. This is really important when Ansible connects to hosts and grabs variables from the remote system to perform its action (such as running some tasks based on the operating system of the host, amount of random-access memory (RAM), and so on). Later, we can see the actual task execution, where we get the msg line containing the hostname.
If we repeat in the same host by adding as inventory -i localhost,127.0.0.1—that is, two different ways to refer to the same host (as a trick for not requiring an additional one)—we get this output:

Figure 8.23 – Ansible playbook execution with two hosts
The important piece here is that Ansible considers the hosts to be different and has executed the tasks twice, one for each host. We can see a summary, with the different hosts, tasks completed, changes performed, hosts unreachable, and so on.
You can find more documentation at the developer’s site at https://www.ansible.com/overview/how-ansible-works and find some online interactive courses at https://developers.redhat.com/products/ansible/getting-started that will allow you to practice.
Let’s work on creating a sample playbook that does several tasks, and let’s keep explaining alongside (also available in the GitHub repository). Have a look at the following code snippet:
---
- hosts: all
  user: root
  vars:
    firewall:
      - service: https
        permanent: true
        state: enabled
        immediate: yes
      - service: http
        permanent: true
        state: enabled
        immediate: yes
  tasks:
  - name: Install httpd package
    package:
      name: httpd
      state: installed
  - name: Start http service
    service:
      name: httpd
      state: started
      enabled: yes
  - name: Open Firewall ports
      include_role:
        name: rhel-system-roles.firewall
The tasks defined will install the httpd package, later enable the service, and open the firewall ports for HTTP and HTTPS services. We can later use ansible-playbook –i myhost, httpd.yaml to get it applied to it.
Ansible is taking care of the error control. If we reapply a playbook over a server that has the changes defined, it will just verify it is in the desired state, so it is very useful to also verify the state or to even repurpose servers if we take care of disabling unused services, once we no longer require a specific usage for them.
The use of conditionals could help, together with data collection tasks to later switch the logic of the playbook based on some system specifics that help in better adapting the tasks and making more complex logic.
The scope of covering those use cases is beyond the scope of this chapter, but with the indicated URLs you can get familiar and start using them to learn a lot more! Also, always check the Ansible documentation at https://docs.ansible.com/ansible/latest/collections/ansible/index.html for syntax and examples of how to use the different modules for defining tasks.
Summary
In this chapter, we covered SSH and how to use it to connect to remote systems, how to use keys to authenticate with or without a password, and how to take advantage of it for automation, transferring files, and even making services accessible or reachable via port redirection. With tmux, we learned how to make our administration sessions survive network interruptions and, at the same time, show important information at a glance by automating the layouts for it, and with Ansible, we learned how to start automating at scale changes in our systems.
In the next chapter, we’ll be digging into securing our system network via firewalld to only expose the services that are required for operation.