
9
Securing Network Connectivity with firewalld
A great mentor and technologist working with military-restricted environments once told me that “The only secure system is the one that is switched off, disconnected from any network, and buried in the middle of the desert.” He is right, of course, but we must provide a service to make the system useful. This means having it running and connected to a network.
One of the techniques that are used in security to reduce incidents, such as avoiding unexpected exposure to a vulnerability and enabling unauthorized remote access, is reducing the attack surface and applying defense in depth principles. When you do that in a network, step one is filtering connections using a firewall. The firewall management tool that’s included in Red Hat Enterprise Linux (RHEL) is firewalld and it helps us manage zones, profiles, services, and ports. It also includes a command-line tool called firewall-cmd and a systemd service unit to simplify its management.
In this chapter, we will cover the following topics to get a good understanding of how to manage the default firewall in RHEL:
- Introduction to the RHEL firewall – firewalld
- Enabling firewalld on the system and reviewing the default zones
- Reviewing the different configuration items under firewalld
- Enabling and managing services and ports
- Creating and using service definitions for firewalld
- Configuring firewalld with the web interface
Introduction to the RHEL firewall – firewalld
RHEL comes with two low-level network traffic filtering mechanisms: nftables, for filtering IP-related traffic, and ebtables, for transparent filtering in bridges. These mechanisms are static and use a set of rules to accept or reject traffic, though they do provide a myriad of other capabilities. In RHEL, they are both handled and managed dynamically by firewalld. Unless there is a specific need to have a very low-level usage of these low-level filtering mechanisms, please use firewalld (or its main command, firewall-cmd) instead. In this section, we will take a look at the firewall defaults in RHEL.
firewalld is installed by default in the system, which we can check by using the rpm command, so there is no need to install it:
[root@rhel-instance ~]# rpm -qa | grep firewalld
firewalld-filesystem-1.0.0-3.el9_b.noarch
firewalld-1.0.0-3.el9_b.noarch
If we have an installation that doesn’t include firewalld for some reason, we can install it by running dnf install firewalld.
firewalld includes a service called firewalld, which is configured to run by default at startup. We can check this by using the systemctl status firewalld command:
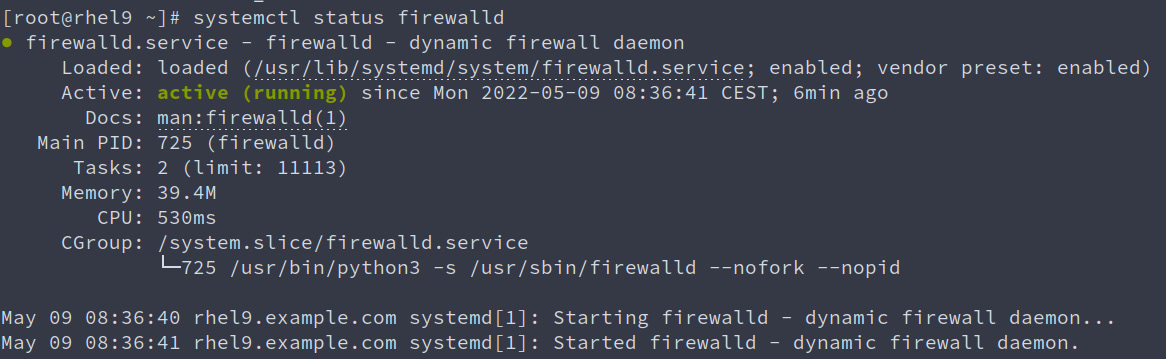
Figure 9.1 – Output of “systemctl status firewalld”
As we can see, the firewalld service is enabled and running. This is the default status in an RHEL system.
The main way for a sysadmin to configure firewalld is by using the firewall-cmd command. However, you can also do the following:
- Add new files with service definitions in /etc/firewalld/ (as explained in the Creating and using service definitions for firewalld section of this chapter).
- Use the web interface, called cockpit, to configure firewalls (as explained in the Configuring firewalld with the web interface section of this chapter).
- Use the firewall-config graphical interface in your desktop environment.
In this chapter, we will review the main mechanism and the web interface.
Now that we know the defaults of the RHEL main firewall, let’s learn how to enable it.
Enabling firewalld in the system and reviewing the default zones
We have already seen that firewalld is enabled by default in the system. However, we may need to disable (that is, check whether the firewall is interfering with a service), re-enable (that is, after restoring configuration files), and start and stop it (that is, to reload configuration or to do a quick check). These tasks are managed like any other service in the system, that is, using systemctl. Let’s stop the firewalld service:
[root@rhel-instance ~]# systemctl stop firewalld
[root@rhel-instance ~]# systemctl status firewalld
○ firewalld.service - firewalld - dynamic firewall daemon
     Loaded: loaded (/usr/lib/systemd/system/firewalld.service; enabled; vendor preset: enabled)
     Active: inactive (dead) since Mon 2022-05-09 08:45:54 CEST; 5s ago
       Docs: man:firewalld(1)
    Process: 725 ExecStart=/usr/sbin/firewalld --nofork --nopid $FIREWALLD_ARGS (code=exited, status=0/SUCCESS)
   Main PID: 725 (code=exited, status=0/SUCCESS)
        CPU: 589ms
May 09 08:36:40 rhel9.example.com systemd[1]: Starting firewalld - dynamic firewall daemon...
May 09 08:36:41 rhel9.example.com systemd[1]: Started firewalld - dynamic firewall daemon.
May 09 08:45:54 rhel9.example.com systemd[1]: Stopping firewalld - dynamic firewall daemon...
May 09 08:45:54 rhel9.example.com systemd[1]: firewalld.service: Deactivated successfully.
May 09 08:45:54 rhel9.example.com systemd[1]: Stopped firewalld - dynamic firewall daemon.
In the previous output, as shown in bold, the service is inactive. We can check this by using the firewall-cmd --state command:
[root@rhel-instance ~]# firewall-cmd --state
not running
At the moment, the firewall service has stopped and all the rules have been dropped. The configuration for the service, however, has not changed, so if we reboot the system, firewalld will be running again.
Tip
We can always see the underlying netfilter rules by running the nft list tables command. You may want to run it before and after stopping the service to see the difference.
Now, let’s try and start the service again:
[root@rhel-instance ~]# systemctl start firewalld
[root@rhel-instance ~]# systemctl status firewalld
○ firewalld.service - firewalld - dynamic firewall daemon
Loaded: loaded (/usr/lib/systemd/system/firewalld.service; enabled; vendor preset: enabled)
Active: active (running) since Mon 2022-05-09 08:47:34 CEST; 3s ago
Docs: man:firewalld(1)
Main PID: 4377 (firewalld)
Tasks: 2 (limit: 11113)
Memory: 21.5M
CPU: 291ms
CGroup: /system.slice/firewalld.service
└─4377 /usr/bin/python3 -s /usr/sbin/firewalld --nofork --nopid
Let’s check that firewalld is running:
[root@rhel-instance ~]# firewall-cmd --state
running
To fully disable the service, we will need to run the following command:
[root@rhel-instance ~]# systemctl disable firewalld
Removed /etc/systemd/system/multi-user.target.wants/firewalld.service.
Removed /etc/systemd/system/dbus-org.fedoraproject.FirewallD1.service.
Let’s see how the service is disabled but still running:
[root@rhel-instance ~]# systemctl status firewalld -n0
○ firewalld.service - firewalld - dynamic firewall daemon
Loaded: loaded (/usr/lib/systemd/system/firewalld.service; disabled; vendor preset: enabled)
Active: active (running) since Mon 2022-05-09 08:47:34 CEST; 1min 29s ago
Docs: man:firewalld(1)
Main PID: 4377 (firewalld)
Tasks: 2 (limit: 11113)
Memory: 24.5M
CPU: 395ms
CGroup: /system.slice/firewalld.service
└─4377 /usr/bin/python3 -s /usr/sbin/firewalld --nofork --nopid
When you’re managing services with systemd using systemctl, you need to understand that enabling and disabling the service only affects how it behaves during the startup sequence, while starting and stopping only affects the current status of the service.
Tip
To disable and stop in one command, we can use the --now option, for example, systemctl disable firewalld --now. This option can also be used to enable and start, for example, systemctl enable firewalld --now.
Let’s reenable the service again and ensure it’s running:
[root@rhel-instance ~]# systemctl enable firewalld --now
Created symlink /etc/systemd/system/dbus-org.fedoraproject.FirewallD1.service → /usr/lib/systemd/system/firewalld.service.
Created symlink /etc/systemd/system/multi-user.target.wants/firewalld.service → /usr/lib/systemd/system/firewalld.service.
[root@rhel-instance ~]# firewall-cmd --state
Now that we know how to start and stop, as well as enable and disable, the firewalld service, let’s understand the configuration structure and learn how to interact with it by reviewing the default configuration.
Reviewing the different configuration items under firewalld
firewalld manages three concepts in its configuration:
- Zones: A firewalld zone is a group of rules that can be activated altogether and assigned to a network interface. It includes different services and rules but also settings that alter the behavior of network traffic filtering.
- Services: A firewalld service is a port or group of ports that must be configured together for a specific system service (hence the name) to work properly.
- Ports: A firewalld port includes a port number (that is, 80) and a type of traffic (that is, TCP) and can be used to manually enable network traffic to a custom system service.
firewalld manages two types of configurations:
- Running: The rules that have currently been applied to the system
- Permanent: The rules that have been saved and will be loaded when the service starts
Important Note
The concept behind running versus permanent is to try network filtering rules in a running system and, once ensured that they work well, save them as permanent ones. Remember to check that the rules you want in the system have been saved properly.
Now, let’s check out our system and see which zones are available:
[root@rhel-instance ~]# firewall-cmd --get-zones
block dmz drop external home internal nm-shared public trusted work
Let’s also check which zone is applied by default:
[root@rhel-instance ~]# firewall-cmd --get-default-zone
public
Let’s review the zones that are available in firewalld by looking at the following table:
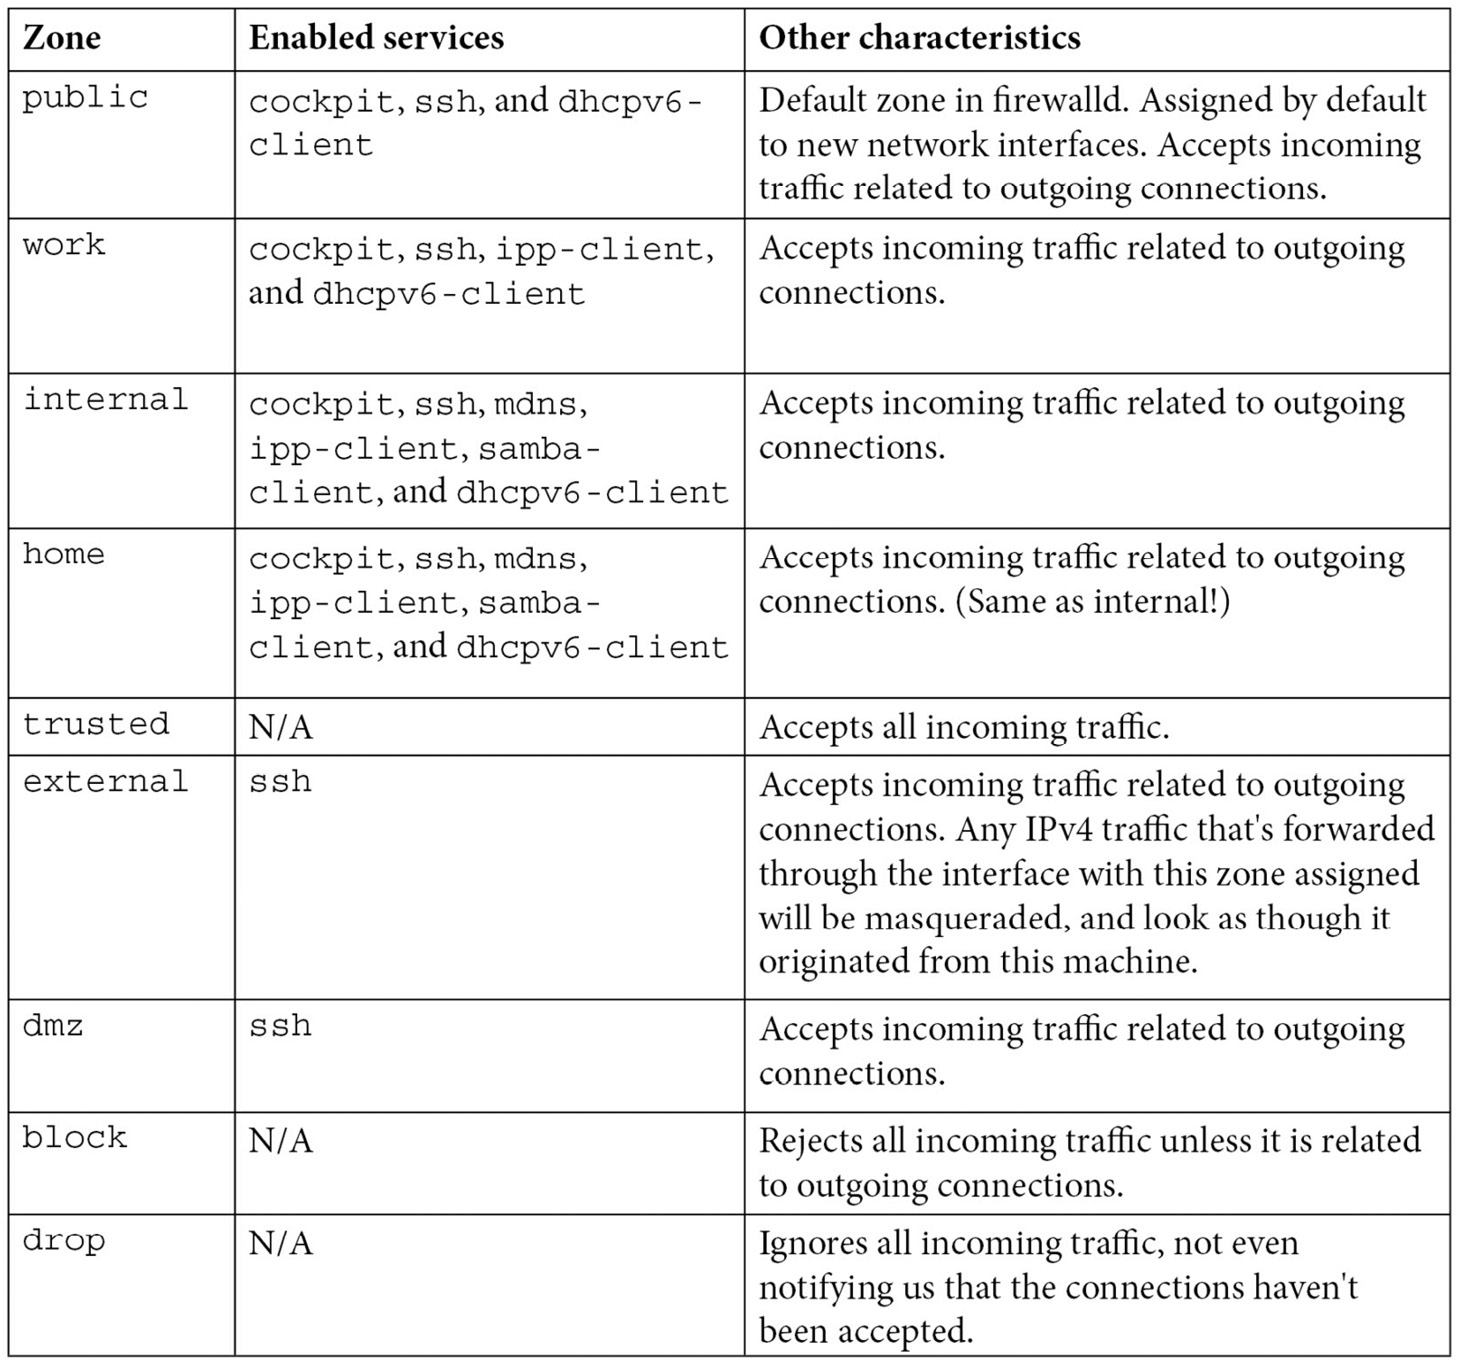
Table 9.1 – Services and characteristics of each zone
Important Note
You can always access the information about these zones, and more, by accessing the firewalld.zones manual pages available in the system by running man firewalld.zones. A good exercise is to review the aforementioned manual page.
The aforementioned services will be reviewed in more detail in the next section. For now, let’s learn how to manage zones.
Let’s change the default zone to home:
[root@rhel-instance ~]# firewall-cmd --set-default-zone=home
success
[root@rhel-instance ~]# firewall-cmd --get-default-zone
home
We can establish a public zone as the default and assign a home zone to our local network:
[root@rhel-instance ~]# firewall-cmd --set-default-zone=public
success
[root@rhel-instance ~]# firewall-cmd --permanent --zone=internal
--add-source=192.168.122.0/24
success
[root@rhel-instance ~]# firewall-cmd --reload
success
[root@rhel-instance ~]# firewall-cmd --get-active-zones
internal
sources: 192.168.122.0/24
public
interfaces: enp1s0
This configuration allows us to publish services to the local network only, which is defined as 192.168.122.0/24 and assigned to the internal zone. Any service or port that’s assigned to the internal zone from now on will be only accessible if it’s accessed from an IP address in the internal network. We avoid allowing access to these services from other networks.
Also, to enable services to be accessed from any other network, we only need to assign them to the public zone.
Let’s review the main options that are used and a couple more that could be useful:
- --get-zones: Lists the zones that have been configured in the system.
- --get-default-zone: Shows the zone that’s configured by default.
- --set-default-zone=<zone>: Sets the default zone. This is applied to the running and permanent configuration.
- --get-active-zones: Shows the zones being used and what networks/interfaces they apply to.
- --zone=<zone>: Used to specify a zone for another option.
- --permanent: Used to apply the changes to the saved configuration. When you use this option, the changes will not be applied to the running configuration.
- --reload: Loads the saved configuration as running.
- --add-source=<network>: Adds a source network, in CIDR format, to a specified zone. The default zone is used if one hasn’t been specified. Changes are applied to the running config; use --permanent to save them.
- --remove-source=<network>: Removes a source network, in CIDR format, to a specified zone. The default zone is used if one hasn’t been specified. Changes are applied to the running config; use --permanent to save them.
- --add-interface=<interface>: Routes traffic from an interface to a zone. The default zone is used if one hasn’t been specified.
- --change-interface=<interface>: Changes the traffic that’s being routed to an interface to a zone. The default zone is used if one hasn’t been specified.
Although this list of options may be very helpful, the full list of options is available on the manual page for firewall-cmd. You should review this page as you will be using it often when you’re reconfiguring your firewall options.
Tip
To view the firewall-cmd manual page, simply run man firewall-cmd.
Now that we are aware of what zones are and how they are selected, let’s learn how to manage services and ports.
Enabling and managing services and ports
As we mentioned in the previous section, a firewalld service is a port or group of ports that are configured together for a specific system service (hence the name) to work properly. There are a set of services that are enabled by default in one or many of the available firewalld zones. Let’s start by reviewing them:
- ssh: Provides access to the Secure Shell (SSH) service in the system, which also enables remote management. The traffic that’s accepted goes to port 22 and is of the TCP type.
- mdns: Provides access to the Multicast DNS (MDNS) service that’s used to announce services in the local network. Traffic is accepted to multicast address 224.0.0.251 (IPv4) or ff02::fb (IPv6), on port 5353, and is of the UDP type.
- ipp-client: Provides access to the Internet Printing Protocol (IPP) client, which goes to port 631 and uses the UDP protocol.
- samba-client: This is a file and print sharing client that’s compatible with Microsoft Windows. It uses ports 137 and 138 and is of the UDP type.
- dhcpv6-client: A Dynamic Host Configuration Protocol (DHCP) for IPv6. Its destination is the special network fe80::/64, its port is 546, and it’s of the UDP type.
- cockpit: The web management interface for RHEL. Its destination is port 9090 and it’s of the TCP type.
As you can see, a firewalld service can specify more than one port, a target address, and even a target network.
Now, let’s take a look at the services that have been configured in our firewall:
[root@rhel-instance ~]# firewall-cmd --list-services
cockpit dhcpv6-client ssh
[root@rhel-instance ~]# firewall-cmd --list-services --zone=internal
cockpit dhcpv6-client mdns samba-client ssh
Please note that when you’re not establishing a zone, the services that are displayed are those related to the default zone – in this case, public. However, consider that we have configured more than one zone.
Now, let’s install a web server – in this case, the Apache httpd server:
[root@rhel-instance ~]# dnf install httpd -y
Updating Subscription Management repositories.
Last metadata expiration check: 0:00:10 ago on Mon May 9 09:05:10 2022.
Dependencies resolved.
===========================================================
Package Architecture Version Repository Size
===========================================================
Installing:
httpd x86_64 2.4.51-7.el9_0 rhel-9-for-x86_64-appstream-rpms 1.5 M
Installing dependencies:
apr x86_64 1.7.0-11.el9 rhel-9-for-x86_64-appstream-rpms 127 k
apr-util x86_64 1.6.1-20.el9 rhel-9-for-x86_64-appstream-rpms 98 k
Complete!
Let’s enable and start the httpd service:
[root@rhel-instance ~]# systemctl enable httpd --now
Created symlink /etc/systemd/system/multi-user.target.wants/httpd.service → /usr/lib/systemd/system/httpd.service.
[root@rhel-instance ~]# systemctl status httpd -n0
○ httpd.service - The Apache HTTP Server
Loaded: loaded (/usr/lib/systemd/system/httpd.service; enabled; vendor preset: disabled)
Active: active (running) since Mon 2022-05-09 09:08:51 CEST; 11s ago
Docs: man:httpd.service(8)
Main PID: 32019(httpd)
Status: "Total requests: 0; Idle/Busy workers 100/0;Requests/sec: 0; Bytes served/sec: 0 B/sec"
Tasks: 213 (limit: 8177)
Memory: 25.0M
CPU: 107
CGroup: /system.slice/httpd.service
├─32019 /usr/sbin/httpd -DFOREGROUND
├─32020 /usr/sbin/httpd -DFOREGROUND
├─32021 /usr/sbin/httpd -DFOREGROUND
├─32022 /usr/sbin/httpd -DFOREGROUND
└─32023 /usr/sbin/httpd -DFOREGROUND
Now, let’s check that the service is listening on all the interfaces:
[root@rhel-instance ~]# ss -a -A "tcp" | grep http
Optionally, we can check whether the port is open by using an external machine (if we have one):
[root@external:~]# nmap 192.168.122.196 -Pn
Starting Nmap 7.80 ( https://nmap.org ) at 2022-05-09 19:12 CEST
Nmap scan report for 192.168.122.196
Host is up (0.55s latency).
Not shown: 998 filtered ports
PORT STATE SERVICE
22/tcp open ssh
9090/tcp closed zeus-admin
Nmap done: 1 IP address (1 host up) scanned in 70.44 seconds
Now, we can enable the http service on the firewall:
[root@rhel-instance ~]# firewall-cmd --add-service http
--zone=public --permanent
success
[root@rhel-instance ~]# firewall-cmd --add-service http
--zone=internal --permanent
success
[root@rhel-instance ~]# firewall-cmd --reload
success
[root@rhel-instance ~]# firewall-cmd --list-services
cockpit dhcpv6-client http ssh
[root@rhel-instance ~]# firewall-cmd --list-services --zone=internal
cockpit dhcpv6-client http mdns samba-client ssh
With that, the service has been enabled and the port is open. We can verify this from an external machine, like so (this is optional):
[root@external:~]# nmap 192.168.122.8
Starting Nmap 7.80 ( https://nmap.org ) at 2022-05-09 19:13 CEST
Nmap scan report for rhel.redhat.lan (192.168.122.8)
Host is up (0.00032s latency).
Not shown: 997 filtered ports
PORT     STATE  SERVICE
22/tcp   open   ssh
80/tcp   open   http
9090/tcp closed zeus-admin
Nmap done: 1 IP address (1 host up) scanned in 12.64 seconds
We can see that port 80 is open now. We can also retrieve the main page from the web server and show the first line:
[root@external:~]# curl -s http://192.168.122.8 | head -n 1
<!DOCTYPE html PUBLIC "-//W3C//DTD XHTML 1.1//EN" "http://www.w3.org/TR/xhtml11/DTD/xhtml11.dtd">
Important Note
The definitions of the services in firewalld are kept in independent files in the /usr/lib/firewalld/services directory. If you need to check out the details of a service, you can go there and inspect the file and its definition.
Now, let’s try to remove the service from the public network since this will be an internal service:
[root@rhel-instance ~]# firewall-cmd --list-services --zone=public
cockpit dhcpv6-client http ssh
[root@rhel-instance ~]# firewall-cmd --remove-service http
--zone=public --permanent
success
[root@rhel-instance ~]# firewall-cmd --reload
success
[root@rhel-instance ~]# firewall-cmd --list-services --zone=public
Let’s assume we didn’t have the service definition and we still wanted to open port 80 on TCP in the public interface:
[root@rhel-instance ~]# firewall-cmd --list-ports --zone=public
[root@rhel-instance ~]# firewall-cmd --add-port 80/tcp --zone=public --permanent
success
[root@rhel-instance ~]# firewall-cmd --reload
success
[root@rhel-instance ~]# firewall-cmd --list-ports --zone=public
80/tcp
We can review the ports and services in one go, like so:
[root@rhel-instance ~]# firewall-cmd --list-all --zone=public
public (active)
target: default
icmp-block-inversion: no
interfaces: enp1s0
sources:
services: cockpit dhcpv6-client ssh
ports: 80/tcp
protocols:
masquerade: no
forward-ports:
source-ports:
icmp-blocks:
rich rules:
Now, we can remove the port:
[root@rhel-instance ~]# firewall-cmd --list-ports --zone=public
80/tcp
[root@rhel-instance ~]# firewall-cmd --remove-port 80/tcp --zone=public --permanent
success
[root@rhel-instance ~]# firewall-cmd --reload
success
[root@rhel-instance ~]# firewall-cmd --list-ports --zone=public
[root@rhel-instance ~]#
With this, we know how to add and remove services and ports to/from a firewall and check their statuses. Let’s review the options that we can use for firewall-cmd to do so:
- --zone=<zone>: Used to specify a zone. When no zone is specified, the default one is used.
- --list-services: Displays a list of services for the specified zone.
- --add-service: Adds a service to the specified zone.
- --remove-service: Removes a service from the specified zone.
- --list-ports: Lists the open ports in the specified zone.
- --add-port: Adds a port to the specified zone.
- --remove-port: Removes a port from the specified zone.
- --list-all: Lists the ports, services, and all configuration items associated with the specified zone.
- --permanent: Rules will be applied to the saved configuration instead of the running one.
- --reload: Reloads the rules from the saved configuration.
Now that we know how to assign services and ports to different zones in the firewall, let’s take a look at how they are defined.
Creating and using service definitions for firewalld
Service definitions for firewalld are stored in the /usr/lib/firewalld/services directory. Let’s take a look at a simple service, such as the ssh service stored in the ssh.xml file, which has the following content:
<?xml version="1.0" encoding="utf-8"?>
<service>
  <short>SSH</short>
  <description>Secure Shell (SSH) is a protocol for logging into and executing commands on remote machines. It provides secure encrypted communications. If you plan on accessing your machine remotely via SSH over a firewalled interface, enable this option. You need the openssh-server package installed for this option to be useful.</description>
  <port protocol="tcp" port="22"/>
</service>
Here, we can see that we only need an XML file with three sections to describe a basic service:
- short: The short name for the service
- description: A long description of what the service does
- port: The port to be opened for this service
Let’s say we want to install an Oracle database on our server. We must have port 1521 open, and it must be of the TCP type. Let’s create the /etc/firewalld/services/oracledb.xml file with the following content:
<?xml version="1.0" encoding="utf-8"?>
<service>
  <short>OracleDB</short>
  <description>Oracle Database firewalld service. It allows connections to the Oracle Database service. You will need to deploy Oracle Database in this machine and enable it for this option to be useful.</description>
  <port protocol="tcp" port="1521"/>
</service>
We can enable it by using the following code:
[root@rhel-instance ~]# firewall-cmd --reload
success
[root@rhel-instance ~]# firewall-cmd --add-service oracledb
success
[root@rhel-instance ~]# firewall-cmd --list-services
cockpit dhcpv6-client oracledb ssh
Now, it’s ready to be used in the running configuration. We can add it to the permanent configuration like so:
[root@rhel-instance ~]# firewall-cmd --add-service oracledb --permanent
success
Tip
It would be unsual to have to open more complex services. In any case, the manual page that describes how to create firewalld services is firewalld.service and can be opened by running man firewalld.service.
With this, we have an easy way to standardize the services to be opened in the firewalls of our systems. We can include these files in our configuration repositories so that they can be shared with the whole team.
Now that we can create a service, let’s take a look at an easier way to configure the firewall in RHEL, that is, using the web interface.
Configuring firewalld with the web interface
To use the RHEL web administrative interface of RHEL 9, we must install it. The package and service running it are both called cockpit. We can install it by running the following code:
[root@rhel-instance ~]# dnf install cockpit -y
Updating Subscription Management repositories.
[omitted]
Installing:
cockpit x86_64 264.1-1.el9 rhel-9-for-x86_64-baseos-rpms 46 k
[omitted]
cockpit-264.1-1.el9.x86_64
Complete!
Now, let’s enable it:
[root@rhel-instance ~]# systemctl enable --now cockpit.socket
Created symlink /etc/systemd/system/sockets.target.wants/cockpit.socket → /usr/lib/systemd/system/cockpit.socket.
Tip
cockpit uses a clever trick to save resources. The interface is stopped but a socket is enabled to listen on port 9090. When it receives a connection, cockpit is started. This way, it will only consume resources in your machine when it is in use.
Now, let’s learn how to add the dns service to the public zone.
Let’s access cockpit by pointing a browser to the IP of the machine and port 9090 – in this case, https://192.168.122.196:9090. Let’s log in as root with the password that was provided during installation:
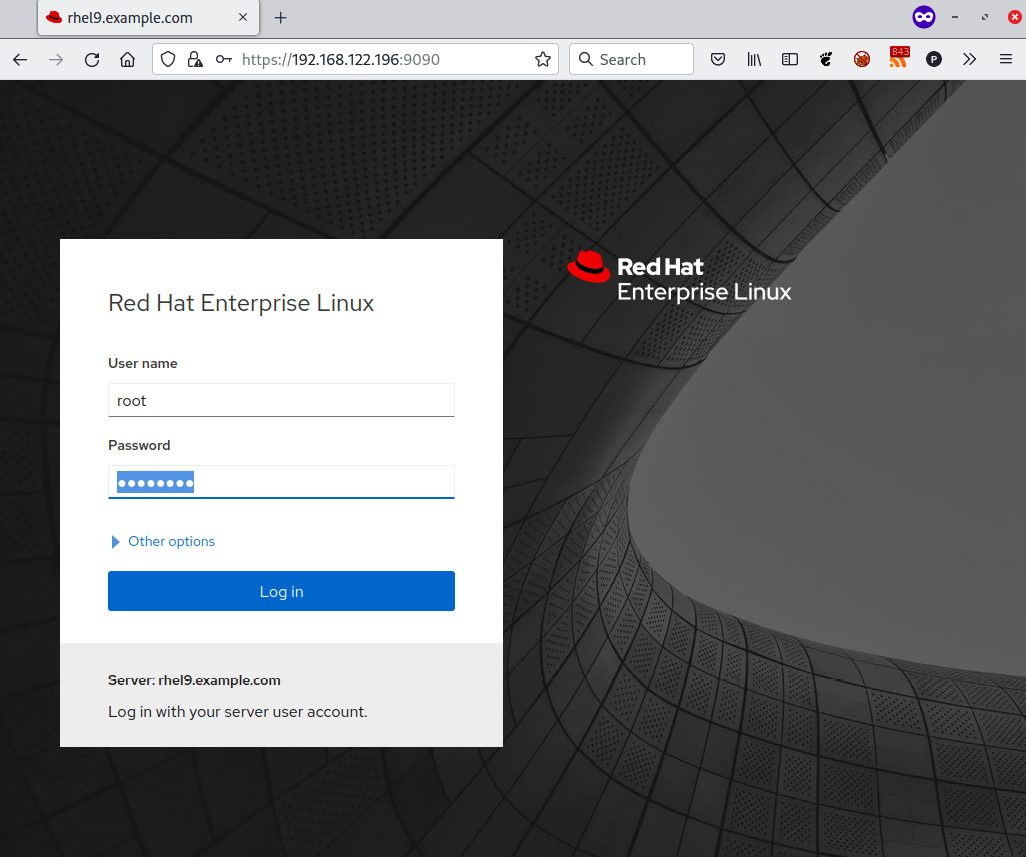
Figure 9.2 – cockpit login screen
Now, we can access the cockpit dashboard, which contains information about the system:
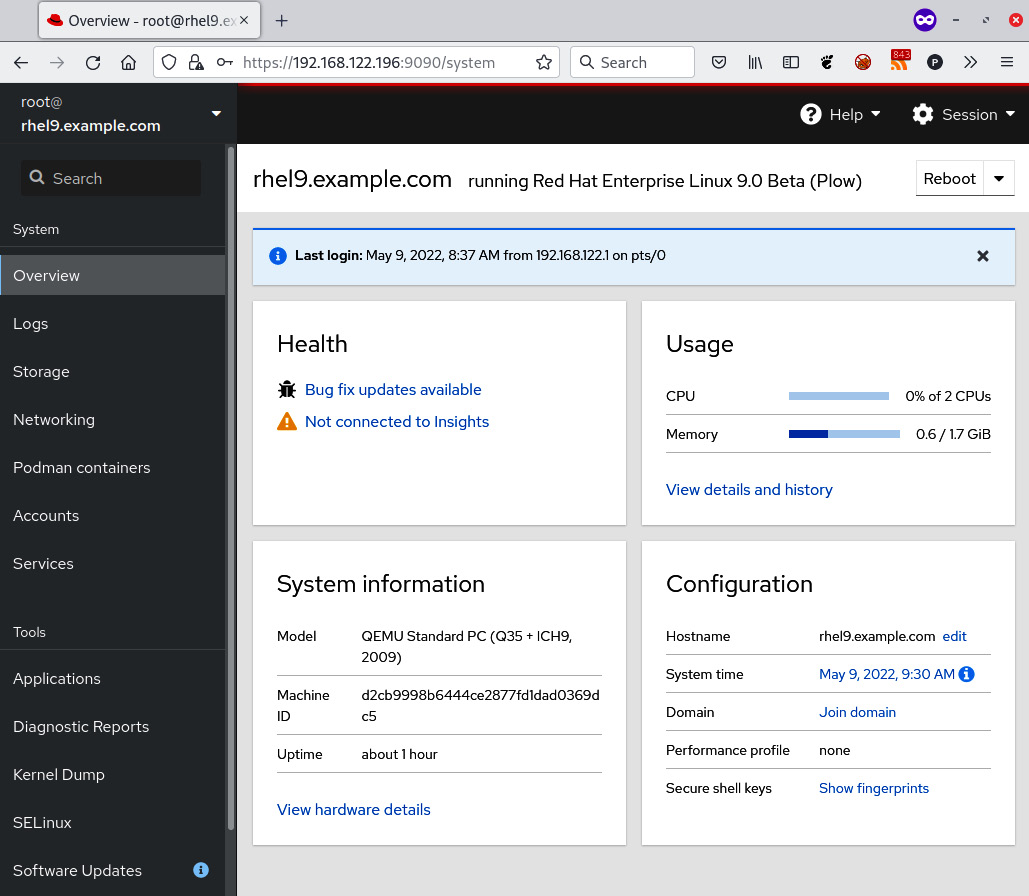
Figure 9.3 – cockpit initial screen and dashboard
Now, let’s go to Networking and then click on Edit rules and zones, as shown in the following screenshot:

Figure 9.4 – cockpit accessing the firewall configuration
At this point, we can click on Add Services in the public zone section to modify it and add one more service:

Figure 9.5 – cockpit firewall configuration interface
The steps to add the dns service to the public zone section of the firewall are simple:
- Click on Services.
- Filter the services by typing dns into the Filter services input field.
- Select the dns service with TCP:53 and UDP:53.
- Click on Add services:
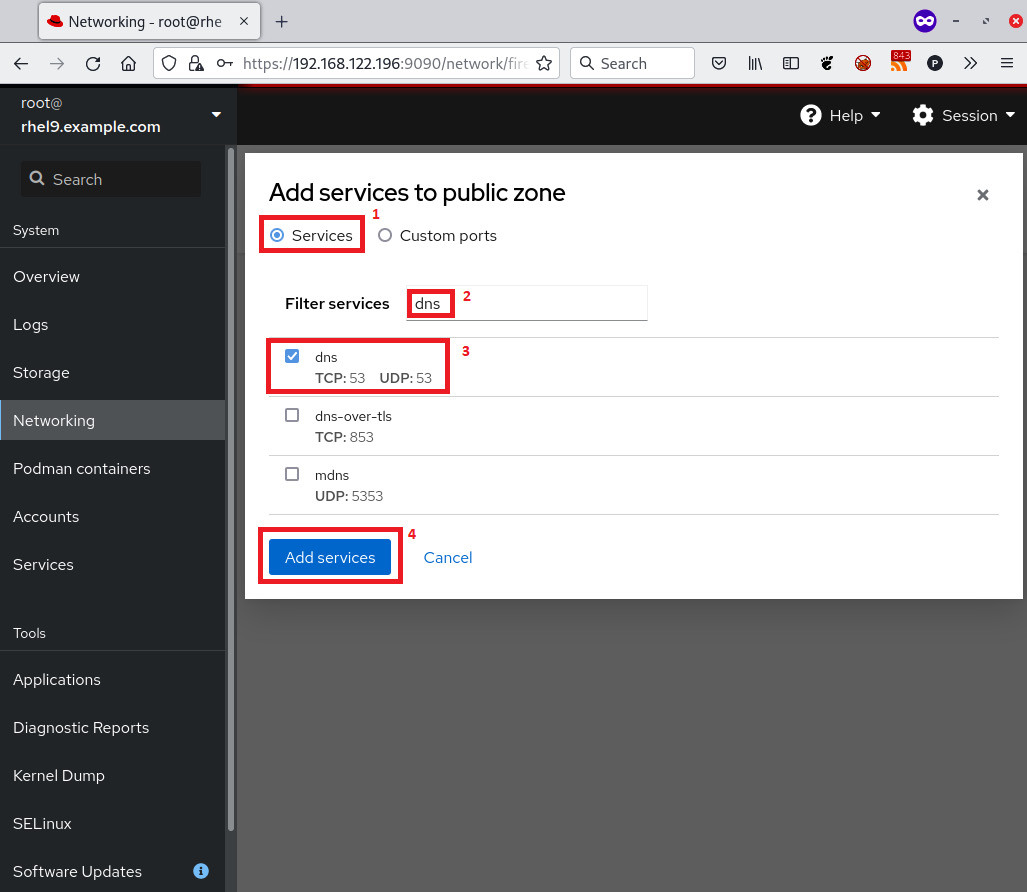
Figure 9.6 – cockpit firewall – adding a service to a public zone
Once you’ve done this, the service will be added to the running and permanent configurations. It will be displayed in the public zone section of cockpit:
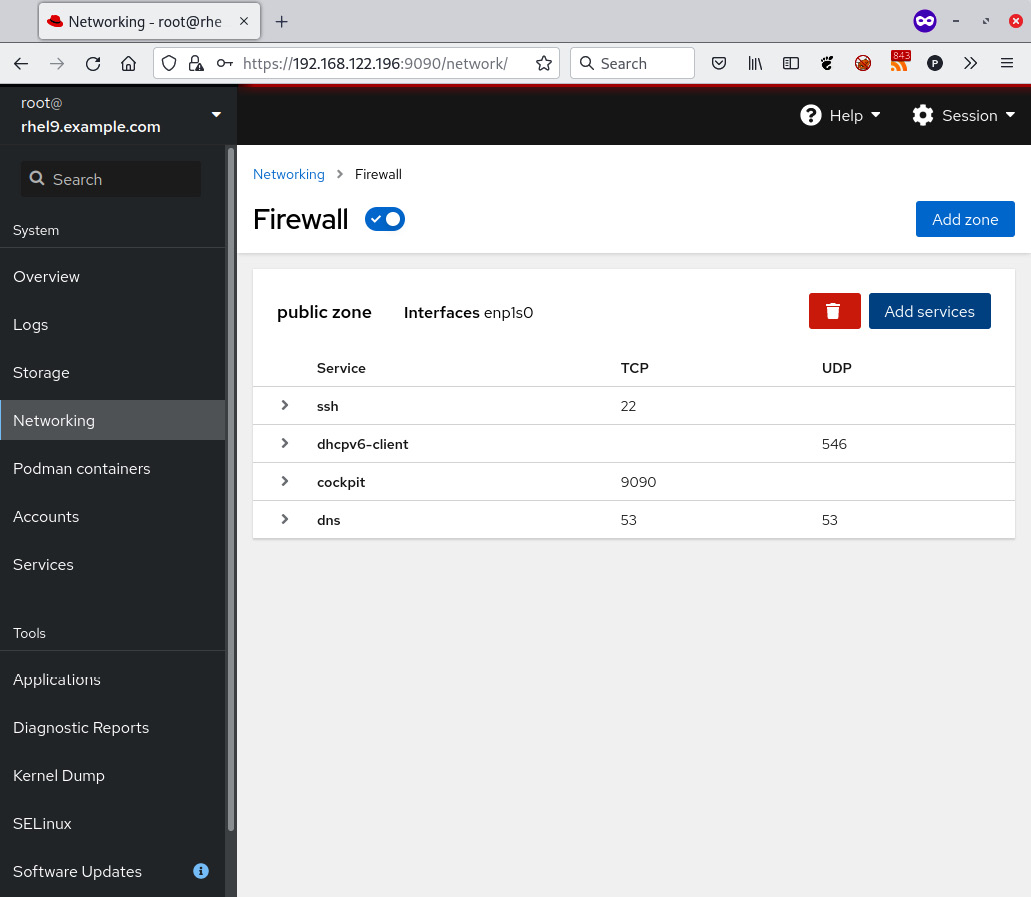
Figure 9.7 – cockpit firewall – the result of a service DNS being added to a public zone
With this, we know how to make modifications to the firewall in RHEL 9 using a web interface. We’ll leave it as an exercise for you to remove and redo the configuration we did with the command line at the beginning of this chapter, but with the web interface instead.
Summary
Security is a very important part of system administration. Disabling the security measures on a system just because it’s in an isolated network goes against the defense in depth principle, so this is heavily discouraged.
In this chapter, we saw how simple and easy it is to configure a firewall using firewalld in RHEL 9, thus providing us with another tool to manage, filter, and secure the network connections in our system. We also worked with cockpit, a web administration tool that makes this task more visual and easier to perform.
We can now take control of the network connectivity of our systems, provide access to the services we want to provide, and add a layer of security to them. We also know how to manage zones and how to use them, depending on our system’s use case. We are now ready to define our own custom services so that we can always filter network connectivity for them. We can now also deploy more secure systems by using the firewall included in RHEL.
Now, we are ready to learn more about security in RHEL, which is what we will do in the next chapter. Remember, security is a team sport, and the system administrators are key.