
3
Basic Commands and Simple Shell Scripts
Once you have your first Red Hat Enterprise Linux (RHEL) system running, you want to start using it, practicing, and getting comfortable with it. In this chapter, we will review the basics of logging into the system, navigating through it, and getting to know the basics in terms of its administration.
The set of commands and practices described in this chapter will be used on many occasions when managing systems, so it is important to study them with care.
The following topics will be covered in this chapter:
- Logging in as a user and managing multi-user environments
- Changing users with the su command
- Understanding users, groups, and basic permissions
- Using the command line, environment variables, and navigating through the filesystem
- Understanding I/O redirection on the command line
- Filtering output with grep and sed
- Listing, creating, copying, and moving files, directories, links, and hard links
- Using tar and gzip
- Creating basic shell scripts
- Using system documentation resources
Logging in as a user and managing multi-user environments
Login is the process during which a user identifies themselves in the system – usually, by providing a username and password, a couple of pieces of information often referred to as credentials.
The system can be accessed in many ways. The initial case for this, which we are covering here, is how a user accesses it when they install a physical machine (such as a laptop) or via the virtualization software interface. In this case, we are accessing the system through a console.
During installation, the user was created with an assigned password, and no graphical interface was installed. We will access the system in this case via its text console. The first thing we are going to do is to log in to the system using it. Once we start the machine and the boot process is completed, we will enter, by default, the multi-user text mode environment in which we are being requested to provide our login:
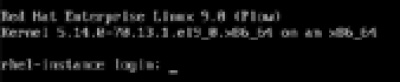
Figure 3.1 – The login process and username request
The blinking cursor will let us know that we are ready to enter our username, in this case, user, and then press Enter. A line requesting the password will appear:
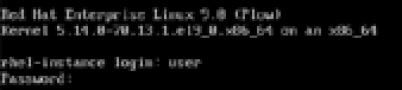
Figure 3.2 – The login process and password request
We may now type the user’s password to complete the login and, by pressing Enter on your keyboard, start a session. Note that no characters will be displayed on the screen when typing the password to avoid eavesdropping. The following screenshot shows the session running:

Figure 3.3 – The completed login process and the session running
Now, we are fully logged in to the system with the credentials for a user called user. This will define what we can do in the system, which files we can access, and even how much disk space we are assigned.
The console can have more than one session. To make that possible, we have different terminals through which we can log in. The default terminal can be reached by simultaneously pressing the Ctrl + Alt + F1 keys. In our case, nothing will happen, as we are already in that terminal. We could move to the second terminal by pressing Ctrl + Alt + F2, to the third one by pressing Ctrl + Alt + F3, and so on for the rest of the terminals (by default, six are allocated). This way, we can run different commands in different terminals.
Using the root account
Regular users will not be able to make changes to the system, such as creating new users or adding new software to the whole system. To do so, we need a user with administrative privileges and for that, the default user is root. This user always exists in the system and its identifier – the User Id (UID) – has the value 0.
In the previous installation, we configured the root password, making the account accessible through the console. To use it by logging in to the system, we only need to type the user root into one of the terminals shown right next to the login, then hit Enter, and then provide its password, which won’t be displayed. This way, we will access the system as the administrator, root:
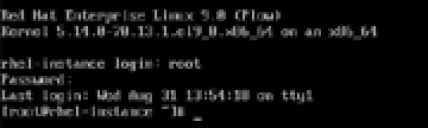
Figure 3.4 – The completed login process for root
Important Note
Above the login prompt, there is a message suggesting how the activation of the web console (cockpit) can be done – the cockpit is a set of tools that enables web management for the system. The cockpit is covered in Chapter 4, Tools for Regular Operations.
Using and understanding the command prompt
The command line that appears once we have logged in and are waiting for our commands to be typed and run is called the command prompt.
In its default configuration, it will show the username and hostname between brackets to let us know with which user we are working. Next, we see the path, in this case, ~, which is the shortcut for the user’s home directory (in other words, /home/user for user, and /root for root).
The last part and, probably the most important one, is the symbol before the prompt:
- The $ symbol is used for regular users with no administrative privileges.
- The # symbol is used for root or once a user has acquired administrative privileges.
Important Note
Be careful when using a prompt with the # sign, as you will be running as an administrator and the system will likely not stop you from damaging it.
Once we have identified ourselves within the system, we are logged in and have a running session. It is time to learn how to change from one user to the other in the following section.
Changing users with the su command
As we have entered a multi-user system, it is logical to think that we will be able to change between users. Even when this can be done easily by opening a session for each, sometimes we want to act as several users within one session.
To do so, we can use the su tool. The name of the tool is usually referred to as Substitute User.
Let’s use that last session, in which we logged in as root, and turn ourselves into user.
Before doing so, we can always ask which user we are logged in as by running the whoami command:
[@rhel-instance ~]# whoami
root
Now, we can make the change from root to user:
[root@rhel-instance ~]# su user
[user@rhel-instance root]$ whoami
user
Now, we have a session as user. We can finish this session by using the exit command:
[user@rhel-instance root]$ exit
exit
[root@rhel-instance ~]# whoami
root
As you may have seen, when we are logged in as root, we can act as any user without knowing its password. But how can we impersonate root? We can do so by running the su command and specifying the root user. In this case, the root user’s password will be requested:
[user@rhel-instance ~]$ su root
Password:
[@rhel-instance user]# whoami
root
As root is the user with the ID 0 and the most important one, when running su without specifying the user we want to turn into, it will default to turning us into root:
[user@rhel-instance ~]$ su
Password:
[root@rhel-instance user]# whoami
root
Each user can define several options in their own environment, such as, for example, their preferred editor. If we want to fully impersonate the other user and take their preferences (or environment variables, as they are referred to on many occasions), we can do so by adding - after the su command:
[user@rhel-instance ~]$ su -
Password:
Last login: mar feb 15 04:57:29 CET 2022 on pts/0
[root@rhel-instance ~]#
We can also switch from root to user:
[root@rhel-instance ~]# su - user
Last login: Tue Feb 15 04:53:02 CET 2022 from 192.168.122.1 on pts/0
As you can observe, it behaves as if a new login was done, but within the same session. Now, let’s move on to managing the permissions for the different users in the system, as addressed in the following section.
Understanding users, groups, and basic permissions
Multi-user environments are defined by being able to handle more than one user simultaneously. But to be able to administer the system resources, two capabilities help with the tasks:
Each user has a primary group.
By default, a group is created for each user and assigned to it as a primary with the same name as the username.
Standard Linux (and UNIX or POSIX) permissions include user, group, and others (ugo).
The whole system comes with a set of permissions assigned by default to each file and directory. Be careful when changing them.
There is a certain principle in UNIX that Linux has inherited: everything is a file. Even when there may be some corner cases to this principle, it remains true on almost any occasion. It means that a disk is represented as a file in the system (in other words, such as /dev/sdb mentioned in the installation), a process can be represented as a file (under /proc), and many other components in the system are also represented as files.
This means that, when assigning permissions to files, we can also assign permissions to many other components and capabilities implemented by them by virtue of the fact that, in Linux, everything is represented as a file.
Tip
The Portable Operating System Interface (POSIX) is a family of standards specified by the IEEE Computer Society: https://en.wikipedia.org/wiki/POSIX.
Users
Users are a way of providing security limits to people as well as programs running in a system. There are three types of users:
- Regular users: Assigned to individuals to perform their job. They have restrictions applied to them.
- The superuser: Also referred to as root. This is the main administrative account in the system and has full access to it.
- System users: These are user accounts usually assigned to running processes or “daemons’’ to limit their reach within the system. System users are not intended for logging in to the system.
Users have a number called the UID that the system uses to internally identify each one of them.
We previously used the whoami command to reveal which user we were working with, but to get more information here, we will use the id command:
[user@rhel-instance ~]$ id
uid=1000(user) gid=1000(user) groups=1000(user),10(wheel) context=unconfined_u:unconfined_r:unconfined_t:s0-s0:c0.c1023
We can also check the information related to other user accounts in the system, even to get info about root:
[user@rhel-instance ~]$ id root
uid=0(root) gid=0(root) groups=0(root)
Now, let’s take a look at the information we have received for user by running id:
- uid=1000(user): The UID is the numeric identifier of the user in the system. In this case, it is 1000. Identifiers of 1,000 and above are used in RHEL for regular users, whereas 999 and below are reserved for system use.
- gid=1000(user): The group ID is the numeric identifier for the principal group assigned to the user.
- groups=1000(user),10(wheel): These are the groups that the user belongs to, in this case, user with a Group ID (GID) of 1000 and wheel with a GID of 10. The wheel user group is a special one. It is used in RHEL and many other systems as the group for users that can become administrators by using the sudo tool (which we will explain later).
- context=unconfined_u:unconfined_r:unconfined_t:s0-s0:c0.c1023: This is the SELinux context for the user. It will define several restrictions in the system by using SELinux (which will be explained in greater depth in Chapter 10, Keeping Your System Hardened with SELinux).
ID-related data is stored in the system in the /etc/passwd file. Please note that this file is very sensitive and is better managed by using the tools related to it. If we want to edit it, we will do so by using vipw, a tool that will ensure (among other things) that only one admin is editing the file at any one time. The /etc/passwd file contains the info of each user per line. This is the line for user:
user:x:1000:1000:user:/home/user:/bin/bash
Each field is separated by a colon, :, in each line. Let’s review what they mean:
- user: The username assigned to the user.
- x: The field for the encrypted password. In this case, it shows as x because it has moved to /etc/shadow, which is not directly accessible to regular users, to make the system more secure.
- 1000 (the first one): The UID value.
- 1000 (the second one): The GID value.
- user: A description of the account.
- /home/user: The home directory assigned to the user. This will be the default directory (or folder, if you prefer) that the user will work on and where their preferences will be stored.
- /bin/bash: The command interpreter for the user. Bash is the default interpreter in RHEL. Other alternatives, such as tcsh, zsh, or fish are available to be installed in RHEL.
Groups
Groups are a way of assigning certain permissions to a subset of users in a dynamic way. As an example, let’s imagine a scenario where we have a finance team. We can create the finance group and provide permission to access, read, and write the /srv/finance directory. When the finance team has a new hire, to provide them with access to that folder, we only need to add the user assigned to this person to the finance group (this also works if someone leaves the team – we will only have to remove their account from the finance group).
Groups have a number called the GID that the system uses to identify them internally.
The data for groups is stored in the system in the /etc/group file. To edit this file in a way that ensures consistency and avoids corruption, we have to use the vigr tool. The file contains one group per line with different fields separated by a colon (:). Let’s take a look at the line for the wheel group:
wheel:x:10:user
Let’s review what each field means:
- wheel: This is the name of the group. In this case, this group is special, as it is configured by default to be used as the one to provide admin privileges to regular users.
- x: This is the group password field. It’s currently obsolete and should always contain x. It is maintained for compatibility purposes.
- 10: This is the GID value for the group itself.
- user: This is the list of the users belonging to that group (separated by commas, such as user1, user2, and user3).
The types of groups are as follows:
- The primary group: This is the group assigned to the files newly created by the user.
- A private group: This is a specific group with the same name as the user that is created for each user. When adding a new user account, a private group will be automatically created for it. Commonly, the primary group and private group are the same.
- A supplementary group: This is another group usually created for specific purposes. By way of an example, we can see the wheel group for enabling admin privileges to users or the cdrom group for providing access to CDs and DVDs devices in the system.
File permissions
To review file permissions, we are going to log in to the system as root. We will use the ls command to list files and we will review the permissions associated with them. We will learn more about how to change permissions in Chapter 5, Securing Systems with Users, Groups, and Permissions.
Once logged in to the system as root, we can run the ls command:
[root@rhel-instance ~]# ls
anaconda-ks.cfg
This shows the files present in the root user home directory, represented by ~. In this case, it shows the kickstart file created by Anaconda that we reviewed in the previous chapter.
We can get the long version of the list by appending the -l option to ls:
[root@rhel-instance ~]# ls -l
total 4
-rw-------. 1 root root 1106 Feb 18 19:45 anaconda-ks.cfg
We see the following in the output:
- total 4: This is the total space in kilobytes occupied in the disk by the files (note that we are using 4 KB blocks, so every file under that size will occupy a minimum of 4 KB).
- -rw-------.: These are the permissions assigned to the file.
The structure of the permissions can be seen in the following diagram:

Figure 3.5 – The permissions structure for Linux
Let’s discuss the preceding structure:
- The first character is for any special permissions that the file may have. If it is a regular file and has no special permission (as in this case), it will appear as -.
- Directories will appear with d. Consider that in Linux, everything is a file, and directories are a file with special permissions.
- Links, usually symbolic links, will appear with l. These act as a shortcut to a file from a different directory.
- Special permissions to run a file as a different user or group, called setuid or setgid, will appear as s.
- A special permission so that only the owner can remove or rename a file, called a sticky bit, will appear as t.
The next three characters, rw-, are the permissions for the owner:
- The first one, r, is the read permission assigned.
- The second one, w, is the write permission assigned.
- The third one, x, not present and shown as -, is the executable permission. Note that executable permission for directories means being able to enter them.
The next three characters, ---, are for the group permissions and work the same way as the owner permission. In this case, no group access is granted.
The final three characters, ---, are the permissions for others, which means users or groups do not show as the ones assigned to the file:
- 1: This indicates the number of links (hard links) to this file. This is intended, among other things, so that we do not delete a file used in another folder.
- root (the first instance): This indicates the owner of the file.
- root (the second instance): This indicates the group assigned to the file.
- 1393: This indicates the size in bytes.
- Dec 7 16:45: This indicates the date and time that the file was last modified.
- anaconda-ks.cfg: This indicates the filename.
When we list a directory (referred to in other systems as a folder), the output will show the contents of the directory itself. We can list the info for the directory itself with the -d option. Let’s now take a look at /etc, the directory that stores the system-wide configuration:
[root@rhel-instance ~]# ls -l -d /etc
drwxr-xr-x. 103 root root 8192 Feb 18 18:03 /etc
As you can see, it’s quite easy to obtain information about files and directories in the system. Let’s now learn more about the command line and how to navigate the filesystem easily in the following section.
Using the command line, environment variables, and navigating through the filesystem
As we have seen before, once we log in to the system, we have access to the command line. It’s important to navigate the command line and the filesystem well to feel comfortable in the environment and make the most of it.
Command line and environment variables
The command line is provided by a program also known as an interpreter or shell. It will behave differently depending on which shell we use, but in this section, we will cover the most widespread shell used in Linux and the one provided by default in RHEL – bash.
A simple trick to know which shell you are using is to run the following command:
[root@rhel-instance ~]# echo $SHELL
/bin/bash
The echo command will show the content of whatever we give to it on the screen. Some content needs to be substituted or interpreted, such as environment variables. The content to be substituted starts with the $ symbol. In this case, we are telling the system to use the echo function on (and therefore, echo) the content of the SHELL variable. Let’s use it for other variables:
[root@rhel-instance ~]# echo $USER
root
[root@rhel-instance ~]# echo $HOME
/root
These are environment variables that can be customized for every user. Let’s now check these for a different user:
[root@rhel-instance ~]# su - user
Last login: Wed Feb 16 19:03:32 CET 2022 from 192.168.122.1 on pts/0
[user@rhel-instance ~]$ echo $USER
user
[user@rhel-instance ~]$ echo $HOME
/home/user
As you can see, you can always refer to $USER and it will be substituted with the current user, or to $HOME and it will be substituted by the directory dedicated to the user, also known as the home directory.
These are some of the most common and important environment variables:
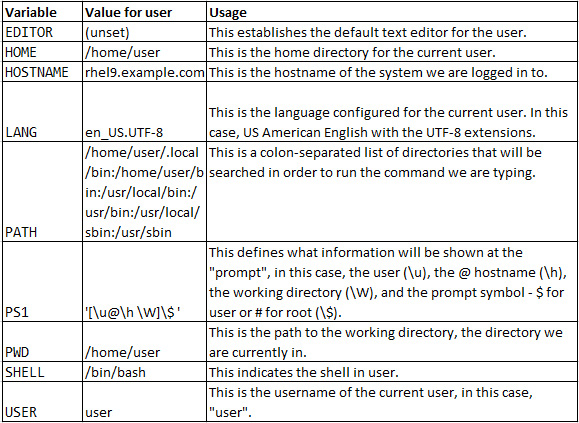
Table 3.1 – Common environment variables
The ~/.bashrc file is the one that should be edited to change these values for the current user.
Important Note
Files starting with a dot (.) are hidden files – to see them, you can use the ls -a command.
Navigating the filesystem
Now, it’s time to move into the directory tree of the system. In Linux and Unix (macOS is a Unix-like system), there are no drive letters, but a single directory tree that starts with the root directory, represented by /. The rest of the content of the system will hang from that folder and any other accessible disk or device will be assigned an accessible directory.
Important Note
The root directory and the home directory for the root user are two different things. The root user is assigned the home directory, /root, by default, whereas the root directory is the mother of all directories in the system and is represented by /.
We can see which directory we are in by running the pwd command:
[user@rhel-instance ~]$ pwd
/home/user
We can change the directory by using the cd command:
[user@rhel-instance ~]$ cd /var/tmp
/var/tmp
As you already know, there is a shortcut for the home directory of the current user, ~. We can use this shortcut to go to it:
[user@rhel-instance tmp]$ cd ~
[user@rhel-instance ~]$ pwd
/home/user
Some shortcuts for directories include the following:
- ~: This is the home of the current user.
- .: This is the current directory.
- ..: This is the parent directory.
- -: This is the directory used previously.
More details on managing files and directories in Linux and RHEL are available in the Listing, creating, copying, and moving files, directories, links, and hard links section.
Bash auto-complete
Shortcuts are a faster way to reach commonly used directories or relative references to the current working directory. However, bash includes some capabilities to reach other directories in a fast way, which is called auto-completion. It relies on the Tab key (the one with two opposing arrows at the very left of your keyboard, right above Caps Lock).
When reaching a folder or a file, we can hit Tab to complete its name. For example, if we want to go to the /etc/NetworkManager folder, we type the following:
[user@rhel-instance ~]$ cd /et
Then, when we hit the Tab key, this will auto-complete it to /etc/, even adding the final forward slash (/), as it is a directory:
[user@rhel-instance ~]$ cd /etc/
Now, we type in the first letter of the directory we want to go to, NetworkManager, which is N:
[user@rhel-instance ~]$ cd /etc/N
Then, when we hit the Tab key, this will auto-complete it to /etc/NetworkManager/:
[user@rhel-instance ~]# cd /etc/NetworkManager/
Now, we can hit Enter and go there.
If we press Tab + Tab (pressing Tab twice during complete), this will show a list of available targets to complete – for example, see the following:
root/ run/
It can also be used to complete commands. We can type a letter, for example, h, hit Tab + Tab, and this will show all the commands starting with h:
[user@rhel-instance ~]# h
halt hardlink hash h dparm head help hexdump history hostid hostname hostnamectl hwclock
This capability can be extended to help complete other parts of our commands by installing the bash-completion package:
[user@rhel-instance ~]# yum install bash-completion –y
Tip
A good practice when installing a system is to install bash-completion and also create or update the manuals database with the mandb command to get the latest manuals available using the man <command> command.
Previous commands
There is a way to recover the last commands run, which is referred to as history, in case you want to re-run them. Just press the up arrow key (the one with an arrow pointing up) and the previous commands will appear onscreen.
If there are too many commands in your history, you can search through them quickly by running the history command:
[user@rhel-instance ~]$ history
1 su root
2 su
3 su -
4 id
5 id root
6 grep user /etc/passwd
7 echo $USER
8 echo $HOME
9 declare
10 echo $SHELL
11 echo EDITOR
12 echo $EDITOR
13 grep wheel /etc/gro
14 grep wheel /etc/group
15 cat /etc/group
16 grep nobody /etc/group /etc/passwd
You can run any of those commands again by using the ! command. Just run ! with the number of the command and it will run again:
[user@rhel-instance ~]$ !5
id root
uid=0(root) gid=0(root) groups=0(root)
Tip
The !! command will run the very last command again, no matter which number.
Now, it is time to enjoy your superfast command line. Let’s learn more about the structure of directories in Linux, to know where to go to find things, in the following section.
The filesystem hierarchy
Linux has a standard, maintained by the Linux Foundation, that defines the filesystem hierarchy used in almost every Linux distribution, including RHEL. This standard is known as the FHS, or the Filesystem Hierarchy Standard. Let’s review the most important folders in the standard and the system itself here:
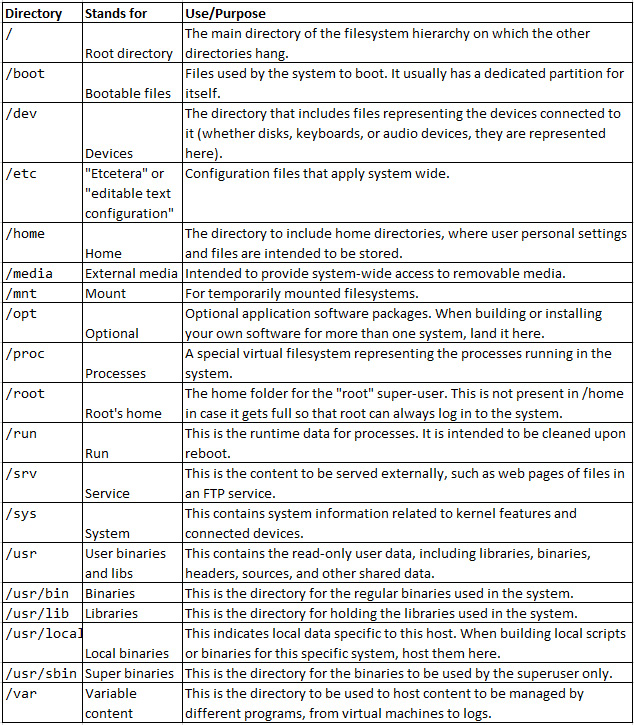
Table 3.2 – The most important folders in the filesystem
Tip
Previous versions of RHEL used to have /bin for the essential binaries and /usr/bin for the non-essential ones. Now, the content of both resides in /usr/bin. They also used /var/lock and /var/run for what is running in /run. In addition, they used to have /lib for the essential libraries and /usr/lib for the non-essential ones, which were consolidated into a single directory, /usr/lib. And last but not least, /sbin is the directory for the essential superuser binaries, and /usr/sbin is the directory for the non-essential ones, merged under /usr/sbin.
When partitioning, we may well be asking ourselves, where does the disk space go?
These are the allocation values for a minimal installation of RHEL 9 and the recommendations:
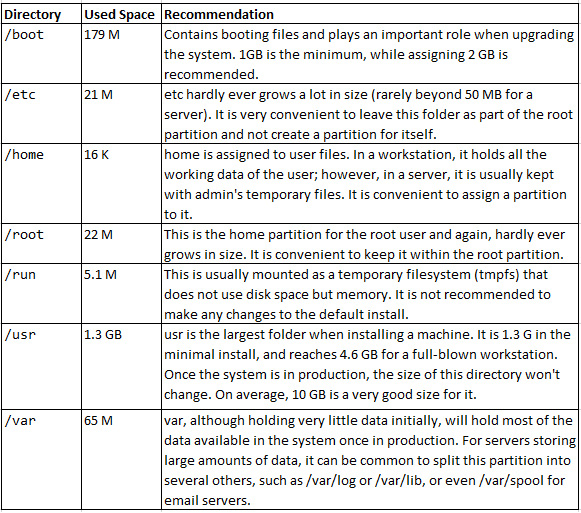
Table 3.3 – The allocation values for a minimal installation of RHEL 9
It’s important to become familiar with the main directories in the system to make the best of them. It is recommended to navigate through the different system directories and look at what’s in them to become comfortable with the structure. In the following section, we will look at how to perform redirections on the command line to learn more about command and file interaction.
Understanding I/O redirection on the command line
We have already run several commands to ascertain information about the system, such as listing files with ls, and we have got some information, or the output, from the running command, including, for example, filenames and file sizes. That information (or output) can be useful, and we want to be able to work with it, store it, and manage it properly.
When talking about command output and also input, there are three sources or targets for them that need to be understood:
- STDOUT: Also known as Standard Output, this is where commands will put their regular messages to provide information on what they are doing. In a terminal, on an interactive shell (as with the ones we are using so far), this output will show onscreen. This will be the main output managed by us.
- STDERR: Also known as Standard Error, this is where the commands will put their error messages to be processed. In our interactive shells, this output will also be shown on screen together with the standard output unless we specifically redirect it.
- STDIN: Also known as Standard Input, this is where the commands get data to be processed.
We will cover these in the following paragraphs to understand them better.
The way that the command input and output are used is defined by the following operators:
- |: A pipe operator is used to get the output from one command and make it the input of the next command. It channels data from one command to another.
- >: A redirect operator is used to redirect the entire output of a command into a file. If the file exists, it will be overwritten. Be careful with this, as you might clobber a file that could be important.
- <: Reverse redirect can be applied to use a file as the input for a command. Using it won’t delete the file that is used as input.
- >>: A redirect and add operator is used to append the output of a command into a file. If the file does not exist, it will be created with the output provided to it.
- 2>: A redirect STDERR operator will only redirect the output sent to the error message handler. (Note that no space should be included between 2 and > in order for this to work!)
- 1>: A redirect STDOUT operator will only redirect the output sent to the standard output and not to the error message handler.
- >&2: A redirect to STDERR operator will redirect the output to the standard error handler.
- >&1: A redirect to STDOUT operator will redirect the output to the standard output handler.
To better understand these, we will go through several examples in this section and the following one.
Let’s get a list of files and put it in a file. First, we list the files in /var, using the -m option to separate entries with commas:
[root@rhel-instance ~]# ls -m /var/
account, adm, cache, crash, db, empty, ftp, games, gopher, kerberos, lib, local, lock, log, mail, nis, opt, preserve, run, spool, tmp, yp
Now, we run the command again, redirecting the output to the /root/var-files.txt file:
[root@rhel-instance ~]# ls –m /var/ > /root/var-files.txt
[root@rhel-instance ~]#
As we can see, no output is shown on screen, but we will be able to find the new file in the current working directory – in this case, /root, the newly created file:
[root@rhel-instance ~]# ls /root
anaconda-ks.cfg var-files.txt
To see the content of the file on screen, we use the cat command, intended to concatenate the output for several files, but regularly used for this purpose:
[root@rhel-instance ~]# cat var-files.txt
account adm, cache, crash, db, empty, ftp, games, gopher, kerberos, lib, local, lock, log, mail, nis, opt, preserve, run, spool, tmp, yp
We can also add to this file the content of /var/lib. First, we can list it:
[root@rhel-instance ~]# ls -m /var/lib/
alternatives, authselect, chrony, dbus, dhclient, dnf, games, initramfs, logrotate, misc, NetworkManager, os-prober, plymouth, polkit-1, portables, private, rhsm, rpm, rpm-state, rsyslog, selinux, sss, systemd, tpm, tuned, unbound
Now, to append this content to the /root/var-files.txt file, we use the >> operator:
[root@rhel-instance ~]# ls -m /var/lib/ >> var-files.txt
[root@rhel-instance ~]# cat var-files.txt
account, adm, cache, crash, db, empty, ftp, games, gopher, kerberos, lib, local, lock, log, mail, nis, opt, preserve, run, spool, tmp, yp
alternatives, authselect, chrony, cni, containers, dnf, fprint, games, initramfs, iscsi, kdump, logrotate, misc, mlocate, NetworkManager, os-prober, PackageKit, plymouth, polkit-1, private, rhsm, rpm, rpm-state, rsyslog, samba, selinux, setroubleshoot, smartmontools, sss, systemd, tpm2-tss, udisks2, unbound, xfsdump
The /root/var-files.txt file now contains both the comma-separated list for /var and for /var/lib.
Now, we can try to list a non-existing directory to see an error being printed:
[root@rhel-instance ~]# ls -m /non
ls: cannot access '/non': No such file or directory
The output we see is an error and is treated differently by the system than regular messages. We can try to redirect the output to a file:
[root@rhel-instance ~]# ls -m /non > non-listing.txt
ls: cannot access '/non': No such file or directory
[root@rhel-instance ~]# cat non-listing.txt
[root@rhel-instance ~]#
We can see that using the standard redirect, with a command providing an error message, will show the error message (via STDERR) onscreen and create an empty file. This is because the file contains the output of the common information messages that are shown via STDOUT. We can still capture the output of the error, redirecting STDERR, by using 2>:
[root@rhel-instance ~]# ls -m/non 2> /root/error.txt
[root@rhel-instance ~]# cat /root/error.txt
ls: cannot access '/non': No such file or directory
Now, we can redirect the standard output and the error output independently.
Now, we want to count the number of files and directories in /var. For that, we are going to use the wc command, which stands for word count, with the -w option to only focus on counting words. To do so, we will redirect the output of ls to it by using a pipe represented by |:
[root@rhel-instance ~]# ls -m /var/ | wc -w
21
We can also use it to count the entries in /etc:
[root@rhel-instance ~]# ls -m /etc/ | wc -w
199
Pipes, |, are great for reusing the output of one command and sending it to another command to process that output. Now, we know more about using the more common operators to redirect input and output. There are several ways to process that output and we will see more examples in the following section.
Filtering output with grep and sed
The grep command is heavily used (and commonly mistyped) in system administration. It helps when finding a pattern in a line, whether in a file or via standard input (STDIN).
Let’s do a recursive search of the files in /usr with find and put it in /root/usr-files.txt:
[root@rhel-instance ~]# find /usr/ > /root/usr-files.txt
[root@rhel-instance ~]# ls -lh usr-files.txt
-rw-r--r--. 1 root root 2,1M Feb 18 12:38 usr-files.txt
As you can see, it’s a 2.1 MB file and it isn’t easy to go through. There is a utility in the system called gzip and we want to know which files in /usr contain the gzip pattern. To do so, we can run the following command:
[root@rhel-instance ~]# grep gzip usr-files.txt
/usr/bin/gzip
/usr/lib64/python3.9/__pycache__/gzip.cpython-39.opt-2.pyc
/usr/lib64/python3.9/__pycache__/gzip.cpython-39.opt-1.pyc
/usr/lib64/python3.9/__pycache__/gzip.cpython-39.pyc
/usr/lib64/python3.9/gzip.py
/usr/share/licenses/gzip
/usr/share/licenses/gzip/COPYING
/usr/share/licenses/gzip/fdl-1.3.txt
/usr/share/man/man1/gzip.1.gz
/usr/share/doc/gzip
/usr/share/doc/gzip/AUTHORS
/usr/share/doc/gzip/ChangeLog
/usr/share/doc/gzip/NEWS
/usr/share/doc/gzip/README
/usr/share/doc/gzip/THANKS
/usr/share/doc/gzip/TODO
/usr/share/info/gzip.info.gz
/usr/share/mime/application/gzip.xml
As you can see, we have found all the files with gzip under the /usr directory by creating a file with all the content and searching through it with grep. Could we do the same without creating the file? We sure could – by using a pipe. We can redirect the output of find to grep and get the same output:
[root@rhel-instance ~]# find /usr/ | grep gzip
/usr/bin/gzip
/usr/lib64/python3.9/__pycache__/gzip.cpython-39.opt-2.pyc
/usr/lib64/python3.9/__pycache__/gzip.cpython-39.opt-1.pyc
/usr/lib64/python3.9/__pycache__/gzip.cpython-39.pyc
/usr/lib64/python3.9/gzip.py
/usr/share/licenses/gzip
/usr/share/licenses/gzip/COPYING
/usr/share/licenses/gzip/fdl-1.3.txt
/usr/share/man/man1/gzip.1.gz
/usr/share/doc/gzip
/usr/share/doc/gzip/AUTHORS
/usr/share/doc/gzip/ChangeLog
/usr/share/doc/gzip/NEWS
/usr/share/doc/gzip/README
/usr/share/doc/gzip/THANKS
/usr/share/doc/gzip/TODO
/usr/share/info/gzip.info.gz
/usr/share/mime/application/gzip.xml
In this command, the standard output from find was sent to grep to process it. We can even count the number of instances of files with wc, but this time, using the -l option to count the lines:
[root@rhel-instance ~]# find /usr/ | grep gzip | wc -l
18
We have now concatenated two pipes, one to filter the output and another to count it. We will find ourselves doing this kind of plumbing often when searching for and finding information in the system.
Some very common options for grep are as follows:
- -i: for ignore-case. This will match the pattern whether it’s uppercase, lowercase, or a combination thereof.
- -v: for invert match. This will show all entries that do not match the pattern being searched for.
- -r: for recursive. We can tell grep to search for a pattern in all the files within a directory while going through all of them (if we have permission).
There is also a way to also filter columns in the output provided. Let’s say we have a list of files in our home directory and we want to see its size. We run the following command:
[root@rhel-instance ~]# ls -l
total 1888
-rw-------. 1 root root 1393 Feb 18 19:45 anaconda-ks.cfg
-rw-r--r--. 1 root root 52 Feb 16 12:17 error.txt
-rw-r--r--. 1 root root 0 Feb 16 12:08 non-listing.txt
-rw-r--r--. 1 root root 1917837 Feb 16 12:40 usr-files.txt
-rw-r--r--. 1 root root 360 Feb 16 12:12 var-files.txt
Let’s say we only want the size, which is the fifth column, of the content that has files in its name. We can use awk for that:
[root@rhel-instance ~]# ls -l | grep files | awk '{ print $5}'
1917837
360
The awk tool will help us to filter according to the correct column. It is very useful for finding identifiers in processes or for getting a specific list of data from a long output.
Tip
Consider that awk is super powerful for processing output and that we will use the minimal capability for it.
We could replace the separator with -F and get a list of available users in the system:
[root@rhel-instance ~]# awk -F: '{ print $1}' /etc/passwd
root
bin
daemon
adm
lp
sync
shutdown
halt
operator
games
ftp
nobody
dbus
systemd-coredump
systemd-resolve
tss
polkitd
unbound
sssd
chrony
sshd
rngd
user
The awk and grep tools are very common processing tools in the life of a Linux sysadmin, and it is important to understand them well to manage the output provided by the system. We have applied the base knowledge to filter the output received by row and column. Let’s now move on to how to manage files in a system so that we can better handle the stored output we have just generated.
Listing, creating, copying, and moving files, directories, links, and hard links
It is important to know how to manage files and directories in a system from the command line. It will serve as the basis for managing and copying important data, such as configuration files or data files.
Directories
Let’s start by creating a directory to keep some working files. We can do so by running mkdir, short for “make directory”:
[user@rhel-instance ~]$ mkdir mydir
total 0
drwxrwxr-x. 2 user user 6 Feb 13 19:53 mydir
Folders can be deleted with the rmdir command, short for “remove directory”:
[user@rhel-instance ~]$ ls -l
total 0
drwxrwxr-x. 2 user user 6 Feb 13 19:53 mydir
[user@rhel-instance ~]$ mkdir deleteme
[user@rhel-instance ~]$ ls -l
total 0
drwxrwxr-x. 2 user user 6 Feb 13 20:15 deleteme
drwxrwxr-x. 2 user user 6 Feb 13 19:53 mydir
[user@rhel-instance ~]$ rmdir deleteme
[user@rhel-instance ~]$ ls -l
total 0
drwxrwxr-x. 2 user user 6 Feb 13 19:53 mydir
However, rmdir will only delete empty directories:
[user@rhel-instance ~]$ ls /etc/ > ~/mydir/etc-files.txt
[user@rhel-instance ~]$ rmdir mydir
rmdir: failed to remove 'mydir': Directory not empty
How can we delete a directory and all the other files and directories it contains using the remove (rm) command? First, let’s just create and remove a single file, var-files.txt:
[user@rhel-instance ~]$ ls /var/ > ~/var-files.txt
[user@rhel-instance ~]$ ls -l var-files.txt
-rw-rw-r--. 1 user user 109 Feb 13 15:31 var-files.txt
[user@rhel-instance ~]$ rm var-files.txt
[user@rhel-instance ~]$ ls -l var-files.txt
ls: cannot access 'var-files.txt': No such file or directory
To remove a full directory branch, including its contents, we may use the -r option, short for “recursive”:
[user@rhel-instance ~]$ rm -r mydir/
[user@rhel-instance ~]$ ls -l
total 0
Important Note
Be very careful when using recursive mode to delete things, as there is neither a recovery command for it nor a trash bin to keep files that have been removed in the command line.
Let’s take a look at the review table:

Table 3.4 – The directory commands
Now that we know how to create and delete directories in a Linux system, let’s start copying and moving content.
Copying and moving
Now, let’s copy some files to play with them using the cp (which stands for copy) command. We may get some powerful awk examples copied to our home directory:
[user@rhel-instance ~]$ mkdir myawk
[user@rhel-instance ~]$ cp /usr/share/awk/* myawk/
[user@rhel-instance ~]$ ls myawk/ | wc -l
27
To copy more than one file at the same time, we have used globbing with the * sign. This works so that by specifying the files one by one, we can just type * for everything. We can also type the initial characters and then *, so let’s try this by copying some more files using globbing:
[user@rhel-instance ~]$ mkdir mysystemd
[user@rhel-instance ~]$ cp /usr/share/doc/systemd/* mysystemd/
[user@rhel-instance ~]$ cd mysystemd/
[user@rhel-instance mysystemd]$ ls
20-yama-ptrace.conf CODING_STYLE DISTRO_PORTING ENVIRONMENT.md GVARIANT-SERIALIZATION HACKING NEWS README TRANSIENT-SETTINGS.md TRANSLATORS UIDS-GIDS.md
You will see that running ls TR* only shows files that start with TR:
[user@rhel-instance mysystemd]$ ls TR*
TRANSIENT-SETTINGS.md TRANSLATORS
It will work the same way with the file ending:
[user@rhel-instance mysystemd]$ ls *.md
ENVIRONMENT.md TRANSIENT-SETTINGS.md UIDS-GIDS.md
As you can see, it only shows files ending in .md.
We can copy a full branch of files and directories with the recursive option for cp, which is -r:
[user@rhel-instance mysystemd]$ cd ~
[user@rhel-instance ~]$ mkdir myauthselect
[user@rhel-instance ~]$ cp -r /usr/share/authselect/* myauthselect
[user@rhel-instance ~]$ ls myauthselect/default/
minimal sssd winbind
The recursive option is very useful for copying complete branches. We could also move directories or files easily using the mv command. Let’s put all our new directories together into a newly created directory called docs:
[user@rhel-instance ~]$ mkdir docs
[user@rhel-instance ~]$ mv my* docs/
[user@rhel-instance ~]$ ls docs/
myauthselect myawk mysystemd
You can see that with mv, you do not need to use the recursive option to manage a full branch of files and directories. It can also be used to rename files or directories:
[user@rhel-instance ~]$ cd docs/mysystemd/
[user@rhel-instance mysystemd]$ ls
20-yama-ptrace.conf CODING_STYLE DISTRO_PORTING ENVIRONMENT.md GVARIANT-SERIALIZATION HACKING NEWS README TRANSIENT-SETTINGS.md TRANSLATORS UIDS-GIDS.md
[user@rhel-instance mysystemd]$ ls -l NEWS
-rw-r--r--. 1 user user 451192 Feb 16 19:59 NEWS
[user@rhel-instance mysystemd]$ mv NEWS mynews
[user@rhel-instance mysystemd]$ ls -l NEWS
ls: cannot access 'NEWS': No such file or directory
[user@rhel-instance mysystemd]$ ls -l mynews
-rw-r--r--. 1 user user 451192 Feb 16 19:59 mynews
There is a special command for creating empty files, which is touch:
[user@rhel-instance mysystemd]$ cd ~
[user@rhel-instance ~]$ ls -l docs/
total 4
drawer-x. 4 user user 35 Feb 16 20:08 myauthselect
drwxrwxr-x. 2 user user 4096 Feb 16 19:51 myawk
drwxrwxr-x. 2 user user 238 Feb 16 20:21 mysystemd
[user@rhel-instance ~]$ touch docs/mytouch
[user@rhel-instance ~]$ ls -l docs/
total 4
drwxrwxr-x. 4 user user 35 Feb 16 20:08 myauthselect
drwxrwxr-x. 2 user user 4096 Feb 16 19:51 myawk
drwxrwxr-x. 2 user user 238 Feb 16 20:21 mysystemd
-rw-rw-r--. 1 user user 0 Feb 16 20:27 mytouch
When applied to an existing file or folder, it will update its access time to the current one:
[user@rhel-instance ~]$ touch docs/mysystemd
[user@rhel-instance ~]$ ls -l docs/
total 4
drwxrwxr-x. 4 user user 35 Feb 16 20:08 myauthselect
drwxrwxr-x. 2 user user 4096 Feb 16 19:51 myawk
drwxrwxr-x. 2 user user 238 Feb 16 20:28 mysystemd
-rw-rw-r--. 1 user user 0 Feb 16 20:27 mytouch
Let’s check the review table:
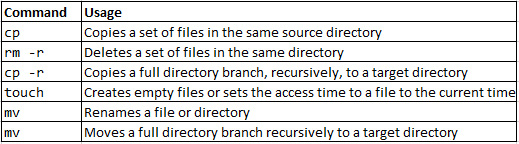
Table 3.5 – Copying and moving commands
Now we know how to copy, delete, rename, and move files and directories, even full directory branches. Let’s now take a look at a different way to work with them – links.
Symbolic and hard links
We can have the same file in two places using links. There are two types of links:
- Hard links: There will be two entries (or more) to the same file in the filesystem. The content will be written once to disk. Hard links for the same file cannot be created in two different filesystems. Hard links cannot be created for directories.
- Symbolic links: A symbolic link is created pointing to a file or directory in any place in the system.
Both are created using the ln (which stands for link) utility.
Let’s now create hard links:
[user@rhel-instance ~]$ cd docs/
[user@rhel-instance docs]$ ln mysystemd/README MYREADME
[user@rhel-instance docs]$ ls -l
total 20
drwxrwxr-x. 4 user user 35 Feb 16 20:08 myauthselect
drwxrwxr-x. 2 user user 4096 Feb 16 19:51 myawk
-rw-r--r--. 2 user user 13826 Feb 16 20:59 MYREADME
drwxrwxr-x. 2 user user 238 Feb 16 20:28 mysystemd
-rw-rw-r--. 1 user user 0 Feb 16 20:27 mytouch
[user@rhel-instance docs]$ ln MYREADME MYREADME2
[user@rhel-instance docs]$ ls -l
total 36
drwxrwxr-x. 4 user user 35 Feb 16 20:08 myauthselect
drwxrwxr-x. 2 user user 4096 Feb 16 19:51 myawk
-rw-r--r--. 3 user user 13831 Feb 16 20:32 MYREADME
-rw-r--r--. 3 user user 13831 Feb 16 20:32 MYREADME2
drwxrwxr-x. 2 user user 238 Feb 16 20:28 mysystemd
-rw-rw-r--. 1 user user 0 Feb 16 20:27 mytouch
drwxrwxr-x. 2 user user 6 Feb 16 20:35 test
Check the increasing number of references to the file (in bold in the previous example).
Now, let’s create a symbolic link to a directory with ln -s (with s for symbolic):
[user@rhel-instance docs]$ ln -s mysystemd mysystemdlink
[user@rhel-instance docs]$ ls -l
total 36
drwxrwxr-x. 4 user user 35 Feb 16 20:08 myauthselect
drwxrwxr-x. 2 user user 4096 Feb 16 19:51 myawk
-rw-r--r--. 3 user user 13831 Feb 16 20:32 MYREADME
-rw-r--r--. 3 user user 13831 Feb 16 20:32 MYREADME2
drwxrwxr-x. 2 user user 238 Feb 16 20:28 mysystemd
lrwxrwxrwx. 1 user user 9 Feb 16 20:40 mysystemdlink -> mysystemd
-rw-rw-r--. 1 user user 0 Feb 16 20:27 mytouch
drwxrwxr-x. 2 user user 6 Feb 16 20:35 test
Check how the symbolic link created is treated as a different type when listing it, as it starts with l for link (in bold in the previous example) instead of d for directory (also in bold in the previous example).
Tip
When in doubt about whether to use a hard link or a symbolic link, use the symbolic link as the default choice.
Let’s check the review table:

Table 3.6 – Link commands
As you can see, creating links and symbolic links is super simple and can help us access the same file or directory from different locations. In the following section, we will cover how to pack and compress a set of files and directories.
Using tar and gzip
Sometimes, we want to pack a full directory (including files) into a single file for backup purposes or to simply share it more easily. The command that can help aggregate files into one is tar.
First, we need to install tar:
[root@rhel-instance ~]# yum install tar -y
We can try by creating (as root) a backup of the /etc directory branch:
[root@rhel-instance ~]# tar -cf etc-backup.tar /etc
tar: Removing leading '/' from member names
[root@rhel-instance ~]# ls -lh etc-backup.tar
-rw-r--r--. 1 root root 20M Feb 17 20:08 etc-backup.tar
Let's check the options used:
- -c: Short for create. tar can put files together but also unpack them.
- -f: Short for file. We specify that the next parameter will be working with a file.
We can try to unpack it:
[root@rhel-instance ~]# mkdir tmp
[root@rhel-instance ~]# cd tmp/
[root@rhel-instance tmp]# tar -xf ../etc-backup.tar
[root@rhel-instance tmp]# ls
etc
Let’s check the new options used:
- -x: for extraction. It unpacks a tar file.
Observe that we created a directory called tmp to work on and that we pointed to the parent directory of tmp by using the .. shortcut (which refers to the parent directory of the current working directory).
Let’s use gzip to compress a file. We can copy /etc/services and compress it:
[root@rhel-instance tmp]# cp /etc/services .
[root@rhel-instance tmp]# ls -lh services
-rw-r--r--. 1 root root 677K Jun 23 2020 services
[root@rhel-instance tmp]# gzip services
[root@rhel-instance tmp]# ls -lh services.gz
-rw-r--r--. 1 root root 140K Feb 17 20:16 services.gz
Please note that when using gzip, this will compress the specified file, adding the .gz extension to it, and the original file will not be kept. Also, be aware that the newly created file is one fifth of the size of the original file.
To recover it, we can run gunzip:
-rw-r--r--. 1 root root 140K Feb 17 20:16 services.gz
[root@rhel-instance tmp]# gunzip services.gz
[root@rhel-instance tmp]# ls -lh services
-rw-r--r--. 1 root root 677K Feb 17 20:16 services
Now, we can combine the two of them, packing and compressing them:
[root@rhel-instance ~]# tar cf etc-backup.tar /etc/
tar: Removing leading '/' from member names
[root@rhel-instance ~]# ls -lh etc-backup.tar
-rw-r--r--. 1 root root 20M Feb 17 20:08 etc-backup.tar
[root@rhel-instance ~]# gzip etc-backup.tar
[root@rhel-instance ~]# ls etc-backup.tar.gz
etc-backup.tar.gz
[root@rhel-instance ~]# ls -lh etc-backup.tar.gz
-rw-r--r--. 1 root root 4,9M Feb 17 20:20 etc-backup.tar.gz
This way, we pack and compress in two steps.
The tar command is smart enough to be able to perform packing and compression in a single step:
[root@rhel-instance ~]# rm -f etc-backup.tar.gz
[root@rhel-instance ~]# tar -czf etc-backup.tar.gz /etc/
tar: Removing leading '/' from member names
[root@rhel-instance ~]# ls -lh etc-backup.tar.gz
-rw-r--r--. 1 root root 4,9M Feb 17 20:22 etc-backup.tar.gz
- -z: This compresses the newly created tar file with gzip. It is also usable for decompression.
We may want to review that same option when decompressing:
[root@rhel-instance ~]# cd tmp/
[root@rhel-instance tmp]# rm -rf etc
[root@rhel-instance tmp]# tar -xzf ../etc-backup.tar.gz
[root@rhel-instance tmp]# ls
etc
As you can see, it’s very easy to pack and compress files using tar and gzip. There are other available compression methods with higher ratios, such as bzip2 or xz, that you may want to try, too. Now, let’s move on to combine all the commands that we have learned into a powerful way to automate – by creating shell scripts.
Creating basic shell scripts
As a system administrator (or sysadmin), there will be times when you want to run a series of commands more than once. You can do this manually by running each command every time. However, there is a more efficient way to do so – by creating a shell script.
A shell script is nothing more than a text file with a list of commands to be run and a reference to the shell that will interpret it.
In this book, we will not cover how to use a text editor; however, we will provide three recommendations for text editors in Linux that could be of help:
- Nano: This is probably the easiest text editor to use for beginners. Lean, simple, and straightforward, you may want to start by installing it and giving it a try.
- vi or vim: vi is the default text editor available in RHEL, even included in the minimal install and in many Linux distributions. Even if you are not going to use it every day, it’s good to familiarize yourselves with the basics of it as it will be present in almost any Linux system you will use. vim stands for vi-improved.
- Emacs: This is probably the most advanced and complex text editor ever. It can do everything and beyond, including reading emails or helping with a bit of psychoanalysis via Emacs Doctor.
We can create our first shell script by editing a new file called hello.sh with the following line as its content:
echo ''hello world!''
Then, we can run it by using the bash command interpreter with the following line:
[root@rhel-instance ~]# bash hello.sh
hello world!
There is a different way to do this where we do not need to type bash. We can add an initial line referencing the interpreter, so the file content of hello.sh looks as follows:
#!/bin/bash
echo ''hello world!''
Now, we change the permissions to make it executable:
[root@rhel-instance ~]# ls -l hello.sh
-rw-r--r--. 1 root root 32 Feb 17 20:32 hello.sh
[root@rhel-instance ~]# chmod +x hello.sh
[root@rhel-instance ~]# ls -l hello.sh
-rwxr-xr-x. 1 root root 32 Feb 17 20:32 hello.sh
And we run it as follows:
[root@rhel-instance ~]# ./hello.sh
hello world!
We have created our first shell script. Congratulations!
Tip
The commands must be in the path to run in any working directory, as stated by the $PATH variable. If our command (or shell script) is not in one of the directories specified in the path, we will specify the running directory, in this case, using the . shortcut for the current directory and the / separator.
Let’s use some variables. We can define a variable by simply providing its name and the value we want. Let’s try replacing world with a variable. To use it, we prepend the $ symbol to the name of the variable and it will be used. The script will look as follows:
#!/bin/bash
PLACE=''world''
echo ''hello $PLACE!''
We can run the script, obtaining the same output as before:
[root@rhel-instance ~]# ./hello.sh
hello world!
To have more clarity, when using the value of the variable, we will put the name of it between curly braces, { and }’, and take this as a good practice.
The previous script will look as follows:
#!/bin/bash
PLACE=''world''
echo ''hello ${PLACE}!''
We now know how to create a basic script, but we may want to have greater control over it by using some programmatic capabilities, starting with loops. Let’s go for it!
for loops
What if we want to run the same command over a list of places? That’s what a for loop is used for. It can help iterate over a set of elements, such as a list or a counter, for example.
The for loop syntax is as follows:
- for: To specify the iteration
- do: To specify the action
- done: To close the loop
We can define a space-separated list to try it and iterate through it with our first for loop:
#!/bin/bash
PLACES_LIST="Madrid Boston Singapore World"
for PLACE in ${PLACES_LIST}; do
echo "hello ${PLACE}!"
done
Let’s run it. The output will look as follows:
[root@rhel-instance ~]# ./hello.sh
hello Madrid!
hello Boston!
hello Singapore!
hello World!
Using the for loop can be very interesting when reading the list from an external command. We can do so by putting the external command between $( and ).
Tip
Backticks, ', can also be used to run a command and get its output as a list, but we will stick to the previous expression for clarity.
One example of a usable external command can be ls. Let’s create the txtfiles.sh script with the following content:
#!/bin/bash
for TXTFILE in $(ls *.txt); do
  echo ''TXT file ${TXTFILE} found! ''
done
Make it executable and run it:
[root@rhel-instance ~]# chmod +x txtfiles.sh
[root@rhel-instance ~]# ./txtfiles.sh
TXT file error.txt found!
TXT file non-listing.txt found!
TXT file usr-files.txt found!
TXT file var-files.txt found!
You see how we can now iterate over a set of files, including, for example, changing their names, finding and replacing content in them, or simply making a specific backup of a selection of files.
We’ve seen several ways in which to iterate a list with the for loop, which can be very useful when it comes to automating tasks. Now, let’s move on to another programmatic capability in scripts – conditionals.
if conditionals
Sometimes, we may want to execute something different for one of the elements in a list, or only if a condition is happening. We can use the if conditional for this.
The if conditional syntax is if; to specify the condition.
Conditions are usually specified between brackets ([ and ]):
- then: To specify the action.
- fi: To close the loop.
- else: This is used as a then element when the condition is not matched.
Let’s change our previous hello.sh script to say "hello to Madrid" in Spanish, as follows:
#!/bin/bash
PLACES_LIST="Madrid Boston Singapore World"
for PLACE in ${PLACES_LIST}; do
    if [ ${PLACE} = "Madrid" ]; then
        echo ''¡Hola ${PLACE}!''
    fi
done
Then, run it:
[root@rhel-instance ~]# ./hello.sh
¡Hola Madrid!
We have a problem; it only says hello to Madrid. What happens if we want to run the previous code on the ones not matching the condition? That’s when we extend the conditional using else for the items that do not match.
And now, we have an example of a conditional using else:
#!/bin/bash
PLACES_LIST="Madrid Boston Singapore World"
for PLACE in ${PLACES_LIST}; do
    if [ ${PLACE} = "Madrid" ]; then
        echo ''¡Hola ${PLACE}!''
    else
        echo ''hello ${PLACE}!''
    fi
done
We can run it:
[root@rhel-instance ~]# ./hello.sh
¡Hola Madrid!
hello Boston!
hello Singapore!
hello World!
As you see, it’s simple to use the conditionals in a script and provide a lot of control over the conditions under which a command is run. We now need to control when something may not be running correctly. That’s what the exit codes (or error codes) are for. Let’s go for it!
Exit codes
When a program is run, it provides an exit code, specifying whether it ran OK or whether there was an issue. That exit code is stored in a special variable called $?.
Let’s take a look at it by running ls hello.sh:
[root@rhel-instance ~]# ls hello.sh
hello.sh
[root@rhel-instance ~]# echo $?
0
When the program runs OK, the exit code is zero, 0.
What happens when we try to list a file that doesn’t exist (or run any other command incorrectly, or that is having issues)? Let’s try listing a nonexistent file:
[root@rhel-instance ~]# ls nonexistentfile.txt
ls: cannot access 'nonexistentfile.txt': No such file or directory
[root@rhel-instance ~]# echo $?
2
You see, the exit code is not zero. We will go to the documentation and check the number associated with it to understand the nature of the issue.
When running a command in a script, check for the exit code and act accordingly. Let’s now review where to find further information on the commands, such as exit codes or other options, in the following section.
Using system documentation resources
The system includes resources to help you while working with it and guide you to improve your sysadmin skills. This is referred to as the system documentation. Let’s check three different resources available by default in your RHEL installation: man pages, info pages, and other documents.
man pages
The most common resource used to obtain documentation is manual pages, also referred to by the command used to invocate them: man.
Almost any utility installed in the system has a man page to help you use it (in other words, specifying all the options for the tools and what they do). You can run man tar and check the output:
[root@rhel-instance ~]# man tar
TAR(1) GNU TAR Manual TAR(1)
NAME
tar - an archiving utility
SYNOPSIS
Traditional usage
tar {A|c|d|r|t|u|x}[GnSkUWOmpsMBiajJzZhPlRvwo] [ARG...]
UNIX-style usage
tar -A [OPTIONS] ARCHIVE ARCHIVE
tar -c [-f ARCHIVE] [OPTIONS] [FILE...]
tar -d [-f ARCHIVE] [OPTIONS] [FILE...]
You can see in it (navigate with the arrow keys, the space bar, or Page Up and Page Down) and exit it by hitting q (for quit).
There are sections within the man page on related topics. It is pretty simple to search those by using the apropos command. Let’s see this for tar:
[root@rhel-instance ~]# apropos tar
dbus-run-session (1) - start a process as a new D-Bus session
dnf-needs-restarting (8) - DNF needs_restarting Plugin
dracut-pre-udev.service (8) - runs the dracut hooks before udevd is started
gpgtar (1) - Encrypt or sign files into an archive
gtar (1) - an archiving utility
open (1) - start a program on a new virtual terminal (VT).
openvt (1) - start a program on a new virtual terminal (VT).
scsi_start (8) - start one or more SCSI disks
setarch (8) - change reported architecture in new program environment and set personalit...
sg_reset (8) - sends SCSI device, target, bus or host reset; or checks reset state
sg_rtpg (8) - send SCSI REPORT TARGET PORT GROUPS command
sg_start (8) - send SCSI START STOP UNIT command: start, stop, load or eject medium
sg_stpg (8) - send SCSI SET TARGET PORT GROUPS command
systemd-notify (1) - Notify service manager about start-up completion and other daemon status c...
systemd-rc-local-generator (8) - Compatibility generator for starting /etc/rc.local and /usr/sbin...
systemd.target (5) - Target unit configuration
tar (1) - an archiving utility
tar (5) - format of tape archive files
unicode_start (1) - put keyboard and console in unicode mode
As you can see, it matches not only tar but also start. This isn’t perfect, but it can provide helpful information related to tar, such as gpgtar.
man pages have sections. As you can see in the previous example, for tar, there are manual pages in two sections, one for the command-line utility (section 1), and one for the archiving format (section 5):
tar (1) - an archiving utility
tar (5) - format of tape archive files
We can access the page in section 5 to understand the format by running the following command:
[root@rhel-instance ~]# man 5 tar
Now, we can see the tar format page:
TAR(5) BSD File Formats Manual TAR(5)
NAME
tar — format of tape archive files
DESCRIPTION
The tar archive format collects any number of files, directories, and other file system objects (symbolic links, device nodes, etc.) into a single stream of bytes. The format was ...
You can see that manual pages are a great resource for learning more about the typical commands being used. This is also a fantastic resource as far as the Red Hat Certified System Administrator exam is concerned. One recommendation is to review all man pages for the commands shown previously in this chapter, as well as for the forthcoming chapters. Consider man pages the main information resource in the system. Let’s now review other information resources available.
info pages
info pages are usually more descriptive than man pages and are more interactive. They help more in getting started on a topic.
We can try to get info for the ls command by running the following:
[root@rhel-instance ~]# info ls
Important Note
If the info command is not available, you can install it first using the dnf install info –y command.
We can see the info page for it:
Next: dir invocation, Up: Directory listing
10.1 'ls': List directory contents
==================================
The 'ls' program lists information about files (of any type, including
directories). Options and file arguments can be intermixed arbitrarily,
info pages can redirect to other topics, shown underlined, and these can be followed by putting the cursor over them and hitting Enter.
As with man pages, press q to quit.
Please take some time to review the info pages for the main topics covered in this chapter (in several cases, info pages will not be available, but the ones that are will be very valuable).
What if we do not find a man or info page for a topic? Let’s cover this in the following section.
Other documentation resources
For other documentation resources, you can go to the /usr/share/doc directory. There, you will find other documents that come with the tools installed in the system.
Let’s see how many items we have:
[root@rhel-instance doc]# cd /usr/share/doc/
[root@rhel-instance doc]# ls | wc -l
333
You can see that there are 333 directories available under /usr/share/doc.
As a good example, let’s enter the bash directory:
[root@rhel-instance doc]# cd bash/
Then, let’s take a look at the INTRO file using less to read it (remember, you use q to quit):
[root@rhel-instance bash]# ls
bash.html bashref.html FAQ INTRO RBASH README
[root@rhel-instance bash]# less INTRO
BASH - The Bourne-Again Shell
Bash is the shell, or command language interpreter, that will appear in the GNU operating system. Bash is an sh-compatible shell that
incorporates useful features from the Korn shell (ksh) and C shell
(csh). It is intended to conform to the IEEE POSIX P1003.2/ISO 9945.2 Shell and Tools standard. It offers functional improvements
This is a good read for a better understanding of bash. Now, you have a lot of documentation resources that you will be able to use during your daily tasks, as well as in the RHCSA exam.
Summary
In this chapter, we have learned about how to log in to a system with user and with root, understanding the basics of permissions and security. We are now also more comfortable using the command line with auto-complete, navigating through the directories and files, packing and unpacking them, redirecting command output and parsing it, and even automating processes with shell scripts. More importantly, we have a way to obtain information on what we are doing (or want to do) available in any RHEL system with the included documentation. These skills are the basis of the upcoming chapters. Don’t hesitate to revisit this chapter if you feel stuck or if your progress is not as fast as you thought.
Now, it is time to extend your knowledge to encompass more advanced topics in the upcoming chapters. In the following chapter, you will be getting used to the tools for regular operations, in which you will review the most common actions taken when managing a system. Enjoy!