10
Keeping Your System Hardened with SELinux
In this chapter, we are going to familiarize ourselves with SELinux. SELinux has been around for a while, but a lack of understanding regarding how it works leads many people to suggest disabling it.
This is not something we want, as it would be similar to telling a user to forego a password because it is hard to remember.
We will introduce the origins of SELinux, and what the default modes and policies are. Then, we will understand how SELinux applies to our files, folders, and processes, and how to restore them to the system defaults.
Additionally, we will explore how to fine-tune the policies using Booleans and troubleshoot common issues with the help of the following sections:
- SELinux usage in enforcing and permissive modes
- Reviewing the SELinux context for files and processes
- Tweaking the policy with semanage
- Restoring changed file contexts to the default policy
- Using SELinux Boolean settings to enable services
- SELinux troubleshooting and common fixes
- Integrity Measurement Architecture, digital hashes, and signatures for enhancing security
In the last section, we’ll be learning about how we can secure our system by using signatures and digital hashes to validate the integrity of our system and make sure that no unauthorized changes to the files are performed.
By the end, we will better understand how to use SELinux properly and how to benefit from the additional protection that it provides to our system.
During the chapter, there will be detailed explanations of how SELinux works to aid our understanding of the way it operates, even if using it, in reality, is a lot simpler. We will also use these examples to illustrate cases where SELinux prevents attacks or misconfigurations.
Let’s get hands-on with SELinux!
Technical requirements
It is possible to continue the practice of using the virtual machine created at the beginning of this book in Chapter 1, Getting RHEL Up and Running. Any additional packages required for this chapter will be indicated alongside the text and can be downloaded from https://github.com/PacktPublishing/Red-Hat-Enterprise-Linux-RHEL-9-Administration.
SELinux usage in enforcing and permissive modes
Security-Enhanced Linux (SELinux) was introduced in December 2000 via the Linux-Kernel mailing list as a product started by the National Security Agency (NSA) to improve the security of the operating system by means of mandatory access controls and role-based access control, as opposed to the traditional discretionary access controls that were available in the system.
Before SELinux was introduced in the Linux kernel, discussions took place regarding the proper way to do it, and finally, a kernel framework named Linux Security Modules (LSM) was introduced and SELinux was implemented using it so that other approaches could use LSM too, and not just SELinux.
SELinux provides security improvements to Linux as access to files made by users, processes, or even other resources can be controlled in a very granular way.
Let’s take one example to make it clearer when SELinux comes into play: when a web server is serving pages from a user’s account, it reads files from the user’s home directory inside the public_html or www folders (the most standard ones). Being able to read files from the user’s home directory can reveal the contents in the event that the web server process is hijacked by an attacker, and this precise moment is when SELinux comes into play, as it will automatically block access to files that should not be accessible for a web server.
SELinux then confines the processes and services to only perform what they are supposed to and only use the resources that are authorized. This is a really important feature that keeps things under control, even in the event of software bugs that may lead to unexpected files or resources being accessed. SELinux will block it if it has not been authorized by the active policy.
Important Tip
SELinux permissions always arise following regular discretionary access control (DAC) if a user has no access to a file because of improper file permissions. SELinux has nothing to do there.
By default, the system installation should deploy it in the enforcing mode using the targeted policy. It is possible to check your current system status via the execution of sestatus, as shown in the following screenshot:
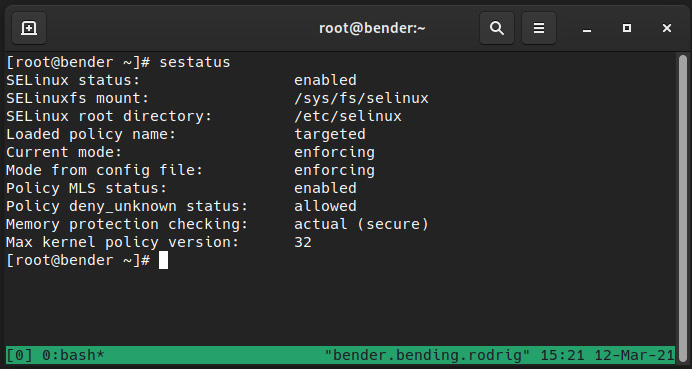
Figure 10.1 – Output of sestatus for our system
As we can see, our system has SELinux enabled using the targeted policy and is currently enforcing. Let’s learn what this means.
SELinux works by defining a policy, that is, a set of predefined rules for granting or denying access to resources. The ones available can be listed via dnf list selinux-policy-* in your system, with targeted and mls being the most common ones.
We will focus on the targeted policy, but to make an analogy regarding mls, the multi-level security (MLS) policy, it is about allowing users to interact based on their security clearance level, similar to what we can see in movies where someone has clearance to know some information, but not other people. How does this apply to a system? Well, the root user might have access to perform certain actions but not others, and if the user became root via su or sudo, they would still have the original SELinux label attached, so permissions could be reduced if the root login happened over a local terminal or a remote connection and sudo execution.
The mode, listed as enforcing, means that the policy is currently being enforced, which is the opposite of permissive. We can consider this as being active and offering protection, while permissive entails being active but only providing a warning, and not offering protection.
Why do we have permissive instead of just disabling it? This question is a bit tricky, so let’s explain a bit more about how it works to provide a better answer.
SELinux uses extended attributes in the filesystem to store the labels. Each time a file is created, a label is assigned based on the policy, but this only happens while SELinux is active, so this makes SELinux disabled different from SELinux permissive, as the first one will not create those labels for the new files created.
Additionally, SELinux in the permissive mode allows us to see the errors that will be raised if a program has not received a good policy for it or if a file has no proper labels.
It is really easy to temporarily switch from enforcing to permissive and vice versa, and always via the setenforce command, while we can use getenforce to retrieve the current status, as we can see in the following screenshot:
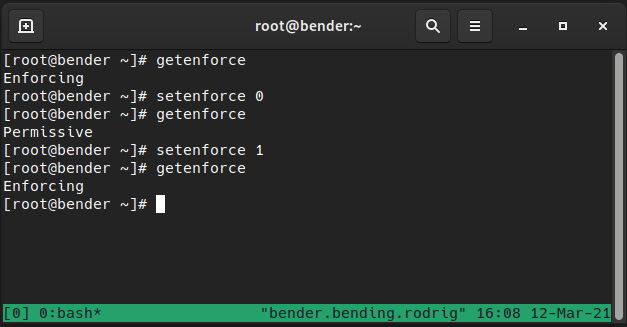
Figure 10.2 – Changing SELinux enforcing status
It might look basic, but it really is as easy as that – a matter of running a command. However, if the status was disabled, it would be a completely different story.
The SELinux status is configured by editing the /etc/selinux/config file, but changes only take effect after a system reboot; that is, we can switch from enforcing to permissive in real time or from permissive to enforcing, but when changing the policy from disabling to enabling, or vice versa, SELinux will require us to reboot the system.
The general advice is to leave SELinux in the enforcing mode, but if, for whatever reason, it was disabled, the recommendation is to switch SELinux to permissive as the first step when moving from disabled. This will allow us to check that the system actually works without being locked out of it because of a kernel blocking access to files and resources.
Note
During the reboot after switching from disabled to permissive or enforcing, the system will force a relabeling of the filesystem based on the policy. This is accomplished by the creation of a file in the root folder of our filesystem named /.autorelabel, which will trigger the process and reboot again afterward.
But why opt for disabling instead of permissive? For example, some software might require to set it in the disabled mode even if later, it can be re-enabled for operations or other reasons, but bear in mind that SELinux is a security feature that protects your system and should be kept.
Keep in mind that SELinux uses Access Vector Cache (AVC) messages that are logged to the /var/log/audit/audit.log file as well as system journals, and yes, it’s a cache, so rules are not checked as frequently so as to speed up operations.
Let’s go back to the idea of the filesystem storing labels and let’s jump into the next section to see how they relate to processes, files, and the RBAC provided by SELinux.
Reviewing the SELinux context for files and processes
SELinux uses labels, also referred to as the security context attached to each file, and defines several aspects. Let’s check one example in our home folder with the ls –l command, but with a special modifier, Z, that will show SELinux attributes as well, as we can see in the following screenshot:

Figure 10.3 – File listing showing SELinux attributes
Let’s focus on the output for one of the files:
-rw-r--r--. 1 root unconfined_u:object_r:admin_home_t:s0 540 Mar 6 19:33 term.sh
The SELinux attributes are the ones listed as unconfined_u:object_r:admin_home_t:s0:
- The first part is the user mapping: unconfined_u
- The second part is the role: object_r
- The third part is the type: admin_home_t
- The fourth part is used for the level: s0 in multi-level security and multi-category security
Something similar happens with processes, and similarly, we can append Z to many of the common commands to get the contexts, for example, with ps Z, as we can see in the following screenshot:
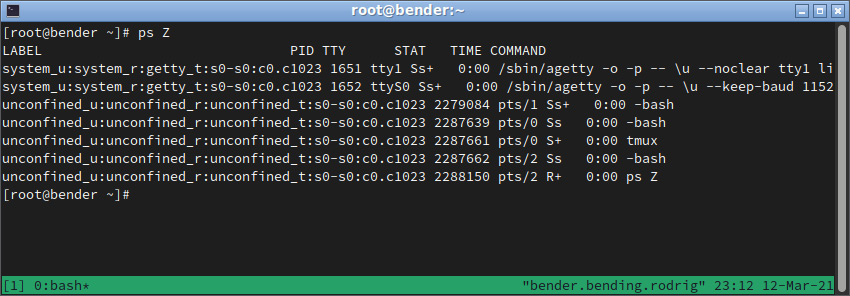
Figure 10.4 – ps output with SELinux contexts
Again, let’s examine one of the lines:
unconfined_u:unconfined_r:unconfined_t:s0-s0:c0.c1023 2287661 pts/0 S+ 0:00 tmux
Again, we can see the same approach: user, role, type, and level for multi-level security and multi-category security.
Now that we’ve introduced what the context looks like, let’s focus on how it works in the targeted policy.
The targeted policy allows everything to run as if SELinux was not enabled in the system, except for the services targeted by it. This makes a good compromise between security and usability.
During the development of the policy, new services are added, while others are refined, and many of the most common services have policies written for protecting them.
SELinux also features something named transitions. A transition allows one process started by a user, with a binary with some specific role, to transition via the execution into some other role, which is used later to define what the permissions are for it.
As you might imagine, our user also has an SELinux context, and similarly, we can use the id -Z command for checking it:
unconfined_u:unconfined_r:unconfined_t:s0-s0:c0.c1023
So, going back to the first example, Apache Web Server is provided by the httpd package, which can be installed via dnf –y install httpd. Once installed, let’s start it with systemctl start httpd and enable it with systemctl enable httpd, and then open the firewall with firewall-cmd --add-service=http and firewall-cmd --add-service=https, as we’ve done with other services in previous chapters.
Previous commands can be found in the following script: https://github.com/PacktPublishing/Red-Hat-Enterprise-Linux-RHEL-9-Administration/blob/main/chapter-10-selinux/apache.sh.
Let’s see how all that comes into play in the following screenshot:
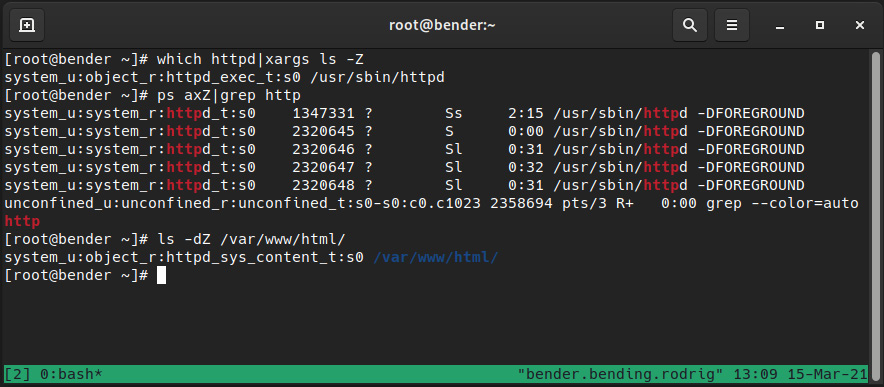
Figure 10.5 – Web server SELinux contexts
Here, we can see how the executable on disk has the httpd_exec_t context, the process is httpd_t, and the files/folder served by it is httpd_sys_content_t, and it works!
Let’s now create an index.htm file in our home folder and move it to the Apache Web Root folder as follows:
# echo '<html><head><title>Our test</title></head><body>This is our test html</body></html>' > index.htm
# cp index.htm /var/www/html/index2.htm
# mv index.htm /var/www/html/index1.htm
Let’s see what happens when we try to access the files as shown in the following screenshot:
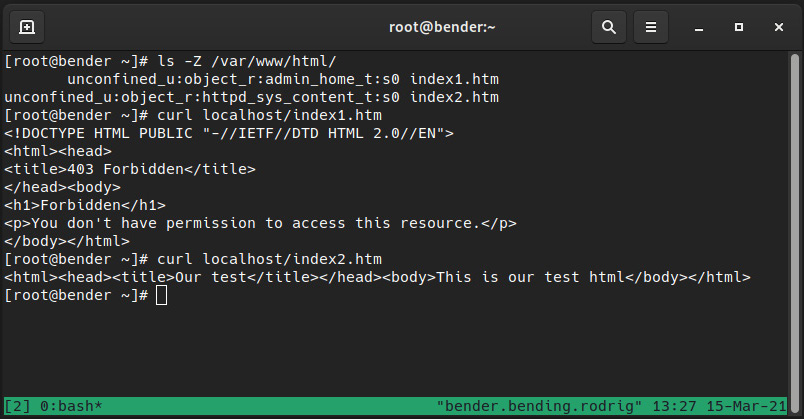
Figure 10.6 – Apache behavior with the generated files
As we can see, each file has one SELinux context, but on top of that, Apache is denying access to the one we moved (index1.htm), but showing the contents for the one we copied (index2.htm).
What has happened here? We copied one file and moved the other, out of the same source, but they got two different SELinux contexts, as we can see in the following figure:

Figure 10.7 – Different SELinux contexts
Let’s extend the test as shown in the following screenshot:
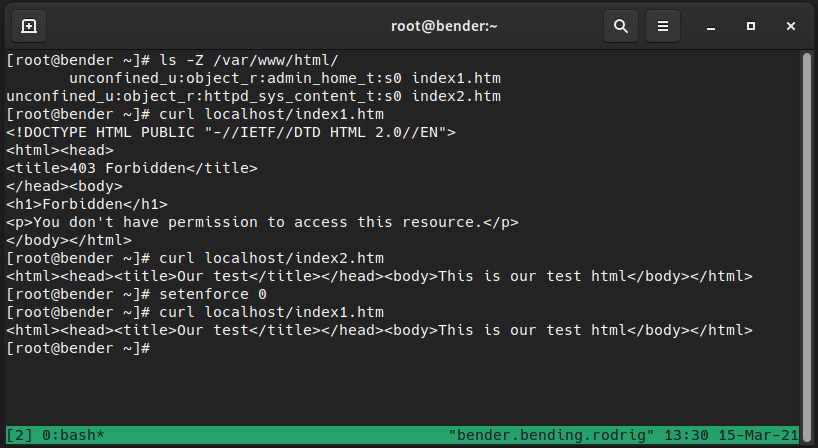
Figure 10.8 – Retrying with SELinux in permissive mode
As we can see in the preceding screenshot, we are now able to access file contents, so you could say “What is wrong with SELinux that does not allow my site to work?” but the right way to express it would be “Look how SELinux has protected us from disclosing a personal file on a website.”
Note that as we’ve temporarily disabled SELinux enforcing via setenforce 0, we need to enable it back with setenforce 1 to keep our system protected.
Instead of directly moving a file into Apache’s DocumentRoot (/var/www/html), if it was an attacker trying to reach our home folder files, SELinux would have denied those accesses by default. The httpd_t process cannot access the admin_home_t context.
A similar thing happens when we try to get Apache (or any other service under the targeted policy) to listen on a port that is not the one configured by default, and the best way to get familiar with what we can or cannot do is to learn about the semanage utility.
Using semanage, we can list, edit, add, or delete the different values in the policy, and even export and import our customizations, so let’s use it to learn a bit more about it using our example with httpd.
Let’s learn about semanage in the following section.
Tweaking the policy with semanage
As we introduced earlier, the targeted policy contains some configurations that are enforced for the services it has defined, allowing the protection of those services while not interfering with the ones it does not know about.
Still, sometimes we need to tweak several settings, such as allowing http or the ssh daemon to listen on alternate ports or accessing some other file types, but without losing the additional layer of protection provided by SELinux.
First, let’s ensure that policycoreutils and policycoreutils-python-utils are installed in our system with dnf –y install policycoreutils-python-utils policycoreutils, as they provide the tools we will use in this and the next sections of this chapter.
Let’s learn with the help of an example. Let’s see which ports httpd_t can access with semanage port -l|grep http:
http_cache_port_t tcp 8080, 8118, 8123, 10001-10010
http_cache_port_t udp 3130
http_port_t tcp 80, 81, 443, 488, 8008, 8009, 8443, 9000
pegasus_http_port_t tcp 5988
pegasus_https_port_t tcp 5989
As we can see, http_port_t, used by Apache Daemon, is allowed, by default, to use ports 80, 81, 443, 488, 8008, 9009, 8443, and 9000 via tcp.
That means that if we want to run Apache on any of those ports, no changes to the policy will be required.
If we repeat the command but for ssh, we only see port 22 opened (executing semanage port -l|grep ssh):
ssh_port_t tcp 22
For example, we might want to add another port, let’s say 2222, to the list of possible ports, so that we hide the standard one being tested by port scanners. We will be able to do it via semanage port -a -p tcp -t ssh_port_t 2222 and then validate with the prior command, semanage port –l|grep ssh, which now shows the following:
ssh_port_t tcp 2222, 22
As we can see, port 2222 has been added to the list of available ports for the ssh_port_t type, and that enables the ssh daemon to start listening on it (this, of course, requires additional configuration for the ssh daemon configuration and to the firewall before we get a working service).
In the same way, for example, some web services require writing to specific folders for storing configurations, but by default, the context on /var/www/html is httpd_sys_content_t, which does not allow writing to disk.
We can check the available file contexts with semanage fcontext –l in a similar way to what we did with the ports, but the list of files is huge, as a web server might use common locations such as logs and cgi-bin, as well as filesystem files for certificates, configuration, and home directories, and extensions such as PHP and others. When you check the contexts with the preceding command, pay attention to the different types that are available and what the structure is for one listing, as in the following example:
/var/www/html(/.*)?/wp-content(/.*)? all files system_u:object_r:httpd_sys_rw_content_t:s0
As we can see, there is a regular expression that matches the files in the wp-content folder inside the /var/www/html path applying to all files and sets an SELinux context of httpd_sys_rw_content_t, which allows read-write access. This folder is used by the popular blog software WordPress, so the policy is already prepared for covering some of the most popular services, folders, and requirements without requiring system administrators to write them ad hoc.
When invoking semanage, it will output that it has some subcommands we can use, such as the following:
- import: This allows the importing of local modifications.
- export: This allows the exporting of local changes.
- login: This allows the login and SELinux user associations to be managed.
- user: This manages SELinux users with roles and levels.
- port: This manages port definitions and types.
- ibpkey: This manages InfiniBand ibpkey definitions.
- ibendport: This manages end port InfiniBand definitions.
- interface: This defines network interface definitions.
- module: This manages policy modules for SELinux.
- node: This manages definitions of network nodes.
- fcontext: This manages file context definitions.
- boolean: This manages Booleans for tweaking policies.
- permissive: This manages the enforcing mode.
- dontaudit: This manages the dontaudit rules in the policy.
For each one of the preceding commands, we can use the -h argument to list, get help about, and learn about the extra arguments that can be used for each one.
For the day-to-day use case, most of the time we’ll be using port and fcontext as those will cover extending or tuning the available services that come with Red Hat Enterprise Linux, like the example we have showcased with ssh listening on an additional port.
Important Tip
Traditionally, Red Hat Certified System Administrator (RHCSA) and Red Hat Certified Engineer (RHCE) courses used to have a reboot validation. This meant that for each service that was installed and started, it was also mandatory to remember to enable it to be active on the next reboot. A similar thing happens with SELinux. If we are adding a piece of software that will stay in our system, the best approach is to define, via semanage, regexp for the path that will be used. When following this approach, if the filesystem is relabeled or the context restored, the application will continue to work.
Let’s see how to manually set the context for files and how to restore the defaults in the next section.
Restoring changed file contexts to the default policy
In the previous section, we mentioned how semanage enables us to perform changes to the policy, which is the recommended way to perform changes and to persist them for future files and folders, but that is not the only way we can perform operations.
From the command line, we can use the chcon utility to change the context for a file. This will allow us to define the user, the role, and the type for the file we want to alter, and similar to other filesystem utilities such as chmod or chown, we can also affect files recursively, so it’s easy to set a full folder hierarchy to the desired context.
One feature that I always found very interesting is the ability to copy the context of a file via the --reference flag so that the same context as the referenced file is applied to the target one.
When we were introducing the example of httpd earlier in this chapter, we did a test with two files, index1.htm and index2.htm, that were moved and copied to the /var/www/html folder. To go deeper into this example, we will make additional copies of index1.htm (such as index3.htm) to demonstrate in the next screenshot the usage of chcon. Bear in mind that creating the files directly in the /var/www/html folder will set the files to have the proper context, so we need to create them at /root and then move them to the target folder, as we can see in the following screenshot:
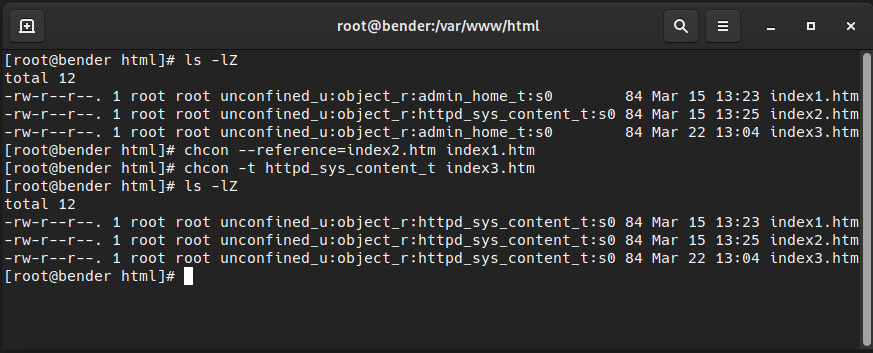
Figure 10.9 – Demonstrating chcon usage
As we can see, both the index1.htm and index3.htm files now have the proper context – in the first case, using the reference, and in the second, defining the type to use.
Of course, this is not the only method. As we indicated earlier, the recommended way for setting the context for applications is to define the regexps path via semanage, and this empowers us to use the restorecon command to apply the right context, according to the configuration, to the files. Let’s see how it operates in the following screenshot:
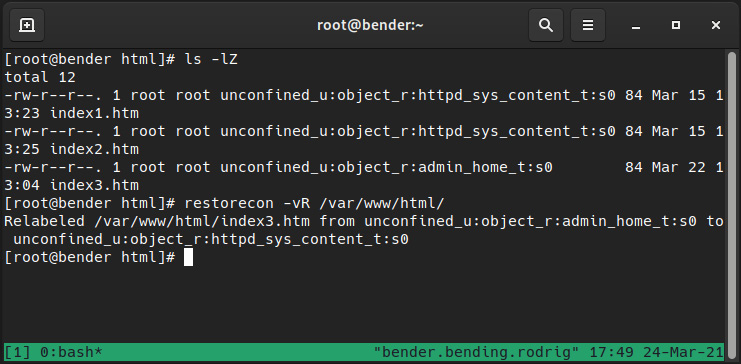
Figure 10.10 – Using restorecon to restore context
As we can see, we used restorecon –vR /var/www/html/ and it automatically changed the index3.htm file into httpd_sys_content_t, which is defined for that folder as we saw when we were testing semanage to list the contexts. The arguments used, v and R, make the utility report the changes (verbose) and work recursively on the paths provided.
Let’s say we have messed the system up by running chcon over the root filesystem. What would be the way to fix it? In this case, as we mentioned earlier, we should do the following:
- Set the operation mode to permissive to not block further access via setenforce 0.
- Put the marker to have the filesystem relabeled via touch /.autorelabel.
- Modify the /etc/selinux/config file to set the boot mode to permissive.
- Reboot the system to let relabeling happen.
- Once the system reboots, edit /etc/selinux/config again to define the operation mode as enforcing.
By operating in this way, instead of just running restorecon -R /, we are making sure that the system is operational and will continue to operate after reboot and a full relabel is applied to the filesystem, so it is left ready to re-enable the enforcing mode safely.
In the next section, let’s see how to tune the policy within itself, using Booleans to tune how it works.
Using SELinux Boolean settings to enable services
Many services have a wide range of configuration options for many common cases, but not always the same. For example, the http server should not access user files, but at the same time, it’s a common operation to enable personal websites from the www or public_html folders in each user’s home directory.
To overcome that use case and at the same time, provide enhanced security, the SELinux policy makes use of Booleans.
A Boolean is a tunable that can be set by the administrator that can enable or disable conditionals in the policy code. Let’s see, for example, a list of Booleans available for httpd by executing getsebool -a|grep ^http (list reduced):
httpd_can_network_connect --> off
httpd_can_network_connect_db --> off
httpd_can_sendmail --> off
httpd_enable_homedirs --> off
httpd_use_nfs --> off
This list is a reduced subset of the Booleans available, but it does give us an idea of what it can accomplish; for example, http, by default, cannot use the network to connect to other hosts, or send an email (usually done in PHP scripts), or even access home folders for users.
For example, if we want to enable users in a system to publish their personal web pages from the www folder in their home directory, that is /home/user/www/, we will have to enable the httpd_enable_homedirs Boolean by running the following command:
setsebool -P httpd_enable_homedirs=1
This will tweak the policy to enable http to access the user’s home directory to serve the pages there. If additionally, the servers will be stored on a Network FileSystem (NFS) or Common Internet FileSystem (CIFS) mount, additional Booleans will be required. We’re still using the same targeted policy, but we’ve enabled the internal conditionals to permit that the accesses are not to be blocked by SELinux.
Important Tip
The –P parameter to setsebool is required to make the change permanent. That means writing the change so that it is persisted; without it, the change will be lost once we restart our server.
As we’ve seen, getsebool and setsebool allow us to query and set the values for the Booleans that tune the policy, but also, semanage boolean -l can help here, as we can see in the following screenshot:
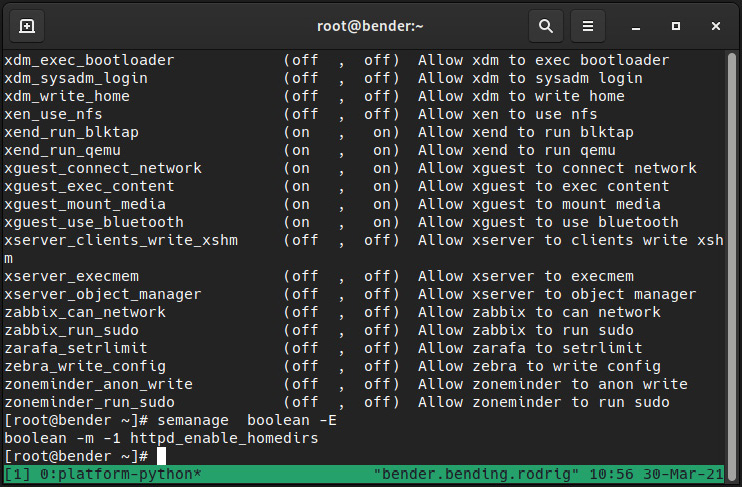
Figure 10.11 – Using semanage to manage Booleans
In the previous screenshot, we can see not only the Boolean we edited using setsebool but also a description of the intended behavior.
One of the benefits is that semanage, as we introduced, allows us to export and import the local changes to the policy, so any customization made can be exported and imported to another system to ease the setup of similar server profiles.
All the possible Booleans in the policy can be checked with semanage boolean –l, similar to what we did to list the binding ports for applications in our http example.
We have learned about using Booleans to tune how the policy is adapting to some specific but pretty common cases. Next, we will explore probably the most frequently used part for administrators, that is, troubleshooting, but with a focus on SELinux.
SELinux troubleshooting and common fixes
One of the main problems in getting used to SELinux is that many people who are not familiar with it blame it for things not working; however, this argument is getting a bit outdated, as SELinux was introduced in Red Hat Enterprise Linux 4, which was back in 2005.
Most of the time, issues with SELinux and our systems are related to changed file contexts and changing ports for services, and fewer time issues with the policy itself.
First of all, there are several places where we can check for errors, but in our list, we should start with the audit log or the system messages. For example, we can start with the /var/log/audit/audit.log file that we introduced earlier in this chapter.
Also bear in mind that SELinux mandatory access control (MAC) only plays once we have cleared access from regular discretionary access control (DAC), that is, if we’ve no permission to check a file (for example, mode 400 and our user not being the owner). In this case, it’s highly unlikely that SELinux is blocking access.
Most of the time, our system will have installed the setroubleshoot-server and setroubleshoot-plugins packages that provide several tools, including sealert, to query the received SELinux messages and many times also, to suggest changes. Those packages provided additional tools for troubleshooting problems related to SELinux in an easier way.
Let’s cover some of the basics that we should always validate:
- Review all the other controls (user and group ownership and permissions are properly set).
- Do not disable SELinux (https://stopdisablingselinux.com/).
If a program is not working properly and it was shipped with the OS, it might be a bug and should be reported via a support case or Bugzilla at https://bugzilla.redhat.com.
Only if a program is not working properly might it be made to run unconfined, but leaving all remaining system services protected via the targeted policy.
- Think about what was done before the error happened if this is an existing program.
Perhaps files were moved instead of copied or created upon reaching their destination, or perhaps the ports or folders for the software were changed.
Having arrived at this point, we should check audit.log for relevant messages. For example, as regards the example we mentioned regarding the wrong context with the files in /var/www/html/, an example audit entry would be as follows:
type=AVC msg=audit(1617210395.481:1603680): avc: denied { getattr } for pid=2826802 comm="httpd" path="/var/www/html/index3.htm" dev="dm-0" ino=101881472 scontext=system_u:system_r:httpd_t:s0 tcontext=unconfined_u:object_r:admin_home_t:s0 tclass=file permissive=0It looks strange, but if we check the parameters, we see the path of the affected file, the PID, the source context (scontext), and the target context (tcontext), so in brief, we can see that httpd_t tried to access (get attributes) for a target context admin_home_t and that was denied.
At the same time, if we’re using setroubleshoot, we will get a message like this in the system journal:
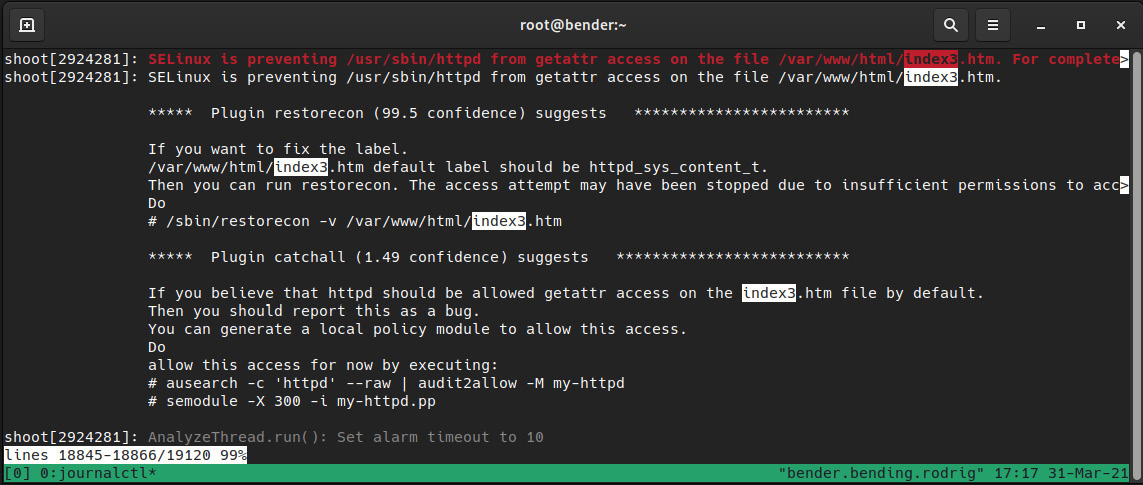
Figure 10.12 – setroubleshoot logging in the system journal
As we can see in the preceding screenshot, setroubleshoot already identified that one of the plugins suggests applying the restorecon command over the file, as it’s not matching the one for the folder it’s in, and even suggests the exact command to use for restoring the label.
Another plugin suggests generating a custom policy using the following two commands:
# ausearch -c 'httpd' --raw | audit2allow -M my-httpd
# semodule -X 300 -i my-httpd.pp
However, this kind of recommendation should be taken with knowledge of what is being done, which means that the preceding commands will fix httpd_t in terms of getting access to the home_admin_t file. We can learn about what would happen by only running the first command, together with the audit2allow pipe.
Running ausearch –c 'httpd' --raw | audit2allow –M my-httpd creates several files named my-httpd in the current folder, one named my-httpd.te, and another named my-httpd.pp. The second command, which we will not use, installs the modified policy, but please, don’t ever do that until you have an understanding of what’s going on, as we will see in the following lines.
The interesting file for us now is the my-httpd.te one (where te means type enforcement):
module my-httpd 1.0;
require {
        type httpd_t;
        type admin_home_t;
        class file getattr;
}
#============= httpd_t ==============
allow httpd_t admin_home_t:file getattr;
From there, we can see that it uses a requirements session for the types involved, and later, the rule itself, which allows httpd_t access to admin_home_t files for using the getattr function, nothing else, nothing more.
As has been said previously, will this fix our issue? It will effectively allow httpd_t to obtain access to the index3.html file, so there will no longer be any errors, but this comes with a significant cost. From that point, httpd_t could also read home directory files without any complaints.
Important Note
I don’t know how many times this fact needs to be reinforced but think twice before acting on a system. SELinux is a protection mechanism for increasing the safety of your system; do not disable it, and do not blindly accept audit2allow-created policies without some initial investigation and understanding of what the issue might be and what the proposed resolution does, as it may almost be equivalent to disabling SELinux.
At this point, if we have installed that module, we can use semodule to do the following:
- List: semodule -l
- Install: semodule -i $MODULE_NAME
- Remove: semodule –r $MODULE_NAME
With the preceding commands, we can check or alter the current status of the policy-loaded modules.
Going back to reviewing system logs, we may realize that something is actually failing some time after it began, but not from the very beginning, so using ausearch or passing the full logs to audit2allow might not prove helpful; however, we can use the command suggested by setroubleshoot to list them:
Mar 31 17:06:41 bender setroubleshoot[2924281]: SELinux is preventing /usr/sbin/httpd from getattr access on the file /var/www/html/index3.htm. For complete SELinux messages run: sealert -l 1b4d549b-f566-409f-90eb-7a825471aca8
If we execute sealert –l <ID>, we will receive the output provided by the different plugins to fix the issue as well as context information similar to what is shown in Figure 10.11.
In the case of new software being deployed that has no SELinux support, we can do the following checks the other way around in a test system:
- Set SELinux to the permissive mode.
- Deploy the software.
- Analyze all the alerts received to see whether anything is unexpected.
- Contact software vendors and initiate a support case with Red Hat to work on a policy.
If we’re getting locked out of our system because SELinux is enforcing and we have badly messed the labels up, for example, by running a bad chcon command recursively against our root folder (for example, scripting a context change depending on a variable and that variable being empty), we still have the following ways to get out of trouble:
- Use setenforce 0 to put SELinux in the permissive mode.
- Run touch /.autorelabel.
- Reboot the host so that at the next boot, SELinux restores the appropriate labels
If we are in a really bad situation and, for example, are unable to use setenforce 0 or the system cannot even boot or perform relabeling correctly, there is still hope, but some additional steps are required.
When a system is rebooting, we can see the list of installed kernels at the grub prompt and use it to edit the kernel boot parameters.
Using the selinux=0 parameter, we completely disable SELinux, and this is something we don’t want, but we can use enforcing=0 to accomplish having SELinux enabled, but in the permissive mode.
Once we have our system booting into the permissive mode, we can repeat the previous procedure to get back to the previous behavior and continue debugging the situation within the system itself with the prior indications given (checking system logs, and others).
Let’s move to the next section to learn about how we can increase our system security with another kernel function named Integrity Measurement Architecture that will monitor file contents to be validated before execution, access, and so on.
Integrity Measurement Architecture, digital hashes, and signatures for enhancing security
SELinux, as aforementioned, can increase your system security by confining processes to what is intended for them to do, but in order to improve the protection, you can make use of another feature of the kernel, the integrity subsystem, provided by two components (http://linux-ima.sourceforge.net/):
- Integrity Measurement Architecture (IMA), which maintains a runtime list of measures
- Extended Verification Module (EVM), which detects alterations to measurements
The first component, IMA, checks the file contents when opened or executed, stores the obtained values, and allows the validation while permitting tunning via custom policies.
The second component, EVM, hashes the values from IMA, and SELinux attributes via cryptographic functions.
Of course, if the system has support for the Trusted Platform Module (TPM), it can be used to increase the level of hardening of the solution. TPM can provide some services to improve security such as creating and storing encryption keys, for example.
Note that IMA is somewhat similar to what software such as AIDE can do; there’s a comparison on the documentation at https://access.redhat.com/documentation/en-us/red_hat_enterprise_linux/9/html/security_hardening/checking-integrity-with-aide_security-hardening#file-integrity-tools-aide-and-ima_checking-integrity-with-aide that might help you decide what fits better with your requirements.
In the following subsections, we will introduce some of the commands and how data is stored so that you can get familiar with this technology.
EVM and trusted keys
Red Hat Enterprise Linux 9 Kernel uses the evm-key keyring, which accepts encrypted keys.
Encrypted keys are generated by the kernel and make use of the keyring kernel service. Those can be used by the EVM to confirm that the running system has integrity.
Used in conjunction with TPM, the keys will get additional values used to seal them with a set of integrity management values that will only allow decrypting the keys on the same system they were generated while allowing to update the keys to support new versions of the software (for example, updated kernel versions will be allowed to boot).
For using trusted keys, the system must have the trusted kernel module loaded. Check the keyctl man page to learn about the different options for creating keys.
Just for following this section, ensure that the required packages are installed with the following:
dnf install ima-evm-utils attr keyutils
Let’s see how to enable this feature in the next section.
Enabling IMA and EVM in the system kernel
Both IMA end EVM are part of the kernel integrity system. To enable it on our system, we need to first check that securityfs is mounted by running the following commands:
mount|grep security
dmesg |grep –iE 'EVM|IMA'
The commands can be seen in action in the following screenshot:

Figure 10.13 – Security kernel filesystem mounted
The first command should show that the filesystem is mounted, and the second, the entries of IMA. Note that in the preceding figure, the kernel command line contains some parameters, and to enable them, if you don’t have them in your system, you can add them via the following:
grubby --update-kernel=/boot/vmlinuz-$(uname -r) --args="ima_policy=appraise_tcb ima_appraise=fix evm=fix"
And once added, reboot the system to apply the changes. You can always verify the current kernel parameters via the cat /proc/cmdline command. In Figure 10.12, you can see it on the fourth line (coming from the kernel boot log).
Okay, now that we have our system ready, we can start adding keys. Previously, we indicated to check the manual page for keyctl but now we’ll see some examples while we continue setting IMA.
When following the documentation at https://sourceforge.net/p/linux-ima/wiki/Home/, we can create the keys that we’ll be later using.
The first step is to create the kernel master key (kmk). In the following examples, we’ll be using the commands for systems without TPM enabled to allow testing of this inside an RHEL 9 VM:
keyctl add user kmk "$(dd if=/dev/urandom bs=1 count=32 2> /dev/null)" @u
keyctl add encrypted evm-key "new user:kmk 64" @u
This gives an output like the one shown in the following figure:
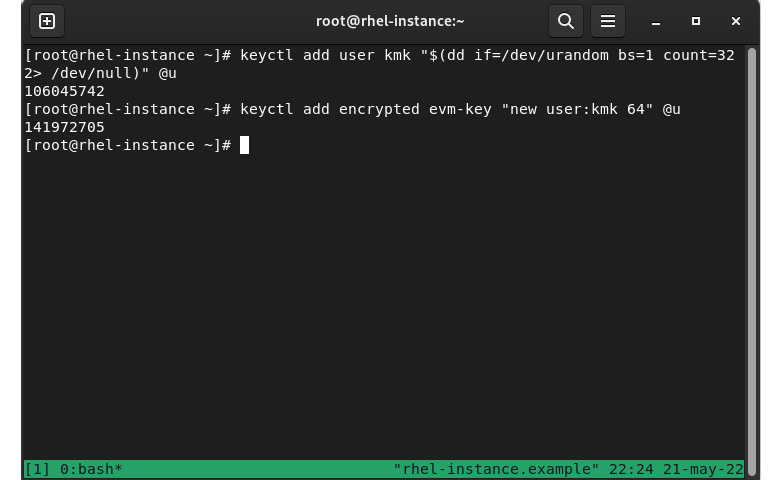
Figure 10.14 – Creating keys for kernel and EVM
We can also save the keys with the following commands so that an unencrypted copy of them will be stored on disk:
mkdir –p /etc/keys
keyctl pipe $(keyctl search @u encrypted evm-key) > /etc/keys/evm-key
keyctl pipe $(keyctl search @u user kmk) > /etc/keys/kmk
We can check the new keys in the kernel and enable EVM, as shown in the next screenshot:
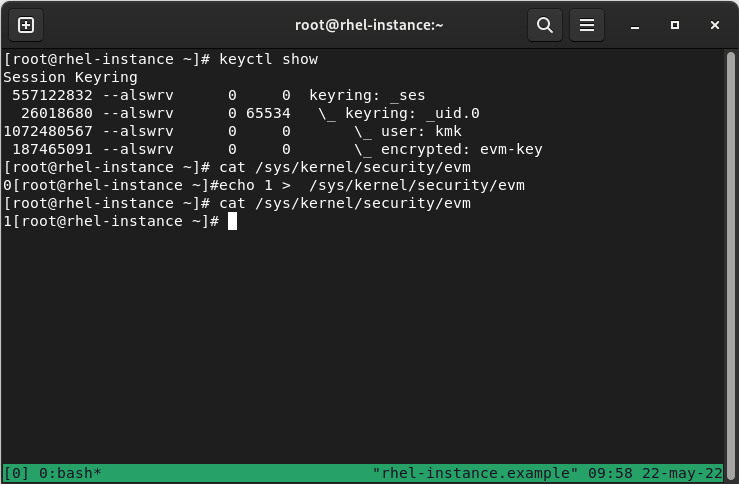
Figure 10.15 – Checking created keys and enabling EVM
As you can see, keyctl show is listing a tree-like display of the keys, and by querying and writing to the special /sys/kernel/security/evm file, we can enable it.
Now that IMA is enabled, the files on our system will get some extended attributes; for example, let’s check the extended attributes of the .bash_history file with the following:
getfattr -m . -d .bash_history
It will return an output similar to this:
# file: .bash_history
security.ima=0sBAT4/qlLGUMDFUL8AmKNg5BJ9YFS8vU/Z0vi1wezgWGveA==
security.selinux="unconfined_u:object_r:admin_home_t:s0"
As you can see, the file doesn’t show the evm attribute, because this was done before evm was created, so let’s use the following command to update the file and get the attributes again:
touch .bash_history
[root@rhel-instance ~]# getfattr -m . -d .bash_history
# file: .bash_history
security.evm=0sAi194Jg8KrZA2Wy1tzAcTX9nO7mJ
security.ima=0sBAT4/qlLGUMDFUL8AmKNg5BJ9YFS8vU/Z0vi1wezgWGveA==
security.selinux="unconfined_u:object_r:admin_home_t:s0"
Now, we can see that security.ima keeps the same value, but the new security.evm key has been listed.
As aforementioned, check the provided links for more information and examples of how to use IMA and EVM to protect and go further than this introduction.
Summary
This chapter has introduced SELinux, how it works, how we can check the processes, files, and ports, and how to fine-tune them either by adding new options or using Booleans. We also covered several initial troubleshooting skills that we should explore further to enhance our knowledge and experience.
SELinux, as we’ve seen, is a powerful tool for keeping our system secured with an extra layer that protects our system even from unknown issues that might come from defects in the software itself.
We have covered how to find the SELinux context in files and processes, how those are applied via the policy, and how to tune it so that our system is protected and still able to provide the expected service.
Troubleshooting SELinux is a skill that will help us in adapting the software that doesn’t come with Red Hat Enterprise Linux to still perform properly. Last but not least, we introduced IMA and EVM so that they can be leveraged to increase the security of the system via the usage of hashing algorithms to detect changes in our system
In the next chapter, we will learn about security profiles with OpenSCAP to continue keeping our system safe.