17
Managing Containers with Podman, Buildah, and Skopeo
In this chapter, we’ll learn how to use Podman and Red Hat Universal Base Image, also called UBI. Together, Podman and UBI provide users with the software they need to run, build, and share enterprise-quality containers on Red Hat Enterprise Linux (RHEL).
In recent years, being able to understand and use containers has become a key requirement for Red Hat system administrators. In this chapter, we’ll review the basics of containers, how containers work, and the standard tasks for managing containers.
You will also learn how to run containers with simple commands, build enterprise-quality container images, and deploy them on a production system. Finally, you will learn when to use more advanced tools such as Buildah and Skopeo.
In this chapter, we will cover the following topics:
- Introduction to containers
- Running a container using Podman and UBI
- When to use Buildah and Skopeo
Technical requirements
In this chapter, we will review the basic usage of Podman, Buildah, and Skopeo, as well as how to build and run containers using Red Hat UBI.
We will create and run containers on the local RHEL 9 system, which we deployed in Chapter 1, Getting RHEL Up and Running. You will need to have the container-tools package from the Application Stream repository installed.
Introduction to containers
Containers provide users with a new way to run software on Linux systems. Containers provide all the dependencies related to a given piece of software, in a consistent and redistributable manner. Containers were first made popular by Docker, Google, and Red Hat, and many others joined Docker to create a set of open standards called the Open Container Initiative (OCI). The popularity of the OCI standards has facilitated a large ecosystem of tools where users don’t have to worry about compatibility between popular container images, registries, and tools. Containers have become standardized in recent years and most major tools follow three standards governed by the OCI, outlined here:
- Image specification: Governs how container images are saved on disk
- Runtime specification: Specifies how containers are started by communicating with the operating system (in particular, the Linux kernel)
- Distribution specification: Governs how images are pushed and pulled from registry servers
You can learn more about this at https://opencontainers.org/.
All container tools (Docker, Podman, Kubernetes, and so on) need an operating system to run the container, and each operating system can choose different sets of technology to secure containers, so long as they comply with the OCI standards. RHEL uses the following operating system capabilities to securely store and run containers:
- Namespaces: These are a technology in the Linux kernel that helps isolate processes from one another. Namespaces prevent containerized processes from having visibility of other processes on the host operating system (including other containers). Namespaces are what make a container feel like a virtual machine (VM).
- Control groups (Cgroups): These limit the number of central processing units (CPUs), memory, disk input/output (I/O), and/or network I/O available to a given process/container. This prevents the noisy neighbor problem.
- Security-Enhanced Linux (SELinux): As described in Chapter 10, Keeping Your System Hardened with SELinux, this provides an extra layer of operating system security that can limit the damage caused by security exploits. SELinux is nearly transparent when used in conjunction with containers and provides mitigation of security breakouts, even when there are vulnerabilities in tools such as Podman, Docker, or runC.
Many systems administrators use VMs to isolate applications and their dependencies (libraries and so on). Containers provide the same level of isolation but reduce the overhead of virtualization. Since containers are simple processes, they do not need a virtual CPU (vCPU) with all of the overhead of translation. Containers are also smaller than VMs, which simplifies management and automation. This is particularly useful for continuous integration/continuous delivery (CI/CD).
RHEL provides users with container tools and images that are compatible with all OCI standards. This means they work in a way that is very familiar to anyone who has used Docker. For those unfamiliar with these tools and images, the following concepts are important:
- Layers: Container images are constructed as a set of layers. New containers are created by adding new layers (even to delete things) that reuse existing lower layers. The ability to use existing prepackaged containers is convenient for developers who simply want to make changes to their applications and test them in a reproducible way.
- Distribution and deployments: Since containers provide all the dependencies coupled with an application, they are easy to deploy and redistribute. Combining them with container registries makes it easy to share container images, and collaboration, deployments, and rollbacks are much quicker and easier.
The container tools provided with RHEL make it easy to deploy containers at a small scale, even for production workloads. But to manage containers at scale and with reliability, container orchestration such as Kubernetes is a much better fit. Red Hat, following the lessons learned from building Linux distributions, has created a Kubernetes distribution called OpenShift. If you need to deploy containers at scale, we recommend you take a look at this platform. The container tools and images provided in RHEL, and introduced in this chapter, will provide a solid foundation for deploying to Kubernetes/OpenShift if and when you are ready for it. The tools introduced in this chapter have been built in a way that will prepare your applications to be deployed in Kubernetes when you are ready for it.
Installing container tools
To manage pods, containers, and container images, we can use Podman; to create OCI images, we can use Buildah; and to inspect container images and repositories on registries, we can use Skopeo. So, let’s install them:
[root@rhel-instance ~]# dnf install podman buildah skopeo –y
[omitted]
Let’s take a look at the main tools that we have installed, as follows:
- podman: This command is used to run containers. You may use it in every case in which you find the use of the docker command in the examples you discover on the internet. We will use this command in this chapter to run our containers.
- buildah: This is a tool that’s used to create container images. It uses the same Dockerfile definitions as Docker but without the need for a daemon.
- skopeo: This tool is used to introspect containers and check the different layers so that we can review whether they contain any non-compliant issues.
You now have a machine installed with all of the tools you will need to build, run, and manage containers on an RHEL 9 system.
Running a container using Podman and UBI
Now that you have the container tools from the Application Stream repository installed, let’s run a simple container based on Red Hat UBI that contains a set of official container images and extra software based on RHEL. To run a UBI image, it only takes a single command, as illustrated in the following code snippet:
[root@rhel-instance ~]# podman run –it registry.access.redhat.com/ubi9/ubi bash
Trying to pull registry.access.redhat.com/ubi9:latest...
Getting image source signatures
Checking if image destination supports signatures
Copying blob bf30f05a2532 done
Copying blob c6e5292cfd5f done
Copying config 168c58a383 done
Writing manifest to image destination
Storing signatures
[root@e38453f5e055 /]#
Check the hostname; it has changed from rhel-instance to e38453f5e055, which means we are inside the container.
Tip
These tutorials run commands as root, but one of the benefits of Podman is that it can run containers as a regular user without special permissions or a running daemon in the system.
You now have a fully isolated environment to execute whatever you want. You can run any commands you’d like in this container. It’s isolated from the host and from other containers that might be running, and you can even install software on it.
Note
Red Hat UBI is based on software and packages from RHEL. This is the official image to use with RHEL and provides a rock solid, enterprise-ready base for your containers. UBI will be used throughout this chapter.
Running a one-off container such as this is useful for testing new configuration changes and new pieces of software without interfering with the software directly on the host.
Note
Red Hat UBI contains a minimal set of tools for this image to be used as an enterprise-ready base. If you want to run common commands that have not been installed in the system such as ps, you need to install them first using dnf, like a normal system.
Let’s install the package that contains the ps command:
[root@e38453f5e055 /]# dnf install procps-ng
Updating Subscription Management repositories.
Unable to read consumer identity
Subscription Manager is operating in container mode.
[output omitted]
[output omitted]
Installed:
procps-ng-3.3.174.el9.x86_64
Complete!
Let’s take a look at the processes running in the container, as follows:
[root@e38453f5e055 /]# ps -efa
UID PID PPID C STIME TTY TIME CMD
root 1 0 0 21:13 pts/0 00:00:00 bash
root 39 1 0 21:17 pts/0 00:00:00 ps -efa
As you can see, the only processes that are running are the shell we are using and the command we have just run. It is a completely isolated environment.
Now, exit the container by running the following command:
[root@e38453f5e055 /]# exit
[root@rhel-instance ~]#
Now that we have a working set of container tools and a UBI container image cached locally, we’re going to move on to some more basic commands.
Basic container management – pull, run, stop, and remove
In this section, we’ll run some basic commands to get familiar with using containers. First, let’s pull some more images, as follows:
[root@rhel-instance ~]# podman pull registry.access.redhat.com/ubi9/ubi-minimal
...
[root@rhel-instance ~]# podman pull registry.access.redhat.com/ubi9/ubi-micro
...
[root@rhel-instance ~]# podman pull registry.access.redhat.com/ubi9/ubi-init
...
We now have several different images cached locally. Let’s take a look at these here:
[root@rhel-instance ~]# podman images
REPOSITORY TAG IMAGE ID CREATED SIZE
registry.access.redhat.com/ubi9/ubi-micro latest 8bbc013a1407 13 days ago 26.2 MB
registry.access.redhat.com/ubi9/ubi-init latest a991566cfe2c 13 days ago 244 MB
registry.access.redhat.com/ubi9 latest 168c58a38365 2 weeks ago 228 MB
registry.access.redhat.com/ubi9/ubi-minimal latest 4a8128b051b8 2 weeks ago 129 MB
Notice that we have four images cached locally. Red Hat UBI comes in multiple flavors, as outlined here:
- UBI Standard (ubi9/ubi): An RHEL-based container base image with YellowDog Updater Modified (YUM)/Dandified YUM (DNF) in the image. It can be used in a similar way to any other Linux base image. This image is targeted at 80% of people’s use cases and can easily be consumed from within a Dockerfile or Containerfile. The trade-off with this image is that it is larger than some of the other images.
- UBI Minimal (ubi9/ubi-minimal): This base image minimizes the size by using a small package manager called microdnf that is written in C instead of Python, such as for the standard YUM/DNF. This C implementation makes it smaller and pulls fewer dependencies into a container image. This base image can be used in any Dockerfile or Containerfile simply by using the microdnf command instead of yum. This image saves about 129 MB in memory.
- UBI Micro (ubi9/ubi-micro): This base image is built without a package manager. It cannot be used with a standard Dockerfile or Containerfile. Instead, users add software to this image using the Buildah tool on the container host. This image is the smallest base image provided in RHEL.
- UBI Init (ubi9/ubi-init): Based on the RHEL standard image, this image also supports the use of systemd in the container. This makes it easy to install a few pieces of software, start them with systemd, and treat the container in a similar way to a VM. This image is best for users who don’t mind slightly larger images and just want ease of use.
Now that you understand the basics of the four types of base images, let’s start a container in the background so that we can inspect it while it’s running. Start it in the background with the following command:
[root@rhel-instance ~]# podman run -itd --name background ubi9 bash
b75aeb784f71d990f4a6413acc1e09046ad966fce6df5e7232517f8ad642 d4ae
Notice that when we start the container, the shell returns to normal and we can’t type commands in the container. Our Terminal doesn’t enter a shell in the container. The -d option specified that the container should run in the background. This is how most server-based software, such as web servers, runs on a Linux system.
We can still connect our shell to a container running in the background if we need to troubleshoot one, but we have to determine which container we want to connect to. To do this, list all of the containers that are running with the following command:
[root@rhel-instance ~]# podman ps
CONTAINER ID IMAGE COMMAND CREATED STATUS PORTS NAMES
b75aeb784f71 registry.access.redhat.com/ubi9:latest bash 18 seconds ago Up 18 seconds ago background
We could reference the container using the CONTAINER ID value, but we have started the container with the name background to make it easier to reference. We can enter the container and see what is going on inside it with the exec subcommand, as follows:
[root@rhel-instance ~]# podman exec –it background bash
[root@b75aeb784f71 /]#
After you type a few commands, exit the container by running the following command:
Now, let’s stop the containerized process by running the following command:
[root@rhel-instance /]# podman stop background
Check it’s stopped by running the following command:
[root@rhel-instance ~]# podman ps -a
CONTAINER ID IMAGE COMMAND CREATED STATUS PORTS NAMES
b75aeb784f71 registry.access.redhat.com/ubi9:latest bash 2 minutes ago Exited (137) 33 seconds ago background
Notice that the state is Exited. This means the process has been stopped and is no longer in memory, but the storage is still available on disk. The container can be restarted, or we can delete it permanently with the following command:
[root@rhel-instance ~]# podman rm background
b75aeb784f71d990f4a6413acc1e09046ad966fce6df5e7232517f8ad642 d4ae
This deleted the storage, which means the container is gone forever; you can remove all the stopped containers as a cleanup step. Verify that no containers are left by running the following command:
[root@rhel-instance ~]# podman ps -a
CONTAINER ID IMAGE COMMAND CREATED STATUS PORTS NAMES
This section taught you some basic commands. Now, let’s move on to attaching storage.
Attaching persistent storage to a container
Remember that the storage in a container is ephemeral. Once the podman rm command is executed, the storage is deleted. If you have data that you need to save after the container has been removed, you need to use a volume. To run a container with a volume, execute the following command:
[root@rhel-instance ~]# podman run –it --rm -v /mnt:/mnt:Z --name data ubi9 bash
[root@228b44c14e2f /]#
The preceding command has mounted /mnt into the container, and the Z option has told it to appropriately change the SELinux labels so that data can be written to it. The --rm option ensures that the container is removed as soon as you exit the shell. Now, you can save data on this volume, and it won’t be removed when you exit the container. Add some data by running the following command:
[root@12ad2c1fcdc2 /]# touch /mnt/test.txt
[root@12ad2c1fcdc2 /]# exit
exit
[root@rhel-instance ~]#
Now, inspect the test file you created by running the following command:
[root@rhel-instance ~]# ls /mnt/
test.txt
Notice that the file is still on the system, even though the container has been removed and its internal storage has been deleted.
Deploying a container on a production system with systemd
Since Podman is not a daemon, it relies on systemd to start a container when the system boots. Podman makes it easy to start a container with systemd by creating a systemd unit file for you. The process of running a container with systemd looks like this:
- Run a container with Podman exactly how you want it to run in production.
- Export a systemd unit file.
- Configure systemd to use this unit file.
First, let’s run an example container, as follows:
[root@rhel-instance ~]# podman run -itd --name systemd-test ubi9 bash
ba3a30f45379b7cb5006844ebbd4e626962055aad8784b8288b199261d f92b1f
Now, let’s export the systemd unit file that we’ll use to start this container, as follows:
[root@rhel-instance ~]# podman generate systemd --name --new systemd-test > /etc/systemd/system/podman-test.service
Enable and start the service by running the following command:
[root@rhel-instance ~]# systemctl daemon-reload
[root@rhel-instance ~]# systemctl enable --now podman-test
Created symlink /etc/systemd/system/default.target.wants/podman-test.service → /etc/systemd/system/podman-test.service.
Test that the container is running by executing the following command:
[root@rhel-instance ~]# systemctl status podman-test
podman-test.service - Podman container-systemd-test.service
Loaded: loaded (/etc/systemd/system/podman-test.service; enabled; vendor preset: disabled)
Active: active (running) since Thu 2022-08-17 21:29:30 EDT; 13min ago
[output omitted]
...
Now, check that the container is running by using the podman command, as follows:
[root@rhel-instance ~]# podman ps
CONTAINER ID IMAGE COMMAND CREATED STATUS PORTS NAMES
12f8c495f20c registry.access.redhat.com/ubi9:latest bash About a minute ago Up About a minute ago systemd-test
This container will now start every time the system boots; even if you kill the container with Podman, systemd will always make sure this container is running. Podman and systemd make it easy to run containers in production. Now, let’s stop the container with systemctl and disable it, as follows:
[root@rhel-instance ~]# systemctl stop podman-test
[root@rhel-instance ~]# systemctl disable podman-test
Building a container image using a Dockerfile or Containerfile
Now that we know how to run containers, let’s learn how to build container images. Container images are commonly built with a file that serves as a blueprint for how to build them the same way every time. A Dockerfile or Containerfile contains all of the information necessary to build container images. It makes it easy to script how a container will get built. A Containerfile is just like a Dockerfile, but its name attempts to make it more agnostic and not tied to the Docker tooling. Either type of file can be used with the container tools that come with RHEL. Start by creating a file called Containerfile inside a test folder with the following content:
FROM registry.access.redhat.com/ubi9/ubi
RUN yum update -y
This simple Containerfile pulls the UBI standard base image and applies all of the latest updates to it. Now, let’s build a container image by running the following command:
[root@rhel-instance ~]# mkdir test
[root@rhel-instance ~]# mv Containerfile test/
[root@rhel-instance ~]# podman build –t test-build ./test
STEP 1: FROM registry.access.redhat.com/ubi9/ubi
You now have a new image called test-build that has a new layer containing all of the updated packages from the Red Hat UBI repositories, as illustrated in the following code snippet:
[root@rhel-instance ~]# podman images
REPOSITORY TAG IMAGE ID CREATED SIZE
localhost/test-build latest 98abd9c1754a 9 minutes ago 260 MB
... [output omitted] ...
The workflow for building images from a Dockerfile or Containerfile is nearly identical to how Docker was in RHEL 7 or any other operating system. This makes it easy for system administrators and developers to move to Podman.
Configuring Podman to search registry servers
Container registries are like file servers for container images. They allow users to build and share container images, resulting in better collaboration. Often, it’s useful to pull container images from public registry servers that are located on the internet, but in many instances, corporations have private registries that are not public. Podman makes it easy to search multiple registries, including private registries, on your company’s network.
Podman comes with a configuration file that allows users and administrators to select which registries are searched by default. This makes it easy for users to find the container images that administrators want them to find.
A set of default registries to search for are defined in /etc/containers/registries.conf. Let’s take a quick look at this file by filtering all the comments in it, as follows:
[root@rhel-instance ~]# cat /etc/containers/registries.conf | grep -v ^#
unqualified-search-registries = ["registry.access.redhat.com", "registry.redhat.io", "docker.io"]
short-name-mode = "enforcing"
As you can see, we have the unqualified-search-registries variable for secure registries, which includes the two main Red Hat registries, registry.access.redhat.com and registry.redhat.io, as well as the docker.io Docker registry. All of these registries are secured with Transport Layer Security (TLS) certificates, but Podman can also be configured to pull images without encryption using the registries.insecure section.
Separately from TLS, all images provided by Red Hat are signed and provide a signature store that can be used to verify them. This is not configured by default and is beyond the scope of this chapter.
The short-name-mode option supports three modes to control the behavior of short-name resolution:
- enforcing: Use enforcing if only one unqualified-search-registries is set. In this case, if there is more than one registry, and the user program is running in a Terminal (for example, stdout and stdin are a teletypewriter (TTY)), then it prompts the user to choose one of the specified search registries. In another case, if the program is not running in a Terminal, the ambiguity cannot be resolved and it will lead to an error.
- permissive: This behaves the same way as enforcing but does not give an error if the program is not running in a Terminal. Instead, it falls back to using all unqualified-search-registries.
- disabled: This will use all unqualified-search-registries without asking.
By default, short-name-mode is configured with enforcing.
To verify that Podman is using and searching the proper registries, run the following command:
[root@rhel-instance ~]# podman info | grep registries -A 4
registries:
search:
- registry.access.redhat.com
- registry.redhat.io
- docker.io
Tip
If you want to publish your own images, you can do this in the service that Red Hat offers to do so: https://quay.io. You can also configure registries.conf to search quay.io for images you store there.
Summary of Podman options
Let’s review the options that we used with Podman in this chapter:
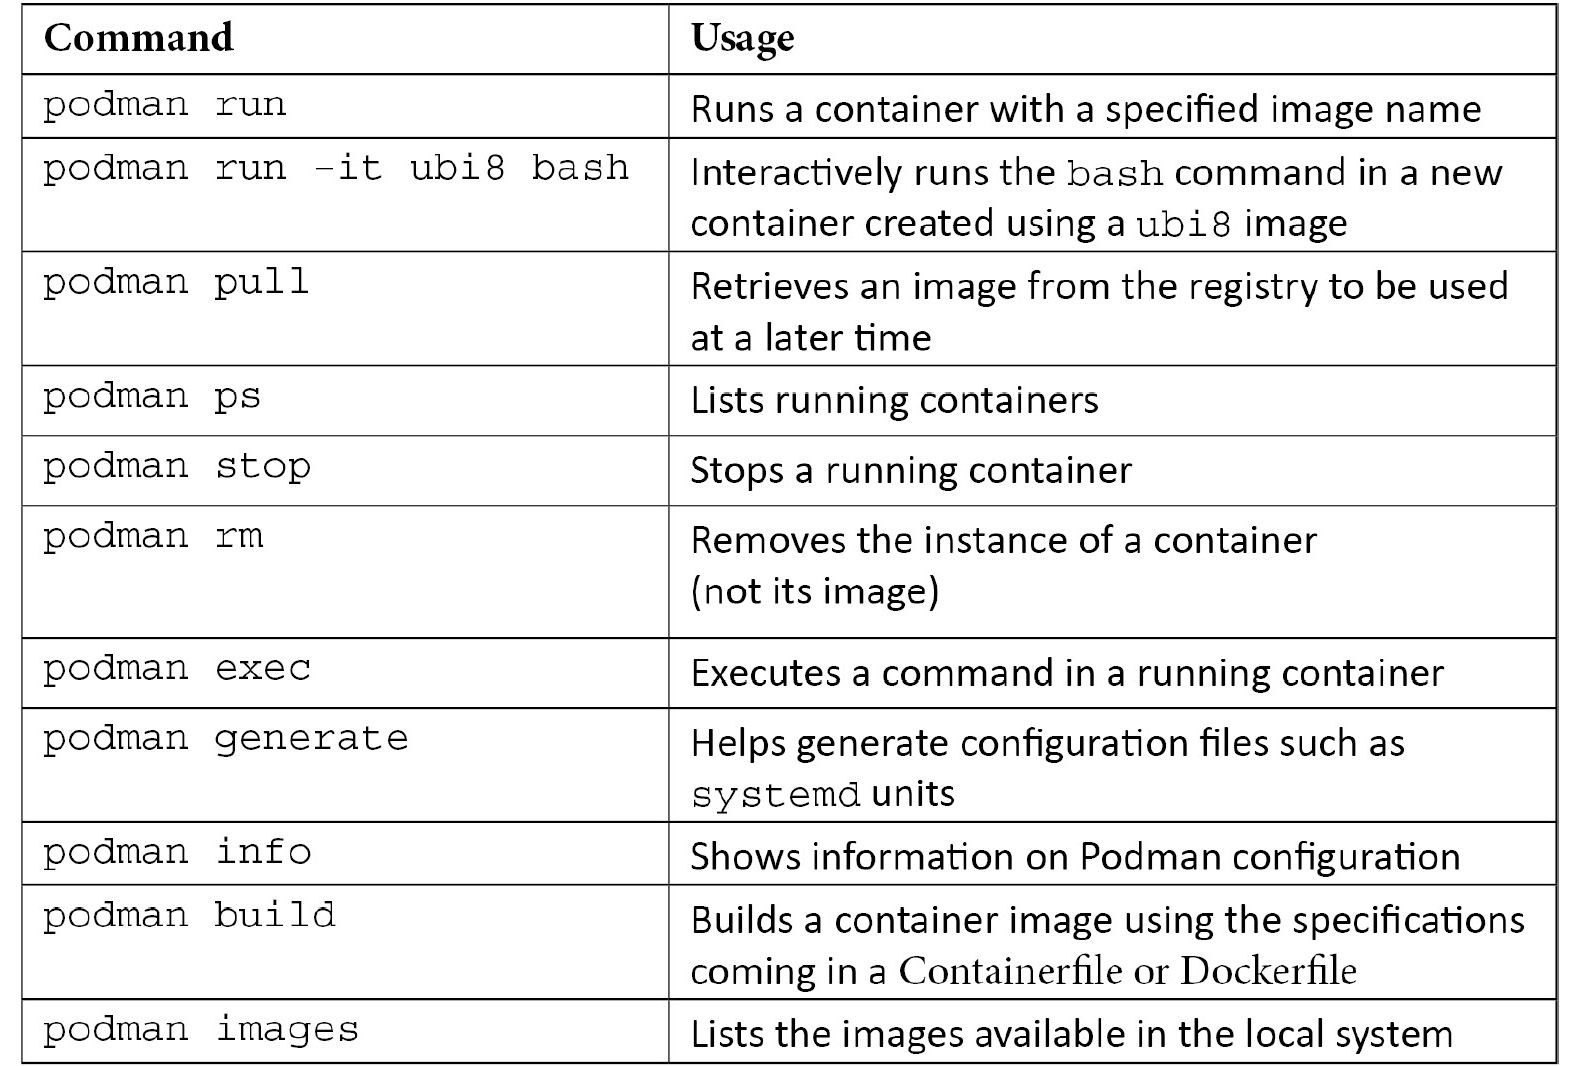
Table 17.1 – List of Podman options
As you can see, Podman includes options for managing the full container life cycle. Most Podman commands are compatible with docker. Podman even provides a package (podman-docker) that supplies an alias from podman to docker so that users can continue to type a command they are familiar with. While Podman and Docker feel quite similar to use, Podman can be run as a regular user and does not require a daemon to be continuously running. Let’s move on to the next section to explore some advanced use cases.
When to use Buildah and Skopeo
Podman is a general-purpose container tool and should solve 95% of a user’s needs. Podman leverages Buildah and Skopeo as libraries and pulls these tools together under one interface. That said, there are edge cases where a user may want to leverage Buildah or Skopeo separately. We will explore two such use cases here.
Building container images with Buildah
Building from a Dockerfile or Containerfile is quite easy, but it does come with some trade-offs. For example, Buildah is good in the following situations:
- When you need granular control over committing image layers. This can be necessary when you want two or three commands to run and then commit a single layer.
- When you have difficult-to-install software – for example, some third-party software comes with standardized installers that don’t understand they are being run in a Dockerfile. Many of these install.sh installers assume they have access to the entire filesystem.
- When a container image does not provide a package manager. UBI Micro builds very small images because it does not have a Linux package manager installed, nor any of the dependencies of a package manager.
For this example, let’s build on top of UBI Micro to demonstrate why Buildah is such a great tool. First, create a new container to work with, as follows:
[root@rhel-instance ~]# buildah from registry.access.redhat.com/ubi9/ubi-micro
ubi-micro-working-container
The preceding command created a reference to a new container called ubi-micro-working-container. Once Buildah creates this reference, you can build upon it. To make this easier, let’s start over and save the reference in a shell variable, as follows:
[root@rhel-instance ~]# microcontainer=$(buildah from registry.access.redhat.com/ubi9/ubi-micro)
Now, you can mount the new container as a volume. This lets you modify the container image by changing the files in a directory. Run the following command to do this:
[root@rhel-instance ~]# micromount=$(buildah mount $microcontainer)
Once the container storage has been mounted, you can modify it in any way you like. These changes will eventually be saved as a new layer in the container image. This is where you could run an installer (install.sh), but in the following example, we will use the package manager on the host to install packages in UBI Micro:
[root@rhel-instance ~]# yum install
--installroot $micromount --releasever 9 --setopt install_weak_deps=false --nodocs -y httpd
... [output omitted] ...
[root@rhel-instance ~]# yum clean all
... [output omitted] ...
When the package installation completes, we will unmount the storage and commit the new image layer as a new container image called ubi-micro-httpd, as illustrated in the following code snippet:
[root@rhel-instance ~]# buildah umount $microcontainer
232e2cdde4171c465f63b013214e5f1a161a1e62969e265c92487c92ce1f 73b9
[root@rhel-instance ~]# buildah commit $microcontainer ubi-micro-httpd
Getting image source signatures Copying blob 5f70bf18a086 skipped: already exists
Copying blob a5198d17d541 skipped: already exists
Copying blob 80a8684cd0a5 done
Copying config c857c77f14 done
Writing manifest to image destination
Storing signatures
c857c77f14674d79114010d80031b6fc5ae309f524d0ef10bf2f1d242e3 41202
You now have a new container image with httpd installed, built on UBI Micro. Only a minimal set of dependencies have been pulled in. Look at how small the image is:
[root@rhel-instance ~]# podman images
REPOSITORY TAG IMAGE ID CREATED SIZE
localhost/ubi-micro-httpd latest c857c7 7f1467 About a minute ago 26.3 MB
Buildah is a wonderful tool that gives you a lot of control over how builds are done. Now, we will move on to Skopeo.
Inspecting a remote container with Skopeo
Skopeo is specifically designed and built to work on remote container repositories. With the following command, you can easily remotely inspect the available tags for an image:
[root@rhel-instance ~]# skopeo inspect docker://registry.access.redhat.com/ubi9/ubi
{
"Name": "registry.access.redhat.com/ubi9/ubi",
"Digest": "sha256:aee6d39282dabc3374a01d4a81f97c6827cbcdcf155cadb5a42 966134205b05d",
"RepoTags": [
"9.0.0-1468",
"9.0.0-1468.1655190709",
... [output omitted] ...
Remote inspection is useful for determining whether you want to pull an image and, if so, with which tag. Skopeo can also be used to copy between two remote registry servers without caching a copy in the local storage. For more information, see the skopeo man pages.
Summary
In this chapter, we reviewed the basics of how to run, build, and share containers on RHEL 9. With this, you are prepared to create containers, run them, manage them, and even use systemd to ensure they’re always running in a production environment.
You are now ready to leverage the functionality and ease of deployment that containers provide. While a deep dive into all of the intricacies of migrating software into containers is outside the scope of this book, containers simplify the packaging and delivery of applications ready to be executed with all of their dependencies.
Containers are now a strong focus within the IT industry. Containers alone simplify how applications are packaged and delivered, but orchestration platforms such as OpenShift (based on Kubernetes) make it easier to deploy, upgrade, and manage containerized applications at scale.
Congratulations – you have made it to the end of this chapter! Now, it’s time to move on to the next chapter and take a self-assessment to ensure you’ve absorbed the material; this will help you practice your skills. There are two more chapters to go.