
14
Advanced Storage Management with Stratis and VDO
In this chapter, we will learn about Stratis and Virtual Data Optimizer (VDO).
Stratis is a storage management tool to simplify running the most typical daily tasks. It uses the underlying technologies explained in the previous chapters, such as LVM, partition schemas, and filesystems.
VDO is a storage layer that includes a driver that sits between our applications and the storage devices to provide deduplication and compression of the data stored, as well as tools to manage this functionality. This will allow us, for example, to maximize the ability of our system to hold virtual machine (VM) instances that will only consume disk space for the bits that are different between them while only having one copy of the common ones.
We can also use VDO for storing different copies of our backups, knowing that disk usage will still be optimized. By the end of this chapter, we will know how VDO works and what is required to set it up for our system.
We will explore how to prepare, configure, and use our systems in the following sections:
- Understanding Stratis
- Installing and enabling Stratis
- Managing storage pools and filesystems with Stratis
- Preparing systems to use VDO
- Creating and using a VDO volume
- Testing a VDO volume and reviewing stats
Let’s jump into preparing our systems to use Stratis.
Technical requirements
It is possible to continue the practice of using the VM created at the beginning of this book in Chapter 1, Installing RHEL9. Any additional packages required for this chapter will be indicated and can be downloaded from https://github.com/PacktPublishing/Red-Hat-Enterprise-Linux-RHEL-9-Administration.
For the Understanding Stratis section, we will need the same two disks that were added in Chapter 13, Flexible Storage Management with LVM, after all the LVM components have been cleaned up from them.
Understanding Stratis
As a new feature, to manage storage, Stratis was included in RHEL 8 as a technology preview (and is still a preview in RHEL 9). Stratis was created to manage local storage by combining a system service, stratisd, with the well-known tools in LVM (explained in Chapter 13, Flexible Storage Management with LVM) and the XFS filesystem (explained in Chapter 12, Managing Local Storage and Filesystems), which makes it very solid and reliable.
Important Note
The filesystems/pools created with Stratis should always be managed with it, and not with the LVM/XFS tools. In the same way, already-created LVM volumes should not be managed with Stratis.
Stratis combines local disks into pools and then distributes the storage in filesystems, as shown in the following diagram:

Figure 14.1 – Stratis simplified architecture diagram
As can be seen, when compared to LVM, Stratis provides a much simpler and easy-to-understand interface to storage management. In the following sections, we will install and enable Stratis and then use the same disks created in Chapter 13, Flexible Storage Management with LVM, to create a pool and a couple of filesystems.
Installing and enabling Stratis
To be able to work with Stratis, we will start by installing it. The two packages required to work with it are these:
- stratis-cli: A command-line tool to execute storage management tasks
- stratisd: A system service (also known as a daemon) that takes commands and executes the low-level tasks
To install them, we will use the dnf command:
[root@rhel-instance ~]# dnf install stratis-cli stratisd
Updating Subscription Management repositories.
Red Hat Enterprise Linux 9 for x86_64 - BaseOS (RPMs) 17 MB/s | 32 MB 00:01
Red Hat Enterprise Linux 9 for x86_64 - AppStream (RPMs) 12 MB/s | 30 MB 00:02
Dependencies resolved.
====================================================================================================
Package Arch Version Repository Size
====================================================================================================
Installing:
stratis-cli noarch 2.4.3-2.el9 rhel-9-for-x86_64-appstream-rpms 108 k
stratisd x86_64 2.4.2-3.el9 rhel-9-for-x86_64-appstream-rpms 2.8 M
[omitted]
Complete!
Now we can start the stratisd service with systemctl:
[root@rhel-instance ~]# systemctl start stratisd
[root@rhel-instance ~]# systemctl status stratisd
● stratisd.service - Stratis daemon
Loaded: loaded (/usr/lib/systemd/system/stratisd.service; enabled; vendor preset: enabled)
Active: active (running) since Sat 2022-05-22 17:31:35 CEST; 53s ago
Docs: man:stratisd(8)
Main PID: 17797 (stratisd)
Tasks: 1 (limit: 8177)
Memory: 1.2M
CGroup: /system.slice/stratisd.service
└─17797 /usr/libexec/stratisd --log-level debug
[omitted]
Now we shall enable it to start at boot:
[root@rhel-instance ~]# systemctl enable stratisd
[root@rhel-instance ~]# systemctl status stratisd
● stratisd.service - Stratis daemon
Loaded: loaded (/usr/lib/systemd/system/stratisd.service; enabled; vendor preset: enabled)
[omitted]
Tip
We can do both tasks with one command, which is systemctl enable --now stratisd.
Let’s check with stratis-cli that the daemon (also known as system service) is running:
[root@rhel-instance ~]# stratis daemon version
2.4.2
We have Stratis ready, so it’s time to start working on disks. Let’s move on to the next subsection.
Managing storage pools and filesystems with Stratis
In order to have some storage available for Stratis, we will use the /dev/vdb and /dev/vdc disks. We need to be sure that they do not have any logical volumes or partitions on them. Let’s review them:
[root@rhel-instance ~]# lvs
LV VG Attr LSize Pool Origin Data% Meta% Move Log Cpy%Sync Convert
root rhel -wi-ao---- <8,00g
swap rhel -wi-ao---- 1,00g
[root@rhel-instance ~]# vgs
VG #PV #LV #SN Attr VSize VFree
rhel 1 2 0 wz--n- <9,00g 0
[root@rhel-instance ~]# pvs
PV VG Fmt Attr PSize PFree
/dev/vda2 rhel lvm2 a-- <9,00g 0
We are good: all the LVM-created objects are on the /dev/vda disk. Let’s check the other two disks, /dev/vdb and /dev/vdc:
[root@rhel-instance ~]# parted /dev/vdb print
Model: Virtio Block Device (virtblk)
Disk /dev/vdb: 1074MB
Sector size (logical/physical): 512B/512B
Partition Table: gpt
Disk Flags:
Number Start End Size File system Name Flags
<snip>
[root@rhel-instance ~]# parted /dev/vdc print
Error: /dev/vdc: unrecognised disk label
Model: Virtio Block Device (virtblk)
Disk /dev/vdc: 1074MB
Sector size (logical/physical): 512B/512B
Partition Table: unknown
Disk Flags:
The /dev/vdc disk has no partition table label. We are good with this one. However, the /dev/vdb disk has a partition table. Let’s remove it:
[root@rhel-instance ~]# dd if=/dev/zero of=/dev/vdb count=2048 bs=1024
2048+0 records in
2048+0 records out
2097152 bytes (2,1 MB, 2,0 MiB) copied, 0,0853277 s, 24,6 MB/s
Tip
The dd command, which stands for disk dump, is used to dump data from devices and to devices. The special /dev/zero device simply generates zeroes, which we use to overwrite the initial sectors of the disk, where the label lives. Please use dd with care; it may overwrite anything without warning.
Now we are ready to create the first pool with the stratis command:
[root@rhel-instance ~]# stratis pool create mypool /dev/vdb
[root@rhel-instance ~]# stratis pool list
Name Total Physical Properties
mypool 1 GiB / 37.63 MiB / 986.37 MiB ~Ca,~Cr
We currently have the pool created, as shown in the following diagram:

Figure 14.2 – Stratis pool created
We have the pool created; we can now create a filesystem on top of it:
[root@rhel-instance ~]# stratis filesystem create mypool data
[root@rhel-instance ~]# stratis filesystem list
Pool Name Name Used Created Device UUID
mypool data 546 MiB May 23 2022 19:16 /dev/stratis/mypool/data b073b6f1d56843b888cb83f6a7d80a43
The status of the storage is as follows:

Figure 14.3 – Stratis filesystem created
Let’s prepare to mount the filesystem. We need to add the following line in /etc/fstab:
Important Note
In order for a Stratis filesystem to be mounted correctly during boot, we shall add the x-systemd.requires=stratisd.service option so it is mounted after the stratisd service is started.
Now we can mount it:
[root@rhel-instance ~]# mkdir /srv/stratis-data
[root@rhel-instance ~]# mount /srv/stratis-data/
Let’s now extend the pool:
[root@rhel-instance ~]# stratis blockdev list mypool
Pool Name Device Node Physical Size Tier
mypool /dev/vdb 1 GiB Data
[root@rhel-instance ~]# stratis pool add-data mypool /dev/vdc
[root@rhel-instance ~]# stratis blockdev list mypool
Pool Name Device Node Physical Size Tier
mypool /dev/vdb 1 GiB Data
mypool /dev/vdc 1 GiB Data
As the underlying layer uses thin-pooling, we do not need to extend the filesystem. The storage is as follows:
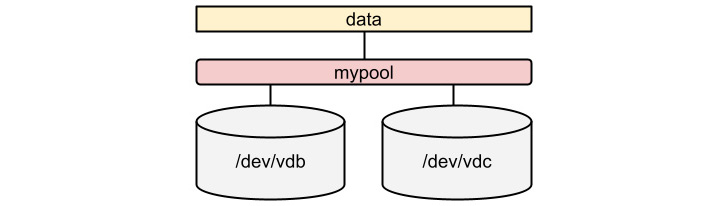
Figure 14.4 – Stratis pool extended
Time to use the stratis snapshot command to create a snapshot. Let’s create some data and then snapshot it:
[root@rhel-instance ~]# stratis filesystem
Pool Name Name Used Created Device UUID
mypool data 546 MiB May 23 2022 19:54 /dev/stratis/mypool/data 08af5d5782c54087a1fd4e9531ce4943
[root@rhel-instance ~]# dd if=/dev/urandom of=/srv/stratis-data/file bs=1M count=512
512+0 records in
512+0 records out
536870912 bytes (537 MB, 512 MiB) copied, 2,33188 s, 230 MB/s
[root@rhel-instance ~]# stratis filesystem
Pool Name Name Used Created Device UUID
mypool data 966 MiB May 23 2022 19:54 /dev/stratis/mypool/data 08af5d5782c54087a1fd4e9531ce4943
[root@rhel-instance ~]# stratis filesystem snapshot mypool data data-snapshot1
[root@rhel-instance ~]# stratis filesystem
Pool Name Name Used Created Device UUID
mypool data 1.03 GiB May 23 2022 19:54 /dev/stratis/mypool/data 08af5d5782c54087a1fd4e9531ce4943
mypool data-snapshot1 1.03 GiB May 23 2022 19:56 /dev/stratis/mypool/data-snapshot1 a2ae4aab56c64f728b59d710b82fb682
Tip
To see the internal pieces of Stratis, you can run the lsblk command. With it, you will see the components used by Stratis in a tree: physical devices, allocations for metadata and data, pools, and filesystems. All of that is abstracted by Stratis.
With this, we have seen an overview of Stratis in order to cover the basics of its management. Remember that Stratis is in preview and therefore it should not be used in production systems.
Let’s move on now to other advanced topics in storage management by reviewing data deduplication with VDO.
Preparing systems to use VDO
As mentioned earlier, VDO is a driver, specifically a Linux device-mapper driver, that uses two kernel modules:
Regular storage devices such as local disks, Redundant Array of Inexpensive Disks (RAIDs), and so on are the final backend where data is stored; the VDO layer on top reduces disk usage via the following:
- The removal of zeroed blocks, only storing them in the metadata.
- Deduplication: Duplicate data blocks are referenced in the metadata but stored only once.
- Compression, using 4 KB data blocks with a lossless compression algorithm (LZ4: https://lz4.github.io/lz4/).
These techniques have been used in the past in other solutions, such as in thin-provisioned VMs that only kept the differences between VMs, but VDO makes this happen transparently.
Similar to thin-provisioning, VDO can mean faster data throughput, as data can be cached by the system controller, and several services or even VMs can use that data without there being a need for additional disk reads to access it.
Let’s install the required packages on our system in order to create VDO volumes by installing the vdo and kmod-kvdo packages:
dnf install vdo kmod-kvdo
Now, with the packages installed, we’re ready to create our first volume in the next section.
Creating and using a VDO volume
To create a VDO device, we will make use of the loopback device we created in Chapter 12, Managing Local Storage and Filesystems, so we will check first whether it’s mounted or not by executing this:
mount|grep loop
If there’s output, we might need to run umount /dev/loop0p1 (or relevant mounted filesystems); if no output is shown, we’re set for creating our vdo volume on top of it. Note that we should have a volume with enough space for this test, in this case, we’re using a 10 GB file to simulate a disk.
Since RHEL8, VDO has been integrated into the LVM, so for creating a VDO volume, we’ll need to prepare our loop device to be a physical volume with a volume group, which can be done with the following commands:
pvcreate /dev/loop0
vgcreate vdo /dev/loop0
lvcreate --type vdo --name myvdo vdo -L 20G
The output is shown in the following screenshot:
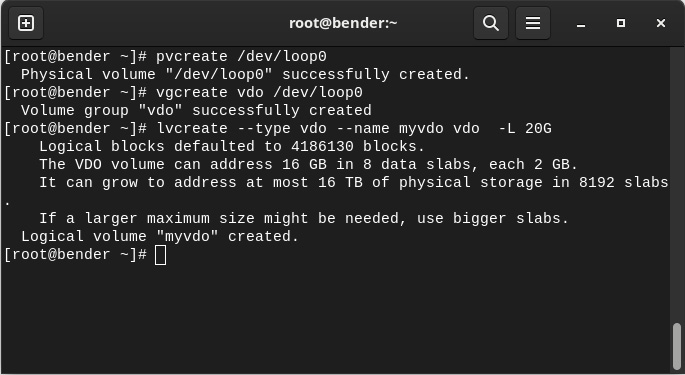
Figure 14.5 – vdo volume creation
Once the volume has been created, we can execute lvs -o+vdo_compression,vdo_deduplication to get detailed information about the volume created, as seen in the following screenshot:

Figure 14.6 – Output of vdo status
As we can see, there’s information about the volume (size, compression status, and so on).
The new volume can now be seen via /dev/vdo/myvdo (the name we assigned) and it’s ready to be used.
As we saw in the prior screenshot, both compression and deduplication are enabled on our volume, so we’re ready to test the functionality. At this point, our /dev/vdo/myvdo volume is ready to be formatted. Let’s use the XFS filesystem:
mkfs.xfs /dev/vdo/myvdo
Once the filesystem has been created, let’s put some data on it by mounting, as follows:
mount /dev/vdo/myvdo /mnt
Now, let’s test the VDO volume in the next section.
Testing a VDO volume and reviewing the stats
In order to test deduplication and compression, we will test with a big file, such as the RHEL 9 KVM guest image or the installation ISO available at https://access.redhat.com/downloads/content/479/ver=/rhel---9/9.0/x86_64/product-software.
Once downloaded, save it as rhel-9.0-x86_64.iso and copy it four times to our VDO volume:
cp rhel-9.0-x86_64.iso /mnt/vm1.iso
cp rhel-9.0-x86_64.iso /mnt/vm2.iso
cp rhel-9.0-x86_64.iso /mnt/vm3.iso
cp rhel-9.0-x86_64.iso /mnt/vm4.iso
This would be the typical case for a server holding VMs that start with the same base disk image, but do we see any improvement?
Let’s execute vdostats --si to verify the data. Note that the image downloaded is 8.5 GB, as reported by ls –si. The output obtained from vdostats --human-readable is as follows:
Device Size Used Available Use% Space saving%
vdo-vpool0-vpool 20.0G 11.8G 8.2G 59% 2%
The original volume (LV) was 20 GB, so that’s the size we can see from the output, and we see that approximately only 11.8 GB has been consumed, even if we’ve got four files of 8.5 GB each.
The percentage is also very clear. We have a reported saved 2% of the space (three files out of four are exact copies, and the used disk matches a bit over the usage of an image). If we make an additional copy, we will see that the values increase to keep 11.8 GB used and 8.2 GB available, so no changes here.
Let’s check out one of the other approaches, by creating an empty file (filled with zeros):
[root@bender mnt]# dd if=/dev/zero of=emptyfile bs=1G count=16384
dd: error writing 'emptyfile': No space left on device
8+0 records in
7+0 records out
8489861120 bytes (8,5 GB, 7,9 GiB) copied, 89,5963 s, 94,8 MB/s
As we can see, we were able to write 8.5 GB before the disk completely filled, but let’s check the vdo stats again with vdostats --human-readable, as seen in the following screenshot:

Figure 14.7 – Checking the vdostats output
As we can see, we still have 8.2 GB available and we’ve increased the disk space saved from 2% to 51% because this big file is empty.
Wait – how, if we’re using deduplication and compression, have we filled the volume if 51% of it has been saved?
As we did not indicate the logical size of the VDO volume, it set by default a 1:1 ratio with the underlying device. This is the safest approach, but we’re not taking real advantage of the compression and deduplication beyond performance.
We can tune this with the --virtualsize parameter of lvcreate on LV creation.
Important Note
It’s tempting to set a really big logical volume out of our real physical disk space, but we should plan ahead and think about avoiding future problems, such as the likelihood of compression ratios not being as high as our optimism. Adequately profiling the actual data being stored and the typical compression ratios for it can give us a better idea of a safe approach to be used while we continue to actively monitor disk usage evolution, both for the logical volume and for the physical one.
Long ago, when disk space was really expensive (and hard drives were 80 MB in total), it became very popular to use tools that allowed an increase in disk space by using a transparent layer of compression that could make some estimations and report bigger space; in reality, we know that content such as images and movies don’t compress as well as other document formats such as text files. Some document formats, such as the ones used by LibreOffice, are already compressed files, so no extra compression benefits are gained.
But this changes when we speak about VMs, where the base for each one is more or less equal (based on company policies and standards) and are deployed via cloning disk images and later performing small customization, but in essence, sharing most of the disk contents.
Tip
In general, bear in mind that optimizations really just mean trade-offs. In the case of tuned profiles, you’re adjusting throughput for latency, and in our case, you’re trading CPU and memory resources for disk availability. The only way to tell whether something’s a worthwhile trade-off is to implement it and see how it performs, look at the benefits gained, and then continue to monitor performance over time.
Summary
In this chapter, we have learned about VDO and Stratis. We’ve looked at simple ways to manage storage, how to save disk space transparently, and how to gain some throughput in the process.
With Stratis, we have created a pool with two disks and assigned it to a mount point. It takes fewer steps than doing so with LVM, but on the other hand, we have less control over what we are doing. In any case, we learned how to use this preview technology in RHEL 9.
With VDO, we used the volume we created to define an LVM PV and, on top of it, a volume group and a logical volume that we’ve formatted using the knowledge gained in previous chapters to store a VM disk image several times, to simulate a scenario where several VMs are started from the same base.
We also learned how to check the VDO optimizations and the amount of disk saved.
Now, we’re ready to use Stratis instead of LVM to group and distribute storage (though not for production). We can also implement VDO for our servers to start optimizing disk usage via deduplication and compression.
In the next chapter, we will learn about the boot process.