chapter 4
face map
Makeup can be transformative. And no makeup technique you master will have a bigger impact on that transformation than combining highlighting and contouring. It’s been in the media a lot lately, but makeup artists have always used it. I’ve practiced it since the beginning of my career, and mastering it has truly set me apart as an artist.
It’s the makeup artist’s version of an optical illusion. You can use it to change the appearance of your face shape: Everything you highlight (or lighten) comes forward visually, and everything you contour (or darken) moves into the background.
The face shape that’s considered the most perfect is oval. By highlighting and contouring, you can make your face appear more oval, thinner, or more sculpted. You’ll highlight the areas of your face you want to see (the oval area) and contour the areas you don’t.
This technique also adds color, warmth, and light. The subtle effect gives your skin an incredible glow. This is an optional step, but once you experience the benefits, you’ll love it.
choose the right shades: ivory/beige skin
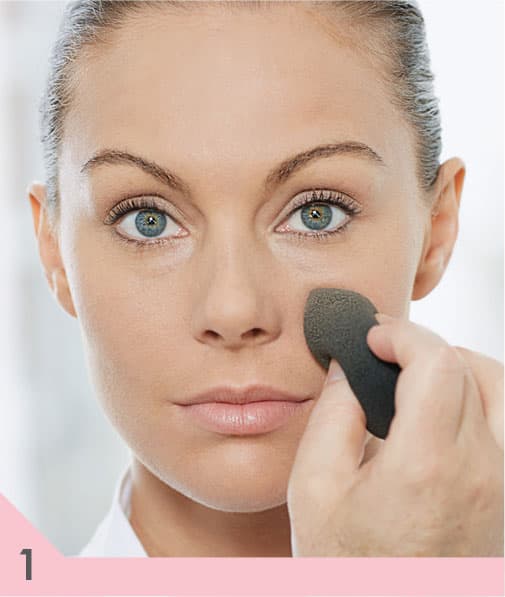
First, select three shades of foundation and/or powder in three different depth levels. It works best if the three shade are all the same texture, because they will blend more easily.
1. The first color, your true foundation color, should match your skin exactly.
2. The second color, your highlight color, should be at least one level lighter than the first, preferably with the same undertone.
3. The third shade, your contour color, should be at least one level darker than your first, preferably with the same undertone.
The more dramatic you want your result to be, the more dramatic the contrast between the three shades’ depth levels should be. For noticeable contouring on ivory or beige skin, use a contour shade that is two to three levels darker than your natural shade. The more dramatic your choices, the more thoroughly you will have to blend the shades together.
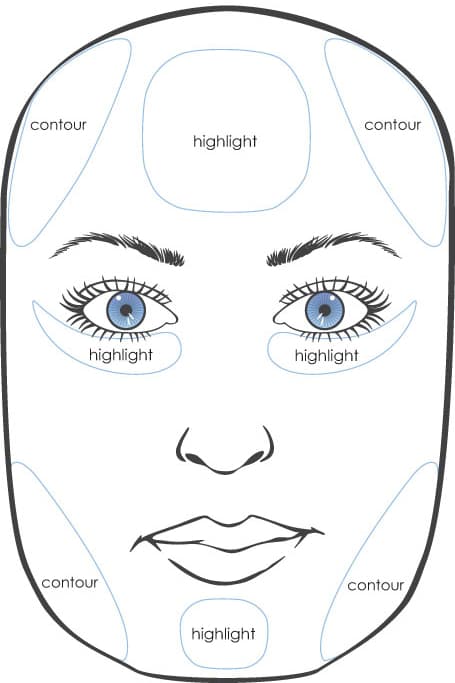
How do you know where to place what shades? It’s simple! Picture an oval on your face, as wide as your eye sockets and extending from the tip of your forehead to the tip of your chin.
Now it’s simply a matter of lightening all the high points inside the oval and contouring or darkening everything outside the oval.
In the images opposite and shown here, I have over-exaggerated what to highlight and what to contour. The light color indicates where to highlight: the center of your forehead, down the center of your nose (if you want to visually narrow it), under your eyes, on top of your cheekbones, the tip of your chin, and the top of the bow of the lips (to make them look fuller). The dark color indicates where to contour: your temples, all along your cheekbones (some would say under, but this could widen the appearance of your face), along the sides of your nose up into your crease, just under the lower lip to create a shadow (to make it look fuller), and along your jawline to define it.
If you have ivory or beige skin, you will contour your face more than you highlight. With very fair skin, you want to avoid appearing washed out. Contouring will give you the most dramatic change. For bronze or ebony skin, you will highlight your skin more than contour. Contouring may get somewhat lost if you have darker bronze or ebony skin tones, while highlighting will brighten and bring life to your skin.

how to sculpt your face
ivory/beige skin tone
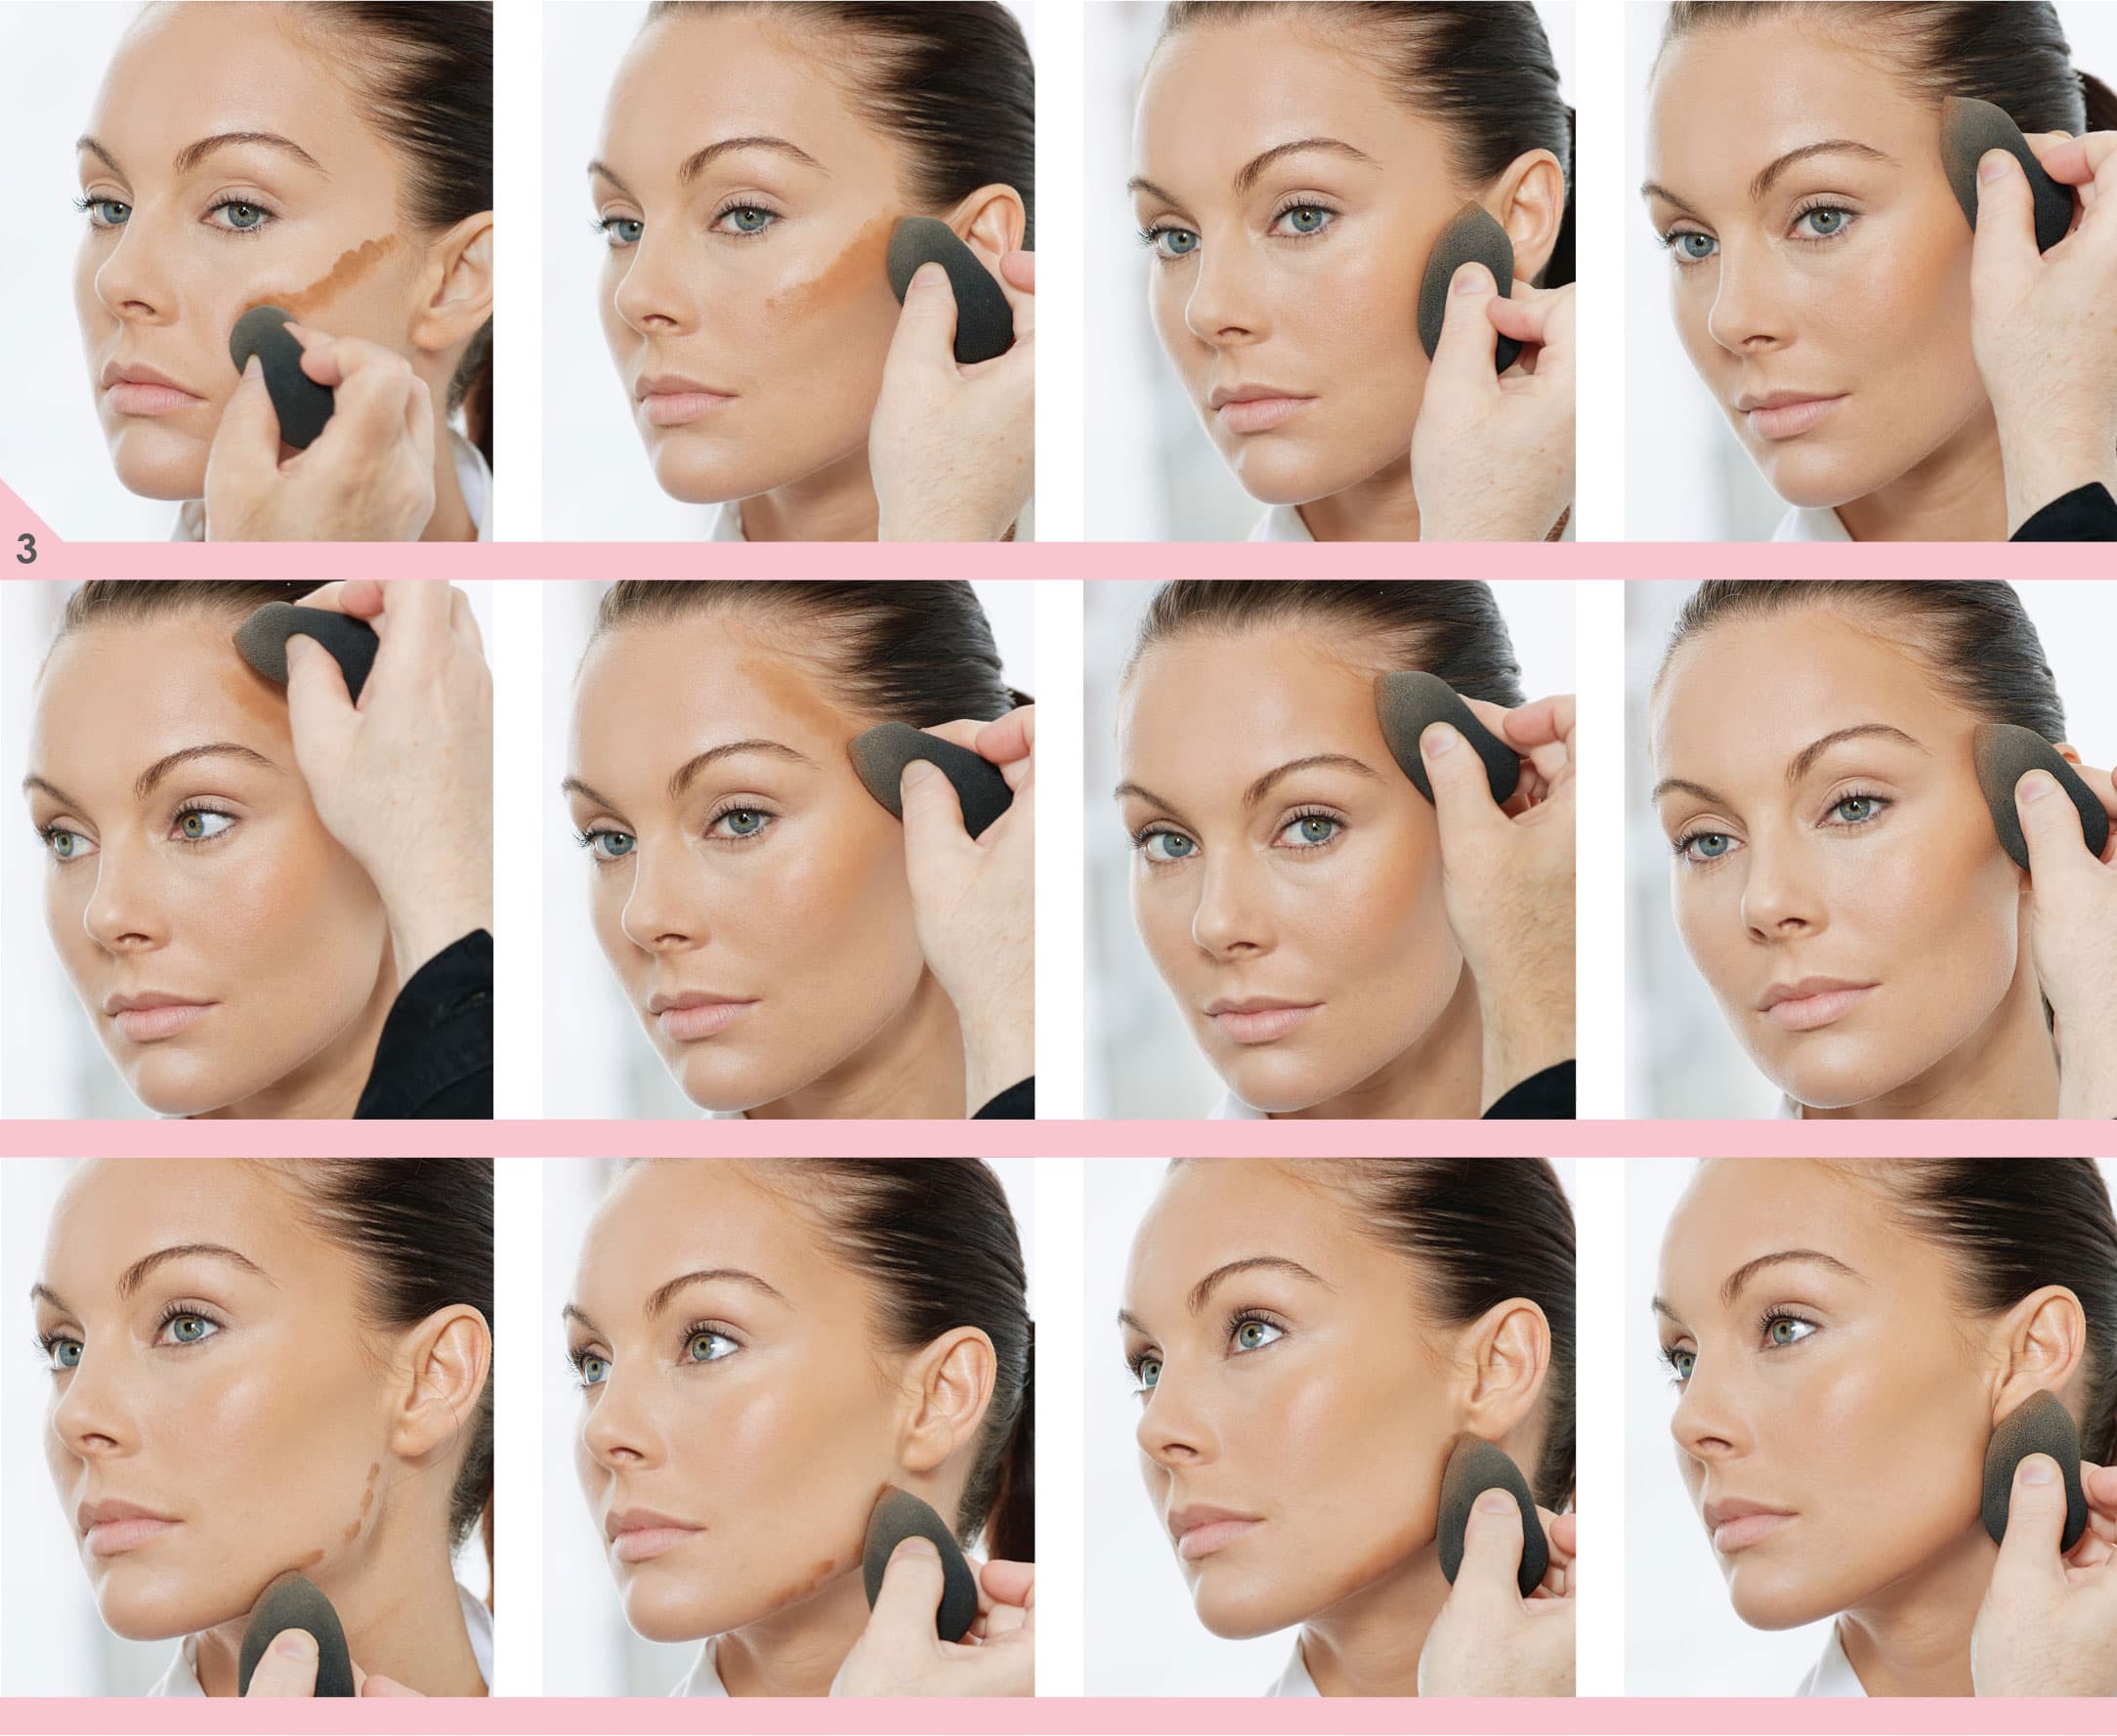
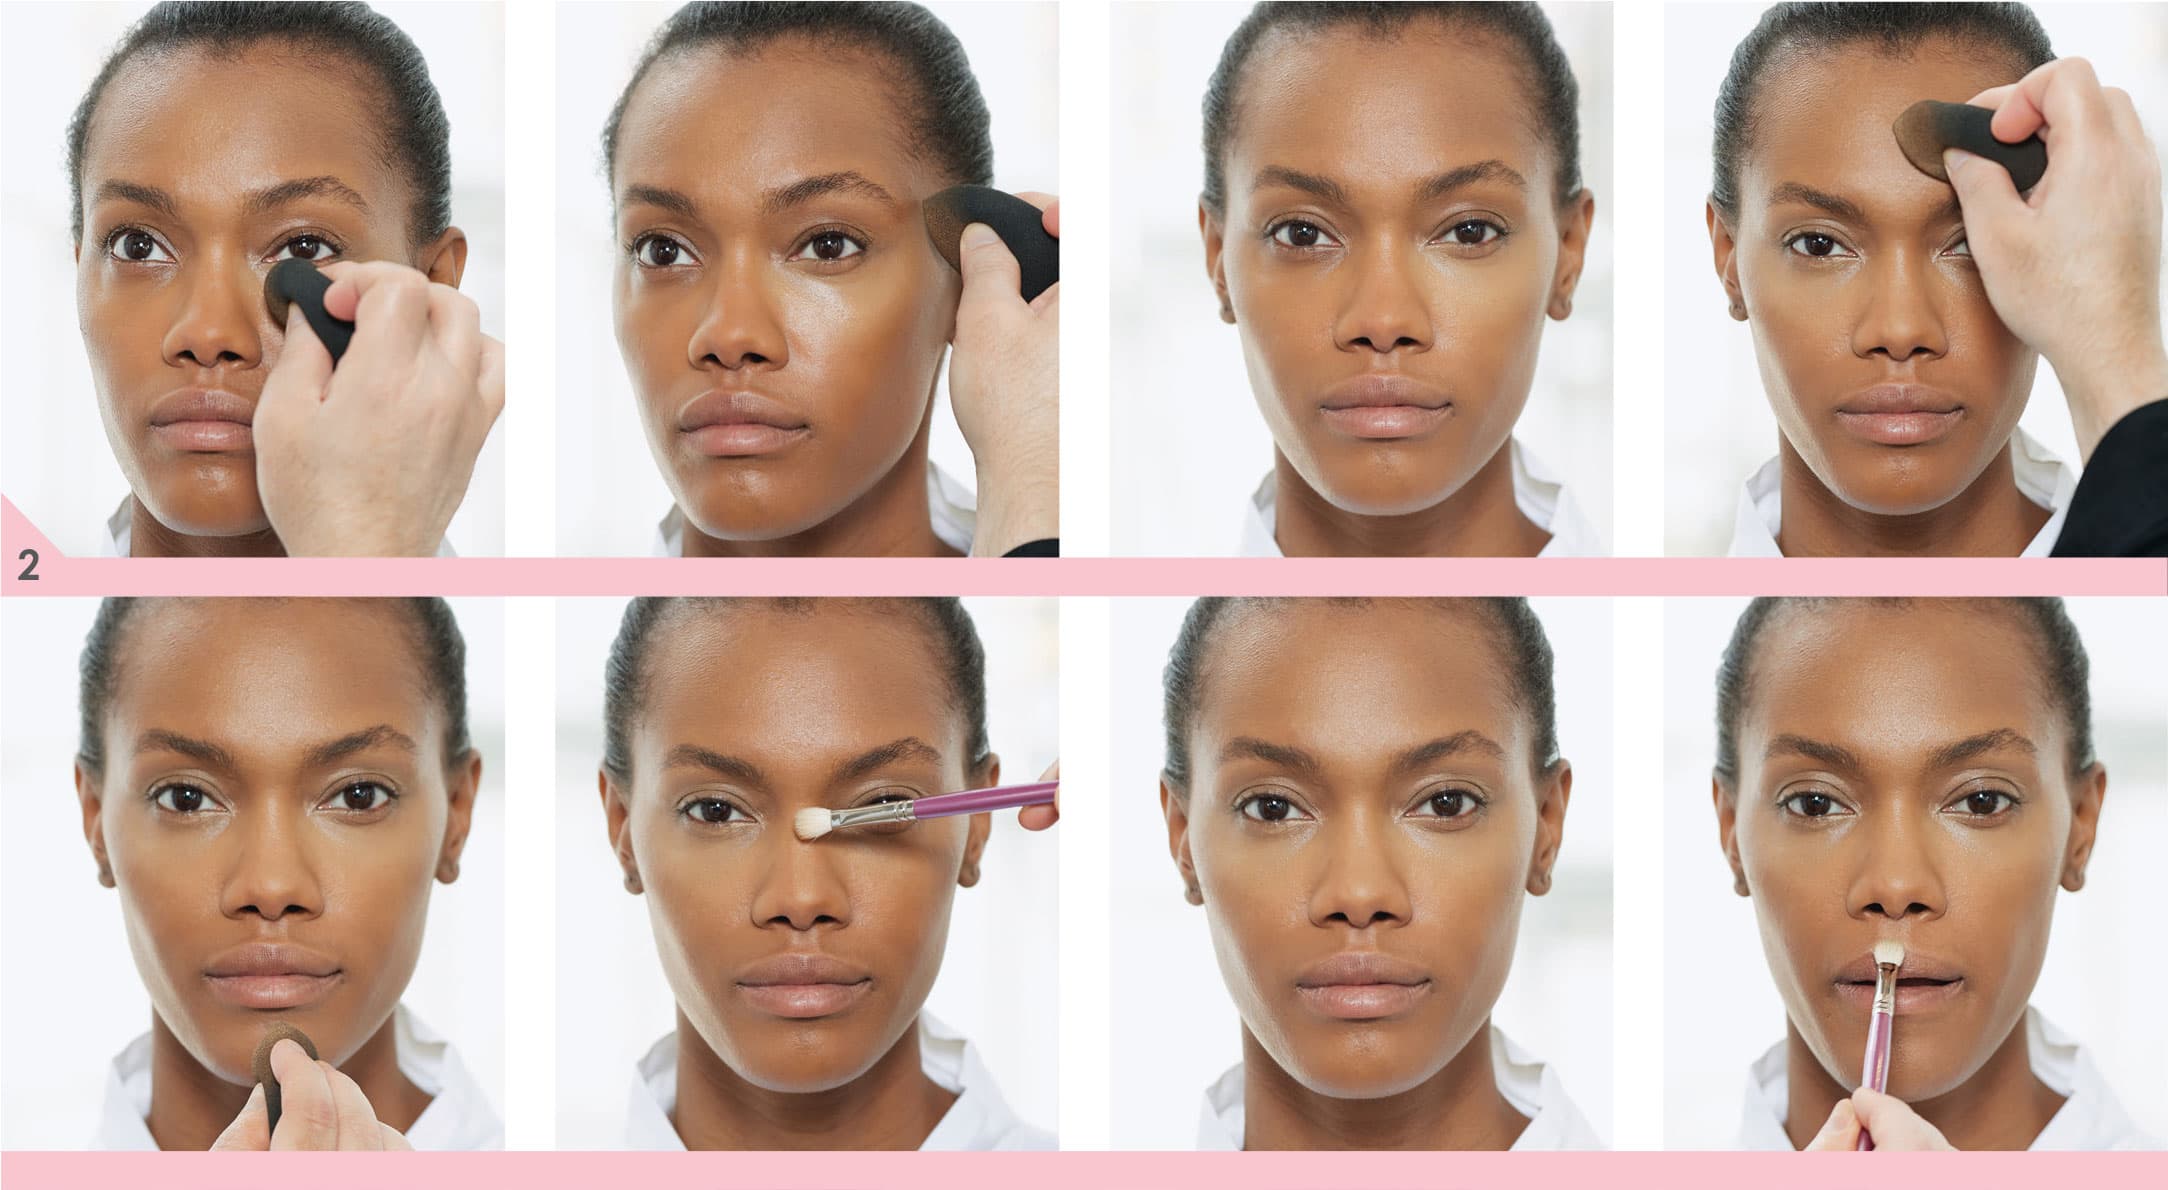
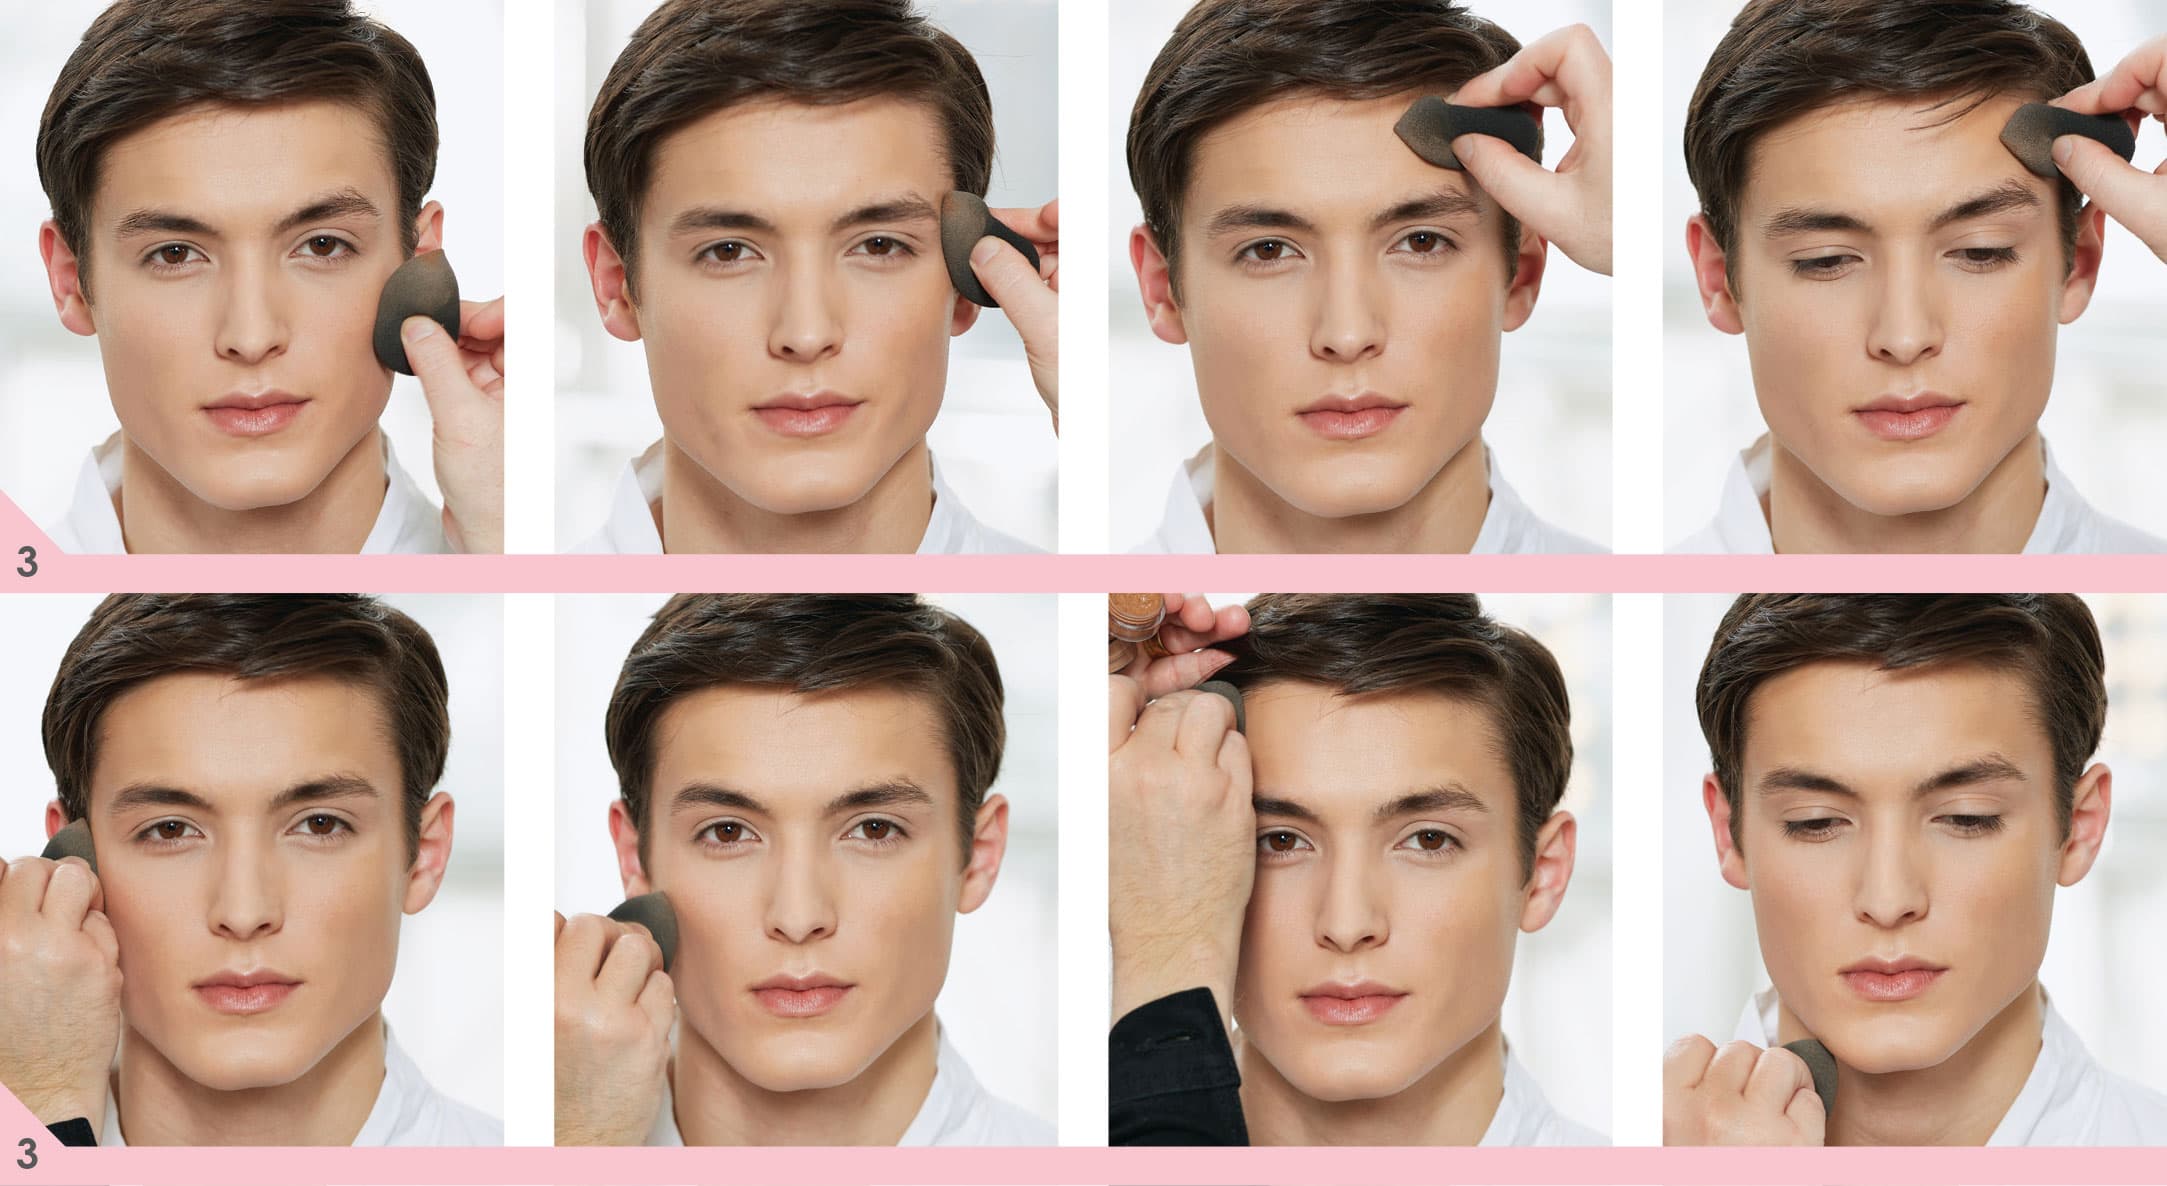
1. Apply your first, or true, foundation color over your entire face. Then visualize an oval on your face. The width of the oval is from the outside of one eye socket to the outside of the other; the height of your oval extends from the tip of your forehead to the tip of your chin.
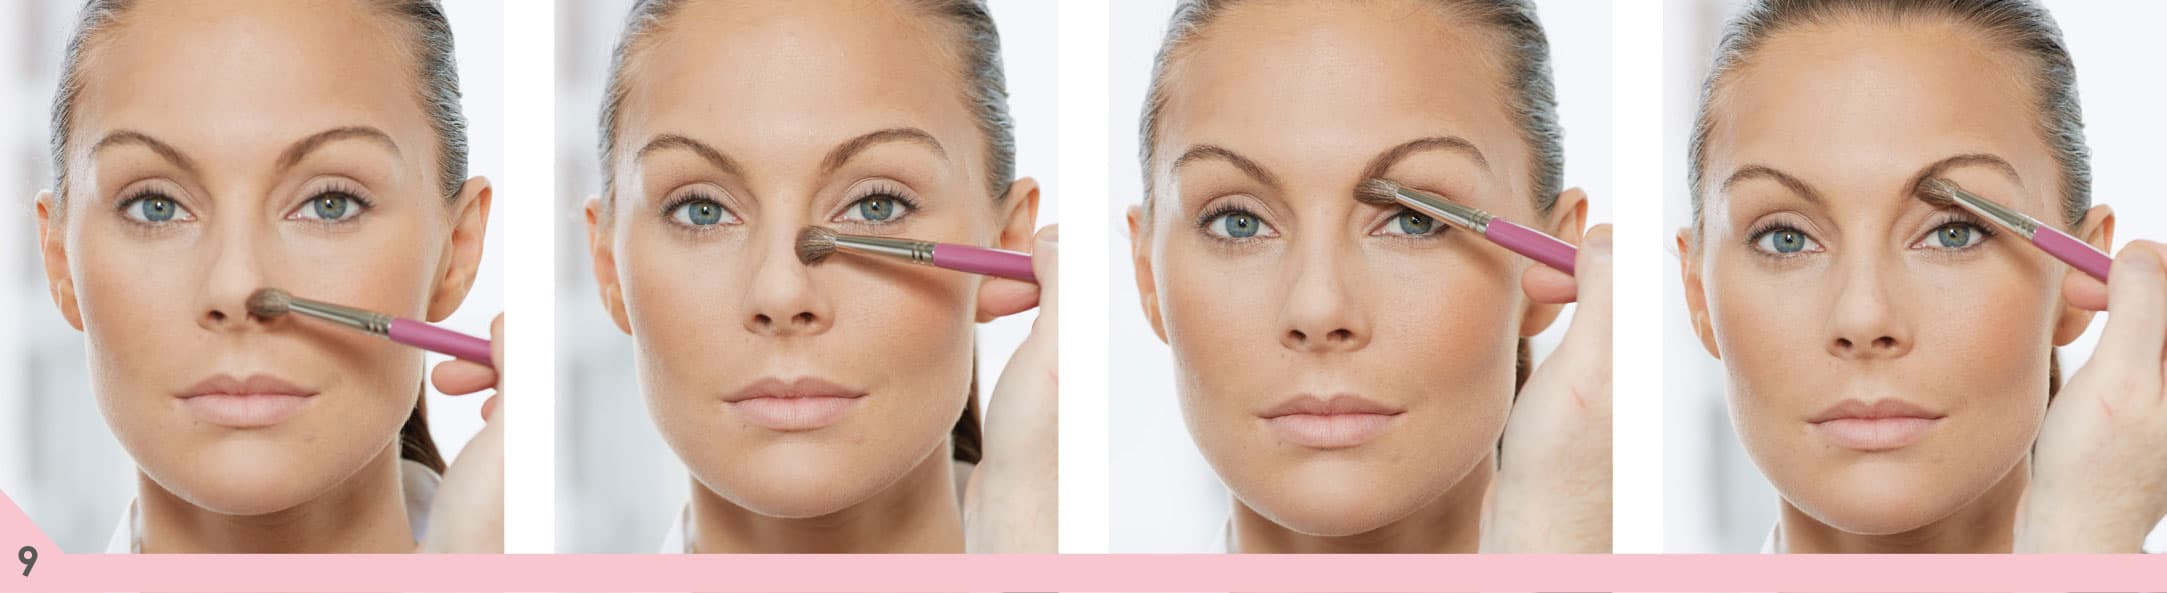
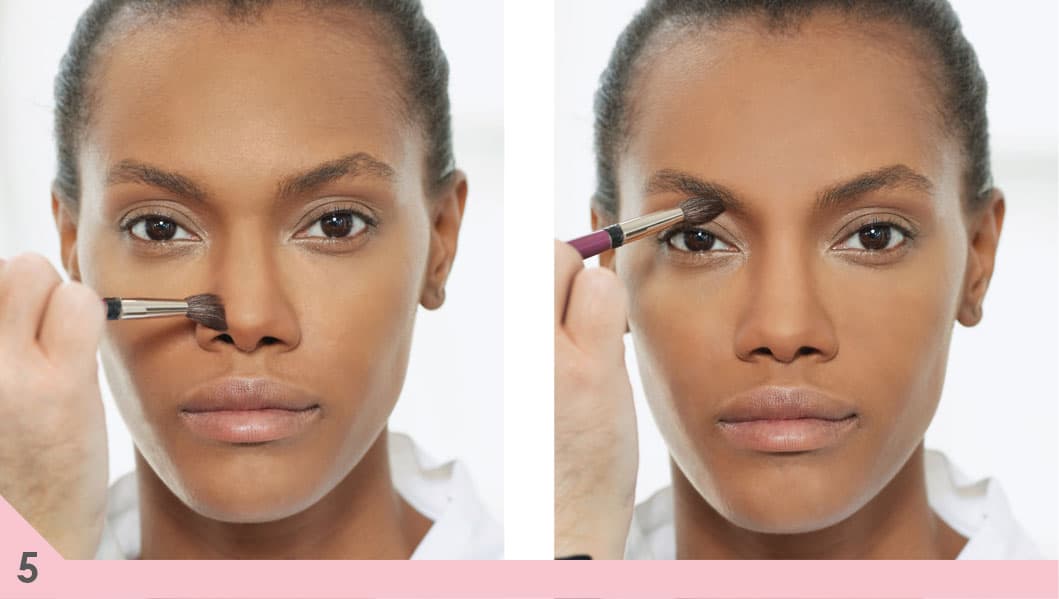
2. Apply your second, or highlight, foundation color to the high points inside the oval, including under your eyes, on top of your cheekbones, the center of your forehead, and the tip of your chin. Use brush #59 (for more control) down the center of your nose (if you want to visually narrow it) and the top of the bow of the lips (to make them look fuller).

3. Apply your darkest, or contour, shade to the areas outside the oval, including all along your cheekbones, your temples, and along your jawline. By deepening the outside areas, you are visually helping those areas recede, making your face appear more narrow and oval.
tip: If you’re short of time and want a similar but less dramatic effect, contour with a matte bronzer after you apply your foundation.
4. Blend everything well. The secret to making your highlights and contours look appearing is all in the blending.

5. Apply powder in a shade that matches your natural skin tone. It won’t negate all your work; instead it will set everything beautifully.
For even more dramatic results, finish with three shades of powder: one that matches your true foundation shade, one that matches your highlight shade, and a darker or matte bronzing powder to match your contour shade. This will reinforce your work and give you a beautifully sculpted, three-dimensional effect that will make any face shape appear more oval and add that ever-so-important glow.
Your neck is likely paler than your face, so extend your matte bronzer down onto your neck; don’t just stop at your jawline. It will help your entire face and neck match your décolletage.
6. Using brush #76 and a no-shimmer translucent highlight powder, set your highlight under your eyes and on top of your cheekbones, up the center of the nose, the center of the forehead, and the tip of the chin. Be generous but mindful that with age and thinner skin, more powder draws attention to fine lines. Brush off excess highlight powder.

tip: Shimmer highlight powder can draw attention to skin texture and flaws. Choose no-shimmer to avoid this issue.
7. Using powder brush #73, powder the rest of your face with a powder that matches your exact foundation.
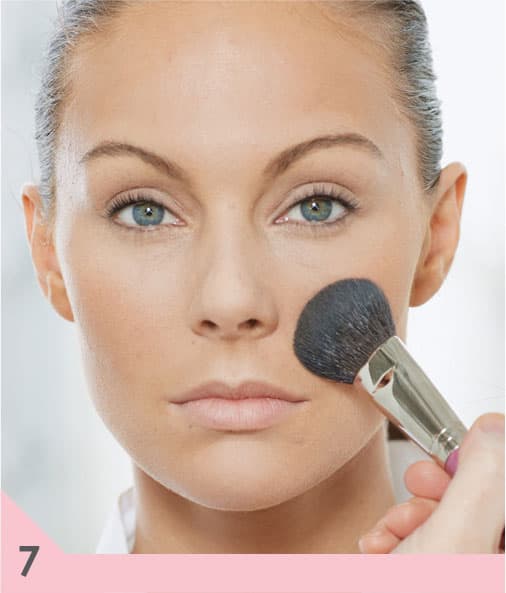
8. With bronzing brush #73, reinforce your contour using a matte bronzer (never shimmer, which will expand the face shape, not contour it). Begin at the back of your cheekbone and sweep it forward to the apple of your cheek. Then take the brush back toward your ear. This lays the color in place. Next, move your brush in the opposite direction (up and down) to blend well. Don’t forget to add a little at the temples to help add shape and a glow. Sweep the bronzing powder up around the temples and eye socket. Finish by applying it along your jawline.

9. Using brush #11 and matte bronzing powder, sweep your brush up along the sides of your nose up into the beginning of your brow and crease. Apply across the tip of your nose, blending the edges well.
10. With brush #38 and matte bronzing powder, define just below your lower lip to create a deeper shadow and give the illusion of a fuller lip.


choose the right shades: bronze/ebony skin
First, select three shades of foundation and/or powder in three different depth levels. It works best if the three shade are all the same texture, because they will blend more easily.
1. The first color, your true foundation color, should match your skin exactly.
2. The second color, your highlight color, should be at least one level lighter than the first, preferably with the same undertone.
3. The third shade, your contour color, should be at least one level darker than your first, preferably with the same undertone.
The more dramatic you want your result to be, the more dramatic the contrast between the three shades’ depth levels should be. To create contrast on bronze and ebony skin, choose a highlight shade that is two to three levels lighter than your natural shade. The more dramatic your choices, the more thoroughly you will have to blend the shades together.
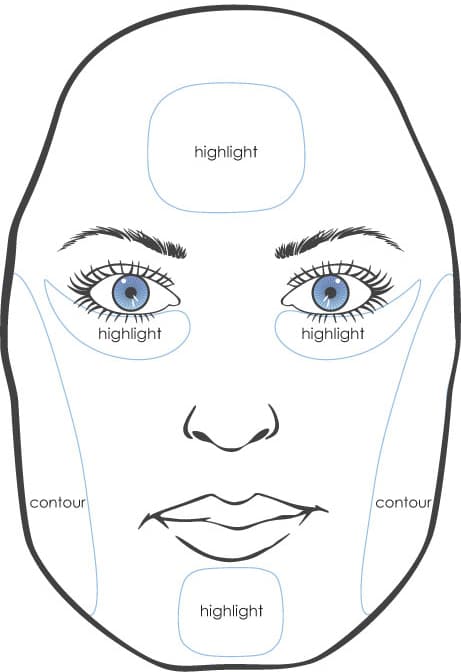
How do you know where to place what shades? It’s simple! Picture an oval on your face, as wide as your eye sockets and extending from the tip of your forehead to the tip of your chin.
Now it’s simply a matter of lightening all the high points inside the oval and contouring or darkening everything outside the oval.
In the images opposite and shown here, I have over-exaggerated what to highlight and what to contour. The light color indicates where to highlight: the center of your forehead, down the center of your nose (if you want to visually narrow it), under your eyes, on top of your cheekbones, the tip of your chin, and the top of the bow of the lips (to make them look fuller). The dark color indicates where to contour: your temples, all along your cheekbones (some would say under, but this could widen the appearance of your face), along the sides of your nose up into your crease, just under the lower lip to create a shadow (to make it look fuller), and along your jawline to define it.
If you have ivory or beige skin, you will contour your face more than you highlight. With very fair skin, you want to avoid appearing washed out. Contouring will give you the most dramatic change. For bronze or ebony skin, you will highlight your skin more than contour. Contouring may get somewhat lost if you have darker bronze or ebony skin tones, while highlighting will brighten and bring life to your skin.

bronze/ebony skin tone
1. Apply your first, or true, foundation color over your entire face. Then, visualize an oval on your face.
2. Apply your second, or highlight, foundation color to the high points inside the oval, including under your eyes, on top of your cheekbones, the center of your forehead, and on the tip of your chin. Use brush #59 (for more control) down the center of your nose (if you want to visually narrow it) and the top of the bow of the lips (to make them look fuller).
3. Using brush #76 and a no-shimmer translucent highlight powder, set your highlight under your eyes and on top of your cheekbones, up the center of the nose, the center of the forehead, and the tip of the chin.

4. With powder brush #73, powder the rest of your face with a powder that matches your foundation exactly.

5. Using brush #11 and matte bronzing powder, sweep your brush up along the sides of your nose up into the beginning of your brow and crease. Apply across the tip of your nose, blending the edges well.
6. With bronzing brush #73, define your contour areas using a matte bronzer (I find one with a hint of raisin tone in it works best). Begin at the back of your cheekbone and sweep it forward to the apple of your cheek. Then take the brush back toward your ear. This lays the color in place. Next, move your brush in the opposite direction (up and down) to blend well. Don’t forget to add a little at the temples to help add shape and a glow. Sweep the bronzing powder up around the temples and eye socket. Finish by applying it along your jawline.


ivory/beige skin tone
1. Apply your first, or true, foundation color over your entire face. Then visualize an oval on your face.
2. Apply your second, or highlight, foundation color to the high points inside the oval, including under your eyes, on top of your cheekbones, the center of your forehead, and the tip of your chin. Use brush #59 down the center of your nose (if you want to visually narrow it) and the top of the bow of the lips (to make them look fuller).


3. Apply your darkest, or contour, shade to the areas outside the oval, including all along your cheekbones, your temples, and along your jawline. By deepening the outside areas, you are visually helping those areas recede, making your face appear more narrow and oval.
4. Blend everything well.
5. Using brush #76 and a no-shimmer translucent highlight powder, set your highlight under your eyes and on top of your cheekbones, up the center of the nose, the center of the forehead, and the tip of the chin.

6. With powder brush #73, powder the rest of your face with a powder that matches your foundation exactly.
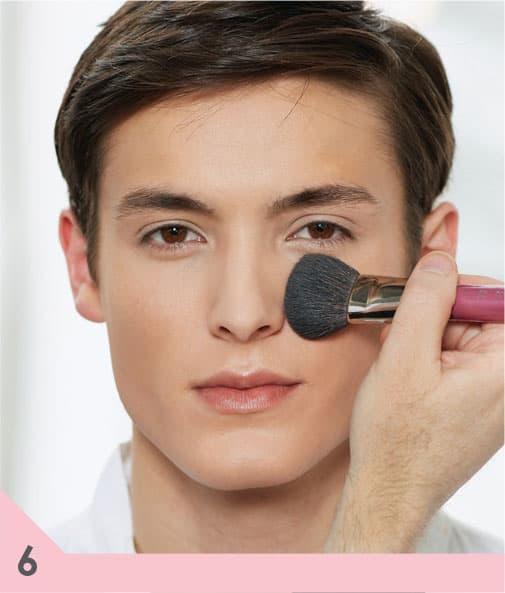
7. With bronzing brush #73, reinforce your contour using a matte bronzer. Begin at the back of your cheekbone and sweep it forward to the apple of your cheek. Then, take the brush back toward your ear. This lays the color in place. Next, move your brush in the opposite direction (up and down) to blend well. Don’t forget to add a little at the temples to help add shape and a glow. Sweep the bronzing powder up around the temples and eye socket. Finish by applying it along your jawline.

8. Using brush #11 and matte bronzing powder, sweep your brush up along the sides of your nose up into the beginning of your brow and crease. Apply across the tip of your nose, blending the edges well.

face shape
The way to sculpt your face depends on your face shape, but your goal is always the same: a more defined shape and beautiful glow. You do not need to know your face shape to make yourself look your best—you might even have a combination of face shapes. Simply envision the oval and then highlight the high points inside it and contour everything outside it. Everything about your face is unique, but no matter what, you can achieve a beautiful glow. Let’s look at the best sculpting application for every face shape.
oval face
An oval face is considered the “perfect” face shape because of its symmetry. It is usually broader at the cheeks, tapering in slightly at both the forehead and chin. Because of its symmetry, you do not have to contour and highlight your face. If you pictured an oval around your face and nothing extended past it, your face is oval. That does not mean that you will not benefit from a generous dusting of bronzer along the cheekbones, temples, and even a bit on the tip of the chin. This will give you a glow and give your skin life. Feel free to experiment. An oval face can support most makeup trends, so have fun!
round face

A round face is fuller and generally holds its youthful appearance longer than the other face shapes. It’s shorter, wide, and has full cheeks and a rounded chin. When picturing your oval, some fullness will extend out past the oval. Contouring that fullness away will narrow the appearance of your face.
If you have a round face:
• Highlight your forehead, underneath your eyes, on top of your cheekbones, and the center of your chin to draw attention to the center of your face.
• Contour your temples, cheeks, and jawline with a foundation and/or bronzer that is darker than your skin tone to create the illusion of an oval.
heart-shaped face

The heart-shaped face looks like an inverted triangle: it’s wider at the forehead and cheeks, curving down to a narrow chin. When you picture your oval, notice a fullness extending at your temples and cheeks, and contour and soften the fullness in these areas. This is the least common face shape.
If you have a heart-shaped face:
• Highlight your chin to help broaden it. Highlight your forehead and underneath your eyes, just on top of the cheekbones, to draw attention to the center of your face.
• Contour your temples and cheeks to diminish the width of this portion of your face.
square face
I consider this shape to be one of the most beautiful and the most photogenic because it suggests strength and the features are usually symmetrically balanced. A square-shaped face is the same width at the forehead, the cheeks, and the jaw. When envisioning your oval around this face shape, you will be left with four corners to contour or soften.
If you have a square face:
• Highlight the center of your forehead, underneath your eyes, on top of your cheekbones, and the tip of your chin to draw attention to the middle of your face.
• Contour your hairline at the two corners by your temples and the two corners of your jaw.
• Apply blush on the apples of your cheeks to help draw attention away from the corners of the square and widen the area to make it appear more oval.
The pear-shaped face is narrow at the temples and forehead and wider at the cheeks and jawline. When envisioning your oval, the area at your cheeks and jaw will extend out past your oval, and that is the area you need to minimize. This is the most common face shape.
pear-shaped face
If you have a pear-shaped face:
• Highlight your forehead to create the illusion of width and highlight underneath your eyes, on top of your cheekbones, and the tip of your chin.
• Contour from your cheeks down along your jaw to minimize the width of this area.
The long face has high cheekbones, a high and deep forehead, and a strong, chiseled jawline.
long face

If you have a long face:
• Never highlight the oval area of your face! This will make your face appear even longer.
• Brush a bit of bronzer across your chin and across your forehead at your hairline to help make your face look shorter.
• Be generous with your blush and place a lot of color on the apples of your cheeks. This will help widen and shorten your face. When applying your blush, start closer in on the apples of the cheeks and brush outward across your face.
• Bangs can help shorten the length of your face.