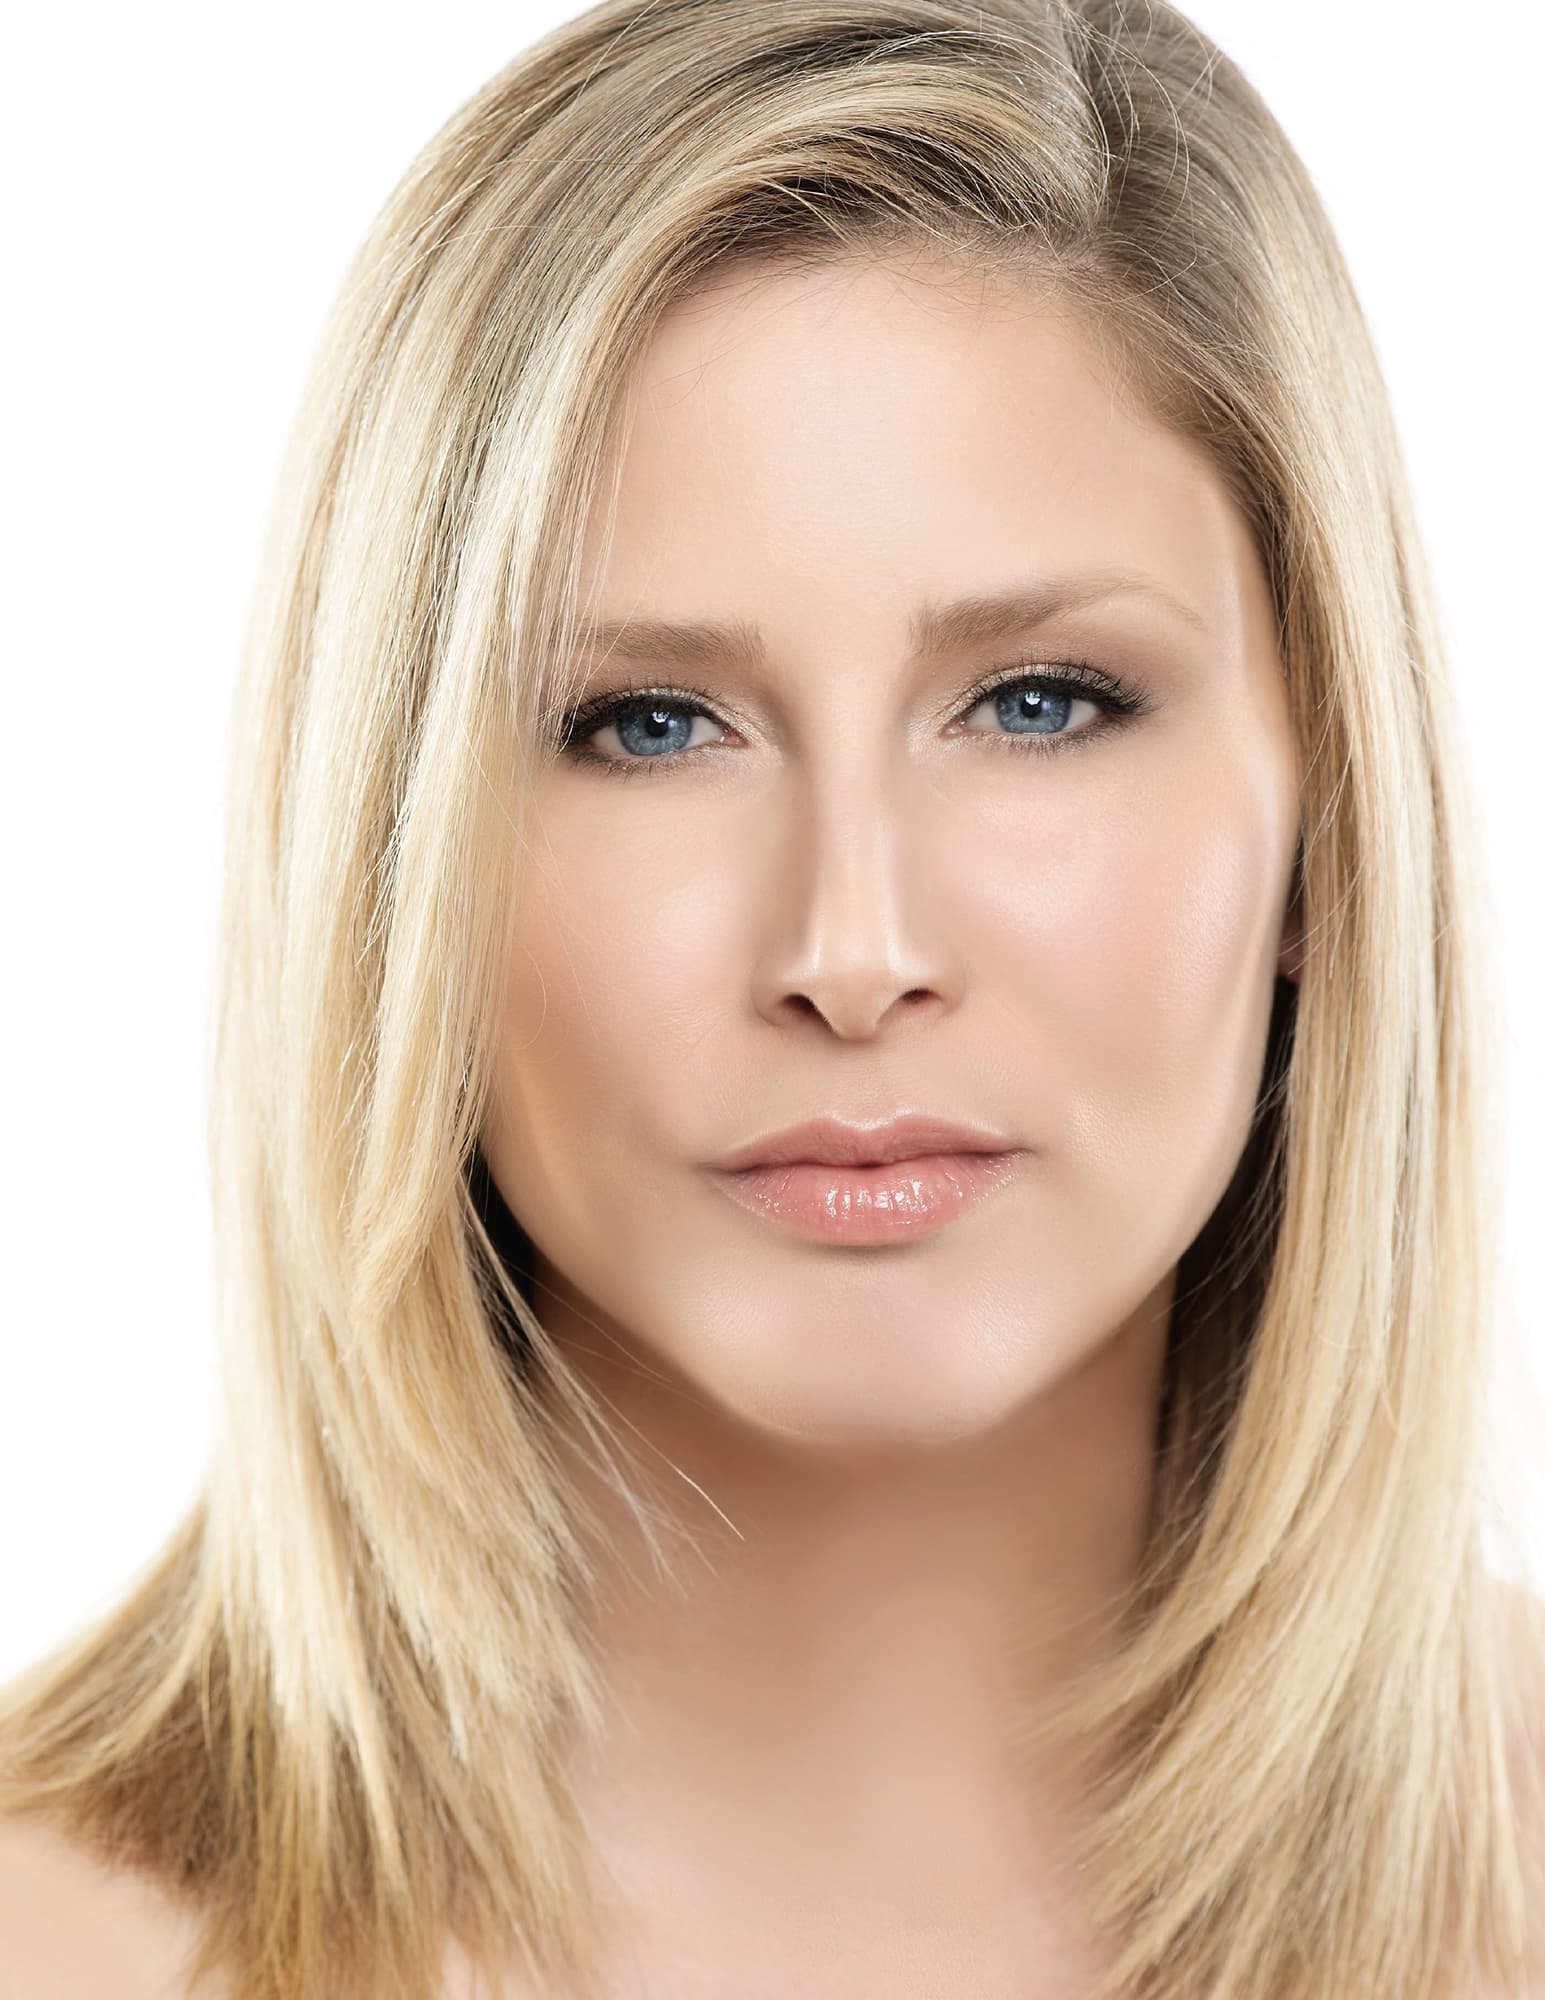
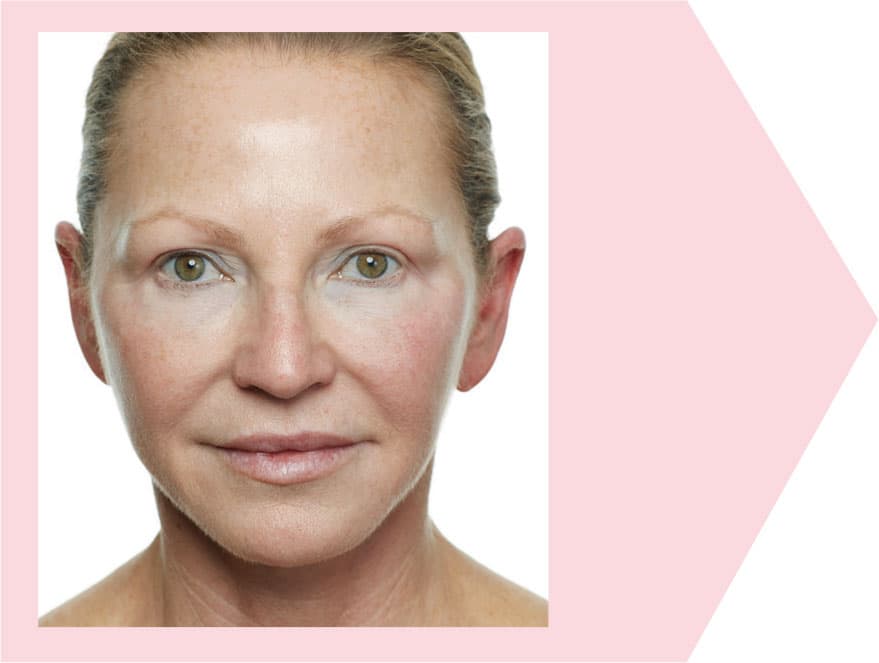
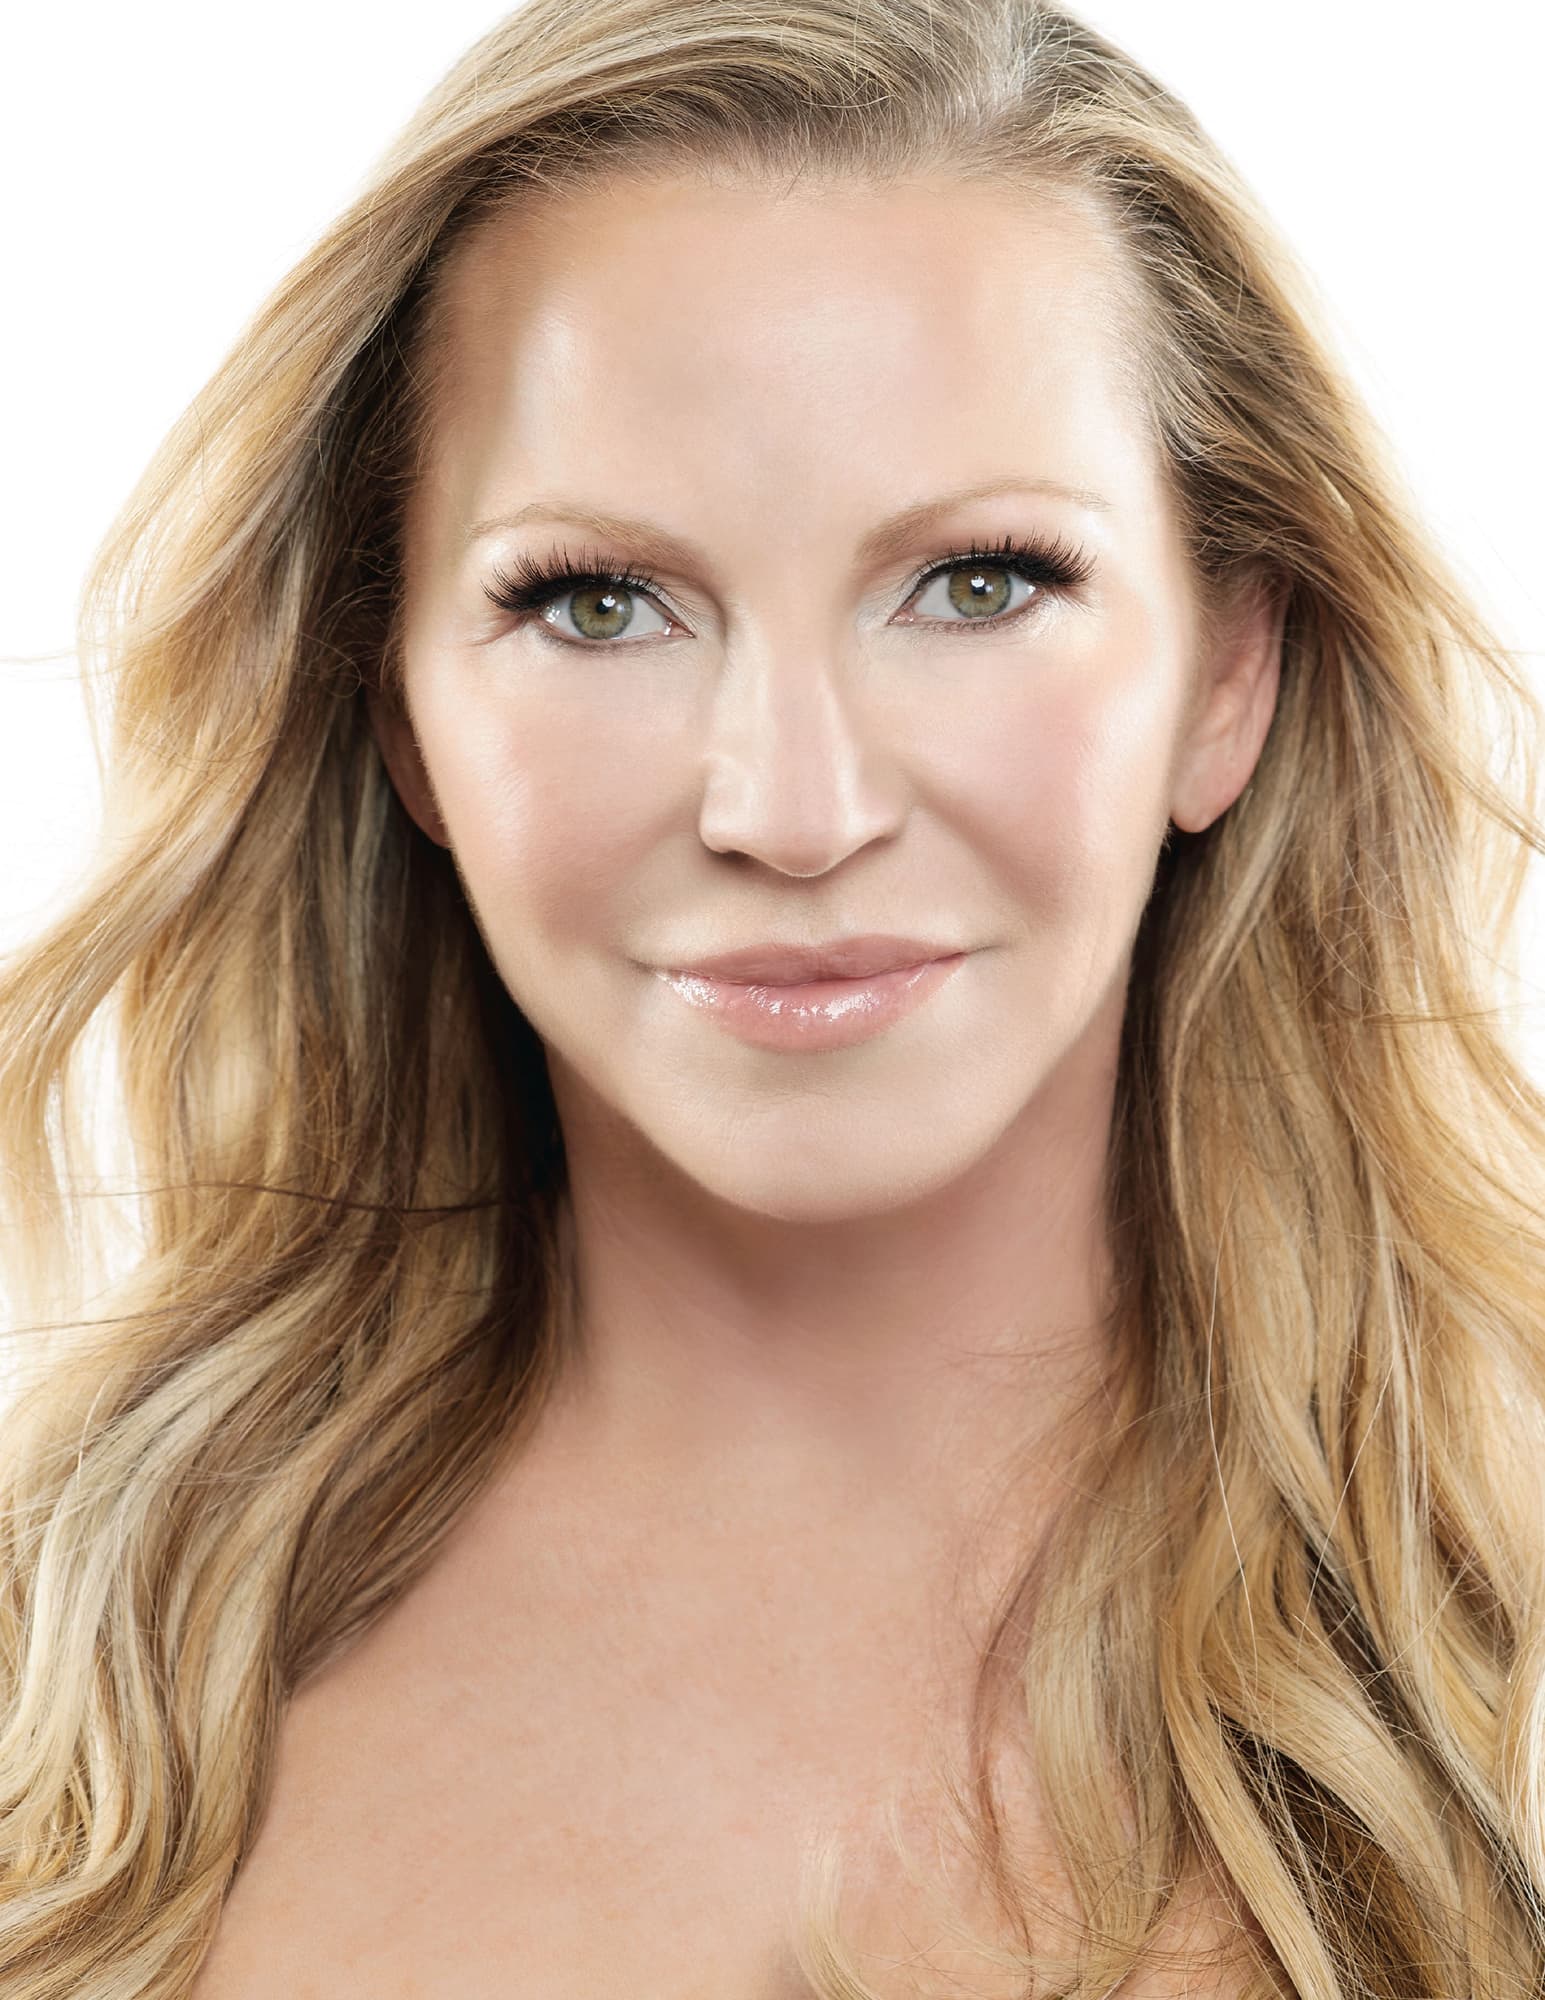
chapter 5
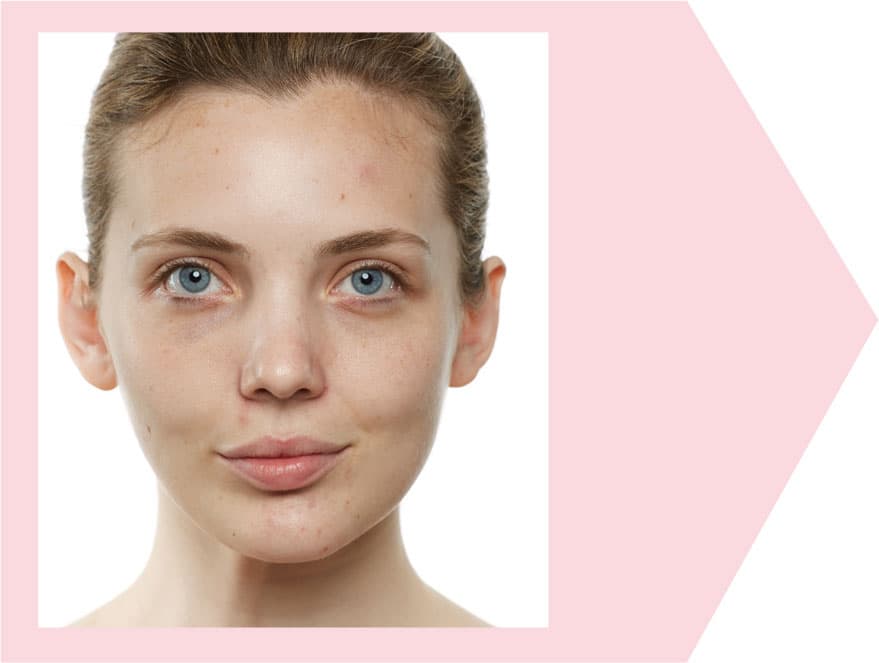
eye basics
Your eyebrows, the frame to your face, give you your expression. They can make you look harsh or soften you. Don’t underestimate their importance.
Fuller brows make you look younger, and they tend to fit more face shapes. So, one of my best bits of advice is, don’t go wild and rip them all out. You will want them later in life, and if you tweeze them out over a long time, they may not grow back.
And don’t follow eyebrow fashion trends; they come and go, and they’re not always right for your face shape. Don’t try to make your brows look like someone else’s! Your brow shape is individual to you, so embrace it. For instance, if your brows grow very straight, you will never have a high arch. Some people have a natural arch; some don’t. Whatever your natural shape, there is a way to groom your brows to make them look amazing.
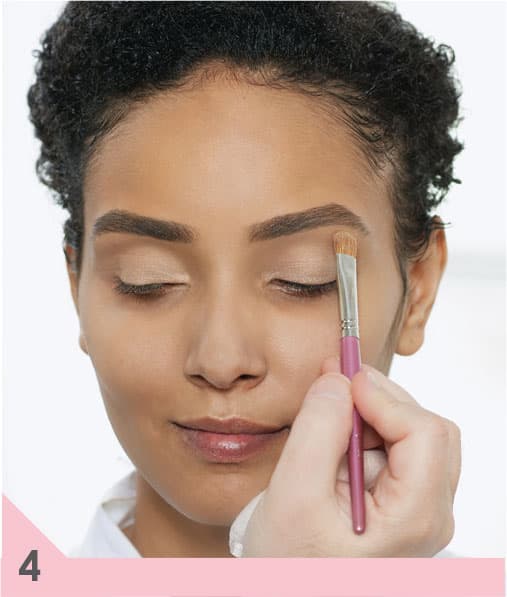
Before we begin, gather your tools: a good pair of tweezers, a brow brush, and a small pair of scissors.
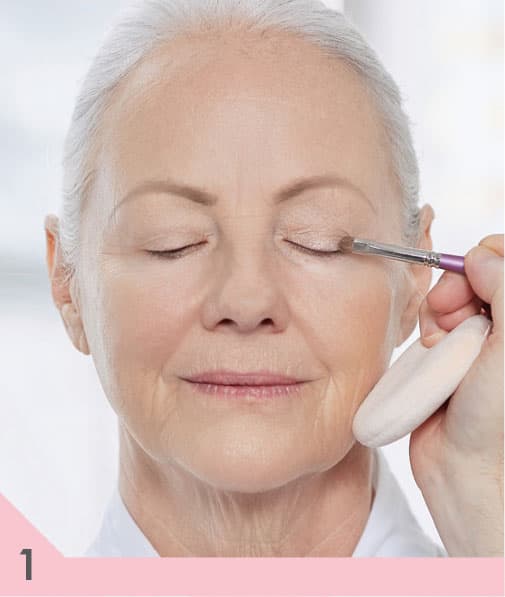
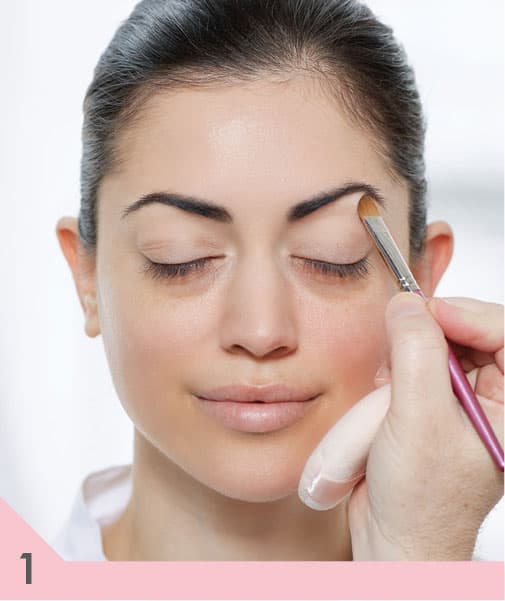
trim your eyebrows
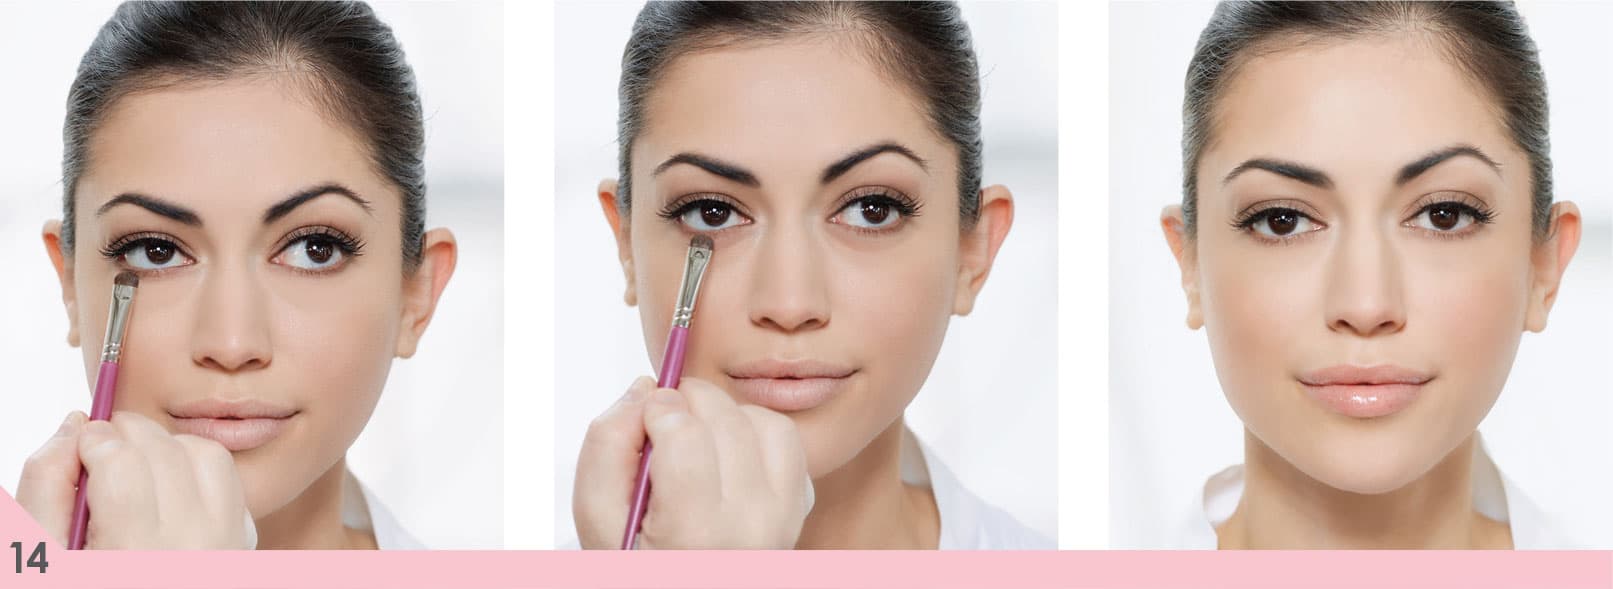
Let’s begin by evaluating your brows.
First, are they too dense or heavy? Trimming can soften them if they are. It will completely change the way your eyebrow hairs lie on your face.
Often, brow hairs are longer than they appear because the tips of the hairs are lighter in color, and when they reach a certain length, they tend to curl. By trimming them, you trim away some of the density and that slight curl, so they lie down more neatly.
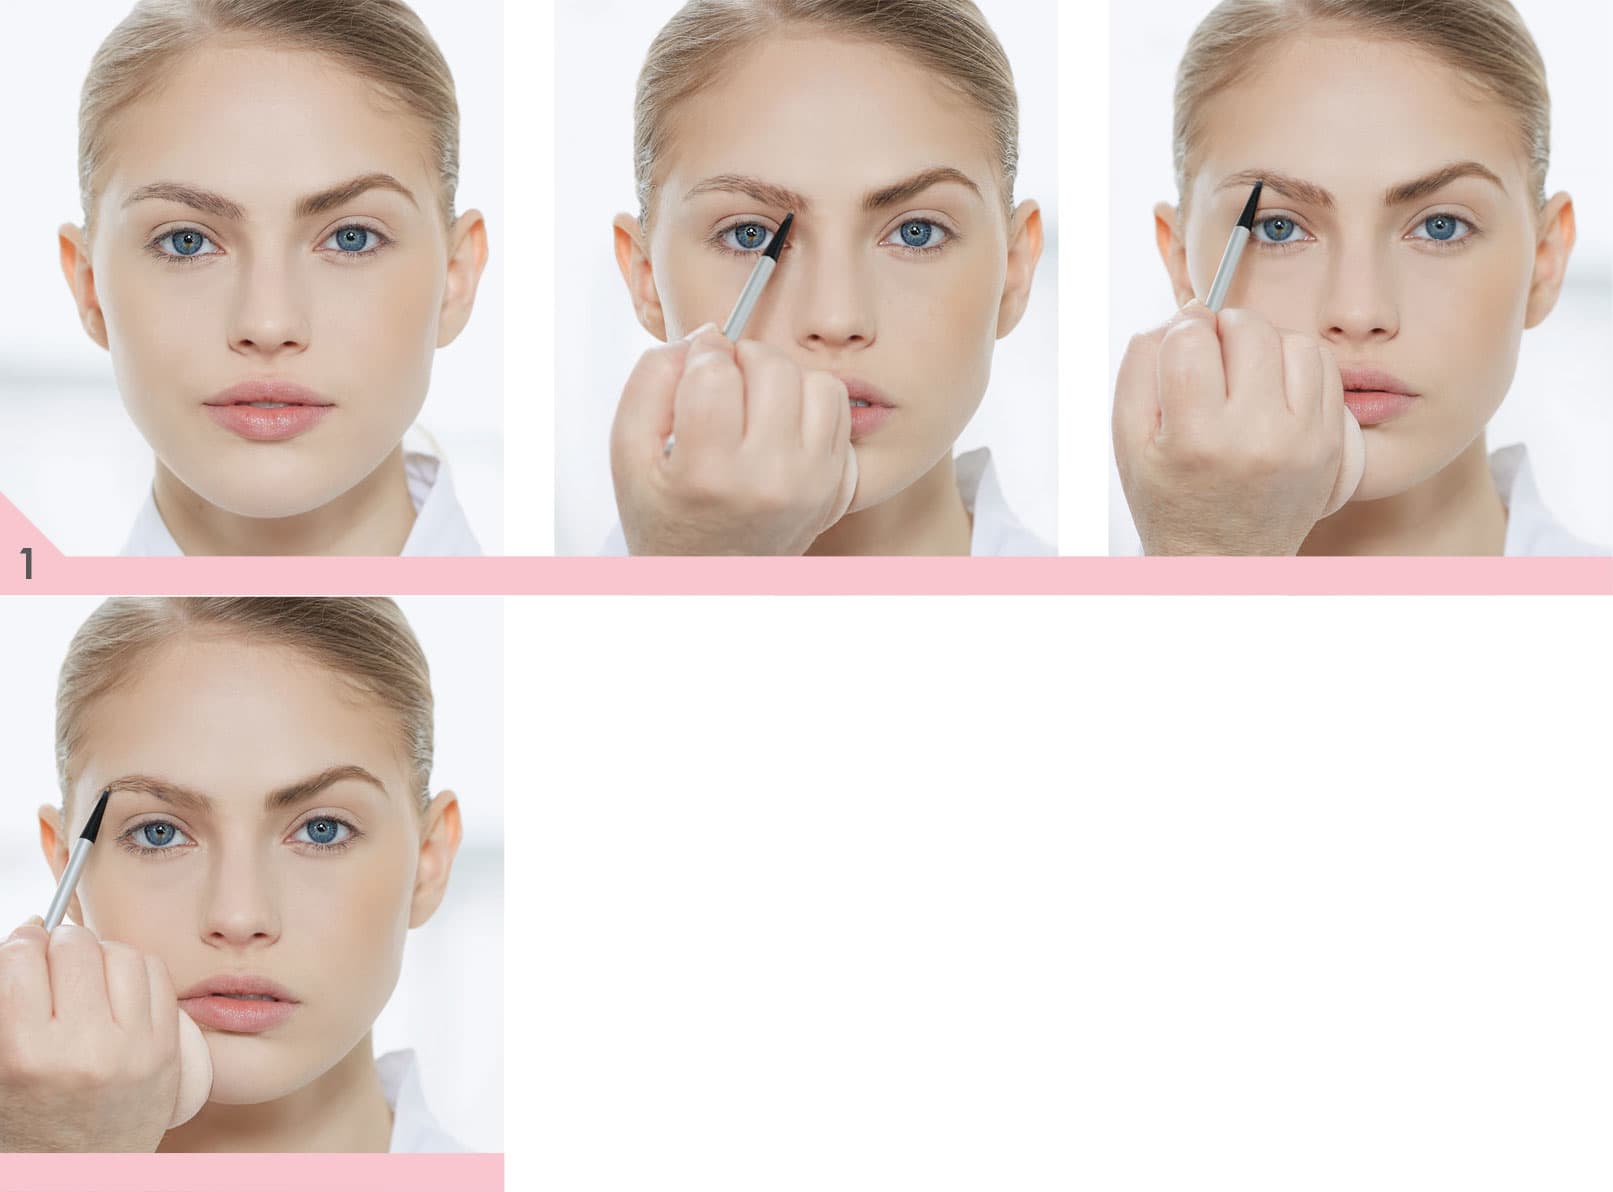
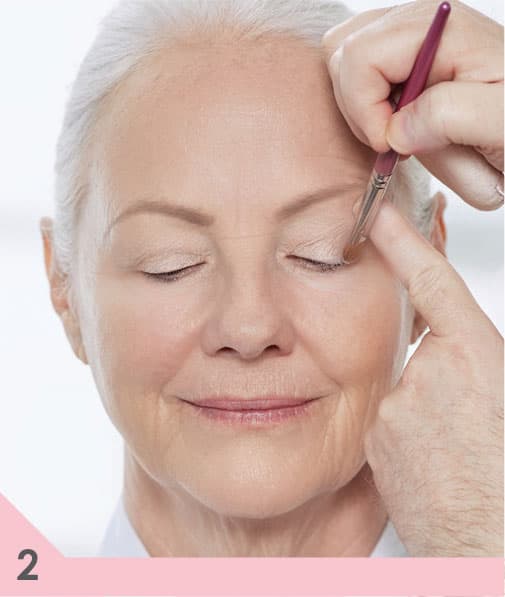
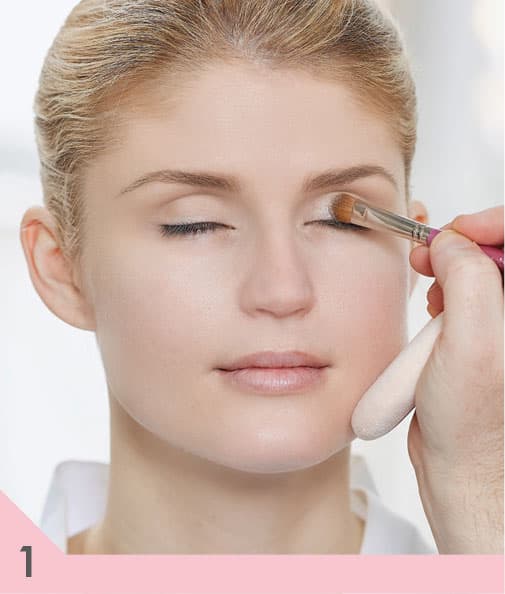
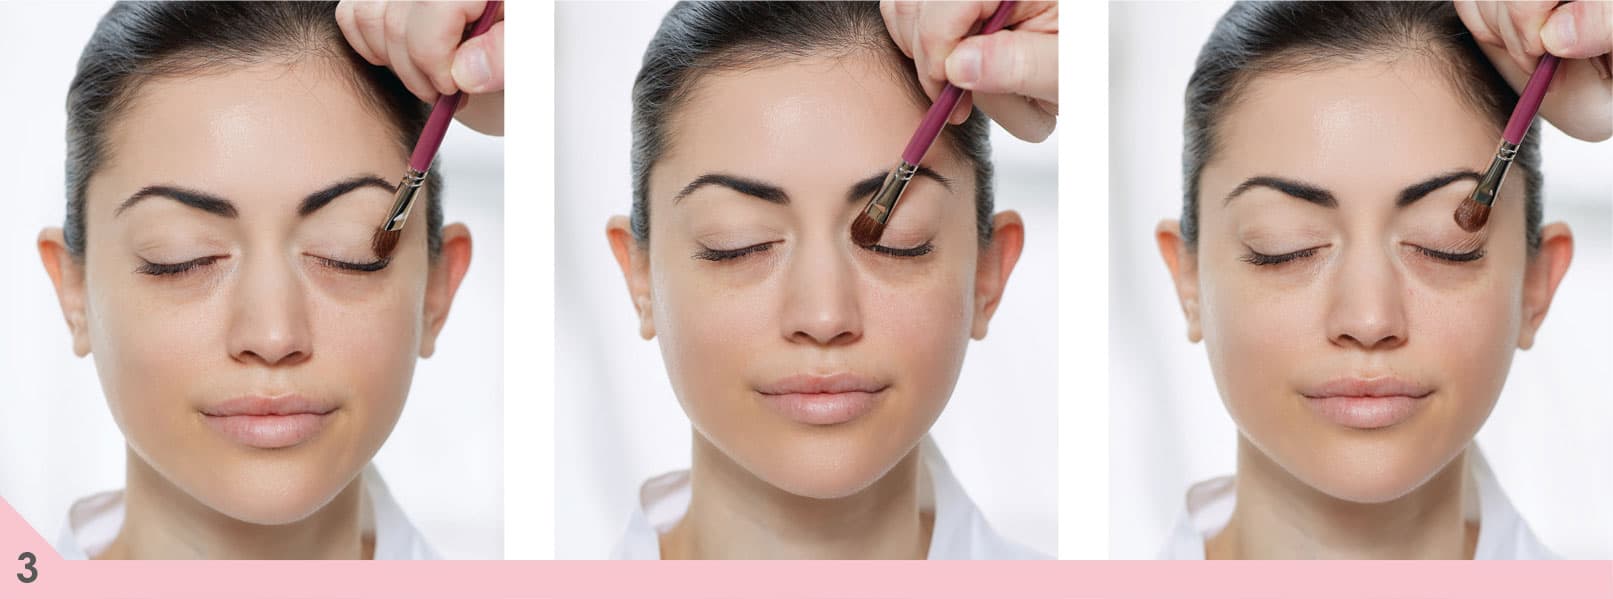
1. To trim your brow: Brush your eyebrows up and snip any stray hairs that extend past the upper brow line.
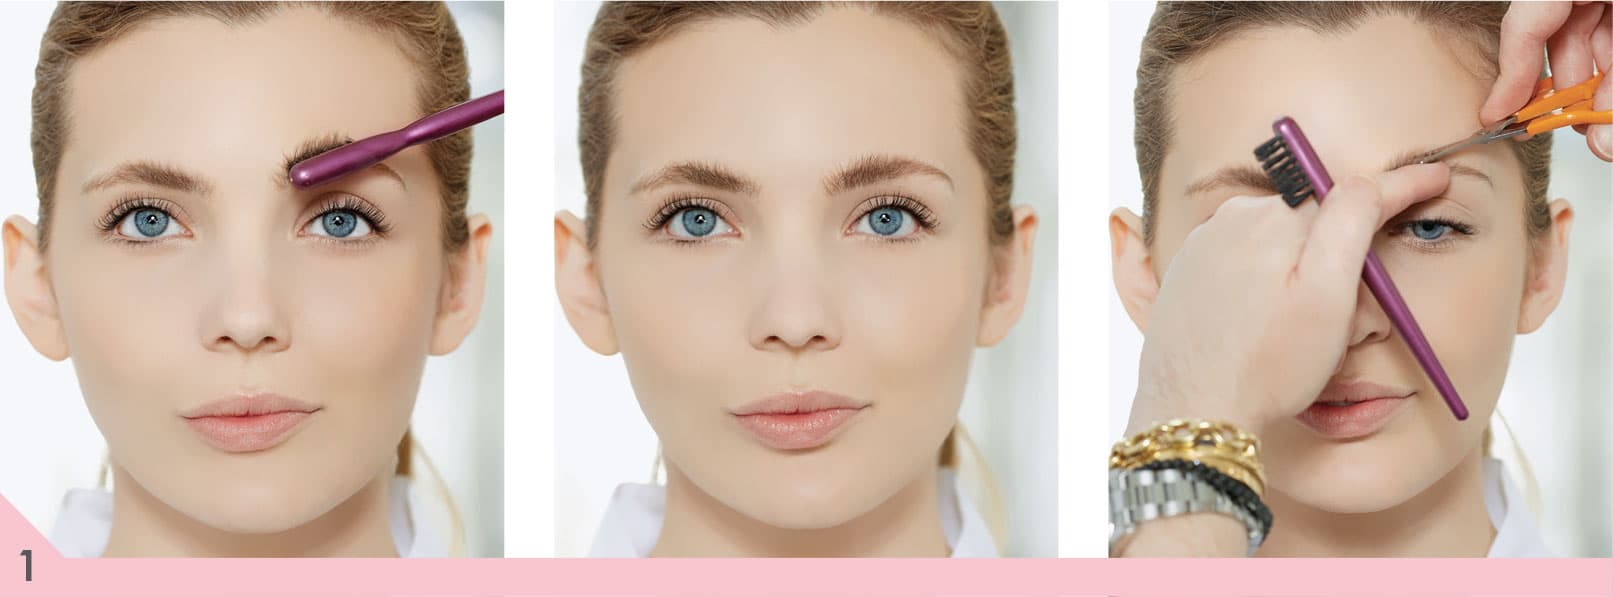
2. Brush them down and snip any unruly hairs that extend past the lower brow line.

3. Now brush them back into place. Notice how much better they lie and how much softer they look on your face.
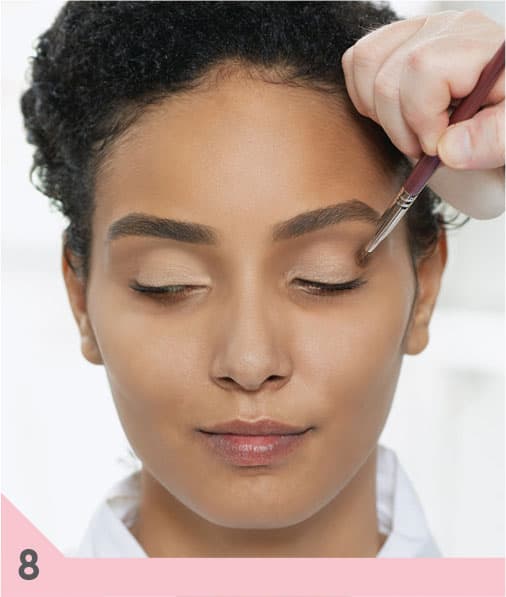
If you need to trim your brows, do it before you start to tweeze. Otherwise, you might ruin your brow line by tweezing away hairs that should have stayed but were simply too long.
tweeze your eyebrows
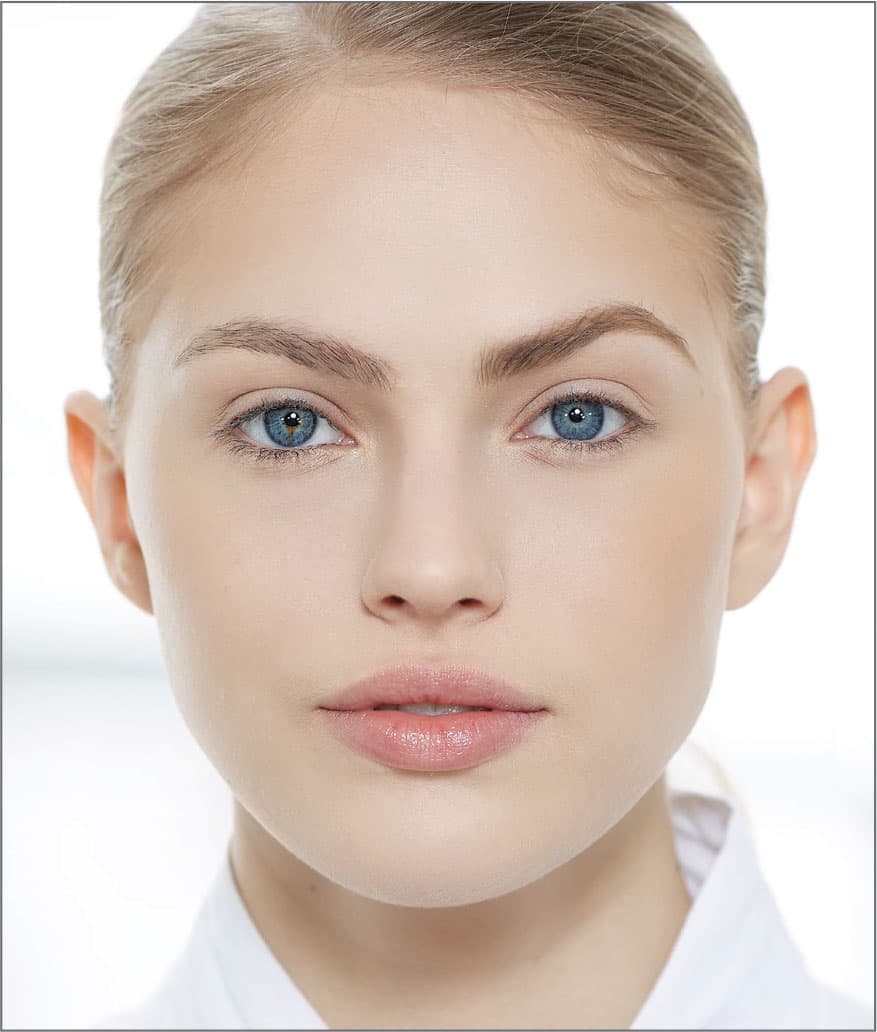
The best time to tweeze your brows is after a steamy shower, when it’s a lot less painful because your pores are already open. Try to tweeze in natural light; you’ll be able to see what you’re doing much better. Always tweeze in the direction your hair grows. If you don’t, it can damage the hair follicle, and the hair might not grow back properly—sticking straight out rather than lying down, for example.
If you have naturally full brows, you never want to tweeze them pencil-thin because your face needs a fuller brow. Shape them and groom them, just don’t over-tweeze them.
Tweezing your brows to look like each other can be very difficult. Very few people have brows that grow exactly symmetrically. If you fully tweeze one eyebrow first, you may never make the other match it no matter how much you work, simply because of the way it grows. If you do what I call “tweezing from side to side” instead, it will help you make them more even. Start by tweezing a couple of hairs out of one brow, then switch to the other, tweeze a couple out of it, and switch back to the first. This way you can constantly reevaluate what needs to be tweezed, and the frequent comparison will help you get them more even.
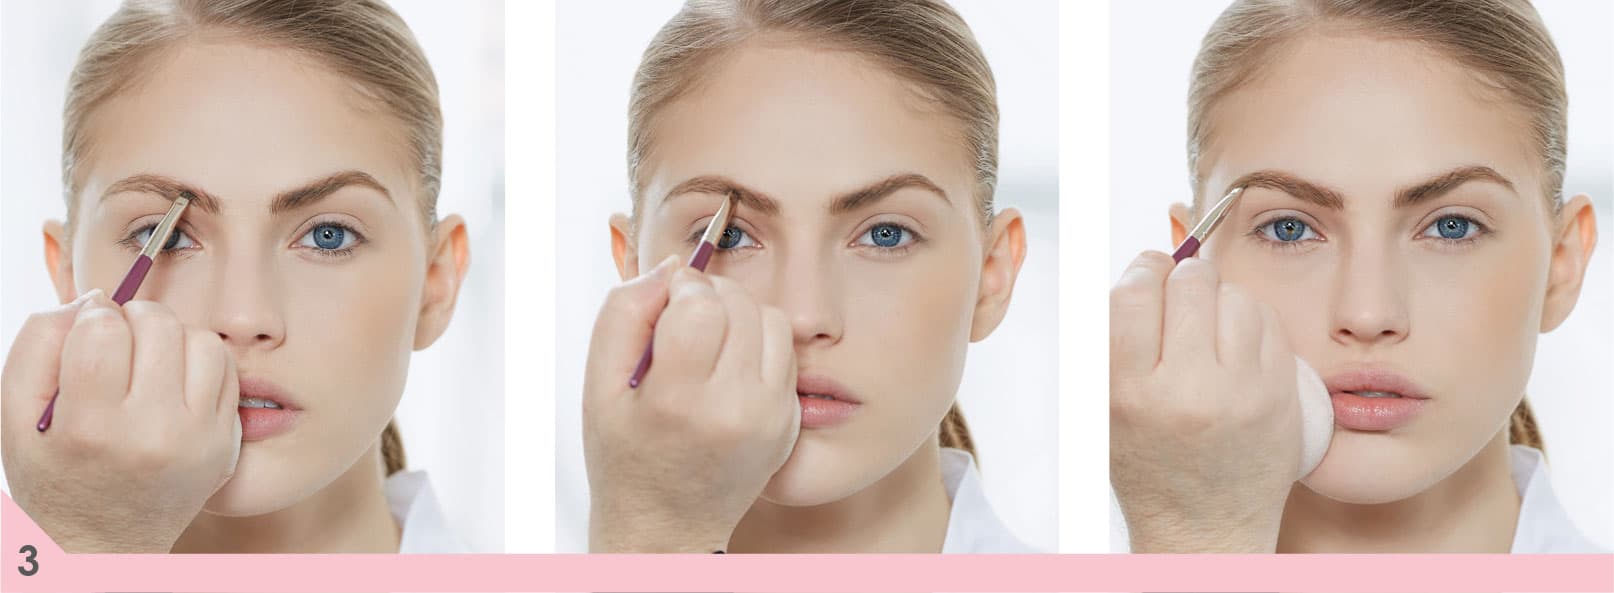
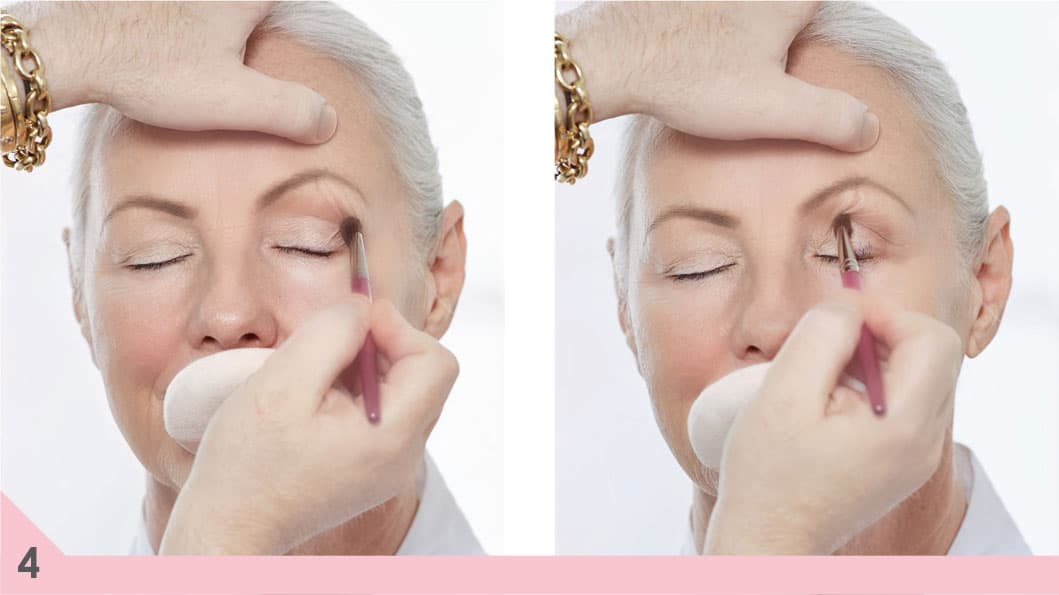
How do you determine where to start?
By locating three key points of reference, we will know where and what to tweeze.
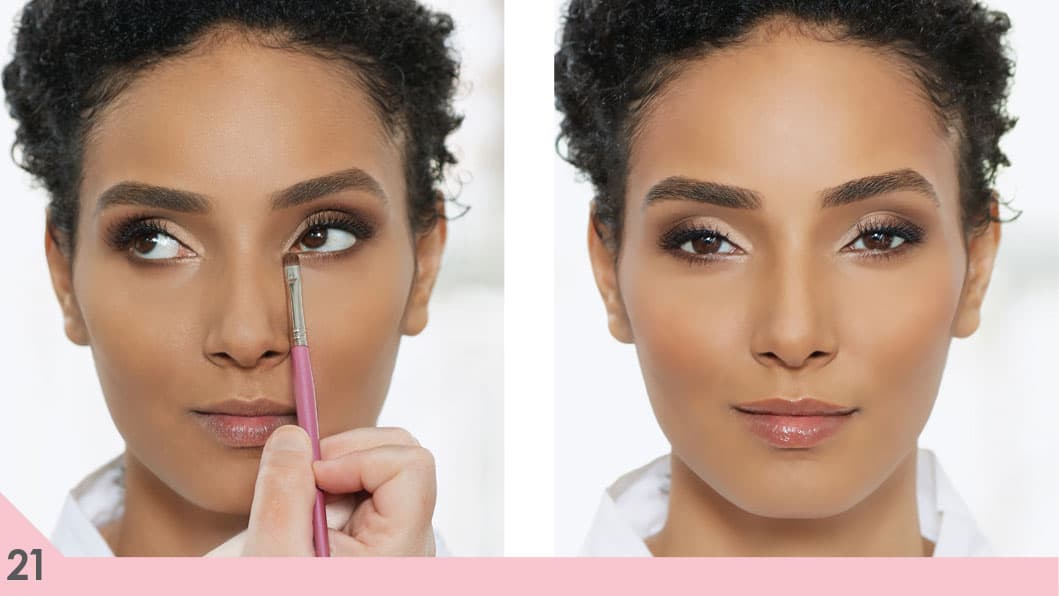
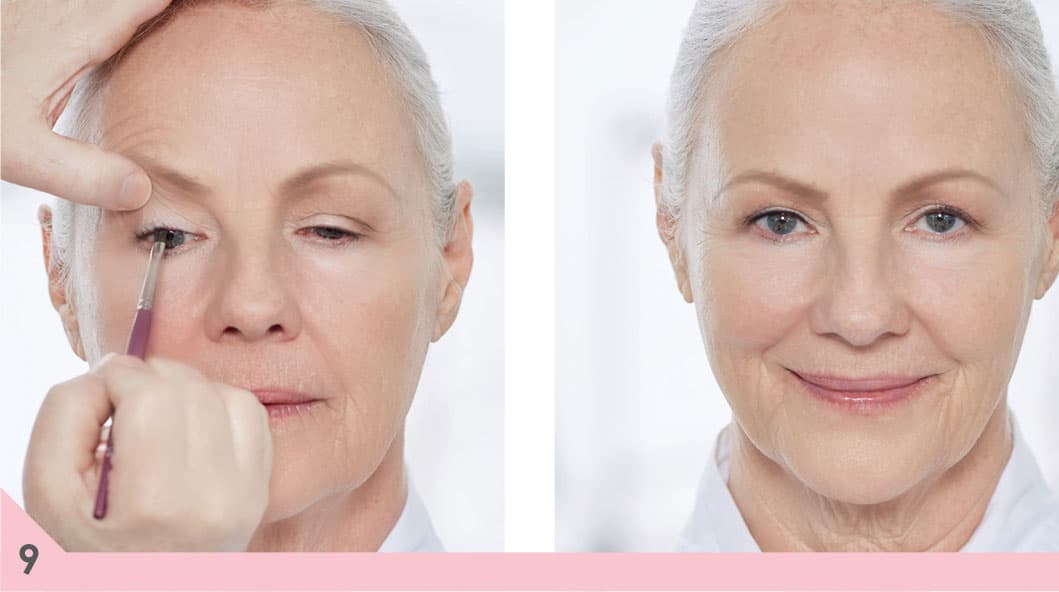
Point A. Hold a pencil or the handle of a brush vertically against the side of your nose, noting where it meets the brow. That is where your eyebrow should begin. Keep in mind the width you put between your brows will affect how wide the bridge of your nose appears. The wider the space between your brows, the wider your nose can look; the narrower the space, the narrower your nose will look.

Point B. Hold the handle against your nostril and move it diagonally across the outer half of the iris of your eye. Note where the handle meets your brow: This is the best place for the peak of your arch. If you tweeze from point A to point B, tapering the line slightly toward the peak, you will create the ideal shape for your brow. It is a gentle taper, using the natural width at the beginning of your brow (point A) and slowly tapering it as you get to the arch (point B).

Point C. Place the handle against your nostril again, but this time, extend it diagonally to the outer corner of your eye. Where it meets the brow is the best place for your brow to end. If you tweeze from point B to point C, tapering the line even thinner, you will create the best brow shape for your face. Once again, it is a slow taper from point B to point C, not a drastic change.

tip: Make sure you tweeze one hair at a time. Tweezing clusters could cause bald spots.
what to color your brow
Did you know that you can choose a brow color as easily as a hair color? The basic rule of thumb is that it should pretty closely match your hair color (whether natural or chosen). Let’s elaborate a little bit, though, because it’s not just as simple as that. Here are the perfect brow colors for each hair color:
• light blonde: the same shade as your hair or one shade darker
• medium to dark blonde: the same color as your hair
• auburn: the same color as your hair
• light brown: the same color as your hair or one shade lighter
• medium to dark brown: the same color as your hair or one shade lighter
• very dark brown to black: one shade lighter than your hair color, to soften the look of your brows and prevent them from making you look too harsh
• silver or gray: a blonde or soft taupe for ivory or beige skin tones or a light golden brown for bronze or ebony skin tones. A silver or gray brow color to match your hair would just wash you out and make you look older. Another option is to have them dyed; they make special products to do this.
Just a reminder: Brow color products are specifically designed for their job. Eyebrow pencils are duller in color, usually with no sheen, and have a somewhat waxier texture than eyeliner pencils do. Eyebrow powder is duller and more matte than eye shadow. Make sure you are using products designed to do the job at hand.
tip: When you have your hair colored, ask your colorist to tint your brows to match. This will ensure that your brows match your hair.
how to apply brow color
The goal when applying brow color is to mimic your natural brows. You want to draw short feather-like hair strokes, meant to imitate natural eyebrow hairs, as you apply the color, never a straight solid line. Here are the best application techniques for each type of brow color and grooming product you might choose (see here).
eyebrow pencil
An eyebrow pencil is probably the most commonly used and certainly the most portable coloring tool. The sharper the point, the better the application, so sharpen your pencil before you start.
1. With your pencil, make short, feathery, hair-like strokes, angled in the same direction as the hairs’ growth. Your strokes should mimic natural brow hairs (never draw a solid straight line).

2. Using a small stiff-angled brush, go over the pencil strokes you just made, using the same short strokes. This will blend the color even more, making it look natural.
powder
Powder is probably the easiest of all brow color options to apply, and it also looks the most natural. It is perfect if your brows don’t need much filling in, but you want to define and refine them. It is also the quickest and easiest to apply because there is only one step—you apply and blend at the same time. Dip your short, stiff-angled brush in product and draw short, feathery, hair-like strokes angled in the same direction as the hairs’ growth. Remember: no straight lines, just short, feathery strokes.
crème/pomade
This will give you the most coverage, but it is the hardest to master, so give it some practice. It’s a great choice for you if you need a lot of coverage due to over-plucking or chemotherapy, or if you just really want dramatic brows. (However, I prefer the powder-on-pencil technique on the next page.)
1. Using a short, stiff-angled brush, apply your crème/pomade using short, feathery, hair-like strokes.
2. Make sure to always follow your crème with powder brow color, using the exact same application method. The powder will set the crème and help it last all day. Most of your pomade formulas won’t necessarily have to be followed by a powder because they dry to a finish that the crèmes do not.
tip: Sharpen your eyebrow pencil each time you use it. The sharper the point, the better the application.
pencil and powder for more coverage
If you have scars in your eyebrows or brows that just are not there, you will need more coverage. You could use a crème, but I prefer to layer eyebrow pencil and eyebrow powder together because it looks most natural. I almost always layer pencil and powder when apply brow color. It helps your brows last longer and look more natural.
1. With your pencil, make short, feathery, hair-like strokes angled in the same direction as the hairs’ growth. Your strokes are meant to mimic natural brow hairs (never draw a solid straight line). I usually use a pencil that is lighter than the natural brow color to make it look softer and more natural.
2. With a small stiff-angled brush, go over the pencil you just applied using the same short strokes. This will blend your color even more, making it look extremely natural.

3. Dip your brush in eyebrow powder and apply it once again using short, feathery, hair-like strokes angled in the same direction as the hairs’ growth. I usually choose a powder that’s the exact brow color so it gives a subtler effect when layered with the lighter pencil. Make sure you cover the entire brow. The powder and pencil layered together will give you more complete coverage, help the color last longer, and look more natural.
Whichever method you prefer, always finish by using a brow brush (my favorite is shaped like a toothbrush) to brush all your brow hairs upward and outward. This will ensure that your brow hairs are lying in place, and it will blend your color beautifully to give you an absolutely natural effect. If you have wild, unruly brows and need help keeping them tamed during the day, you can end with a brow gel. It acts like hairspray for the brows.
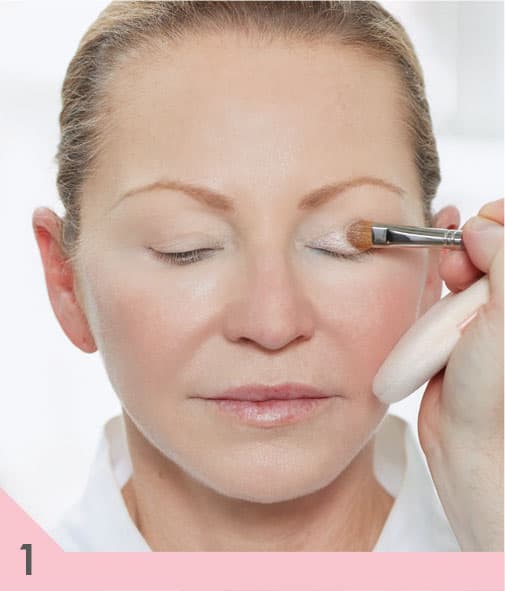
apply your eye shadow
I almost always make the eyes the focus of the face. It is often said that they are the windows to the soul. What are yours saying about you? Applying color correctly to your eyes can go a long way toward making your signature statement to the world. With eye makeup, it should always be your goal to bring out your eyes and help them grab everyone’s attention. When someone looks at you, you want that person to think you look beautiful today, not that your eye makeup does.
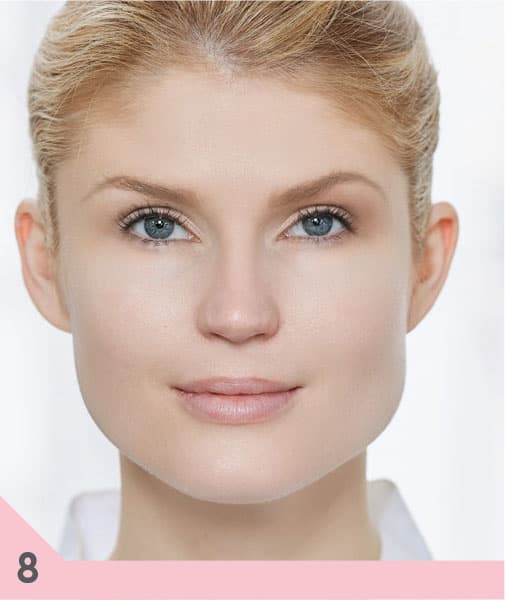
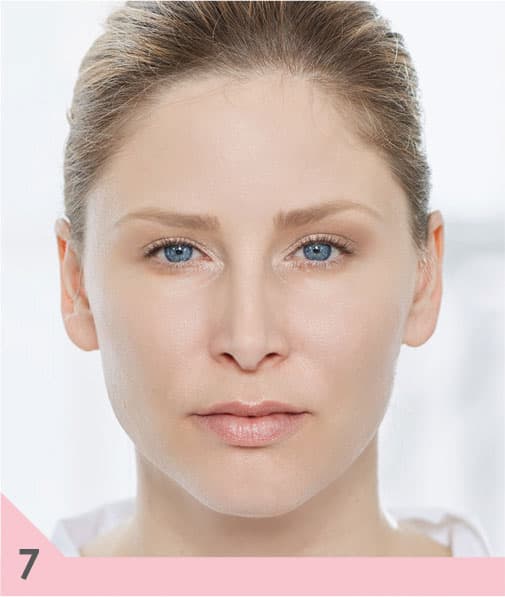
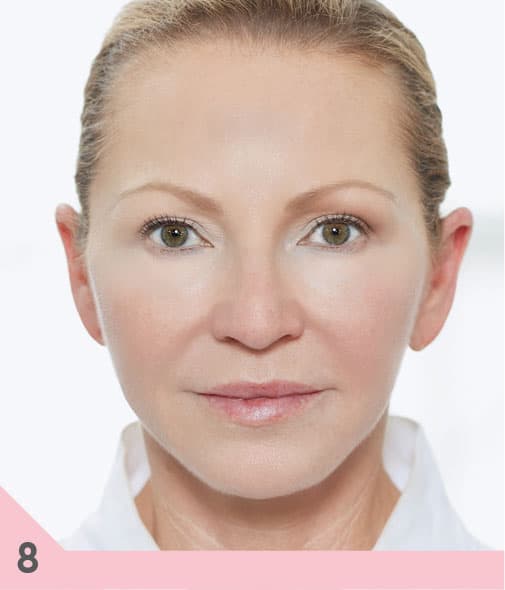
Let’s start with how to apply eye makeup on a basic eye. It’s not the perfect application for every eye shape, but it is a place to start when you are first learning to apply makeup.
You have a basic eye if your eyes are one eye width apart—that is, the space between your eyes is the same width as one of your eyes. Also, when you look in the mirror, you’ll see the entire eyelid, from lash line to crease. You’ll have a defined crease all the way across, and you’ll have a clear and definite amount of space above the crease with a normal, not overly prominent, brow bone. Let’s talk about how to make a basic shaped eye look it’s best.
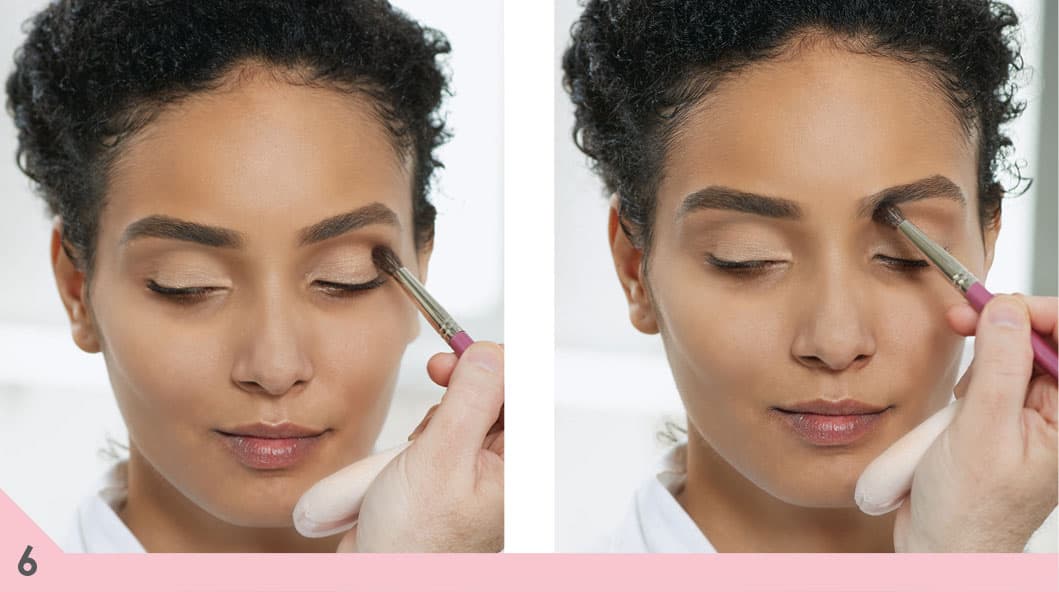
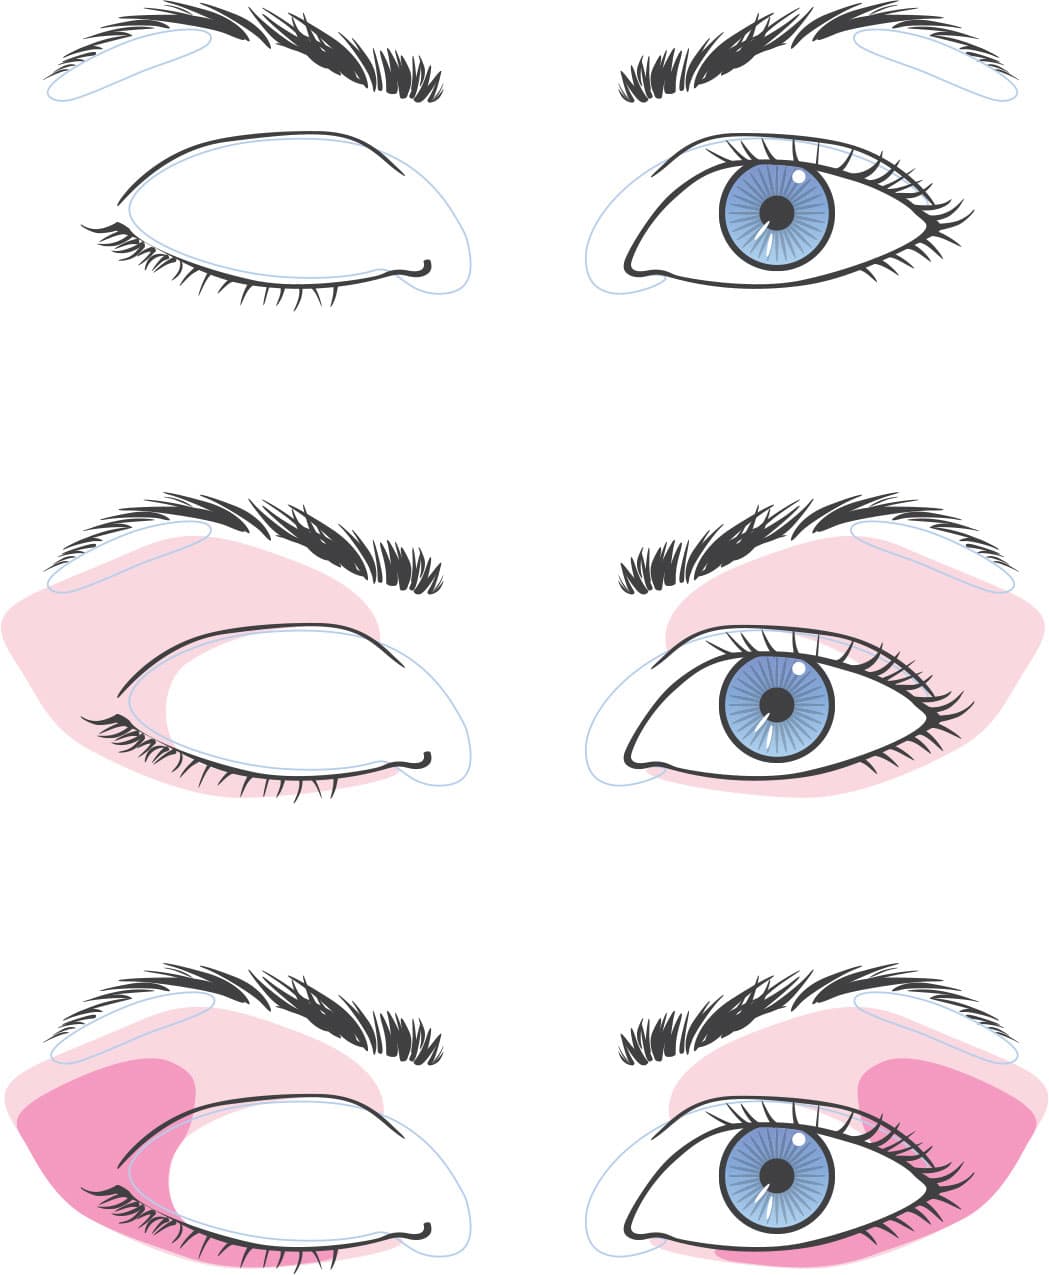
The diagram below shows where to place your highlight, midtone, and contour shades.

application: basic eye
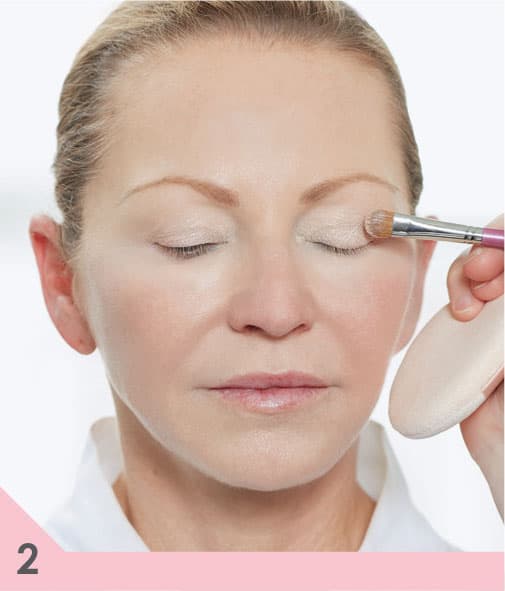
Your first goal when applying eye shadow is to give the eyelid shape by visually pushing away the areas you don’t want to see and bringing forward the areas you do. That will also help you achieve your second goal, which is to define and open up your eyes. Proper eye makeup application will make your eyes appear more open, so you look awake.
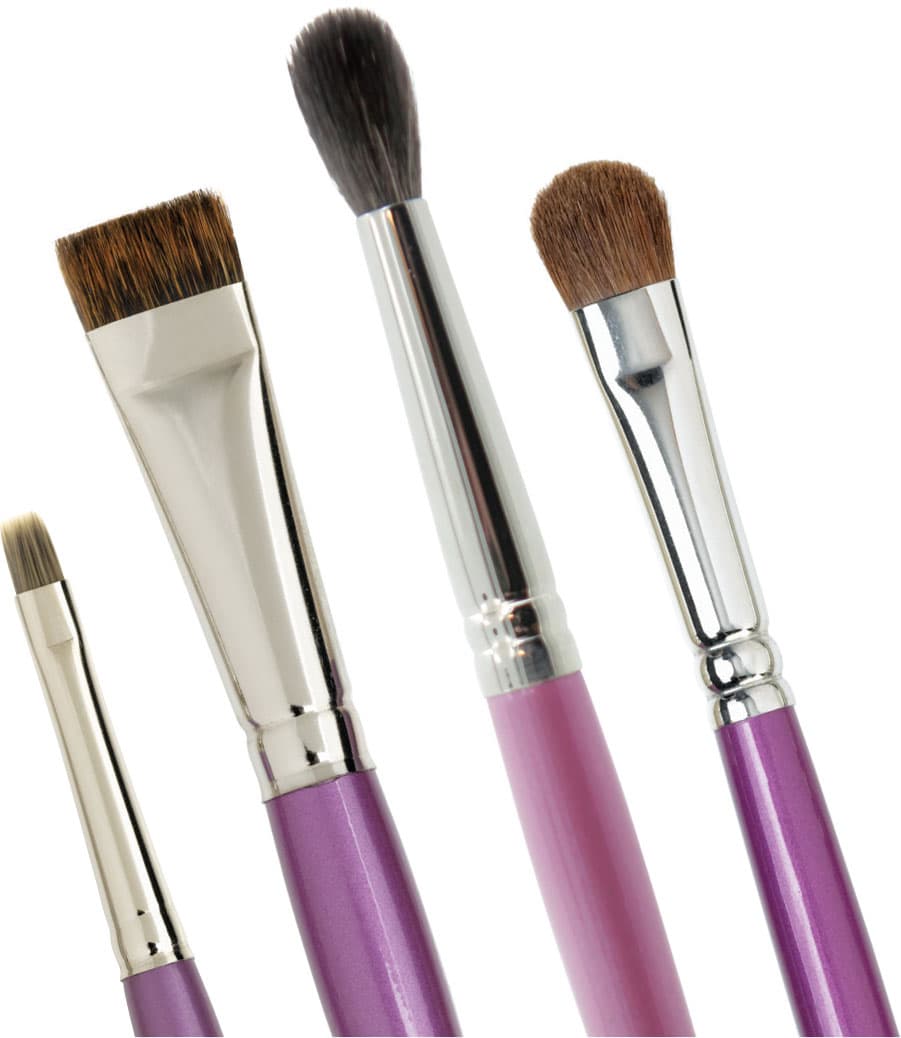
It takes three shades to shape the eye: a highlight, a midtone, and a contour shade. The basic rule is that everything you highlight will become more visible, and everything you contour or darken will recede. Using three shades creates a subtle visual trick to help bring out one of your most beautiful features and help draw attention to your eyes rather than your eyelids. Let’s learn more about these three shades.
Your highlight shade is the lightest of the three eye shadows. Everything you highlight comes forward visually. How dramatically it comes forward depends on the shade and finish you select. A matte finish will give you a much subtler look than a shimmer finish. I usually use a shimmer highlight on deep-set eyes because it opens up the eye more than a matte shade. Also, the lighter the highlight shade is, the more dramatic your result will be. A softer or more flesh-toned shade will give you a less dramatic look.
Your midtone shade is the most important shade. It is the middle shade of your three eye shadow colors, deeper than your highlight shade and lighter than your contour shade. It’s the first step in the blending process and in creating definition in the crease of the eye. This shade should be the most natural—an extension of your skin. You’ll change your highlight and contour colors more often than your midtone shade. Most of the time, it is best for your midtone color to have a matte finish, but it doesn’t always have to. A matte finish gives it a more subtle and natural appearance. The application of your midtone will start the reshaping of your eyelids because everything we add depth to will visually recede away from us.
The contour shade is the deepest of the three shades. It’s not necessarily stark or dark—it can even be metallic—but it is the deepest color. The contour eye shadow is the shade you can have fun with and change with your mood. You’ll find that most makeup lines offer plenty of contour colors because they are the most eye catching and exciting to use. Your contour shade does the most dramatic reshaping of your eyelid because of its depth. This shade really helps define the eyes.
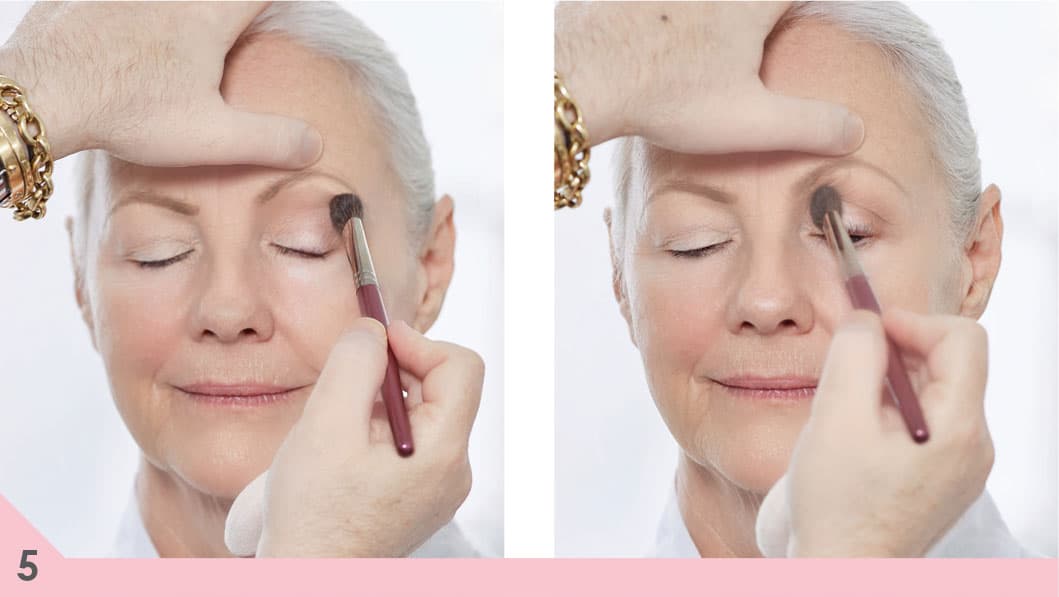
Now that we have a better understanding of our three shades, here’s where to put them on the eyelid:
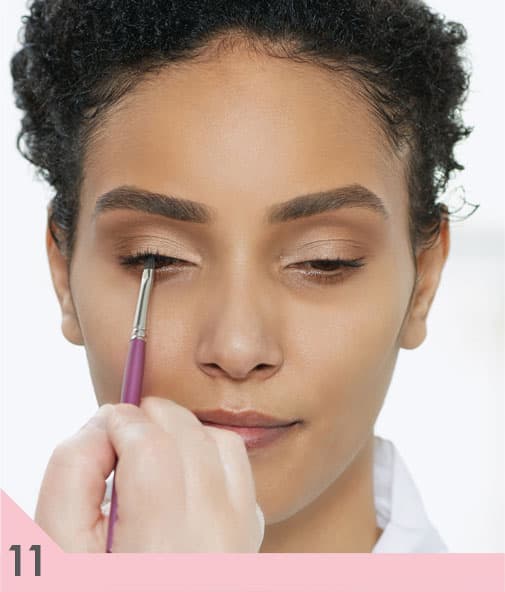
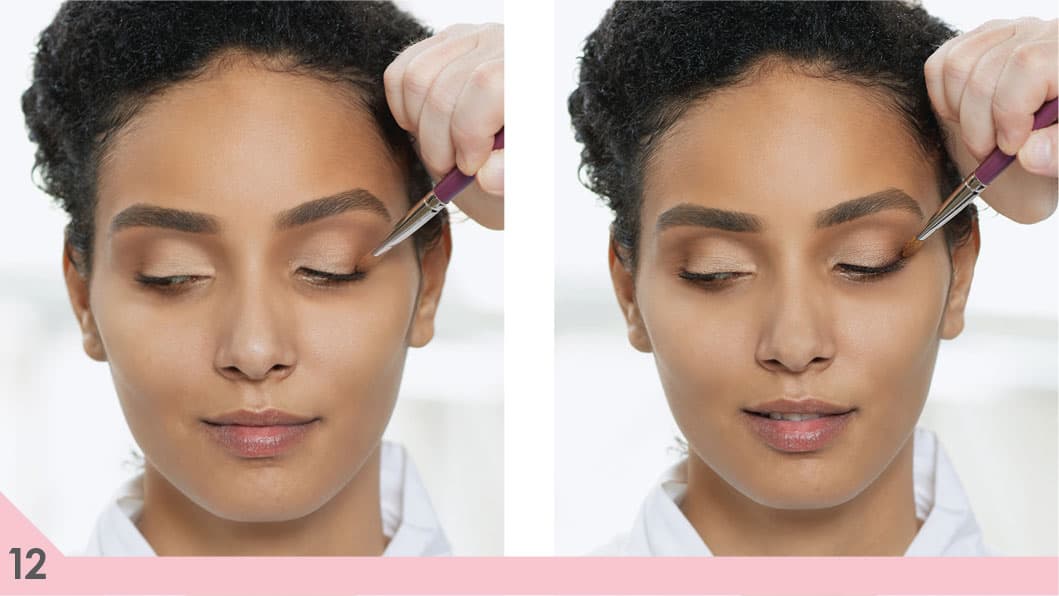
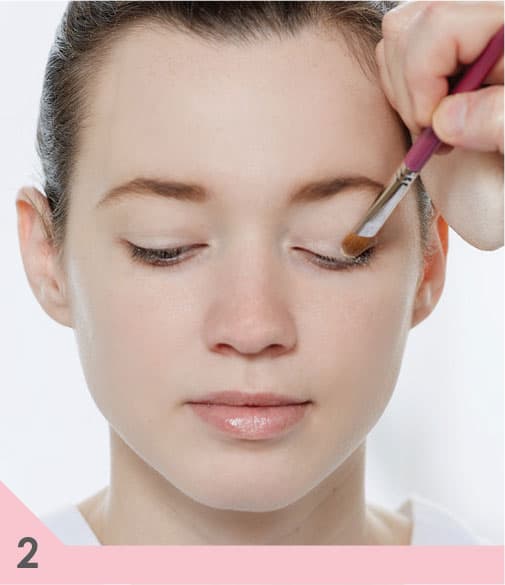
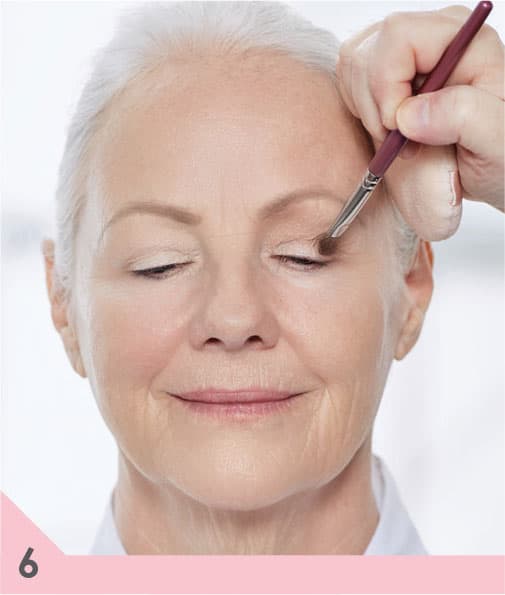
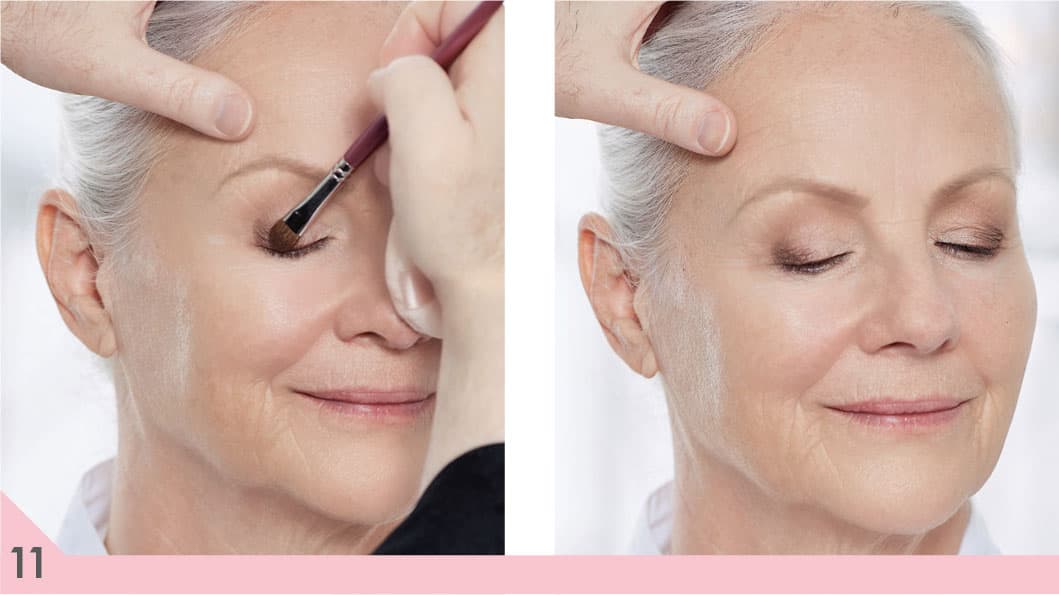
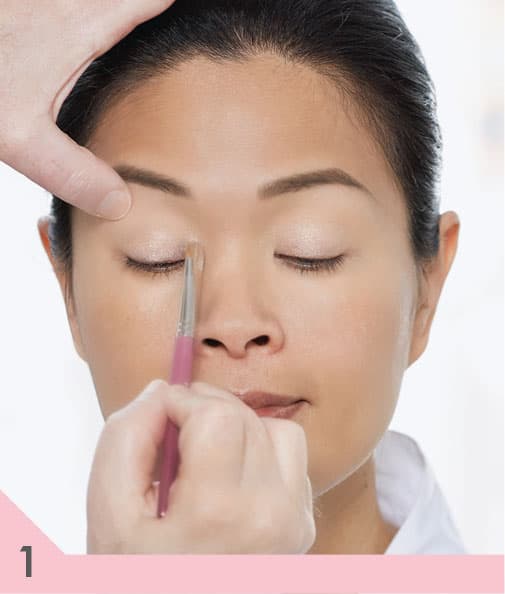
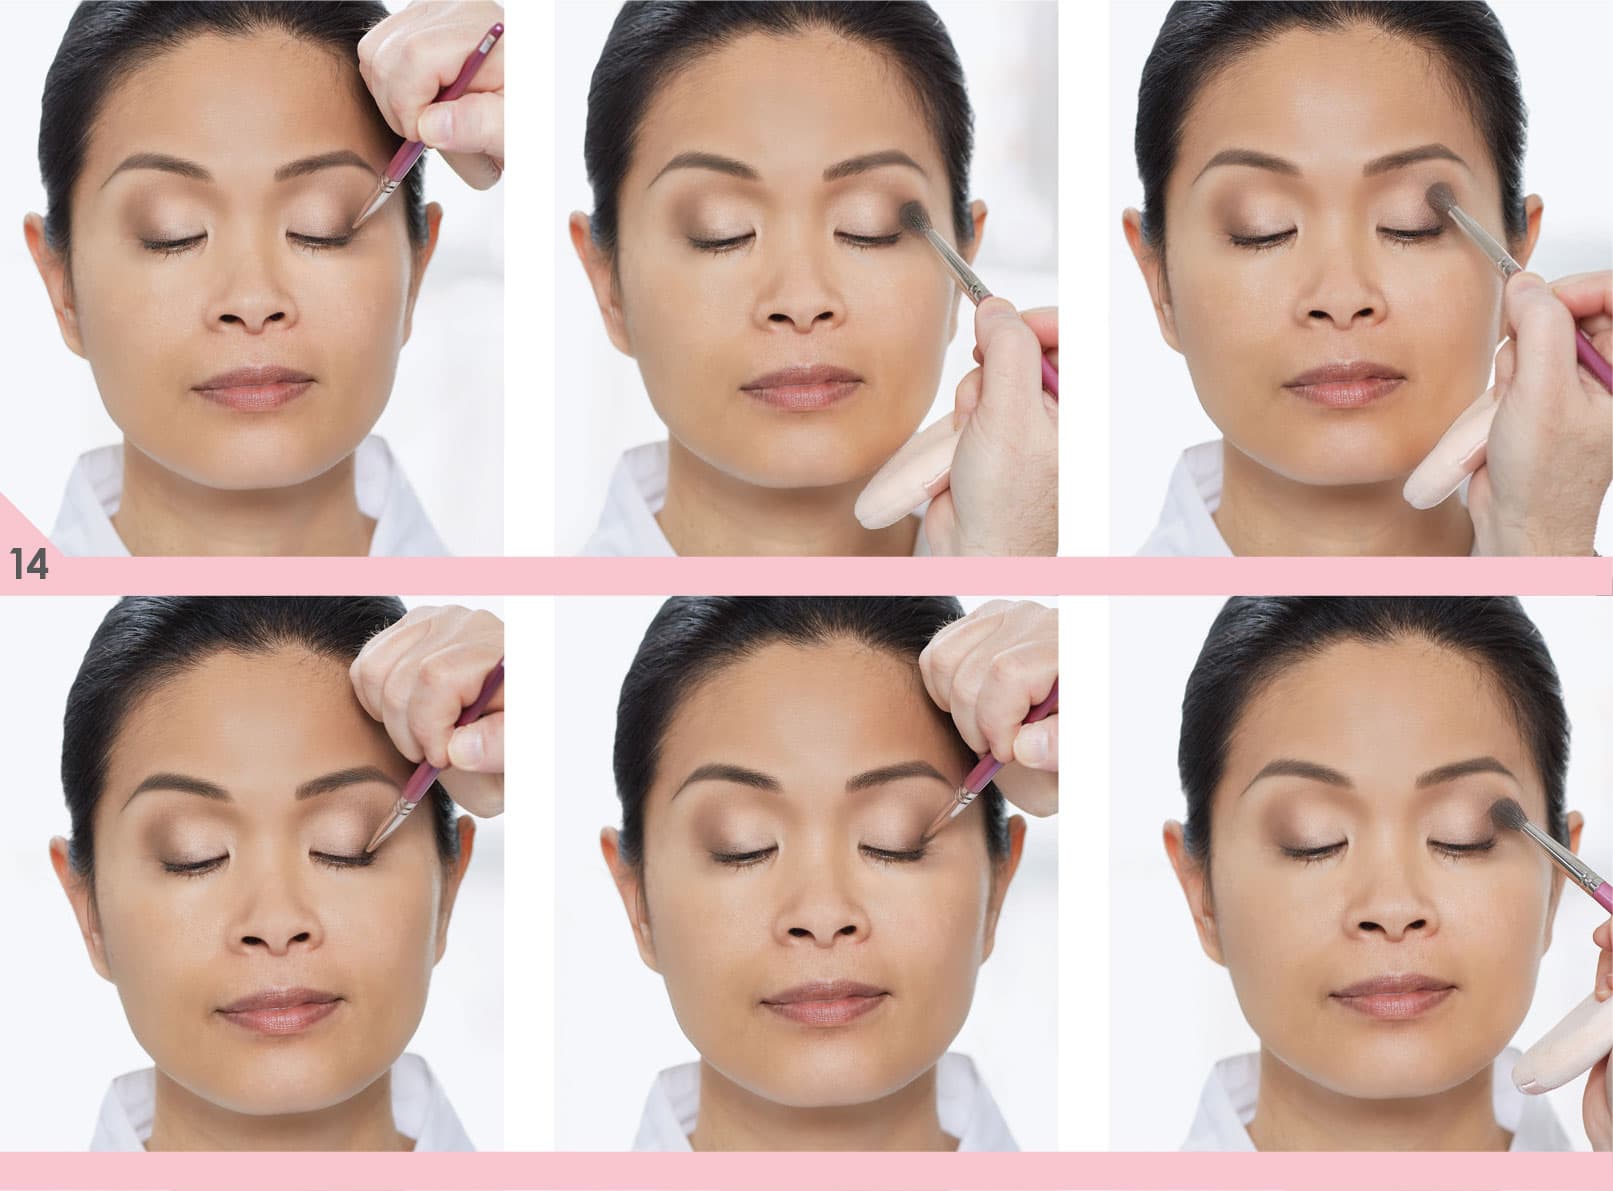
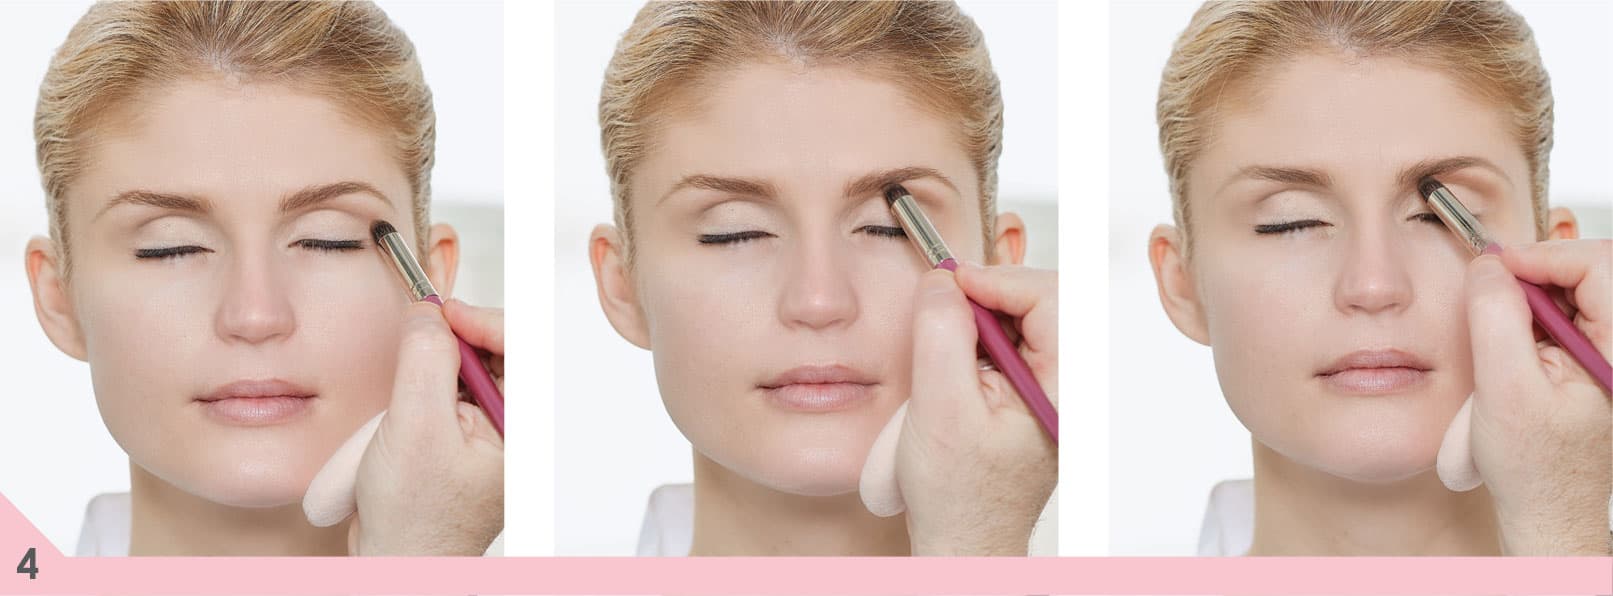
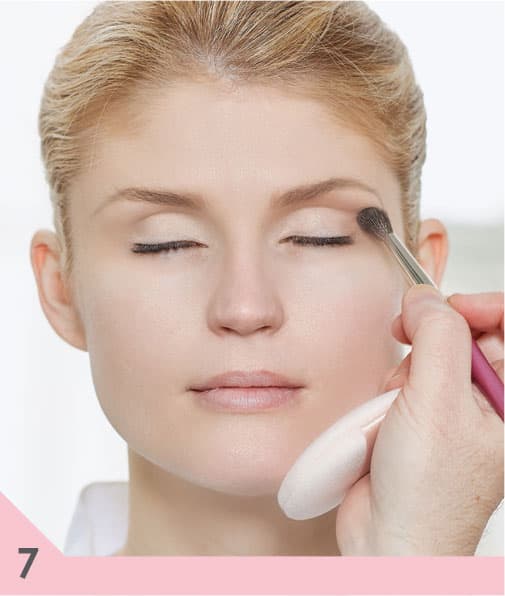
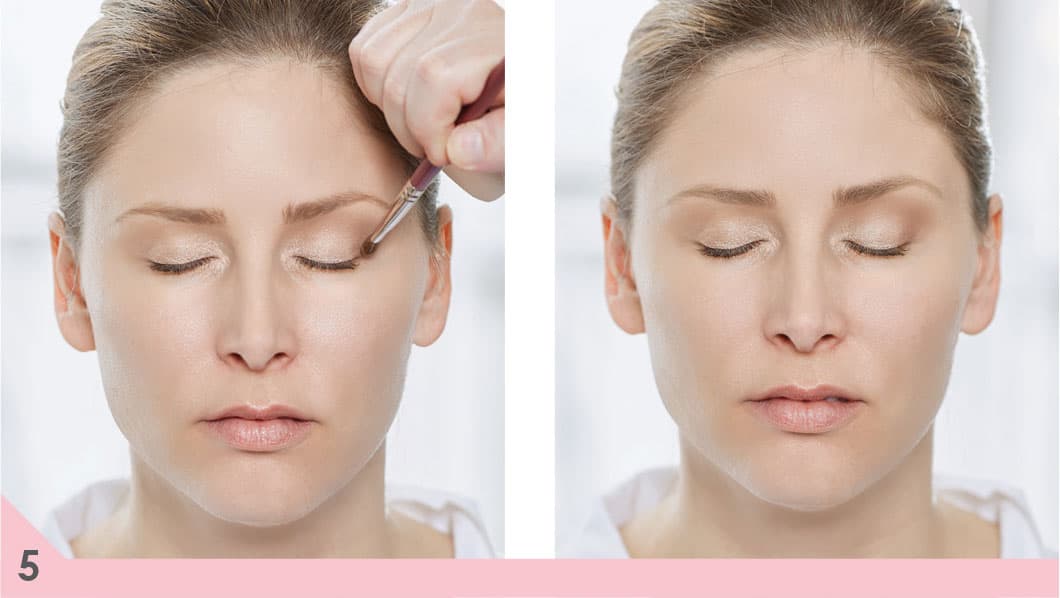
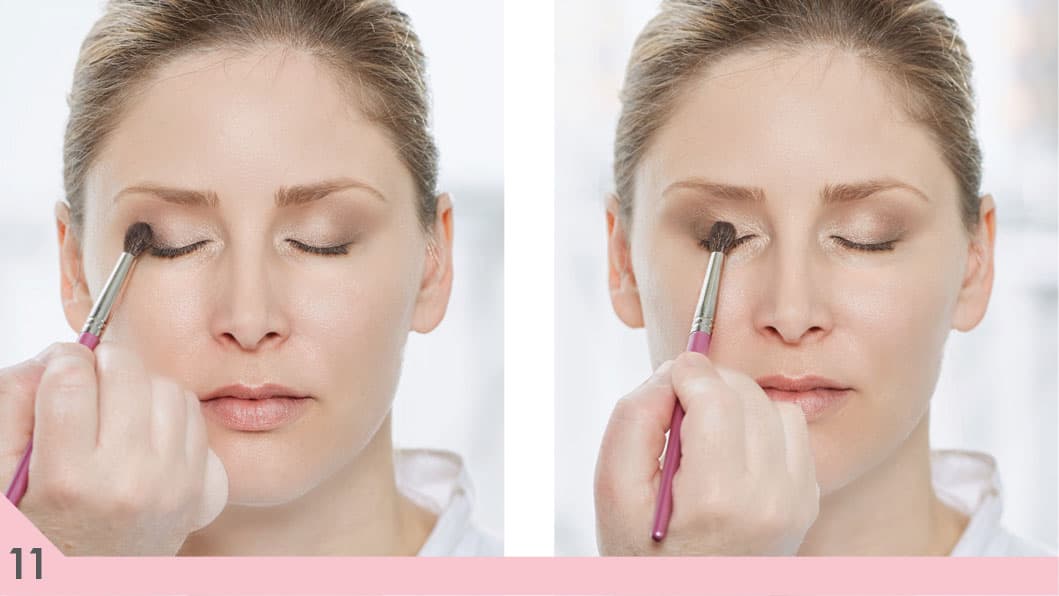
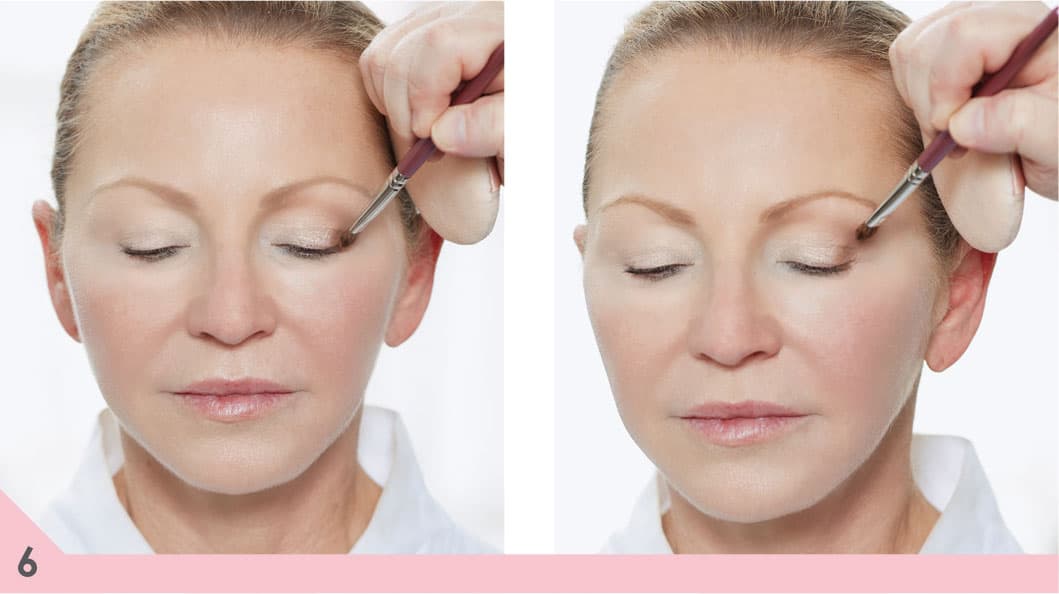
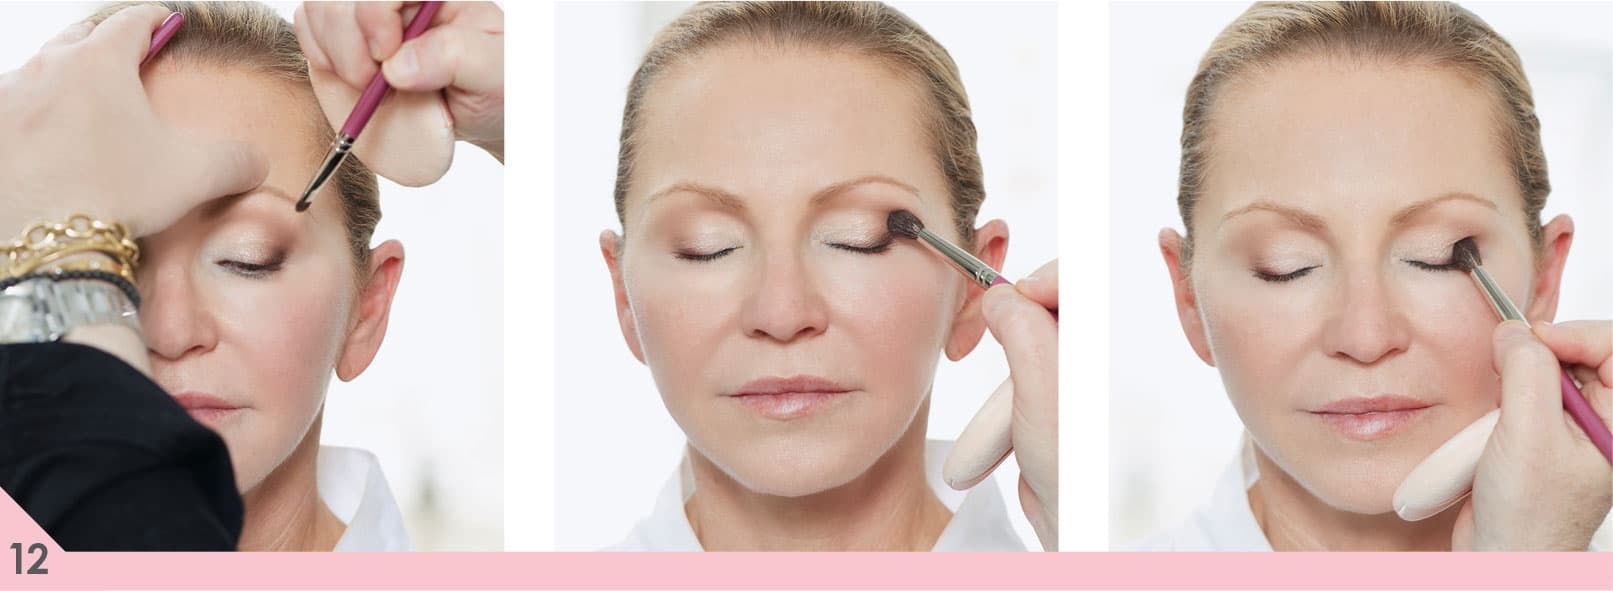
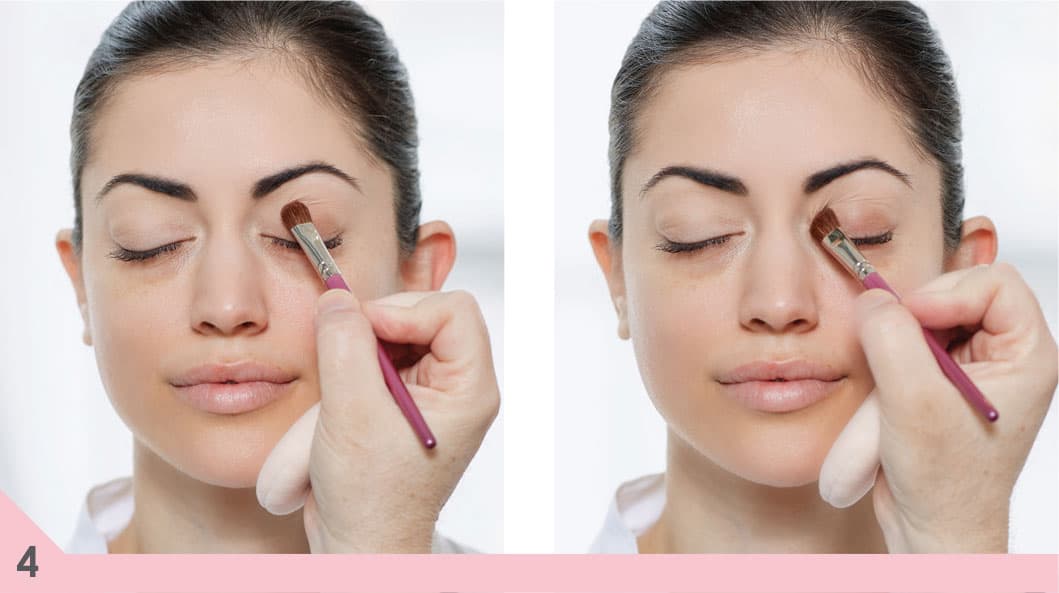
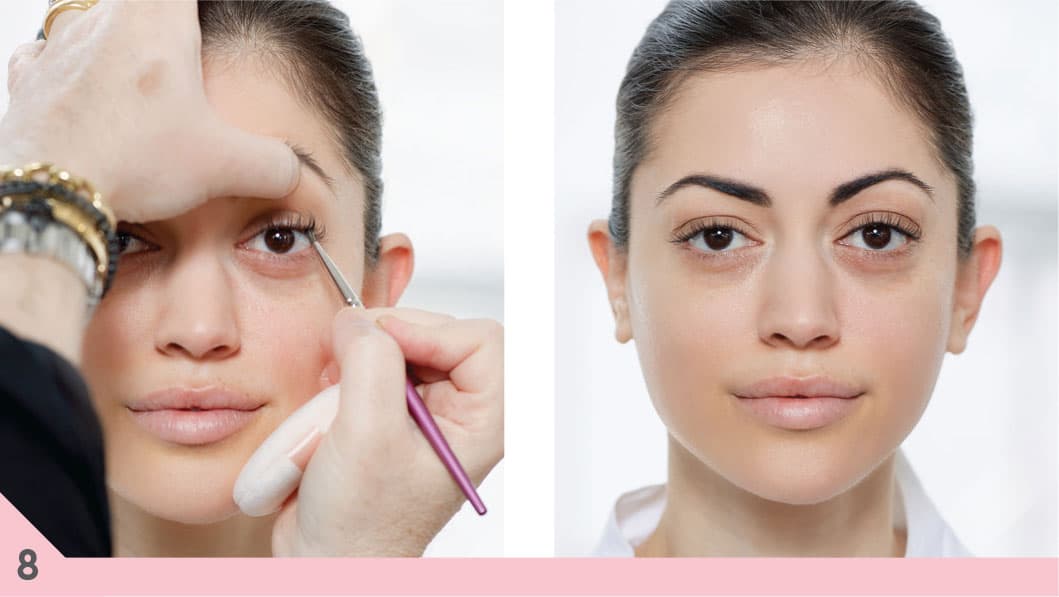
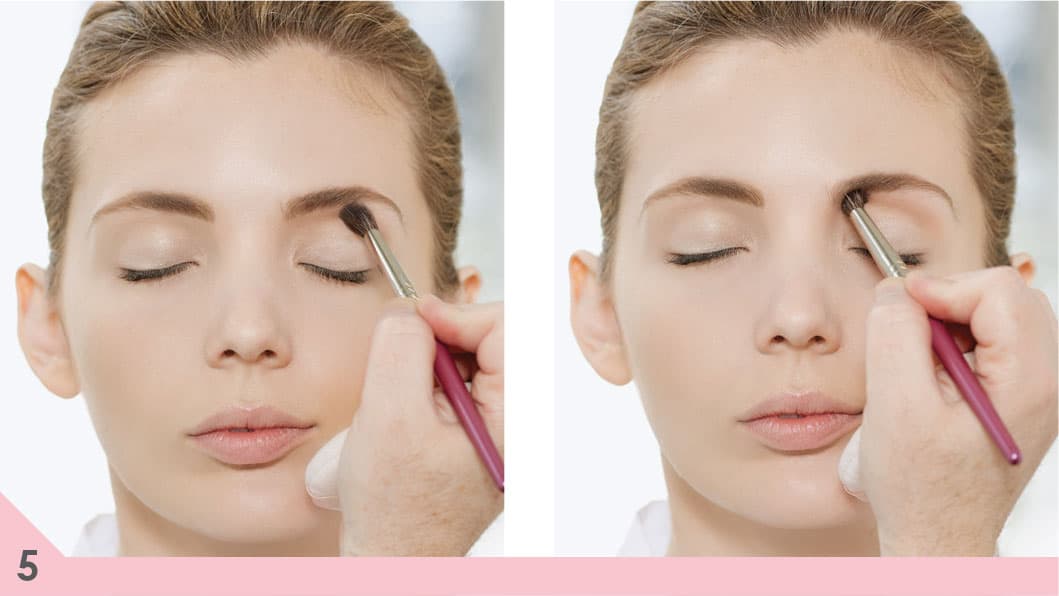
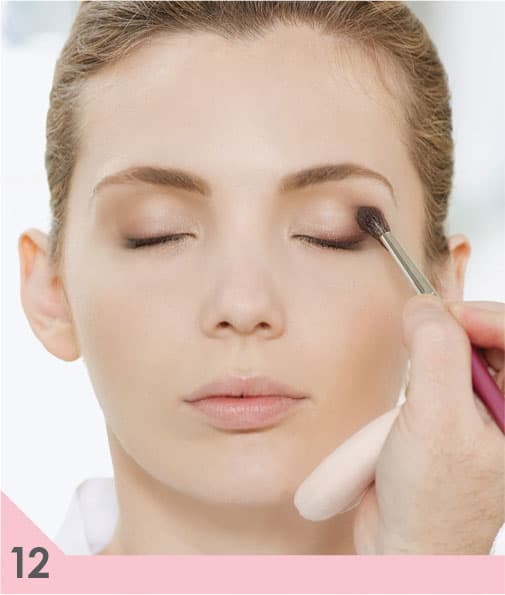
1. Apply the highlight shade to your eyelid and if you want to, your brow bone (the area immediately underneath your brow’s arch). However, don’t apply it all the way from the lash line to the brow because that can be detrimental to most eye shapes.
2. For more pop, start with shimmery beige crème-to-powder eye shadow because layering a crème and a powder will make your highlight more dramatic. Using your #22 highlight brush, apply your crème shadow to your lid only.
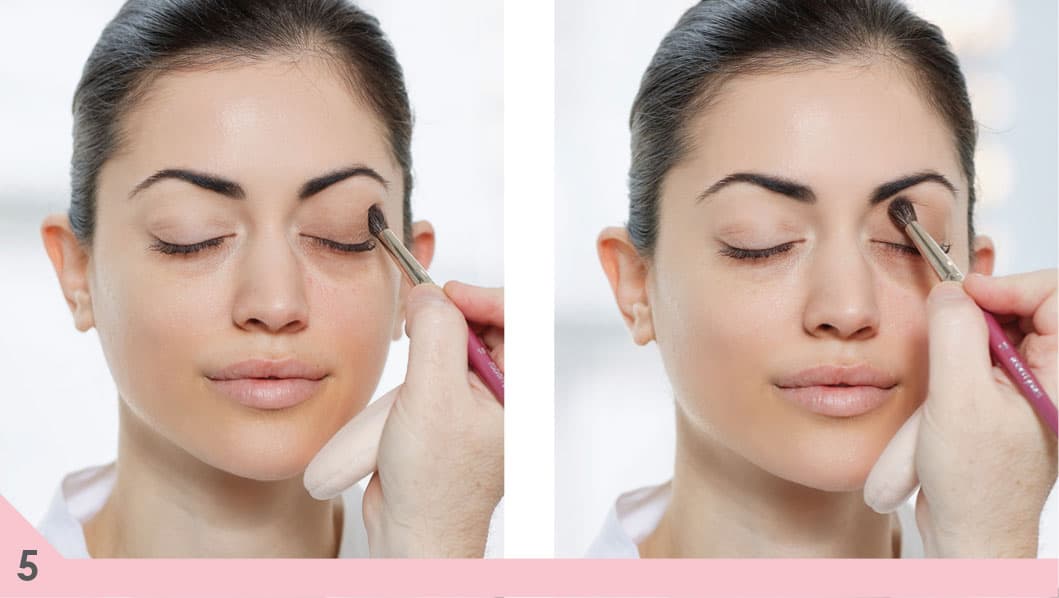
3. With the same brush, layer on a shimmery gold and a matte flesh over the crème. The reason for layering the two is you will still get the shine from the shimmer while making it opaque by adding the matte, giving you even more coverage. Just keep in mind when loading the brush that the color you touch first will be on top, so touch the shimmer shadow first and then the matte; that way the matte will be against your skin.
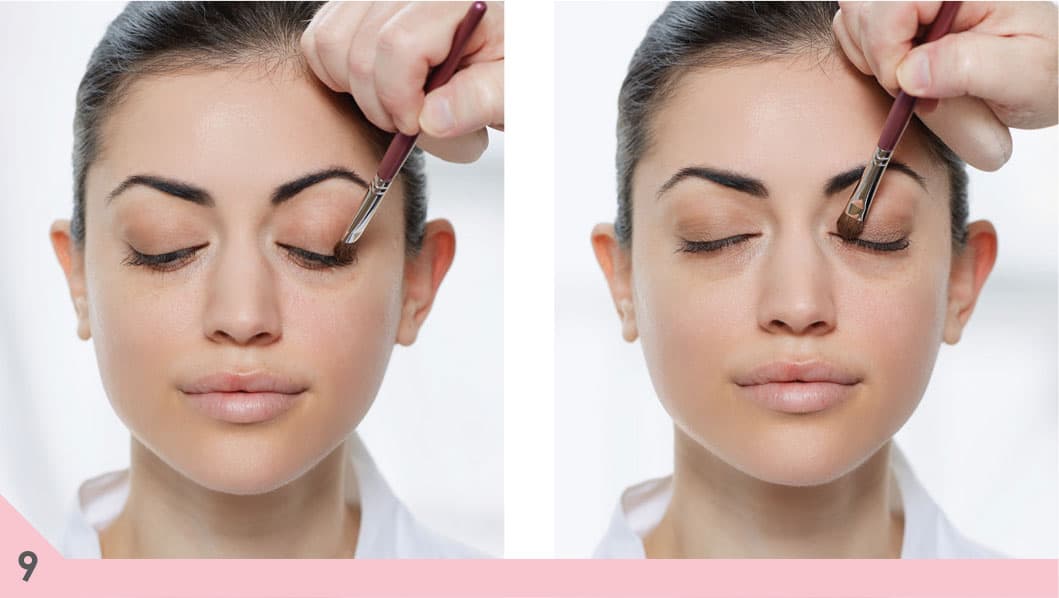
4. With your #22 highlight brush, apply the matte flesh eye shadow to your brow bone.
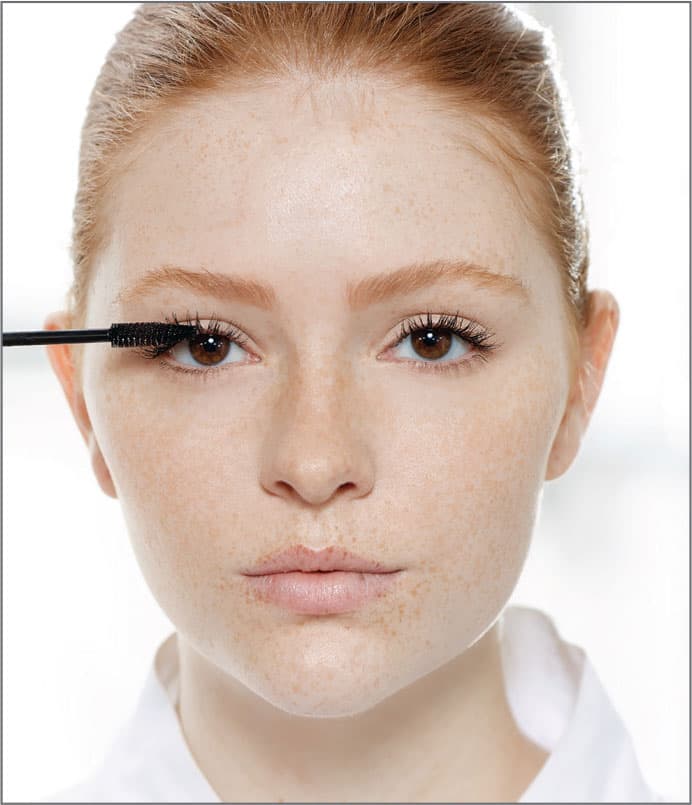
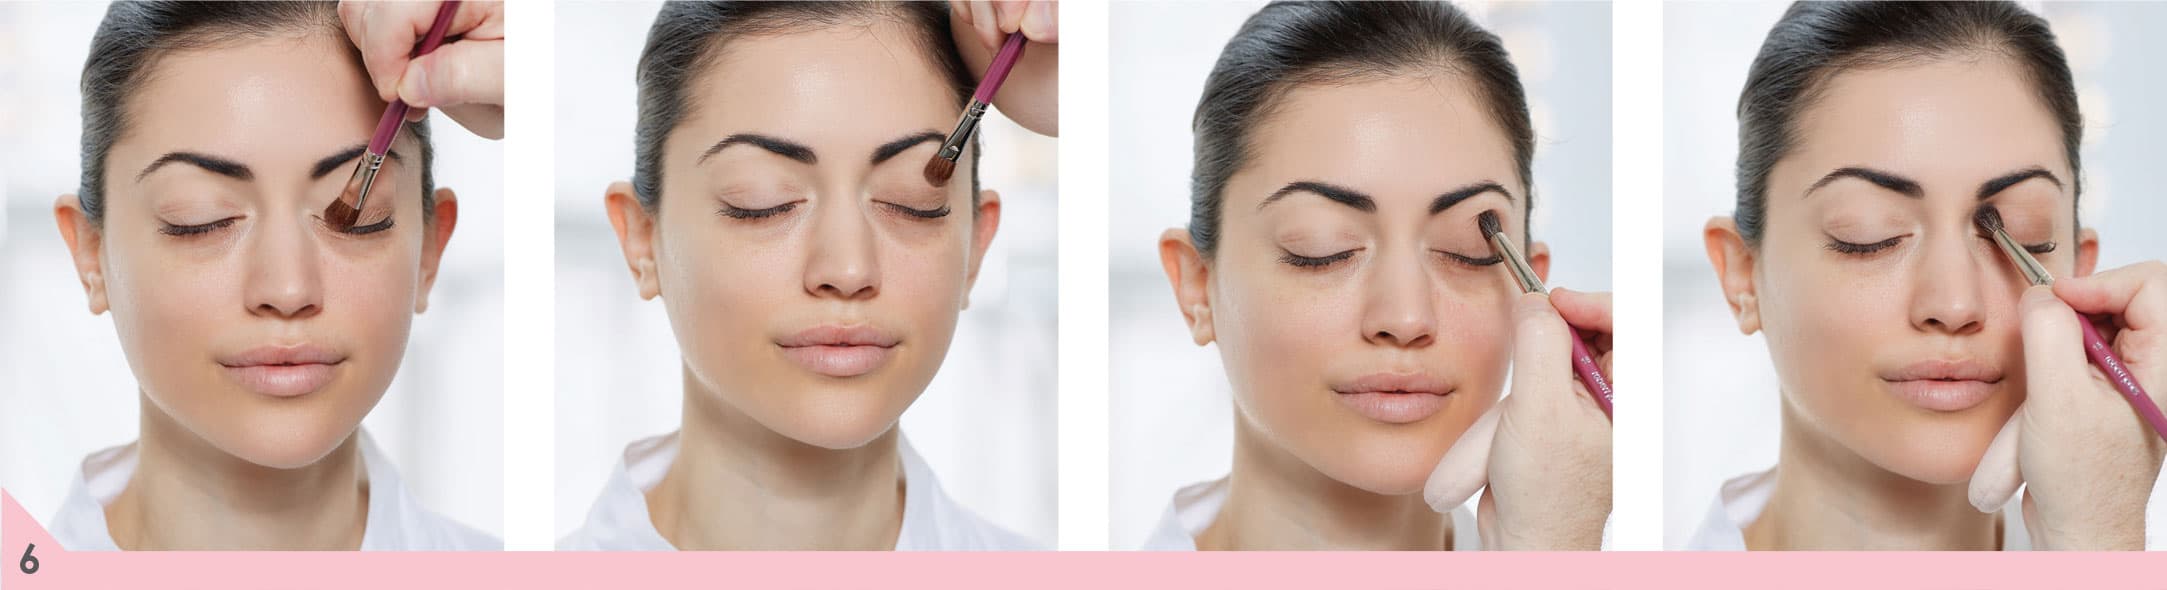
5. Curl your eyelashes and do your first layer of mascara now (see here). This will give it time to dry so you can apply more layers without them clumping, and your highlight shade won’t drip down on your eyelashes and wash out your mascara.
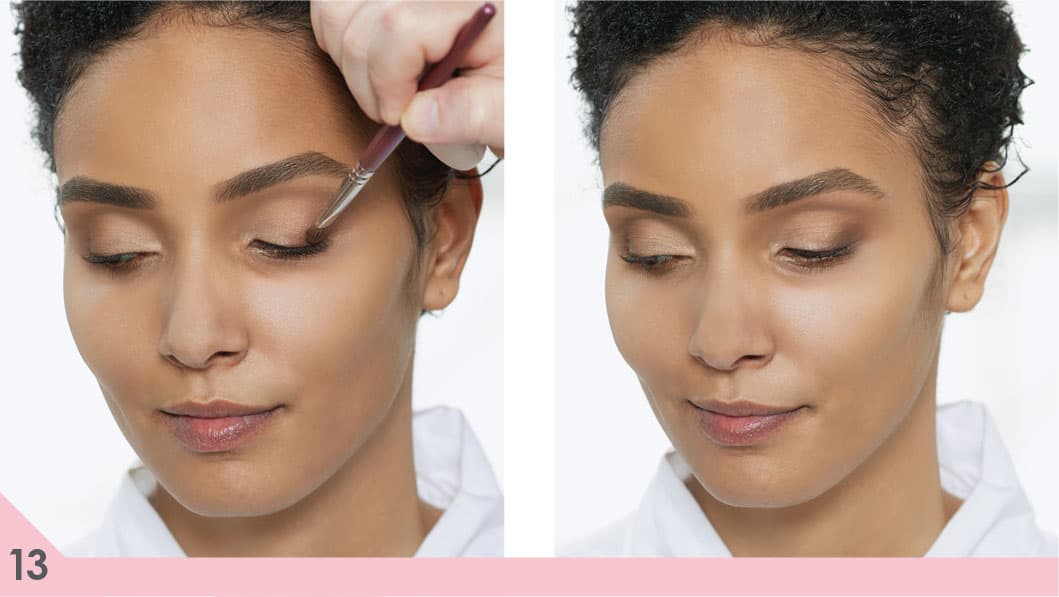
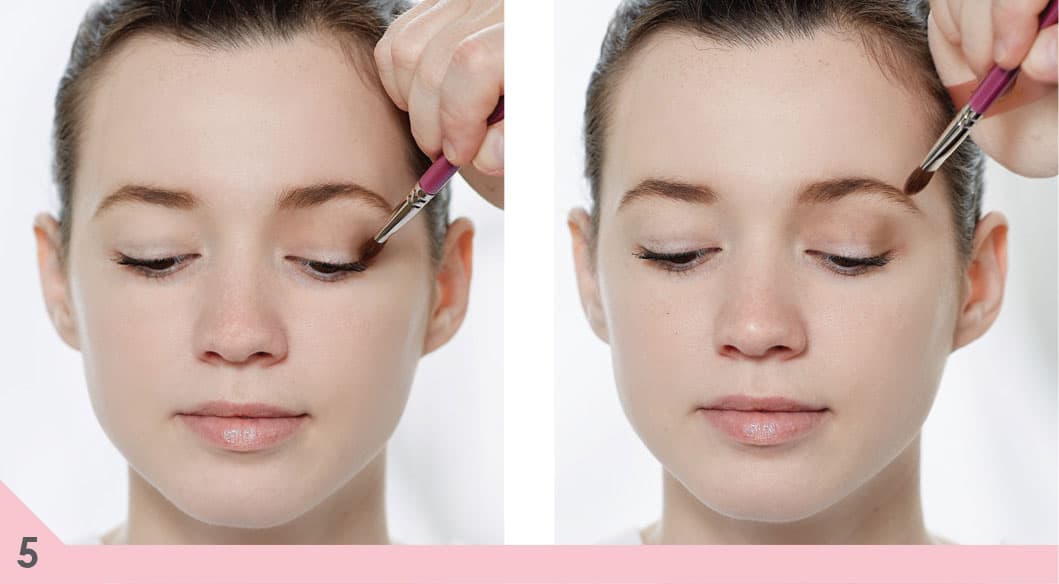
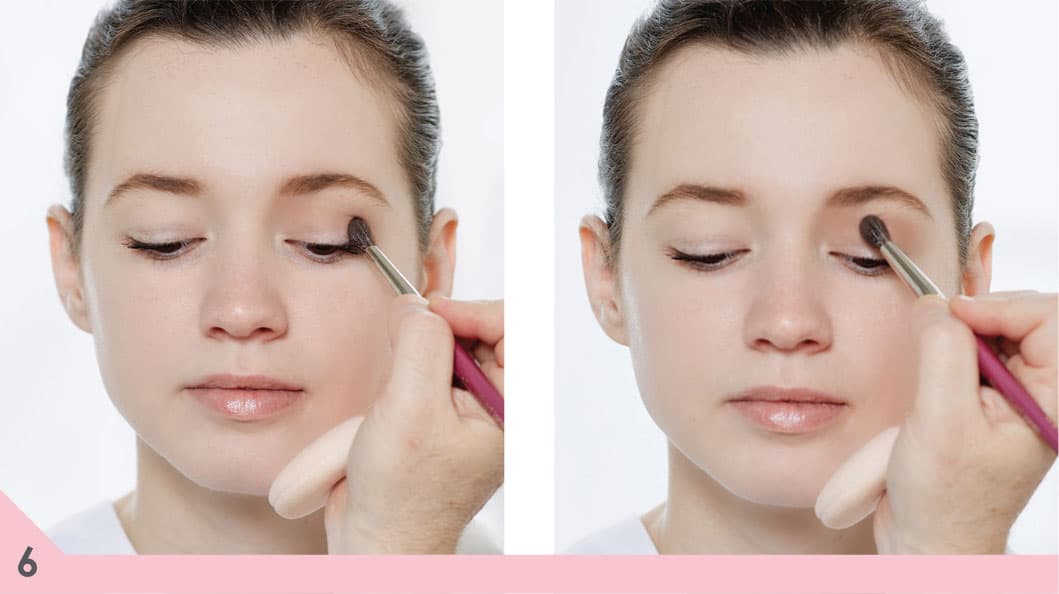
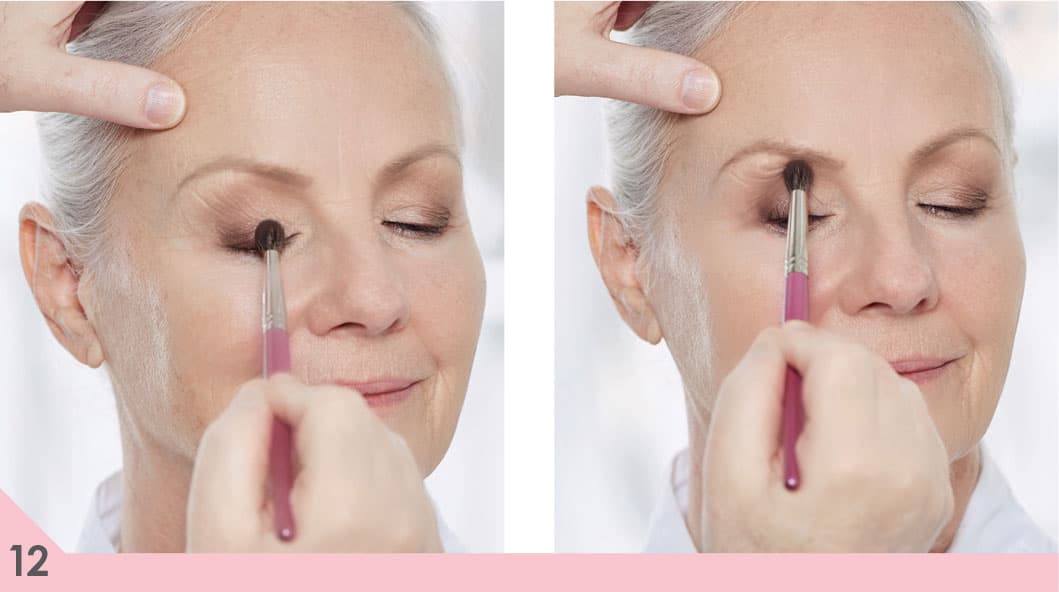
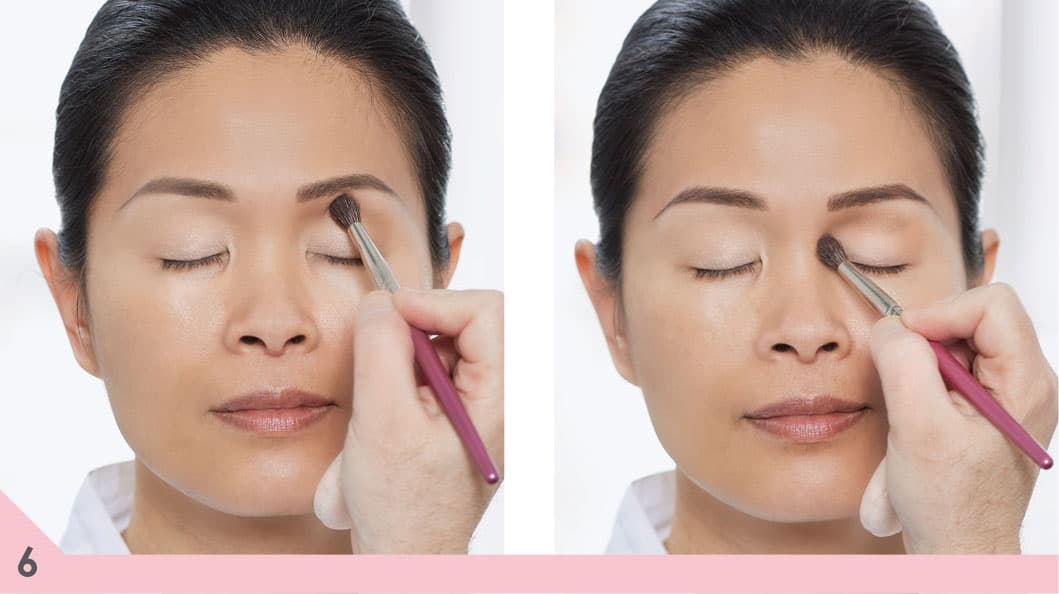
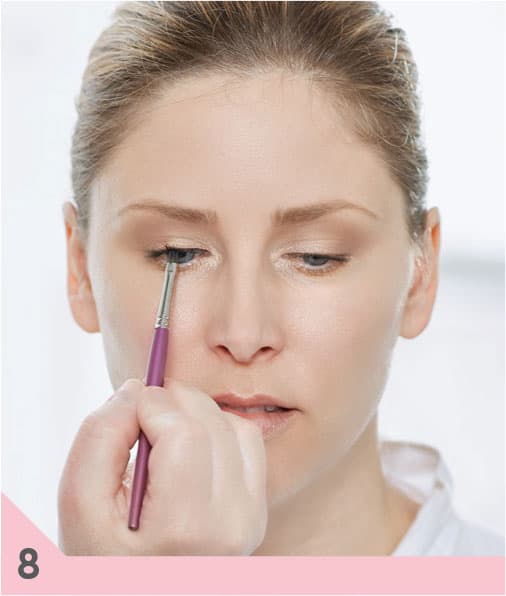
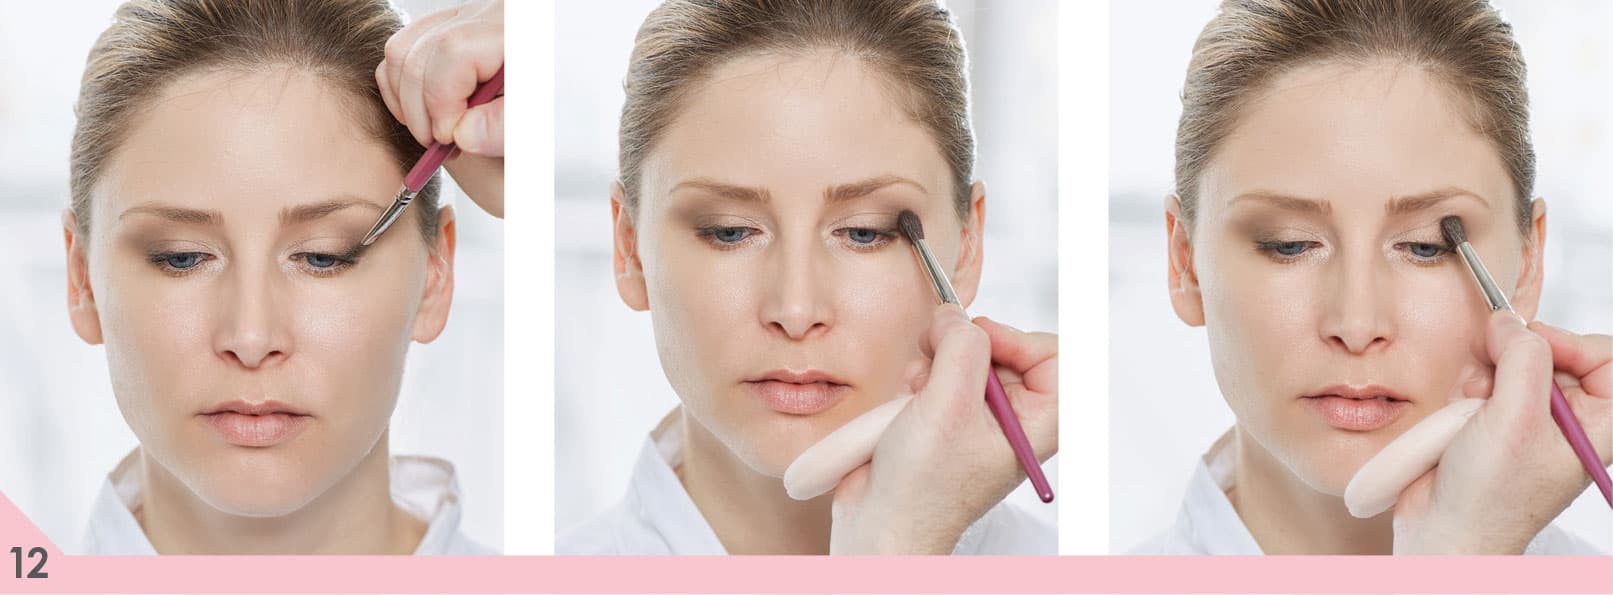
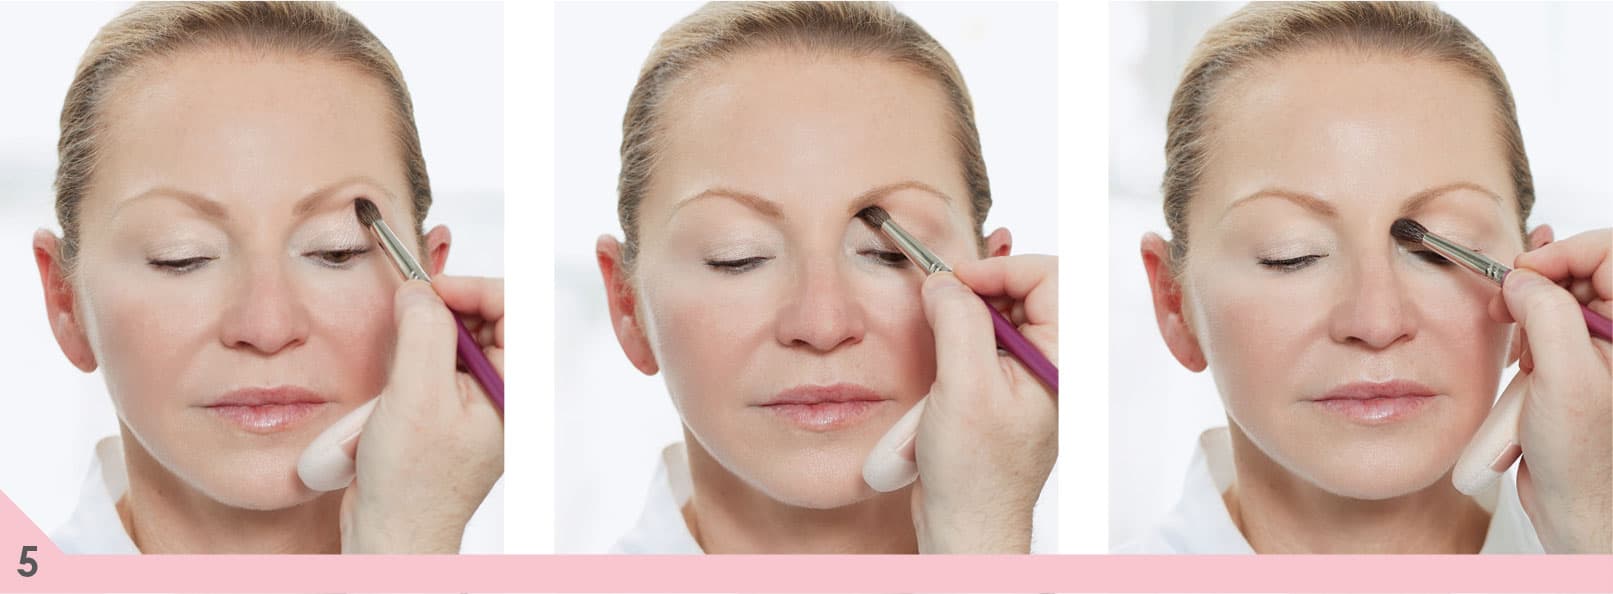
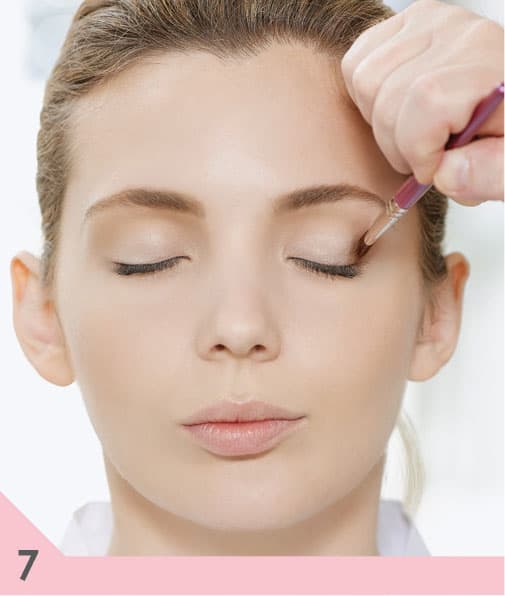
6. With your #11 midtone brush, apply a matte ginger midtone eye shadow, starting from the outside corner of the eyelid, so that area will get the most midtone color because the first place you lay your brush receives the highest concentration of color. Gently move your brush along the crease into the inside corner of your eyelid (from the outside corner all the way across to the inside corner). For a very defined crease, you can apply a few more layers of your midtone shade (feel free to layer for more definition).
7. With your #16 blending brush, blend your midtone so that there are no hard edges. To create a perfectly blended eye, you need a clean brush that is only used for blending. You cannot blend with the brush you apply color with; it will only create mud.

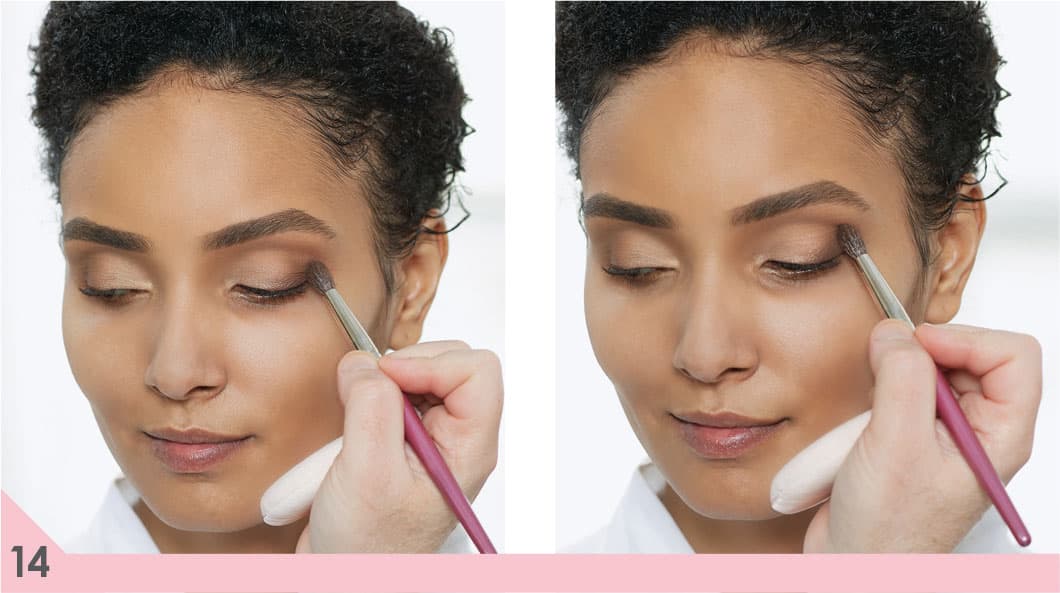
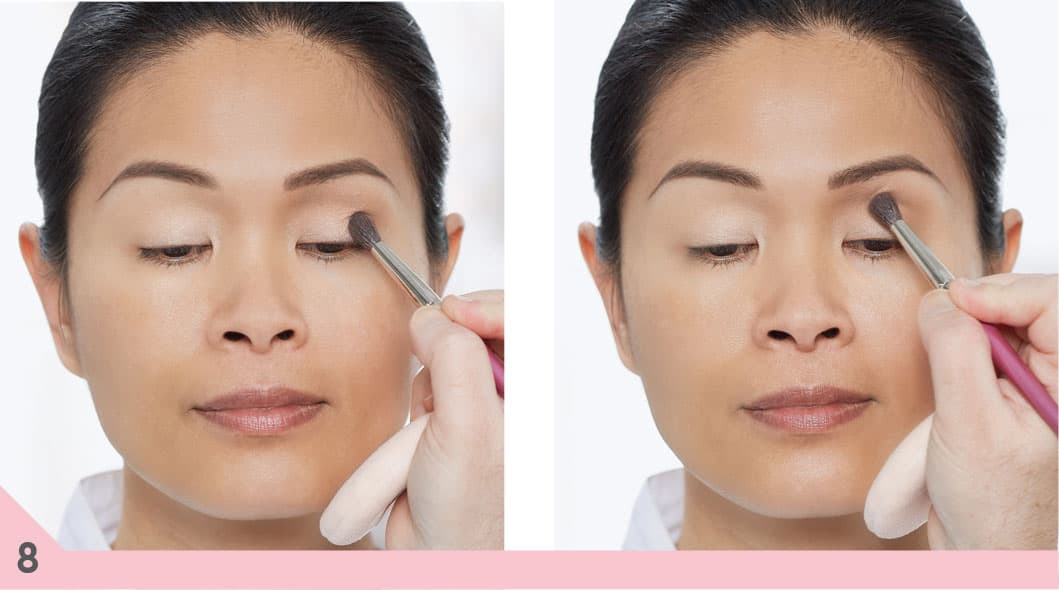
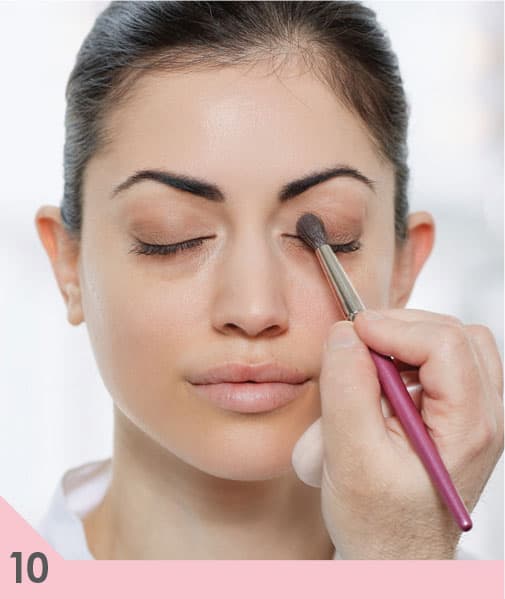
8. Using your #30 contour brush, apply more of your midtone to the outer corner of your eyelid to close it in.
9. With your #16 blending brush, blend out the shadow that you just applied, blending up toward your crease and in toward the center of your eyelid. Keep the blend tight so you don’t darken the lid too much.

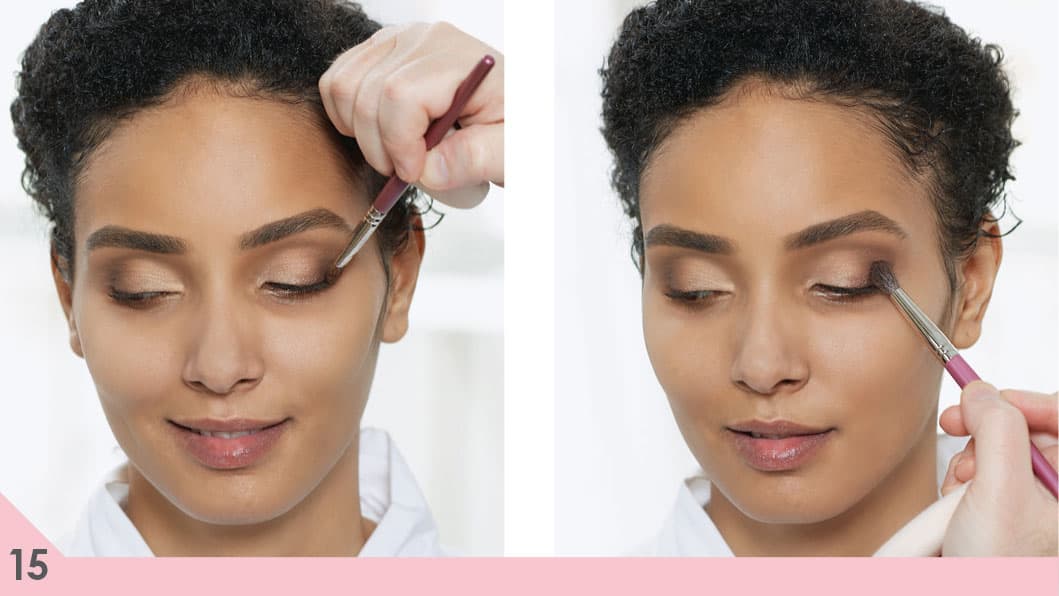
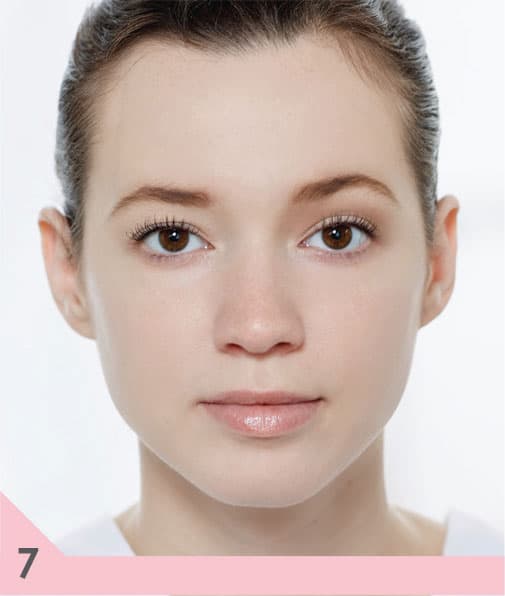
10. You can see, comparing one eye with midtone and one without, how much shaping just your midtone does. It does 85 percent of the heavy lifting. I could just line this eye and apply more layers of mascara and it would look finished—not dramatic, but finished.

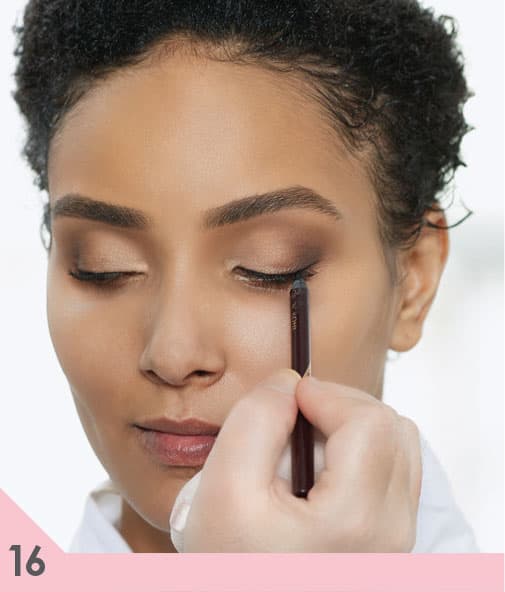
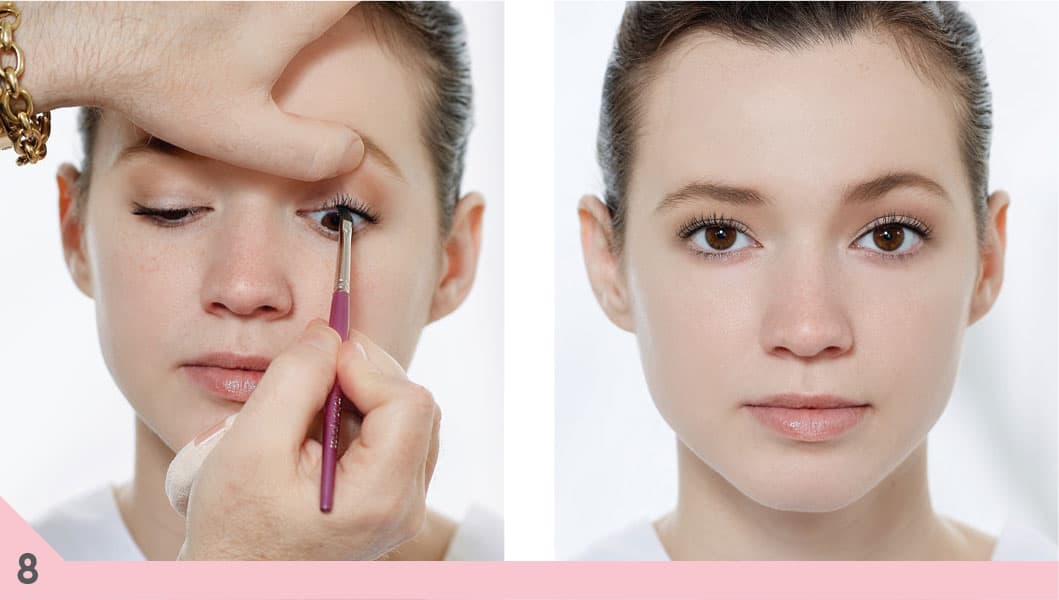
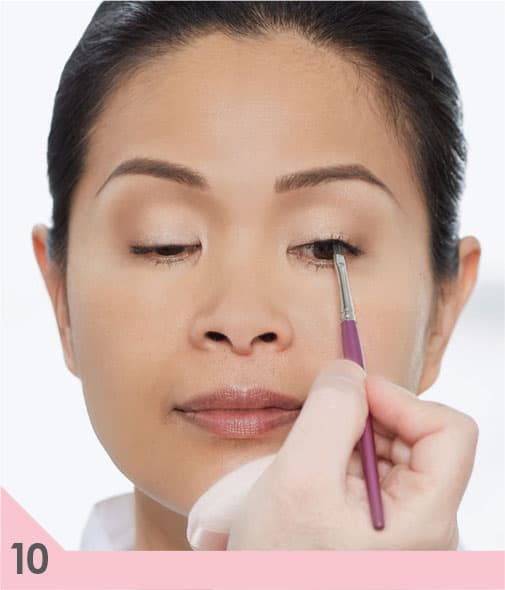
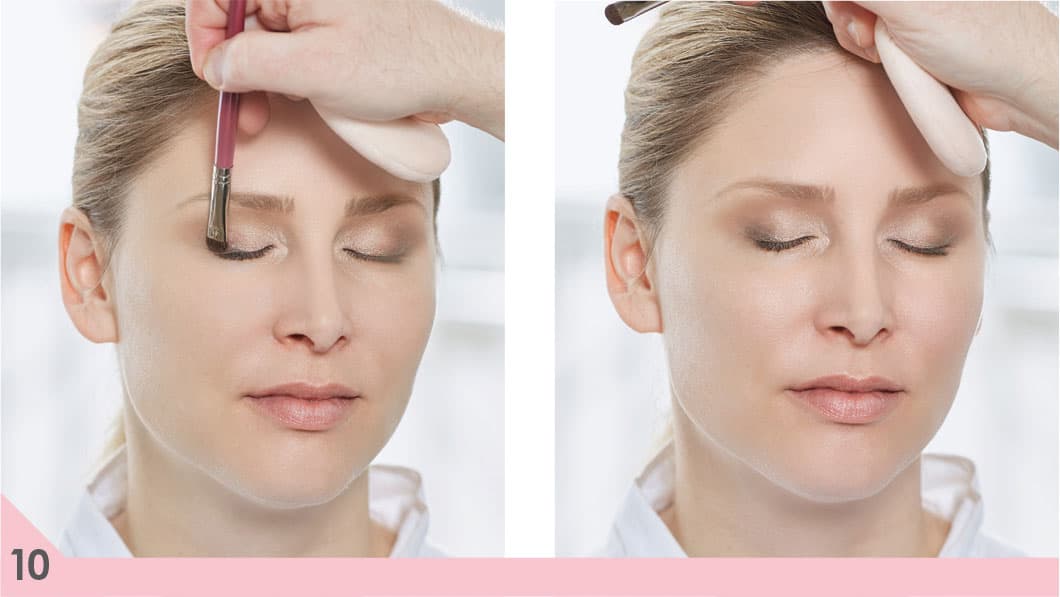
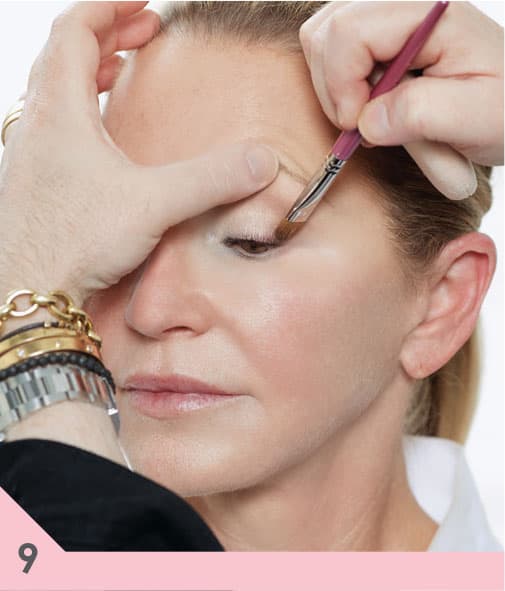
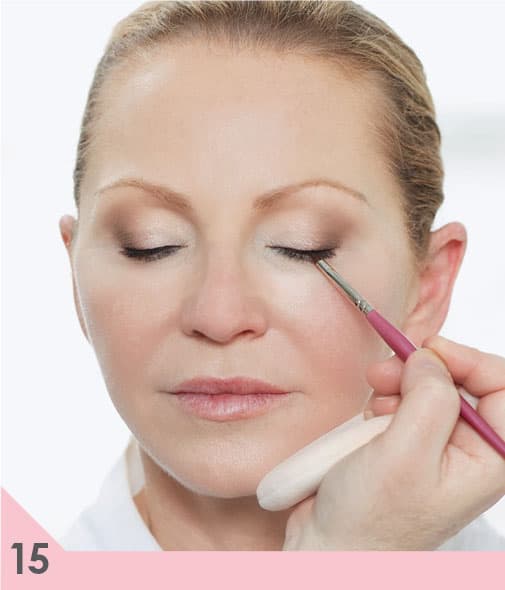
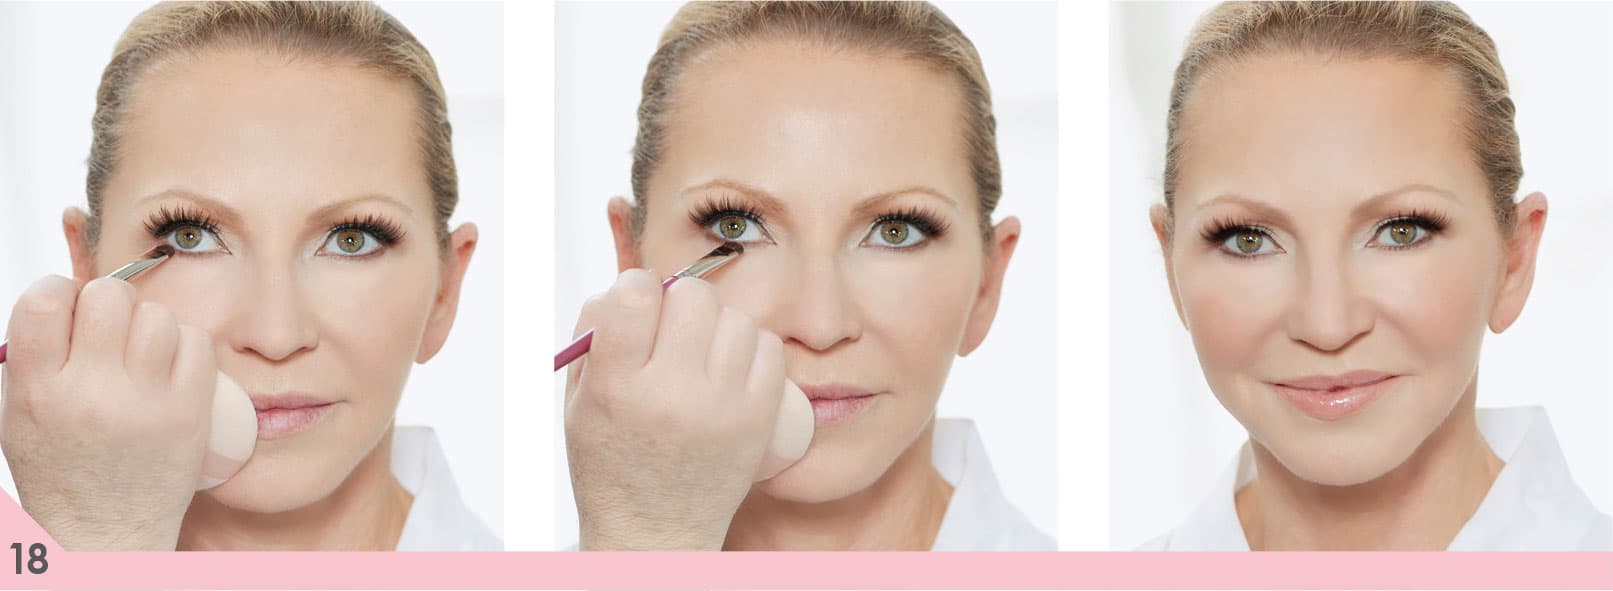
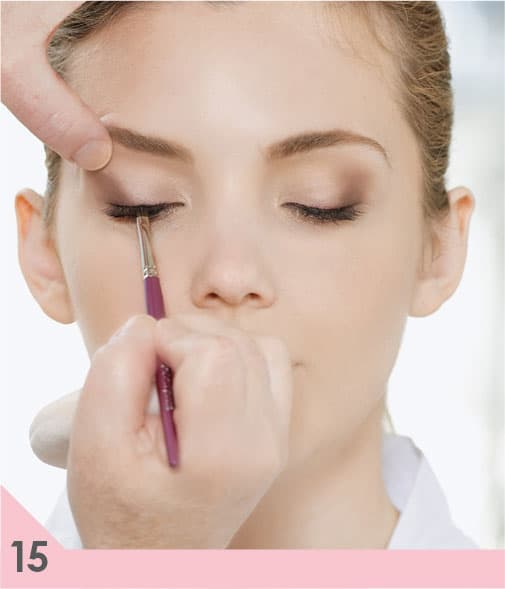
11. I like to create the illusion of thicker eyelashes and start the lash line definition by applying a matte black shadow at the base of the lash line, in between the eyelashes. Using your #41 detail eye liner brush, push matte black shadow into your upper lash line starting from you outside corner and working your way all the way across to the inner corner.
12. This step is optional, but it can help create more depth at the lash line, which will help you create a dark-to-light gradation of color. Layering a crème and powder shadow will make it grab darker, so using another #22 highlight brush, apply a dark copper crème eye shadow all along your lash line in the outer corner of your lid.
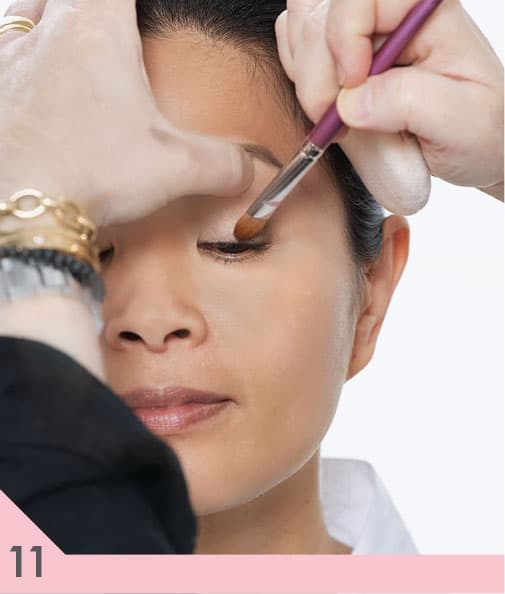
13. With your #30 contour brush, layer a dark matte brown in the outer corner of the eyelid at the base of the lash line, on top of the crème.
14. With your #16 blending brush, blend the color up toward the crease and in toward the inner part of the lid.
15. Keep layering on color with your #30 contour brush and blending it out with your #16 blending brush until you reach your desired intensity. Your goal is to blend the color up into the outer portion of the crease and blend it inward (about a third or, at most, halfway across). You want to create a gradation of color, with the outer corner of the eye being the darkest and becoming lighter as you move in toward the inside of the eyelid. By layering your contour shade on top of your midtone shade, you’ll get the blended, defined look you want.
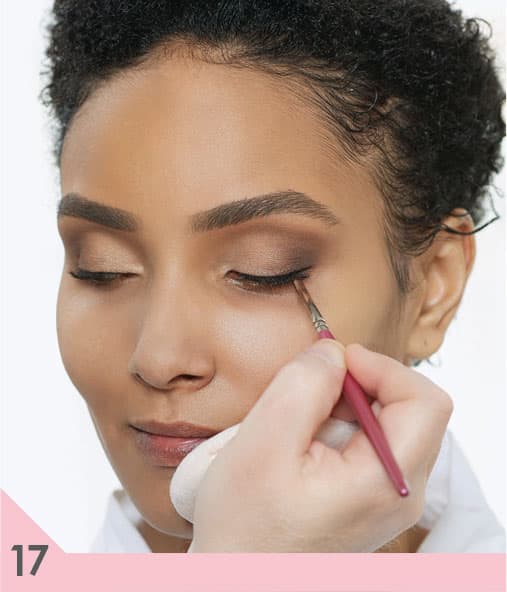
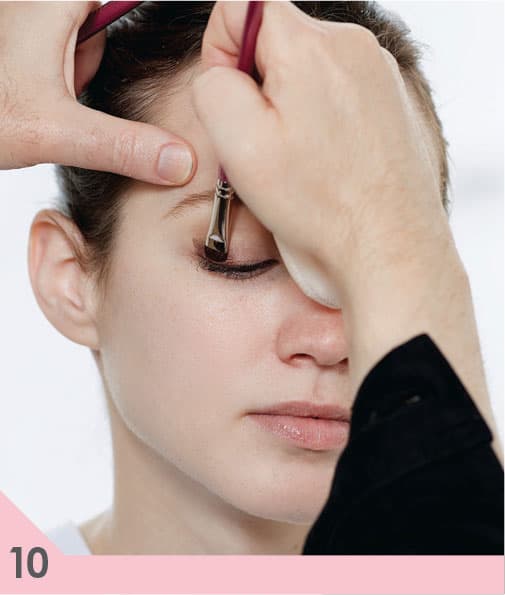
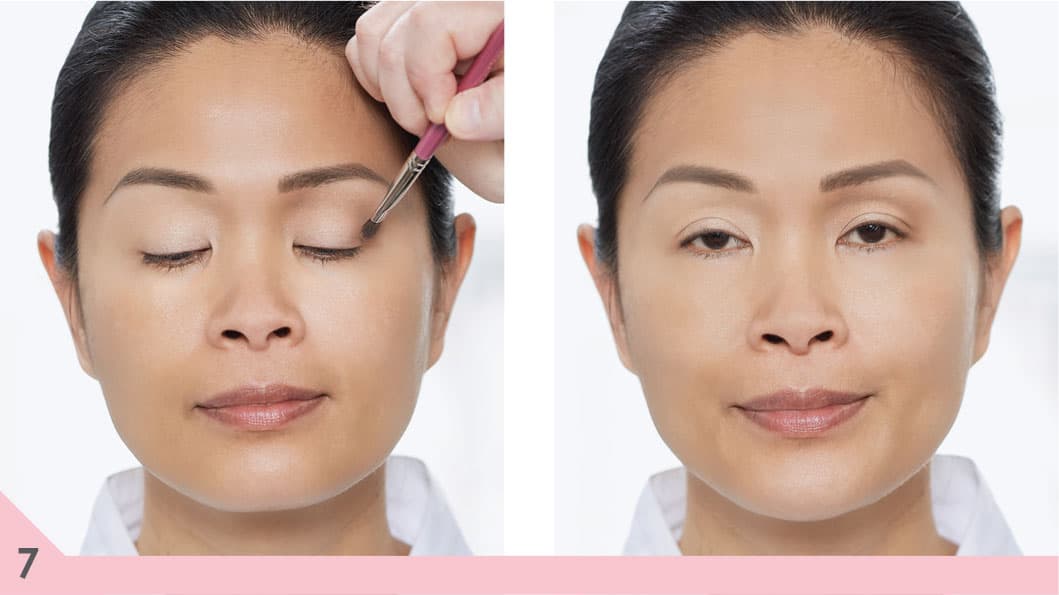
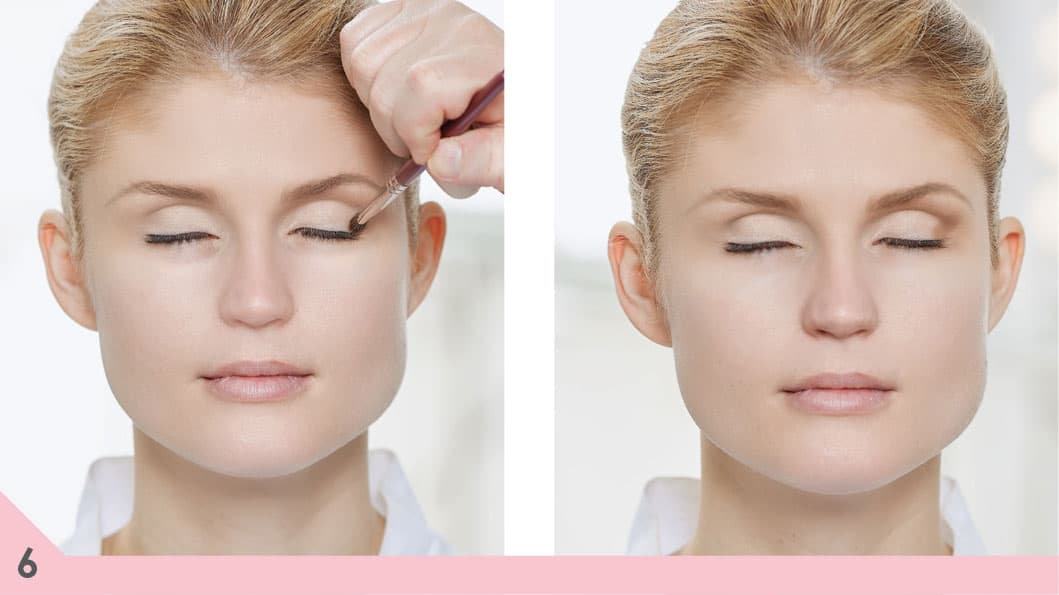
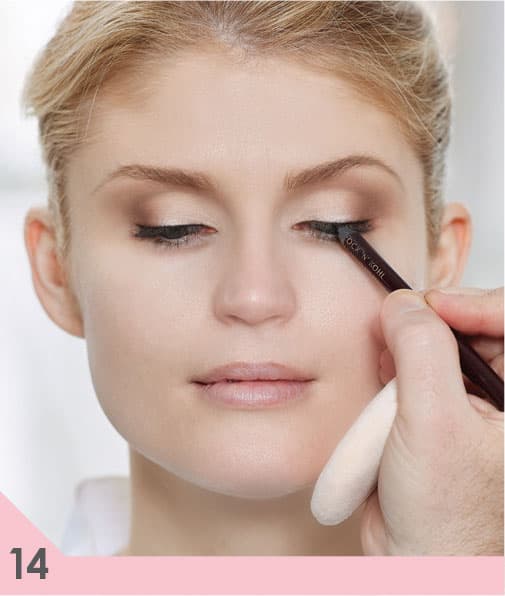
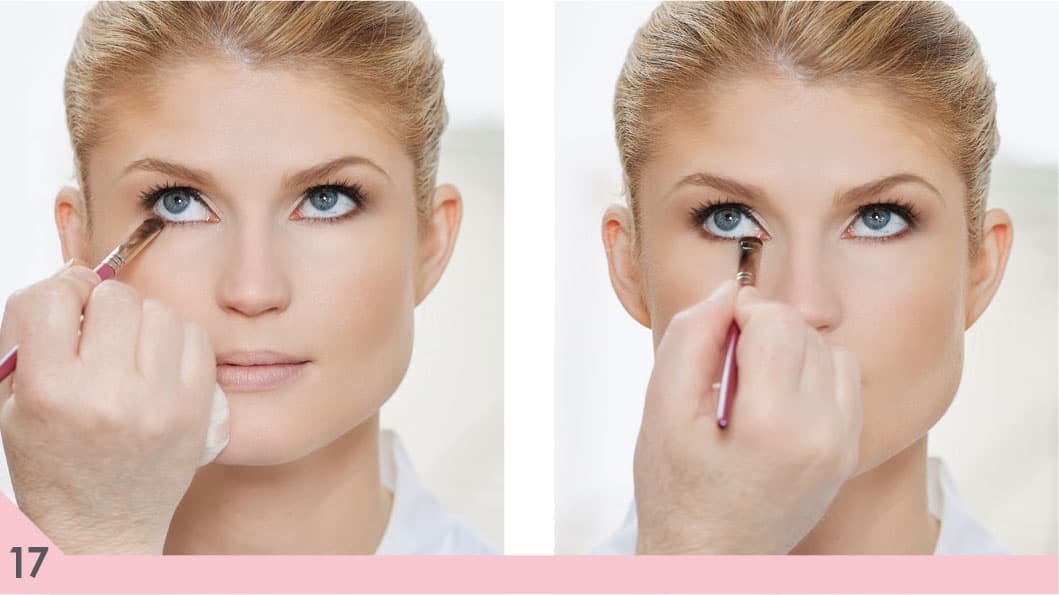
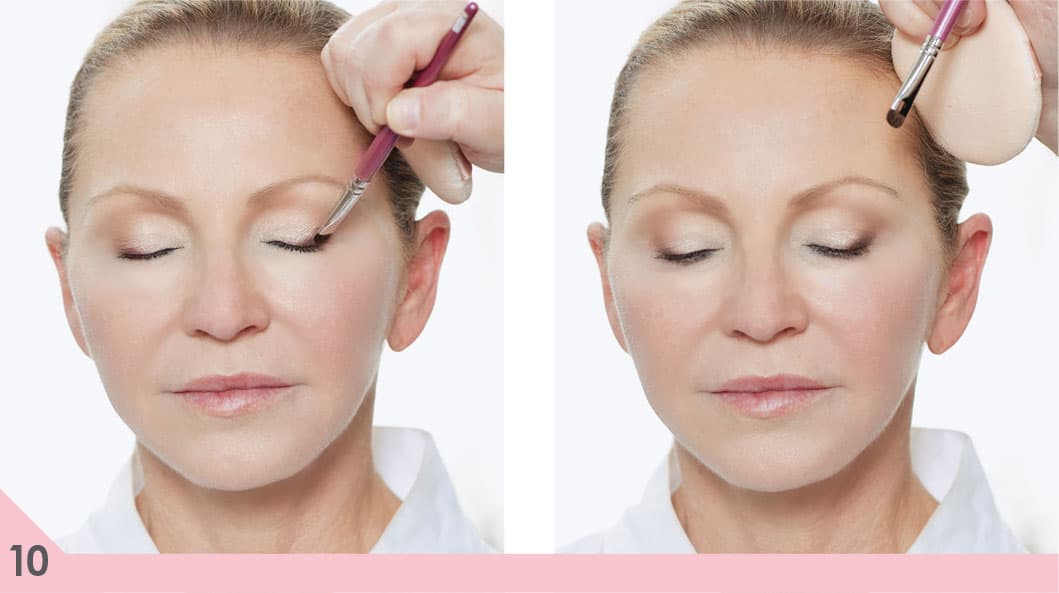
16. Create your final upper lash line definition: Using black eyeliner, line your upper lash line (see here).
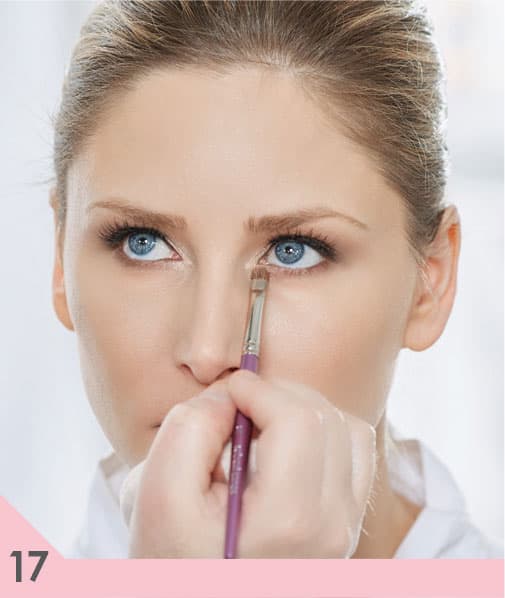
17. Using your #42 eye liner brush, smooth out your liner.
18. For more definition, apply another layer of mascara now, so the layer has time to dry. Optional: This is the time to apply false eyelashes (see here).
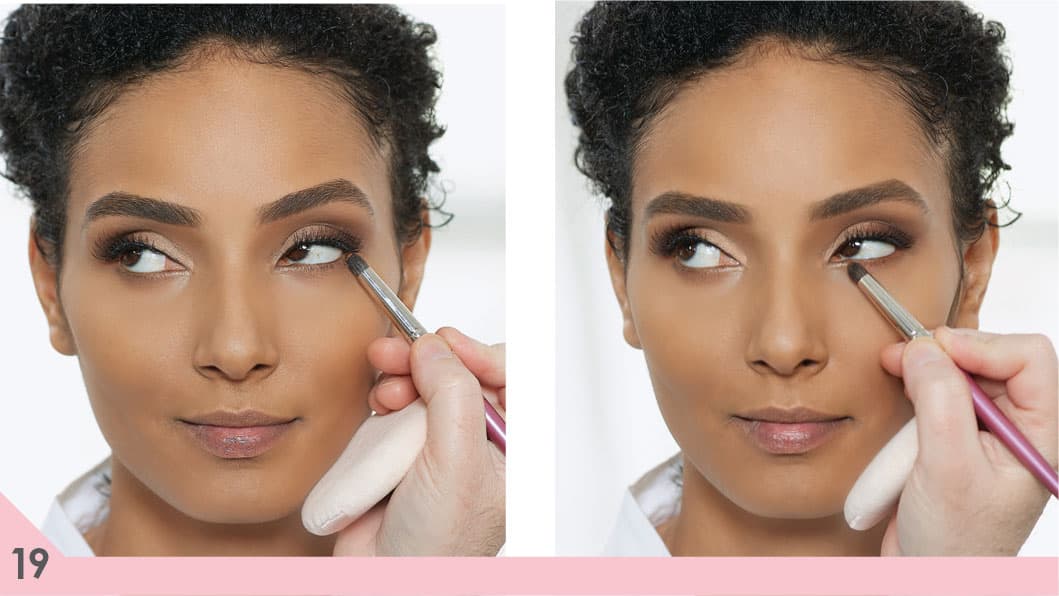
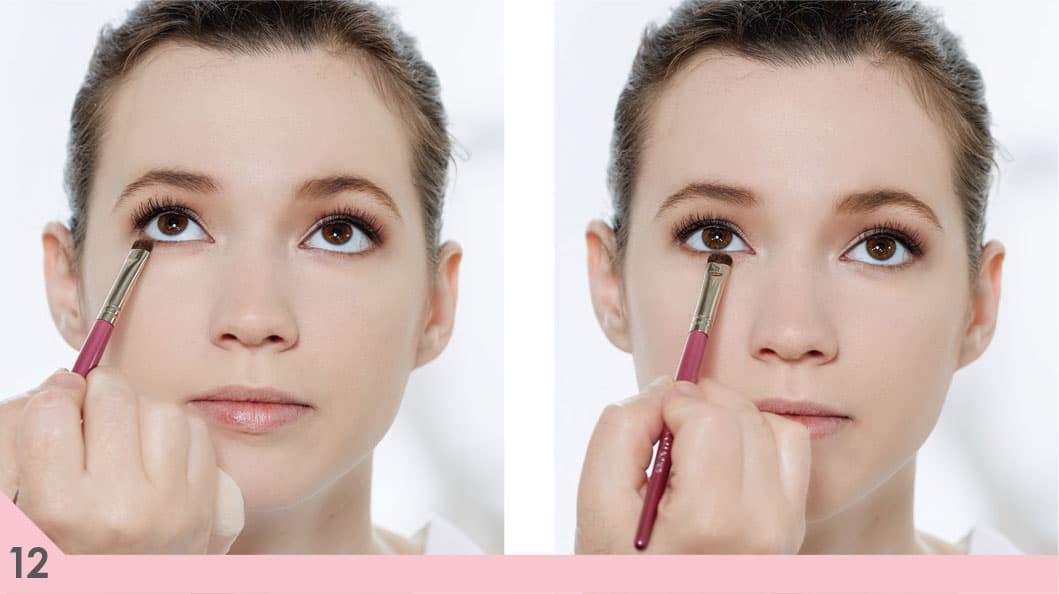
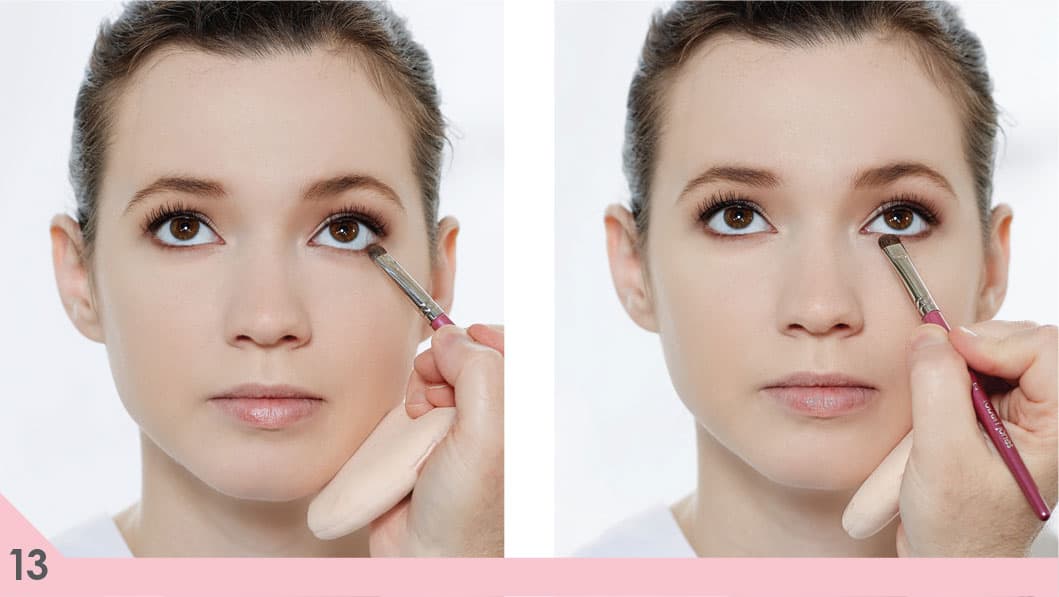
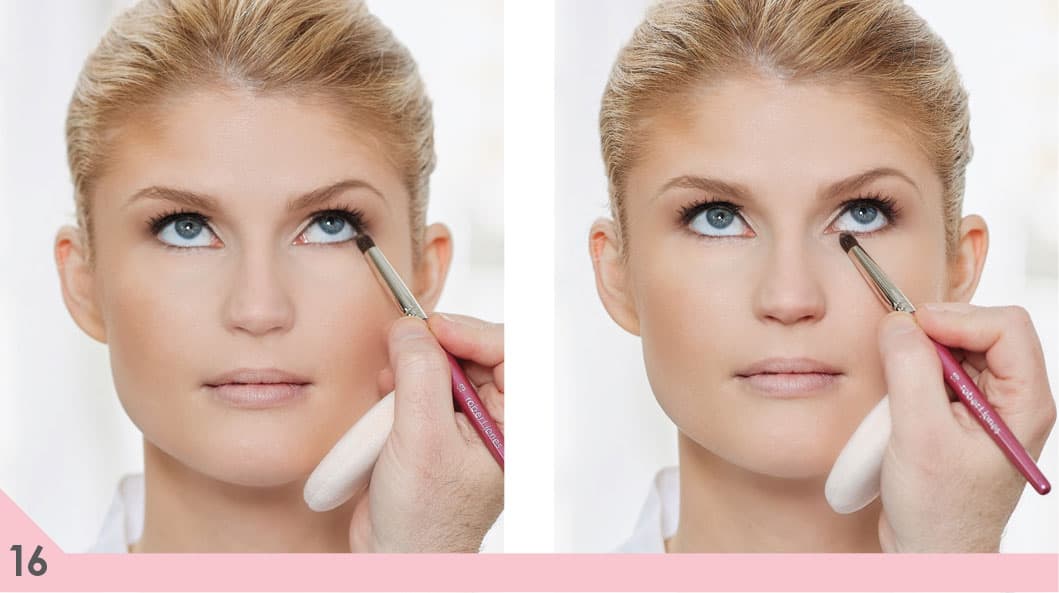
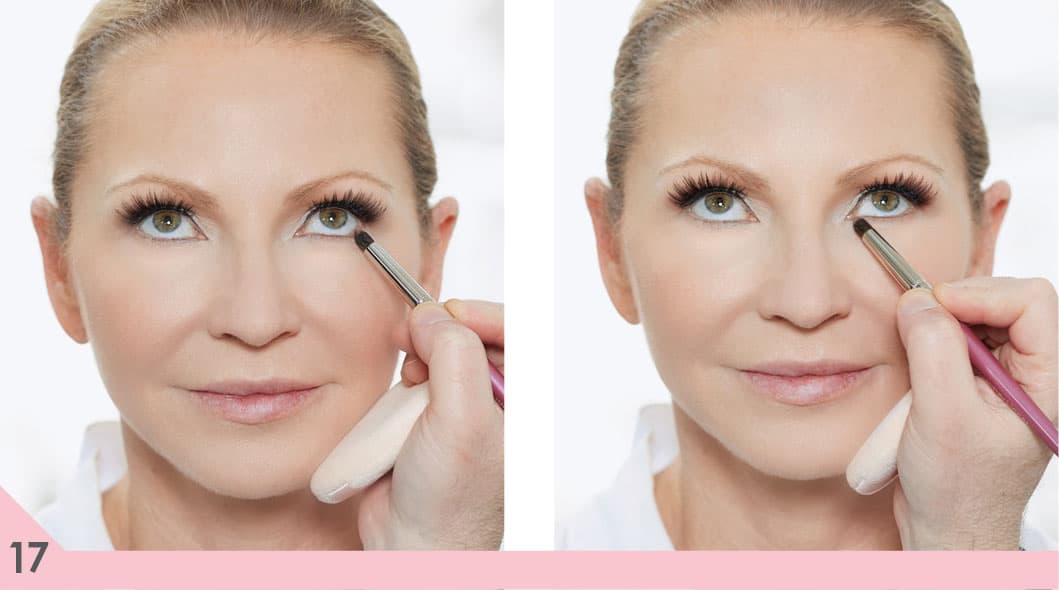
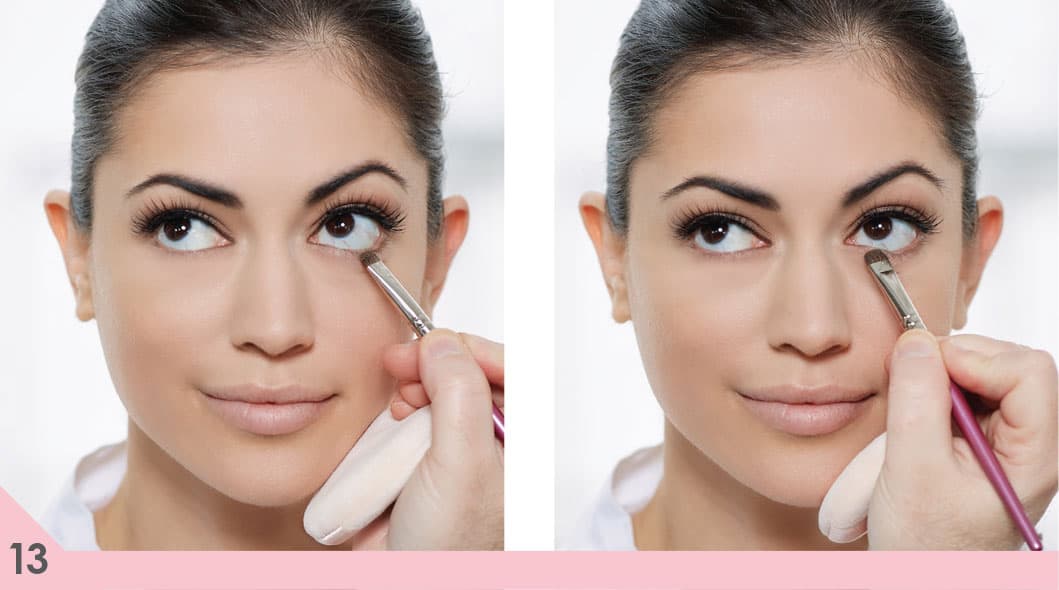
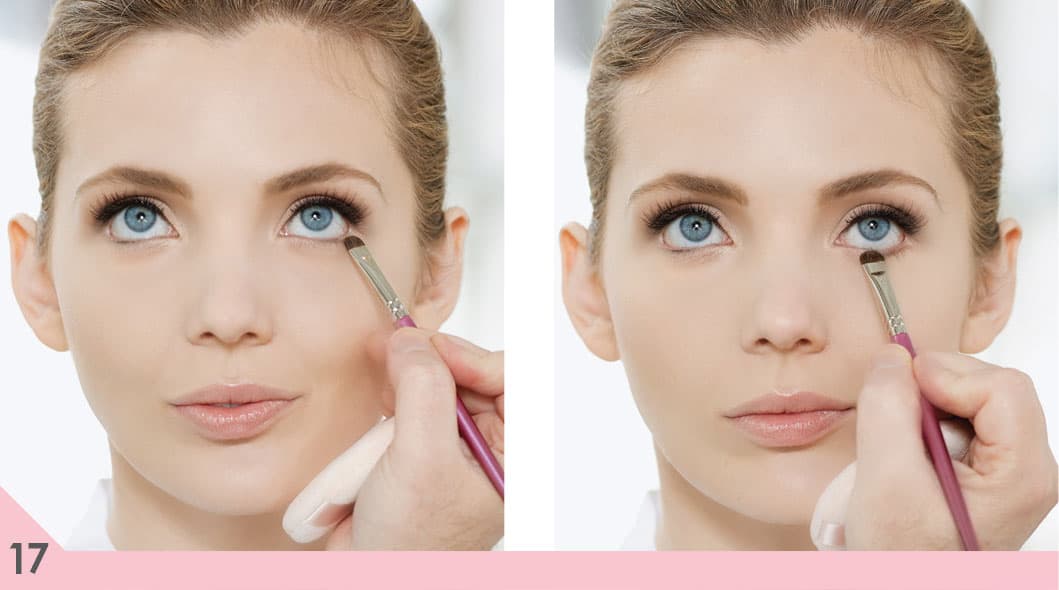
19. With your #13 detail eye shadow brush, apply your midtone all along your lower lash line. Once again, start your application from the outside corner, sweeping it across to the inside corner. Applying midtone here before you apply eyeliner or your contour shade will help create a blend because you are building depth of color creating a gradation. This way you won’t have stark dark liner against pale or light skin.
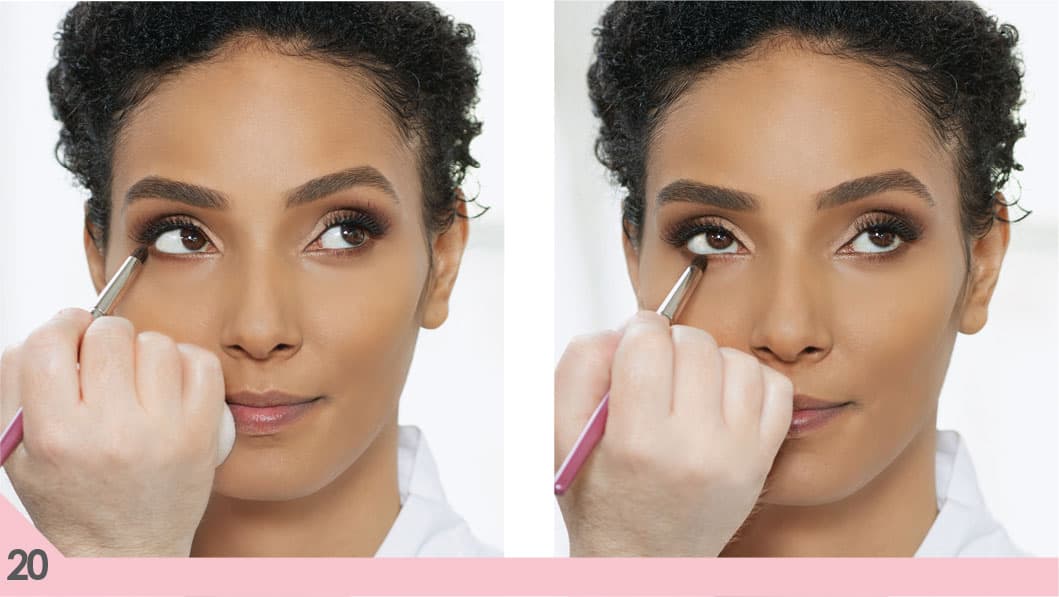
20. With the same brush, apply your contour color underneath and along the lower lash line to define your eyes. Blending it over your eye pencil will also help give you a softer, subtler lined effect. If I were going to use pencil along the lower lash line, I would apply it after the midtone and before the contour. For this look, I only used midtone and contour along the lower lash line to create definition.
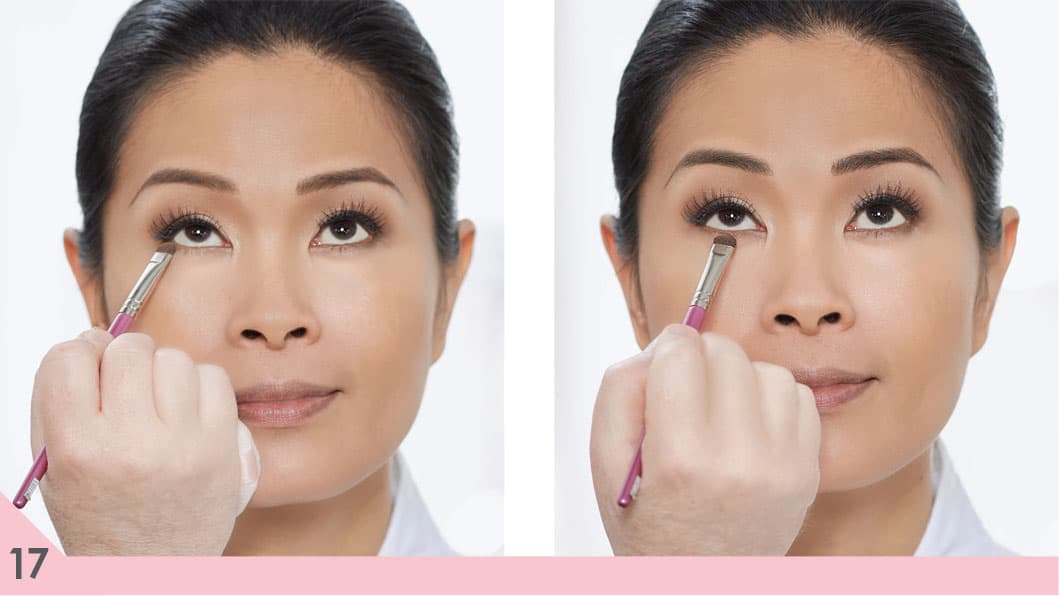
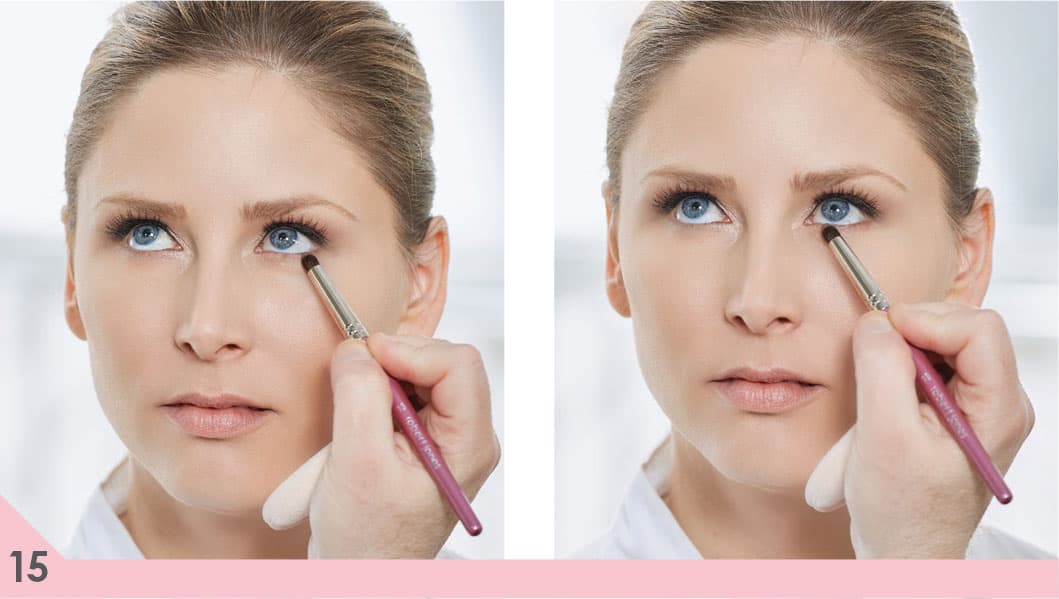
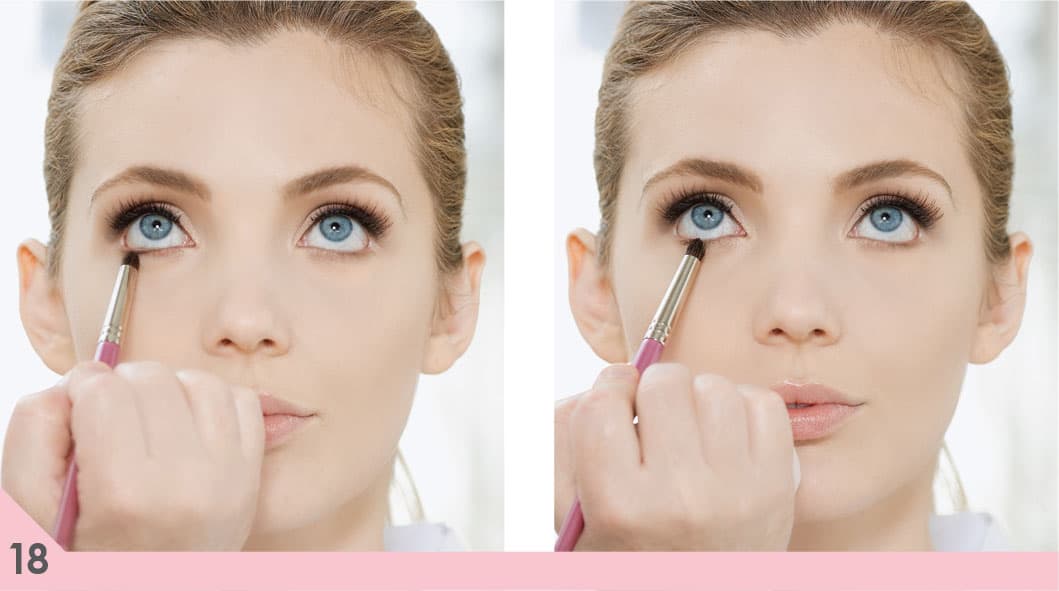
21. With your #14 eye shadow brush, apply your highlight shade to the inside corner of the lower lash line. This will really help open up your eyes, making them appear larger.
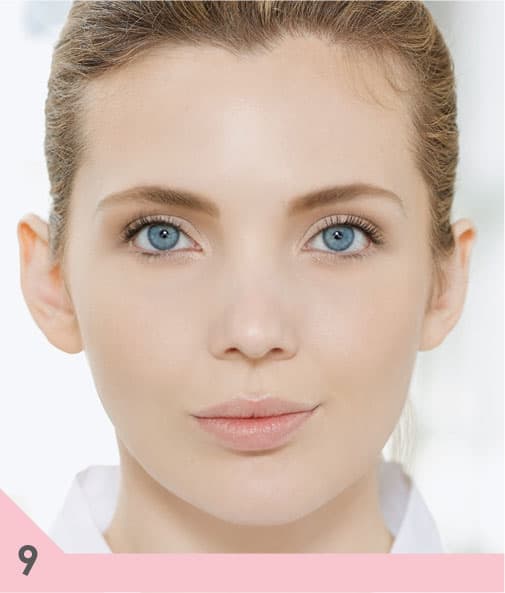
22. Finish by applying the third and final layer of mascara to your top lashes (or by blending into your false eyelashes with mascara) and a layer to your bottom lashes.
apply your eyeliner
Eyeliner can go a long way toward defining your eyes—opening them up and drawing attention to them—but if used incorrectly, it will close them down and make them look smaller. There are several ways to define your eyes when lining them, but first let’s set some ground rules:
• If you line along your bottom lash line, you must line across your top lash line. If you don’t, the depth along the bottom will pull the eye down without the balance along the top, and your eyes will look older and tired.
• You can line along the top lash line without lining along the bottom. I usually like a little definition along the bottom, even if it is just a little of your eye shadow contour color, but you don’t need it.
• You can skip eyeliner if you want a soft, natural look. You can also get a natural look by taking an eyeliner brush and a dark eye shadow and just adding a little soft definition at your lash line. Using an eye shadow instead of eyeliner is much subtler. It will give you a little definition without making your eyes looked lined.
• The color along your bottom lash line should never be deeper in depth than along your top lash line, or once again it will just drag your eye down. I find that a lot of people want more definition along their top lash line than they do along the bottom, and this is always okay. For example, you could use deep brown eyeliner along your top lash line while choosing a soft bronze for along the bottom; it just makes it look softer and subtler.
For any lining option, your goal is: to create definition and make your eyes the focus of your look. As you age, you still want to define your eyes; it will wake your face up and create a wide-eyed, youthful expression. I am constantly asked where to apply color. How far in do you go with color? Where do you start and where do you stop? Where should you line? How thick a line should you create?
A simple rule of thumb works for all eye shapes (as shown in the images opposite, at top). Along your top lash line, you want your definition to start at the inside corner of your eye, where you want the liner to be thinnest. It should gradually become wider as you apply it across to the outer corner of the eye. This will create definition without closing in the eye. Along your lower lash line, you want the color to be most intense in the outer corner, fading as you move toward the inside corner. Bring it all the way across the bottom lash line, but make sure it fades in intensity from the outer corner to the inner corner. Drawing the same thickness all the way across the top lash line can close in your eyes and make them appear smaller. You want a gradation of color along the bottom lash line for definition and attention. Your color should be as close to the lash line as possible. Don’t let any skin show between your eyelashes and your eyeliner!

Now let’s talk about application options. Most often, I choose to line or create my definition around the eye with nothing more than the correct brush and a dark eye shadow. Not only is it the easiest to apply, it also creates the subtlest effect.
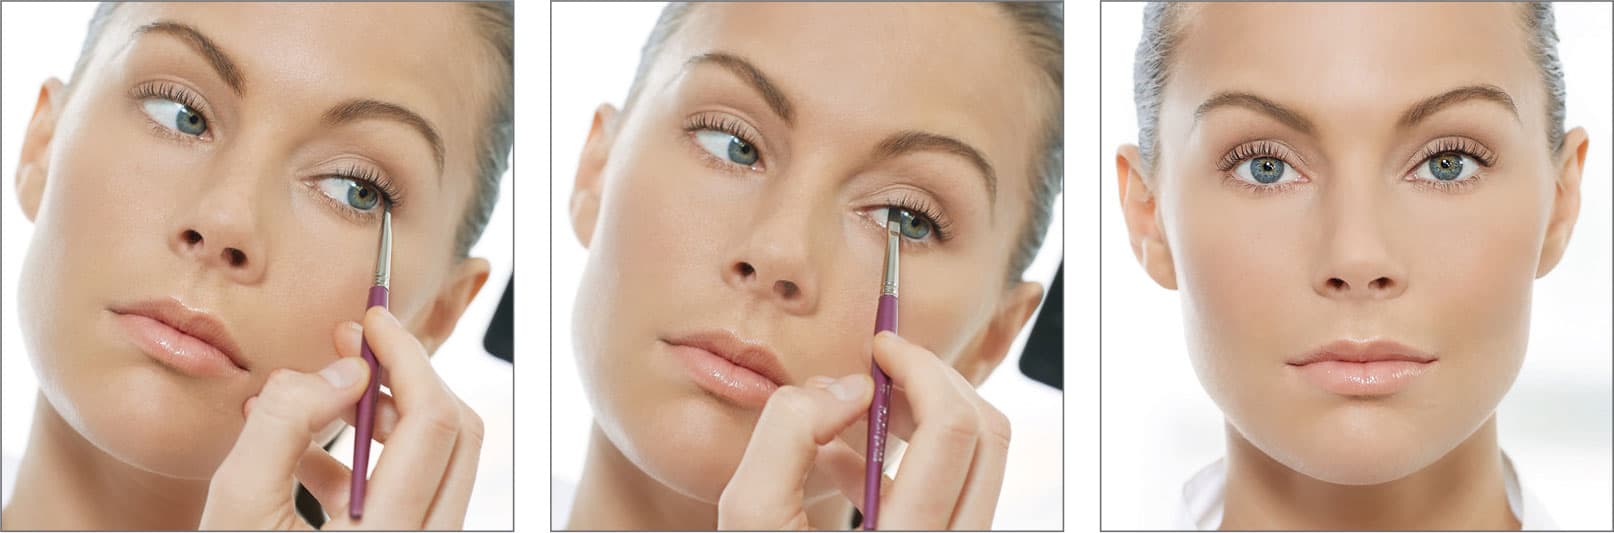
tip: The professional secret to creating definition along the lash line is to get the color right into the base of the eyelashes (especially along the top lash line). There is a little secret trick many of us makeup pros do that can create definition like no other: You simply take black eye shadow and carefully push it into the base of your eyelashes using a fine-tipped brush. This defines the eyes and makes your eyelashes look thicker without making your eyes appear lined. You could take a pencil and scrub it into the base of your eyelashes as well, but I find it easier to use eye shadow and a brush.
powder
1. Dip a dry eyeliner brush (see here) in your powder eye shadow and tap the excess off.
2. Place the brush along your top lash line and sweep it from the outside corner in toward the inside corner. This will give you a subtle wash of color along the lash line.
3. Dip the brush in your eye shadow again and tap off the excess.
4. Starting from the outside corner (because the first place we lay the brush will get the highest concentration of color), sweep the color along your lower lash line, all the way across. This will automatically create a fading of color from the outer corner (the deepest) to the inner corner (the lightest).
pencil
The application of eyeliner pencil can be difficult. Here are some tricks to make it easier:
1. Don’t feel like you have to apply your eyeliner in one straight, solid line. Begin at the outside corner of your eye and draw small, feather-like strokes or dashes, connecting each one as you move toward the inside of the eye.
2. You can make eyeliner pencil look even better by using an eyeliner brush to blend across the line you just created, making it look like one solid, mistake-free line. I also suggest this professional technique: Before you use your brush to blend, dip it in a little eye shadow. This will help the line look more smudged and soften its appearance. You could use a shade of eye shadow that matches your eyeliner, or you could choose a different shade to customize your liner color.
3. With your eyeliner pencil, starting at the outside corner of your lower lash line, begin to draw small, feather-like strokes, connecting each one as you move toward the inside corner of the eye. It will look more natural if you draw into the actual base of your eyelashes rather than just below them.
4. Blend the line with your brush. I find it especially effective to use an eye shadow when blending. The main benefit is that the outside corner—the first place you lay the brush—gets the highest concentration of color, and as you sweep your brush across, it blends the liner, helping it fade as you move inward. When you are finished, it will be darkest at the outside corner and fade toward the inside corner, which is your goal.
tip: The sharper the point on your pencil, the easier and more precise the application, so always sharpen before you apply.
liquid, crème, and gel
These three types of eyeliner are similar in their appearance and application. They will give you the most dramatic effect—think Audrey Hepburn and her signature cat-eyed eyeliner look! One advantage of liquid, crème, and gel eyeliners is that they usually have great staying power.
You can only use these eyeliners along the top lash line. Never use them along the bottom lash line—they will look too harsh and stark. If you want color along your lower lash line when using liquid, crème, or gel eyeliner along your top lash line, use pencil or powder for your lower lash definition. With these three formulas, practice makes perfect: The more you use them, the better you will get at applying them.
How to apply them: With your applicator (if you’re using a liquid, it comes with a brush or felt tip; with crème or gel, you will need an eyeliner brush), starting at the inside corner of your top lash line, slowly move across the lash line. Make sure your line is its most narrow at the inside corner, gradually getting thicker as you reach the outside corner. As your brush reaches the outside corner, you can give it a little kick upward.
cake
This is a powder that looks much like an eye shadow in its container. It is much heavier and more highly pigmented than an eye shadow, though. Cake eyeliner is easy to apply and gives you a similar effect to a liquid, crème, or gel. You apply it the same way as the other three, only you need to dampen your brush before beginning. Just make sure you have the right brush for the job (see here).
tip: Don’t bring your shadow down too far when applying it. It will make your eyes look droopy. Visualize a line from your nostril to the outer corner of your eye and up to your brow; don’t extend your shadow past that line if you don’t want to drag the outer corner of your eyes down.
curl your eyelashes
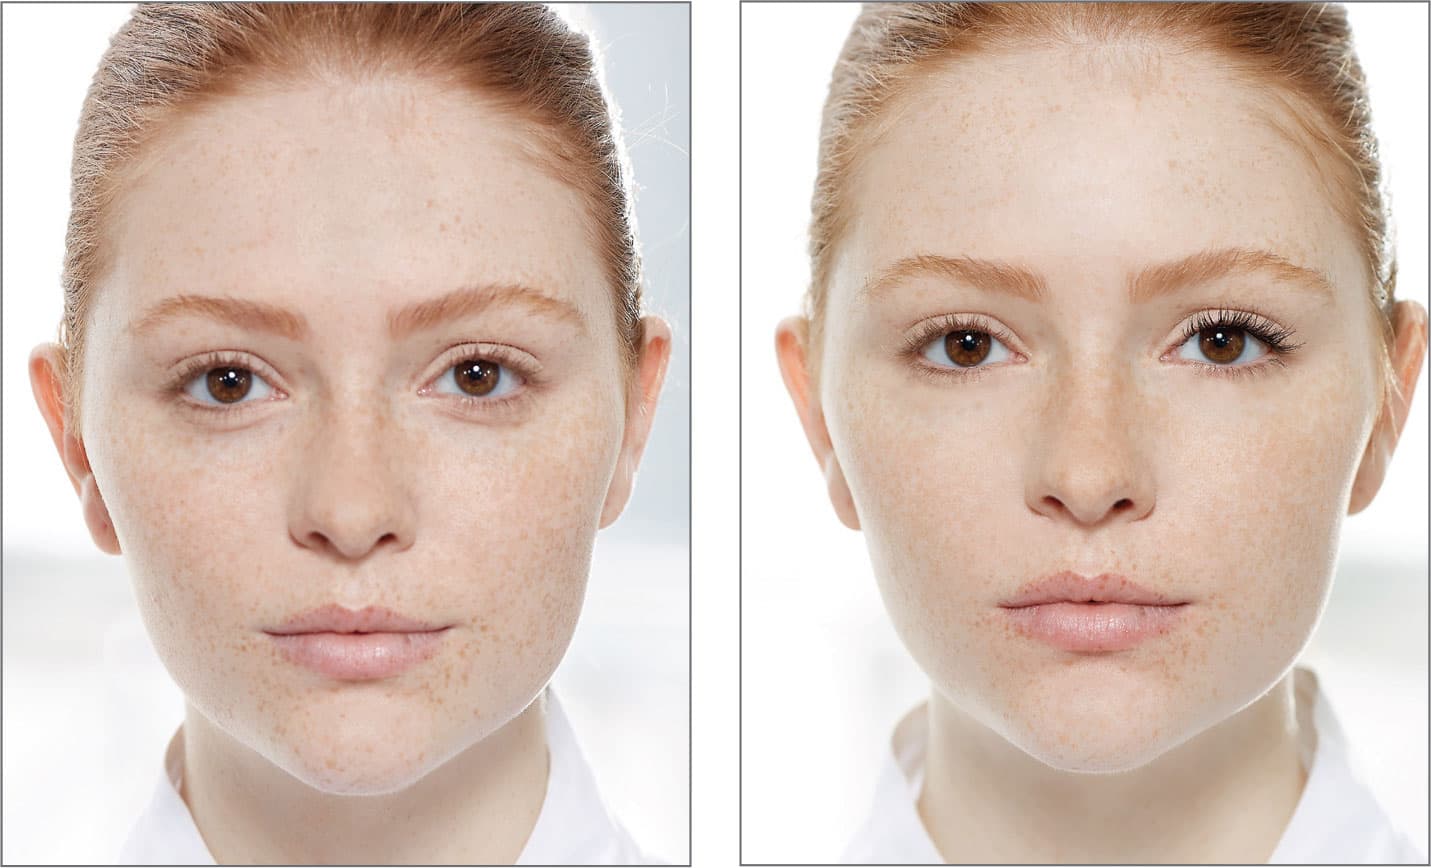
I have five words to say about eyelashes: curl, curl, curl, curl, and curl. There is no quicker, cheaper, faster facelift than curling your eyelashes. It opens your eyes, lifts your lids, and makes your eyes look bigger. If you don’t think you need to curl, just look at the before-and-after pictures below. All she has done is curl her eyelashes. You can see how much it has lifted her eye and made it appear more open.
Nowadays you have many curling options, from the classic crimp curler to a detailed precision eyelash curler to one of my favorites, the heated eyelash curler. No matter what your choice is, just remember to curl!
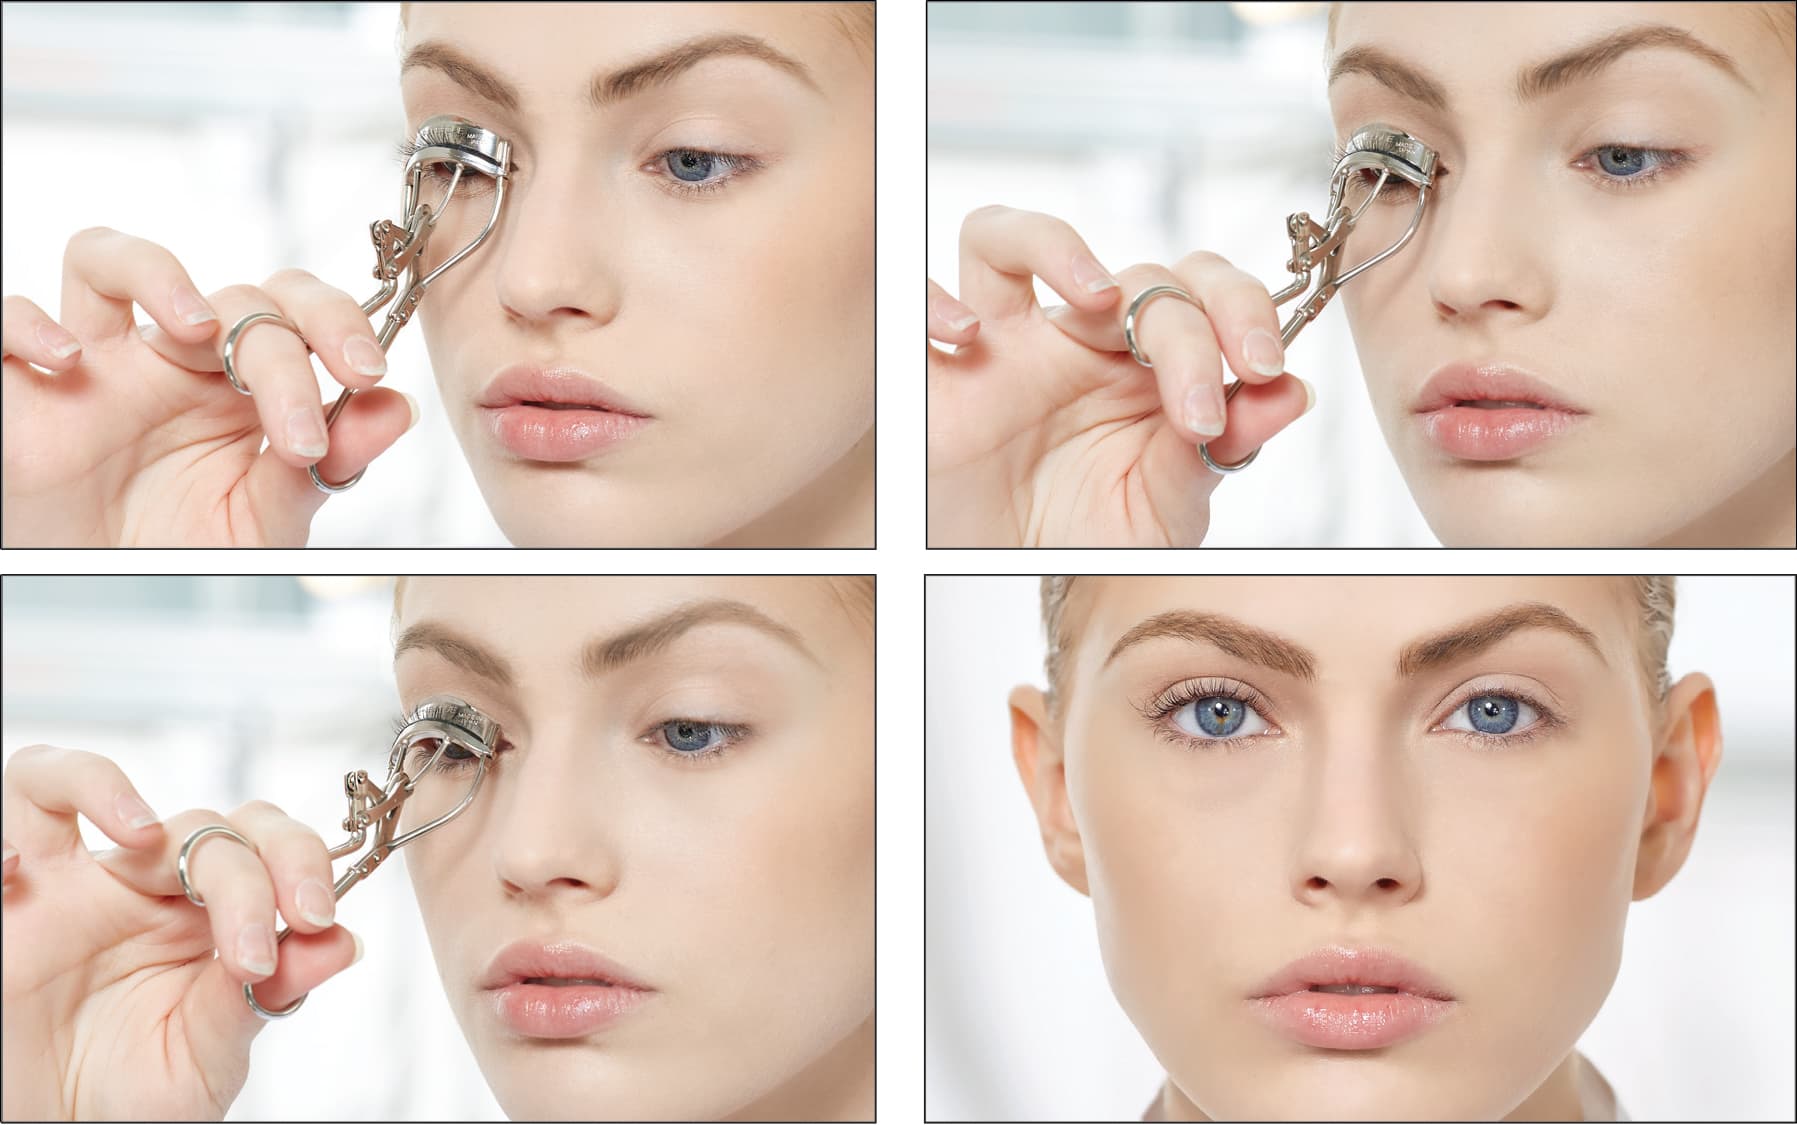
If your choice is a classic crimp curler, it is fast and easy, but make sure the tool you use is fairly new. If you use an eyelash curler for more than a year, it can get out of alignment and cut your eyelashes. Throw out the one from high school; it’s time to by a new one! You need to replace a crimp curler every year and change the rubber piece every six months. The trick to using a crimp curler is to crimp your eyelashes more than just once at the lash line. Instead, “walk” the eyelash curler up the length of your eyelashes, taking care to close, open, and move the eyelash curler up several times until you reach the end. Some women can crimp once, some three times; the point is to walk it out and crimp it as many times as you can until you reach the end. This method creates a curve rather than a crimp and will help your eyelashes stay curled.

A detailed precision eyelash curler works the same way a classic crimp curler works; you crimp it down on the lash and it curls. The big difference is the size: It is only about a fourth the width of the classic version, making it easier to get right at the base of the eyelashes. Start at the base of the eyelashes and crimp as you walk it out to the ends, just as you did with the classic crimp curler.

If you’re afraid of crimp-style eyelash curlers, you’re in luck: There is now an alternative eyelash-curling tool, a heated eyelash curler. This tool is used after you’ve applied mascara. It uses your mascara as a curling catalyst—an excellent feature because applying mascara can slightly uncurl your eyelashes. Starting at the base of your eyelashes, work it back and forth from side to side, so your eyelashes can fall into the grooves of the curler. Now push up and twist the curler in toward your lid, and your eyelashes will be curled to perfection—no crimping needed!
Curl your eyelashes, as shown above left. Then add a layer of mascara. Even a single layer of mascara, shown right, can make an enormous difference in starting to define your eyes. It helps open them up and gives you the attention you are looking for.
layer on your mascara
Curled, thick, dark, luscious eyelashes equal young and beautiful. Mascara is everyone’s favorite way to add definition to the eyes. I recommend applying several coats to define and open your eyes because layering it will give you the most dramatic definition. If you have allergies or are concerned about getting teary-eyed, you can make any application waterproof by making your final coat a layer of waterproof mascara.
Here’s the best way to apply several coats of mascara to build eyelashes that last:
1. Curl your eyelashes with a crimp-style eyelash curler, opening up the eyes and making them appear larger. (If you opt to use a heated curler, do so once you’ve applied your mascara and it’s thoroughly dried.)
2. Pull the mascara wand out of the tube and wipe the brush against the opening or on a paper towel to remove any excess product. Don’t be afraid of cleaning too much product off—there is plenty on there!
3. Apply the small amount that is left on the brush to your eyelashes.
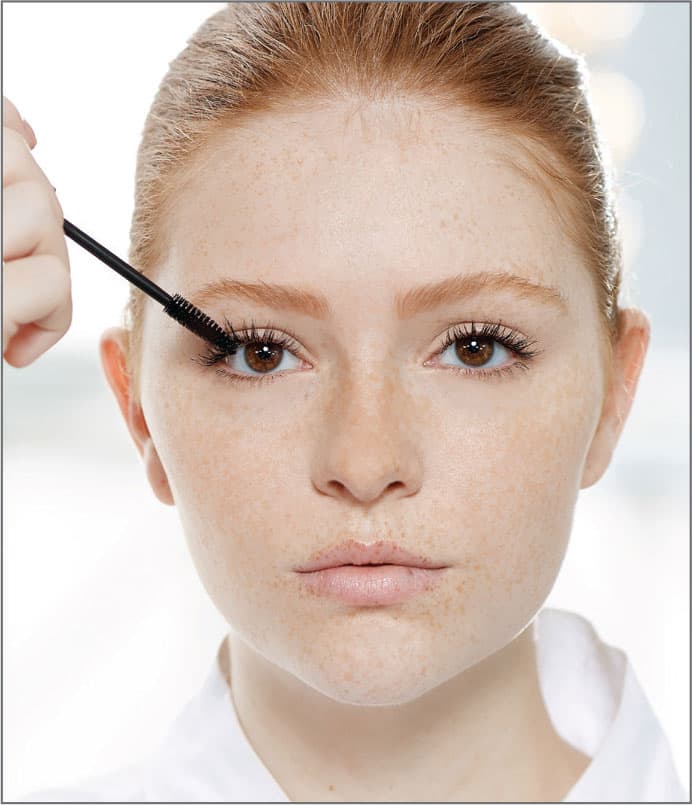
4. Using an eyelash comb, comb your eyelashes before the mascara dries. This will help keep your eyelashes well separated and prevent them from clumping.
5. Let each coat of mascara dry between applications. This could take a couple of minutes, so be patient, but each coat must be completely dry. If you do not wait for each layer to dry, your eyelashes will clump. This is also why I like to apply my first layer when it has plenty of time to dry before the second layer.
6. After one coat is dry, pull out your wand, clean it off, and apply the next coat. Repeat as necessary.
The trick to mastering multiple-coat application is making sure to apply very thin coats, letting each dry completely between coats. I almost always apply three coats to the top lash line and one coat to the bottom.
tip: No matter what the formula, when you pull a mascara wand out of its tube, it will likely have more product on it than you want (especially if you’re layering). It is always best to clean the excess off your brush before you apply mascara.
There is no rule saying you must apply mascara to your bottom lashes; it is a matter of personal preference. When I first started my makeup career many, many years ago, I never used mascara on the bottom lashes (it was not in fashion), but now I almost always do (for the eye definition). The one time I might try to convince you not to use mascara along your lower lash line would be if your eyelashes are very sparse because defining them will only accentuate how sparse they are.
Here’s a trick of the trade: If you don’t use mascara on your eyelashes, make sure you smudge your eyeliner well because that is what mascara would do: break up the line, making it look much more natural.
Then there is the ever-present question: black versus brown versus a color (such as blue, purple, etc.). This is something I feel very strongly about because your eyelashes are so important for giving your eyes definition. For me it is always black. If I’m going to have a party, I’m going to have a big party! Black will give you the most definition. I’m not opposed to brown or black/brown, especially if they make you feel more comfortable. Choose one of them if you want a softer result (less definition). Colored mascara is always a no for me; it does not look natural, and it does nothing for your eyes.
For thicker eyelashes: Start at the base of the eyelashes and hold your mascara wand in a horizontal position, moving it from side to side as you work your way up to the end. This technique makes the mascara particles attach to the sides of your eyelashes, making them appear thicker.
tip: Coat your eyelashes with mascara at the inside corners and the very outer corners. These are the two areas that many women miss.
For longer eyelashes: Hold your mascara wand in a vertical position. Starting at the base of the lash line, pull the wand up and out to the end. The particles will attach to the ends of your eyelashes, making them appear longer.
If you want both—and you deserve both!—simply apply multiple layers each way. For example, apply your first coat thick (horizontally) and then let it dry. Apply your next coat (vertically) so it lengthens, let it dry, and so on. If you want to waterproof your eyelashes, just make your final layer waterproof.
tip: Two or three thinly applied coats of mascara are far more effective than a single clumpy one.
how to conquer every eye shape
Now that you know how to apply makeup to a basic eye, let’s explore other eye shapes. Most eyes are a combination of shapes, but usually one shape stands out. You still need the same three ingredients—your highlight, midtone, and contour. The general area of placement is the same; we just shift it slightly to push back what we don’t want to see and bring forward what we do. Each eye shape has its own individual characteristics, changing our goals each time.
hooded eyes
Hooded eyes are sometimes called “bedroom eyes” because the lids tend to look partly closed and heavy. There are two types of hooded eyes—the ones you’re born with and the ones you acquire. Some people, based on ethnic background or natural facial features, are born with a hooded eyelid. Other people acquire hooded eyes as they age; minimizing the fullness of the lids will make you look years younger. When you look at a hooded eye, you see more eyelid than you do eye. It is full and puffy with no defined crease. The upper part of the lid lays on top of the lower part of the lid, hiding the crease and the lower portion of the top eyelid. Applied correctly, eye color can help hooded eyes appear more open by minimizing the eyelid. Our goal is to make the fleshy lid area recede and to make your eyes look more prominent than your eyelids.
• If you have hooded eyes, you can pull off a smoky eye if you want drama. For a more natural look, creating a gradation of color from dark at the outer corner to lighter as you move across the eyelid will help open the eye up.
• Don’t highlight your brow bone too much, which will accentuate the hooded appearance of your eyelid.
• Never apply your highlight shade over your entire lid (above the first fold or crease in your specific lid); it will just make it look even more hooded.
Let’s look at multiple hooded eyes to get a full picture of what to do to make this eye shape look its best. The diagram above shows where to place your highlight, midtone, and contour shades.

hooded eyes (born with)
1. Using a #22 highlight brush, apply a shimmery beige crème-to-powder eye shadow to your eyelid all along your lash line up to your first crease or fold, not above onto the fleshy part of the lid.

2. With the same brush, apply a powder shimmer champagne shadow directly over the crème. Layering the two will make your highlight more intense, opening the eye up. You could also highlight your brow bone; here we simply concealed and powdered it (when we prepped the eyelid).
3. Curl your eyelashes and apply the first layer of mascara to your top lashes.
4. With a #11 midtone brush and a matte taupe eye shadow, start at the outside corner base of your upper lash line and bring the color up and over the entire hooded area. This helps the lid recede, pushing it away and bringing the eye forward. With this eye shape, you want to always use a matte midtone because you have a lot of lid to push back to visually open the eye.

5. Using a #30 contour brush, apply your midtone to the outer corner of your eyelid to help close in the outer corner.
6. With a #16 blending brush (the one that is always clean and ready to blend with), blend out your midtone so there are no hard edges.
7. Compare one eye with midtone and one without; your midtone really opens the eye up. In the end, it will pretty much disappear, but it does all the heavy lifting.
8. To start your lash line definition, using a #41 detail eye liner brush, push a matte black eye shadow into the base of your lash line. You can see here how it starts to create definition on her left eye and is making her eyelashes look thicker.
9. For more intense color and to help create a better gradation of color from dark to light, start with a crème shadow at the base of the lash line in the outer corner of the eyelid. Using another #22 highlight brush, apply a shimmery copper crème shadow.

10. With a #30 contour brush, apply a shimmery copper eye shadow on top of your crème and in the outer corner of the eyelid.
11. With a #16 blending brush, start blending at the base of the lash line and bring the color up and over the hooded area, layering it on top of your midtone. Blend it up toward where the crease should be and in toward the center of the lid. Bring your contour color in a little more and up a little higher than you did on the basic eye. Don’t bring it as far across as you did your midtone, but come halfway across the lid. This will help the hooded area recede.

12. Using a #38 detail eye shadow brush, apply your midtone along your lower lash line, starting from the outside corner and brushing across toward the inside corner; this helps start your definition and create a better blend when you apply your contour shade and eyeliner.
13. With the same brush, sweep your contour color underneath the bottom lashes to define the lower lash line, starting from the outside corner and blending your way across. You don’t want to miss this step! Hooded eyes really benefit from a well-defined upper and lower lash line.
14. With a #14 detail eye shadow brush, apply your highlight shadow to the inside corner of the lower lash line. This will really help open up your eyes, making them appear larger.

15. Finish with another layer of mascara on the top lashes and a layer on the bottom lashes. Then when you finish the rest of your makeup, put a third and final layer of mascara on your top lashes.

hooded eye (acquired)
1. Using a #14 detail eye shadow brush, apply a shimmery beige crème-to-powder eye shadow to your eyelid all along your lash line up to your first crease or fold, not above onto the fleshy part of the lid, which in this case is quite close to the lash line.
2. With a #22 highlight brush, apply a powder shimmer champagne shadow directly over the crème. Layering the two will make your highlight more intense, opening the eye up. You could also highlight your brow bone; here we simply concealed and powdered it (when we prepped the eyelid).
3. Curl your eyelashes and apply the first layer of mascara to your top lashes.
4. With a #27 midtone brush and a matte taupe eye shadow, start at the outside corner base of your upper lash line and bring the color up and over the entire hooded area. This helps the lid recede, pushing it away and bringing the eye forward. With this eye shape, you want to always use a matte midtone because you have a lot of lid to push back to visually open the eye.
5. With a #28 blending brush (the one that is always clean and ready to blend with), blend out your midtone so there are no hard edges.
6. Using a #30 contour brush, apply your midtone to the outer corner of your eyelid to help close in the outer corner.
7. Blend the area again, this time with a #16 blending brush.

8. Compare one eye with midtone and one eye without; your midtone really opens the eye up. In the end, it will pretty much disappear, but it does all the heavy lifting.

9. To start your lash line definition, using a #41 detail eye liner brush, push a matte black eye shadow into the base of your lash line.
10. For more intense color and to help create a better gradation of color from dark to light, start with a crème shadow at the base of the lash line in the outer corner of the eyelid. Using another #22 highlight brush, apply a shimmery copper crème shadow.

11. With a #30 contour brush, apply a shimmery copper eye shadow right on top of your crème and in the outer corner of the eyelid.
12. With a #16 blending brush, start blending at the base of the lash line and bring the color up and over the hooded area, layering it on top of your midtone. Blend it up toward where the crease should be and in toward the center of the lid. Bring your contour color in a little more and up a little higher than you did on the basic eye. Don’t bring it as far across as you did your midtone, but come halfway across the lid. This will help the hooded area recede.
13. To create more definition at the lash line (which is always great for a hooded eye), line your eyes with a black eyeliner right along the lash line, keeping the line as close to the lash line as possible. Make sure it is the thinnest at the inside corner, slowly getting thicker as you get to the outside corner.
14. For the perfect amount of drama, apply false eyelashes (see here).
15. Using a #38 detail eye shadow brush, apply your midtone along your lower lash line, starting from the outside corner and brushing across toward the inside corner; this helps start your definition and create a better blend when you apply your contour shade and eyeliner.

16. With the same brush, sweep your contour color underneath the bottom lashes to define the lower lash line, starting from the outside corner and blending your way across. You don’t want to miss this step! Hooded eyes really benefit from well-defined upper and lower lash lines.

17. With a #14 detail eye shadow brush, apply your highlight shadow to the inside corner of your lower lash line. This will really help open up your eyes, making them appear larger.

18. Finish with another layer of mascara on the top lashes, blending them into your false eyelashes, and a layer on the bottom lashes.


hooded eye (born with)
1. Some might call this hooded lid a monolid, but it is still a hooded eyelid. With this eye, we are creating the illusion of a new crease. Using a #22 highlight brush, apply a shimmery beige crème-to-powder eye shadow to your eyelid starting at the base of your lash line and bring it up to where you want to make your new crease.
2. With the same brush, apply a layer of matte beige and a layer of shimmer champagne powder eye shadow directly over the crème. Layering the two powders will make your lid opaque. The eye shadow you touch first will be on top and the eye shadow you touch second will be against your skin.

3. With the same brush, apply the matte beige eye shadow to just your brow bone.

4. Curl your eyelashes and apply the first layer of mascara to your top lashes.
5. With a #11 midtone brush and a matte taupe midtone eye shadow, start at the outside corner of the eyelid so that area will get the most midtone color. Gently move your brush along the crease into the inside corner of the eyelid (from the outside corner all the way across to the inside corner). You’re basically drawing on the crease you want to see. If you want it more defined, apply a few more layers of your midtone shade (feel free to layer for more definition).

6. With a #16 blending brush (the one that is always clean and ready to blend with), blend out your midtone so there are no hard edges.
7. Using a #30 contour brush, apply your midtone to the outer corner of your eyelid, to help close in the outer corner.
8. Blend with a #16 blending brush.
9. Compare one eye with midtone and one without; your midtone really opens the eye up and creates the illusion of a lid and a crease. In the end, it will pretty much disappear, but it does all the heavy lifting.

10. To start your lash line definition, using a #41 detail eye liner brush, push a matte black eye shadow into the base of your lash line.
11. For more intense color and to help create a better gradation of color from dark to light, start with a crème shadow at the base of the lash line in the outer corner of the eyelid. Using another #22 highlight brush, apply a shimmery copper crème shadow.
12. With a #38 detail eye shadow brush, apply a shimmery brown eye shadow right on top of your crème and in the outer corner of the eyelid.

13. With a #16 blending brush, start blending at the base of the lash line and bring the color up and over the hooded area, layering it on top of your midtone. Blend it up toward where the crease should be and in toward the center of the lid. Bring your contour color in a little more and up a little higher than you did on the basic eye. Don’t bring it as far across as you did your midtone, but come halfway across the lid. This will help the hooded area recede.


14. Keep layering until you get the depth and shaping you want.
15. To create more definition at the lash line (which is always great for a hooded eye), line your eyes with a black eyeliner right along the lash line, keeping the line as close to the lash line as possible. Make sure it is thinnest at the inside corner, slowly getting thicker as you get to the outside corner.
16. For the perfect amount of drama, apply false eyelashes (see here).
17. Using a #38 detail eye shadow brush, apply your midtone along your lower lash line, starting from the outside corner and brushing across toward the inside corner; this helps start your definition and create a better blend when you apply your contour shade and eyeliner.
tip: Your eyebrow shape is very important here because attention can be diverted from the hooded eyelid with a beautifully shaped eyebrow.
18. With the same brush, sweep your contour color underneath the bottom lashes to define the lower lash line, starting from the outside corner and blending your way across. You don’t want to miss this step! Hooded eyes really benefit from well-defined upper and lower lash lines.

19. With a #14 detail eye shadow brush, apply your highlight shadow to the inside corner of your lower lash line. This will really help open up your eyes, making them appear larger.

20. Finish with another layer of mascara on the top lashes, blending them into your false eyelashes, and a layer on the bottom lashes.
tip: With this eye shape, you must curl your eyelashes! It will help push the lid back and open up your eye.

deep-set eyes
Deep-set eyes are set deep into their sockets, and the brow bone extends out farther than it does with any other eye shape. The goal with deep-set eyes is to bring your eyes out and forward, while pushing your brow bone back. Achieving this will make your eyes look more properly set on your face. The great thing about deep-set eyes is that they are much less likely to start to droop as you age. Here’s what you need to know:
• A dark eyelid does not work with this eye shape. You want to highlight the eyelids of deep-set eyes as much as possible to help bring them out. A dark lid will just push them farther back.
• Darkening the crease is also unnecessary for this eye shape.
• There is no need to highlight your brow bone, because it is already prominent. Highlighting would just bring it forward even more.
• When you wear eyeliner on this eye shape, keep it very thin and as close to the lash line as possible. Thick eyeliner will work against you when you’re trying to bring the eyes out, especially on the upper lids.
This diagram below shows where to add your highlight, midtone, and contour shades.

1. Using a #22 highlight brush, apply a shimmery beige crème-to-powder eye shadow to your eyelid and up into the crease. This really helps pull the eye forward.
2. With the same brush, layer a matte beige eye shadow and a shimmery champagne eye shadow on top of your crème. Remember, when you load your brush, what you touch first will be on top and what you touch second will be next to your skin. You want this lid to be nice and shimmery. Layering will give you the shimmer you need along with a great opaque coverage.

3. Curl your eyelashes and apply the first layer of mascara to your top lashes.
4. With a #20 ultimate crease brush for great control, apply a matte taupe midtone eye shadow right above the crease, not in it. Starting from the outside corner, bring it across the lid toward the inside corner just above the crease.
5. Using a #16 blending brush (the one that is always clean and ready to blend with), blend up toward the brow bone—not all the way to the brow, but toward the brow. Deepening the brow bone will visually push the brow bone away from us. So, by highlighting your lid, we have brought it forward, and by deepening your brow bone, we have pushed it away from us, making your eye look more properly set on your face.

6. Using a #30 contour brush, apply your midtone to the outer corner of your eyelid to help close in the outer corner.
7. Blend with a #16 blending brush.
8. As you can see, the highlight and the midtone really start to put the eye back in the right place. We could line and add eyelashes and have a nice polished eye at this point. Your midtone does so much for correcting your eye placement. In the end, it will pretty much disappear, but it does all the heavy lifting.
9. To start the lash line definition, use a #41 detail eye liner brush to push a matte black shadow into the base of your lash line.

10. For more intense color and to help create a better gradation of color from dark to light, start with a crème shadow at the base of the lash line in the outer corner of the eyelid. Using another #22 highlight brush, apply a shimmery copper crème shadow.

11. Using a #38 detail eye shadow brush so you’ll have great control, apply a shimmery copper shadow directly on top of the crème you just applied.

12. Use a #16 blending brush to blend into the outer corner of the eyelid and up onto the brow bone to help push the area away (make it recede). Be careful to keep the blending tight and controlled; you don’t want to darken the eyelid too much, which would push the eye back into the head.

13. Keep layering until you get the intensity you want.

14. To create more definition at the lash line, line your eyes with a black eyeliner right along the lash line, keeping the line as close to your lash line as possible so you don’t darken the lid. Make sure it is thinnest at the inside corner, slowly getting thicker as you get to the outside corner.
15. For the perfect amount of drama, apply false eyelashes (see here).
16. Using a #13 detail eye shadow brush, apply your midtone along your lower lash line, starting from the outside corner and brushing across toward the inside corner. This helps start your definition and creates a better blend when you apply your contour shade and if you choose to use eyeliner.
17. With a #38 detail eye shadow brush, sweep the contour color underneath your bottom lashes to define the lower lash line, starting from the outside corner and blending your way across.
18. With a #14 detail eye shadow brush, apply your highlight shadow to the inside corner of your lower lash line. This will really help open up your eyes, making them appear larger.

19. Finish with another layer of mascara on your top lashes, blending them into your false eyelashes, and a layer on the bottom lashes.
tip: For drama, I always use a brighter (not necessarily a darker) contour shadow. This way, you do not deepen your lid too much.

close-set eyes
The ideal space between your eyes is approximately the width of one eye. If your eyes are spaced any closer than that, you have close-set eyes. Your goal is to create the illusion of eyes that are placed farther apart. Here’s what you need to know:
• Keep the inside corners of your eyes and the areas closest to your nose as light as possible to help visually “push” the eyes apart.
• Make sure to concentrate the darker shades on the outer corners of this eye shape. Elongate your darkest shadows out to help pull the eyes apart.
This diagram shows where to add your highlight, midtone, and contour shades.
1. Using a #22 highlight brush, apply a shimmery beige crème-to-powder eye shadow to your eyelid from your lash line all the way to your crease. You are going to layer crème and powder shadow to make your lid look more dramatic.

2. With the same brush, apply a shimmery champagne eye shadow directly on top of the crème. You could apply it to your brow bone if you want to. We opted not to here; the eyelid prep was enough.

3. Curl your eyelashes and apply the first layer of mascara to your top lashes (see here).
4. With a #11 midtone brush and a matte taupe eye shadow, starting at the outer corner of the crease, bring the color in toward the inside corner. With all other eye shapes, we have applied our midtone all the way across from the outer corner of the crease to the inside corner, but with close-set eyes, we will only bring it three-quarters of the way across because we do not want to deepen the inside corner of the lid. This would only visually push the eyes closer together.

5. With a #30 contour brush, apply your midtone to the outer corner of your eyelid to help close in the outer corner.
6. With a #16 blending brush (the one that is always clean and ready to blend with), blend out your midtone so there are no hard edges.

7. Compare one eye with midtone and one without; the midtone does so much to visually pull the eyes apart. In the end, it will pretty much disappear, but it does all the heavy lifting.
8. To start your lash line definition, use a #41 detail eye liner brush to push a matte black shadow into the base of your lash line.
9. For more intense color and to help create a better gradation of color from dark to light, start with a crème shadow at the base of your lash line in the outer corner of your eyelid. Using another #22 highlight brush, apply a shimmery copper crème shadow.

10. With a #30 contour brush, layer a shimmery brown power eye shadow directly onto your crème.

11. With a #16 blending brush, blend it across the base of your upper lash line and up into the outer area of the crease. This is the shade you want to elongate out to help pull your eyes apart visually. Confine it to the outer corners of the eyes—never bring it more than a third of the way in.
12. Keep layering until you get the depth you want.
13. To create more definition at the lash line, line your eyes with a black eyeliner right along your lash line, keeping the line as close to the lash line as possible. Make sure it is the thinnest at the inside corner, slowly getting thicker as you get to the outside corner.
14. For the perfect amount of drama, apply false eyelashes (see here).
15. Using a #13 detail eye shadow brush, apply your midtone along your lower lash line, starting from the outside corner and brushing across toward the inside corner. This helps start your definition and creates a better blend when you apply your contour shade and if you choose to use eyeliner.
16. With a #38 detail eye shadow brush, sweep the contour color underneath your bottom lashes to define the lower lash line, starting from the outside corner and blending your way across.

17. With a #14 detailed shadow brush, apply your highlight shadow to the inside corner of the lower lash line, making sure it wraps completely around the inside corner. For this eye shape, it not only helps open the eye up, but it is imperative in visually pushing the eyes apart.
18. Make sure to blend where the highlight meets your midtone and contour.

19. Finish with another layer of mascara on the top lashes, blending them into your false eyelashes, and a layer on the bottom lashes.

wide-set eyes
If the spacing between your eyes is wider than the width of one eye, your eyes are considered wide-set. Your goal is to create the illusion that they are set closer together (visually pushing them together). Here’s what you need to know:
• You’ll need to darken the inside hollows of your eyes, next to the bridge of your nose, more than you would for any other eye shape. Deepening the color in this area helps your eyes appear to be set closer together. To get the color depth there, do not bring your contour color all the way in—just layer your midtone to achieve the desired depth.
• Begin any dark-color application slightly in from the outer corner of your eye and blend your shadow up and in instead of outward because blending it outward will pull the eyes wider apart, and your goal here is to push them closer together.
This diagram shows where to add your highlight, midtone, and contour shades.

1. Using a #22 highlight brush, apply a shimmery beige crème-to-powder eye shadow to your eyelid from your lash line all the way to your crease. You are going to layer crème and powder shadow to make your lid look more dramatic.
2. With the same brush, apply a shimmery champagne eye shadow directly on top of the crème. You could apply it to your brow bone if you choose. We opted not to here; the eyelid prep was enough.
3. Curl your eyelashes and apply the first layer of mascara to your top lashes (see here).
4. With a #11 midtone brush and a matte taupe eye shadow, starting from the outer corner of the crease, bring the color toward the inside corner of your eye, making sure to bring it up and in, not elongating it out. Apply a few extra layers to the inside corners to deepen the color and help visually push the eyes closer together.

5. With a #16 blending brush (the one that is always clean and ready to blend with), blend out your midtone so there are no hard edges.
6. With a #30 contour brush, apply your midtone to the outer corner of your eyelid to help close in the outer corner.
7. Using a #16 blending brush, blend the shadow you just applied.

8. Compare one eye with midtone and one without; your midtone does so much to open the eye up, define the crease, and visually push the eyes together. In the end, it will pretty much disappear, but it does all the heavy lifting.
9. For more intense color and to help create a better gradation of color from dark to light, start with a crème shadow at the base of the lash line, in just slightly from the outer corner of the eyelid. Using another #22 highlight brush, apply a shimmery copper crème shadow.
10. With a #38 detail eye shadow brush, layer a matte dark brown power eye shadow directly onto of your crème.
11. With a #16 blending brush, blend it across the base of your upper lash line and up into the crease. This is the shade you don’t want to elongate out because it will pull the eyes apart. Remember, blend it up and in to push the eye inward.

12. Keep layering until you get the level of depth you want.
13. To start the lash line definition, use a #41 detail eye liner brush to push a matte black shadow into the base of your lash line.
14. To create more definition at the lash line (which is always great for wide-set eyes), line your eyes with a black eyeliner right along the lash line, keeping the line as close to the lash line as possible. Make sure it is the thinnest at the inside corner, slowly getting thicker as you get to the outside corner.

15. Using a #42 eye liner brush, smooth out your liner.
16. For the perfect amount of drama, apply false eyelashes (see here). Start slightly in from the outside corner so you don’t pull the eyes apart visually.
17. Using a #13 detail eye shadow brush, apply your midtone along your lower lash line, starting in just slightly from the outside corner and brushing across toward the inside corner. This helps start your definition and creates a better blend when you apply your contour shade and if you choose to use eyeliner.
18. With a #38 detail eye shadow brush, sweep the contour color underneath your bottom lashes to define the lower lash line, starting from the outside corner and blending your way across. Be careful not to extend the color beyond the outer edge of the eye.
19. Finish with another layer of mascara on the top lashes, blending them into your false eyelashes, and a layer on the bottom lashes.
prominent eyes
If your eyelids and eyes are very full and tend to extend out from your face, you have prominent eyes. The goal here is to visually push your eye away from us and help it appear to recede more gently into your face. We do this by creating a light-to-dark effect with the three eye shadows, with the darkest shade applied closest to the lash line and fading as you go toward the brow. This is one eye shape where you are trying to make the eyes appear smaller; we want to minimize their fullness. Here’s what you need to know:
• Never highlight your eyelids, or you will make your eyes appear even more prominent.
• A deeper or contour shade across the entire eyelid helps to minimize the fullness and makes it appear to recede.
• With this eye shape, you can apply your eyeliner all the way around your eye with the same thickness and intensity because we want to close the eye in slightly.
This diagram shows where to add your highlight, midtone, and contour shades.

1. With a #22 highlight brush, apply a matte beige eye shadow just to your brow bone. When I say brow bone, I mean just under the arch of your brow.
2. Curl your eyelashes and apply the first layer of mascara to your top lashes (see here).
3. With a #27 eye shadow brush (because you will be applying your color to a large area), apply a matte taupe midtone eye shadow. Start at the base of your upper lash line, bring it across the lid, and then bring the color up and over your entire lid, all the way up to just under your brow bone. By starting along your lash line and working your way upward, you will get the highest concentration of color where you laid your brush first, making your color deeper at the lash line.
4. Using a #27 brush, apply more midtone eye shadow in a half-moon shape all along the crease to create more definition.
5. With a #16 blending brush (the one that is always clean and ready to blend with), blend your midtone so there are no hard edges.
6. Keep layering until you get the desired amount of depth.
7. Compare one eye with midtone and one eye without; you can see how the midtone starts to really push the eye back into the face. In the end, it will pretty much disappear, but it does all the heavy lifting.

8. To start your lash line definition, use a #41 detail eye liner brush to push matte black shadow into the base of your lash line. You can see not only how it defines the lash line, but how it makes the eyelashes look thicker.
9. With a #30 contour brush and a dark shimmery brown eye shadow, start at the base of your lash line and bring the color up and over your entire lid up to your crease. This gives you the most intense color right at your lash line.
10. Blend with a #16 blending brush (the one that is always clean).
11. This eye really benefits from definition at the lash line. You could use pencil; here, I chose powder and a brush. To make it softer and look more smudged, let’s use a #18 detail eye liner brush, grab some matte black shadow, and lay it all along your top lash line. As you apply it, pull up slightly with your brush to blend the line.

12. For the perfect amount of drama, apply false eyelashes (see here).
13. With a #38 detail eye shadow brush, apply your midtone shadow all along your lower lash line. Start your application from the outside corner, sweeping it across to the inside corner. This helps start your definition and creates a better blend when you apply your contour shade and if you choose to use eyeliner.
14. With the same brush, apply your contour color right over your midtone all along your lower lash line. By layering on your midtone, then your contour on top of it, you are creating a gradation color, making your lower lash line definition look more natural and blended, further helping your eyes recede into your face.
15. Finish your eyes with another layer of mascara on the top lashes, blending them into the false eyelashes, and a layer on the bottom.
droopy eyes
When I say droopy eyes, I do not mean that the lids are droopy; I mean that the outer corners of your eyes turn slightly downward. They are sometimes referred to as “sad puppy dog eyes.” Your goal is to make the outer corners appear as if they turn up rather than down. It’s actually very easy to do! We just want to start all our color application in just slightly from the outside corner, on top and especially along the bottom lash line. Here’s what you need to know:
• You want to do what we call an open-ended eye, which means that the color from your top lash line and bottom lash line do not meet in the outer corner of the eye. If the color met in the outside corner, it would just accentuate the droop. By leaving it naked, you create a visual lift to the eye.
• When applying mascara, be sure to concentrate on the middle to inside lashes. Defined eyelashes in the outer corners of the eyes accentuate the droopiness.
This diagram shows where to add your highlight, midtone, and contour shades.

1. Using a #22 highlight brush, apply a shimmery beige crème-to-powder eye shadow to your eyelid from your lash line all the way to your crease. You are going to layer crème and powder shadow to make your lid look more dramatic.

2. With the same brush, apply a shimmery champagne eye shadow directly on top of the crème. You could apply it to your brow bone if you choose. We opted not to here; the eyelid prep was enough.
3. Curl your eyelashes and apply the first layer of mascara to your top lashes (see here).
4. With a #11 midtone brush and a matte taupe midtone eye shadow, start slightly in from the outside corner so you create the illusion that the outer corner is lifted. Gently move your brush along the crease into the inside corner of the eyelid (from the outside corner all the way across to the inside corner). If you want a very defined crease, you can apply a few more layers of your midtone shade (feel free to layer for more definition).

5. With a #16 blending brush (the one that is always clean and ready to blend with), smooth out your midtone so there are no hard edges.
6. To start the lash line definition, use a #41 detail eye liner brush to push a matte black shadow into the base of your lash line.
7. Using a #30 contour brush, apply more of your midtone to the outer corner of your eyelid to close it in, again slightly in from the complete outside corner to create the illusion of lift.
8. Use a #16 blending brush to blend the shadow you just applied.

9. You can see, with just midtone on, how much shaping just your midtone does. It has already started to lift the outer corner. In the end, it will prety much disappear, but it does all the heavy lifting.
10. For more intense color and to help create a better gradation of color from dark to light, start with a crème shadow at the base of your lash line in just slightly from the outer corner of the eyelid. Use another #22 highlight brush to apply a shimmery copper crème shadow.

11. With a #30 contour brush, layer a shimmery copper eye shadow in the outer corner of the eyelid at the base of the lash line, on top of the crème, again in slightly from the outside corner.

12. With a #16 blending brush (the one that is always clean and is ready to blend with), blend the color up toward the crease and in toward the inner part of the lid.
13. Keep layering on color until you reach your desired intensity with a #30 contour brush and blending it out with a #16 blending brush. Always starting just slightly in from the outside corner, bring your color up and into the crease. You can see how starting in just slightly has visually lifted the outside corner.

14. Using a black eyeliner, line your upper lash line (see here).

15. Using a #42 eye liner brush, smooth out your liner.
16. For the perfect amount of drama, apply false eyelashes (see here). Make sure with this eye shape to start in slightly from the outside corner so you create a visual lift.
17. Using a #38 detail eye shadow brush, apply your midtone along your lower lash line, starting in just slightly from the outside corner and brushing across toward the inside corner. This helps start your definition and creates a better blend when you apply your contour shade and if you choose to use eyeliner.
18. With a #13 detail eye shadow brush, sweep your contour color along the lower lash line, making sure once again to start slightly in from the outside corner. We don’t want the color to meet at the outside corner, or it will just draw attention to the droopiness.
19. With a #14 eye shadow brush, apply your highlight shade to the inside corner of the lower lash line. This will really help open up your eyes, making them appear larger and more open.
20. Finish with another layer of mascara on the top lashes, blending them into your false eyelashes, and a layer on the bottom lashes.
tip: With this eye shape, I would not use any eyeliner along the lower lash line. It could be too dramatic and turn your eye downward. Instead, use your contour shade to define along your lower lash line.