chapter 6
eye masterclass
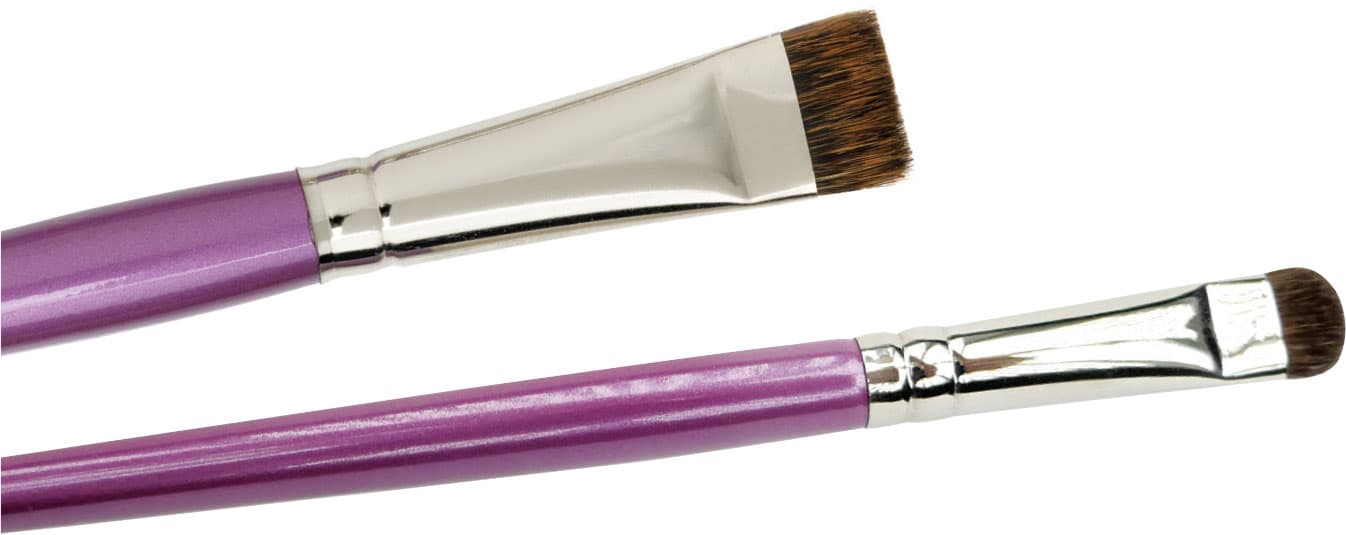
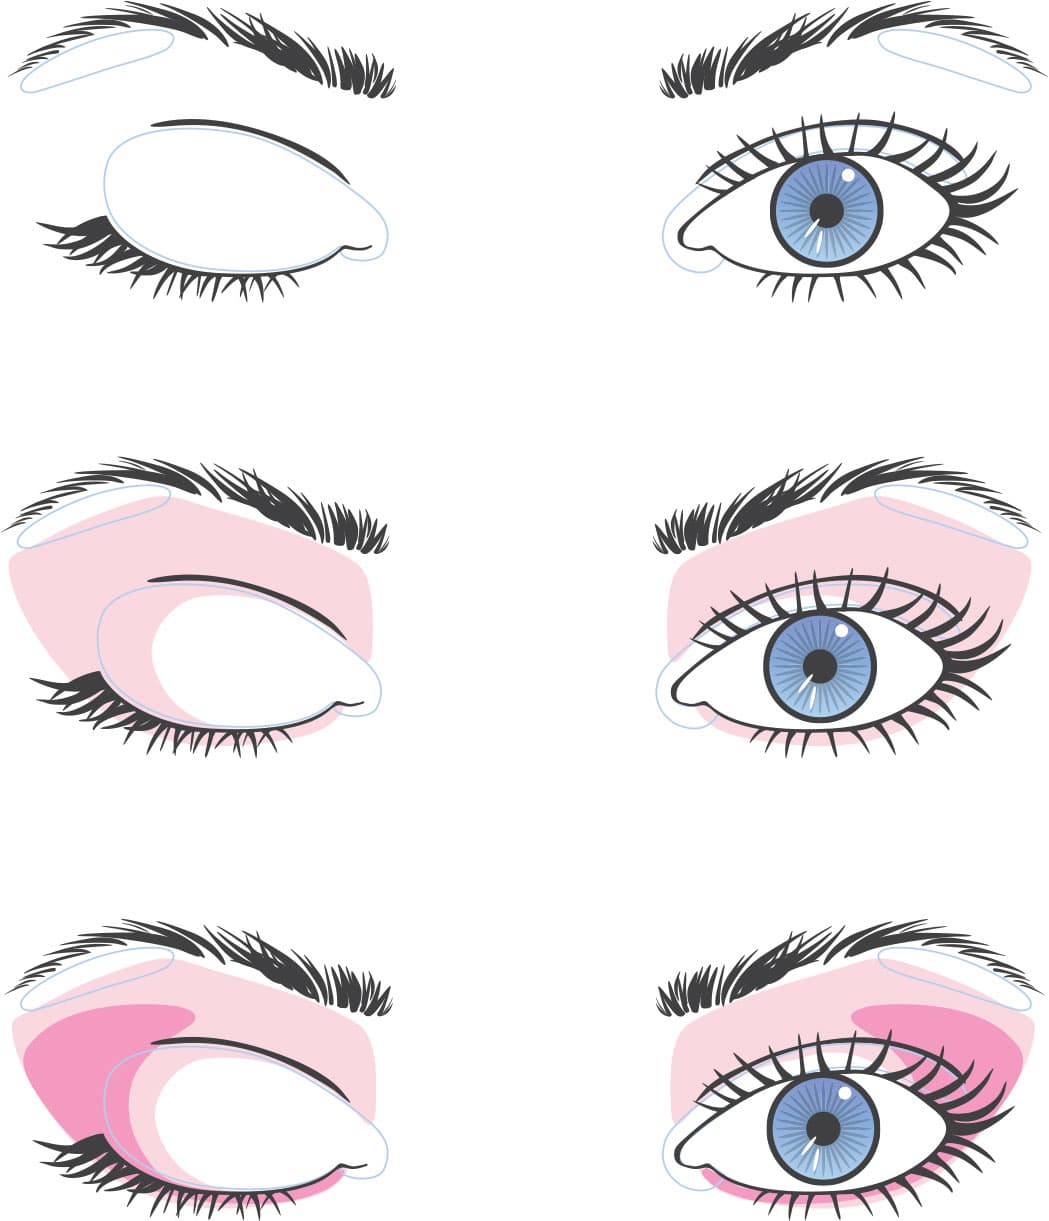
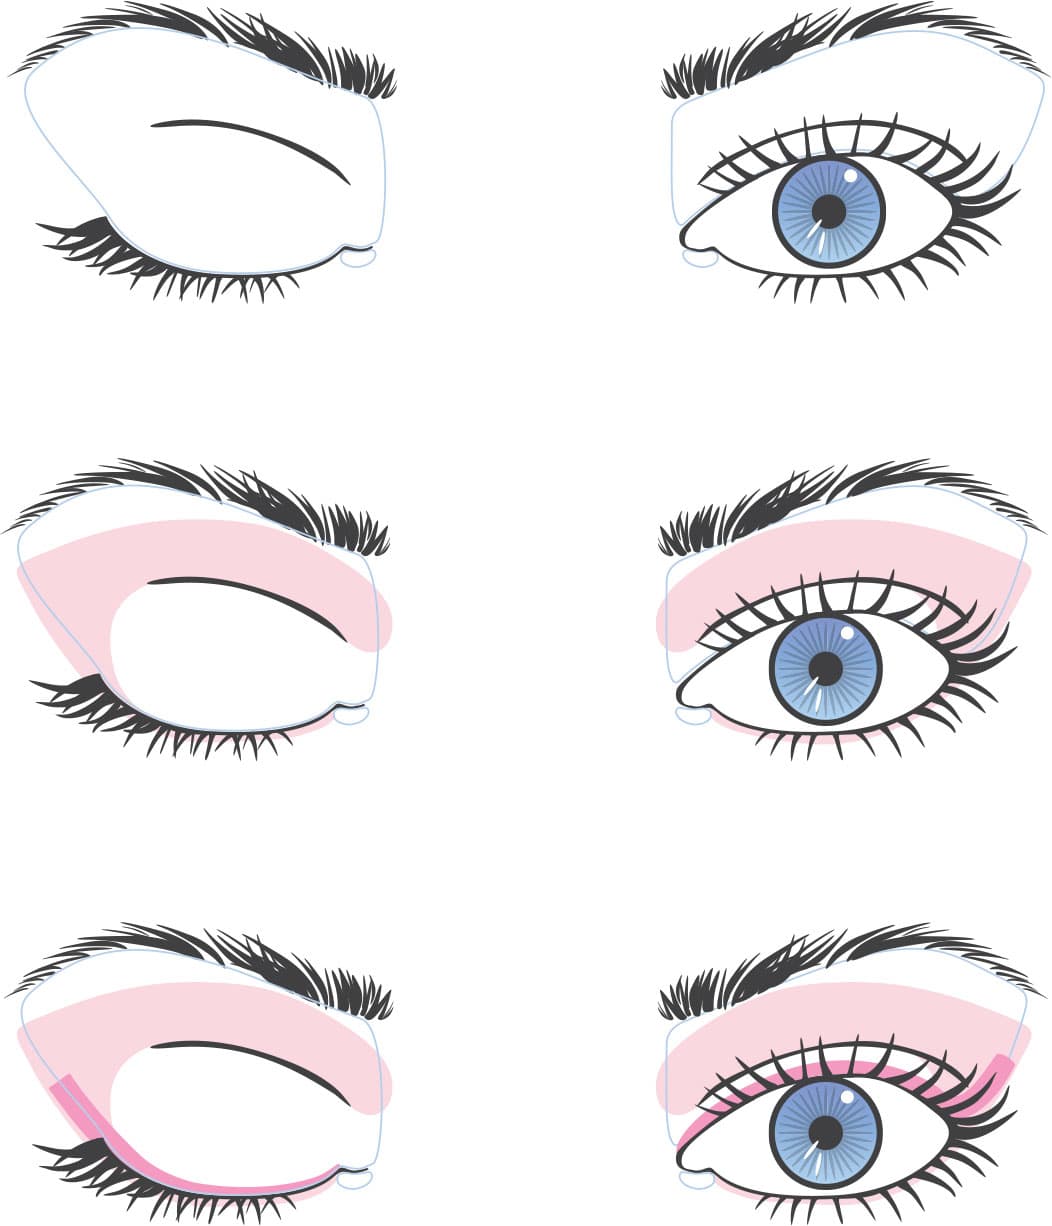
As with any new artistic endeavor, once you understand the basics, you’ll have the building blocks for creating any and every advanced look. Keep in mind that the impressive effects in this chapter are simply applications of basic techniques that when combined differently create something a bit more fabulous. Those tools include the most important basic components you need in creating every look, your three key eye shadows: highlight, midtone, and contour. They’re your tools for being creative.
I will also be sharing some tricks and tips that will make some of the harder techniques a little easier to conquer. Most of them are classic looks with a modern twist. You will also notice that I have chosen models for some of the looks that you might not expect to see typically associated with them. I did this purposefully because I don’t want you to limit who or what you think about when it comes to makeup. Be creative and explore!
how to apply false eyelashes

Nothing takes a basic look to full glamour like a pair of false eyelashes. They are more popular than ever before, and people are wearing them all the time, even for daytime. If you want to wear them, it’s important to know not only how to apply them, but how to make them look their most natural.
You have a lot choices when it comes to false eyelashes—everything from strips to individuals to flares. The most important thing to consider when it comes to strip false eyelashes is how dense they are. The denser the lash, the more likely it is to close the eye in. If you have a smaller eye, choose a lash that is wispier and more open at the base, so it helps open the eye up. If you have a larger eye, such as a prominent eye, you can pull off a denser lash because it will help close down your eye, which is your goal with your eye shape.
Next, we need to think about the band, and how it can help you achieve your end effect. If you want a more natural look, choose false eyelashes with an invisible band. If you’re going for a more dramatic look, choose a strip with a black band, which will make your eye looked lined when you are finished. Lastly, I also look for a lash that is varied in length all along the perimeter; the more jagged a lash is, the more natural it will look.
Be aware that you can change the shape of your eyes with your false eyelashes. If you use a strip lash that has longer lashes in the middle, it will make your eye look rounder. If you choose a strip lash that has longer lashes at the end of the strip, it will make your eye look more elongated. They’re a useful tool.
strip application
False eyelashes can seem intimidating, so here is an easy, foolproof way to apply strip false eyelashes. No matter what your makeup IQ is, this application technique will work for you and look natural:
1. Curl your natural eyelashes. If they grow straight out and down and you don’t curl them, the false lash will lie straight out and down. Apply a coat of mascara; this helps keep them curled and helps the false eyelashes blend with your natural eyelashes.
2. Lay a mirror on the counter in front of you and look down. You’ll be able to see everything you are about to do, and it is much more comfortable than holding your chin up so you can look into a wall mirror while everything dries.
3. Draw a thin line across your upper eyelid along your lash line with a black eyeliner pencil. This is where to place the lash and conceal the lash band. Even if you don’t get the false lash in place directly against your natural eyelashes, no one will know because the liner will ensure that no skin shows between your natural eyelashes and the false ones.

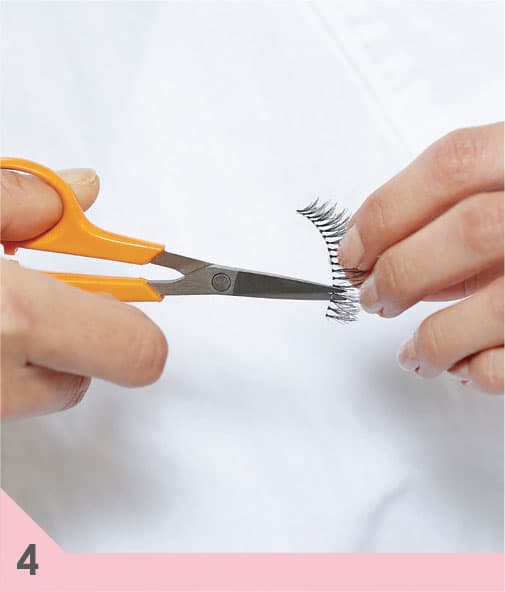
4. Trim the outside ends of your false eyelashes to fit the width of your eyelid. Usually, strip lashes, when used straight from their container, are too wide for most eyes. Trimming them will help them fit better and feel more comfortable. The narrower you trim them, the more comfortable and easier to apply they will be, so if you are a novice, start with narrower strips.
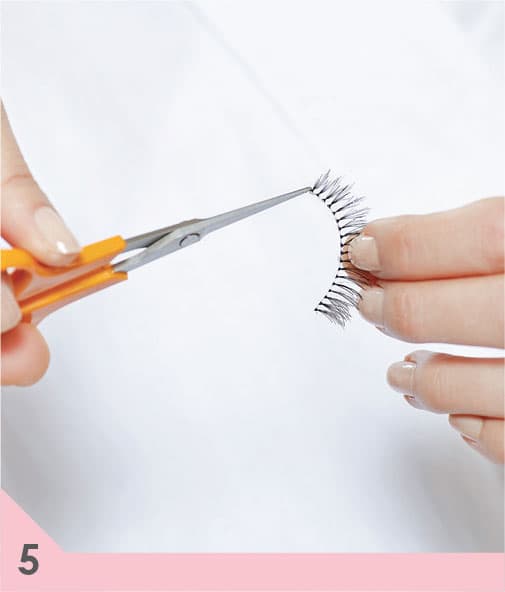
5. Nip the inside corners off. This will make the eyelashes more comfortable to wear. Sometimes that corner can feel like it is poking you.
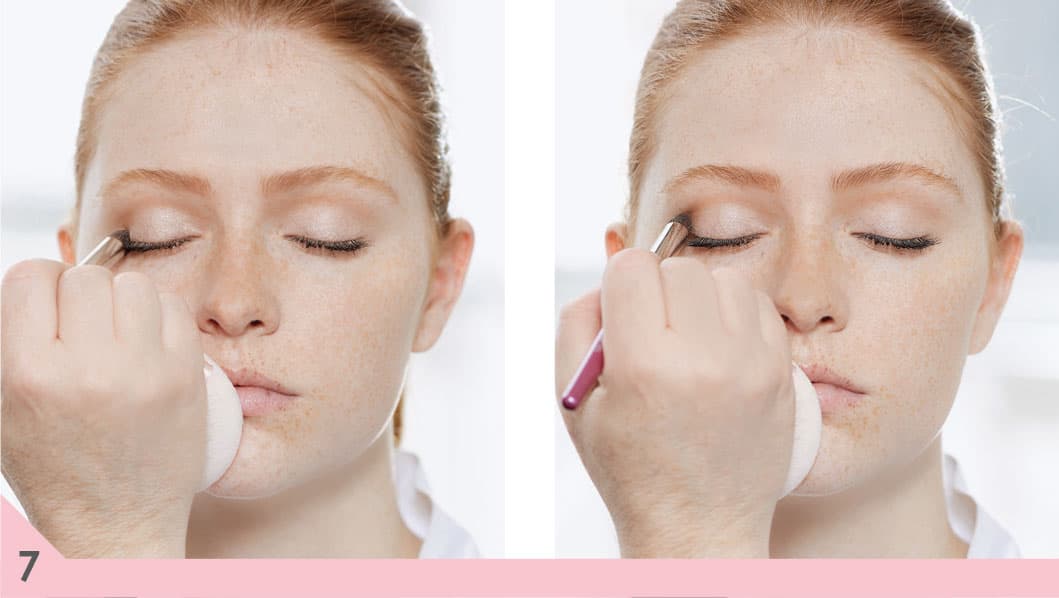
6. Using liquid or gel eyeliner, color the band of your lash if it is clear/invisible. Even though it says invisible, there will be a bit of a shine to it when you are finished; coloring it black will dull that shine and make it look more natural, and it will blend into the eyeliner that you applied earlier.

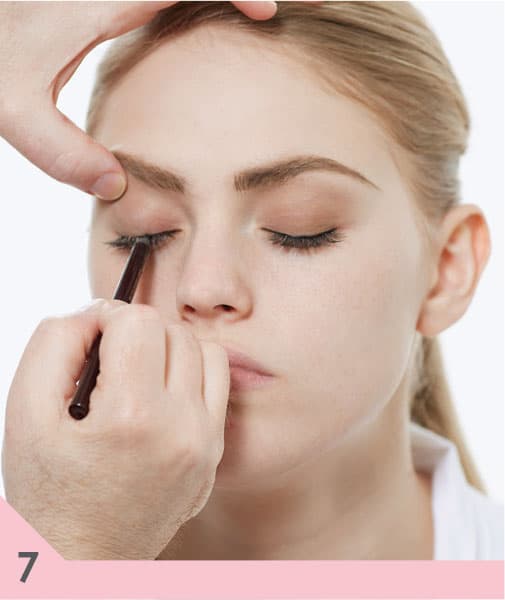
7. Apply eyelash glue to the false eyelashes all along the band. Allow the glue to dry for a minute so it gets tacky (slightly sticky). As it’s drying, roll the lash so it starts to round more and takes more to the shape of your lid.

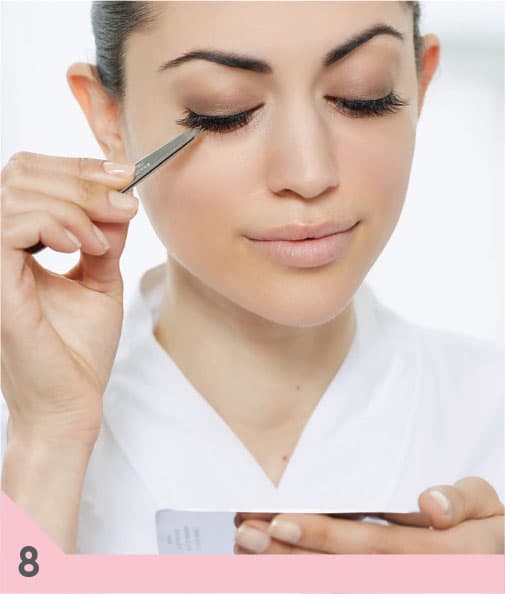
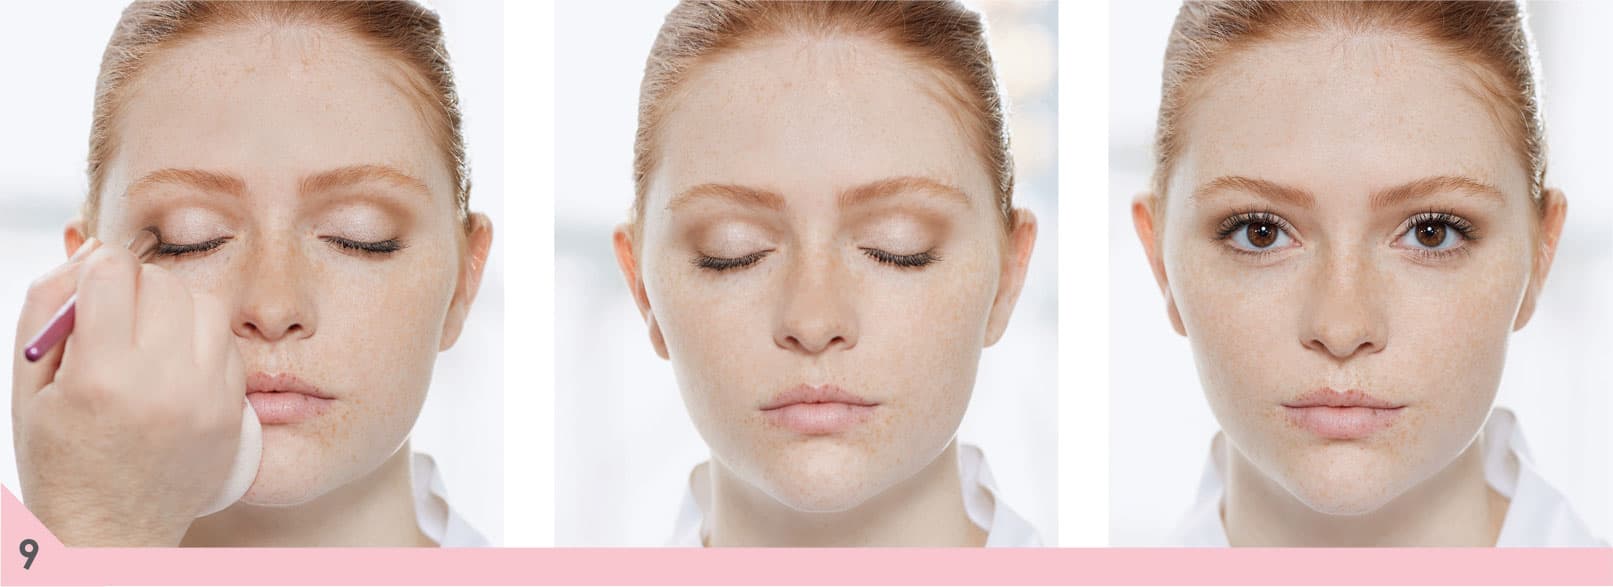
8. After you feel that the glue is tacky enough and the lash seems to have rounded, place it right on top of your eyeliner. Using the handle end of a pair of tweezers, push the lash right up against your natural lash line. Make sure to place it slightly in from the outside corner so it doesn’t drag the eye down.
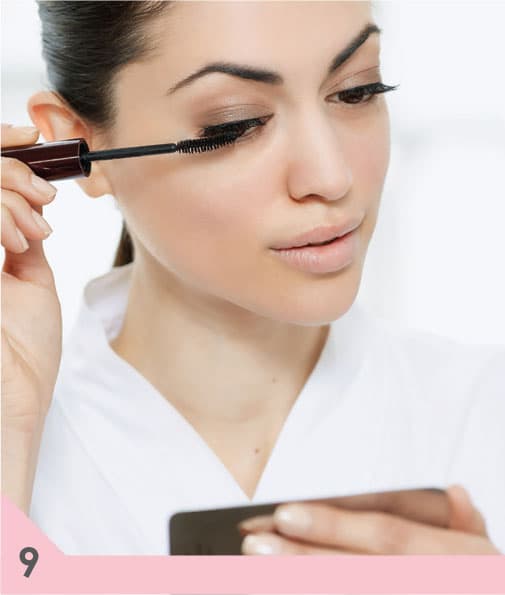
9. Once the glue has dried, apply a coat of mascara to blend your natural eyelashes with the false ones.
flare/strand application
Want to wear false eyelashes that look more natural than a strip? Individual flares and single strands will do just that while still demanding everyone’s attention. And they’re a breeze to apply:
1. Curl your natural eyelashes. If they grow straight out and down and you don’t curl them, your false eyelashes will lie straight out and down too.
2. Lay a mirror on the counter in front of you and look down. You’ll be able to see everything you are about to do, and it is much more comfortable than holding your chin up so you can look into a wall mirror while everything dries.
3. Apply a layer of mascara; it will give your natural eyelashes more bulk and make it easier to attach your false eyelashes.
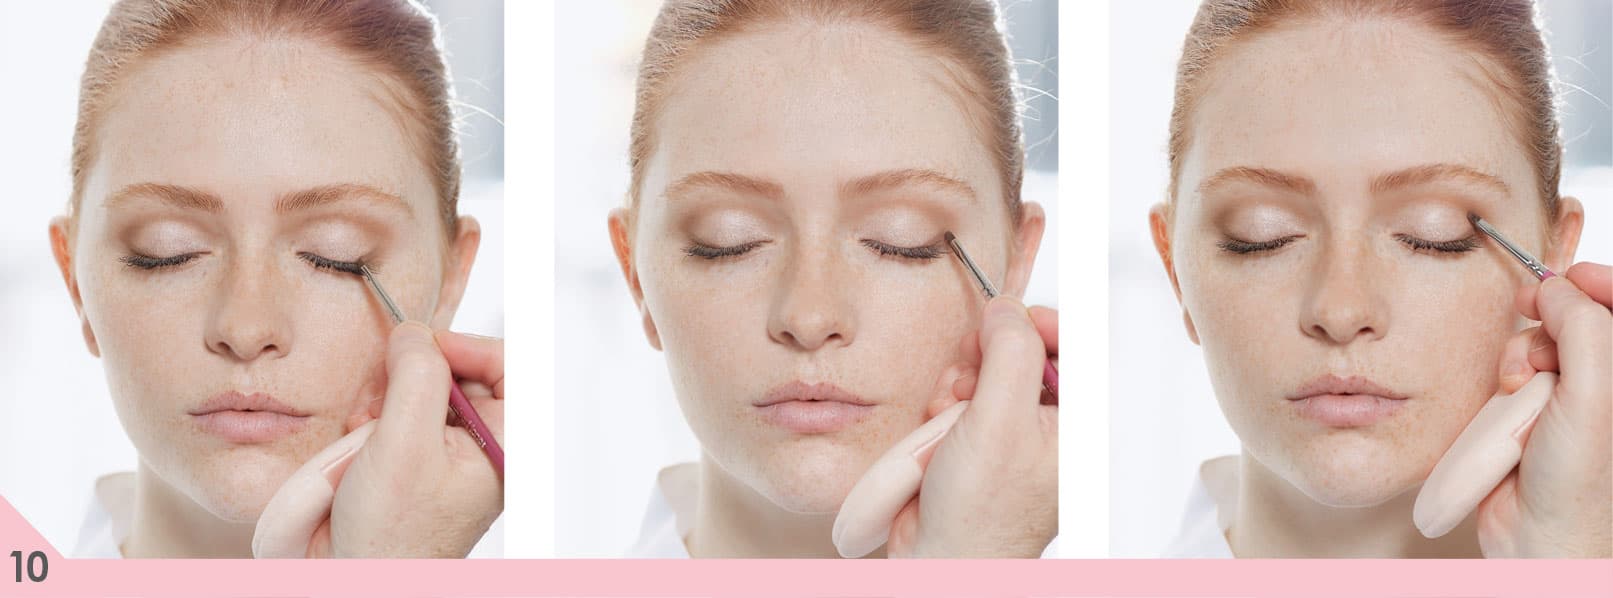
4. Squeeze a dot of lash adhesive onto the packaging from your eyelashes. This way, you can just dip your lash into the glue. Using a pair of tweezers, grab a flare or single strand. Now dip the root end into the adhesive.
5. Lay it right on top of one of your own eyelashes, with the root of the false lash as close as possible to your natural root. Continue all across your lash line, one flare or strand at a time.
6. After the adhesive has dried, apply a coat of mascara to blend everything together.
double false eyelashes
You can create even more drama with your strip eyelashes by doubling them up. I find they look most natural when you build them on the eye rather than building them before you apply them, mainly because they form to the eye better when you build them on the eye. If you build them prior to applying them, they won’t curve to the shape of your eye as well.
When applying the second lash on top of the first, make sure and set it slightly askew so the hairs fill in the gaps, creating a fuller look. You will need to cut the width a little shorter to allow you to do this. A double lash will create a denser lash, so makes sure your eye can take it.
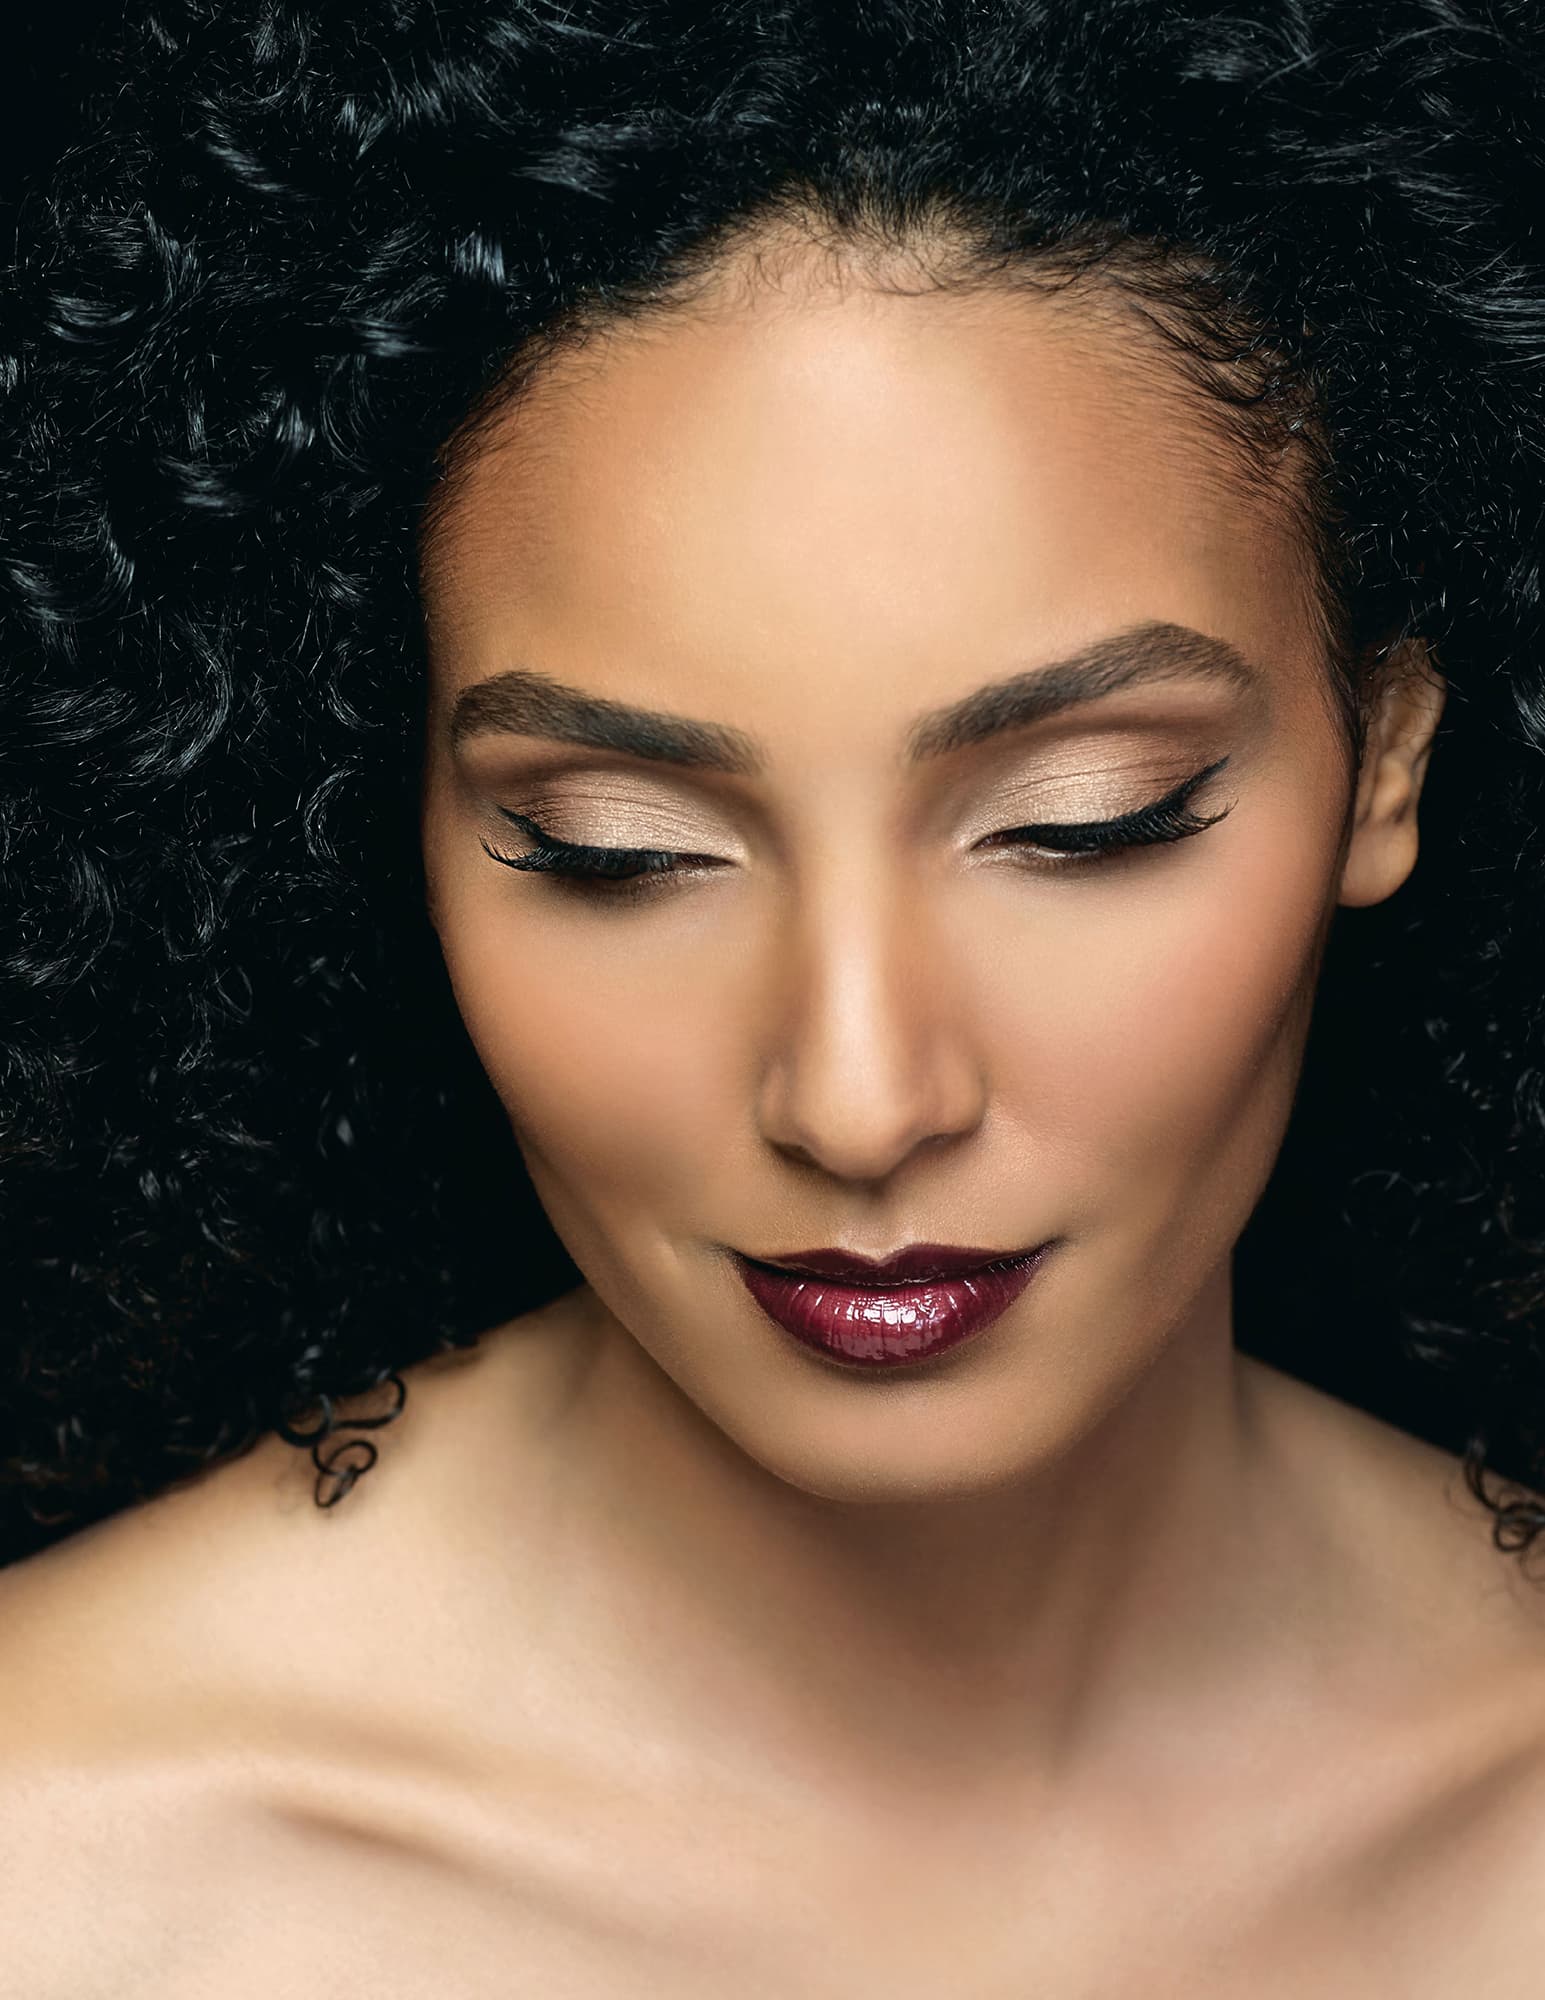
smoky eye
One of the most searched out makeup techniques is the smoky eye. Sexy and dramatic, it’s a go-to for evenings and special occasions. Done correctly, it can be stunningly gorgeous; done wrong, it can be your biggest fashion mistake. That is why it is so important to learn the most impactful way to apply it. Remember, smoky is a technique; it’s about the way it’s applied, not just black or super dark eye shadow. You can use any shade in a smoky application; it doesn’t have to be black eye shadow to make it a smoky eye. Let’s get started.
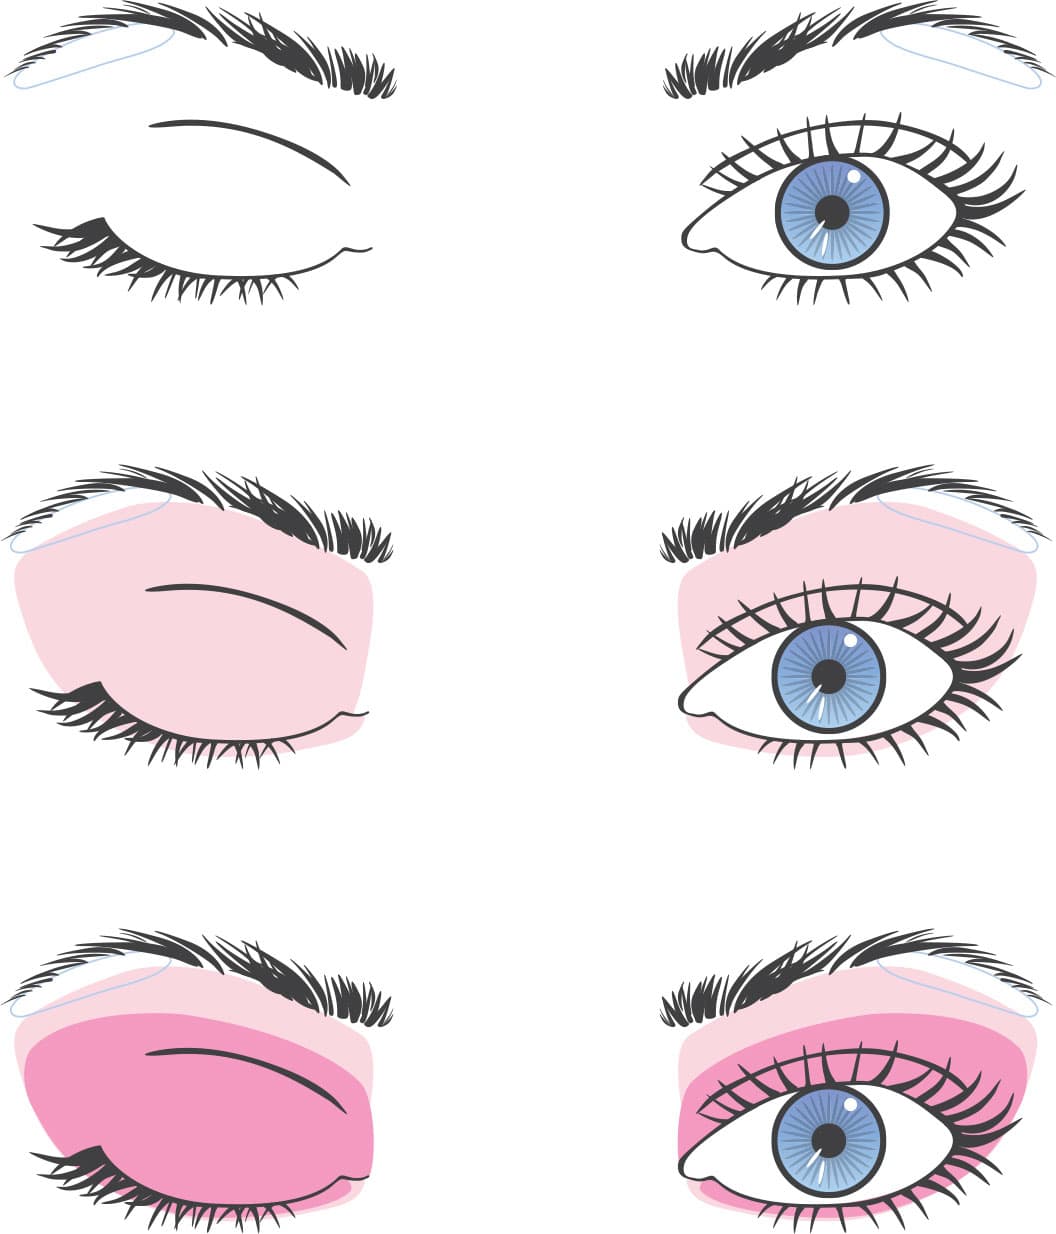
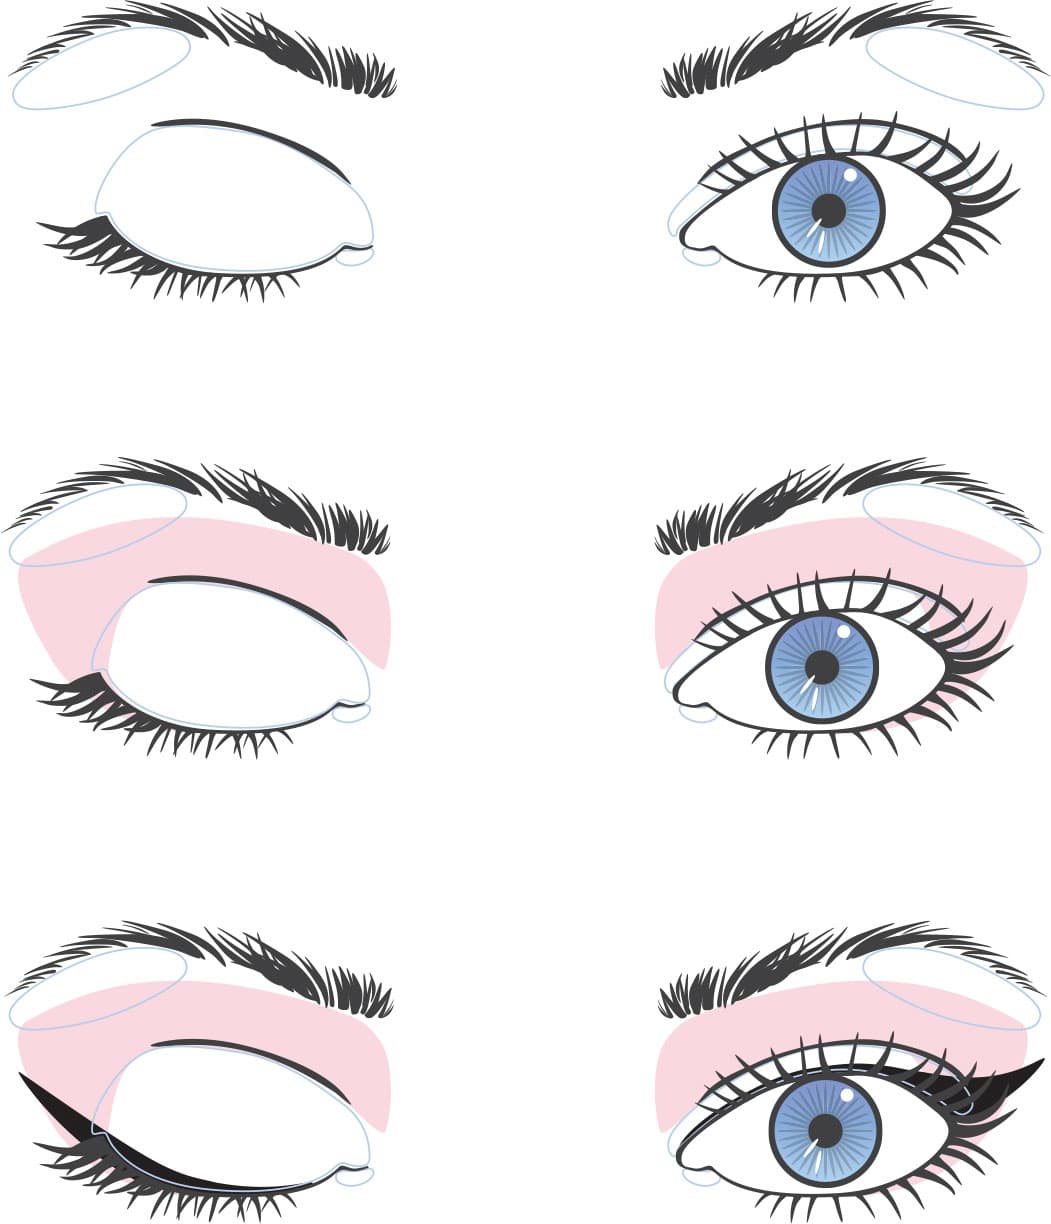
This diagram shows where to add your highlight, midtone, and contour shades.
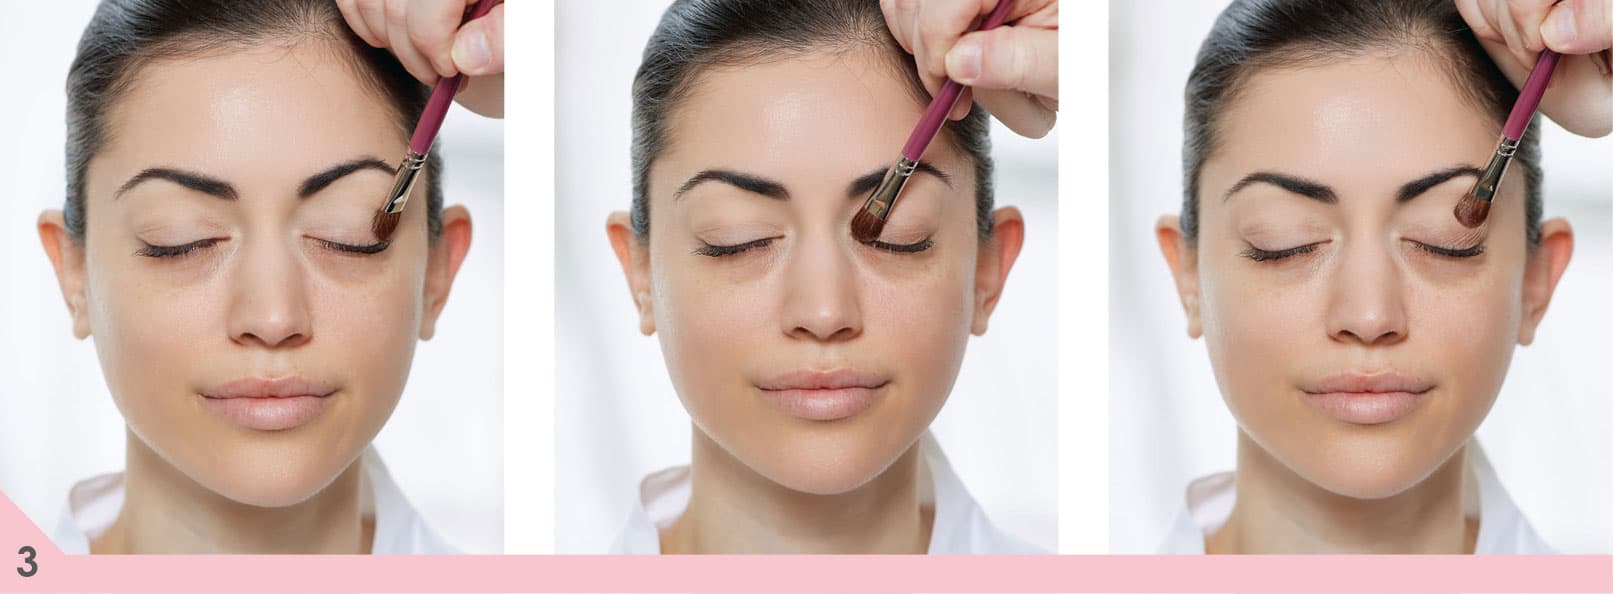
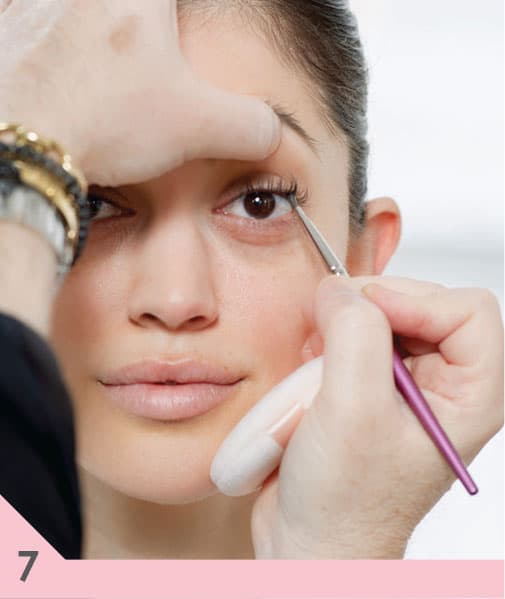
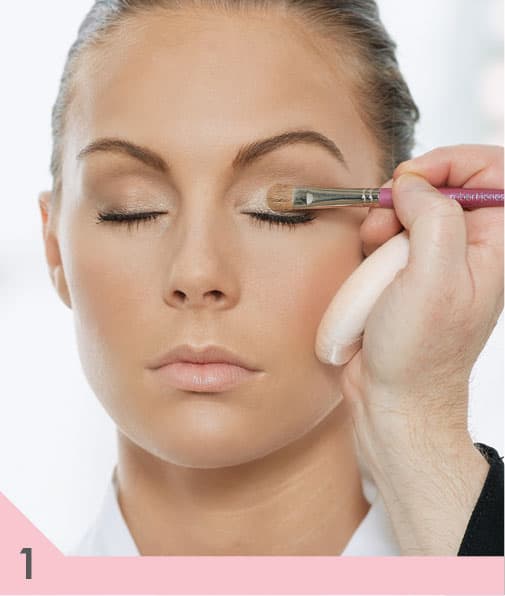
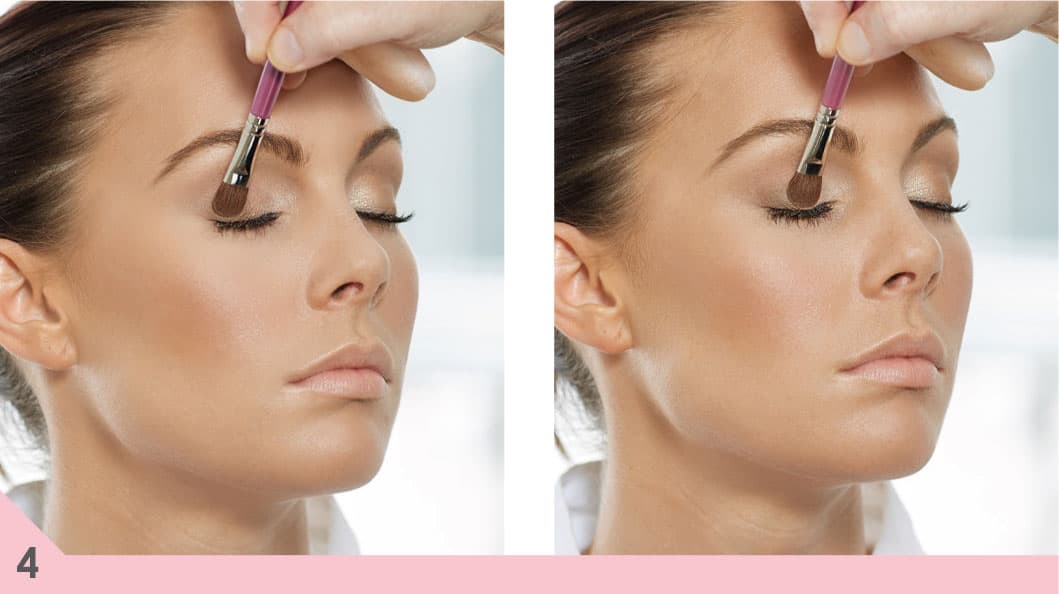
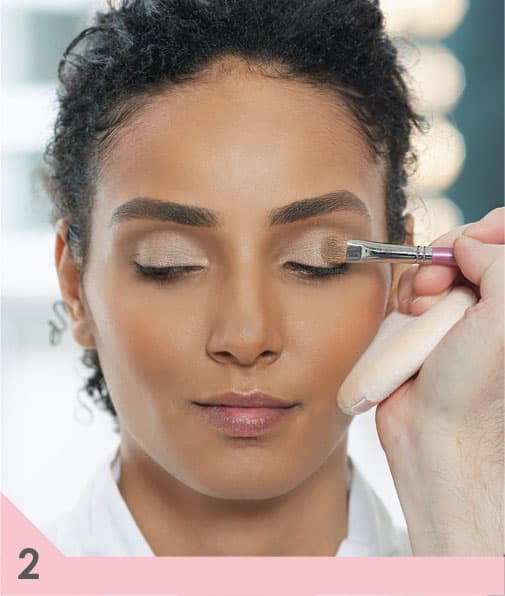
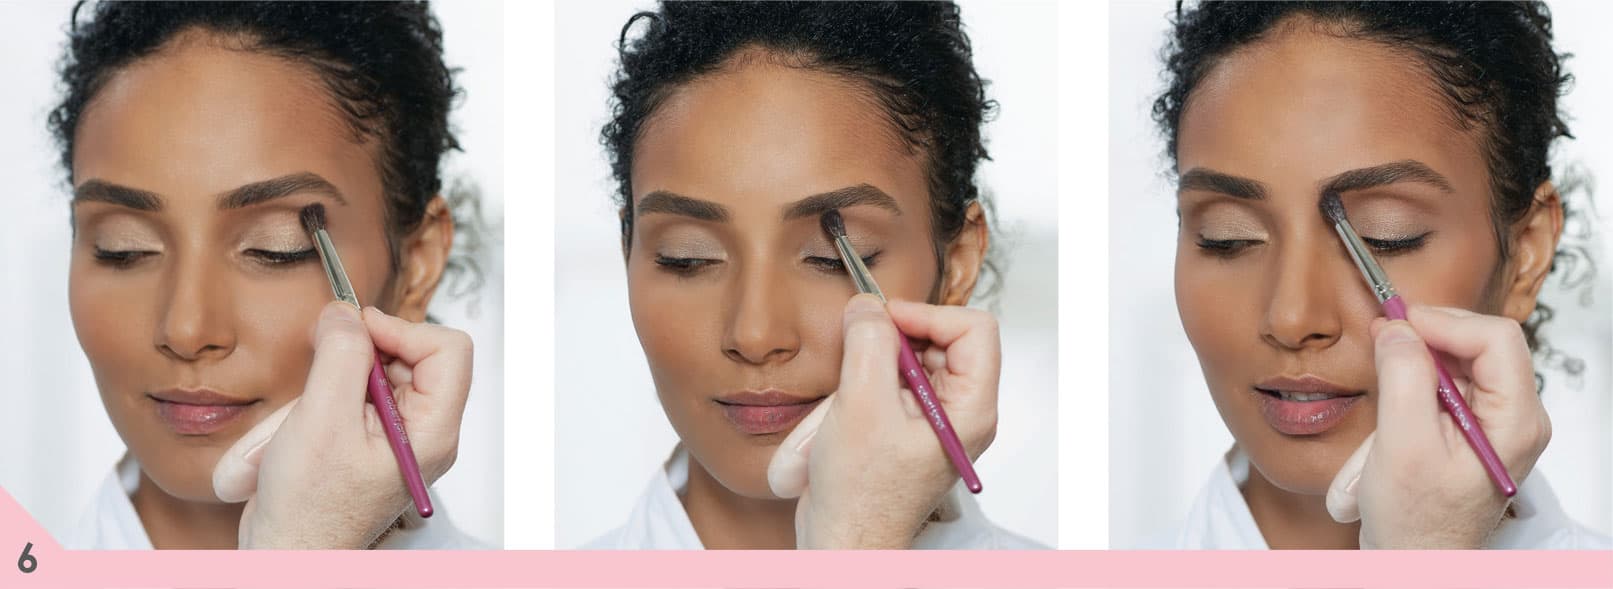
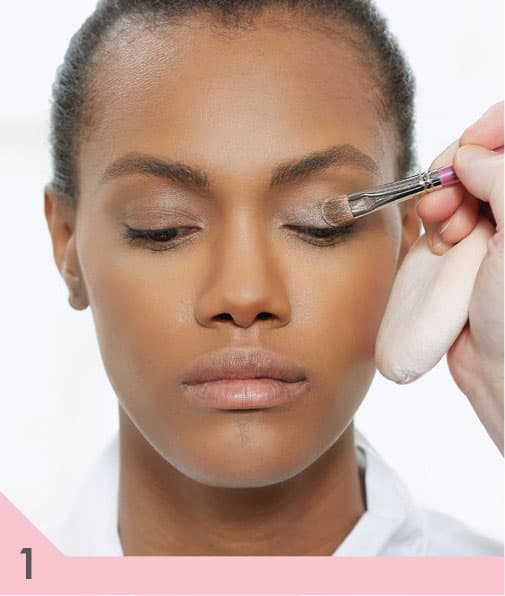
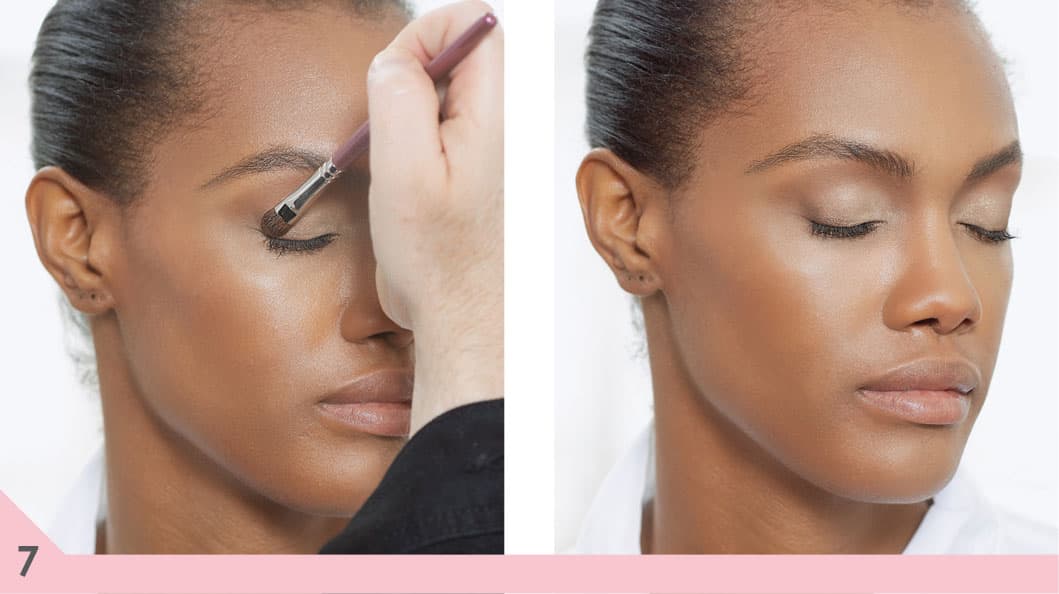
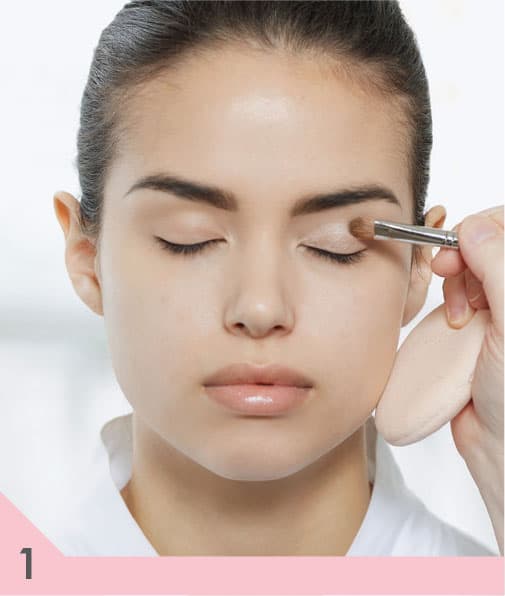
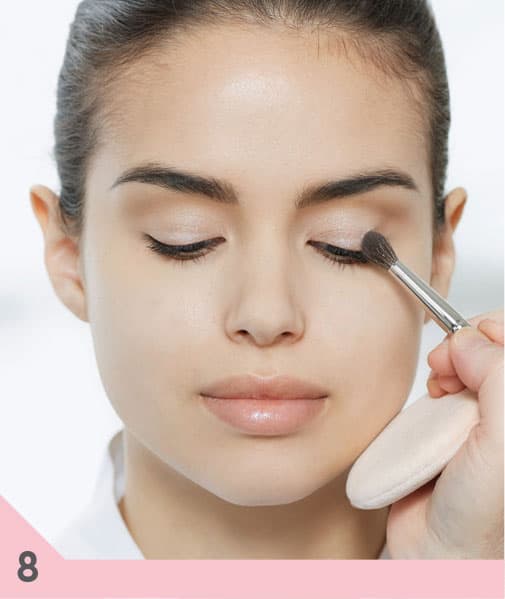
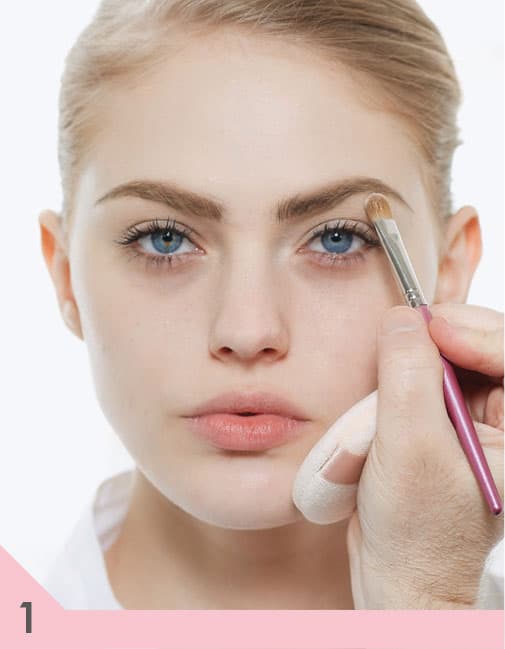
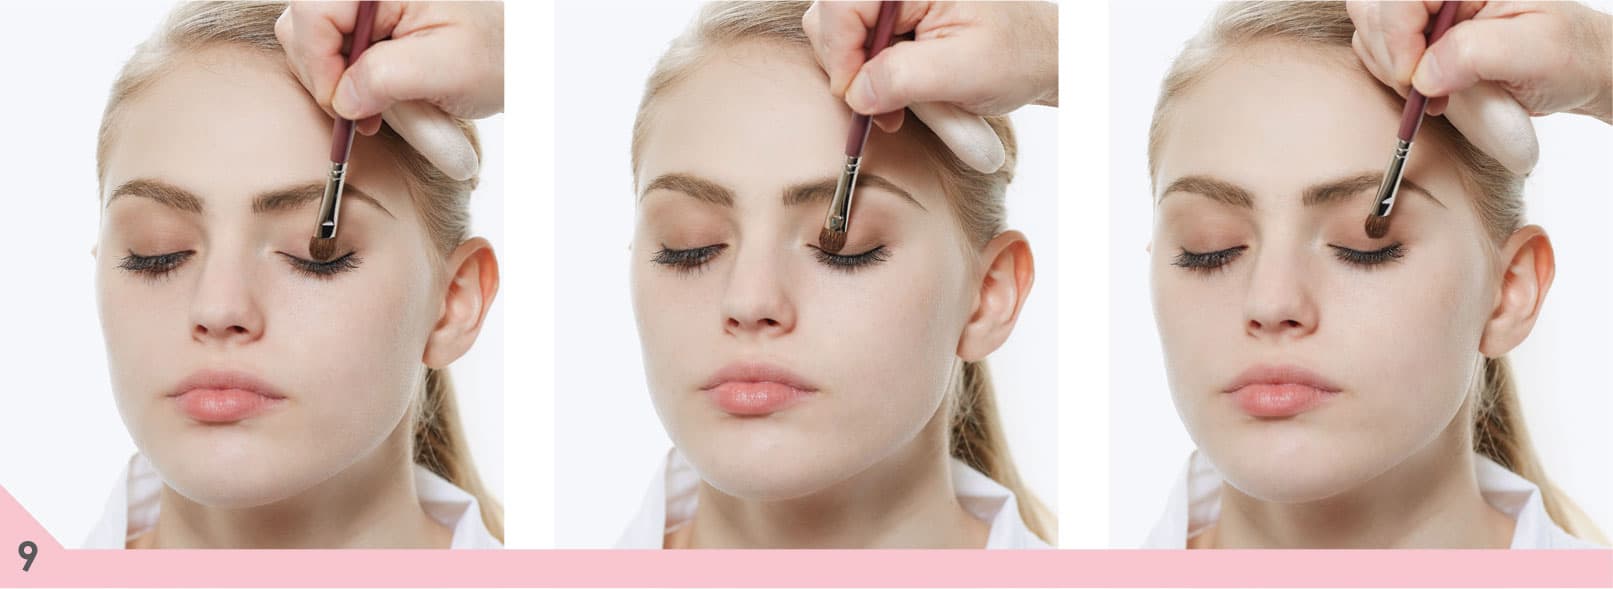
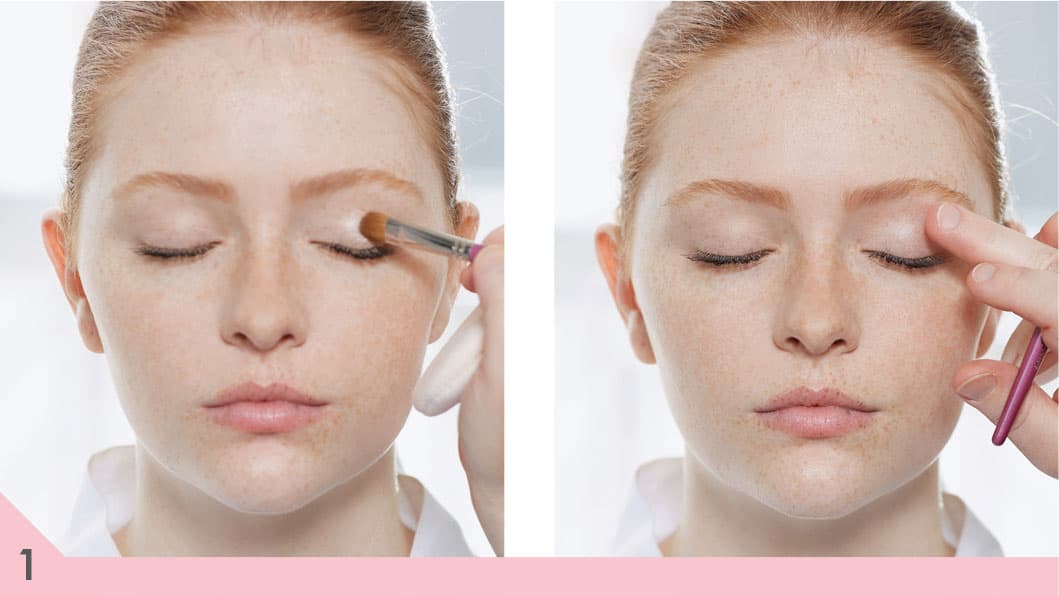
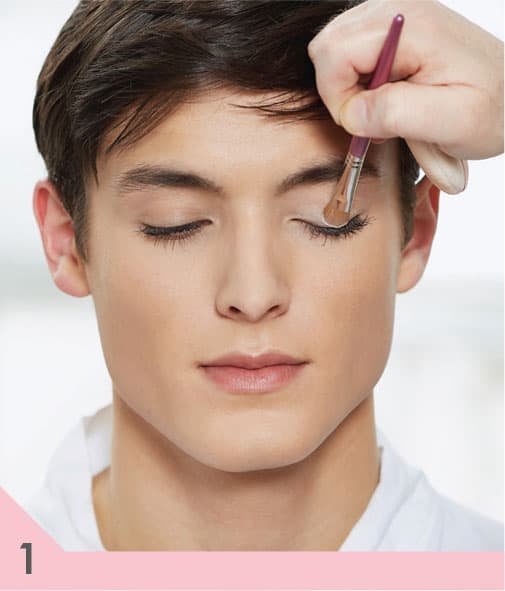
1. With a #22 highlight brush, apply a matte beige eye shadow to just your brow bone—just under the arch of your brow.

2. Curl your eyelashes and apply the first layer of mascara to your top lashes (see here).
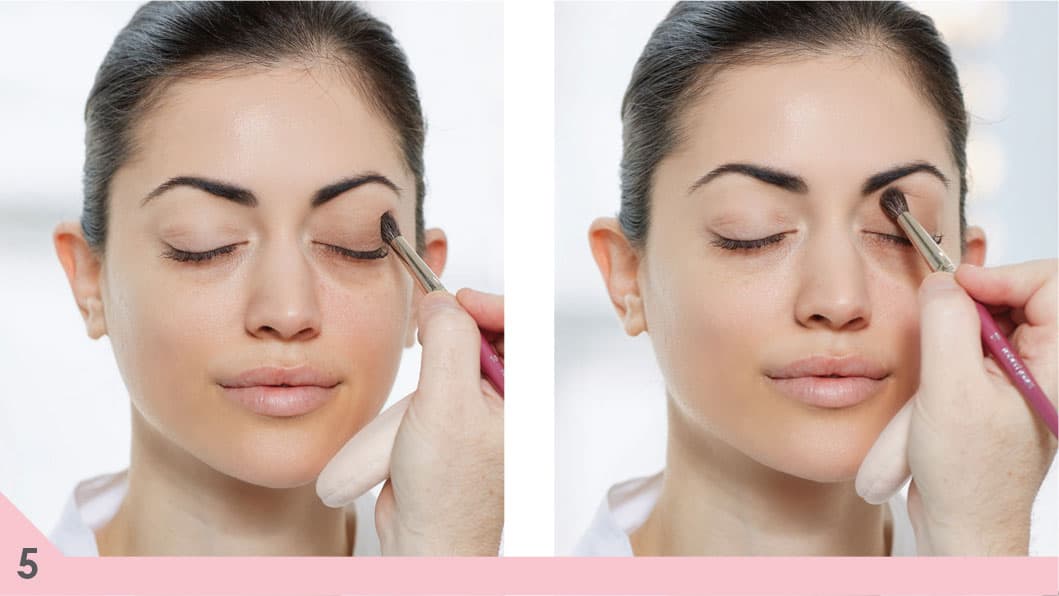
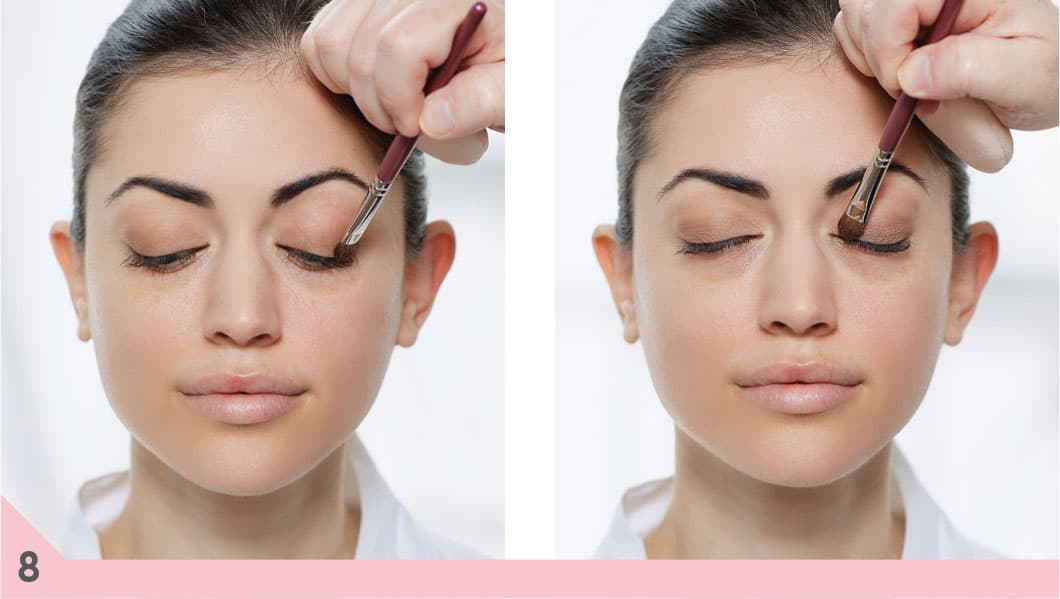
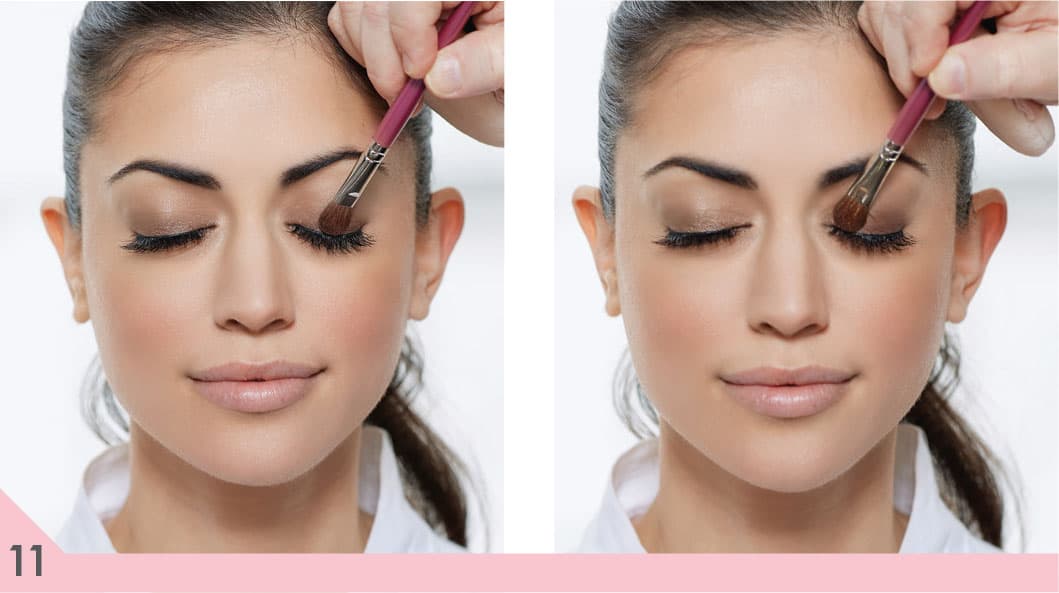
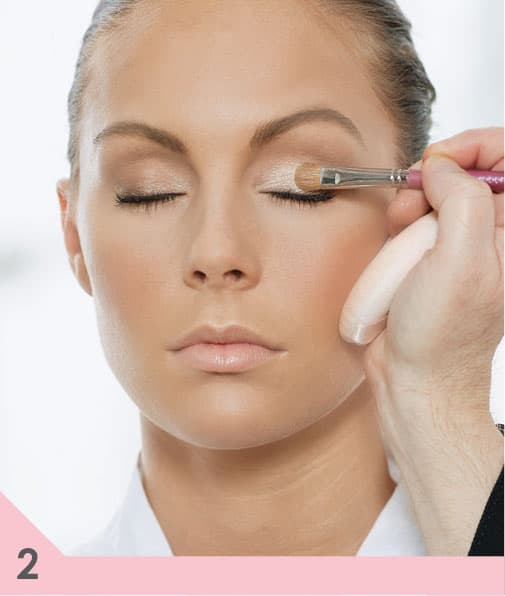
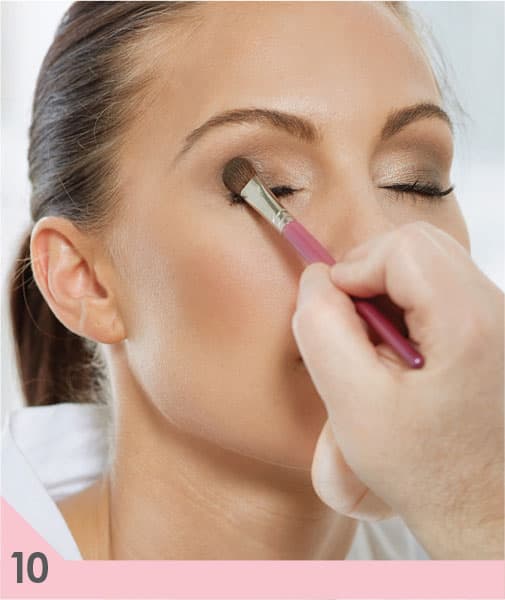
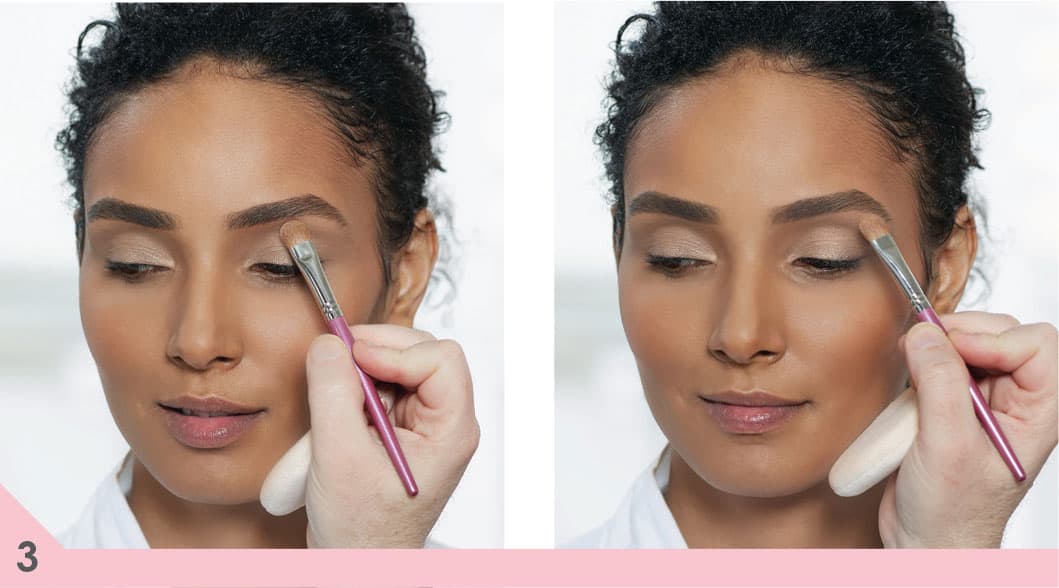
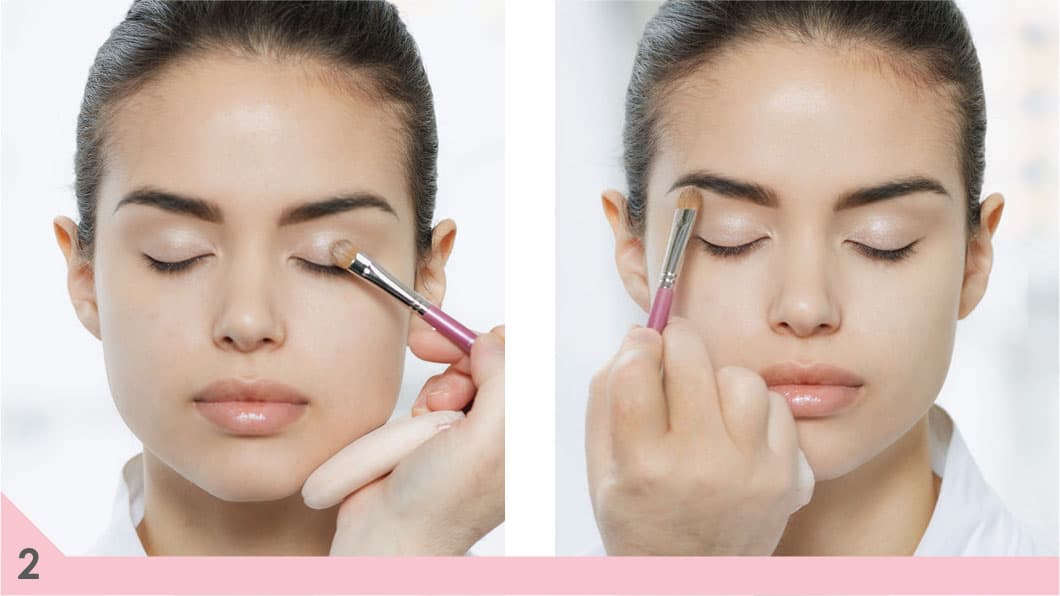
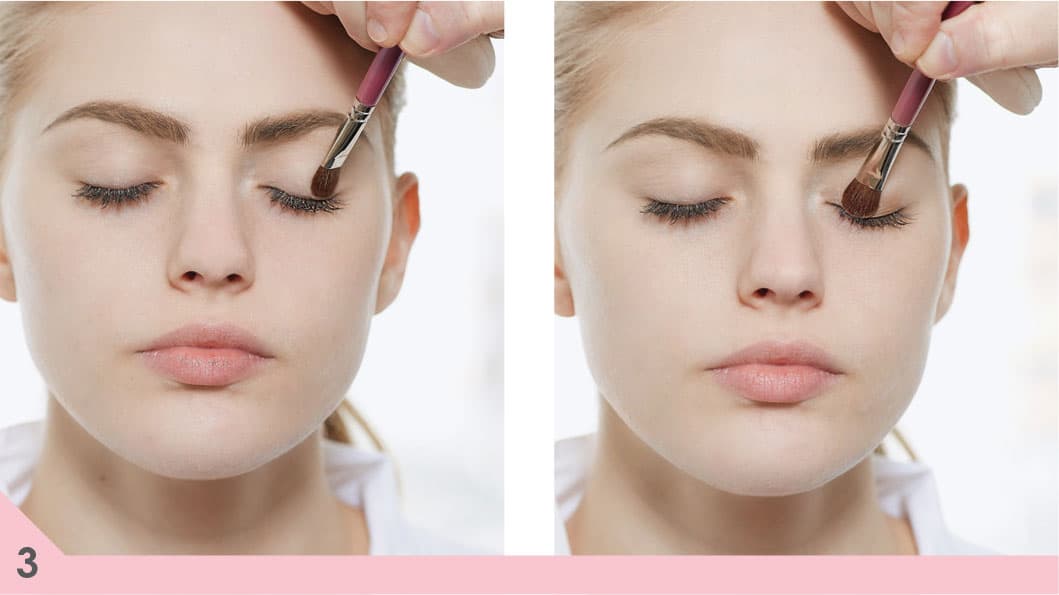
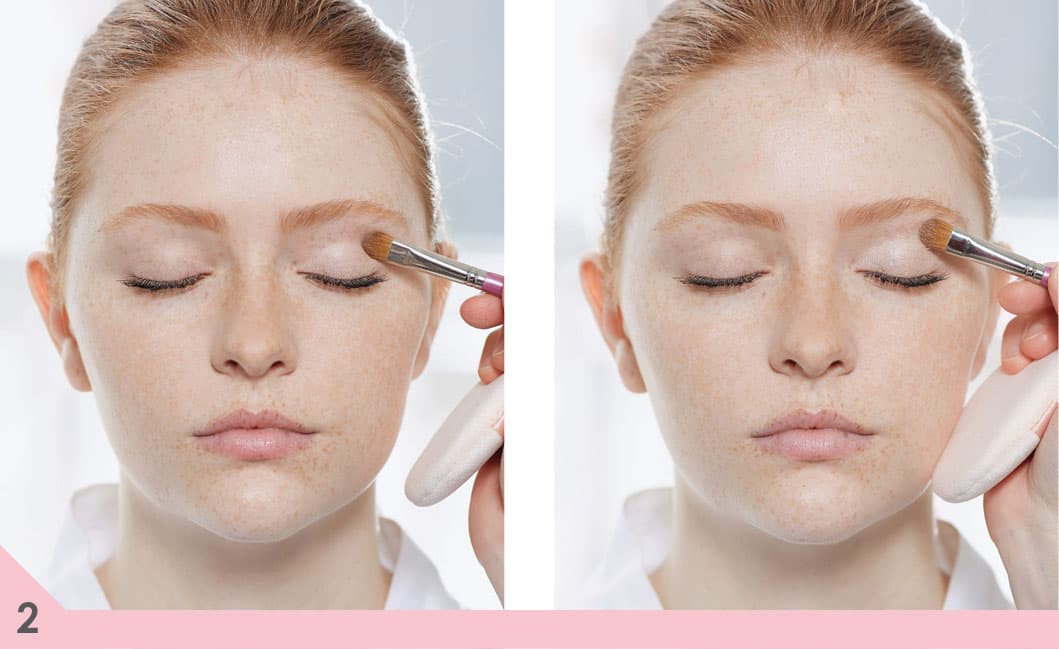
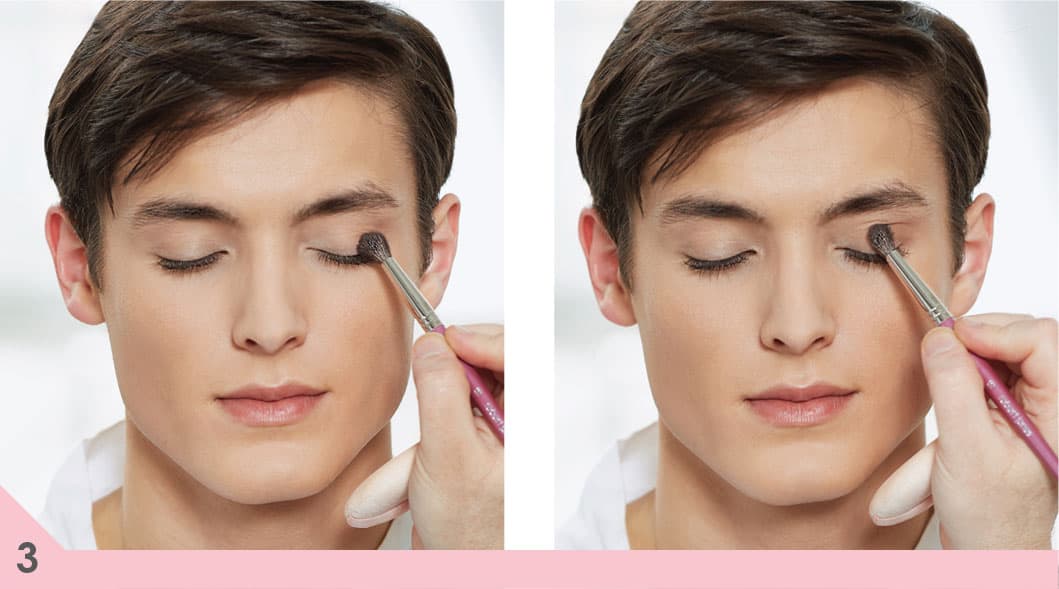
3. With a #27 eye shadow brush (because you will be applying your color to a large area), apply a matte taupe midtone eye shadow. Start at the base of your upper lash line and bring it across the lid, then up and over your entire lid, all the way up to just under your brow bone. By starting along your lash line and working your way upward, you will get the highest concentration of color where you laid your brush first, making your color deeper at the lash line.
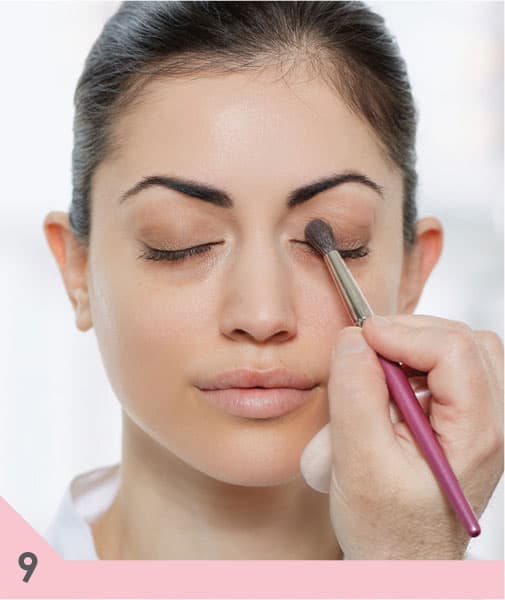
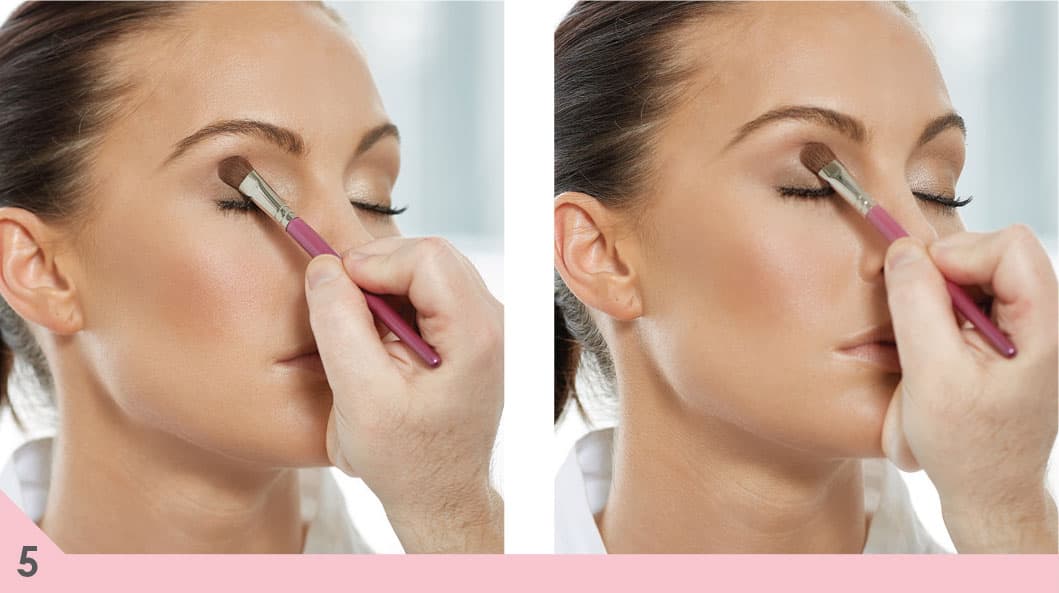
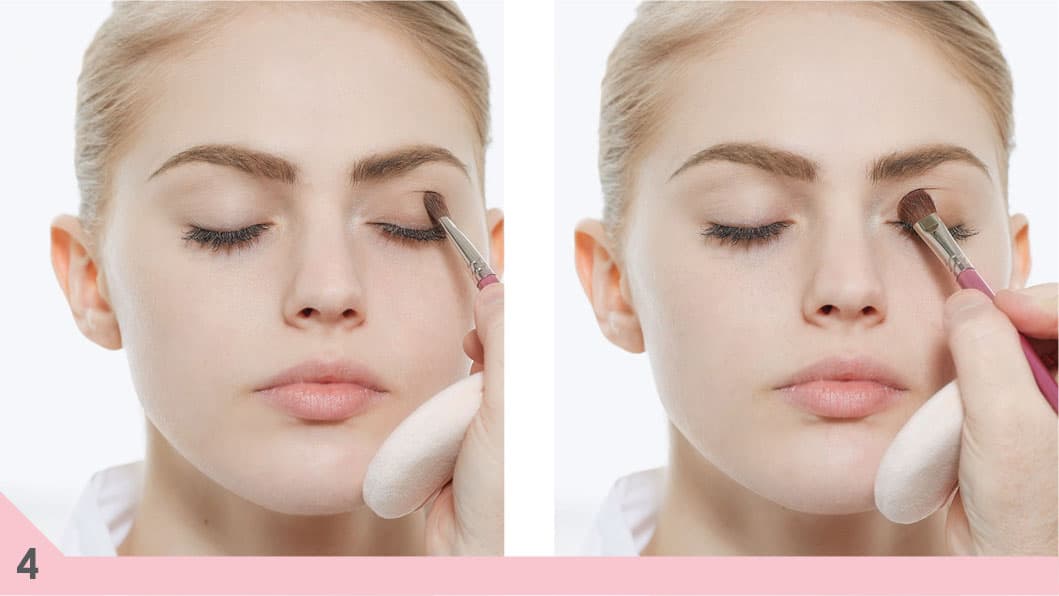
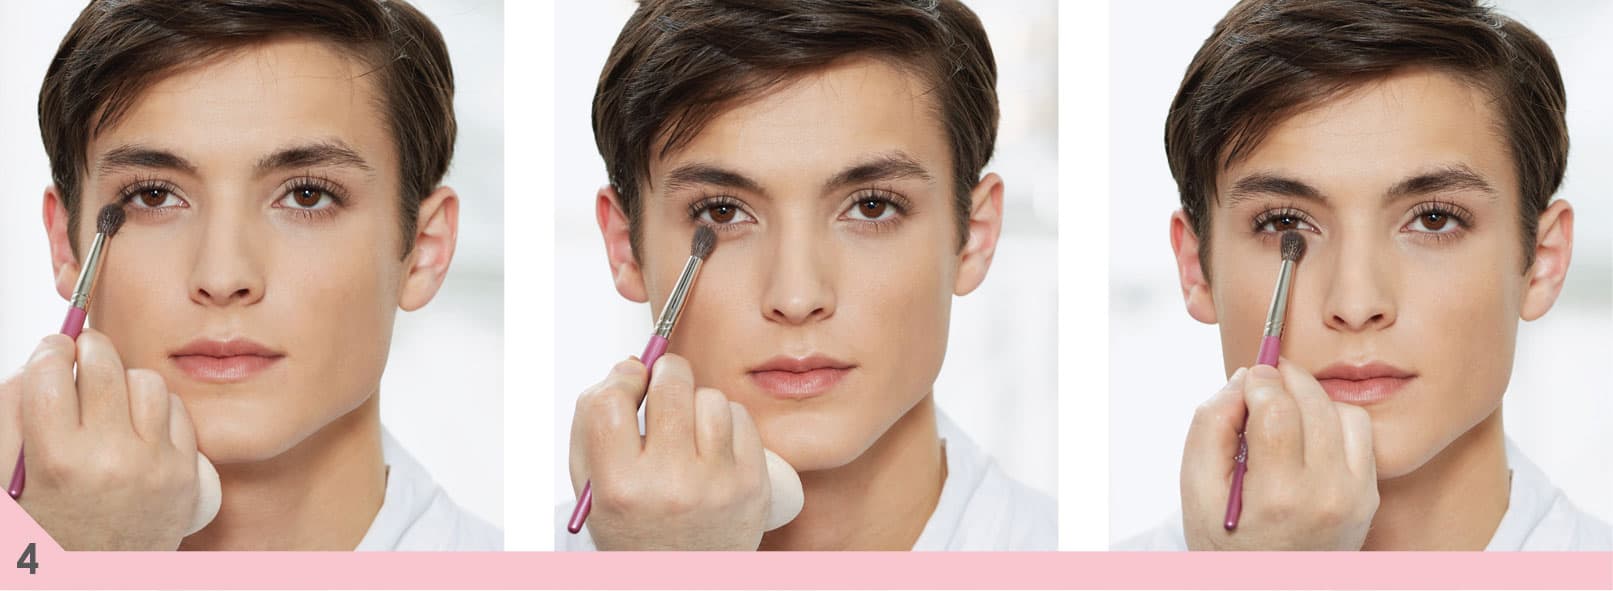
4. With the #27 brush, apply more midtone eye shadow in a half-moon shape all along the crease to create more definition.

5. Using a #16 blending brush (the one that is always clean and ready to blend with), blend your midtone so there are no hard edges.
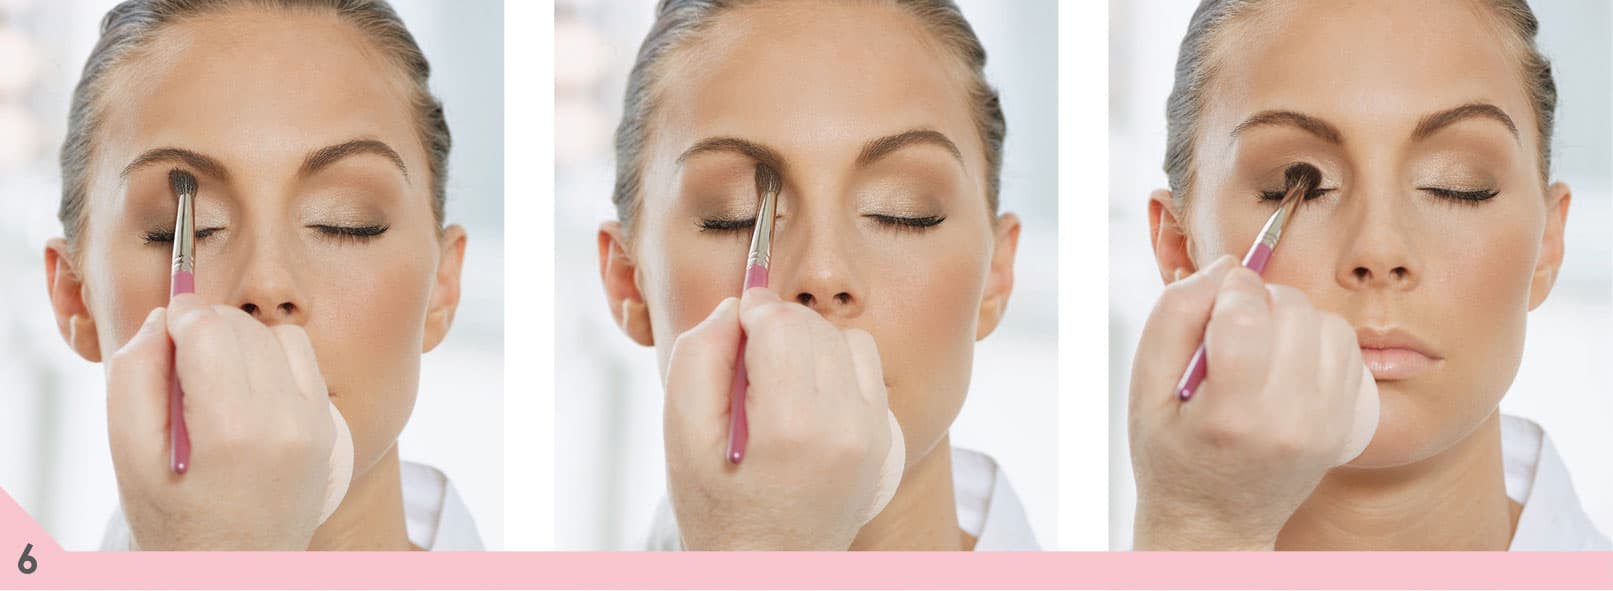
6. As you can see, we are starting to acheive a gradation of color with our midtone.
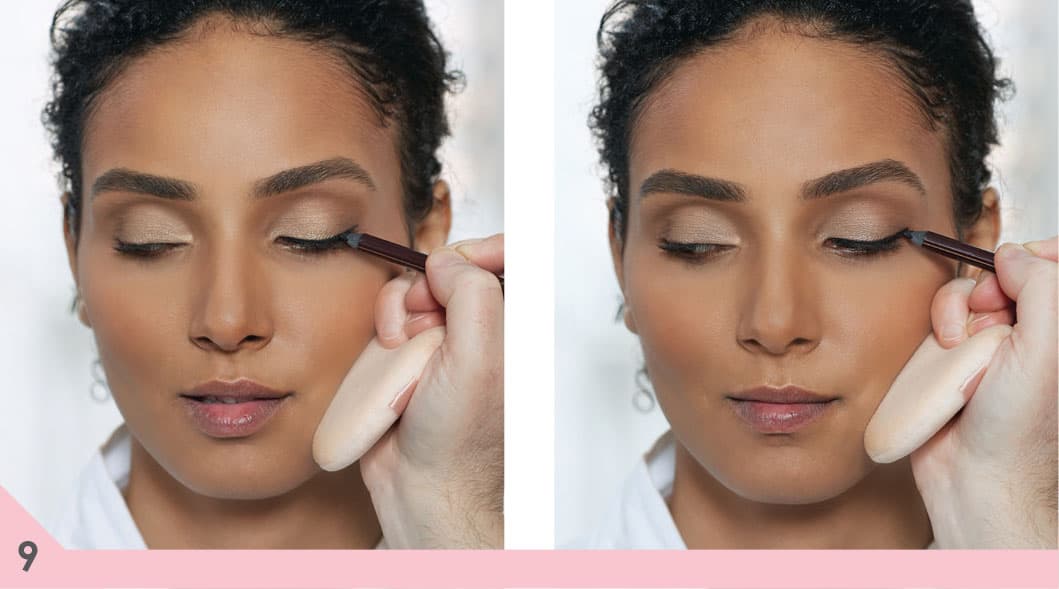
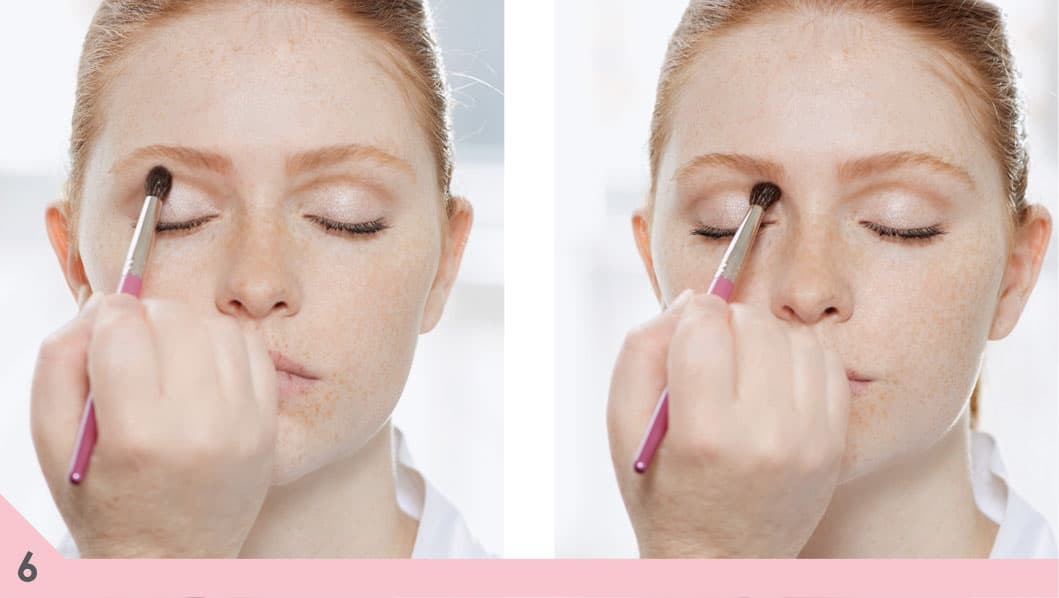
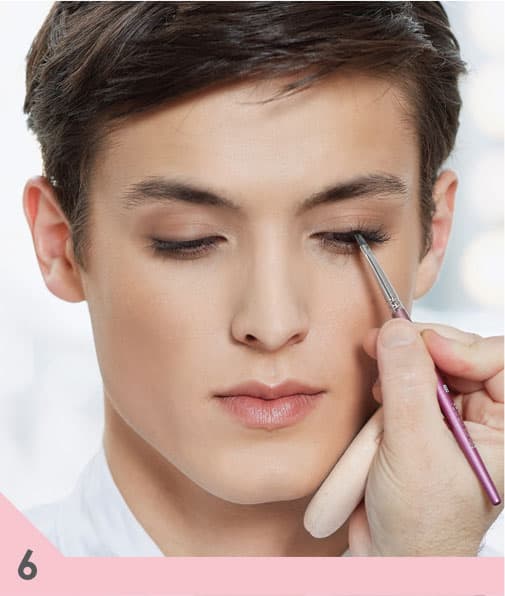
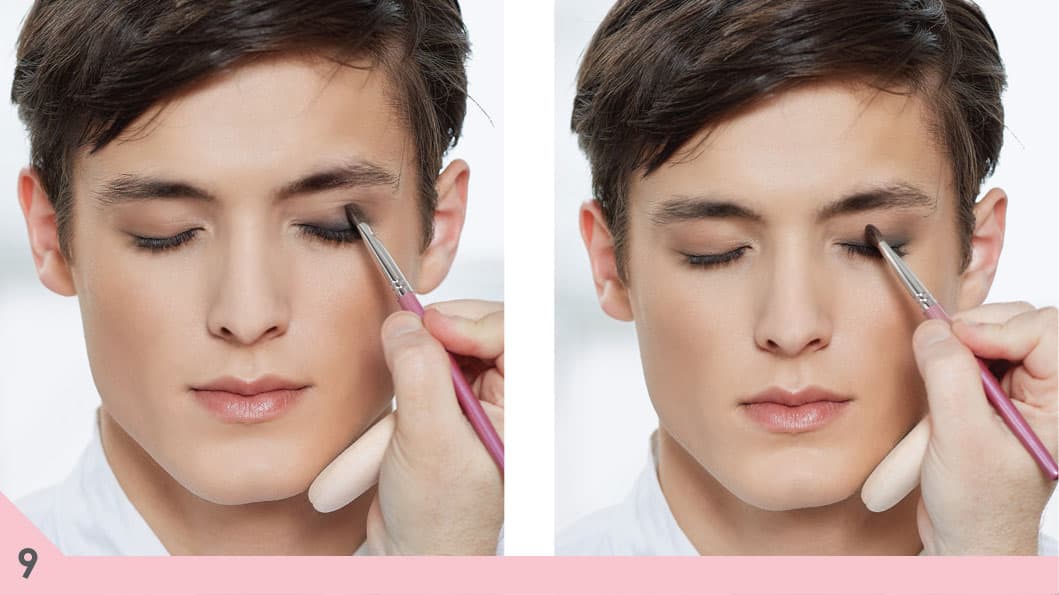
7. To start your lash line definition, use a #41 detail eyeliner brush to push matte black eye shadow into the base of your lash line.
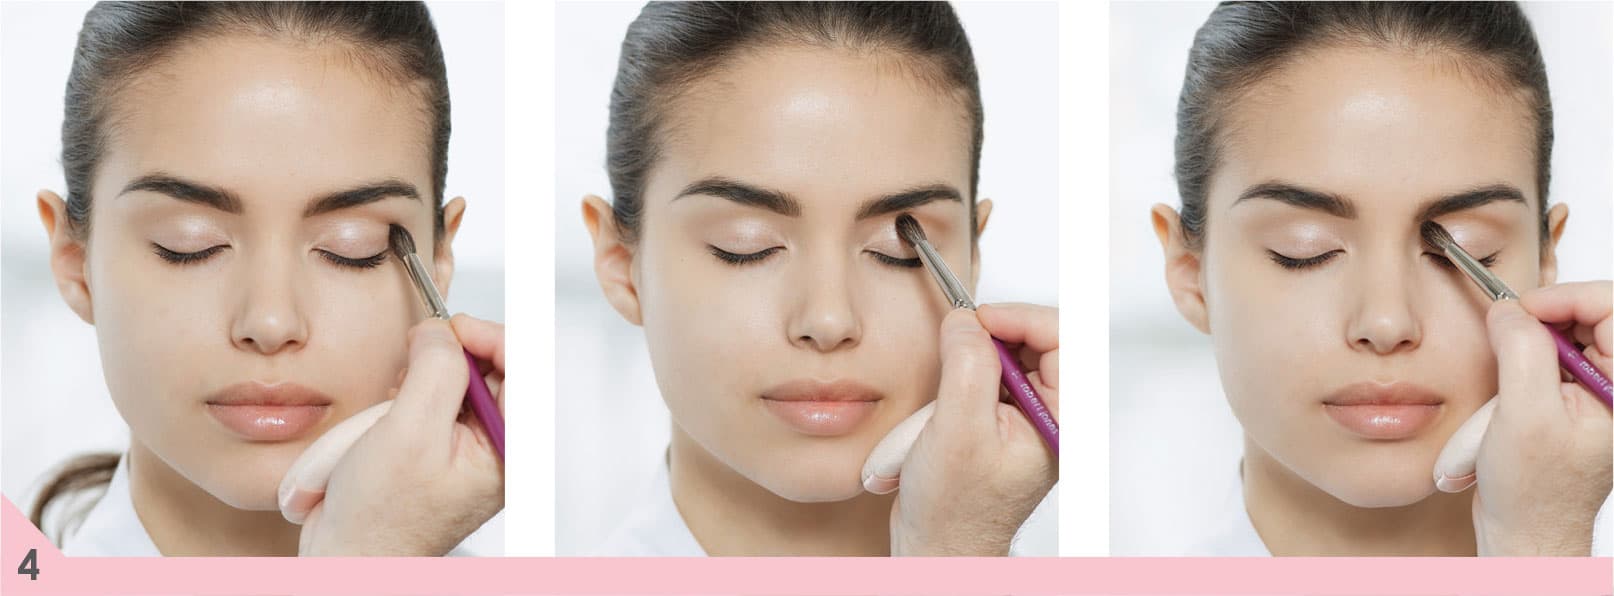
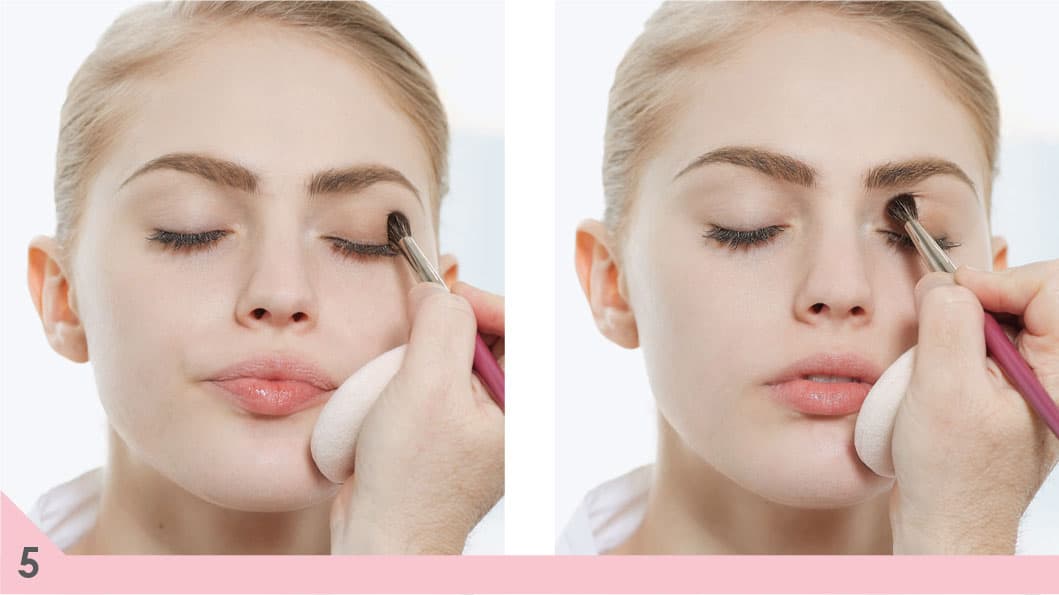
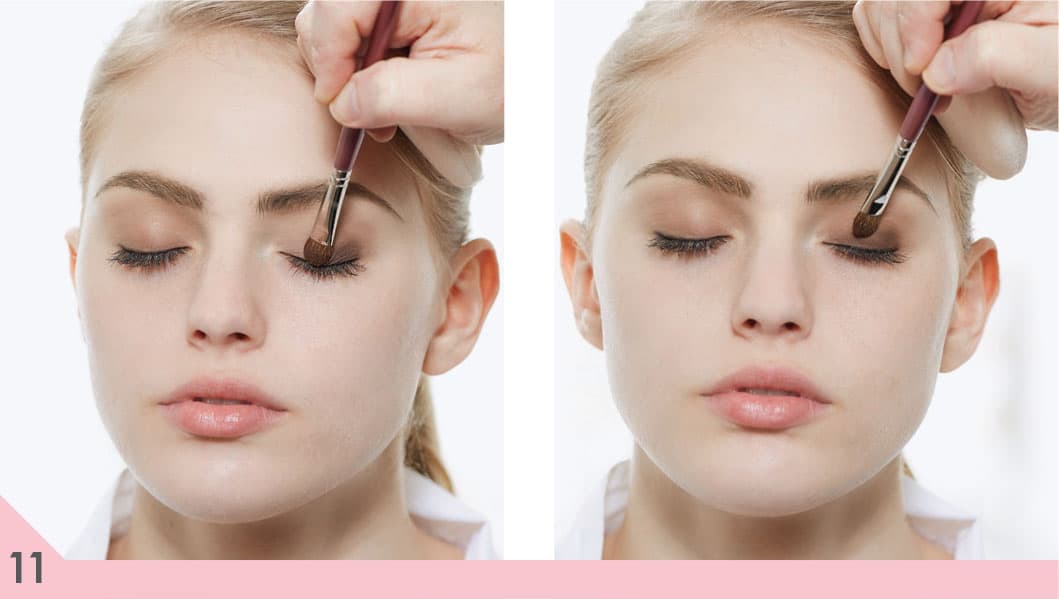
8. With a #30 contour brush and a dark shimmery brown eye shadow, start at the base of your lash line and bring your color up and over your entire lid, up to your crease. This gives you the most intense color right at your lash line.
9. Blend with the #16 blending brush.
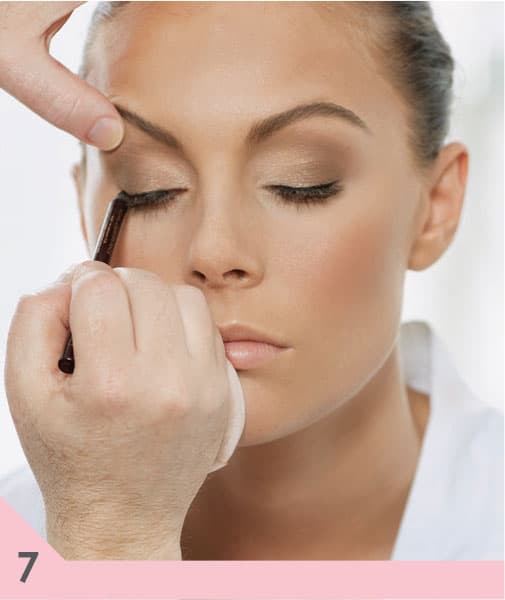
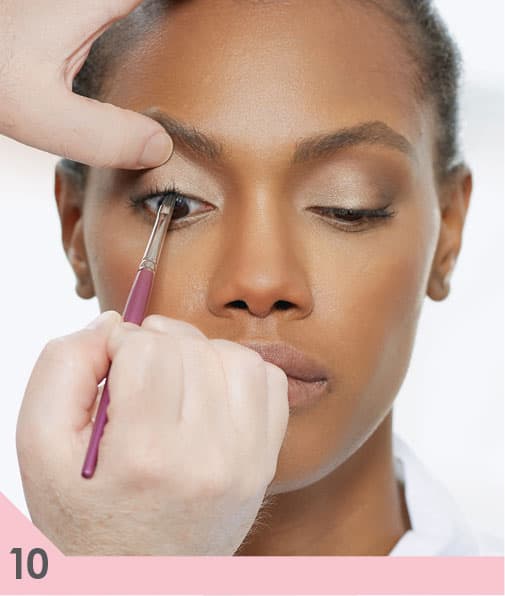
10. So you don’t over-define the eye, apply your false eyelashes now. Start by lining your eyes. To make it softer and look more smudged, use a #18 detail eyeliner brush and lay some matte black shadow all along your top lash line. As you apply it, pull up slightly with your brush to blend the line (see here).

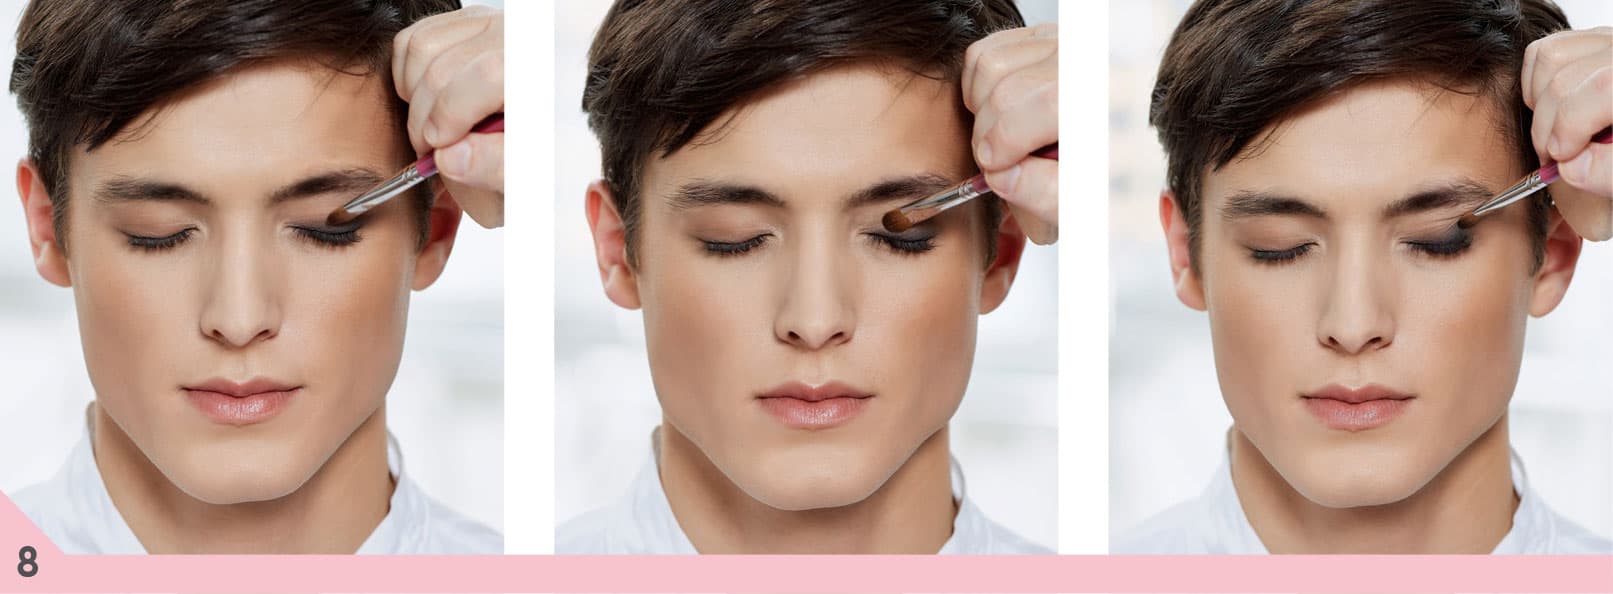
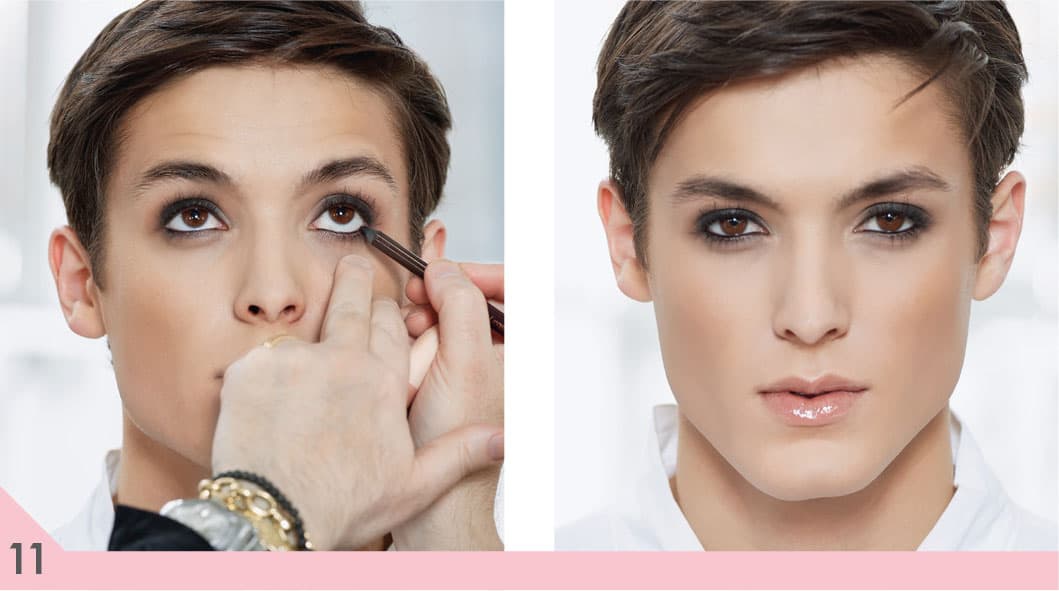
11. After the lash glue has dried, finish the shadow: With a #30 contour brush, apply another layer of dark shimmery brown eye shadow, starting at the base of your lash line and bringing it up over your entire lid, up to your crease, creating more depth at the lash line.
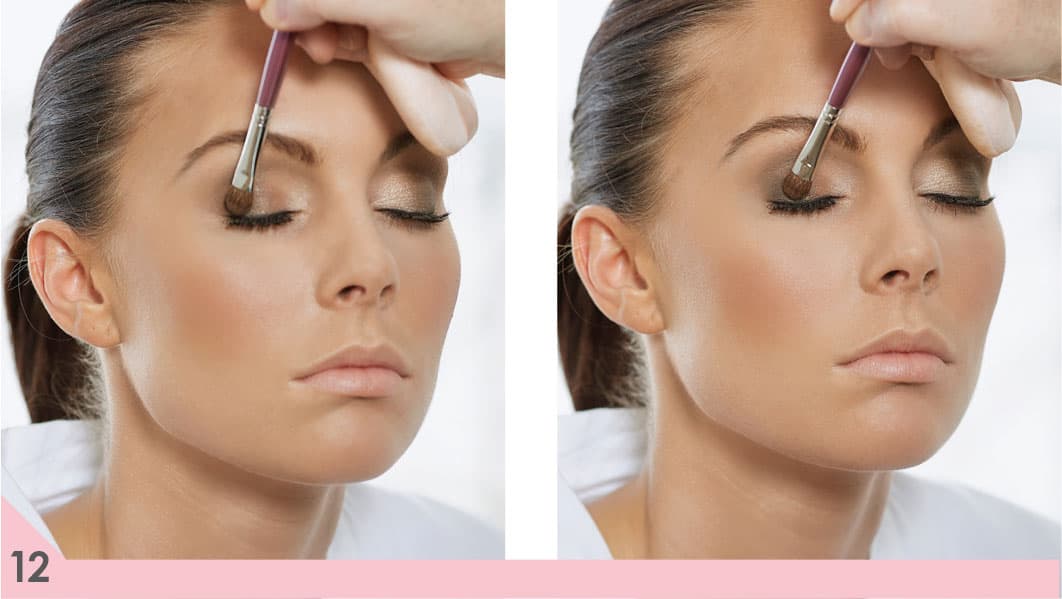
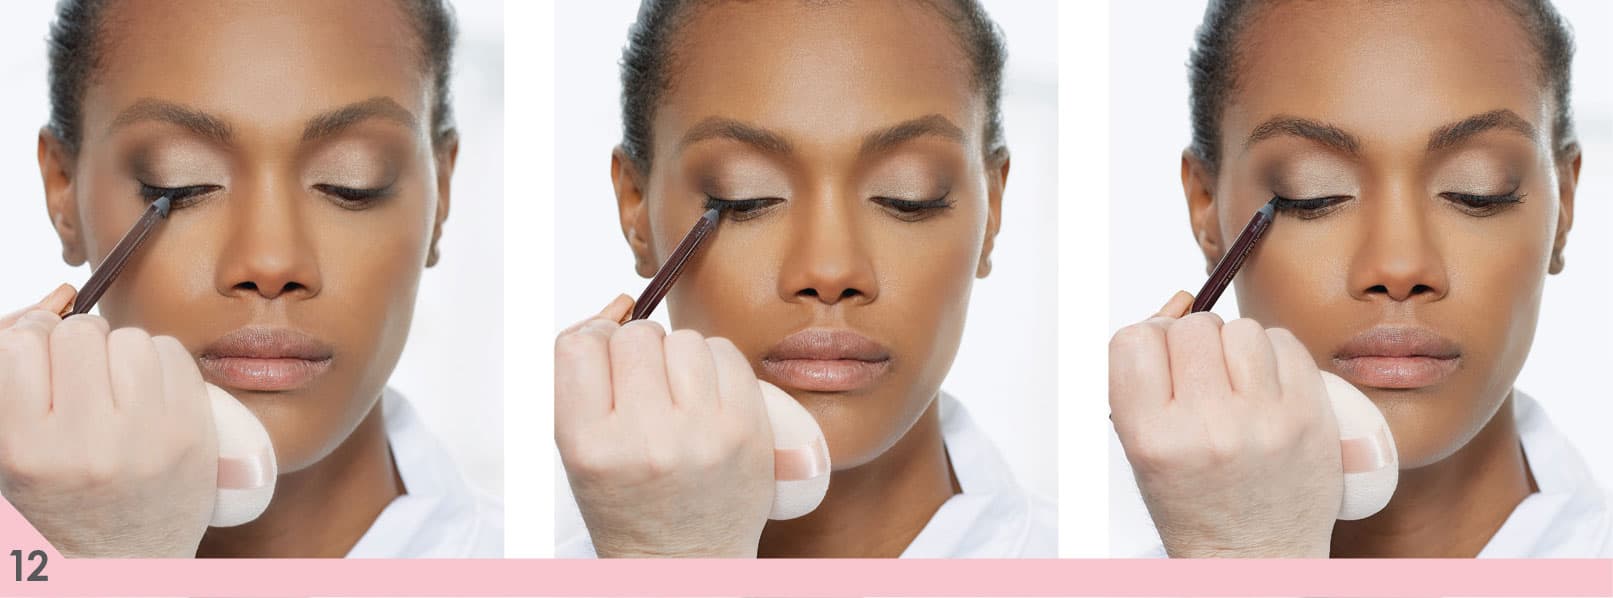
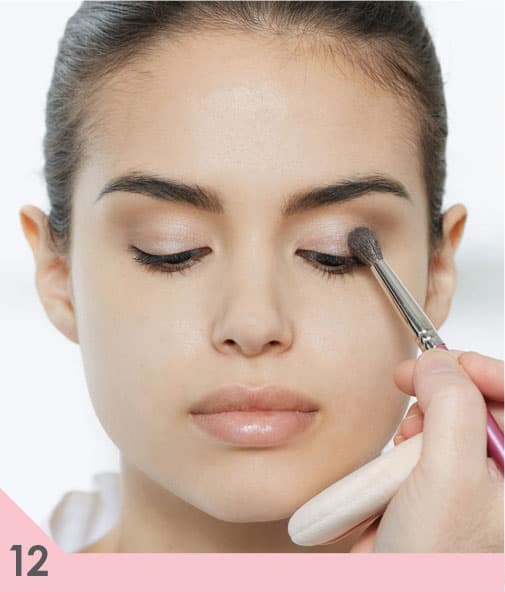
12. Use the #30 contour brush to apply additional dark, shimmery brown eye shadow in a half-moon shape all along your crease and on your lid. Pat it on for more intense color application.
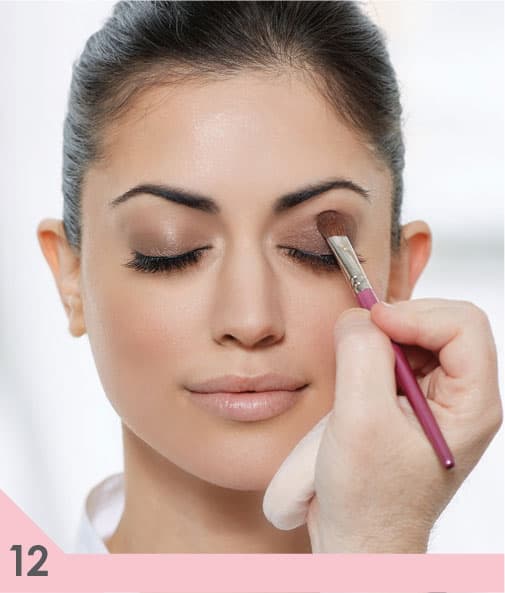
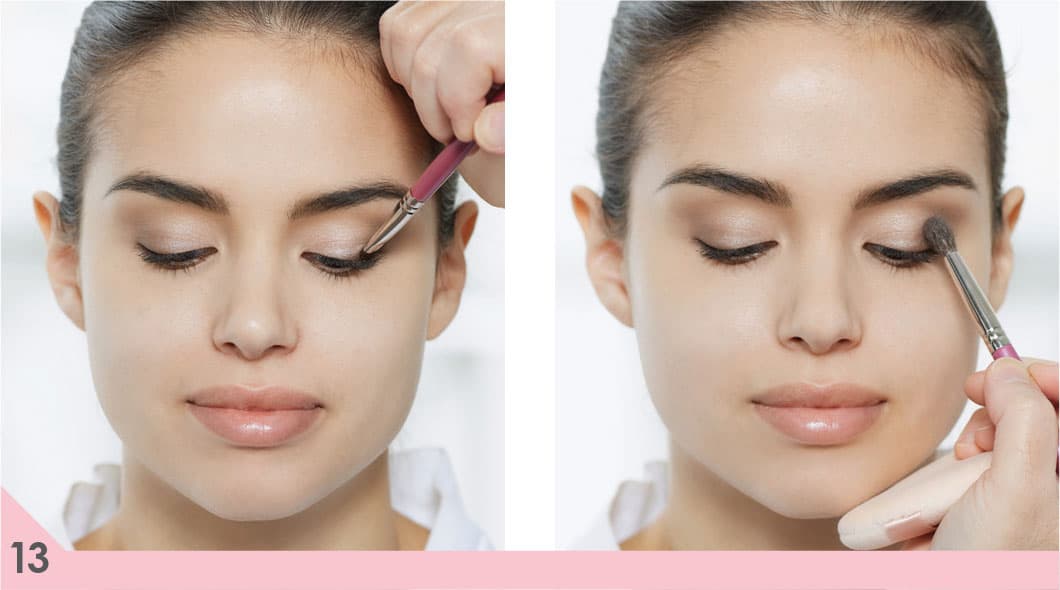
13. Use the #16 blending brush to blend your contour so there are no hard edges.

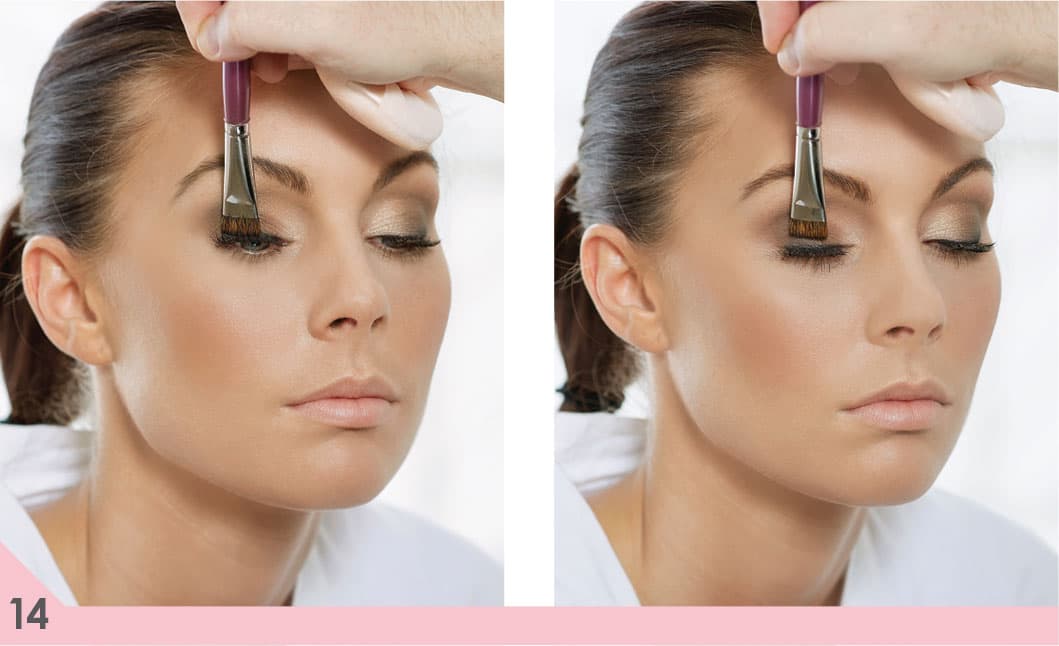
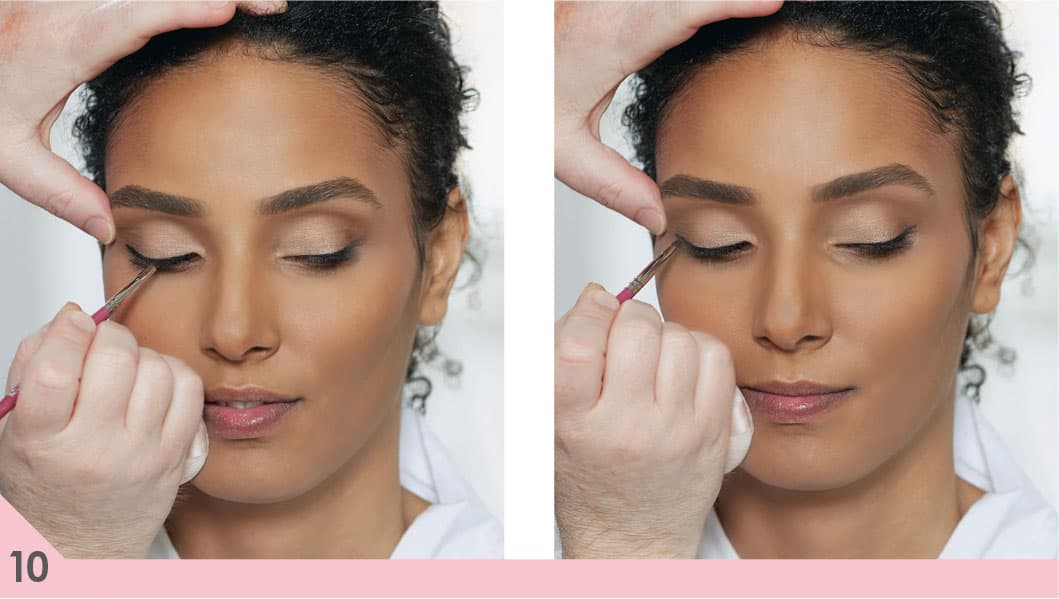
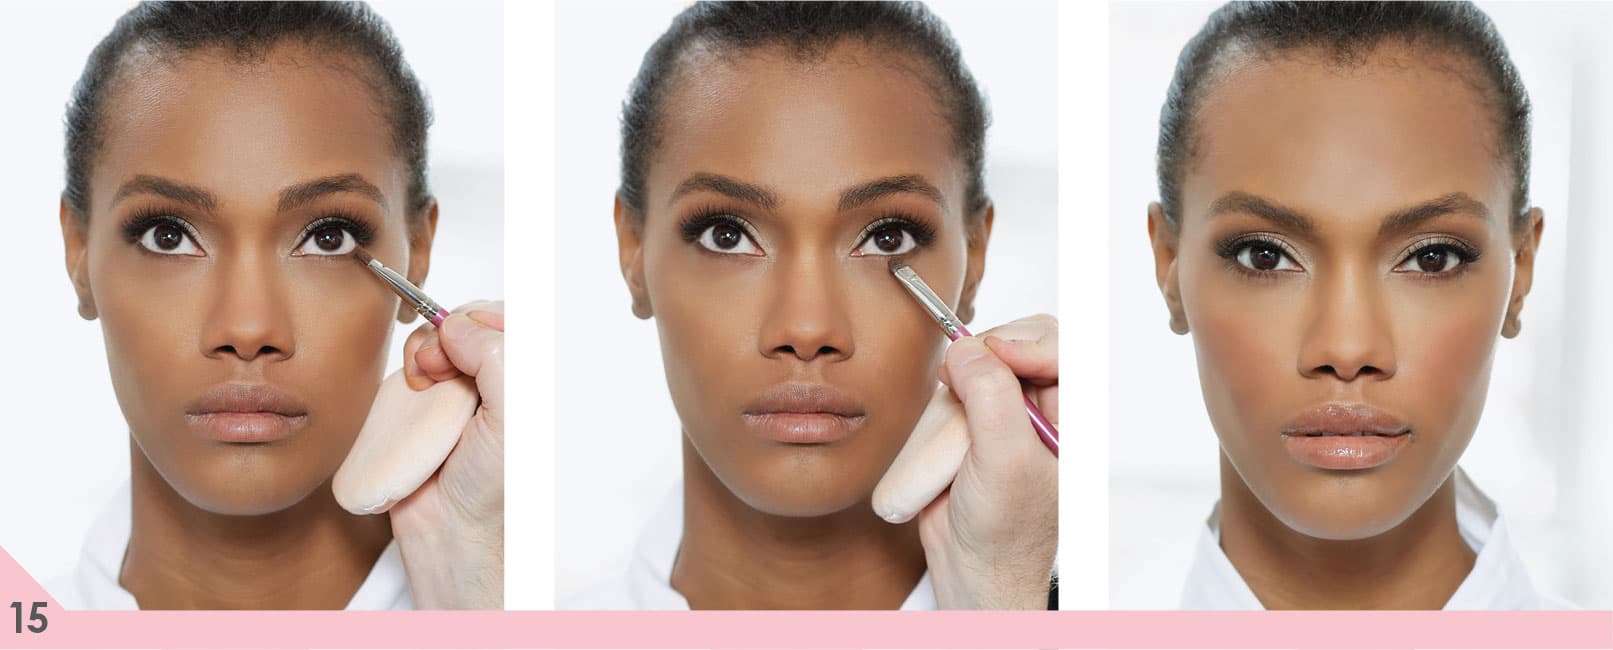
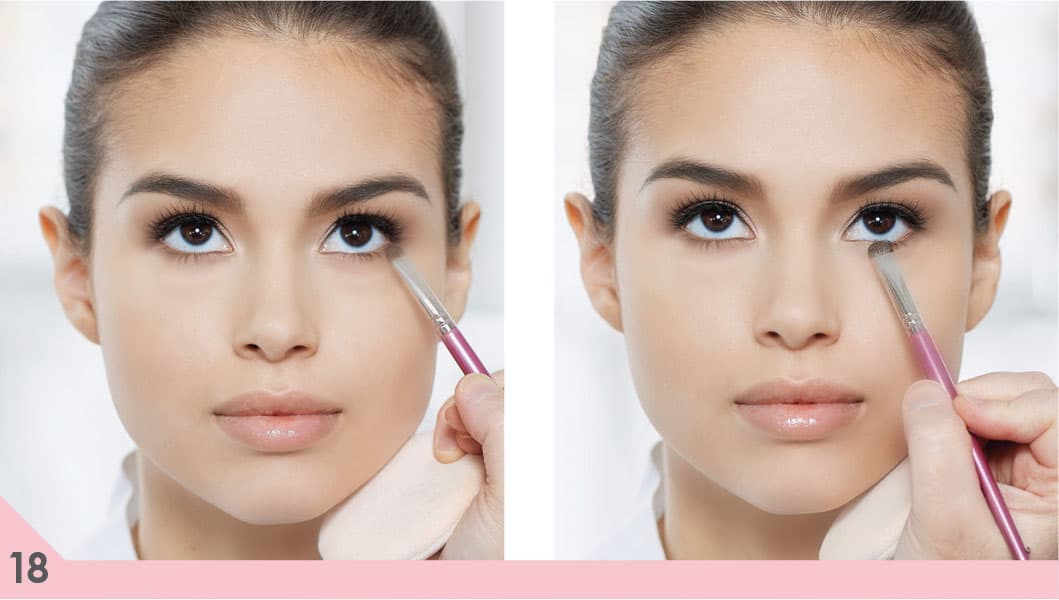
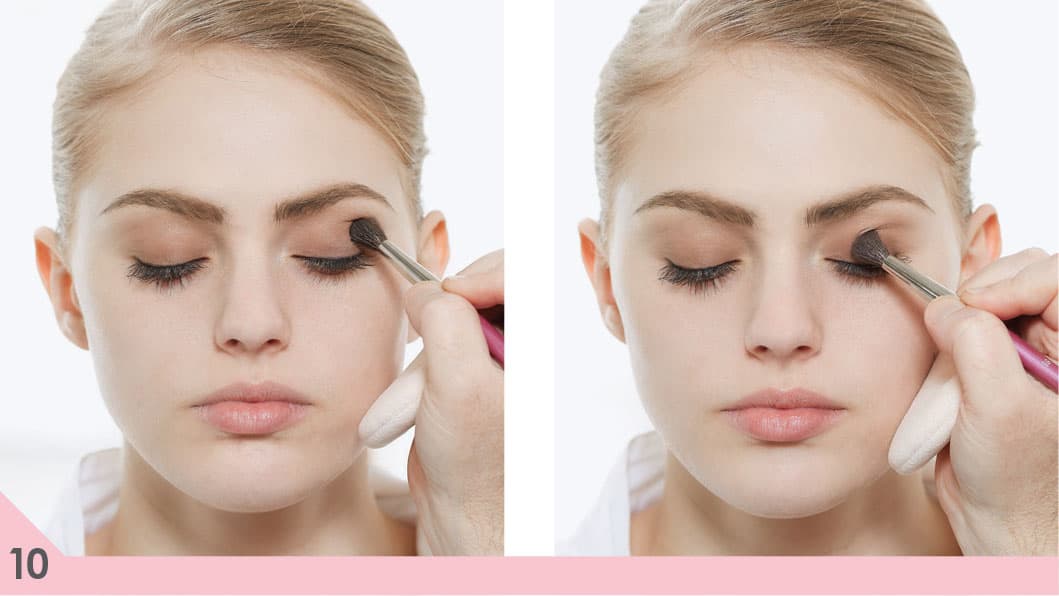
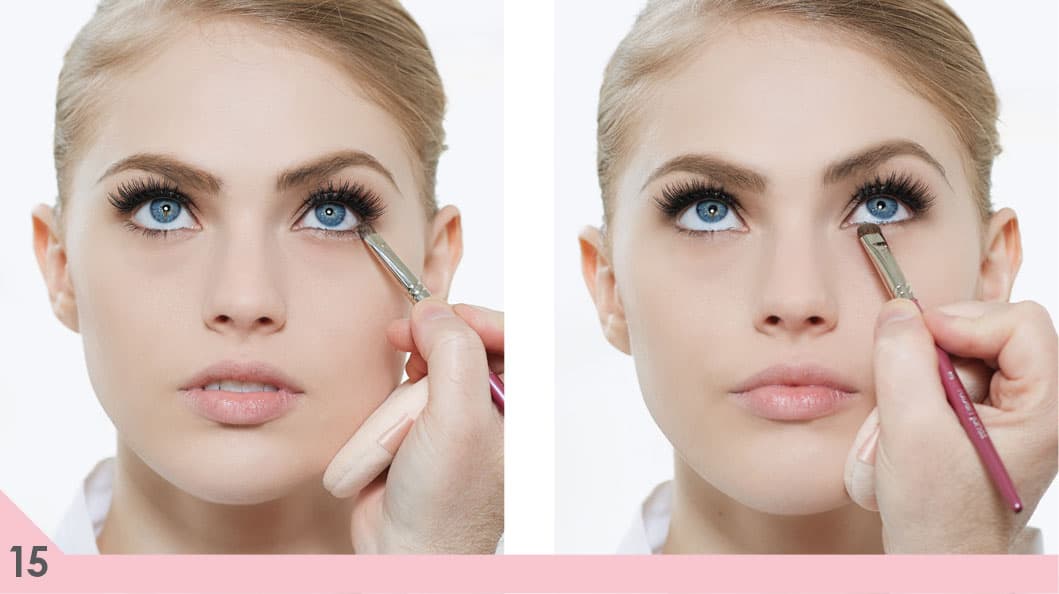
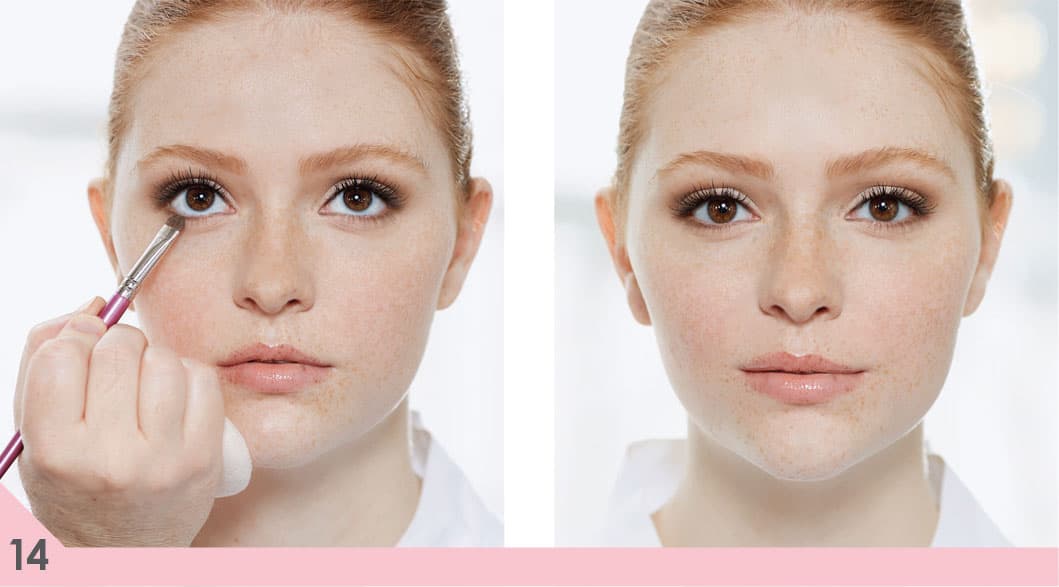
14. With a #38 detail eye shadow brush, apply your midtone shadow all along your lower lash line. Start your application from the outside corner and sweep it across to the inside corner.
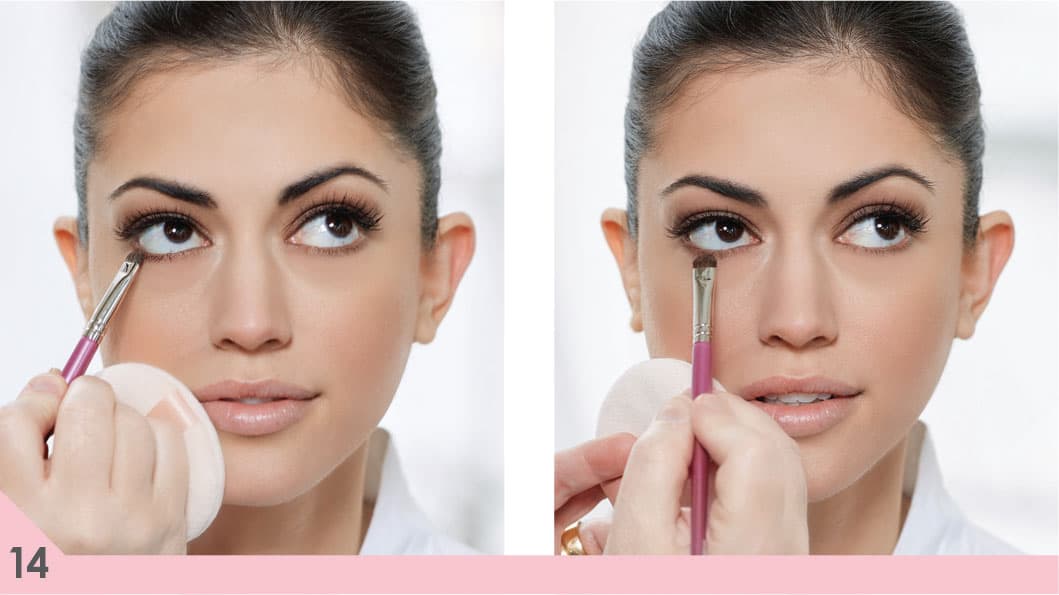
15. With the same brush, apply your contour color right over your midtone all along your lower lash line. By layering on your midtone, then your contour on top of it, you are creating a gradation color, making your lower lash line definition look more natural and blended.

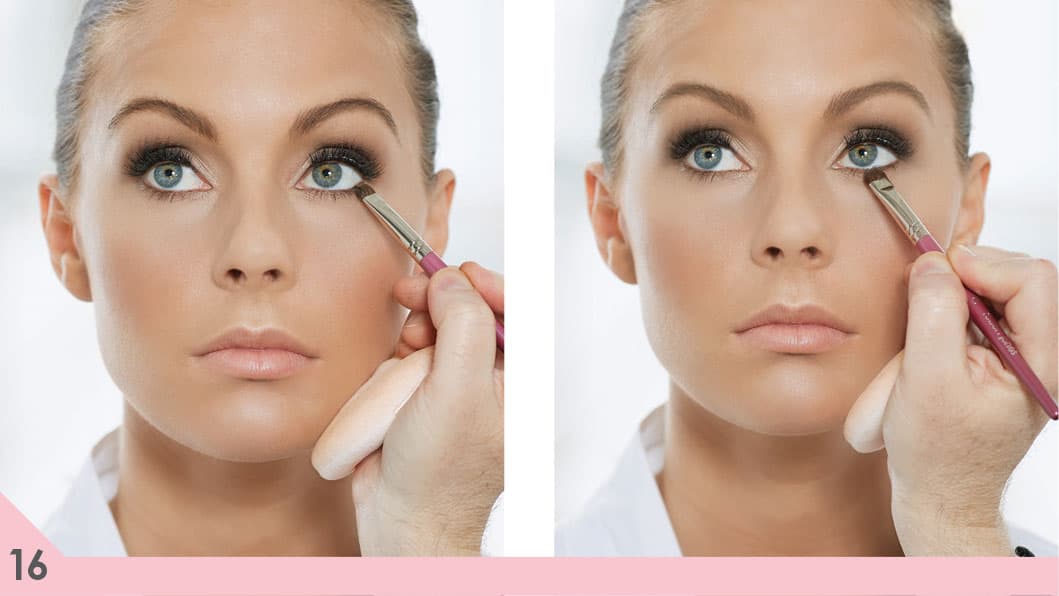
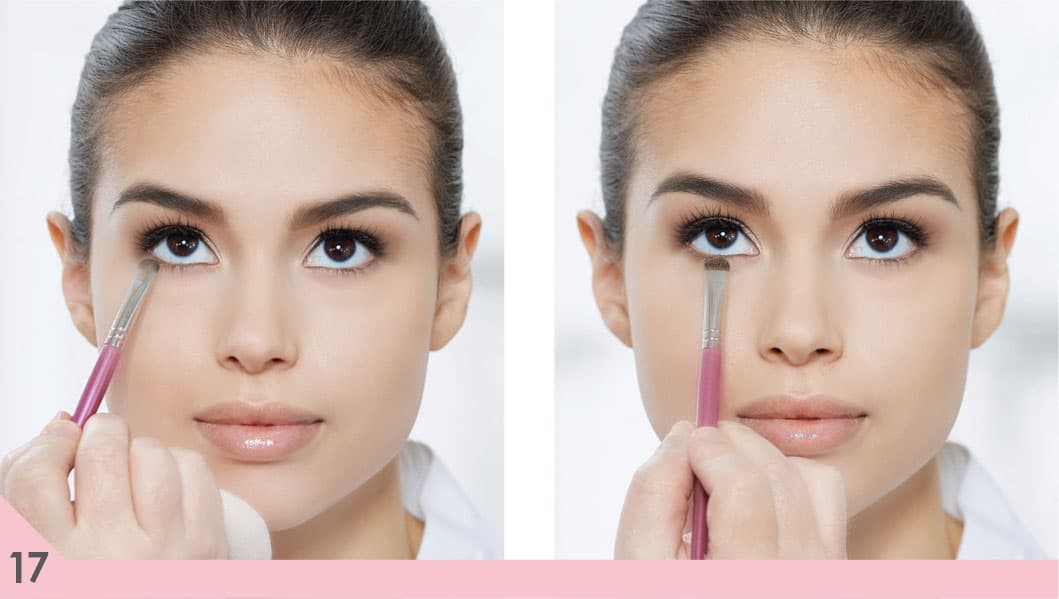
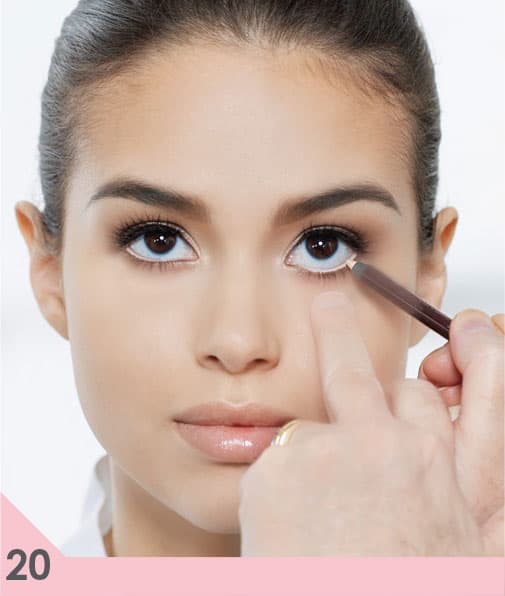
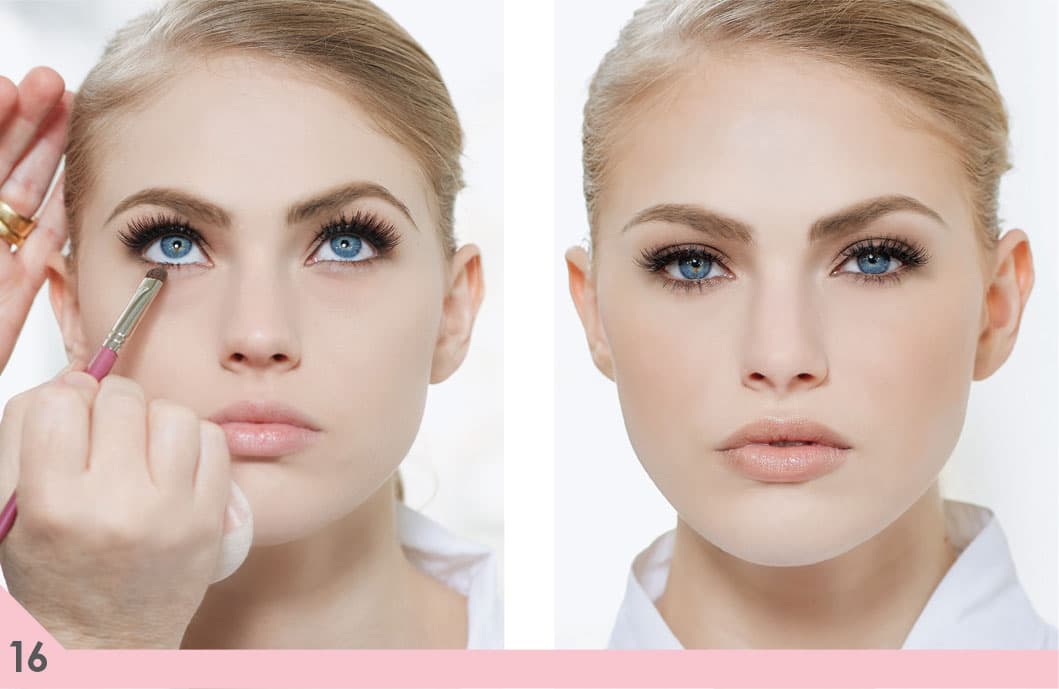
16. Now with a black eyeliner, line the waterline of your lower and upper eyelid. (The waterline is the inner rim of your eye.) This will add just a little more drama to your smoky eye.

17. Finish your eyes with a coat of mascara to the top lashes, blending them into the false eyelashes. Give your bottom lashes a nice coat of mascara.
wearable smoky eye
Sometimes you want to wear a more dramatic look but it might not be appropriate. Sometimes you just don’t care and do it anyway. But it’s nice to have an option for some middle ground. This version of a smoky eye just softens the look slightly, making it easier to wear and more appropriate for those times when a full on smoky eye might be too much.
This diagram shows where to add your highlight, midtone, and contour shades.

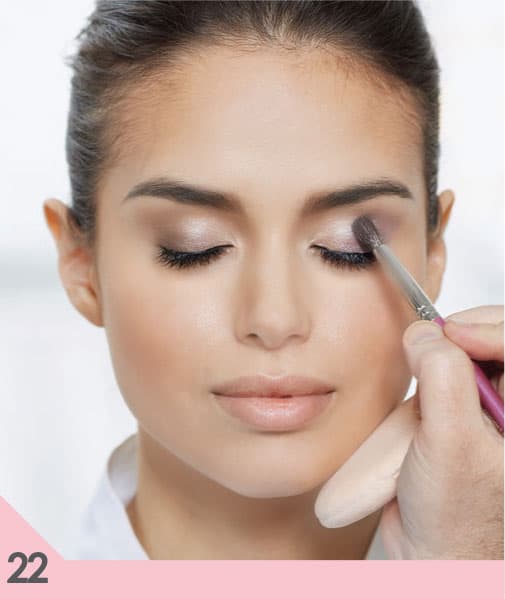
1. Using a #22 highlight brush, apply a crème-to-powder shimmery beige eye shadow to the inside half of your eyelid (just from your lash line to your crease).
2. With the same brush, apply a shimmery champagne powder eye shadow directly on top of the crème.
3. Curl your eyelashes and apply the first layer of mascara to your top lashes (see here).
4. With a #27 eye shadow brush (because you’re applying color to such a large area), apply a dark matte taupe midtone eye shadow. Start at the base of your upper lash line and bring the color up and over your entire lid. It will overlap the highlight you already put on the lid, muting it. By starting along your lash line and working your way upward, you will get the highest concentration of color where you laid your brush first, making your color depart the lash line.
5. With the #27 brush, apply more midtone eye shadow in a half-moon shape all along the crease to create more definition.
6. Using a #16 blending brush (the one that is always clean and ready to blend with), blend your midtone so there are no hard edges.
7. To start your lash line definition, use a #41detail eyeliner brush to push matte black shadow into the base of your lash line. Follow it by using a black eyeliner to line all along your top lash line.
8. Soften the line using a #18 detail eyeliner brush and a matte black eye shadow by going over the line and smudging it.

9. With a #27 eye shadow brush and a dark shimmery golden brown eye shadow, start at the base of your lash line, work it across the lid, and bring it up and over the entire lid, up to your crease. This gives you the most intense color right at your lash line. It too will also slightly overlap the highlight shade you applied earlier.

10. Use the #27 brush to apply additional dark, shimmery golden brown eye shadow in a half-moon shape all along your crease and on your lid. Pat it on for more intense color application.
11. Use the #16 blending brush and blend your contour so there are no hard edges.

12. With a #30 contour brush, apply another layer of dark shimmery golden brown eye shadow all along the upper lash line for more intense color.
13. Follow with the #16 blending brush to blend.

14. To create more intensity at the lash line, use the #18 eyeliner brush to grab some matte black shadow and lay your brush at your lash line. Pull up slightly to blend out and smudge the color. Do this all the way across your upper lash line.
15. For a little more drama, apply false eyelashes (see here).
16. With a #38 detail eye shadow brush, apply your midtone shadow all along your lower lash line. Once again, start your application from the outside corner, sweeping it across to the inside corner.
17. With the same brush, apply your contour color over your midtone all along your lower lash line. By layering on your midtone, then your contour on top of it, you are creating a gradation of color, making your lower lash line definition look more natural and blended.

18. Finish your eyes by applying a coat of mascara to the top lashes, blending them into the false eyelashes. Last, give your bottom lashes a coat of mascara.


modern audrey eye
This is a classic, named after one of the most iconic beauties of all times because it was her signature look. This is my modern take on Audrey Hepburn’s classic look—a look that’s easy to wear but not necessarily easy to do. I’m going to show you a trick that makes it easier to achieve.
This diagram shows where to add your highlight, midtone, and contour shades.
1. Using your #22 highlight brush, apply a crème-to-powder shimmery gold eye shadow to your eyelid (just from your lash line to your crease).

2. With the same brush, apply a shimmery gold eye shadow directly on top of the crème to create a beautiful sheen.
3. Again with the same brush, apply a matte flesh eye shadow to your brow bone—the area just under the arch of your brow.
4. Curl your eyelashes and apply the first layer of mascara to your top lashes (see here).
5. With this look, you want your midtone very precise so it defines the shape without darkening your lid. Because this look has such an intense and dramatic liner, you want your lid soft and shimmery. Using your #20 ultimate crease brush, apply your matte ginger midtone eye shadow in your crease. Starting from the outside corner of your crease, glide your brush across to the inside corner, creating a distinct line all along your crease.

6. Using your #16 blending brush (the one that is always clean and ready to blend with), blend out your midtone so there are no hard edges. Just retrace the same area you just applied your midtone to, rather than blending it up and down to darken too much of your lid.
7. With your #38 detail eye shadow brush, apply midtone just to the outer edge of your lid.

8. Blend with your #16 blending brush, making sure to keep the color to the very outer edge of your lid.


9. Create that perfect dramatic liner along your top lid: The trick is layering it in steps. Even pros prefer to layer. First, begin to create a pattern with a black eyeliner pencil because it is easier to remove and start over if you make a mistake. Starting at the inside corner of your top lash line, slowly move across the lash line. Make sure your line is its most narrow at the inside corner, gradually getting thicker as you reach the outside corner. As you reach the outside corner, you can give it a little kick upward.
10. Your penciling probably won’t be perfect, but it doesn’t have to be because you are now going to trace over it with a matte black eye shadow and your #42 eyeliner brush to perfect your pattern.
11. I know your line looks perfect now, but it’s still not dramatic enough! Go over your pattern with your liquid or gel eyeliner. Because you created the pattern, even if your liquid isn’t perfect, it won’t show. Using your #42 eyeliner brush, apply your liquid or gel, starting from the inside corner and working toward the outer corner. Follow your pattern.

12. Any mistakes can be fixed with a little concealer and your #50 concealer brush.

13. For the perfect amount of drama, apply false eyelashes (see here).
14. Using your #13 detail eye shadow brush, apply your midtone eye shadow along the outside corner of the lower lash line to close in the outer corner of the eye.

15. Finish the eye by applying a layer of mascara to your top lashes, blending them into the false eyelashes.

sparkling eye
This is one of my favorite looks. It works wonderfully for photos and special occasions. It’s all about creating the most shape possible with the eyelid, which is why it photographs so beautifully. Contrast is not only created with color, but with texture.
One of the most important aspects of contrast in this look is shimmer versus matte. By using shimmer against matte, you create an even greater contrast, which increases the visual illusion you are creating with your shadows. The pieces you are visually pushing forward and pulling back appear to be more dramatically placed.
It’s imperative that the only place you use any shimmer or frost is on the eyelid (your highlight shade), so it increases the appearance of its effect. Your midtone and contour are absolutely matte. Also, your highlight should be quite light in depth, with your contour quite deep. Between the texture and the color depth difference, it completely increases the shaping of the lid, which looks amazing. It also allows you to create all kinds of effects, such as a fake crease, which is why I love using this technique so much.
This diagram shows where to add your highlight, midtone, and contour shades.
1. Using your #22 highlight brush, apply a crème-to-powder shimmery gold eye shadow to your lid (just from the lash line to your crease). You are going to layer crème and powder to make your lid more dramatic.
2. With the same brush, apply a shimmery peachy gold eye shadow directly on top of the crème. Pat it on to get more color application.

3. Curl your eyelashes and apply the first layer of mascara to your top lashes (see here).

4. Using your #11 midtone brush and a matte midtone, starting from the outside corner of your crease, glide your brush across to the inside corner. Use a matte ginger eye shadow (a shade just a bit darker than your skin tone) so you get soft definition.
5. Using your #16 blending brush (the one that is always clean and ready to blend with), blend out your midtone so there are no hard edges.
6. With your #30 contour brush and some midtone, define the outer corner of your eyelid. Follow with your #16 blending brush to blend.
7. With your #30 contour brush, apply a dark matte brown eye shadow on the outer corner of your eyelid and up into the crease. You are layering it over your midtone so it starts to create a blend.
8. Follow with your #16 blending brush to blend out your contour color up toward your crease and in toward your lid.

9. With your #30 contour brush, apply another layer of your contour color, building up to create depth, followed with your #16 blending brush to blend out.

10. To start your lash line definition, use your #41 detail eyeliner brush to push matte black eye shadow into the base of your lash line. Follow it by using a black eyeliner to line all along your top lash line.
11. With your #30 contour brush, apply another layer of your contour color, building it up to create depth, followed with your #16 blending brush to blend out.

12. To create more definition at the lash line, line your eyes with black eyeliner right along the lash line, keeping the line as close to the lash line as possible. Make sure it is the thinnest at the inside corner, slowly getting thicker as you get to the outside corner.
13. For the perfect amount of drama, apply false eyelashes (see here).
14. With your #38 detail eye shadow brush, apply your midtone all along your lower lash line. Start your application from the outside corner, sweeping it across to the inside corner.

15. With the same brush, apply a layer of your contour color right over your midtone all along your bottom lash line. By layering your midtone on, then applying your contour on top of it, you are creating a gradation of color, making your lower lash line definition look more natural and blended.
16. Using your #14 detail highlight brush, highlight the inside corner of the lower lash line. This really brightens the eye and opens it up to give you a wide-eyed effect.
17. Finish the eyes by applying a coat of mascara to the top lashes, blending them into your false eyelashes. Lastly, give your bottom lashes a nice coat of mascara.

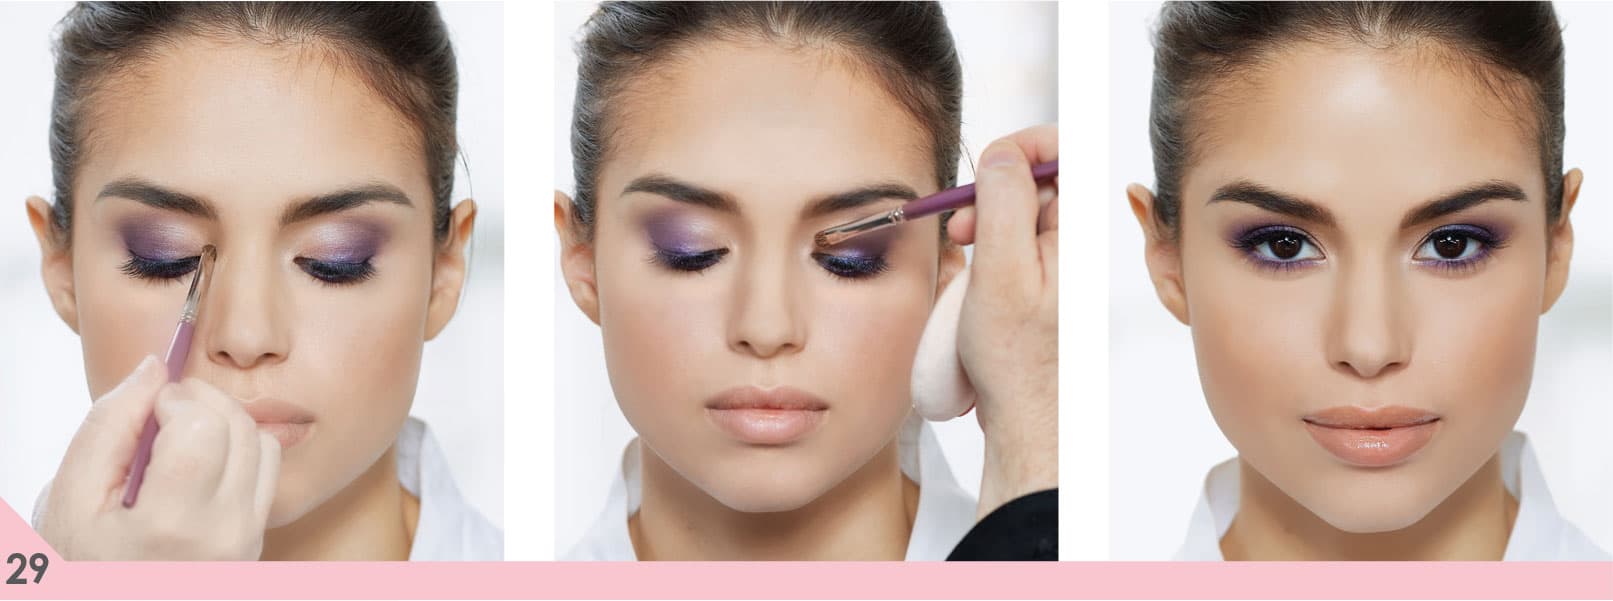
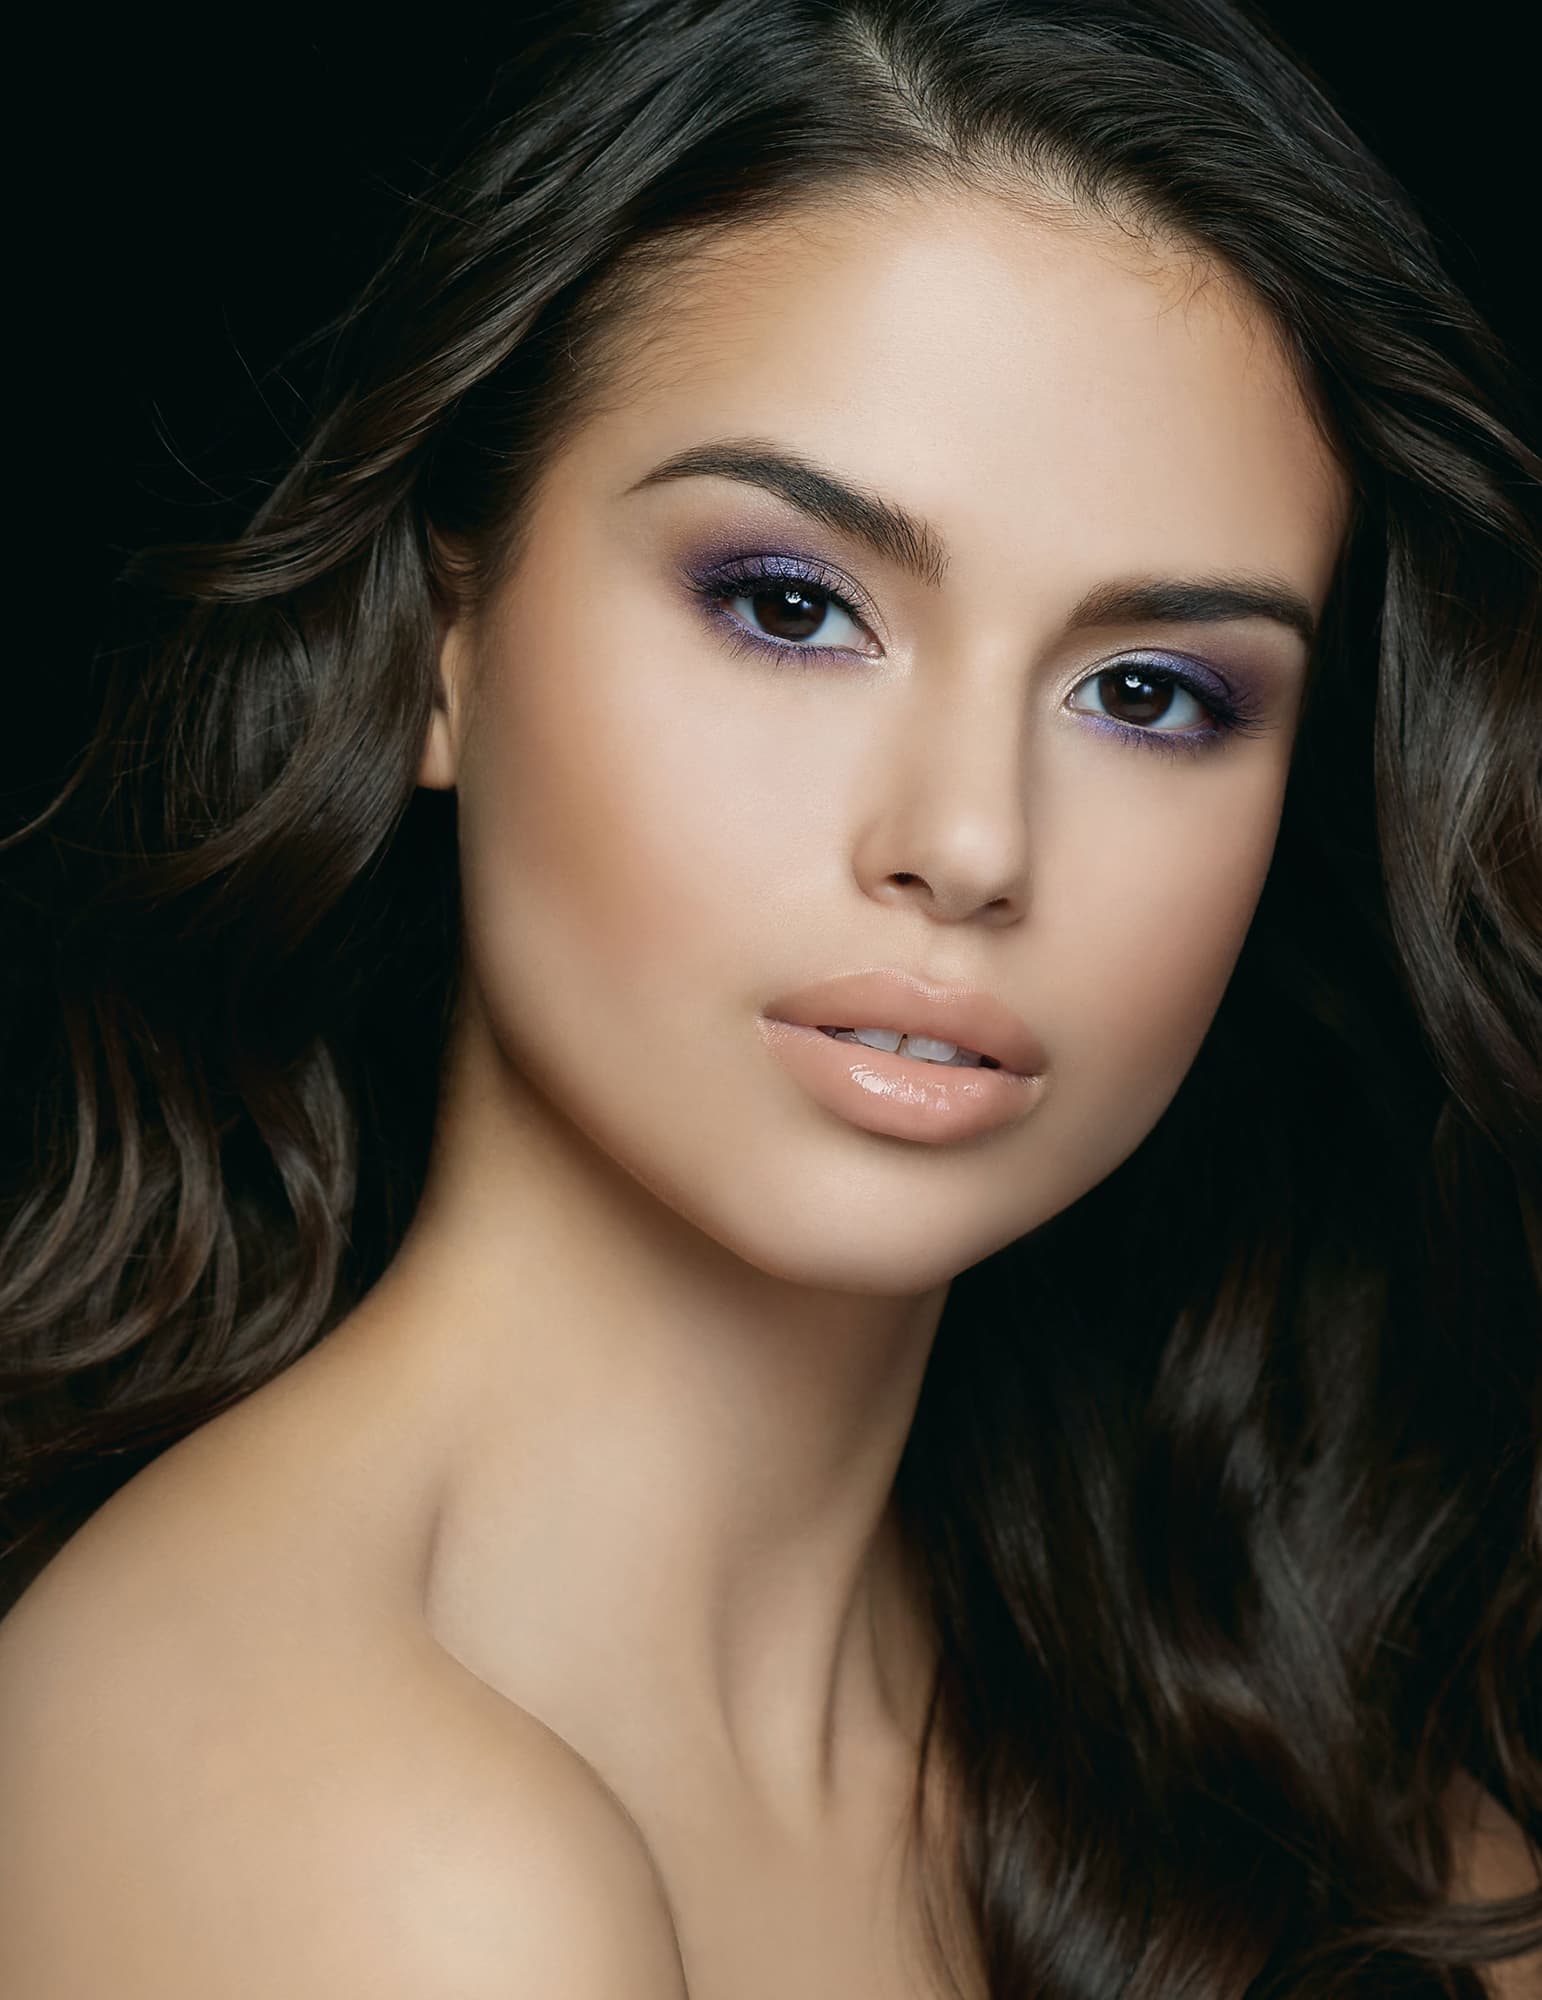
playing with color
There is a trick to using bright color well. Bright colors cannot reshape the eyelid, so you need to do all your shaping first with neutrals. Then layer your bright colors on top. And yes, the brights will still be vivid!
You can first paint and shape your eyes with neutral shades to help bring them out. Then layer your bright colors right on top of your neutrals. That way you get great shape to the lid while still getting a great shot of fun bright color.
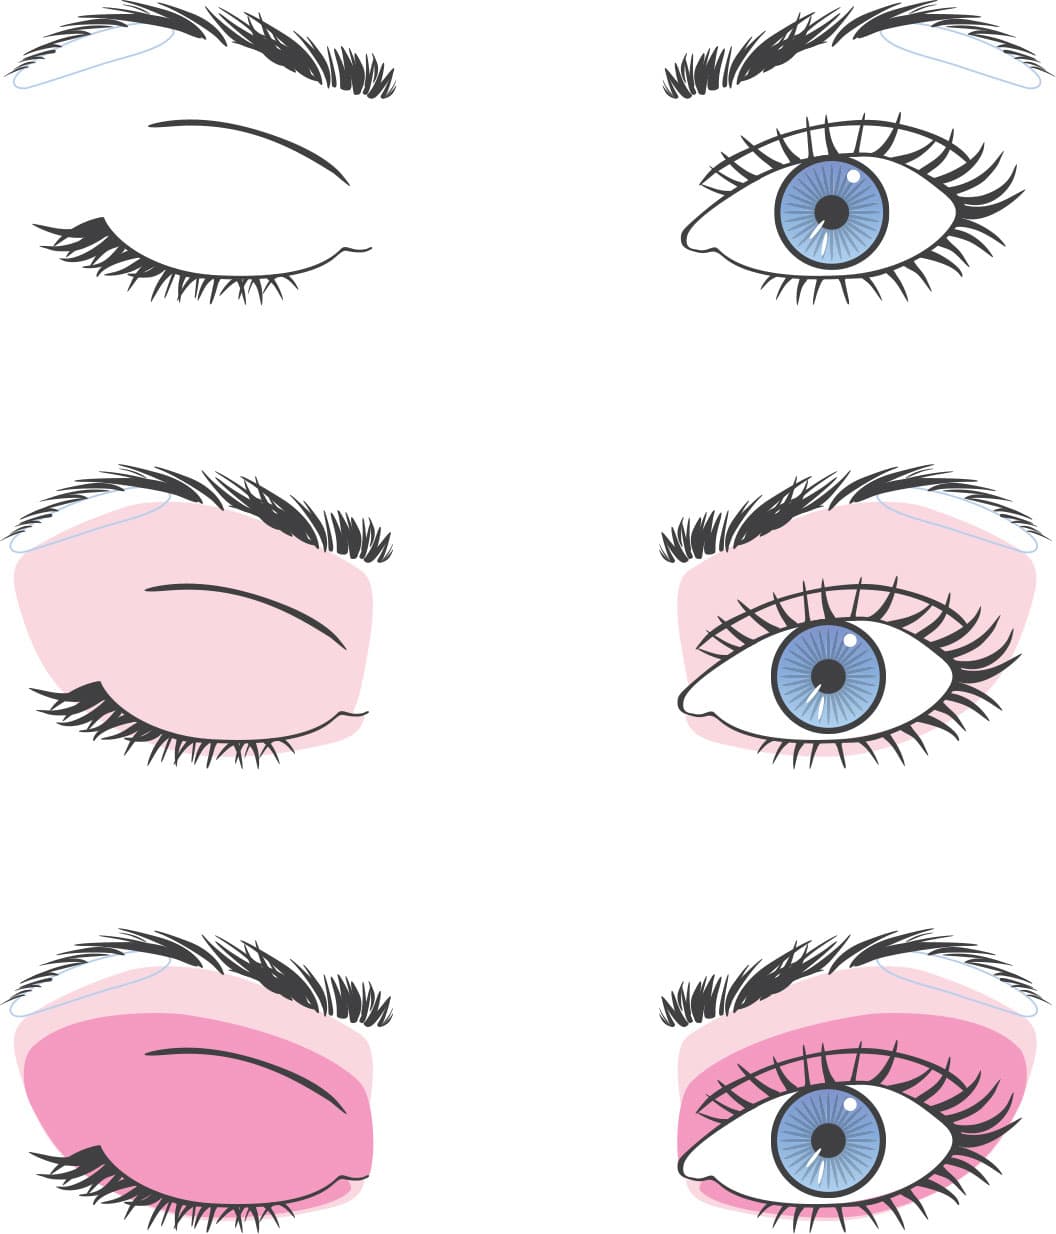
This diagram shows where to add your highlight, midtone, and contour shades.

1. Using your #22 highlight brush, apply a crème-to-powder shimmery beige eye shadow to your lid (from your lash line to your crease). You are going to layer crème and powder to make your lid more dramatic.
2. With the same brush, apply a shimmery champagne eye shadow directly on top of the crème and also apply it to your brow bone—right under your arch.
3. Curl your eyelashes and apply the first layer of mascara to your top lashes (see here).
4. Using your #11 midtone brush and a matte midtone eye shadow, start from the outside corner of your eye and glide your brush across to the inside corner. Use a soft matte caramel shadow (a shade just a bit darker than your skin tone) to get soft definition.
5. Using your #16 blending brush (the one that is always clean and ready to blend with), blend your midtone so there are no hard edges.

6. Add another layer for more definition.
7. Use your #30 contour brush and some midtone shadow to define the outer corner of your eyelid.


8. Follow with your #16 blending brush and blend toward the inside. This gives you just a hint of definition and color.
9. Add another layer for more definition and to help support the bright color you’re about to apply.

10. To start your lash line definition, use your #41 detail eyeliner brush to push matte black eye shadow into the base of your lash line. Follow it by using a black eyeliner to line all along your top lash line.

11. Create lid shape before adding your bright color. With your #30 contour brush, apply a shimmery pinky gray eye shadow on the outer corner of your eyelid. You are layering it over your midtone so it starts to create a blend.

12. With your #16 blending brush, blend your color up toward your crease and in toward your lid.
13. Add another layer for more depth to support the bright color you’re about to add.
14. To create more definition at the lash line, line your eyes with a black eyeliner right along the lash line, keeping the line as close to the lash line as possible. Make sure it is the thinnest at the inside corner, slowly getting thicker as you get to the outside corner.

15. Smooth your liner with your #42 eyeliner brush so it is slightly smudged and blended.

16. For the perfect amount of drama, apply false eyelashes (see here).
17. With your #38 detail eye shadow brush, apply your midtone all along your lower lash line. Start your application from the outside corner, sweeping it across to the inside corner.
18. With the same brush, apply a layer of shimmery pinky gray color right over your midtone all along your bottom lash line. By layering your midtone on, then applying your contour on top of it, you are creating a gradation of color, making your lower lash line definition look more natural and blended and creating shape before you apply your bright color.
19. Using your #14 detail highlight brush, highlight the inside corner of the lower lash line with shimmery champagne eye shadow. This really brightens the eye and opens it up to give you a wide-eyed effect.

20. To make your eyes look even bigger when finished, line your waterline with a beige concealer pencil. (The waterline is the inner rim of your eye.)
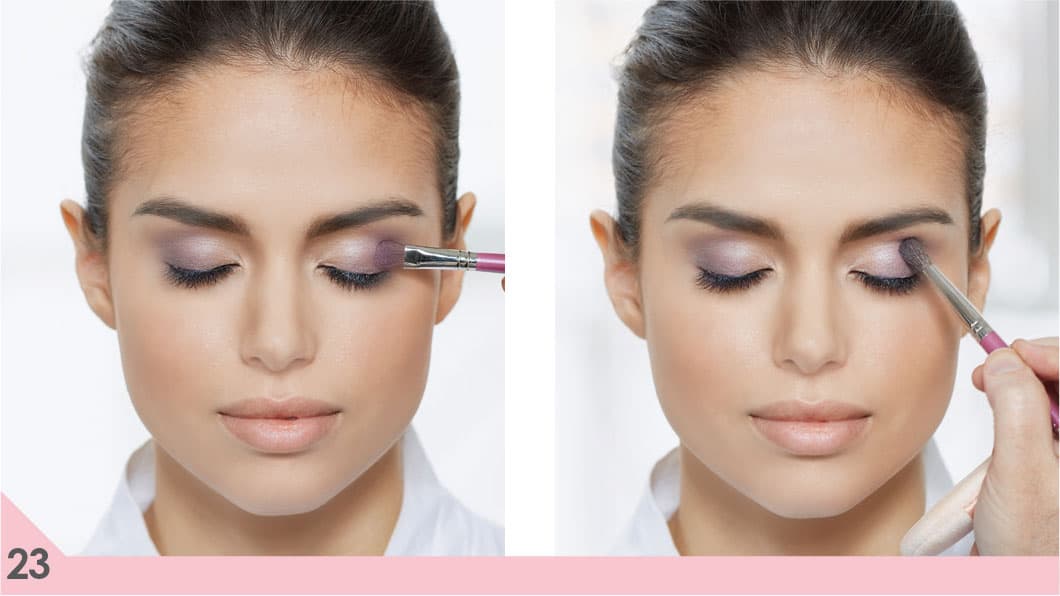
21. Add a sheer wash of an iridescent purple. Using your #30 contour brush, apply a sheer shimmery iridescent purple to the outer third of the eyelid. Pat it on for more concentrated application of color.

22. Using your #16 blending brush, blend your color up into your crease and over your lid, toward the inside corner, about halfway.
23. Apply another layer for depth and a pop of color.
24. With your #22 highlight brush, apply a dark purple crème shadow at the base of the lash line in the outer corner of the lid to help create color and depth. (When you layer crème and powder, it will intensify the color.)

25. Using your #38 detail eye shadow brush you can get your eye shadow right at the lash line, apply your bright rich dark purple shadow right on top of your crème purple shadow. Be sure and pat on plenty of color so you have plenty to blend up and out.

26. With your #16 blending brush, blend your bright rich dark purple eye shadow up toward your crease and onto the outer third of your lid.

27. Keep layering on more purple until you get the intensity you are looking for. Pat the eye shadow on close to the lash line for intense color application and then blend up and out.

28. Using your #38 detail eye shadow brush, layer purple eye shadow all along your lower lash line right on top of the color you applied earlier.

29. To increase contrast, add another layer of shimmery champagne eye shadow to the inner corner of your eyelid top and bottom with your #14 detail highlight brush. It will make the purple look more intense.
30. Finish with a layer of mascara on your bottom lashes and another layer on top, blending them into your false eyelashes.

brigitte bardot
Another iconic woman with an iconic look—known for her sultriness, Brigitte Bardot was not credited with creating the smoky eye, but with making it an everyday look. Hers was, of course, her own modern take on the classic look. Now here’s my modern take on her classic look.
What makes this smoky eye different is that it is always matte, and the smoke is always kept closer to the lash line and less blended up toward the crease. The matte-ness and the tightness of the color is what makes it more wearable at all times. You don’t want to use black because your goal is for it to be softer, but still completely sexy.
This diagram shows where to add your highlight, midtone, and contour shades.
1. With a #22 highlight brush, apply a matte beige eye shadow just to your brow bone—the arch of your brow.
2. Curl your eyelashes and apply the first layer of mascara to your top lashes (see here).
3. With a #27 eye shadow brush (because you will be applying your color to a large area), apply a matte taupe midtone eye shadow. Start at the base of your upper lash line, bring it across the lid, and then bring the color up and over your entire lid, all the way up to just under your brow bone. By starting along your lash line and working your way upward, you will get the highest concentration of color where you laid your brush first, making your color deepest at the lash line.

4. With the #27 brush, apply more midtone eye shadow in a half-moon shape all along the crease to create more definition.
5. Using a #16 blending brush (the one that is always clean and ready to blend with), blend your midtone so there are no hard edges.
6. To start your lash line definition, use a #41 eyeliner brush to push matte black eye shadow into the base of your lash line.

7. To create more definition at the lash line, line your eyes with a black eyeliner right along the lash line, keeping the line as close to the lash line as possible. Make sure it is the thinnest at the inside corner, slowly getting thicker as you get to the outside corner.
8. Smooth your liner with a #42 eyeliner brush to make sure it is slightly smudged and blended.

9. With a #30 contour shadow brush, use a matte brown eye shadow, starting at the base of your lash line, and bring your color up and over your entire lid up toward your crease. This gives you the most intense color right at your lash line.
10. Blend the line with the #16 blending brush.
11. With the #30 contour shadow brush, apply another layer of matte brown eye shadow, keeping it close to the lash line when you apply it.
12. With the #16 blending brush, start to blend, keeping your blend tight to the lash line at first and then slowly starting to blend up toward your crease. Keep the most intense color more toward the lash line.

13. For the perfect amount of drama, apply false eyelashes (see here).
14. To make your eyeliner softer and more smudged, use a #18 eyeliner brush to grab some matte black eye shadow and lay it all along your top lash line. As you apply it, pull up slightly with your brush to blend the line (see here).
15. With the #38 detail eye shadow brush, apply your midtone eye shadow all along your lower lash line. Once again, start your application from the outside corner, sweeping it across to the inside corner.
16. With the same brush, apply your contour color right over your midtone all along your lower lash line. By layering on your midtone, then your contour on top of it, you are creating a gradation of color, making your lower lash line definition look more natural and blended.
17. Finish with a layer of mascara on your bottom lashes and another layer on your top, blending them into your false eyelashes.

marilyn
Yet another icon—you only need her first name to know who she is. Her name is synonymous with glamour. She was known for her undeniable sexiness and beauty. Her look was all about understated glamour. All about a shimmery lid with a defined crease.
Again, this is my modern take on a classic look, but the theory of the application is still the same. It is all about creating a fake crease; you choose where and how intense the crease is. It’s a shimmery lid with a deepened controlled crease and lots of definition at the lash line.
This diagram shows where to add your highlight, midtone, and contour shades.
1. Using your #22 highlight brush, apply a crème-to-powder shimmery beige eye shadow, but only to your lid (from the lash line to your crease). You are going to layer crème and powder to make your lid more dramatic.
2. With the same brush, apply a shimmery champagne eye shadow and a matte beige directly on top of the crème. Combining a matte and a shimmer will give you more complete coverage, creating a more dramatic lid. Take this eye shadow up to your brow bone so you have a canvas on which to create your crease.
3. Curl your eyelashes and apply the first layer of mascara to your top lashes (see here).
4. To start your lash line definition, use your #41 detail eyeliner brush to push matte black eye shadow into the base of your lash line.

5. With this look, you want your midtone very precise, so it won’t darken your lid but define the shape. You want your lids shimmery and defined. Using your #20 ultimate crease eye shadow brush, apply your matte taupe midtone shadow in your crease: Starting from the outside corner of your crease, glide your brush across to the inside corner. Create a distinct line all along your crease. You may even want to apply a couple of layers so it is very defined.
6. Using your #16 blending brush (the one that is always clean and ready to blend with), blend out your midtone so there are no hard edges. But make sure you just retrace the same area that you applied your midtone in the previous step. Don’t blend it up and down or you’ll darken too much of your lid.
7. Now, for a little extra definition. Using your #20 eye shadow brush, add some of your midtone eye shadow, but just to the very outermost corner of your eyelid, right along your lash line and up into the outer part of your crease, much like the letter v. This will close in the eyelid and help start your lid definition.
8. Blend with your #16 blending brush, keeping your blend very tight.

9. Keep layering until you get the depth that you desire.
10. Now, start your lash line definition: Use your #42 eye liner brush and a matte brown eye shadow to apply shadow right along the lash line, bringing it up into the outer edge of your crease for nice subtle definition.
11. Using your #16 blending brush, blend the color out, being very careful to keep the color nice and tight.

12. Apply another layer all along your lash line for more definition.


13. For even more definition, use your #41 detail eyeliner brush to push matte black eye shadow into the base of your lash line. This will make your eyelashes look thicker and start to define your lash line.

14. With your #38 detail eye shadow brush, apply your midtone all along your lower lash line. Start from the outside corner and work in toward the inner corner.
15. Using your #14 detail highlight brush, highlight the inside corner of your lower lash line.
16. Finish with another layer of mascara on your top lashes.
smoking with crèmes
Some would call this a very rock ‘n’ roll look, because of the smudginess of the smoky eye. I just like the kind of slept-in look it has. The great part of creating a smoky eye with a crème is that it is fast. The hard part is blending, but you will conquer it with a little practice.
This diagram shows where to add your highlight, midtone, and contour shades.

1. With a #22 highlight brush, apply a shimmery champagne eye shadow all along your lid up to your crease.
2. Curl your eyelashes and apply the first layer of mascara to your top lashes (see here).

3. Using a #16 blending brush so your color will be soft and blended as you apply it, apply a matte midtone eye shadow starting from the outside corner of your eye, gliding your brush across to the inside corner. Also apply it to the outer half of the eyelid. Use a soft matte taupe eye shadow (a shade just a bit darker than your skin tone) to get soft definition.
4. With the same brush, apply your midtone all along your lower lash line.
5. This will create very smudged out color because of the size and shape of the brush you are using.
6. To start your lash line definition, use a #41 detail eyeliner brush to push matte black eye shadow into the base of your lash line.
7. With a fresh #22 highlight brush and a matte black crème eye shadow, start at the base of your lash line and bring your color up and over your entire lid up toward your crease. This gives you the most intense color right at your lash line.

8. Keep layering it until you get the intensity you desire, always stating at the lash line.
9. Use a clean #30 contour brush to blend where your crème shadow blends into your crease. You are using a #30 contour brush instead of a normal blending brush because the bristles are stiffer, which is better for blending a crème shadow.
10. With the #22 highlight brush, apply some of your black crème eye shadow all along your lower lash line, smudging it out and dragging it down a little as you go across to create that smudginess.

11. With a black eyeliner, line the waterline of your lower and upper eyelids. (The waterline is the inner rim of your eye.) This will add just a little more drama to your smoky eye.
12. Finish your eyes by applying a coat of mascara to the top lashes. Lastly, give your bottom lashes a nice coat of mascara.