
We have already covered drawing to the screen and how to handle objects but we have not had anything moving around very much yet. Getting input from the user and then controlling our game objects is one of the most important topics in game development. It can decide the feel and responsiveness of your game and is something that a user can really pick up on. In this chapter we will cover:
- Cartesian coordinate systems
- 2D vectors
- Creating variables to control the movement of a game object
- Setting up a simple movement system
- Setting up input handling from joysticks, keyboard, and mouse
- Creating a fixed frame rate
In the previous chapter, we gave our objects x and y values which we could then use to pass into our drawing code. The x and y values we used can be represented using a Cartesian coordinate system.
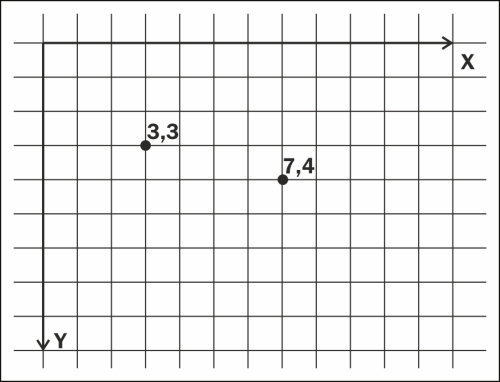
The above figure shows a Cartesian coordinate system (flipped on the Y axis) with two coordinates. Representing them as (x,y) gives us position 1 as (3,3) and position 2 as (7,4). These values can be used to represent a position in 2D space. Imagine this figure as a zoomed in image of the top-left corner of our game window, with each of the grid squares representing one pixel of our game window. With this in mind, we can see how to use these values to draw things to the screen in the correct position. We now need a way to update these position values so that we can move our objects around. For this we will look at 2D vectors.
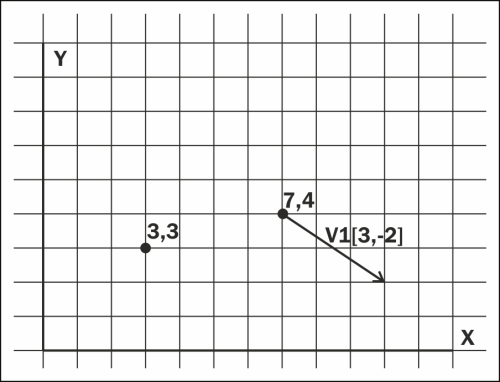
A vector can be described as an entity with a direction and a magnitude. We can use them to represent aspects of our game objects, for example, velocity and acceleration, that can be used to create movement. Taking velocity as an example, to fully represent the velocity of our objects, we need the direction in which they are travelling and also the amount (or magnitude) by which they are heading in that direction.
Let's define a couple of things about how we will use vectors:
- We will represent a vector as v(x,y)
We can get the length of a vector using the following equation:

The preceding figure shows the vector v1(3,-2) which will have a length of √(32+(-22)). We can use the x and y components of a vector to represent our object's position in 2D space. We can then use some common vector operations to move our objects. Before we move onto these operations let's create a vector class called Vector2D in the project. We can then look at each operation we will need and add them to the class.
#include<math.h>
class Vector2D
{
public:
  Vector2D(float x, float y): m_x(x), m_y(y) {}

  float getX() { return m_x; }
  float getY() { return m_y; }

  void setX(float x) { m_x = x; }
  void setY(float y) { m_y = y; }
private:

  float m_x;
  float m_y;
};
You can see that the Vector2D class is very simple at this point. We have our x and y values and a way to get and set them. We already know how to get the length of a vector, so let's create a function for this purpose:
float length() { return sqrt(m_x * m_x + m_y * m_y); }Now since we have our basic class in place, we can start to gradually add some operations.
The first operation we will look at is the addition of two vectors. For this we simply add together the individual components of each vector.
Let's make use of overloaded operators to make it easy for us to add two vectors together:
Vector2D operator+(const Vector2D& v2) const
{
  return Vector2D(m_x + v2.m_x, m_y + v2.m_y);
}

friend Vector2D& operator+=(Vector2D& v1, const Vector2D& v2)
{
  v1.m_x += v2.m_x;
  v1.m_y += v2.m_y;

  return v1;
}
With these functions we can add two vectors together using the standard addition operators, for example:
Vector2D v1(10, 11);
Vector2D v2(35,25);
v1 += v2;
Vector2D v3 = v1 + v2;
Another operation is to multiply a vector by a regular scalar number. For this operation we multiply each component of the vector by the scalar number:
We can again use overloaded operators to create these functions:
Vector2D operator*(float scalar)
{
  return Vector2D(m_x * scalar, m_y * scalar);
}

Vector2D& operator*=(float scalar)
{
  m_x *= scalar;
  m_y *= scalar;

  return *this;
}
Subtraction is very similar to addition.
Let's create some functions to do this for us:
Vector2D operator-(const Vector2D& v2) const
{
  return Vector2D(m_x - v2.m_x, m_y - v2.m_y);
}

friend Vector2D& operator-=(Vector2D& v1, const Vector2D& v2)
{
  v1.m_x -= v2.m_x;
  v1.m_y -= v2.m_y;

  return v1;
}By now I am sure you have noticed a pattern emerging and can guess how dividing a vector by a scalar will work, but we will cover it anyway.
And our functions:
Vector2D operator/(float scalar)
{
  return Vector2D(m_x / scalar, m_y / scalar);
}

Vector2D& operator/=(float scalar)
{
  m_x /= scalar;
  m_y /= scalar;

  return *this;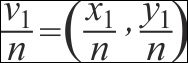
}We need another very important operation and that is the ability to normalize a vector. Normalizing a vector makes its length equal to 1. Vectors with a length (magnitude) of 1 are known as unit vectors and are useful to represent just a direction, such as the facing direction of an object. To normalize a vector we multiply it by the inverse of its length.
We can create a new member function to normalize our vectors:
void normalize()
{
  float l = length();
  if ( l > 0) // we never want to attempt to divide by 0
  {
    (*this) *= 1 / l;
  }
}
Now that we have a few basic functions in place, let's start to use these vectors in our SDLGameObject class.
- Open up
SDLGameObject.hand we can begin implementing the vectors. First we need to include the newVector2Dclass.#include "Vector2D.h"
- We also need to remove the previous
m_xandm_yvalues and replace them withVector2D.Vector2D m_position;
- Now we can move to the
SDLGameObject.cppfile and update the constructor.SDLGameObject::SDLGameObject(const LoaderParams* pParams) : GameObject(pParams), m_position(pParams->getX(), pParams->getY()) { m_width = pParams->getWidth(); m_height = pParams->getHeight(); m_textureID = pParams->getTextureID(); m_currentRow = 1; m_currentFrame = 1; } - We now construct the
m_positionvector using the member initialization list and we must also use them_positionvector in our draw function.void SDLGameObject::draw() { TextureManager::Instance()->drawFrame(m_textureID, (int)m_position.getX(), (int)m_position.getY(), m_width, m_height, m_currentRow, m_currentFrame, TheGame::Instance()->getRenderer()); } - One last thing before we test is to use our vector in the
Enemy::updatefunction.void Enemy::update() { m_position.setX(m_position.getX() + 1); m_position.setY(m_position.getY() + 1); }
This function will use vector addition very soon, but for now we just add 1 to the current position to get the same behavior we already had. We can now run the game and we will see that we have implemented a very basic vector system. Go ahead and play around with the Vector2D functions.
We previously had to separately set the x and y values of our objects, but now that our position is a vector, we have the ability to add a new vector to it to update our movement. We will call this vector the velocity vector and we can think of it as the amount we want our object to move in a specific direction:
- The velocity vector can be represented as follows:

- We can add this to our
SDLGameObjectupdate function as this is the way we update all derived objects. So first let's create the velocity member variable.Vector2D m_velocity;
- We will construct it in the member initialization list as 0,0.
SDLGameObject::SDLGameObject(const LoaderParams* pParams) : GameObject(pParams), m_position(pParams->getX(), pParams->getY()), m_velocity(0,0)
- And now we will move to the
SDLGameObject::updatefunction.void SDLGameObject::update() { m_position += m_velocity; } - We can test this out in one of our derived classes. Move to
Player.cppand add the following:void Player::update() { m_currentFrame = int(((SDL_GetTicks() / 100) % 6)); m_velocity.setX(1); SDLGameObject::update(); }
We set the m_velocity x value to 1. This means that we will add 1 to our m_position x value each time the update function is called. Now we can run this to see our object move using the new velocity vector.
Not all of our objects will move along at a constant velocity. Some games will require that we gradually increase the velocity of our object using acceleration. A car or a spaceship are good examples. No one would expect these objects to hit their top speed instantaneously. We are going to need a new vector for acceleration, so let's add this into our SDLGameObject.h file.
Vector2D m_acceleration;
Then we can add it to our update function.
void SDLGameObject::update()
{
  m_velocity += m_acceleration;
  m_position += m_velocity;
}
Now alter our Player::update function to set the acceleration rather than the velocity.
void Player::update()
{
  m_currentFrame = int(((SDL_GetTicks() / 100) % 6));

  m_acceleration.setX(1);

  SDLGameObject::update();
}
After running our game you will see that the object gradually picks up speed.