Chapter 10
Manipulating Files
In This Chapter
![]() Combining files by adding cases
Combining files by adding cases
![]() Combining files by adding variables when doing a one-to-one match
Combining files by adding variables when doing a one-to-one match
![]() Combining files by adding variables when doing a one-to-many match
Combining files by adding variables when doing a one-to-many match
Often data are kept in different files. Sometimes these files are very similar (for example, the same customer information just separated by store); other times the files are very different (for example, customer satisfaction information in one file and financial information in another). IBM SPSS Statistics has two facilities available for merging files: Add Cases joins data files that contain similar variables for separate groups of cases; Add Variables joins data files that contain different information for the same cases.
Merging Files Adding Cases
Add Cases appends cases with the same or similar variables. Figure 10-1 illustrates a simple Add Cases merge of two files containing customer satisfaction records. Both files have the same variables, Satisfaction and Years_Customer. The variables must have the same name, coded values, and type (for example, string vs. numeric) in both files. In this example, there are three cases in each of the files, so the combined file has six cases. In other words, the combined file contains the total number of cases from both files.
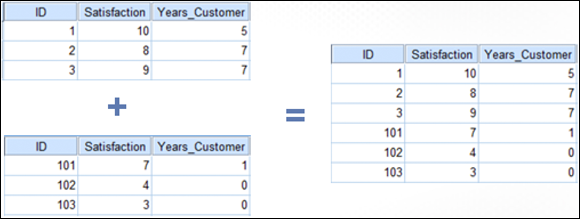
Figure 10-1: Add Cases.
 Note that although an ID variable is in both files, it isn’t used in an Add Cases merge operation.
The following example uses two of the data files that are installed with IBM SPSS Statistics: stroke_invalid and stroke_valid.
-
From the main menu, choose File ⇒ Open ⇒ Data and load the stroke_invalid file, which is in the IBM SPSS Statistics directory.
The data file with 39 variables and 1,183 cases is shown in Figure 10-2. This file doesn’t contain information on whether the patient had a stroke.
-
From the main menu, choose File ⇒ Open ⇒ Data and load the stroke_valid file, which is in the IBM SPSS Statistics directory.
The data file with 42 variables and 1,048 cases is shown in Figure 10-3. This file does contain information on whether the patient had a stroke, which is why it has three additional variables.
Now we want to combine these two files.
- Choose Data ⇒ Merge Files ⇒ Add Cases.
The dialog box shown in Figure 10-4 appears.
At this point, you can combine the active dataset (stroke_valid) with any files that are open in IBM SPSS Statistics or files that are saved as an IBM SPSS Statistics data file. This means that if you want to combine files in other formats you must first read the files into IBM SPSS Statistics.
- Select the file stroke_valid and then click Continue.
The dialog box shown in Figure 10-5 appears.
Variables that have the same names in both files are listed in the Variables in New Active Dataset box. Variables that do not match others are listed in the Unpaired Variables box.
 The variables are aligned by variable name, and the variable formats should be the same. So, for example, a variable like gender should not be coded as 1 and 2 in one file and M and F in the second file.
When matching variables that don’t have the same name across both files, you have three options on how to proceed:
- Change the name of one of the variables before adding the files together.
- Use the rename option within the Add Cases facility.
- Variables that are not paired can be paired with the Pair button; the new variable’s name is taken from the variable in the active data file.
The file legend in the lower-left corner lists the symbol corresponding to each file, which is used to designate the source for unpaired variables.
Variables that are unpaired and don’t measure the same thing can be moved to the Variables in New Active Dataset list, and they’ll be retained in the combined file.
-
Select the variables stroke1, stroke2, and stroke3 and click the button with the arrow to move the variables to the box on the right.
The Indicate Case Source as Variable option allows you to create a new variable, named source01 by default, which will be coded 0 if the case comes from the active dataset and 1 if the case comes from the other data file. This variable can be especially useful if you don’t have a variable in the files that uniquely identifies that file.
- Select the Indicate Case Source as Variable option and rename the new variable file, as shown in Figure 10-6.
Click OK.
The new combined file, along with new variable file is generated. The result is a new file with 43 variables and 2,231 cases, as shown in Figure 10-7.
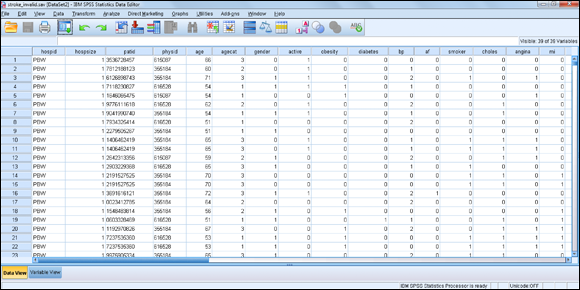
Figure 10-2: The stroke_invalid data file.

Figure 10-3: The stroke_valid data file.
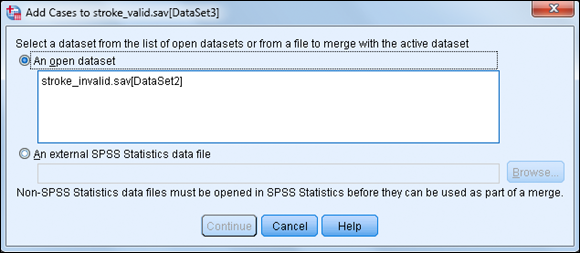
Figure 10-4: The initial Add Cases dialog box.
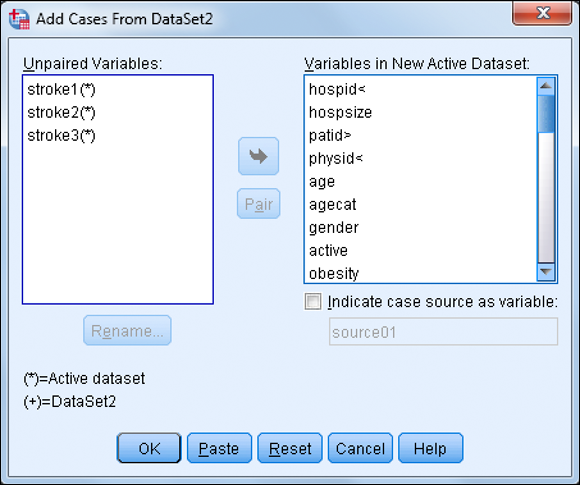
Figure 10-5: The Add Cases dialog box.
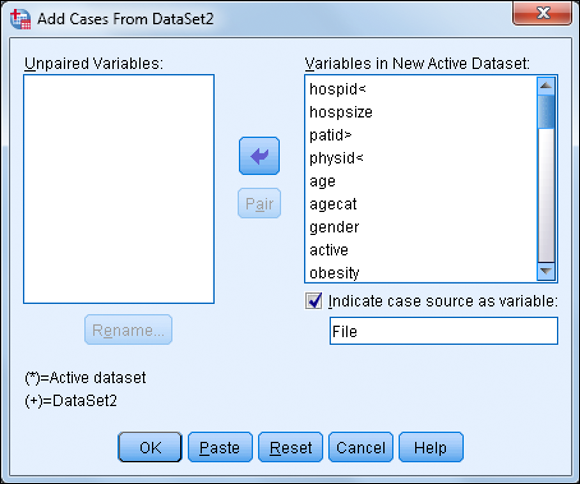
Figure 10-6: The completed Add Cases dialog box.
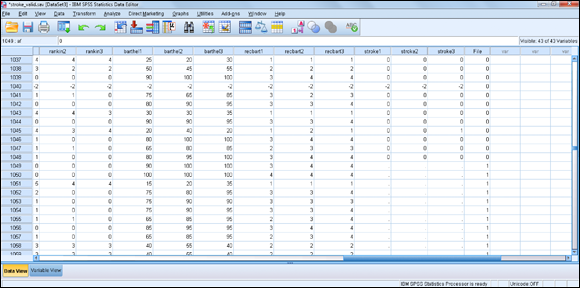
Figure 10-7: The combined data file.
Now you can perform analyses on the combined data file, or you can even compare the people in the first file with the people in the second file using the new variable that you just created.
Only two data files can be combined simultaneously when using dialog boxes. However, you can merge an unlimited number of files using syntax.
Merging Files Adding Variables
Add Variables joins two data files together so that information held for an individual in different locations can be analyzed together. There are two types of Add Variables merges: one-to-one and one-to-many. Both types add variables to cases matched on key variables. Key variables are case identifiers that exist in both files (for example, a variable like customer ID number).
In one-to-one merges, the basis for the cases is the same in both files and the cases are matched so that one case in the first file corresponds to one case in the second file. In Figure 10-8, for example, ID is the key variable used for the match. The resulting file contains all the variables from both files. All cases are retained from both files. Cases not in a file have system-missing values for the variables from that file. In our example, all cases were in both files.
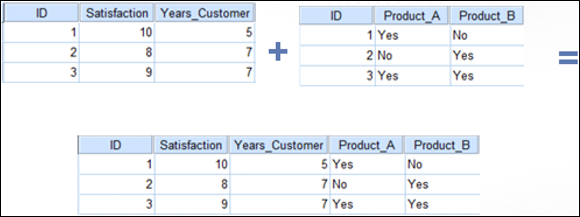
Figure 10-8: Adding variables using a one-to-one match.
Both input files must be sorted in ascending order on the key variables to get a one-to-one match to work properly.
In one-to-many merges, one file is designated as the Table file and cases from that file can match to multiple cases in the Case file. The Case file defines the cases in the merged file. The values of the key variable(s) must define unique cases in the Table file, but not in the Case file. In Figure 10-9, each case in the Case file represents a property with information about the property. Each case in the Table file is defined by a zip code with the mean property value for that zip code. Zip_code is the key variable that uniquely identifies each record in this file and is used as the key variable in the one-to-many merge. In the merged file, both cases one and two have the same value for mean_propvalue because they’re both in the 85718 zip code.
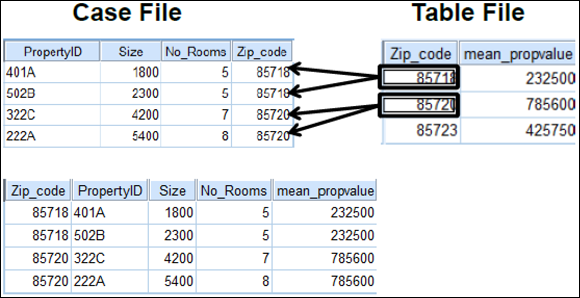
Figure 10-9: Adding variables using a one-to-many match.
The following example of a one-to-one match uses two of the data files that are not installed with IBM SPSS Statistics: electronics_company_info and electronics_complete.
-
From the main menu, choose File ⇒ Open ⇒ Data and load the electronics_company_info file, which is not in the IBM SPSS Statistics directory.
The data file with five variables and 5,003 cases is shown in Figure 10-10. This file contains information on each customer’s company.
Input files must be sorted on key variables. In this example the data has already been sorted on the key variable ID. -
From the main menu, choose File ⇒ Open ⇒ Data and load the electronics_complete file, which is not in the IBM SPSS Statistics directory.
The data file with 12 variables and 5,003 cases is shown in Figure 10-11. This file contains the customer’s purchase history.
Input files must be sorted on key variables. In this example, the data has already been sorted on the key variable ID.Now we want to combine these two files.
-
Choose Data ⇒ Merge Files ⇒ Add Variables.
The dialog box shown in Figure 10-12 appears.
At this point, you can combine the active dataset (electronics_complete) with any files that are open in IBM SPSS Statistics or files that are saved as an IBM SPSS Statistics data file. This means that if you want to combine files in other formats, you must first read the files into IBM SPSS Statistics.
-
Select the file electronics_company_info and then click Continue.
The dialog box shown in Figure 10-13 appears.
Variables that have unique names are listed in the New Active Dataset box. If the same variable name is used in both files, only one set of data values can be retained — these variables will appear in the Excluded Variables box. Although a renaming facility is available in the Add Variables dialog box, it’s safer to use unique names from the beginning.
If you’re merging two files from two time periods, some of the variables may well have the same name because they measure the same concept. In this case, each variable should be given a unique name — perhaps numbered, or based on the date of the survey — to differentiate them.
There are two options to rename variables:
- Change the name of one of the variables before adding the files together.
- Use the rename option within the Add Cases facility.
Notice that you can click OK at this point. If you do, you’ll be doing a merge based on Order. This joins the first record in the first dataset with the first record in the second dataset, and so on. When any of the datasets run out of records, no further output records are produced. This method can be dangerous if there happen to be any cases that are missing from a file or if files have been sorted differently. -
Select the Match Cases on Key Variables option. Select the variable ID(+), and click the button with the arrow to move the variable to the Key Variables box.
Notice that you can click OK at this point. If you do, you’ll be doing a merge based on a left outer join. It’s important to note that in a left outer join merge, cases are included only if they have key values that match key values in the active data file. -
Select the Cases Are Sorted in Order of Key Variables in Both Datasets option. Make sure that the Both Files Provide Cases option is selected (this is the option that produces a one-to-one match), as shown in Figure 10-14.
All the additional options in this dialog box are the same as those previously explained for the merge files Add Cases procedure.
-
Click OK.
Figure 10-15 provides a caution that both files must be sorted on the key variable(s). This warning box will always appear and does not indicate that there is a problem with the match.
Click OK.
The new combined file is generated. The result is a new file with 16 variables and 5,003 cases, as shown in Figure 10-16.
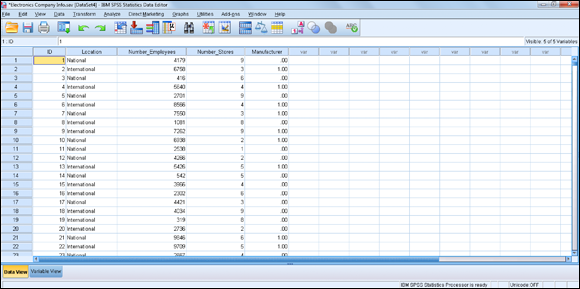
Figure 10-10: The electronics_company_info data file.
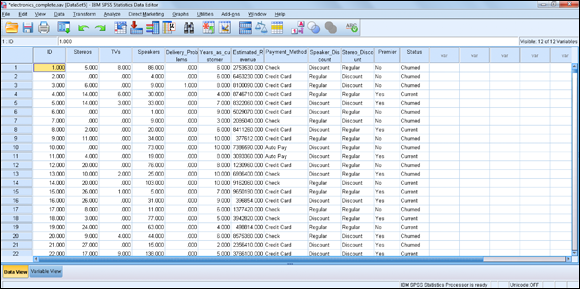
Figure 10-11: The electronics_complete data file.
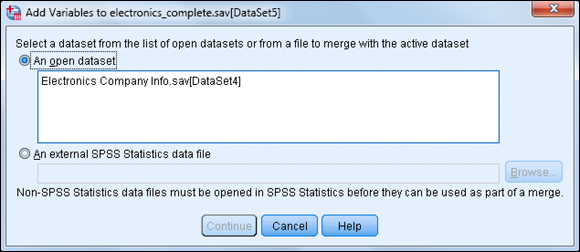
Figure 10-12: The initial Add Variables dialog box.
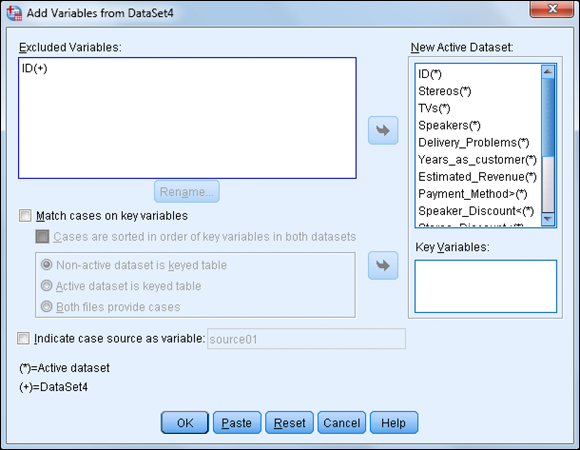
Figure 10-13: The Add Variables dialog box.
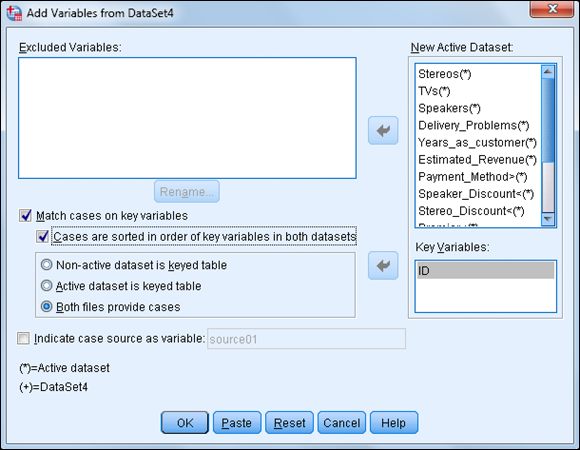
Figure 10-14: A completed Add Variables dialog box.
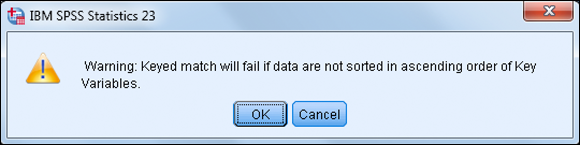
Figure 10-15: The merge warning.

Figure 10-16: The combined data file.
Now you can perform analyses on the combined data file and investigate relationships that wouldn’t have been possible without first performing the merge.
Only two data files can be combined simultaneously when using dialog boxes. However, you can merge an unlimited number of files using syntax.
The following example of a one-to-many match uses two of the data files that are not installed with IBM SPSS Statistics: rfm_transactions1 and rfm_aggregated.
- From the main menu, choose File ⇒ Open ⇒ Data and load the rfm_aggregated file, which is not in the IBM SPSS Statistics directory.
The data file with four variables and 995 cases is shown in Figure 10-17. This file contains customer’s purchase history, where each row represents a customer.
Input files must be sorted on key variables. In this example, the data has already been sorted on the key variable ID. - From the main menu, choose File ⇒ Open ⇒ Data and load the rfm_transactions1 file, which is not in the IBM SPSS Statistics directory.
The data file with five variables and 4,906 cases is shown in Figure 10-18. This file contains customer transactional data, where each row represents a transaction.
Input files must be sorted on key variables. In this example, the data has already been sorted on the key variable ID.Now we want to combine these two files.
- Choose Data ⇒ Merge Files ⇒ Add Variables.
- Select the file rfm_aggregated and then click Continue.
- Select the Match Cases on Key Variables option. Select the variable id, and click the button with the arrow to move the variable to the Key Variables box.
-
Select the Cases Are Sorted in Order of Key Variables in Both Datasets option. Make sure that the Non-active Dataset Is Keyed Table option is selected (this is the option that produces a one-to-many match), as shown in Figure 10-19.
The Active Dataset is Keyed Table option is used when doing a many-to-one match.
- Click OK.
-
Click OK again.
The new combined file is generated, with eight variables and 4,906 cases, as shown in Figure 10-20.
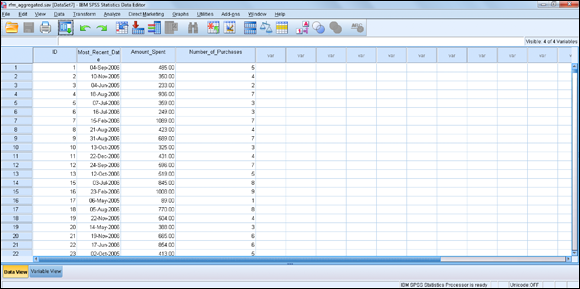
Figure 10-17: The rfm_aggregated data file.

Figure 10-18: The rfm_transactions1 data file.
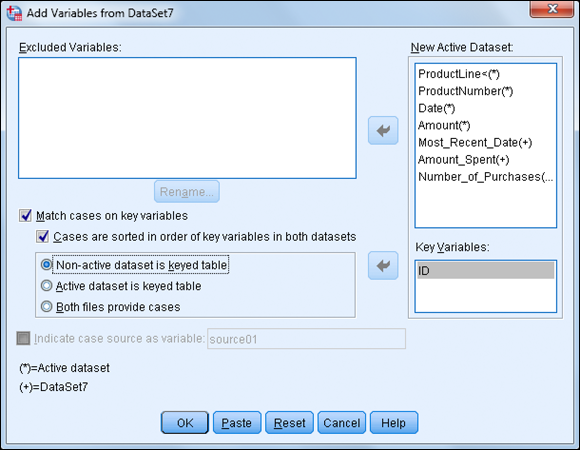
Figure 10-19: The completed Add Variables dialog box.
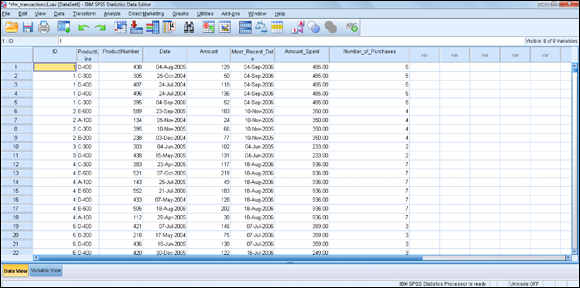
Figure 10-20: The combined data file.
Now you can perform analyses on the combined data file and investigate relationships that wouldn’t have been possible without first performing the merge.