
8.3. Policies in action
SQL Server 2008 ships with a number of predefined policies that can be imported and evaluated. These policies encapsulate best practices such as those for securing the surface area of a SQL instance. In addition to importing these policies, new policies can be created and exported to file for later use on other server instances.
In this section, we'll start off by importing an existing policy and looking at the various evaluation options. We'll then walk through the process of creating a new policy from scratch and exporting it to file.
8.3.1. Importing policies from file
In SQL Server 2005 and earlier, tools such as Best Practices Analyzer and Baseline Security Analyzer were used to periodically check a SQL Server instance for adherence to various best practices. In SQL Server 2008, policy-based management can be used to import predefined policies that encapsulate best practice settings.
Once imported, depending on the evaluation mode, the policies remain in place, actively checking, preventing, and/or logging violations. As such, they're a stronger, more active version of previous-generation tools such as Best Practices Analyzer, and can be customized to suit a particular environment's requirements.
Importing an existing policy is straightforward. In SQL Server Management Studio simply right-click the Policies menu under Policy Management, choose Import Policy, and specify the location of the policy definition file. SQL Server 2008 ships with anumber of predefined policies that can be imported. These policies are located in C:Program FilesMicrosoft SQL Server100ToolsPolicies.
In this directory (or the equivalent installation directory) are three subdirectories containing polices for the Database Engine, together with Reporting Services and Analysis Services. The policies for Reporting and Analysis Services are limited to surface area configuration checks, and the Database Engine directory contains approximately 50 policies covering a wide variety of best practices. Here are some examples of best practices addressed by the supplied policies:
Backup files must be on separate devices from the database files.
Data and log files should be on separate drives.
Max Degree of Parallelism should be less than 8.
Backups should be performed frequently.
One of the nice things about the supplied policies is that some of them can be used with previous versions of SQL Server. For example, the File Growth for SQL Server 2000 policy can be used to check for the existence of SQL Server 2000 databases larger than 1GB whose AutoGrowth property is percentage based rather than a fixed size. Although policies can be defined and executed against versions of SQL Server prior to 2008, there are some restrictions, and we'll cover these (and some workarounds) later in this chapter.
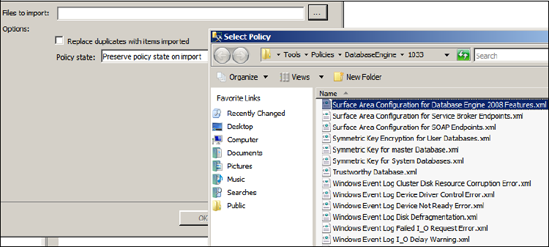
In the example shown in figure 8.6, we'll import the supplied Surface Area Configuration for Database Engine 2008 Features.
Once the file is selected, the only other option we need to specify is Policy State. By default, the policy state is preserved on import—that is, if the policy is enabled in the definition file, it will be enabled on import. Alternatively, we can explicitly enable or disable the policy as part of the import process.
Figure 8.6. You can import existing policies to check SQL instances for compliance based on predefined configuration files.
Now that we've imported a policy, let's look at the process of evaluating it.
8.3.2. Evaluating policies
One of the most powerful features of policy-based management is the variety of ways in which checks and violations can be defined and managed at an individual policy level.
In the previous section we covered the four evaluation modes: On Change – Prevent, On Change – Log Only, On Schedule, and On Demand. Let's take a look at an example of each of these methods, starting with On Demand.
On Demand
When you create a policy using the On Demand evaluation mode, the policy is created in a disabled state. You can then use it in an ad hoc manner as required by right-clicking the policy and choosing Evaluate. Let's do this for the Surface Area Configuration policy we imported earlier. Figure 8.7 shows the evaluation results of this policy. In this example, the evaluation failed because the target server has Database Mail enabled.
In addition to clicking View to see the details of the evaluation, you can click Apply, which will reconfigure the server to be compliant with the policy.
On Change – Prevent
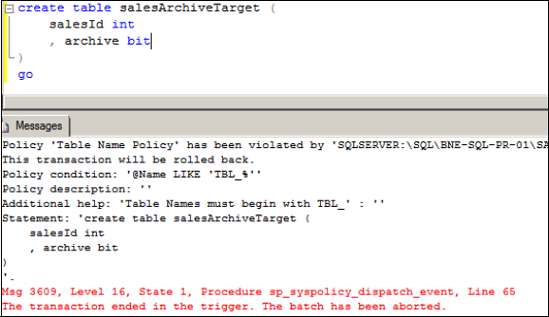
You may wish to enforce certain policies so that violations are prevented from occurring. Unfortunately, this is only possible for a certain class of conditions, specifically those able to be rolled back with DDL triggers.
As an example, figure 8.8 contains the error message returned when a table create statement violates a table name condition specifying that tables must be created with a tbl_ prefix.
Figure 8.7. You can manually evaluate a policy by right-clicking it and choosing Evaluate.

Figure 8.8. The On Change – Prevent evaluation mode will actively prevent changes that violate policy conditions.
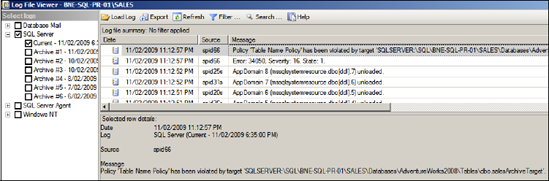
On Change – Log Only
Like On Change – Prevent, On Change – Log Only actively monitors for policy violations, but rather than roll back the violation, it logs the violation to the SQL Server log. Regardless of the evaluation mode, all policy failures are logged,[] enabling custom policy failure alerts to be set up, a process we'll cover in chapter 14. Figure 8.9 shows such a policy failure error in the SQL Server log.
[] Error numbers 34050 through 34053 are reserved for policy failures.
Figure 8.9. All policy violations are recorded in the SQL Server log.
On Schedule
The On Schedule evaluation mode lets you enable policies to be checked on a scheduled basis. This mode ensures that the overhead of active policy checking doesn't impact performance. When you choose this mode, the policy creator selects a schedule, which creates SQL Agent jobs to run the scheduled policy checks.
Now that we've looked at the process of importing policies and covered the evaluation modes, let's walk through the process of creating a new policy to check database properties such as AutoClose and AutoShrink.
8.3.3. Creating a database properties policy
The first step in creating a new policy is to right-click Policies under Policy Management and choose New Policy. You then enter a policy name and either choose an existing condition or create a new condition.
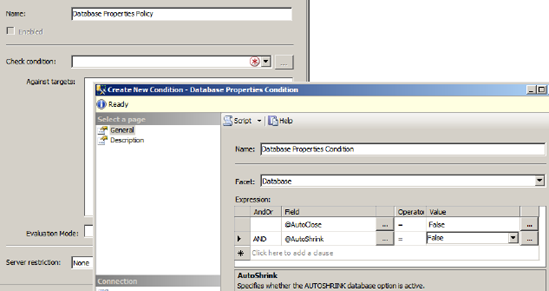
In the example shown in figure 8.10, we'll create a policy called Database Properties Policy and create a new condition. We'll use the Database facet and specify that both AutoClose and AutoShrink should be false.
Figure 8.10. After selecting a condition's facet, we build the expression.
After clicking OK, we're returned to the policy definition screen shown in figure 8.11. Here we select Every Database for the condition's target. For the evaluation mode, we'll choose On Schedule and create a new schedule for Nightly 11PM.
Figure 8.11. When you're creating a policy, after choosing a condition, you select the condition target and evaluation mode.
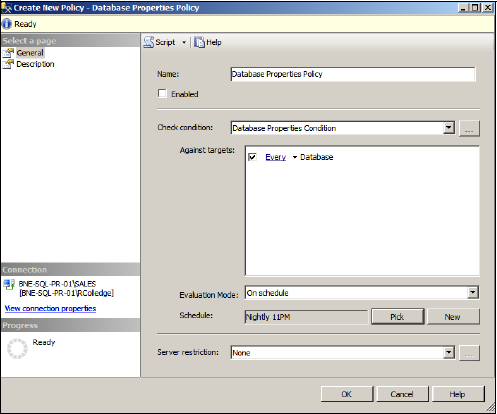
Figure 8.12. SQL Server Management Studio includes visual aids to make policy violations stand out. In this case, the AdventureWorks2008 database has failed a policy.
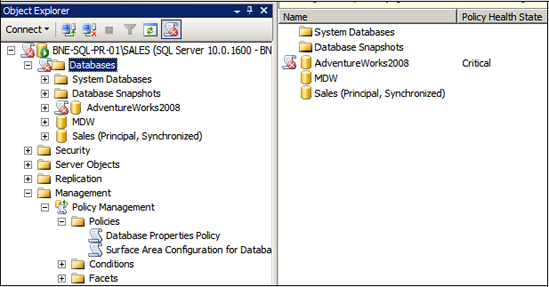
At this point, the policy is created and will run according to the defined schedule. One of the really useful features of the new SQL Server Management Studio is that it's aware of policy failures. As shown in figure 8.12, any server and/or database that has failed a policy will be marked with a red cross icon. In this example, the AdventureWorks2008 database is set to AutoShrink and AutoClose, contrary to the policy we just created.
To correct the policy failure, rather than manually setting these two database properties we can simply right-click the database and choose Polices > Evaluate to view the policy failure, and then click Apply to force the server's properties to comply with the policy conditions.
Once created, policies can be easily exported, and doing so enables a number of important management functions.
8.3.4. Exporting policies
Policies can be exported in one of two ways. First, you can simply right-click an existing policy and choose Export Policy. The resulting dialog box allows you to select a location in which to save the XML-based policy file.
The other method is based on an instance facet. By right-clicking on a registered SQL Server instance, you can choose Facets. The View Facets window allows you to view the instance properties on a facet-by-facet basis, but more important, you can choose the option Export Current State as Policy.
Figure 8.13 shows the Server Performance facet of the BNE-SQL-PR-01SALES instance. By clicking the Export Current State as Policy button, we're able to create a new policy file based on the Server Performance properties of this server.
The importance of this function can't be overstated; essentially, we're able to configure a single server to be exactly how we want all servers to be configured, and then create policies based on the individual facets. Doing so makes the configuration of multiple servers very simple, a process we'll cover next.
Figure 8.13. The Export Current State as Policy button allows us to create a policy file based on an instance's facet configuration.
