
![]()
Advanced Select Techniques
It’s easy to return data from a table. What’s not so easy is to get the data you need how you need it, utilizing fast, set-based methods. This chapter will show you some of the advanced techniques that can be used when selecting data.
6-1. Avoiding Duplicate Results
Problem
You need to see all of the dates where any employee was hired. However, you have hired multiple employees on the same dates, and you want to see the date only once.
Solution #1
Utilize the DISTINCT clause of the SELECT statement to remove duplicate values.
SELECT DISTINCT HireDate
FROM HumanResources.Employee
ORDER BY HireDate;
This query returns the following abridged result set:
HireDate
----------
2000-07-31
2001-02-26
2001-12-12
...
2006-05-18
2006-07-01
2006-11-01
2007-04-15
2007-07-01
Solution #2
Utilize the GROUP BY clause of the SELECT statement to remove duplicate values.
SELECT HireDate
FROM HumanResources.Employee
GROUP BY HireDate
ORDER BY HireDate;
This query returns the same result set.
How It Works
The default behavior of a SELECT statement is to use the ALL keyword (however, because it is the default, you’ll rarely see this being used in a query), meaning that all rows will be retrieved and displayed if they exist. Using the DISTINCT keyword instead of ALL allows you to return only unique rows (across columns selected) in your results.
When utilizing the GROUP BY clause, all unique values are grouped together. If all columns in the query are in the GROUP BY clause, the output will not have any duplicate rows.
Problem
You want to return only the last five dates where any employee was hired.
Solution
Utilize the TOP clause of the SELECT statement, together with an ORDER BY clause, to return the five most recent dates where an employee was hired.
SELECT TOP (5) HireDate
FROM HumanResources.Employee
GROUP BY HireDate
ORDER BY HireDate DESC;
This query returns the following result set:
HireDate
----------
2007-07-01
2007-04-15
2006-11-01
2006-07-01
2006-05-18
How It Works
The TOP keyword allows you to return the first n number of rows from a query based on the number of rows or percentage of rows that you define. The first rows returned are also impacted by how your query is ordered. In this example, we are ordering the results by HireDate descending, so only the first five most recent dates are returned.
The TOP keyword also allows returning a percentage. To return the top 5 percent of the most recent dates any employee was hired, add the PERCENT keyword to the previous query.
SELECT TOP (5) PERCENT HireDate
FROM HumanResources.Employee
GROUP BY HireDate
ORDER BY HireDate DESC;
This query returns the following result set:
HireDate
----------
2007-07-01
2007-04-15
2006-11-01
2006-07-01
2006-05-18
2005-07-01
2005-03-28
2005-03-18
2005-03-17
![]() Note The parentheses surrounding the expression are required in INSERT, UPDATE, DELETE, and MERGE statements. To maintain backward compatibility, they are optional in SELECT statements, though it is recommended that they be used in order to be consistent across all of the statements in which they are used.
Note The parentheses surrounding the expression are required in INSERT, UPDATE, DELETE, and MERGE statements. To maintain backward compatibility, they are optional in SELECT statements, though it is recommended that they be used in order to be consistent across all of the statements in which they are used.
6-3. Renaming a Column in the Output
Problem
Your query has a column that is the result of a function, and you need to assign the column a name. Or, your query joins multiple tables together, and you are returning a column from multiple tables that have the same name.
Solution
Utilize a column alias to specify an alternate name for a column in the result set.
SELECT ss.name AS SchemaName,
       TableName = st.name,
       st.object_id ObjectId
FROM sys.schemas AS ss
     JOIN sys.tables st
       ON ss.schema_id = st.schema_id
ORDER BY SchemaName, TableName;
This query returns the following abridged result set:
| SchemaName | TableName | ObjectId |
| ---------- | --------------- | ---------- |
| dbo | AWBuildVersion | 469576711 |
| dbo | DatabaseLog | 245575913 |
| dbo | ErrorLog | 277576027 |
| dbo | MyTestTable | 1159675179 |
| dbo | Person | 1975678086 |
| dbo | PersonPhone | 2039678314 |
| dbo | PhoneNumberType | 2007678200 |
![]() Note The ObjectId values returned may be different on your server.
Note The ObjectId values returned may be different on your server.
How It Works
In this example, two system views are being queried. Each system view contains a name column. To prevent ambiguity, each column is supplied a column alias.
Note that two methods are shown for providing a column alias. In the first line, the column is aliased by specifying the column being returned, followed by the optional AS keyword, and then followed by the column alias. In the second line, the column alias is specified first, followed by an equals sign, which is followed by the column being returned. The third column utilizes the first method without the optional AS keyword. Either method will work in SQL Server. It should be noted that the AS method is the ANSI standard for column aliases.
6-4. Retrieving Data Directly into Variables
Solution
Utilize the SELECT statement to retrieve data from a table and populate a variable with that data.
DECLARE @FirstHireDate DATE,
        @LastHireDate DATE;

SELECT @FirstHireDate = MIN(HireDate),
       @LastHireDate = MAX(HireDate)
FROM    HumanResources.Employee;

SELECT @FirstHireDate AS FirstHireDate,
       @LastHireDate AS LastHireDate;
This query returns the following result set:
FirstHireDate     LastHireDate
-------------     ------------
2000-07-31        2007-07-01
How It Works
The variables are initially declared. The first query retrieves the first and last hire dates and populates the variables with these values. The final query returns these variables to be displayed.
6-5. Creating a New Table with the Results from a Query
Problem
You have a query where you need to have the result set from it put into a new table.
Solution
Utilize the INTO clauses of the SELECT statement to create and populate a new table with the results from this query.
SELECT *
INTO   #Sales
FROM   Sales.SalesOrderDetail
WHERE  ModifiedDate = '2005-07-01T00:00:00';

SELECT COUNT(*) AS QtyOfRows
FROM   #Sales;
This query returns the following result set:
QtyOfRows
---------
357
How It Works
The SELECT ... INTO statement creates a new table in the default filegroup and then inserts the result set from the query into it. In the previous example, the rows from the Sales.SalesOrderDetail table that were modified on July 1, 2005, are put into the new local temporary table #Sales. You can use a three-part naming sequence to create the table in a different database on the same SQL Server instance. The columns created are in the order of the columns returned in the query, and they have the name of the column as specified in the query (meaning that if you use a column alias, the column alias will be the name of the column). The data types for the columns will be the data type of the underlying column.
There are some limitations with the use of this syntax.
- You cannot create a new table on a different instance or server.
- You cannot create a table variable or a partitioned table.
- Only data and columns are copied; indexes, constraints, and triggers are not copied.
- Use of the ORDER BY clause does not guarantee that the rows will be inserted in that order.
- If a computed column is selected, the column in the new table will not be a computed column. The data in this column will be the result of the computed column.
- New columns that originate from a sparse column will not have the sparse property set.
- The Identity property of a column is applied to the new column, unless one of the following conditions is true:
- Multiple select statements are joined by using UNION.
- More than one column in the result set has a column with the Identity property set.
- The identity column is listed more than once in the select list.
- The SELECT statement contains a join, contains a GROUP BY, or uses an aggregate function.
- The identity column is from a remote data source.
If the database is in the simple or bulk-logged recovery model, then the SELECT ... INTO statement is minimally logged. For more information about minimally logged operations, see http://msdn.microsoft.com/en-us/library/ms190925.aspx#MinimallyLogged.
6-6. Filtering on the Results from a Subquery
Problem
You need to filter the results from one query based upon the results from another query. For instance, you want to retrieve all of the purchase order numbers for any order where there is a line item unit price between 1,900 and 2,000.
Solution
Utilize a query with a subquery, where the subquery has the results that will be used to be filtered upon by the outer query.
SELECT s.PurchaseOrderNumber
FROM   Sales.SalesOrderHeader s
WHERE  EXISTS ( SELECT SalesOrderID
                FROM   Sales.SalesOrderDetail
                WHERE  UnitPrice BETWEEN 1900 AND 2000
                       AND SalesOrderID = s.SalesOrderID );
This query returns the following result set:
PurchaseOrderNumber
-------------------
PO12586178184
PO10440182311
PO13543119495
PO12586169040
PO2146113582
PO7569171528
PO5858172038
How It Works
In this example, the PurchaseOrderNumber column is retrieved from the Sales.SalesOrderHeader table. The individual line items for each order are in the Sales.SalesOrderDetail table. The subquery returns a row if there is a Sales.SalesOrderDetail record with a UnitPrice between 1,900 and 2,000 for the SalesOrderId. If a record exists in the subquery, the outer query will return the PurchaseOrderNumber for that order. If you look at the last line of the subquery, you can see that the SalesOrderId is being related to the SalesOrderId column from the Sales.SalesOrderHeader table. This is an example of a correlated subquery: the values returned depend upon the values of the outer query.
Subqueries can frequently be rewritten into a query with a JOIN condition. You should evaluate each query to see which method achieves the best performance. For instance, the example shown in this recipe can be rewritten to the following format, which returns the same result set:
SELECT DISTINCT sh.PurchaseOrderNumber
FROM Sales.SalesOrderHeader AS sh
     JOIN Sales.SalesOrderDetail AS sd
     ON sh.SalesOrderID = sd.SalesOrderID
WHERE sd.UnitPrice BETWEEN 1900 AND 2000;
6-7. Selecting from the Results of Another Query
Problem
You have a query that needs to be used as a data source input into another query.
Solution
Make the query into a derived table, and use it in the FROM clause of the second query.
SELECT DISTINCT
        s.PurchaseOrderNumber
FROM    Sales.SalesOrderHeader s
        INNER JOIN (SELECT SalesOrderID
                    FROM   Sales.SalesOrderDetail
                    WHERE  UnitPrice BETWEEN 1900 AND 2000
                   ) dt
        ON s.SalesOrderID = dt.SalesOrderID;
This query returns the following result set:
PurchaseOrderNumber
-------------------
PO10440182311
PO12586169040
PO12586178184
PO13543119495
PO2146113582
PO5858172038
PO7569171528
How It Works
This example’s query searches for the PurchaseOrderNumber from the Sales.SalesOrderHeader table for any order that contains products in the Sales.SalesOrderDetails table with a UnitPrice between 1,900 and 2,000. The query joins the Sales.SalesOrderHeader table to a derived table (which is itself a query), which is encapsulated in parentheses and is followed by a table alias (dt).
Since the derived table doesn’t require a temporary table to store the results, it can frequently perform better than using temporary tables since you eliminate the steps that SQL Server takes to create, allocate, populate, and destroy the temporary table.
6-8. Passing Rows Through a Function
Solution
Use the APPLY operator in the FROM clause of a query to invoke a table-valued function.
CREATE FUNCTION dbo.fn_WorkOrderRouting (@WorkOrderID INT)
RETURNS TABLE
AS
RETURN
       SELECT   WorkOrderID,
                ProductID,
                OperationSequence,
                LocationID
       FROM     Production.WorkOrderRouting
       WHERE    WorkOrderID = @WorkOrderID;
GO

SELECT TOP (5)
       w.WorkOrderID,
       w.OrderQty,
       r.ProductID,
       r.OperationSequence
FROM   Production.WorkOrder w
       CROSS APPLY dbo.fn_WorkOrderRouting(w.WorkOrderID) AS r
ORDER  BY w.WorkOrderID,
          w.OrderQty,
          r.ProductID;
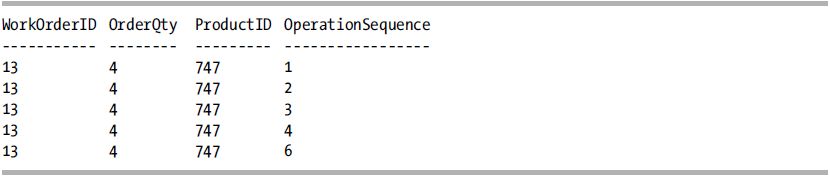
This query returns the following result set:
How It Works
First, a table-valued function is created that returns work order routing information for the WorkOrderId passed to it. The query then selects the first five records from the Production.WorkOrder table with two columns from the table-valued function. The next part of the SELECT statement is the key piece of this recipe: in the FROM clause, for each row from the Production.WorkOrder table, the WorkOrderId column is passed to the new fn_WorkOrderRouting function with the CROSS APPLY operator.
Both the left and right operands of the APPLY operator are table sources; the difference is that the right operand can be a table-valued function that accepts a parameter from the left operand. (The left operand can be a table-valued function, but it cannot accept an input to a parameter from the right operand.) The APPLY operator works by applying the right operand against each row of the left operand. Similar to the JOIN operators, the columns being returned from the left operand will be duplicated for each row returned by the right operand.
The CROSS and OUTER clauses of the APPLY operator are used to control how rows are returned in the final result of the two operands when the APPLY operator does not return any rows. Similar to an INNER JOIN, if CROSS APPLY is utilized and the right operand does not return any rows, then that row from the left operand is removed from the result set. And like an OUTER JOIN, if OUTER APPLY is utilized and the right operand does not return any rows, then that row from the left operand is returned with the values of the columns that come from the right operand being set to NULL.
To illustrate the difference between CROSS APPLY and OUTERAPPLY, let’s add a record to the Production.WorkOrder table.
INSERT INTO Production.WorkOrder
        (ProductID,
        OrderQty,
        ScrappedQty,
        StartDate,
        EndDate,
        DueDate,
        ScrapReasonID,
        ModifiedDate)
VALUES (1,
        1,
        1,
        GETDATE(),
        GETDATE(),
        GETDATE(),
        1,
        GETDATE());
Because this is a new row and the Production.WorkOrder table has an IDENTITY column for the WorkOrderId, the new row will have the maximum WorkOrderId value in the table. Additionally, the new row will not have an associated value in the Production.WorkOrderRouting table because it was just added.
Next, the previous CROSS APPLY query is executed, filtering it to return data for the newly inserted row only.
SELECT w.WorkOrderID,
       w.OrderQty,
       r.ProductID,
       r.OperationSequence
FROM   Production.WorkOrder AS w
       CROSS APPLY dbo.fn_WorkOrderRouting(w.WorkOrderID) AS r
WHERE  w.WorkOrderID IN (SELECT  MAX(WorkOrderID)
                         FROM    Production.WorkOrder);
This query returns the following result set:
WorkOrderID     OrderQty     ProductID     OperationSequence
-----------     --------     ---------     -----------------
Since there isn’t a row in the Production.WorkOrderRouting table, a row isn’t returned by the function. Since a CROSS APPLY is being utilized, the absence of a row from the function removes the row from the left operand, resulting in no rows being returned by the query.
Now, change the CROSS APPLY to an OUTER APPLY.
SELECT w.WorkOrderID,
       w.OrderQty,
       r.ProductID,
       r.OperationSequence
FROM   Production.WorkOrder AS w
       OUTER APPLY dbo.fn_WorkOrderRouting(w.WorkOrderID) AS r
WHERE  w.WorkOrderID IN (SELECT MAX(WorkOrderID)
                         FROM   Production.WorkOrder);
This query returns the following result set:
WorkOrderID     OrderQty     ProductID     OperationSequence
-----------     --------     ---------     -----------------
72592           1            NULL          NULL
You may have noticed that I have described the left and right operands of the APPLY operator as a table source. This means that you do not have to utilize a table-valued function for the right operand; you can use anything that returns a table, such as another SELECT statement. For example, the following query returns the same result set as the first example in this recipe without the use of the table-valued function:
SELECT TOP (5)
        w.WorkOrderID,
        w.OrderQty,
        r.ProductID,
        r.OperationSequence
FROM    Production.WorkOrder w
        CROSS APPLY (SELECT WorkOrderID,
                            ProductID,
                            OperationSequence,
                            LocationID
                     FROM   Production.WorkOrderRouting
                     WHERE  WorkOrderID = w.WorkOrderId
                   ) AS r
ORDER BY w.WorkOrderID,
         w.OrderQty,
         r.ProductID;
In this example, we are utilizing the CROSS APPLY operator against a correlated subquery instead of a table-valued function. The only difference in the correlated subquery is that the variable in the WHERE clause has been replaced with the column from the table that was being passed into the table-valued function.
6-9. Returning Random Rows from a Table
Problem
You want to return a sampling of rows from a table.
Solution
Utilize the TABLESAMPLE clause of the SELECT statement.
SELECT FirstName,
       LastName
FROM   Person.Person
TABLESAMPLE SYSTEM (2 PERCENT);
This query returns the following abridged result set:
| FirstName | LastName |
| --------- | ----------- |
| Madeline | King |
| Marcus | King |
| Maria | King |
| Anton | Kirilov |
| Anton | Kirilov |
| Sandra | Kitt |
| Christian | Kleinerman |
| Christian | Kleinerman |
| Andrew | Kobylinski |
| Reed | Koch |
| Reed | Koch |
| Reed | Koch |
![]() Note Because of the random nature of this clause, you will see different results from what is shown.
Note Because of the random nature of this clause, you will see different results from what is shown.
How It Works
TABLESAMPLE allows you to extract a sampling of rows from a table in the FROM clause. This sampling can be based on a percentage of a number of rows. You can use TABLESAMPLE when only a sampling of rows is necessary for the application instead of a full result set. TABLESAMPLE also provides you with a somewhat randomized result set. Because of this, if you rerun the previous example, you will get different results.
TABLESAMPLE works by extracting a sample of rows from the query result set. In this example, 2 percent of rows were sampled from the Person.Person table. However, don’t let the “percent” fool you. That percentage is the percentage of the table’s data pages. Once the sample pages are selected, all rows for the selected pages are returned. Since the fill state of pages can vary, the number of rows returned will also vary—you’ll notice this in the row count returned. If you designate the number of rows, this is actually converted by SQL Server into a percentage, and then the same method used by SQL Server to identify the percentage of data pages is used.
6-10. Converting Rows into Columns
Problem
Your database stores information about your employees, including what department they are assigned to and what shift they work in. You need to produce a report that shows how many employees by department are assigned to each shift for selected departments, with each department being a separate column in the result set.
Solution
Use the PIVOT operator to pivot the department column into columns for each department, and count the employees in each department by shift.
How It Works
We start off this example by first examining the data before it is pivoted.
SELECT s.Name AS ShiftName,
       h.BusinessEntityID,
       d.Name AS DepartmentName
FROM   HumanResources.EmployeeDepartmentHistory h
       INNER JOIN HumanResources.Department d
           ON h.DepartmentID = d.DepartmentID
       INNER JOIN HumanResources.Shift s
           ON h.ShiftID = s.ShiftID
WHERE EndDate IS NULL
       AND d.Name IN ('Production', 'Engineering', 'Marketing')
ORDER BY ShiftName;
This query returns the following (abridged) result set:
| ShiftName | BusinessEntityID | DepartmentName |
| --------- | ---------------- | -------------- |
| Day | 6 | Engineering |
| Day | 14 | Engineering |
| Day | 15 | Engineering |
| Day | 16 | Marketing |
| Day | 17 | Marketing |
| Day | 18 | Marketing |
| Day | 25 | Production |
| Day | 27 | Production |
| Day | 28 | Production |
| ... | ||
| Evening | 145 | Production |
| Evening | 146 | Production |
| Evening | 147 | Production |
| ... | ||
| Night | 71 | Production |
| Night | 72 | Production |
| Night | 73 | Production |
In this result set, we can see that all of the departments are listed in one column. The next step is to pivot the department values returned from this query into columns, along with a count of employees by shift.
SELECT ShiftName,
       Production,
       Engineering,
       Marketing
FROM (SELECT s.Name AS ShiftName,
             h.BusinessEntityID,
             d.Name AS DepartmentName
      FROM HumanResources.EmployeeDepartmentHistory h
           INNER JOIN HumanResources.Department d
               ON h.DepartmentID = d.DepartmentID
           INNER JOIN HumanResources.Shift s
               ON h.ShiftID = s.ShiftID
      WHERE EndDate IS NULL
            AND d.Name IN ('Production', 'Engineering', 'Marketing')
      ) AS a
PIVOT
(
 COUNT(BusinessEntityID)
 FOR DepartmentName IN ([Production], [Engineering], [Marketing])
) AS b
ORDER BY ShiftName;
This query returns the following result set:

In this second query, we utilized the PIVOT operator to shift the specified departments into columns, while simultaneously performing a COUNT aggregation by the shift. The syntax for the PIVOT operator is as follows:
FROM table_source
PIVOT ( aggregate_function ( value_column )
       FOR pivot_column
       IN ( <column_list>)
       ) table_alias
Table 6-1 shows the arguments for the PIVOT operator.
Table 6-1. PIVOT Arguments
| Argument | Description |
|---|---|
| table_source | The table where the data will be pivoted. |
| aggregate_function | The aggregate function that will be used against the specified column. COUNT(*) is not allowed. |
| value_column | The column that will be used in the aggregate function. |
| pivot_column | The column that will be used to create the column headers. |
| column_list | The values to pivot from the pivot column. |
| table_alias | The table alias of the pivoted result set. |
Prior to the introduction of the PIVOT operator, a pivot would be performed through aggregations, calculated columns, and the GROUP BY operator. The previous query with the PIVOT operator can be replicated using this method:
SELECT s.Name AS ShiftName,
       SUM(CASE WHEN d.Name = 'Production' THEN 1 ELSE 0 END) AS Production,
       SUM(CASE WHEN d.Name = 'Engineering' THEN 1 ELSE 0 END) AS Engineering,
       SUM(CASE WHEN d.Name = 'Marketing' THEN 1 ELSE 0 END) AS Marketing
FROM HumanResources.EmployeeDepartmentHistory h
       INNER JOIN HumanResources.Department d
        ON h.DepartmentID = d.DepartmentID
       INNER JOIN HumanResources.Shift s
        ON h.ShiftID = s.ShiftID
WHERE h.EndDate IS NULL
       AND d.Name IN ('Production', 'Engineering', 'Marketing')
GROUP BY s.Name;
This query returns the same result set as the query utilizing the PIVOT operator.
One key item to point out in using these pivoting queries is that the values being pivoted must be known in advance. If the values are not known in advance, then the queries have to be constructed dynamically. In looking at the query utilizing the PIVOT operator, the dynamically generated name needs to be used in two places: in the column_list from the outer query and then again in the PIVOT operator; and in this second place the value needs to have the [] brackets for qualifying a name. In the second example (that doesn’t utilize the PIVOT operator), the value is used twice, in the same line. When constructing a dynamic pivot, many developers find it easier to work with the second example than the first. (This comparison ignores the department names hard-coded in the WHERE clause in both examples; if the values aren’t known, then you would not be utilizing the values.)
6-11. Converting Columns into Rows
Problem
You have a table that has multiple columns for the various phone numbers. You want to normalize this data by converting the columns into rows.
Solution
Utilize the UNPIVOT operator to convert multiple columns of a row to a row for each column.
CREATE TABLE dbo.Contact
       (
       EmployeeID INT NOT NULL,
       PhoneNumber1 BIGINT,
       PhoneNumber2 BIGINT,
       PhoneNumber3 BIGINT
       )
GO

INSERT dbo.Contact
       (EmployeeID, PhoneNumber1, PhoneNumber2, PhoneNumber3)
VALUES (1, 2718353881, 3385531980, 5324571342),
       (2, 6007163571, 6875099415, 7756620787),
       (3, 9439250939, NULL, NULL);

SELECT EmployeeID,
       PhoneType,
       PhoneValue
FROM dbo.Contact c
UNPIVOT
(
 PhoneValue
 FOR PhoneType IN ([PhoneNumber1], [PhoneNumber2], [PhoneNumber3])
) AS p;
This query returns the following result set:
| EmployeeID | PhoneType | PhoneValue |
| ----------- | ------------ | ---------- |
| 1 | PhoneNumber1 | 2718353881 |
| 1 | PhoneNumber2 | 3385531980 |
| 1 | PhoneNumber3 | 5324571342 |
| 2 | PhoneNumber1 | 6007163571 |
| 2 | PhoneNumber2 | 6875099415 |
| 2 | PhoneNumber3 | 7756620787 |
| 3 | PhoneNumber1 | 9439250939 |
How It Works
The UNPIVOT operator does almost the opposite of the PIVOT operator by changing columns into rows. It uses the same syntax as the PIVOT operator, only UNPIVOT is used instead of PIVOT.
This example utilizes UNPIVOT to remove column-repeating groups frequently found in denormalized tables. The first part of this example creates and populates a denormalized table, which has incrementing phone number columns.
The UNPIVOT operator is then utilized to convert the numerous phone number columns into a more normalized form of reusing a single PhoneValue column and having a PhoneType column to identify the type of phone number, instead of repeating the phone number column multiple times.
The UNPIVOT operator starts off with an opening parenthesis. A new column called PhoneValue is created to hold the values from the specified columns. The FOR clause specifies the pivot column (PhoneType) that will be created, and its value will be the name of the column. This is followed by the IN clause, which specifies the columns from the original table that will be consolidated into a single column. Finally, a closing parenthesis is specified, and the UNPIVOT operation is aliased with an arbitrary table alias.
6-12. Reusing Common Subqueries in a Query
Problem
You have a query that utilizes the same subquery multiple times. You have noticed that changes to the subquery are becoming problematic because you occasionally miss making a change to one of the subqueries.
Solution
Utilize a common table expression to define the query once, and reference it in place of the subqueries in your query.
WITH cte AS
(
SELECT SalesOrderID
FROM Sales.SalesOrderDetail
WHERE UnitPrice BETWEEN 1900 AND 2000
)
SELECT s.PurchaseOrderNumber
FROM Sales.SalesOrderHeader s
WHERE EXISTS (SELECT SalesOrderID
        FROM cte
        WHERE SalesOrderID = s.SalesOrderID );
This query returns the following result set:
PurchaseOrderNumber
-------------------
PO12586178184
PO10440182311
PO13543119495
PO12586169040
PO2146113582
PO7569171528
PO5858172038
How It Works
A common table expression, commonly referred to by its acronym CTE, is similar to a view or derived query, allowing you to create a temporary query that can be referenced within the scope of a SELECT, INSERT, UPDATE, DELETE, or MERGE statement. Unlike a derived query, you don’t need to copy the query definition multiple times for each time it is used. You can also use local variables within a CTE definition—something you can’t do in a view definition. The syntax for a CTE is as follows:
WITH expression_name [ ( column_name [ , ... n ] ) ] AS ( CTE_query_definition ) [ , ... n ]
The arguments of a CTE are described in the Table 6-2.
Table 6-2. CTE Arguments
| Argument | Description |
|---|---|
| expression_name | The name of the common table expression |
| column_name [ , ... n ] | The unique column names of the expression |
| CTE_query_definition | The SELECT query that defines the common table expression |
There are two forms of CTEs: a recursive CTE is one where the query for the CTE references itself. A recursive CTE will be shown in the next recipe. A nonrecursive CTE does not reference itself.
In this example, a nonrecursive CTE is created that selects the SalesOrderId column from all records from the Sales.SalesOrderDetail table that have a UnitPrice between 1,900 and 2,000. Later in the query, this CTE is referenced in the EXISTS clause. If this query had used this subquery multiple times, you would simply reference the CTE where necessary while the logic for the subquery is contained just once in the definition of the CTE.
Each time a CTE is referenced, the entire query that makes up the CTE is executed; a CTE does not perform the action once and have the results available for all references to the CTE. If you desire this capability, investigate the Temporary Storage options discussed in Recipe 13-23. To illustrate that CTEs are called each time that they are referenced, let’s look at the following queries:
SET STATISTICS IO ON;
RAISERROR('CTE #1', 10, 1) WITH NOWAIT;
WITH VendorSearch(RowNumber, VendorName, AccountNumber) AS
(
SELECT  ROW_NUMBER() OVER (ORDER BY Name) RowNum,
        Name,
        AccountNumber
FROM    Purchasing.Vendor
)
SELECT *
FROM VendorSearch;

RAISERROR('CTE #2', 10, 1) WITH NOWAIT;
WITH VendorSearch(RowNumber, VendorName, AccountNumber) AS
(
SELECT ROW_NUMBER() OVER (ORDER BY Name) RowNum,
       Name,
       AccountNumber
FROM   Purchasing.Vendor
)
SELECT RowNumber,
       VendorName,
       AccountNumber
FROM   VendorSearch
WHERE  RowNumber BETWEEN 1 AND 5
UNION
SELECT RowNumber,
       VendorName,
       AccountNumber
FROM   VendorSearch
WHERE  RowNumber BETWEEN 100 AND 104;
SET STATISTICS IO OFF;
In this example, I/O statistics are turned on, and then the same CTE is used in two queries. In the first query, the CTE is referenced once. In the second CTE, it is referenced twice. A message is also displayed at the start of each query. Ignoring the returned result sets, the I/O statistics returned are as follows:
CTE #1

Table 'Vendor'. Scan count 1, logical reads 4, physical reads 0, read-ahead reads 0,
lob logical reads 0, lob physical reads 0, lob read-ahead reads 0.

CTE #2

Table 'Vendor'. Scan count 2, logical reads 8, physical reads 0, read-ahead reads 0,
lob logical reads 0, lob physical reads 0, lob read-ahead reads 0.
As shown, the first CTE scans the Vendor table once, for four logical reads. The second CTE scans the Vendor table twice, for eight logical reads.
Multiple CTEs can be utilized within one WITH clause; they just need to be separated from each other with a comma. Optionally, column aliases can be defined for the CTE with the definition of the CTE. If column aliases are not defined, then the column names from the query will be utilized. A CTE can reference previously defined CTEs.
![]() Caution If the CTE is not the first statement in a batch of statements, the previous statement must be terminated with a semicolon.
Caution If the CTE is not the first statement in a batch of statements, the previous statement must be terminated with a semicolon.
![]() Note Terminating a SQL statement with a semicolon is part of the ANSI specifications. Currently, SQL Server does not require most statements to be terminated with a semicolon; however, this practice is deprecated, and its usage will be required in a future version of SQL Server.
Note Terminating a SQL statement with a semicolon is part of the ANSI specifications. Currently, SQL Server does not require most statements to be terminated with a semicolon; however, this practice is deprecated, and its usage will be required in a future version of SQL Server.
6-13. Querying Recursive Tables
Problem
You have a table with hierarchal data where one column references another column in the same table on a different row. You need to query the data to return data for each record from the parent row. For instance, the following builds a company table that contains an entry for each company in a (hypothetical) giant mega-conglomerate:
CREATE TABLE dbo.Company
       (
       CompanyID INT NOT NULL
                 PRIMARY KEY,
       ParentCompanyID INT NULL,
       CompanyName VARCHAR(25) NOT NULL
       );

INSERT dbo.Company
       (CompanyID, ParentCompanyID, CompanyName)
VALUES (1, NULL, 'Mega-Corp'),
       (2, 1, 'Mediamus-Corp'),
       (3, 1, 'KindaBigus-Corp'),
       (4, 3, 'GettinSmaller-Corp'),
       (5, 4, 'Smallest-Corp'),
       (6, 5, 'Puny-Corp'),
       (7, 5, 'Small2-Corp'),
Solution
Utilize a recursive CTE to create the hierarchy tree.
WITH CompanyTree(ParentCompanyID, CompanyID, CompanyName, CompanyLevel) AS
(
SELECT ParentCompanyID,
        CompanyID,
        CompanyName,
        0 AS CompanyLevel
FROM    dbo.Company
WHERE   ParentCompanyID IS NULL
UNION ALL
SELECT  c.ParentCompanyID,
        c.CompanyID,
        c.CompanyName,
        p.CompanyLevel + 1
FROM    dbo.Company c
        INNER JOIN CompanyTree p
            ON c.ParentCompanyID = p.CompanyID
)
SELECT ParentCompanyID,
       CompanyID,
       CompanyName,
       CompanyLevel
FROM   CompanyTree;
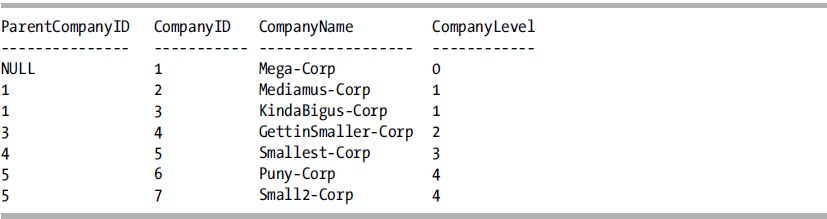
This query returns the following result set:
How It Works
A recursive CTE is created by creating an anchor member and then performing a UNION ALL of the anchor member to the recursive member. The anchor member defines the base of the recursion, in this case, the top level of the corporate hierarchy. The anchor definition is defined first, and this query is joined to the next query through a UNION ALL set operation.
In this example, the anchor definition includes three columns from the Company table and a CompanyLevel column to display how many levels deep a particular company is in the company hierarchy.
The recursive query is defined next. The same three columns are returned from the Company table. The recursion is next; the query is joined to the anchor member by referencing the name of the CTE and specifying the join condition. In this case, the join condition is the expression c.ParentCompanyID = p.CompanyId. Finally, in the column list for this query, the CompanyLevel from the CTE is incremented for the hierarchy level.
After the recursive CTE has been defined, the columns from the CTE are returned in the final query.
Multiple anchor members and recursive members can be defined. All anchor members must be defined before any recursive members. Multiple anchor members can utilize the UNION, UNION ALL, INTERSECT, and EXCEPT set operators. The UNION ALL set operator must be used between the last anchor member and the first recursive member. All recursive members must use the UNION ALL set operator.
If the recursive member contains a value in the joining column that is in the anchor member, then an infinite loop is created. You can utilize the MAXRECURSION query hint to limit the depth of recursions. By default, the serverwide recursion depth default is 100 levels. The value you utilize in the query hint should be based upon your understanding of the data. For example, if you know that your data should not go beyond ten levels deep, then set the MAXRECURSION query hint to that value.
6-14. Hard-Coding the Results from a Query
Problem
In your query, you have a set of constant values that you want to use as a source of data.
How It Works
The VALUES clause can be used as a source of data in INSERT statements, as the source table in the MERGE statement, and as a derived table in a SELECT statement. An example of using the VALUES clause in an INSERT statement can be seen in the previous recipe when populating the Company table.
An example of using the VALUES clause in a SELECT statement would be if you always referred to the first ten presidents of the United States:
SELECT *
FROM (VALUES ('George', 'Washington'),
             ('Thomas', 'Jefferson'),
             ('John', 'Adams'),
             ('James', 'Madison'),
             ('James', 'Monroe'),
             ('John Quincy', 'Adams'),
             ('Andrew', 'Jackson'),
             ('Martin', 'Van Buren'),
             ('William', 'Harrison'),
             ('John', 'Tyler')
       ) dtPresidents(FirstName, LastName);
This query returns the following result set:
| FirstName | LastName |
| ----------- | ---------- |
| George | Washington |
| Thomas | Jefferson |
| John | Adams |
| James | Madison |
| James | Monroe |
| John Quincy | Adams |
| Andrew | Jackson |
| Martin | Van Buren |
| William | Harrison |
| John | Tyler |
The syntax for the VALUES clause is as follows:
VALUES ( <row value expression list> ) [ , ... n ]

<row value expression list> ::=
  {<row value expression> } [ , ... n ]

<row value expression> ::=
  { DEFAULT | NULL | expression }
The VALUES keyword introduces the row value expression list. Each list must start and end with a parenthesis, and multiple lists must be separated with a comma. The maximum number of rows that can be constructed using a table value constructor is 1,000. The table value constructor is equivalent to each list being a separate SELECT statement that is subsequently used with the UNION ALL set operator to make a single result set out of multiple SELECT statements. The number of values specified in each list must be the same, and they follow the data type conversion properties of the UNION ALL set operator, for which unmatched data types between rows are implicitly converted to a type of the next higher precedence. If the conversion cannot be implicitly converted, then an error is returned.