
![]()
Index Tuning and Statistics
As discussed in Chapter 21, SQL Server query performance tuning and optimization requires a multilayered approach. This chapter focuses on the index and statistics tuning aspects of that approach. The following are a few key factors that impact SQL Server query performance:
- Appropriate indexing : Your table indexes should be based on your high-priority or frequently executed queries. If a query is executing thousands of times a day and is completing in two seconds but could be running in less than one second with the proper index, adding this index could reduce the I/O pressure on your SQL Server instance significantly. You should create indexes as needed and remove indexes that aren’t being used (this chapter shows you how to do this). As with most changes, there is a trade-off. Each index on your table adds overhead to data modification operations and can even slow down SELECT queries if SQL Server decides to use the less efficient index. When you’re initially designing your database, it is better for you to keep the number of indexes at a minimum (having at least a clustered index and nonclustered indexes for your foreign keys). Add indexes once you have a better idea about the actual queries that will be executed against the database. Indexing requirements are organic, particularly on volatile, frequently updated databases, so your approach to adding and removing indexes should be flexible and iterative.
- Index fragmentation : As data modifications are made over time, your indexes will become fragmented. As fragmentation increases, index data will become spread out over more data pages. The more data pages your query needs to retrieve, the higher the I/O and memory requirements and the slower the query.
- Up-to-date statistics: The AUTO_CREATE_STATISTICS database option enables SQL Server to automatically generate statistical information regarding the distribution of values in a column. The AUTO_UPDATE_STATISTICS database option enables SQL Server to automatically update statistical information regarding the distribution of values in a column. If you disable these options, statistics can get out-of-date. Since SQL Server depends on statistics to decide how to best execute the query, SQL Server may choose a less-than-optimal plan if it is basing its execution decisions on stale statistics.
In this chapter, I’ll demonstrate the T-SQL commands and techniques you can use to help address fragmented indexes and out-of-date statistics and evaluate the usage of indexes in the database.
![]() Note Since this is a book about T-SQL, I don’t review the graphical interface tools that also assist with performance tuning such as SQL Server Profiler, graphical execution plans, System Monitor, and the Database Engine Tuning Advisor. These are all extremely useful tools—so I still encourage you to use them as part of your overall performance-tuning strategy in addition to the T-SQL commands and techniques you’ll learn about in this chapter.
Note Since this is a book about T-SQL, I don’t review the graphical interface tools that also assist with performance tuning such as SQL Server Profiler, graphical execution plans, System Monitor, and the Database Engine Tuning Advisor. These are all extremely useful tools—so I still encourage you to use them as part of your overall performance-tuning strategy in addition to the T-SQL commands and techniques you’ll learn about in this chapter.
This first batch of recipes demonstrates techniques for managing indexes. Specifically, I’ll be covering how to do the following:
- Identify index fragmentation, so you can figure out which indexes should be rebuilt or reorganized
- Display index usage, so you can determine which indexes aren’t being used by SQL Server
Before getting into the recipes, I’ll take a moment to discuss some general indexing best practices. When considering these best practices, always remember that, like query tuning, there are few hard and fast “always” or “never” rules. Index usage by SQL Server depends on a number of factors, including, but not limited to, the query construction, referenced tables in the query, referenced columns, number of rows in the table, data distribution, and uniqueness of the index column(s) data. The following are some basic guidelines to keep in mind when building your index strategy:
- Add indexes based on your high-priority and high-execution count queries. Determine ahead of time what acceptable query execution durations might be based on your business requirements.
- Don’t add too many indexes at the same time. Instead, add an index and test the query to see that the new index is used. If it is not used, remove it. If it is used, test to make sure there are no negative side effects to other queries. Remember that each additional index adds overhead to data modifications to the base table.
- Unless you have a very good reason not to do so, always add a clustered index to each table. A table without a clustered index is a heap, meaning that the data is stored in no particular order. Clustered indexes are ordered according to the clustered key, and its data pages are reordered during an index rebuild or reorganization. Heaps, however, are not rebuilt during an index rebuild or reorganization process and therefore can grow out of control, taking up many more data pages than necessary.
- Monitor query performance over time and index usage over time. As your data and application activity changes, so too will the performance and effectiveness of your indexes.
- Fragmented indexes can slow down query performance, since more I/O operations are required in order to return results for a query. Keep index fragmentation to a minimum by rebuilding and/or reorganizing your indexes on a scheduled or as-needed basis.
- Select clustered index keys that are rarely modified, highly unique, and narrow in data type width. Width is particularly important because each nonclustered index also contains within it the clustered index key. Clustered indexes are useful when applied to columns used in range queries. This includes queries that use the operators BETWEEN, >, >=, <, and < =. Clustered index keys also help reduce execution time for queries that return large result sets or depend heavily on ORDER BY and GROUP BY clauses. With all these factors in mind, remember that you can have only a single clustered index for your table, so choose carefully.
- Nonclustered indexes are ideal for small or one-row result sets. Again, columns should be chosen based on their use in a query, specifically in the JOIN or WHERE clause. Nonclustered indexes should be made on columns containing highly unique data. As discussed in Chapter 16, don’t forget to consider using covering queries and the INCLUDE functionality for nonkey columns.
- Use a 100 percent fill factor for those indexes that are located within read-only filegroups or databases. This reduces I/O and can improve query performance because fewer data pages are required to fulfill a query’s result set.
- Try to anticipate which indexes will be needed based on the queries you perform—but also don’t be afraid to make frequent use of the Database Engine Tuning Advisor tool. Using the Database Engine Tuning Advisor, SQL Server can evaluate your query or batch of queries and suggest index changes for you to review.
The next recipe will now demonstrate how to display index fragmentation.
Fragmentation is the natural by-product of data modifications to a table. When data is updated in the database, the logical order of indexes (based on the index key) gets out of sync with the actual physical order of the data pages. As data pages become further and further out of order, more I/O operations are required in order to return results requested by a query. Rebuilding or reorganizing an index allows you to defragment the index by synchronizing the logical index order and reordering the physical data pages to match the logical index order. In the next two recipes, I’ll demonstrate two methods you can use to defragment your indexes.
![]() Tip It is important that you rebuild only the indexes that require it. The rebuild process is resource intensive.
Tip It is important that you rebuild only the indexes that require it. The rebuild process is resource intensive.
23-1. Displaying Index Fragmentation
Problem
You suspect that you have indexes that are heavily fragmented. You need to run a query to confirm the fragmentation levels of the indexes in your database.
Solution
Query the sys.dm_db_index_physical_stats dynamic management function.
Fragmentation is the natural by-product of data modifications to a table. When data is updated in the database, the logical order of indexes (based on the index key) gets out of sync with the actual physical order of the data pages. As data pages become further and further out of order, more I/O operations are required in order to return results requested by a query. Rebuilding or reorganizing an index allows you to defragment the index by synchronizing the logical index order, reordering the physical data pages to match the logical index order.
![]() Note See Chapter 16 for a review of index management and later in this chapter for a review of index defragmentation and reorganization.
Note See Chapter 16 for a review of index management and later in this chapter for a review of index defragmentation and reorganization.
The sys.dm_db_index_physical_stats dynamic management function returns information that allows you to determine the fragmentation level of an index. The syntax for sys.dm_db_index_physical_stats is as follows:
sys.dm_db_index_physical_stats (
{ database_id | NULL }
, { object_id | NULL }
, { index_id | NULL | 0 }
, { partition_number | NULL }
, { mode | NULL | DEFAULT }
)
Table 23-1 describes the arguments of this command.
Table 23-1. sys.dm_db_index_physical_stats Arguments
| Argument | Description |
|---|---|
| database_id | NULL | This defines the database ID of the indexes to evaluate. If NULL, all databases for the SQL Server instance are returned. |
| object_id | NULL | This specifies the object ID of the table and views (indexed views) to evaluate. If NULL, all tables are returned. |
| index_id | NULL | 0 | This gives the specific index ID of the index to evaluate. If NULL, all indexes are returned for the table(s). |
| partition_number | NULL | This defines the specific partition number of the partition to evaluate. If NULL, all partitions are returned based on the defined database/table/indexes selected. |
| LIMITED | SAMPLED | DETAILED | NULL | DEFAULT | These modes impact how the fragmentation data is collected. The LIMITED mode scans all pages for a heap and the pages above the leaf level. SAMPLED collects data based on a 1 percent sampling of pages in the heap or index. The DETAILED mode scans all pages (heap or index). DETAILED is the slowest, but most accurate, option. Designating NULL or DEFAULT is the equivalent of the LIMITED mode. |
In this example, the sys.dm_db_index_physical_stats dynamic management function is queried for all objects in the AdventureWorks2012 database with an average fragmentation percent greater than 30.
USE AdventureWorks2012;
GO
SELECT OBJECT_NAME(object_id) ObjectName,
index_id,
index_type_desc,
avg_fragmentation_in_percent
FROM sys.dm_db_index_physical_stats (DB_ID('AdventureWorks2012'),NULL, NULL, NULL, 'LIMITED')
WHERE avg_fragmentation_in_percent > 30
ORDER BY OBJECT_NAME(object_id);
This returns the following (abridged) results:

This second example returns fragmentation for a specific database, table, and index.
USE AdventureWorks2012;
GO
SELECT OBJECT_NAME(f.object_id) ObjectName,
        i.name IndexName,
        f.index_type_desc,
        f.avg_fragmentation_in_percent
FROM sys.dm_db_index_physical_stats
        (DB_ID('AdventureWorks2012'), OBJECT_ID('Production.ProductDescription'), 2, NULL, 'LIMITED') f
INNER JOIN sys.indexes i
        ON i.object_id = f.object_id
        AND i.index_id = f.index_id;
This query returns the following:

How It Works
The first example started by changing the database context to the AdventureWorks2012 database.
USE AdventureWorks2012;
GO
Since the OBJECT_NAME function is database-context sensitive, changing the database context ensures that you are viewing the proper object name.
Next, the SELECT clause displayed the object name, index ID, description, and average fragmentation percent.
SELECT OBJECT_NAME(object_id) ObjectName, index_id, index_type_desc, avg_fragmentation_in_percent
The index_type_desc column tells you if the index is a heap, clustered index, nonclustered index, primary XML index, spatial index, or secondary XML index.
Next, the FROM clause referenced the sys.dm_db_index_physical_stats dynamic management function. The parameters, which were put in parentheses, included the database name and NULL for all other parameters except the scan mode.
FROM sys.dm_db_index_physical_stats (DB_ID('AdventureWorks2012'),NULL, NULL, NULL, 'LIMITED')
Since sys.dm_db_index_physical_stats is table-valued function, the WHERE clause was used to qualify that only rows with a fragmentation percentage greater than 30 percent be returned in the results.
WHERE avg_fragmentation_in_percent > 30
The query returned several rows for objects in the AdventureWorks2012 database with a fragmentation level greater than 30 percent. The avg_fragmentation_in_percent column shows logical fragmentation of nonclustered or clustered indexes, returning the percentage of disordered pages at the leaf level of the index. For heaps, avg_fragmentation_in_percent shows extent-level fragmentation. Regarding extents, recall that SQL Server reads and writes data at the page level. Pages are stored in blocks called extents, which consist of eight contiguous 8KB pages. Using the avg_fragmentation_in_percent, you can determine whether the specific indexes need to be rebuilt or reorganized using ALTER INDEX.
In the second example, fragmentation was displayed for a specific database, table, and index. The SELECT clause included a reference to the index name (instead of index number).
SELECT OBJECT_NAME(f.object_id) ObjectName, i.name IndexName, f.index_type_desc, f.avg_fragmentation_in_percent
The FROM clause included the specific table name, which was converted to an ID using the OBJECT_ID function. The third parameter included the index number of the index to be evaluated for fragmentation.
FROM sys.dm_db_index_physical_stats
(DB_ID('AdeventureWorks2012'),
OBJECT_ID('Production.ProductDescription'),
2,
NULL,
'LIMITED') f
The sys.indexes system catalog view was joined to the sys.dm_db_index_physical_stats function based on the object_id and index_id.
INNER JOIN sys.indexes i ON i.object_id = f.object_id AND i.index_id = f.index_id;
The query returned the fragmentation results just for that specific index.
Problem
After analyzing fragmentation levels of your indexes, you have determined that many indexes need to be rebuilt.
Solution
Rebuild the indexes using ALTER INDEX.
Rebuilding an index serves many purposes, the most popular being the removal of fragmentation that occurs as data modifications are made to a table over time. As fragmentation increases, query performance can slow. Rebuilding an index removes fragmentation of the index rows and frees up physical disk space.
Large indexes that are quite fragmented can reduce query speed. The frequency of how often you rebuild your indexes depends on your database size, how much data modification occurs, how much activity occurs against your tables, and whether your queries typically perform ordered scans or singleton lookups.
The syntax for ALTER INDEX to rebuild an index is as follows:
ALTER INDEX { index_name | ALL }
        ON <object>
        { REBUILD
        [ [ WITH ( <rebuild_index_option> [ ,. . .n ] ) ]
        | [ PARTITION = partition_number
[ WITH ( <single_partition_rebuild_index_option>
        [ ,. . . n ] )
        ]
        ]
        ]
        }
Table 23-2 describes the arguments of this command.
Table 23-2. ALTER INDEX . . . REBUILD Arguments
This recipe demonstrates ALTER INDEX REBUILD, which drops and re-creates an existing index. It demonstrates a few variations for rebuilding an index in the AdventureWorks2012 database.
-- Rebuild a specific index
USE AdventureWorks2012;
GO
ALTER INDEX PK_ShipMethod_ShipMethodID ON Purchasing.ShipMethod REBUILD;
-- Rebuild all indexes on a specific table
USE AdventureWorks2012;
GO
ALTER INDEX ALL
ON Purchasing.PurchaseOrderHeader REBUILD;
-- Rebuild an index, while keeping it available -- for queries (requires Enterprise Edition)
USE AdventureWorks2012;
GO
ALTER INDEX PK_ProductReview_ProductReviewID
ON Production.ProductReview REBUILD WITH (ONLINE = ON);
-- Rebuild an index, using a new fill factor and -- sorting in tempdb
USE AdventureWorks2012;
GO
ALTER INDEX PK_TransactionHistory_TransactionID
ON Production.TransactionHistory REBUILD WITH (FILLFACTOR = 75, SORT_IN_TEMPDB = ON);
-- Rebuild an index with page-level data compression enabled
USE AdventureWorks2012;
GO
ALTER INDEX PK_ShipMethod_ShipMethodID
ON Purchasing.ShipMethod REBUILD WITH (DATA_COMPRESSION = PAGE);
How It Works
In this recipe, the first ALTER INDEX was used to rebuild the primary key index on the Purchasing.ShipMethod table (rebuilding a clustered index does not cause the rebuild of any nonclustered indexes for the table).
ALTER INDEX PK_ShipMethod_ShipMethodID ON Purchasing.ShipMethod REBUILD
In the second example, the ALL keyword was used, which means that any indexes, whether nonclustered or clustered (remember, only one clustered index exists on a table), will be rebuilt.
ALTER INDEX ALL
ON Purchasing.PurchaseOrderHeader REBUILD
The third example in the recipe rebuilt an index online, which means that user queries can continue to access the data of the PK_ProductReview_ProductReviewID index while it’s being rebuilt.
WITH (ONLINE = ON)
The ONLINE option requires SQL Server Enterprise Edition, and it can’t be used with XML indexes, disabled indexes, or partitioned indexes. Also, indexes using large object data types or indexes made on temporary tables can’t take advantage of this option.
In the fourth example, two index options were modified for an index—the fill factor and a directive to sort the temporary index results in tempdb.
WITH (FILLFACTOR = 75, SORT_IN_TEMPDB = ON)
In the previous example, an uncompressed index was rebuilt using page-level data compression.
WITH (DATA_COMPRESSION = PAGE)
![]() Tip You can validate whether an index/partition is compressed by looking at the data_compression_desc column in sys.partitions.
Tip You can validate whether an index/partition is compressed by looking at the data_compression_desc column in sys.partitions.
23-3. Defragmenting Indexes
Problem
In addition to the many indexes that need to be rebuilt, you have determined that several need to be defragmented.
Solution
Use ALTER INDEX REORGANIZE to reduce fragmentation in the leaf level of an index (clustered and nonclustered), causing the physical order of the database pages to match the logical order. During this reorganization process, the indexes are also compacted based on the fill factor, resulting in freed space and a smaller index. ALTER TABLE REORGANIZE is automatically an online operation, meaning that you can continue to query the target data during the reorganization process. The syntax is as follows:
ALTER INDEX { indexname | ALL } ON < object > { REORGANIZE
[ PARTITION = partition_number ]
[ WITH ( LOB_COMPACTION = { ON | OFF } ) ] }
Table 23-3 describes the arguments of this command.
Table 23-3. ALTER INDEX . . . REORGANIZE Arguments
| Argument | Description |
|---|---|
| index_name | ALL | This defines the name of the index that you want to rebuild. If ALL is chosen, all indexes for the table or view will be rebuilt. |
| <object> | This specifies the name of the table or view that you want to build the index on. |
| partition_number | If using a partitioned index, the partition_number designates that partition to reorganize. |
| LOB_COMPACTION = { ON | OFF } | When this argument is enabled, large object data types (varchar(max), navarchar(max), varbinary(max), xml, text, ntext, and image data) are compacted. |
This recipe demonstrates how to defragment a single index, as well as all indexes on a single table.
-- Reorganize a specific index
USE AdventureWorks2012;
GO
ALTER INDEX PK_TransactionHistory_TransactionID
ON Production.TransactionHistory
REORGANIZE;
-- Reorganize all indexes for a table
-- Compact large object data types
USE AdventureWorks2012;
GO
ALTER INDEX ALL
ON HumanResources.JobCandidate
REORGANIZE
WITH (LOB_COMPACTION = ON);
How It Works
In the first example of this recipe, the primary key index of the Production.TransactionHistory table was reorganized (defragmented). The syntax was very similar to rebuilding an index, only instead of REBUILD, the REORGANIZE keyword was used.
In the second example, all indexes (using the ALL keyword) were defragmented for the HumanResources.Jobcandidate table. Using the WITH clause, large object data type columns were also compacted.
Use ALTER INDEX REORGANIZE if you cannot afford to take the index offline during an index rebuild (and if you cannot use the ONLINE option in ALTER INDEX REBUILD because you aren’t running SQL Server Enterprise Edition). Reorganization is always an online operation, meaning that an ALTER INDEX REORGANIZE operation doesn’t block database traffic for significant periods of time, although it may be a slower process than a REBUILD.
23-4. Rebuilding a Heap
Problem
You have a table in the database that does not have a clustered index and is a heap. You have noticed that this table is nearly 90 percent fragmented, and you want to defragment that table.
Solution
Since SQL Server 2008, you can rebuild a heap (a table without a clustered index) using the ALTER TABLE command. In previous versions, rebuilding a heap required adding and removing a temporary clustered index or performing a data migration or table re-creation.
In this example, I will create a heap table (using SELECT INTO) and then rebuild it.
USE AdventureWorks2012;
GO
-- Create an unindexed table based on another table
SELECT ShiftID, Name, StartTime, EndTime, ModifiedDate
INTO dbo.Heap_Shift FROM HumanResources.Shift;
I can validate whether the new table is a heap by querying the sys.indexes system catalog view.
USE AdventureWorks2012;
GO
SELECT type_desc FROM sys.indexes
WHERE object_id = OBJECT_ID('Heap_Shift’);
This query returns the following:
type_desc
HEAP
If I want to rebuild the heap, I can issue the following ALTER TABLE command.
USE AdventureWorks2012;
GO
ALTER TABLE dbo.Heap_Shift REBUILD;
How It Works
In this recipe, I created a heap table and then rebuilt it using ALTER TABLE. . .REBUILD. Using ALTER TABLE. . .REBUILD, you can rebuild a table, even if it does not have a clustered index (heap). If the table is partitioned, this command also rebuilds all partitions on that table and rebuilds the clustered index if one exists.
23-5. Displaying Index Usage
Problem
You are concerned you may have some indexes in the database that are more costly than the benefit they provide or that are no longer being used. You want to find which indexes fit these criteria.
Solution
You can query the sys.dm_db_index_usage_stats dynamic management view (DMV).
Creating useful indexes in your database is a balancing act between read and write performance. Indexes can slow down data modifications while at the same time speed up SELECT queries. You must balance the cost/benefit of index overhead with read activity versus data modification activity. Every additional index added to a table may improve query performance at the expense of data modification speed. On top of this, index effectiveness changes as the data changes, so an index that was useful a few weeks ago may not be useful today. If you are going to have indexes on a table, they should be put to good use on high-priority queries.
To identify disused indexes, you can query the sys.dm_db_index_usage_stats DMV. This view returns statistics on the number of index seeks, scans, updates, or lookups since the SQL Server instance was last restarted. It also returns the last dates the index was referenced.
In this example, the sys.dm_db_index_usage_stats DMV is queried to see whether the indexes on the Sales.Customer table are being used. Prior to referencing sys.dm_db_index_usage_stats, two queries will be executed against the Sales.Customer table: one query returning all rows and columns and the second returning the AccountNumber column for a specific TerritorylD.
USE AdventureWorks2012;
GO
SELECT *
FROM Sales.Customer;
USE AdventureWorks2012;
GO
SELECT AccountNumber
FROM Sales.Customer
WHERE TerritoryID = 4;
After executing the queries, the sys.dm_db_index_usage_stats DMV is queried.
USE AdventureWorks2012;
GO
SELECT i.name IndexName, user_seeks, user_scans, last_user_seek, last_user_scan
FROM sys.dm_db_index_usage_stats s
INNER JOIN sys.indexes i
ON s.object_id = i.object_id
AND s.index_id = i.index_id
WHERE database_id = DB_ID('AdventureWorks2012')
AND s.object_id = OBJECT_ID('Sales.Customer'),
This query returns the following:

How It Works
The sys.dm_db_index_usage_stats DMV allows you to see what indexes are being used in your SQL Server instance. The statistics are valid since the last SQL Server restart.
In this recipe, two queries were executed against the Sales.Customer table. After executing the queries, the sys.dm_db_index_usage_stats DMV was queried.
The SELECT clause displayed the name of the index, the number of user seeks and user scans, and the dates of the last user seeks and user scans.
SELECT i.name IndexName, user_seeks, user_scans, last_user_seek, last_user_scan
The FROM clause joined the sys.dm_db_index_usage_stats DMV to the sys.indexes system catalog view (so the index name could be displayed in the results) on object_id and index_id.
FROM sys.dm_db_index_usage_stats s INNER JOIN sys.indexes i ON
s.object_id = i.object_id AND
s.index_id = i.index_id
The WHERE clause qualified that only indexes for the AdventureWorks2012 database be displayed and, of those indexes, only those for the Sales.Customer table. The DB_ID function was used to get the database system ID, and the OBJECT_ID function was used to get the table’s object ID.
WHERE database_id = DB_ID('AdventureWorks2012')
AND s.object_id = OBJECT_ID('Sales.Customer'),
The query returned two rows, showing that the PK_Customer_CustomerID clustered index of the Sales.Customer table had indeed been scanned recently (most likely by the first SELECT * query) and the IX_Customer_TerritoryID nonclustered index had been used in the second query (which qualified TerritoryID = 4).
Indexes assist with query performance but also add disk space and data modification overhead. Using the sys.dm_db_index_usage_stats DMV, you can monitor whether indexes are actually being used and, if not, replace them with more effective indexes.
Statistics
The AUTO_CREATE_STATISTICS database option enables SQL Server to automatically generate statistical information regarding the distribution of values in a column. The AUTO_UPDATE_STATISTICS database option automatically updates existing statistics on your table or indexed view. Unless you have a very good reason for doing so, these options should never be disabled in your database, because they are critical for good query performance.
Statistics are critical for efficient query processing and performance, allowing SQL Server to choose the correct physical operations when generating an execution plan. Table and indexed view statistics, which can be created manually or generated automatically by SQL Server, collect information that is used by SQL Server to generate efficient query execution plans.
The next few recipes will demonstrate how to work directly with statistics. When reading these recipes, remember to let SQL Server manage the automatic creation and update of statistics in your databases whenever possible. Save most of these commands for special troubleshooting circumstances or when you’ve made significant data changes (for example, executing sp_updatestats right after a large data load).
23-6. Manually Creating Statistics
Problem
You have noticed that a high-use query is performing poorly. After some investigation, you have noted that AUTO_CREATE_STATISTICS and AUTO_UPDATE_STATISTICS are enabled. You are certain that new statistics are needed.
Solution
Use the CREATE STATISTICS command and create new statistics.
SQL Server will usually generate the statistics it needs based on query activity. However, if you still want to explicitly create statistics on a column or columns, you can use the CREATE STATISTICS command.
The syntax is as follows:
CREATE STATISTICS statistics_name ON { table | view } ( column [ ,. . .n ] )
[ WHERE < filter_predicate> ]
[ WITH
[ [ FULLSCAN
| SAMPLE number { PERCENT | ROWS } STATS_STREAM = stats_stream ] [ , ] ]
[ NORECOMPUTE ] ]
Table 23-4 describes the arguments of this command.
Table 23-4. CREATE STATISTICS Arguments
| Argument | Description |
|---|---|
| statistics_name | This defines the name of the new statistics. |
| table | view | This specifies the table or indexed view from which the statistics are based. |
| column [ ,. . . n ] | This specifies one or more columns used for generating statistics. |
| WHERE < filter_predicate> | Expression for filtering a subset of rows on the statistics object. |
| FULLSCAN| SAMPLE number { PERCENT | ROWS } | FULLSCAN, when specified, reads all rows when generating the statistics. SAMPLE reads either a defined number of rows or a defined percentage of rows. |
| STATS_STREAM = stats_stream | This is reserved for Microsoft’s internal use. |
| NORECOMPUTE | This option designates that once the statistics are created, they should not be updated—even when data changes occur afterward. This option should rarely, if ever, be used. Fresh statistics allow SQL Server to generate good query plans. |
In this example, new statistics are created on the Sales.Customer AccountNumber column.
USE AdventureWorks2012;
GO
CREATE STATISTICS Stats_Customer_AccountNumber
ON Sales.Customer (AccountNumber) WITH FULLSCAN;
How It Works
This recipe demonstrated manually creating statistics on the Sales.Customer table. The first line of code designated the statistics name.
CREATE STATISTICS Stats_Customer_AccountNumber
The second line of code designated the table to create statistics on, followed by the column name used to generate the statistics.
ON Sales.Customer (AccountNumber)
The last line of code designated that all rows in the table would be read in order to generate the statistics.
WITH FULLSCAN
Using the FULLSCAN option will typically take longer to generate but provide a higher-quality sampling. The default behavior in SQL Server is to use SAMPLE with an automatically determined sample size.
23-7. Creating Statistics on a Subset of Rows
Problem
You have a very large table that is frequently queried. Most of the queries performed are against a range of data that comprises less than 20 percent of the records in the table. You have determined that the indexes are appropriate, but you may be missing a statistic. You want to improve the performance of these queries.
Solution
In Chapter 16, in Recipe 16-17, I demonstrated the ability to create filtered, nonclustered indexes that cover a small percentage of rows. Doing this reduced the index size and improved the performance of queries that needed to read only a fraction of the index entries that they would otherwise have to process. Creating the filtered index also creates associated statistics.
These statistics use the same filter predicate and can result in more accurate results because the sampling is against a smaller row set.
You can also explicitly create filtered statistics using the CREATE STATISTICS command. Similar to creating a filtered index, filtered statistics also support filter predicates for several comparison operators to be used, including IS, IS NOT, =, <>, >, <, and more.
The following query demonstrates creating filtered statistics on a range of values for the UnitPrice column in the Sales.SalesOrderDetail table:
USE AdventureWorks2012;
GO
CREATE STATISTICS Stats_SalesOrderDetail_UnitPrice_Filtered ON Sales.SalesOrderDetail (UnitPrice)
WHERE UnitPrice > = 1000.00 AND UnitPrice < = 1500.00
WITH FULLSCAN;
How It Works
This recipe demonstrated creating filtered statistics. Similar to filtered indexes, I just added a WHERE clause within the definition of the CREATE STATISTICS call and defined a range of allowed values for the UnitPrice column. Creating statistics on a column creates a histogram with up to 200 interval values designating how many rows are at each interval value, as well as how many rows are smaller than the current key but less than the previous key. The query optimization process depends on highly accurate statistics. Filtered statistics allow you to specify the key range of values your application focuses on, resulting in even more accurate statistics for that subset of data.
23-8. Updating Statistics
Problem
You have created some statistics on a table in your database and now want to update them immediately.
Solution
You can use the UPDATE STATISTICS command.
The syntax is as follows:
UPDATE STATISTICS table | view
        [
        {
        { index | statistics_name }
        | ( { index |statistics_name } [ ,. . .n ] )
        }
        ]
        [ WITH
        [
        [ FULLSCAN ]
        | SAMPLE number { PERCENT | ROWS }
        | RESAMPLE
        ]
        [ , ] [ ALL | COLUMNS | INDEX ]
        [ [ , ] NORECOMPUTE ]
        ]
Table 23-5 shows the arguments of this command.
Table 23-5. UPDATE STATISTICS Arguments
| Argument | Description |
|---|---|
| table | view | This defines the table name or indexed view for which to update statistics. |
| { index | statistics_name}| | This specifies the name of the index or named statistics to update. |
| FULLSCAN| SAMPLE number { PERCENT | ROWS } |RESAMPLE | FULLSCAN, when specified, reads all rows when generating the statistics. SAMPLE reads either a defined number of rows or a percentage. RESAMPLE updates statistics based on the original sampling method. |
| [ ALL | COLUMNS | INDEX ] | When ALL is designated, all existing statistics are updated. When COLUMN is designated, only column statistics are updated. When INDEX is designated, only index statistics are updated. |
| NORECOMPUTE | This option designates that once the statistics are created, they should not be updated—even when data changes occur. Again, this option should rarely, if ever, be used. Fresh statistics allow SQL Server to generate good query plans. |
This example updates all the statistics for the Sales.Customer table, populating statistics based on the latest data.
USE AdventureWorks2012;
GO
UPDATE STATISTICS Sales.Customer
WITH FULLSCAN;
How It Works
This example updated all the statistics for the Sales.Customer table, refreshing them with the latest data. The first line of code designated the table name containing the statistics to be updated.
UPDATE STATISTICS Sales.Customer
The last line of code designated that all rows in the table would be read in order to update the statistics.
WITH FULLSCAN
23-9. Generating Statistics Across All Tables
Problem
You are benchmarking new queries and do not want to wait for the query optimizer to create new single-column statistics.
Solution
Execute sp_createstats to create single-column statistics.
You can automatically generate statistics across all tables in a database for those columns that don’t already have statistics associated with them, by using the system stored procedure sp_createstats. The syntax is as follows:
sp_createstats [ [ @indexonly = ] 'indexonly' ] [ , [ @fullscan = ] 'fullscan' ] [ , [ @norecompute = ] 'norecompute' ]
Table 23-6 describes the arguments of this command.
Table 23-6. sp_createstats Arguments
| Argument | Description |
|---|---|
| indexonly | When indexonly is designated, only columns used in indexes will be considered for statistics creation. |
| fullscan | When fullscan is designated, all rows will be evaluated for the generated statistics. If not designated, the default behavior is to extract statistics via sampling. |
| norecompute | The norecompute option designates that once the statistics are created, they should not be updated, even when data changes occur. Like with CREATE STATISTICS and UPDATE STATISTICS, this option should rarely, if ever, be used. Fresh statistics allow SQL Server to generate good query plans. |
This example demonstrates creating new statistics on columns in the database that don’t already have statistics created for them.
USE AdventureWorks2012;
GO
EXECUTE sp_createstats;
GO
This returns the following (abridged) result set:
Table 'AdventureWorks2012.Production.ProductProductPhoto':
Creating statistics for the following columns:
       Primary
       ModifiedDate
Table 'AdventureWorks2012.Sales.StoreContact':
Creating statistics for the following columns:
       ModifiedDate
Table 'AdventureWorks2012.Person.Address':
Creating statistics for the following columns:
       AddressLine2
       City
       PostalCode
       ModifiedDate
…
How It Works
This example created single-column statistics for the tables within the AdventureWorks2012 database, refreshing them with the latest data.
23-10. Updating Statistics Across All Tables
Problem
You want to update statistics across all tables in the current database.
Solution
You can execute the stored procedure sp_updatestats.
If you want to update all statistics in the current database, you can use the system stored procedure sp_updatestats. This stored procedure updates statistics only when necessary (when data changes have occurred). Statistics on unchanged data will not be updated.
The next example automatically updates all statistics in the current database.
USE AdventureWorks2012;
GO
EXECUTE sp_updatestats;
GO
This returns the following (abridged) results. Notice the informational message of “update is not necessary.” The results you see may differ based on the state of your table statistics.
Updating [Production].[ProductProductPhoto]
[PK_ProductProductPhoto_ProductID_ProductPhotoID], update is not necessary. . .
[AK_ProductProductPhoto_ProductID_ProductPhotoID], update is not necessary. . .
[_WA_Sys_00000002_01142BAl], update is not necessary. . .
[Primary], update is not necessary. . .
[ModifiedDate], update is not necessary. . .
0 index(es)/statistic(s) have been updated, 5 did not require update.
. . .
How It Works
This example updated statistics for the tables within the AdventureWorks2012 database, updating only the statistics where data modifications had impacted the reliability of the statistics.
23-11. Viewing Statistics Details
Problem
You want to see detailed information about column statistics.
Solution
To view detailed information about column statistics, you can use the DBCC SHOW STATISTICS command.
The syntax is as follows:
DBCC SHOW_STATISTICS ( 'tablename' | 'viewname' , target )
[ WITH [ NO_INFOMSGS ]
< STAT_HEADER | DENSITY_VECTOR | HISTOGRAM > [ , n ] ]
Table 23-7 shows the arguments of this command.
Table 23-7. DBCC SHOW_STATISTICS Arguments
| Argument | Description |
|---|---|
| 'table_name' | 'view_name' | This defines the table or indexed view to evaluate. |
| target | This specifies the name of the index or named statistics to evaluate. |
| NO_INFOMSGS | When designated, NO_INFOMSGS suppresses informational messages. |
| STAT_HEADER | DENSITY_VECTOR | HISTOGRAM [ , n ] | Specifying STAT_HEADER, DENSITY_VECTOR, or HISTOGRAM designates which result sets will be returned by the command (you can display one or more). Not designating any of these means that all three result sets will be returned. |
This example demonstrates how to view the statistics information on the Sales.Customer Stats_Customer_CustomerType statistics.
USE AdventureWorks2012;
GO
DBCC SHOW_STATISTICS ('Sales.Customer' , Stats_Customer_AccountNumber);
This returns the following result sets:
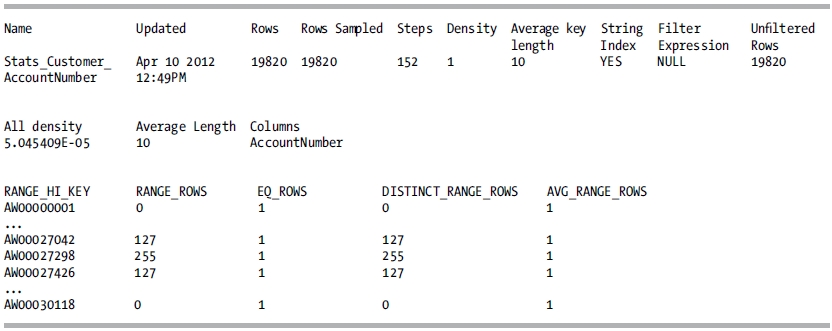
How It Works
This recipe demonstrated how to get more specific information about column statistics. In the results of this recipe’s example, the All density column points to the selectivity of a column. Selectivity refers to the percentage of rows that will be returned given a specific column’s value. Columns with a low density and high selectivity often make for useful indexes (useful to the query optimization process).
In this recipe’s example, the All density value was 5.045409E-05 (float), which equates to a decimal value of 0.00005045409. This is the result of dividing 1 by the number of rows, in this case 19,820.
If you had a column with a high density of similar values and low selectivity (one value is likely to return many rows), you can make an educated assumption that an index on this particular column is unlikely to be very useful to SQL Server in generating a query execution plan.
23-12. Removing Statistics
Problem
You have finished a cycle in your benchmarking and want to remove statistics that were created during that cycle.
Solution
To remove statistics, use the DROP STATISTICS command. The syntax is as follows:
DROP STATISTICS table.statistics_name | view.statistics_name [ ,. . . n ]
This command allows you to drop one or more statistics, prefixed with the table or indexed view name.
In this example, the Sales.Customer_Stats_Customer_AccountNumber statistics are dropped from the database.
USE AdventureWorks2012;
GO
DROP STATISTICS Sales.Customer.Stats_Customer_AccountNumber;
How It Works
This recipe dropped user-created statistics using DROP STATISTICS. The statistics were dropped using the three-part name of schema.table.statistics_name.