
![]()
Inserting, Updating, Deleting
In this chapter, I review how to modify data using the Transact-SQL INSERT, UPDATE, DELETE, and MERGE statements. I’ll review the basics of each statement and cover specific techniques such as inserting data from a stored procedure and outputting the affected rows of a data modification.
Before going into the new features, let’s start the chapter off by reviewing basic INSERT concepts.
The simplified syntax for the INSERT command is as follows:
INSERT [ INTO]
table_or_view_name [ ( column_list ) ] VALUES (({DEFAULT | NULL | expression } [ ,...n ]) [ ,...n ])
Table 8-1 describes the arguments of this command.
Table 8-1. INSERT Command Arguments
| Argument | Description |
|---|---|
| table_or_view_name | The name of the table or updateable view into which you are inserting the data. |
| column_list | The explicit comma-separated list of columns on the insert table that will be populated with values. |
| ({DEFAULT | NULL | expression }[ ,...n ]) | The comma-separated list of values to be inserted as a row into the table. You can insert multiple rows in a single statement. Each value can be an expression, NULL value, or DEFAULT value (if a default was defined for the column). |
Problem
You need to insert one row into a table using a set of defined values.
Solution
A simple use of the INSERT statement accepts a list of values in the VALUES clause that are mapped to a list of columns specified in the INTO clause. In this recipe, we will add a new row to the Production.Location table.
INSERT INTO Production.Location
       (Name, CostRate, Availability)
VALUES ('Wheel Storage', 11.25, 80.00) ;
This returns the following:
(1 row(s) affected)
To verify the row has been inserted correctly, let’s query the Location table for the new row:
SELECT Name,
       CostRate,
       Availability
FROM   Production.Location
WHERE  Name = 'Wheel Storage' ;
This returns the following:
Name              CostRate     Availability
-------------     --------     ------------
Wheel Storage     11.25        80.00
How It Works
In this recipe, a new row was inserted into the Production.Location table. The query begins with the INSERT statement and the name of the table that will receive the inserted data (the INTO keyword is optional):
INSERT INTO Production.Location
Next, we explicitly list the columns of the destination table that will receive the supplied values:
(Name, CostRate, Availability)
A comma must separate each column. Columns don’t need to be listed in the same order as they appear in the base table, but the values supplied in the VALUES clause must exactly match the order of the column list. Column lists are not necessary if the VALUES clause specifies values for all of the columns in the base table and these values are specified in the same order as they are defined in that table. However, using column lists is recommended because explicitly listing columns allows you to add new columns to the base table without changing your insert statements (assuming the new column has a default value).
The next line of code is the VALUES clause and contains a comma-separated list of values (expressions) to insert:
VALUES ('Wheel Storage', 11.25, 80.00)
The values in this list must be provided in the same order as the listed columns, or if no columns are listed, the VALUES clause must contain values for all of the table’s columns in the same order as they appear in the table definition.
8-2. Specifying Default Values
Problem
You need to insert one row into a table, and you want to use a table’s default values for some columns.
Solution
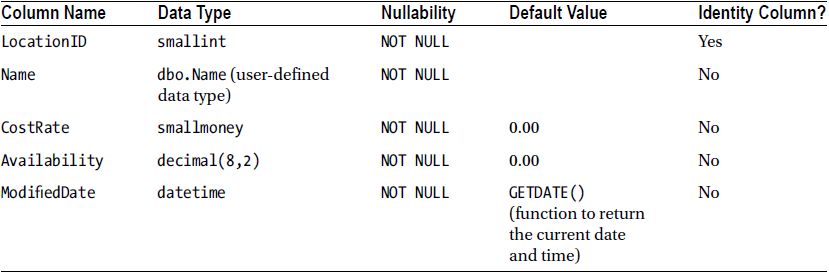
In the previous recipe, we inserted a row into the Production.Location table. The Production.Location table has two other columns that are not explicitly referenced in the INSERT statement. If you look at the definition of Production.Location listed in Table 8-2, you will see that there is also a LocationID column and a ModifiedDate column that we did not include in the INSERT statement.
Table 8-2. Production.Location Table Definition
![]() Note See Chapter 15 for more information on the CREATE TABLE command, IDENTITY columns, and DEFAULT values.
Note See Chapter 15 for more information on the CREATE TABLE command, IDENTITY columns, and DEFAULT values.
The ModifiedDate column has a default value of GETDATE(). If an INSERT statement does not explicitly supply a value for the ModifiedDate column of a new row in the Production.Location table, SQL Server will execute the GETDATE() function to populate the column with the current date and time. The INSERT could have been written to supply a value and override the default value. Here’s an example:
INSERT Production.Location
       (Name,
        CostRate,
        Availability,
        ModifiedDate)
VALUES ('Wheel Storage 2',
        11.25,
        80.00,
        '4/1/2012') ;
When a column has a default value specified, you can use the DEFAULT keyword in the VALUES clause to explicitly use the default value. Here’s an example:
INSERT Production.Location
       (Name,
        CostRate,
        Availability,
        ModifiedDate)
VALUES ('Wheel Storage 3',
        11.25,
        80.00,
        DEFAULT) ;
When a column has no default value specified, you can use the DEFAULT keyword in the VALUES clause to explicitly use the default of the column’s type. Here’s an example:
INSERT INTO Person.Address
       (AddressLine1,
        AddressLine2,
        City,
        StateProvinceID,
        PostalCode)
VALUES ('15 Wake Robin Rd',
        DEFAULT,
        'Sudbury',
        30,
        '01776') ;
In this case, the Person.Address table has no default value specified for the AddressLine2 column, so SQL Server uses the default value for the NVARCHAR type, which is NULL.
If each column in the table uses defaults for all columns, you can trigger an insert that inserts a row using only the defaults by including the DEFAULT VALUES option. Here’s an example:
INSERT dbo.ExampleTable DEFAULT VALUES ;
How It Works
The DEFAULT keyword allows you to explicitly set a column’s default value in an INSERT statement. If all columns are to be set to their default values, the DEFAULT VALUES keywords can be used. If the table definition contains no default value for a column, the type’s default value will be used.
The LocationID column from the Production.Location table, however, is an IDENTITY column (not a defaulted column). An IDENTITY property on a column causes the value in that column to automatically populate with an incrementing numeric value. Because LocationID is an IDENTITY column, the database manages inserting the values for this row, so an INSERT statement cannot normally specify a value for an IDENTITY column. If you want to specify a certain value for an IDENTITY column, you need to follow the procedure outlined in the next recipe.
8-3. Overriding an IDENTITY Column
Problem
You have a table with an IDENTITY column defined. You need to override the IDENTITY property and insert explicit values into the IDENTITY column.
Solution
A column using an IDENTITY property automatically increments based on a numeric seed and increment value for every row inserted into the table. IDENTITY columns are often used as surrogate keys (a surrogate key is a unique primary key generated by the database that holds no business-level significance other than to ensure uniqueness within the table).
In data load or recovery scenarios, you may find that you need to manually insert explicit values into an IDENTITY column. For example, a row with the key value of 4 is deleted accidentally, and you need to manually reconstruct that row and preserve the original value of 4 with the original business information.
To explicitly insert a numeric value into a column defined with an IDENTITY property, you must use the SET IDENTITY_INSERT command. The syntax is as follows:
SET IDENTITY_INSERT [database_name.[schema_name].]table { ON | OFF }
Table 8-3 shows the arguments of this command.
Table 8-3. SET IDENTITY_INSERT Command
| Argument | Description |
|---|---|
| [database_name.[schema_name].]table | The optional database name, optional schema name, and required table name for which an insert statement will be allowed to explicitly specify IDENTITY values. . . |
| ON | OFF | When set ON, explicit value inserts are allowed. When set OFF, explicit value inserts are not allowed. |
This recipe will demonstrate how to explicitly insert the value of an IDENTITY column into a table. The following query demonstrates what happens if you try to explicitly insert into an IDENTITY column without first using IDENTITY_INSERT:
INSERT INTO HumanResources.Department (DepartmentID, Name, GroupName)
VALUES (17, 'Database Services', 'Information Technology')
This returns an error, keeping you from inserting an explicit value for the IDENTITY column:
Msg 544, Level 16, State 1, Line 2
Cannot insert explicit value for identity column in table 'Department' when
IDENTITY_INSERT is set to OFF.
Using SET IDENTITY_INSERT removes this barrier:
SET IDENTITY_INSERT HumanResources.Department ON

INSERT HumanResources.Department (DepartmentID, Name, GroupName)
VALUES (17, 'Database Services', 'Information Technology')

SET IDENTITY_INSERT HumanResources.Department OFF
How It Works
In the recipe, IDENTITY_INSERT was set ON prior to the INSERT:
SET IDENTITY_INSERT HumanResources.Department ON ;
The INSERT was then performed using a value of 17. When inserting into an IDENTITY column, you must also explicitly list the column names after the INSERT table_name clause:
INSERT HumanResourcesDepartment
       (DepartmentID,
        Name,
        GroupName)
VALUES (17,
        'Database Services',
        'Information Technology') ;
If the inserted value is greater than the current IDENTITY value, new inserts to the table will automatically use this new value as the IDENTITY seed.
IDENTITY_INSERT should be set OFF once you are finished explicitly inserting values:
SET IDENTITY_INSERT HumanResources.Department OFF;
Once you are finished inserting into a table with IDENTITY_INSERT set to ON, you should set the property to OFF. Only one table in a session can have IDENTITY_INSERT ON at a time. If you were to explicitly insert IDENTITY values into multiple tables, the pattern would look something like the following:
SET IDENTITY_INSERT TableA ON ;
INSERT INTO TableA (...) VALUES (...);
INSERT INTO TableA (...) VALUES (...);
INSERT INTO TableA (...) VALUES (...);
SET IDENTITY_INSERT TableA OFF ;

SET IDENTITY_INSERT TableB ON ;
INSERT INTO TableB (...) VALUES (...);
INSERT INTO TableB (...) VALUES (...);
INSERT INTO TableB (...) VALUES (...);
SET IDENTITY_INSERT TableB OFF ;

SET IDENTITY_INSERT TableC ON ;
INSERT INTO TableC (...) VALUES (...);
INSERT INTO TableC (...) VALUES (...);
INSERT INTO TableC (...) VALUES (...);
SET IDENTITY_INSERT TableC OFF ;
Closing a connection will reset the IDENTITY_INSERT property to OFF for any table on which it is currently set to ON.
8-4. Generating a Globally Unique Identifier (GUID)
Problem
A column in your table is defined with the type UNIQUEIDENTIFIER. You need to insert a new row into the table and generate a new GUID for the row you are inserting.
![]() Note For further information regarding the UniqueIdentifier data type, please refer to the SQL Server product documentation at http://msdn.microsoft.com/en-us/library/ms187942.aspx.
Note For further information regarding the UniqueIdentifier data type, please refer to the SQL Server product documentation at http://msdn.microsoft.com/en-us/library/ms187942.aspx.
Solution
The NEWID system function generates a new GUID that can be inserted into a column defined with UNIQUEIDENTIFIER.
INSERT Purchasing.ShipMethod
       (Name,
        ShipBase,
        ShipRate,
        rowguid)
VALUES ('MIDDLETON CARGO TS1',
        8.99,
        1.22,
        NEWID()) ;


SELECT rowguid,
       Name
FROM   Purchasing.ShipMethod
WHERE  Name = 'MIDDLETON CARGO TS1'
This returns the following (note that your rowguid value will be different from this example):
rowguid                                  Name
------------------------------------     --------------------
02F47979-CC55-4C4B-B4AA-ECD3F5CC85AF     MIDDLETON CARGO TS1
How It Works
The rowguid column in the Purchasing.ShipMethod table is a UNIQUEIDENTIFIER data type column. Here is an excerpt from the table definition:
rowguid uniqueidentifier ROWGUIDCOL NOT NULL DEFAULT (newid()),
To generate a new uniqueidentifier data type value for this inserted row, the NEWID() function was used in the VALUES clause:
VALUES('MIDDLETON CARGO TS1', 8.99, 1.22, NEWID())
Selecting the new row that was just created, the rowguid was given a uniqueidentifier value of 174BE850-FDEA-4E64-8D17-C019521C6C07 (although when you test it yourself, you’ll get a different value because NEWID creates a new value each time it is executed).
Note that the table is defined with a default value of newid(). If a value is not specified for the rowguid column, SQL Server will use the NEWID function to generate a new GUID for the row.
8-5. Inserting Results from a Query
Problem
You need to insert multiple rows into a table based on the results of a query.
Solution
The previous recipes show how to insert a single row of data. This recipe demonstrates how to insert multiple rows into a table using the INSERT..SELECT form of the INSERT statement. The syntax for performing an INSERT...SELECT is as follows:
INSERT [INTO]
table_or_view_name[(column_list)] SELECT column_list FROM data_source
The syntax for using INSERT...SELECT is almost identical to inserting a single row. Instead of using the VALUES clause, designate a SELECT query formatted to return rows with a column definition that matches the column list specified in the INSERT INTO clause of the statement. The SELECT query can be based on one or more data sources, so long as the column list conforms to the expected data types of the destination table.
For the purposes of this example, this recipe creates a new table for storing the result of a query. The example populates values from the HumanResources.Shift table into the new dbo.Shift_Archive table:
CREATE TABLE [dbo].[Shift_Archive]
       (
        [ShiftID] [tinyint] NOT NULL,
        [Name] [dbo].[Name] NOT NULL,
        [StartTime] [datetime] NOT NULL,
        [EndTime] [datetime] NOT NULL,
        [ModifiedDate] [datetime] NOT NULL
                                  DEFAULT (GETDATE()),
        CONSTRAINT [PK_Shift_ShiftID] PRIMARY KEY CLUSTERED ([ShiftID] ASC)
        ) ;
GO
Next, an INSERT..SELECT is performed:
INSERT INTO dbo.Shift_Archive
       (ShiftID,
        Name,
        StartTime,
        EndTime,
        ModifiedDate)
       SELECT ShiftID,
        Name,
        StartTime,
        EndTime,
        ModifiedDate
  FROM HumanResources.Shift
  ORDER BY ShiftID ;
The results show that three rows were inserted:
(3 row(s) affected)
Next, a query is executed to confirm the inserted rows in the Shift_Archive table:
SELECT ShiftID,
  Name
FROM Shift_Archive ;
This returns:
ShiftID     Name
-------     -------
1           Day
2           Evening
3           Night
How It Works
The INSERT...SELECT form of the INSERT statement instructs SQL Server to insert multiple rows into a table based on a SELECT query. Just like regular, single-value INSERTs, you begin by using INSERT INTO table_name and specify the list of columns to be inserted:
INSERT INTO Shift_Archive (ShiftID, Name, StartTime, EndTime, ModifiedDate)
The next clause is the query used to populate the table. The SELECT statement must return columns in the same order as the columns appear in the INSERT column list, and these columns must have data type compatibility with the associated columns in the column list:
SELECT ShiftID
     , Name
     , StartTime
     , EndTime
     , ModifiedDate
 FROM HumanResources.Shift
 ORDER BY ShiftID
When the column lists aren’t designated, the SELECT statement must provide values for all the columns of the table into which the data is being inserted.
8-6. Inserting Results from a Stored Procedure
Problem
You want to insert multiple rows into a table based on the results of a stored procedure.
Solution
A stored procedure groups one or more Transact-SQL statements into a logical unit and stores it as an object in a SQL Server database. Stored procedures allow for more sophisticated result set creation (for example, you can use several intermediate result sets built in temporary tables before returning the final result set). Stored procedures that return a result set can be used with the INSERT...EXEC form of the INSERT statement.
This recipe demonstrates how to add rows to a table based on the output of a stored procedure. A stored procedure can be used in this manner if it returns data via a SELECT statement from within the procedure definition and the result set (or multiple result sets) matches the column list specified in the INSERT INTO clause of the INSERT statement.
![]() Note For more information on stored procedures, see Chapter 19.
Note For more information on stored procedures, see Chapter 19.
The syntax for inserting data from a stored procedure is as follows:
INSERT [INTO] table_or_view_name [(column_list)] EXEC stored_procedure_name
The syntax is almost identical to the INSERT...EXEC form, only this time the data is populated via a stored procedure execution and not a SELECT statement.
For this example, create a stored procedure that returns rows from the Production.TransactionHistory table where the begin and end dates are between the values passed to the stored procedure as parameters and the row does not already exist in the archive table:
CREATE PROCEDURE dbo.usp_SEL_Production_TransactionHistory
    @ModifiedStartDT DATETIME,
    @ModifiedEndDT DATETIME
AS
    SELECT TransactionID,
           ProductID,
           ReferenceOrderID,
           ReferenceOrderLineID,
           TransactionDate,
           TransactionType,
           Quantity,
           ActualCost,
           ModifiedDate
    FROM   Production.TransactionHistory
    WHERE  ModifiedDate BETWEEN @ModifiedStartDT
               AND   @ModifiedEndDT
       AND TransactionID NOT IN (
       SELECT TransactionID
       FROM Production.TransactionHistoryArchive) ;
GO
Test the stored procedures to check that the results are returned as expected:
EXEC dbo.usp_SEL_Production_TransactionHistory '2007-09-01', '2007-09-02'
This returns 4,171 rows based on the date range passed to the procedure. Next, use this stored procedure to insert the 4,171 rows into the Production.TransactionHistoryArchive table:
INSERT Production.TransactionHistoryArchive
      (TransactionID,
       ProductID,
       ReferenceOrderID,
       ReferenceOrderLineID,
       TransactionDate,
       TransactionType,
       Quantity,
       ActualCost,
       ModifiedDate)
      EXEC dbo.usp_SEL_Production_TransactionHistory '2007-09-01',
          '2007-09-02' ;
Executing this statement yields the following results:
(4171 row(s) affected)
How It Works
This example demonstrates using a stored procedure to populate a table using INSERT and EXEC. The INSERT begins with the name of the table into which rows are to be inserted:
INSERT Production.TransactionHistoryArchive
Next is the list of columns to be inserted into:
  (TransactionID,
  ProductID,
  ReferenceOrderID,
  ReferenceOrderLineID,
  TransactionDate,
  TransactionType,
  Quantity,
  ActualCost,
  ModifiedDate)
Finally, the EXEC statement executes the stored procedure with the supplied parameters:
EXEC dbo.usp_SEL_Production_TransactionHistory '2007-09-01', '2007-09-02'
8-7. Inserting Multiple Rows at Once
Problem
You are creating a script that adds multiple rows into a table one at a time. You want to optimize the size and speed of the script by reducing the number of statements executed.
Solution
SQL Server includes the ability to insert multiple rows using a single INSERT statement without requiring a subquery or stored procedure call. This allows the application to reduce the code required to add multiple rows and also reduce the number of individual statements executed by the script. The VALUES clause is repeated once for each row inserted:
First, create a table to receive the rows:
CREATE TABLE HumanResources.Degree
  (
  DegreeID INT NOT NULL
               IDENTITY(1, 1)
               PRIMARY KEY,
  DegreeName VARCHAR(30) NOT NULL,
  DegreeCode VARCHAR(5) NOT NULL,
  ModifiedDate DATETIME NOT NULL
  ) ;
GO
Next, insert multiple rows into the new table:
INSERT INTO HumanResources.Degree
       (DegreeName, DegreeCode, ModifiedDate)
VALUES ('Bachelor of Arts', 'B.A.', GETDATE()),
     ('Bachelor of Science', 'B.S.', GETDATE()),
     ('Master of Arts', 'M.A.', GETDATE()),
     ('Master of Science', 'M.S.', GETDATE()),
     ('Associate" s Degree', 'A.A.', GETDATE()) ;
GO
This returns the following query output:
(5 row(s) affected)
How It Works
This recipe demonstrates inserting multiple rows from a single INSERT statement. Start by creating a new table to contain college degree types. Then insert rows using the standard INSERT...VALUES form of the INSERT statement. The column list is specified like in all forms of the INSERT statement:
INSERT HumanResources.Degree (DegreeName, DegreeCode, ModifiedDate)
Next, in the VALUES clause, I designated a new row for each degree type. Each row had three columns, and these columns were encapsulated in parentheses:
VALUES ('Bachelor of Arts', 'B.A.', GETDATE()),
     ('Bachelor of Science', 'B.S.', GETDATE()),
     ('Master of Arts', 'M.A.', GETDATE()),
     ('Master of Science', 'M.S.', GETDATE()),
     ('Associate" s Degree', 'A.A.', GETDATE()) ;
This feature allows a developer or DBA to insert multiple rows without needing to retype the initial INSERT table name and column list. This is a great way to populate the lookup tables of a database with a set of initial values. Rather than hand-code 50 INSERT statements in your setup script, create a single INSERT with multiple rows. Not only does this help the script development, but this also optimizes the script execution because there is only one statement to compile and execute instead of 50.
8-8. Inserting Rows and Returning the Inserted Rows
Problem
You are inserting a row into a table, and that table contains some default values. You want to return the resulting values to the calling application to update the user interface.
Solution
The OUTPUT clause adds a result set to the INSERT statement containing a specified set of columns and the set of rows that were inserted. For example, add three rows to the Purchasing.ShipMethod table:
INSERT Purchasing.ShipMethod
       (Name, ShipBase, ShipRate)
OUTPUT INSERTED.ShipMethodID, INSERTED.Name
VALUES ('MIDDLETON CARGO TS11', 10, 10),
       ('MIDDLETON CARGO TS12', 10, 10),
       ('MIDDLETON CARGO TS13', 10, 10) ;
The output of the previous insert statement will be as follows:
ShipMethodID     Name
------------     ---------------------
15               MIDDLETON CARGO TS11
16               MIDDLETON CARGO TS12
17               MIDDLETON CARGO TS13
Note that the results contain values for ShipMethodID, rowgui, and ModifiedDate, three columns for which the query did not specify values explicitly.
How It Works
The OUTPUT clause of the INSERT statement is added directly after the column_list of the INSERT statement (or the table_name if the column_list is not specified explicitly). As rows are inserted into the table, they are exposed to the OUTPUT clause through the virtual table inserted. In this example, the query outputs all columns from the inserted virtual table and returns them as a result set.
INSERT Purchasing.ShipMethod (Name, ShipBase, ShipRate)
OUTPUT inserted.*
VALUES
('MIDDLETON CARGO TS11', 10, 10)
, ('MIDDLETON CARGO TS12', 10, 10)
, ('MIDDLETON CARGO TS13', 10, 10) ;
It is also possible to output information from the INSERT statement to a table or table variable for further processing. In this case, maybe it is required that the IDs of the inserted rows be output to a table variable. If there was a table variable named @insertedShipMethodIDs defined prior to the INSERT statement (this query will return an error because this table variable is not defined):
INSERT Purchasing.ShipMethod (Name, ShipBase, ShipRate)
OUTPUT inserted.ShipMethodID INTO @insertedShipMethodIDs
VALUES
('MIDDLETON CARGO TS11', 10, 10)
, ('MIDDLETON CARGO TS12', 10, 10)
, ('MIDDLETON CARGO TS13', 10, 10) ;
These examples use value lists to perform the INSERT operations. The OUTPUT clause will work with any form of INSERT statement such as INSERT ... SELECT and INSERT ... EXEC.
8-9. Updating a Single Row or Set of Rows
Problem
You need to modify a set of columns in rows that already exist in a table.
Solution
The UPDATE statement modifies data that already exists in a table. The UPDATE statement applies changes to a single or multiple columns of a single or multiple rows.
The basic syntax for the UPDATE statement is as follows:
UPDATE <table_or_view_name>
SET column_name = {expression | DEFAULT | NULL} [ ,...n ]
WHERE <search_condition>
Table 8-4 describes the arguments of this command.
Table 8-4. UPDATE Command Arguments
| Argument | Description |
|---|---|
| table_or_view_name | The table or updateable view containing data to be updated. |
| column_name = {expression| DEFAULT | NULL} | The name of the column or columns to be updated. Followed by the expression to assign to the column. Instead of an explicit expression, DEFAULT or NULL may be specified. |
| search_condition | The search condition that defines what rows are modified. If this isn’t included, all rows from the table or updateable view will be modified. |
In this example, a single row is updated by designating the SpecialOfferID, which is the primary key of the table (for more on primary keys, see Chapter 15).
Before performing the update, first query the specific row that the update statement will modify:
SELECT DiscountPct
FROM Sales.SpecialOffer
WHERE SpecialOfferID = 10 ;
This returns the following:
DiscountPct
-----------
0.50
Next, perform the modification:
UPDATE Sales.SpecialOffer
SET DiscountPct = 0.15
WHERE SpecialOfferID = 10 ;
Querying the modified row after the update confirms that the value of DiscountPct was indeed modified:
SELECT DiscountPct
FROM Sales.SpecialOffer
WHERE SpecialOfferID = 10 ;
This returns the following:
DiscountPct
------------
0.15
How It Works
In this example, the query started off with UPDATE and the table name Sales.SpecialOffer:
UPDATE Sales.SpecialOffer
Next, the SET clause was used, followed by a list of column assignments:
SET DiscountPct = 0.15
Had this been the end of the query, all rows in the Sales.SpecialOffer table would have been modified. Just as a SELECT statement with no WHERE clause returns all the rows in a table, an UPDATE statement with no WHERE clause will update all rows in a table. But the intention of this query was to update the discount percentage for only a specific product. The WHERE clause was used in order to achieve this:
WHERE SpecialOfferID = 10 ;
After executing this query, only one row is modified. Had there been multiple rows that met the search condition in the WHERE clause, those rows would have been modified as well.
UPDATE Sales.SpecialOffer
SET DiscountPct = 0.15
WHERE SpecialOfferID IN (10, 11, 12) ;
![]() Tip Performing a SELECT query with the FROM and WHERE clauses of an UPDATE, prior to the UPDATE, allows you to see what rows you will be updating (an extra validation that you are updating the proper rows). This is also a good opportunity to use a transaction to allow for rollbacks in the event that your modifications are undesired. For more on transactions, see Chapter 13.
Tip Performing a SELECT query with the FROM and WHERE clauses of an UPDATE, prior to the UPDATE, allows you to see what rows you will be updating (an extra validation that you are updating the proper rows). This is also a good opportunity to use a transaction to allow for rollbacks in the event that your modifications are undesired. For more on transactions, see Chapter 13.
8-10. Updating with a Second Table as the Data Source
Problem
You need to update rows in a table, but either your filter condition requires a second table or you need to use data from a second table as the source of your update.
Solution
The UPDATE statement can modify rows based on a FROM clause and associated WHERE clause search conditions. The basic syntax for this form of the UPDATE statement follows:
UPDATE <table_or_view_name | table_or_view_alias>
SET column_name = {expression | DEFAULT | NULL} [ ,...n ]
FROM <table_source>
WHERE <search_condition>
The FROM and WHERE clauses are not mandatory; however, you will find that they are almost always implemented in order to specify exactly which rows are to be modified based on joins against one or more tables.
In this example, assume that a specific product, “Full-Finger Gloves, M,” from the Production.Product table has a customer purchase limit of two units per customer. For this query’s requirement, any shopping cart with a quantity of more than two units for this product should immediately be adjusted back to the limit of 2:
UPDATE Sales.ShoppingCartItem
SET    Quantity = 2,
       ModifiedDate = GETDATE()
FROM Sales.ShoppingCartItem c
       INNER JOIN Production.Product p
        ON c.ProductID = p.ProductID
WHERE p.Name = 'Full-Finger Gloves, M '
       AND c.Quantity > 2 ;
How It Works
Stepping through the code, the first line shows the alias of the table to be updated:
UPDATE Sales.ShoppingCartItem
Next, the columns to be updated are designated in the SET clause:
SET Quantity =2,
ModifiedDate = GETDATE()
Next comes the FROM clause where the Sales.ShoppingCartltem and Production.Product tables are joined by ProductID. When joining multiple tables, the object to be updated must be referenced in the FROM clause:
 FROM Sales.ShoppingCartltem c
 INNER JOIN Production.Product p
 ON c.ProductID = p.ProductID
Using the updated table in the FROM clause allows joins between multiple tables. Presumably, the joined tables will be used to filter the updated rows or to provide values for the updated rows.
The WHERE clause specifies that only the “Full-Finger Gloves, M” product in the Sales.ShoppingCartltem should be modified and only if the Quantity is greater than 2 units:
 WHERE p.Name = 'Full-Finger Gloves, M '
 AND c.Quantity > 2 ;
8-11. Updating Data and Returning the Affected Rows
Problem
You are required to audit rows that have changed in a given table. Each time the DiscountPct is updated on the Sales.SpecialOffer table, the SpecialOfferID as well as the old and new values of the DiscountPct column should be recorded.
Solution
The OUTPUT clause adds a result set to the UPDATE statement containing a specified set of columns for the set of rows that were updated. For example, say all Customer discounts are increased by 5 percent:
UPDATE Sales.SpecialOffer
SET    DiscountPct *= 1.05
OUTPUT inserted.SpecialOfferID,
       deleted.DiscountPct AS old_DiscountPct,
       inserted.DiscountPct AS new_DiscountPct
WHERE  Category = 'Customer' ;
This update statement returns the following result:
SpecialOfferID     old_DiscountPct     new_DiscountPct
--------------     ---------------     ---------------
10                 0.15                0.1575
15                 0.50                0.525
How It Works
The OUTPUT clause of the UPDATE statement is added directly after the SET clause of the UPDATE statement. As rows are updated in the table, they are exposed to the OUTPUT clause through the virtual tables inserted and deleted. In this example, the query outputs all old and new DiscountPct column values for a changed SpecialOrderID and returns them as a result set:
UPDATE Sales.SpecialOffer
SET    DiscountPct *= 1.05
OUTPUT inserted.SpecialOfferID,
       deleted.DiscountPct AS old_DiscountPct,
       inserted.DiscountPct AS new_DiscountPct
WHERE  Category = 'Customer' ;
For columns that do not change (SpecialOfferID) in this case, either the inserted or deleted table can be used to retrieve values.
It is also possible to output information from the UPDATE statement to a table or table variable for further processing. If there was a table variable named @updatedOffers defined prior to the UPDATE statement (this query will return an error because this table variable is not defined):
UPDATE Sales.SpecialOffer
SET    DiscountPct *= 1.05
OUTPUT inserted.SpecialOfferID,
       deleted.DiscountPct AS old_DiscountPct,
       inserted.DiscountPct AS new_DiscountPct
       INTO @updatedOffers
WHERE  Category = 'Customer' ;
8-12. Updating Large-Value Columns
Problem
You have a large data type column and want to update a portion of the data in that column without updating the entire column.
Solution
Updates can be made to large-value data type column values without rewriting the entire column value. SQL Server introduced new large-value data types in SQL Server 2005, which are intended to replace the deprecated text, ntext, and image data types. These data types include the following:
- varchar(max), which holds non-Unicode variable-length data
- nvarchar(max), which holds Unicode variable-length data
- varbinary(max), which holds variable-length binary data
These data types can store up to 2^31-1 bytes of data.
![]() Note For more information on using large-value types in SQL Server, see the SQL Server product documentation at http://msdn.microsoft.com/en-us/library/ms130896.aspx.
Note For more information on using large-value types in SQL Server, see the SQL Server product documentation at http://msdn.microsoft.com/en-us/library/ms130896.aspx.
A major drawback of text and image data types is that they require separate functions such as WRITETEXT and UPDATETEXT to manipulate the image/text data. The new large-value data types allow modification through standard INSERT and UPDATE statements.
The syntax for inserting a large-value data type is no different from a regular INSERT. To update a large-value data type, the UPDATE statement executes the WRITE method of the large-value data type.
UPDATE <table_or_view_name>
SET    column_name.WRITE (expression, (@Offset , @Length)
FROM   <table_source>
WHERE  <search_condition>
Table 8-5 describes the parameters of the WRITE method.
Table 8-5. UPDATE Command with WRITE Method in the SET Clause
| Argument | Description |
|---|---|
| Expression | The expression defines the chunk of text to be placed in the column. |
| @Offset | @Offset determines the starting position in the existing column value where the new text should be placed. If @Offset is NULL, the new expression will be appended to the end of the column (also ignoring the second @Length parameter). |
| @Length | @Length determines the length of the section to overlay. |
Create a new table called RecipeChapter to hold the large-value data type:
CREATE TABLE dbo.RecipeChapter
       (
       ChapterID INT NOT NULL,
       Chapter VARCHAR(MAX) NOT NULL
       ) ;
GO
Next, insert a row into the table. Notice that there is nothing special about the string being inserted into the Chapter column:
INSERT INTO dbo.RecipeChapter
       (ChapterID,
        Chapter)
VALUES (1,
        At the beginning of each chapter you will notice
that basic concepts are covered first.') ;
Next, update the inserted row by adding a sentence to the end of the column value:
UPDATE RecipeChapter
SET    Chapter.WRITE(' In addition to the basics, this chapter will also provide
recipes that can be used in your day to day development and administration.',
                 NULL, NULL)
WHERE  ChapterID = 1 ;
Replace the phrase “day to day” with the single word “daily”:
UPDATE RecipeChapter
SET    Chapter.WRITE('daily', CHARINDEX('day to day', Chapter) - 1,
                     LEN('day to day'))
WHERE  ChapterID = 1 ;
For further information on CHARINDEX and LEN, please see Chapter 9.
Finally, review the resulting string:
SELECT Chapter
FROM   RecipeChapter
WHERE  ChapterID = 1
This returns the following:
Chapter
----------------------------------------------------------------------------------------------
At the beginning of each chapter you will notice that basic concepts are covered first. In
addition to the basics, this chapter will also provide recipes that can be used in your daily
development and administration.
How It Works
The recipe begins by creating a table where book chapter descriptions will be held. The Chapter column uses a varchar(max) data type.
CREATE TABLE dbo.RecipeChapter
       (
       ChapterID INT NOT NULL,
       Chapter VARCHAR(MAX) NOT NULL
       ) ;
GO
Next, a new row is inserted. Notice that the syntax for inserting a large-object data type doesn’t differ from inserting data into a regular non-large-value data type.
INSERT INTO dbo.RecipeChapter
       (ChapterID,
        Chapter)
VALUES (1,
        'At the beginning of each chapter you will notice
that basic concepts are covered first.') ;
An UPDATE is performed against the RecipeChapter table to add a second sentence after the end of the first sentence.
UPDATE RecipeChapter
The SET clause is followed by the name of the column to be updated (Chapter) and the new .WRITE method. The .WRITE takes three parameters. The first parameter is the sentence to be appended. The second and third parameters are null, indicating that the new text should be appended to the column and not inserted into the middle.
SET Chapter.WRITE (' In addition to the basics, this chapter will also provide
recipes that can be used in your day to day development and administration.'
        , NULL, NULL)
The WHERE clause specifies that the Chapter column for a single row matching ChapterlD = 1 is to be modified:
WHERE ChapterlD = 1 ;
The next example of .WRITE demonstrates replacing data within the body of the column. In the example, the expression “day to day” was replaced with “daily.” The bigint value of @0ffset and @Length are measured in bytes for the varbinary(max) and varchar(max) data types. For nvarchar(max), these parameters measure the actual number of characters. For this example, .WRITE has a value for @Offset (181 bytes into the text) and @Length (10 bytes long):
UPDATE RecipeChapter
SET Chapter.WRITE('daily', CHARINDEX('day to day', Chapter) - 1,
        LEN('day to day'))
WHERE ChapterID = 1 ;
In the recipe example, string functions are used to find the required offset and length. These values may also be specified explicitly if they are known.
UPDATE RecipeChapter
SET Chapter .WRITE('daily', 181, 10)
WHERE ChapterlD = 1 ;
To build on this recipe, consider the case of inserting data or removing data from the column value instead of replacing a set of characters.
-- insert the string '*test value* ' before the word 'beginning'
UPDATE RecipeChapter
SET Chapter.WRITE('*test value* ', 7, 0)
WHERE ChapterID = 1 ;

The following select statement will show the string "*test value*" inserted into the chapter text.
SELECT Chapter
FROM RecipeChapter ;
This query returns the following:
Chapter
----------------------------------------------------------------------------------------------
At the *test value* beginning of each chapter you will notice
that basic concepts are covered first. In addition to the basics, this chapter will also provide
recipes that can be used in your daily development and administration.
Because a length of 0 is specified, no data in the original column will be overlaid by the string that is to be inserted.
-- remove the string '*test value* ' before the word 'beginning'
UPDATE RecipeChapter
SET Chapter.WRITE('', 7, 13)
WHERE ChapterID = 1 ;
The following SELECT statement will show the string '*test value*' removed from the chapter text.
SELECT Chapter
FROM RecipeChapter ;
This query returns the following:
Chapter
----------------------------------------------------------------------------------------------
At the beginning of each chapter you will notice that basic concepts are covered first. In
addition to the basics, this chapter will also provide recipes that can be used in your daily
development and administration.
Because the empty string '' is used and a length of 13, 13 characters in the source value will be replaced by the empty string, effectively deleting 13 characters from the column.
![]() Note So, why not update the entire value of the column? Let’s say that instead of a 200- or 300-character string, the column contains 10MB or 1GB of data. By updating just the few bytes that need to change, only the changed pages will be required to be logged. If the entire value is updated, the entire value will be logged, which would be much less efficient.
Note So, why not update the entire value of the column? Let’s say that instead of a 200- or 300-character string, the column contains 10MB or 1GB of data. By updating just the few bytes that need to change, only the changed pages will be required to be logged. If the entire value is updated, the entire value will be logged, which would be much less efficient.
Problem
You need to remove one or more rows from a table.
Solution
The DELETE statement removes one or more rows from a table. First, create an example table and populate it with rows:
SELECT *
INTO Production.Example_ProductProductPhoto
FROM Production.ProductProductPhoto ;
(504 row(s) affected)
![]() Note The SELECT...INTO <table_name> form of the SELECT statement creates a new table with the name <table_name> and column definitions that conform to the columns returned from the SELECT clause. In the case of a SELECT * from a single table, the resulting table will have the same column definitions as the base table; however, no defaults, constraints, indexes, or keys are copied from the base table.
Note The SELECT...INTO <table_name> form of the SELECT statement creates a new table with the name <table_name> and column definitions that conform to the columns returned from the SELECT clause. In the case of a SELECT * from a single table, the resulting table will have the same column definitions as the base table; however, no defaults, constraints, indexes, or keys are copied from the base table.
Next, delete all rows from the table.
DELETE Production.Example_ProductProductPhoto ;
This returns the following.
(504 row(s) affected)
Next, use a DELETE statement with a WHERE clause. Let’s say the relationship of keys between two tables was dropped, and the users were able to delete data from the primary key table, but the data in the foreign key tables is not deleted (see Chapter 15 for a review of primary and foreign keys). We now need to delete rows in the foreign key tables that are missing a corresponding entry in the Product table. In this example, no rows meet this criteria:
-- Repopulate the Example_ProductProductPhoto table
INSERT Production.Example_ProductProductPhoto
       SELECT *
       FROM Production.ProductProductPhoto ;

DELETE Production.Example_ProductProductPhoto
WHERE ProductID NOT IN (SELECT ProductID
        FROM Production.Product) ;
The INSERT followed by the DELETE returns the following:
(504 row(s) affected)
(0 row(s) affected)
This third example demonstrates the same functionality of the previous example; only the DELETE has been rewritten to use a FROM clause instead of a subquery:
DELETE
FROM ppp
FROM Production.Example_ProductProductPhoto ppp
       LEFT OUTER JOIN Production.Product p
        ON ppp.ProductID = p.ProductID
WHERE p.ProductID IS NULL ;
This delete statement returns: (0 row(s) affected)
How It Works
In the first example of the recipe, all rows are deleted from the Example_ProductProductPhoto table:
DELETE Production.Example_ProductProductPhoto
This is because there was no WHERE clause to specify which rows would be deleted. In the second example, the WHERE clause is used to specify rows to be deleted based on a subquery lookup to another table:
WHERE ProductID NOT IN (SELECT ProductID FROM Production.Product)
The third example uses a LEFT OUTER JOIN instead of a subquery, joining the ProductID of the two tables:
DELETE
FROM ppp -- the alias of the table to be modified
--
-- use a from clause and join to specify the table to be modified
-- and any joins used to filter the delete
--
FROM Production.Example_ProductProductPhoto ppp
  LEFT OUTER JOIN Production.Product p
  ON ppp.ProductID = p.ProductID
--
-- and filters to select the rows to be deleted from the table to be modified
--
WHERE p.ProductID IS NULL ;
Because a LEFT OUTER JOIN was used, if any rows did not match between the left and right tables, the fields selected from the right table would be represented by NULL values. To show rows in Production.Example_ProductProductPhoto that do not have a matching ProductID in the Production.Product table, you can qualify the Production.Product as follows:
WHERE p.ProductID IS NULL
Any rows without a match to the Production.Product table will be deleted from the Production.Example_ProductProductPhoto table.
8-14. Deleting Rows and Returning the Deleted Rows
Problem
You need to delete a number of rows from a table and return the ID of the deleted rows to the client application.
Solution
A DELETE statement may contain an output clause. The OUTPUT clause of the DELETE statement instructs SQL Server to return specified columns from the deleted rows.
First, create a sample table.
SELECT *
INTO HumanResources.Example_JobCandidate
FROM HumanResources.JobCandidate ;
This statement will output the following:
(13 row(s) affected)
Next, delete rows from the table and return the ID of the deleted rows.
DELETE
FROM HumanResources.Example_JobCandidate
OUTPUT deleted.JobCandidateID
WHERE JobCandidateID < 5 ;
The DELETE statement returns these results:
JobCandidateID
--------------
1
2
3
4
How It Works
The OUTPUT clause adds a result set to the DELETE statement containing the columns in the OUTPUT clause. The DELETE, FROM, WHERE, and any of the JOIN clauses work the same as any other DELETE statement. The OUTPUT clause allows access to the deleted virtual table. The virtual table is a temporary view of the rows affected by the DELETE statement.
DELETE
FROM HumanResources.Example_JobCandidate
OUTPUT deleted.JobCandidateID
WHERE JobCandidateID < 5
The output may be redirected to a destination table or table variable using the OUTPUT ... INTO form of the OUTPUT clause. For example, if a table variable @deletedCandidates had been declared in a stored procedure or script, the output of the DELETE statement would be inserted in the table variable with the statement.
DELETE
 FROM HumanResources.Example_JobCandidate
OUTPUT deleted.JobCandidateID INTO @deletedCandidates
 WHERE JobCandidateID < 5
8-15. Deleting All Rows Quickly (Truncating)
Problem
You need to remove all rows from a table quickly with minimal logging.
Solution
The TRUNCATE statement deletes all rows from a table in a minimally logged fashion that results in a much quicker delete than a standard DELETE statement if you have very large tables. The DELETE statement should be used for operations that must be fully logged; however, for test or throwaway data, this is a fast technique for removing large amounts of data from the database. “Minimal logging” refers to how much recoverability information is written to the database’s transaction log (see Chapter 33). The syntax for TRUNCATE is as follows:
TRUNCATE TABLE table_name ;
This statement takes just the table name to truncate. Since TRUNCATE always removes all rows from a table, there is no FROM or WHERE clause.
First populate a sample table.
SELECT *
INTO Production.Example_TransactionHistory
FROM Production.TransactionHistory ;
The INSERT statement returns the following.
(113443 row(s) affected)
Next, truncate ALL rows from the example table.
TRUNCATE TABLE Production.Example_TransactionHistory ;
Next, the table’s row count is queried:
SELECT COUNT(*)
FROM Production.Example_TransactionHistory ;
This returns the following:
0
How It Works
The TRUNCATE TABLE statement, like the DELETE statement, can delete rows from a table. TRUNCATE TABLE deletes rows faster than DELETE, because it is minimally logged. Unlike DELETE, however, the TRUNCATE TABLE always removes ALL rows in the table (there is never a WHERE clause).
Although TRUNCATE TABLE is a faster way to delete rows, you cannot use it if the table columns are referenced by a foreign key constraint (see Chapter 15 for more information on foreign keys), if the table is published using transactional or merge replication, or if the table participates in an indexed view (see Chapter 16 for more information). Also, if the table has an IDENTITY column, keep in mind that the column will be reset to the seed value defined for the column (if no seed was explicitly set, it is set to 1).
8-16. Merging Data (Inserting, Updating, or Deleting Values)
Problem
You have a table that contains the ID of the last order placed by a customer. Each time a customer places an order, you need to either insert a new record if this is the first order placed by that customer or update an existing row if the customer had placed an order previously.
Solution
The MERGE statement accepts a row or set of rows and, for each row, determines whether that row exists in a target table. The statement allows different actions to be taken based on this determination. The basic syntax for the MERGE statement is as follows:
MERGE
  [ INTO ] <target_table> [ [ AS ] table_alias ]
  USING <table_source> [ [ AS ] table_alias ]
  ON <merge_search_condition>
  [ WHEN MATCHED [ AND <clause_search_condition> ]
       THEN <merge_matched> ] [ ...n ]
  [ WHEN NOT MATCHED [ BY TARGET ] [ AND <clause_search_condition> ]
        THEN <merge_not_matched> ]
  [ WHEN NOT MATCHED BY SOURCE [ AND <clause_search_condition> ]
        THEN <merge_matched> ] [ ...n ]
Table 8-6 describes the elements of the MERGE statement:
Table 8-6. MERGE Statement
| Argument | Definition |
|---|---|
| target_table | The table or updateable view that the MERGE statement will update, insert into, or delete from. |
| table_source | The data source that will be matched to the target table. The MERGE statement will execute updates, inserts, or deletes against the target table based on the result of this match. |
| merge_search_condition | Specifies the conditions by which the source table will be matched against the target table. |
| clause_search_condition | The MERGE statement can choose from multiple WHEN MATCHED and WHEN NOT MATCHED clauses. If, for example, multiple WHEN MATCHED clauses exist, the MERGE statement will choose the first WHEN MATCHED clause found that matches the search condition specified. |
| merge_matched | Specifies an UPDATE or DELETE to be executed against the target_table. In the case where the MERGE statement will update a row, this looks like this: UPDATE SET column_name = {expression | DEFAULT | NULL} [ ,...n } } [ ,...n ] Note, this looks just like the update statement’s column assignment list. There is no WHERE clause or table name specified here because this context has already been set previously in target_table and merge_search_condition. When the MERGE statement should execute a delete, the syntax is simply DELETE. |
| merge_not_matched | Specifies an INSERT to be executed against the target_table. The INSERT operation looks like this: INSERT [(column_list)] ({DEFAULT | NULL | expression }[ ,...n ]) Note, the arguments to this statement follow the same rules as the INSERT statement syntax described in Table 8-1. |
This example will track the latest customer order information in the following table:
CREATE TABLE Sales.LastCustomerOrder
       (
        CustomerID INT,
        SalesorderID INT,
        CONSTRAINT pk_LastCustomerOrder PRIMARY KEY CLUSTERED (CustomerId)
        ) ;
Executing this CREATE TABLE statement returns the following:
Command(s) completed successfully.
The following statements will declare variables representing the customer and order IDs and then use the MERGE statement to INSERT into or UPDATE the Sales.LastCustomerOrder table.
DECLARE @CustomerID INT = 100,
        @SalesOrderID INT = 101 ;
MERGE INTO Sales.LastCustomerOrder AS tgt
  USING
  (SELECT @CustomerID AS CustomerID,
        @SalesOrderID AS SalesOrderID
  ) AS src
  ON tgt.CustomerID = src.CustomerID
  WHEN MATCHED
  THEN UPDATE
       SET SalesOrderID = src.SalesOrderID
  WHEN NOT MATCHED
  THEN INSERT (
        CustomerID,
        SalesOrderID
        )
  VALUES (src.CustomerID,
        src.SalesOrderID) ;
Executing these statements will return the following:
(1 row(s) affected)
Check to see whether the record was inserted successfully.
SELECT *
FROM Sales.LastCustomerOrder ;
This SELECT statement returns the following:
CustomerID      SalesorderID
-----------     ------------
100             101
Using the following table, substitute values for the variables @CustomerID and @SalesOrderID. For each row in the table, update the script with the appropriate values and rerun the DECLARE and MERGE statements.
| @CustomerID | @SalesOrderID |
|---|---|
| 101 | 101 |
| 100 | 102 |
| 102 | 103 |
| 100 | 104 |
| 101 | 105 |
Now rerun the SELECT statement to check the results.
SELECT *
FROM Sales.LastCustomerOrder ;
The SELECT statement returns the following:
CustomerID      SalesorderID
-----------     ------------
100             104
101             105
102             103
As new orders are created for a customer, a new row is added to the table if this is the first order for that customer; however, if that customer had already placed an order, the existing row is updated.
A new requirement has arrived, and not only do we need to track the LastCustomerOrder, but we need to track the LargestCustomerOrder. We need to populate a new table and insert a row for the first order a customer places but update the row only if a new order from that customer is larger than the previously recorded order.
First, create a table to track the order information.
CREATE TABLE Sales.LargestCustomerOrder
       (
       CustomerID INT,
       SalesorderID INT,
        TotalDue MONEY,
       CONSTRAINT pk_LargestCustomerOrder PRIMARY KEY CLUSTERED (CustomerId)
       ) ;
Executing this CREATE TABLE statement returns the following:
Command(s) completed successfully.
The following statements will declare variables representing the customer and order IDs as well as the TotalDue for the order and then use the MERGE statement to INSERT into or UPDATE the Sales.LastCustomerOrder table.
DECLARE @CustomerID INT = 100,
        @SalesOrderID INT = 101 ,
        @TotalDue MONEY = 1000.00
MERGE INTO Sales.LargestCustomerOrder AS tgt
  USING
        (SELECT @CustomerID AS CustomerID,
        @SalesOrderID AS SalesOrderID,
        @TotalDue AS TotalDue
        ) AS src
  ON tgt.CustomerID = src.CustomerID
  WHEN MATCHED AND tgt.TotalDue < src.TotalDue
        THEN UPDATE
        SET SalesOrderID = src.SalesOrderID
        , TotalDue = src.TotalDue
  WHEN NOT MATCHED
  THEN INSERT (
        CustomerID,
        SalesOrderID,
        TotalDue
        )
  VALUES (src.CustomerID,
        src.SalesOrderID,
        src.TotalDue) ;
Check to see whether the record was inserted successfully.
SELECT *
FROM Sales.LargestCustomerOrder ;
This SELECT statement returns the following:
CustomerID     SalesorderID     TotalDue
----------     ------------     --------
100            101              1000.00
Using the following table, substitute values for the variables @CustomerID and @SalesOrderID and @TotalDue. For each row in the table, update the script with the appropriate values and rerun the DECLARE and MERGE statements.
| @CustomerID | @SalesOrderID | @TotalDue |
|---|---|---|
| 101 | 101 | 1000.00 |
| 100 | 102 | 1100.00 |
| 100 | 104 | 999.00 |
| 101 | 105 | 999.00 |
Now rerun the SELECT statement to check the results.
SELECT *
FROM Sales.LargestCustomerOrder ;
The SELECT statement returns the following:
CustomerID     SalesorderID      TotalDue
----------     -------------     --------
100            102               1100.00
101            101               1000.00
Note that the final two orders did not update any rows, and the results indicate the correct largest orders of 1,100.00 and 1,000.00.
How It Works
In this example, we use the MERGE statement to insert new rows into a table or update rows that already exist in that table. The basic structure of the two examples is the same, so let’s look at the elements of the Sales.LargestCustomerOrder example, which adds one twist.
The first two statements in the example create a table to hold the customer order information and declare variables that are used in the MERGE statement. The meat of the example is the MERGE statement itself.
First, we specify the table that will be the “target” of the MERGE statement, in this case Sales.LargestCustomerOrder. We alias this table tgt for reference throughout the statement. We are merging into a table in this case, but we could also specify an updateable view.
MERGE INTO Sales.LargestCustomerOrder AS tgt
Next, we specify the data that we will merge into the target table. In this case, we use a SELECT statement as a derived table, but this clause can take a number of forms. We could use one of the following:
- Table or view
- Row set function such as OPENROWSET
- User-defined table function
- Call to OPENXML
- Derived table
The USING clause may also include inner and outer joins to involve multiple tables and sources.
In the example we use a derived table that returns one row by mapping variable values to columns in our result set. This is a common pattern when using the MERGE statement with the stored procedure parameter values as the source of the merge.
  USING
  (SELECT @CustomerID AS CustomerID,
        @SalesOrderID AS SalesOrderID,
        @TotalDue AS TotalDue
  ) AS src
Now that we have specified a source and target, we need to instruct the MERGE statement how to match the source row(s) with the rows in the target table. This is effectively a JOIN condition between the source and target.
ON tgt.CustomerID = src.CustomerID
For each source row processed by the MERGE statement, it may either:
- Exist in both the source and target (MATCHED)
- Exist in the source but not the target (NOT MATCHED)
- Exist in the target but not the source (NOT MATCHED BY SOURCE)
In this example, we use WHEN MATCHED with a filter so that only rows that meet the join condition and the filter condition are updated in the target table. For these rows, we update the TotalDue column of the target table.
  WHEN MATCHED AND tgt.TotalDue < src.TotalDue
  THEN UPDATE
  SET SalesOrderID = src.SalesOrderID
        , TotalDue = src.TotalDue
The WHEN NOT MATCHED clause indicates that a row exists in the source that does not exist in the target. In this example, we would like to insert a new row in the target when this occurs.
  WHEN NOT MATCHED
  THEN INSERT (
        CustomerID,
        SalesOrderID,
        TotalDue
        )
  VALUES (src.CustomerID,
        src.SalesOrderID,
        src.TotalDue) ;
The MERGE statement accommodates multiple instances of the WHEN MATCHED, WHEN NOT MATCHED, and WHEN NOT MATCHED BY SOURCE clauses. Let’s say that we would like to track the last customer order and the largest customer order in the same table. We may have these clauses:
  WHEN MATCHED AND tgt.TotalDue < src.TotalDue
  THEN UPDATE
  SET SalesOrderID = src.SalesOrderID
        , TotalDue = src.TotalDue
  WHEN MATCHED
  THEN UPDATE
  SET SalesOrderID = src.SalesOrderID
The order of these clauses is important. The MERGE statement will choose the first clause that evaluates true. In this case, if the MERGE statement finds a match that had a TotalDue that is greater than the existing largest TotalDue for a customer, then the first clause is chosen. The second clause is chosen for all other matches. If we reversed the order of these clauses, then the WHEN MATCHED with no filter would execute for all matched rows, and the filtered clause would never be chosen.
Like the INSERT, UPDATE, and DELETE statements described earlier, the MERGE statement contains an OUTPUT clause. The only difference is the MERGE statement adds a new $ACTION keyword that indicates whether an INSERT, UPDATE, or DELETE operation occurred against the target table. This T-SQL batch is the same as the batch described throughout this chapter; however, the OUTPUT clause with the $ACTION column has been added to the MERGE statement:
DECLARE @CustomerID INT = 100,
        @SalesOrderID INT = 201 ,
        @TotalDue MONEY = 1200.00
MERGE INTO Sales.LargestCustomerOrder AS tgt
  USING
  (SELECT @CustomerID AS CustomerID,
        @SalesOrderID AS SalesOrderID,
        @TotalDue AS TotalDue
       ) AS src
  ON tgt.CustomerID = src.CustomerID
  WHEN MATCHED AND tgt.TotalDue < src.TotalDue
  THEN UPDATE
  SET SalesOrderID = src.SalesOrderID
        , TotalDue = src.TotalDue
  WHEN NOT MATCHED
  THEN INSERT (
        CustomerID,
        SalesOrderID,
        TotalDue
        )
  VALUES (src.CustomerID,
        src.SalesOrderID,
        src.TotalDue)
  OUTPUT
  $ACTION,
  DELETED.*,
  INSERTED.* ;
This merge statement returns the following:

The $ACTION keyword indicates that this set of values resulted in an update to the target table, and the columns that follow represent the version of the record before and after the update.