
![]()
Managing Tables
Almost every database has one thing in common: they all use tables to store data. In this chapter, I’ll present recipes that demonstrate table creation and manipulation. Tables are used to store data in the database, and they are the central unit upon which most SQL Server database objects depend. Tables are uniquely named within a database and schema and contain one or more columns. Each column has an associated data type that defines the kind of data that can be stored within it.
A table can have up to 1,024 columns (with the exception of sparse columns) but can’t exceed a total of 8,060 actual used bytes per row. A data page size is 8KB, including the header, which stores information about the page. This byte limit is not applied to the large object data types—varchar(max), nvarchar(max), varbinary(max), text, image, xml—or any CLR data type based upon these formats, such as the geography or geometry data types.
Another exception to the 8,060-byte limit rule is SQL Server’s row overflow functionality for regular varchar, nvarchar, varbinary, and sql_variant data types, or any CLR data type based upon these formats, such as the HierarchyId data type. If the lengths of these individual data types do not exceed 8,000 bytes but the combined width of more than one of these columns together in a table exceeds the 8,060-byte row limit, the column with the largest width will be dynamically moved to another 8KB page and replaced in the original table with a 24-byte pointer. Row overflow provides extra flexibility for managing large row sizes, but you should still limit your potential maximum variable data type length in your table definition when possible, because reliance on page overflow may decrease query performance, since more data pages need to be retrieved by a single query.
13-1. Creating a Table
Problem
You need to create a table to store data.
Solution
Use the CREATE TABLE statement to create a new table.
CREATE TABLE dbo.Person (
  PersonID INT IDENTITY CONSTRAINT PK_Person PRIMARY KEY CLUSTERED,
  BusinessEntityId INT NOT NULL
   CONSTRAINT FK_Person REFERENCES Person.BusinessEntity (BusinessEntityID),
  First_Name VARCHAR(50) NOT NULL);
How It Works
This recipe creates a relatively simple table of three columns. The first column (PersonID) has an integer data type, is automatically populated by having the IDENTITY property set, and has a clustered primary key constraint on it. Since PRIMARY KEY constraints do not allow columns to be nullable, this column is implicitly set to not allow NULL values.
The second column (BusinessEntityId) has an integer data type, and it is specified to not allow NULL values to be inserted into it. This column has a foreign key constraint on it referencing a second table; this foreign key constraint enforces that whatever value is in this column will have a corresponding value in the referenced table. The value in the referenced table must exist prior to adding the value in this table, and before a value can be deleted from the referenced table, there must be no corresponding values in this table.
The third column (First_Name) has a varchar(50) data type, and it is specified to not allow NULL values. The size of the name can be up to 50 characters in length.
Note that this format allows you to create constraints on a single column. If you need to build a constraint that encompasses multiple columns, you would need to use the following format for those columns:
CREATE TABLE dbo.Test (
  Column1 INT NOT NULL,
  Column2 INT NOT NULL,
  CONSTRAINT PK_Test PRIMARY KEY CLUSTERED (Column1, Column2));
![]() Note To create a table variable, you need to use the DECLARE statement instead of the CREATETABLE statement. See Recipe 13-23 for more details about using table variables.
Note To create a table variable, you need to use the DECLARE statement instead of the CREATETABLE statement. See Recipe 13-23 for more details about using table variables.
Problem
You need to add a new column to an existing table.
Solution
Use the ALTER TABLE statement to add new columns to a table.
ALTER TABLE dbo.Person
ADD Last_Name VARCHAR(50) NULL;
How It Works
The ALTER TABLE statement is used to make modifications to existing tables, including adding new columns. The first line of code specifies which table is to be modified, and the next line specifies to add a new column (Last_Name) with a varchar(50) data type. For all of the existing rows, the value of this column is NULL.
13-3. Adding a Column That Requires Data
Problem
You need to add a new column to an existing table, and you need to create it to have NOTNULL values.
Solution
Use the ALTER TABLE statement to add new columns to a table and simultaneously specify a default constraint.
ALTER TABLE dbo.Person
ADD IsActive BIT NOT NULL
CONSTRAINT DF__Person__IsActive DEFAULT (0);
How It Works
The ALTER TABLE statement is used to add the new column. The first line specifies the table to be modified, the second line specifies the column to be added with the NOTNULL specification, and the third line specifies a default constraint with a value of 0. SQL Server will add the column to the table with the NOTNULL attribute and will set the value of this column to 0 for all the existing rows in this table. Any new rows that do not specify a value for this column will also default to 0.
![]() Note See Recipe 13-13 for how a default constraint works.
Note See Recipe 13-13 for how a default constraint works.
Problem
You need to modify the data type or properties of an existing column in a table.
Solution
Use the ALTER TABLE statement to modify existing columns in a table.
ALTER TABLE dbo.Person
ALTER COLUMN Last_Name VARCHAR(75) NULL;
How It Works
The ALTERTABLE statement is used to make modifications to existing tables, including modifying existing columns. The first line of code specifies which table is to be modified, and the next line specifies to modify an existing column (Last_Name), followed by the column’s new definition.
![]() Note If the existing column is specified with the NOTNULL attribute, you must specify NOTNULL for the new column definition in order to retain the NOTNULL attribute on the column. Additionally, if the existing column already has data in it and the data is not able to be implicitly converted to the new data type, then the ALTER TABLE statement will fail.
Note If the existing column is specified with the NOTNULL attribute, you must specify NOTNULL for the new column definition in order to retain the NOTNULL attribute on the column. Additionally, if the existing column already has data in it and the data is not able to be implicitly converted to the new data type, then the ALTER TABLE statement will fail.
13-5. Creating a Computed Column
Problem
You need to save a calculation used when querying a table.
Solution
Use the ALTER TABLE statement to add a computed column to an existing table or the CREATETABLE statement to create a computed column as the table is created:
ALTER TABLE Production.TransactionHistory
ADD CostPerUnit AS (ActualCost/Quantity);

CREATE TABLE HumanResources.CompanyStatistic (
  CompanylD int NOT NULL,
  StockTicker char(4) NOT NULL,
  SharesOutstanding int NOT NULL,
  Shareholders int NOT NULL,
  AvgSharesPerShareholder AS (SharesOutstanding/Shareholders) PERSISTED);
How It Works
The ALTERTABLE statement is used to add a new computed column to an existing table.
In the first example, a new computed column (CostPerUnit) is added to a table. When querying this table, this column will be returned with the results of the calculation specified. The calculation results are not physically stored in the table.
If you were to run the following query:
SELECT TOP 1 CostPerUnit, Quantity, ActualCost
  FROM Production.TransactionHistory
 WHERE Quantity > 10
 ORDER BY ActualCost DESC;
you would get the following results:
CostPerUnit	Quantity	ActualCost
-----------	--------	----------
132.0408	13              1716.5304
Computed columns can’t be used within a DEFAULT or FOREIGNKEY constraint. A calculated column can’t be explicitly updated or inserted into (since its value is always derived).
Computed columns can be used within indexes but must meet certain requirements, such as being deterministic (always returning the same result for a given set of inputs) and precise (not containing float values).
In the second example, a new table is created with a computed column. Since this calculated column is specified as PERSISTED, the calculation results are physically stored in the table (but the calculation is still performed by SQL Server). This means that any changes to the columns involved in the computation will result in the computed column being recalculated and updated. The stored data still can’t be modified directly—the data is still computed. Storing the data does mean, however, that the column can be used to partition a table (see Chapter 15), or it can be used in an index with an imprecise (float-based) value—unlike its nonpersisted version.
Problem
You need to remove a column from a table.
Solution
Use the ALTER TABLE statement to drop an existing column from a table.
ALTER TABLE dbo.Person
DROP COLUMN Last_Name;
How It Works
The first line of code specifies the table that is being modified. The second line of code specifies to drop the Last_Name column.
![]() Note You can drop a column only if it isn’t being used in a PRIMARYKEY, FOREIGNKEY, UNIQUE, or CHECKCONSTRAINT (these constraint types are all covered in this chapter). You also can’t drop a column being used in an index or that has a DEFAULT value bound to it.
Note You can drop a column only if it isn’t being used in a PRIMARYKEY, FOREIGNKEY, UNIQUE, or CHECKCONSTRAINT (these constraint types are all covered in this chapter). You also can’t drop a column being used in an index or that has a DEFAULT value bound to it.
13-7. Removing a Table
Problem
You need to remove a table from the database.
Solution
Use the DROP TABLE statement to drop an existing table in the database.
DROP TABLE dbo.Person;
How It Works
The code specifies to remove the table definition and data for the specified table from the database.
![]() Note The DROP TABLE statement will fail if any other table is referencing the table to be dropped through a foreign key constraint. If there are foreign key references, you must drop them first before dropping the primary key table.
Note The DROP TABLE statement will fail if any other table is referencing the table to be dropped through a foreign key constraint. If there are foreign key references, you must drop them first before dropping the primary key table.
13-8. Reporting on a Table’s Definition
Problem
You need to see information about the metadata for a table.
Solution
Use the system stored procedure sp_help to report a table’s metadata information.
EXECUTE sp_help 'Person.Person';
How It Works
The sp_help system stored procedure returns several different result sets with useful information regarding the specific object (in this example, it returns data about the table Person.Person). This system stored procedure can be used to gather information regarding other database object types as well. The results of this example include numerous columns and multiple result sets; therefore, the results are not being shown. Some of information in the results includes information about the columns in the table, what filegroup the table is located on, all indexes and the columns that are part of the index, information about all constraints, and whether this table is referenced by any foreign keys or views.
13-9. Reducing Storage Used by NULL Columns
Problem
You have a table with hundreds (or even thousands) of columns (for example, a table in a SharePoint site that stores data about uploaded documents, where different columns are used for data about different file types), and most of these columns are NULL. However, this table still consumes extremely large amounts of storage space. You need to reduce the storage needs of this table.
How It Works
Sparse columns are a storage optimization improvement that enables zero-byte storage of NULL values. Consequently, this allows a large number of sparse columns to be defined for a table (as of this writing, 30,000 sparse columns are allowed). This improvement is ideal for database designs and applications requiring a high number of infrequently populated columns or for tables having sets of columns related only with a subset of the data stored in the table.
To define a sparse column, you need add only the SPARSE storage attribute after the column definition within a CREATE or ALTER TABLE command, as the following query demonstrates:
CREATE TABLE dbo.WebsiteProduct (
   WebsiteProductID int NOT NULL PRIMARY KEY IDENTITY(1,1),
   ProductNM varchar(255) NOT NULL,
   PublisherNM varchar(255) SPARSE NULL,
   ArtistNM varchar(150) SPARSE NULL,
   ISBNNBR varchar(30) SPARSE NULL,
   DiscsNBR int SPARSE NULL,
   MusicLabelNM varchar(255) SPARSE NULL);
The previous table takes a somewhat denormalized approach to creating columns that apply only to specific product types. For example, the PublisherNM and ISBNNBR columns apply to a book product, whereas DiscsNBR, ArtistNM, and MusicLabelNM will more often apply to a music product. When a product row is stored, the sparse columns that do not apply to it will not incur a storage cost for each NULL value.
Let’s now insert two new rows into the table, one representing a book and one a music album:
INSERT dbo.WebsiteProduct (ProductNM, PublisherNM, ISBNNBR)
  VALUES ('SQL Server 2012 Transact-SQL Recipes', 'Apress', '9781430242000'),
INSERT dbo.WebsiteProduct (ProductNM, ArtistNM, DiscsNBR, MusicLabelNM)
  VALUES ('Etiquette', 'Casiotone for the Painfully Alone', 1, 'Tomlab'),
Returning just the appropriate columns for book products is accomplished with the following query:
SELECT ProductNM, PublisherNM,ISBNNBR FROM dbo.WebsiteProduct WHERE ISBNNBR IS NOT NULL;
This query returns the following result set:
ProductNM                               PublisherNM     ISBNNBR
------------------------------------	-----------	-------------
SQL Server 2012 Transact-SQL Recipes	Apress          9781430242000
If your table has a large number of columns and you want to return all the columns that have NOTNULL values, then you can utilize a COLUMNSET. A COLUMNSET allows you to logically group all sparse columns defined for the table. This column (with a data type of xml) allows for SELECTs and data modification and is defined by designating COLUMN_SET FOR ALL_SPARSE_COLUMNS after the column definitions. You can have only one COLUMNSET for a single table, and you also can’t add one to a table that already has sparse columns defined in it. If you attempt to add a COLUMNSET to the dbo.WebsiteProduct table (which already has sparse columns) with the ALTER TABLE statement:
ALTER TABLE dbo.WebsiteProduct
ADD ProductAttributeCS XML COLUMN_SET FOR ALL_SPARSE_COLUMNS;
the following error is returned:
Msg 1734, Level 16, State 1, Line 1
Cannot create the sparse column set 'ProductAttributeCS' in the table 'WebsiteProduct' because the table already contains one or more sparse columns. A sparse column set cannot be added to a table if the table contains a sparse column.
Taking the previous table, this code will re-create it with a sparse column:
IF OBJECT_ID('dbo.WebsiteProduct', 'U') IS NOT NULL
   DROP TABLE dbo.WebsiteProduct;
CREATE TABLE dbo.WebsiteProduct (
   WebsiteProductID int NOT NULL PRIMARY KEY IDENTITY(1,1),
   ProductNM varchar(255) NOT NULL,
   PublisherNM varchar(255) SPARSE NULL,
   ArtistNM varchar(150) SPARSE NULL,
   ISBNNBR varchar(30) SPARSE NULL,
   DiscsNBR int SPARSE NULL,
   MusicLabelNM varchar(255) SPARSE NULL,
   ProductAttributeCS xml COLUMN_SET FOR ALL_SPARSE_COLUMNS);
After re-inserting the data by running the prior two INSERT statements, you can now query the table using this COLUMNSET (instead of the individual columns in the table), as demonstrated here:
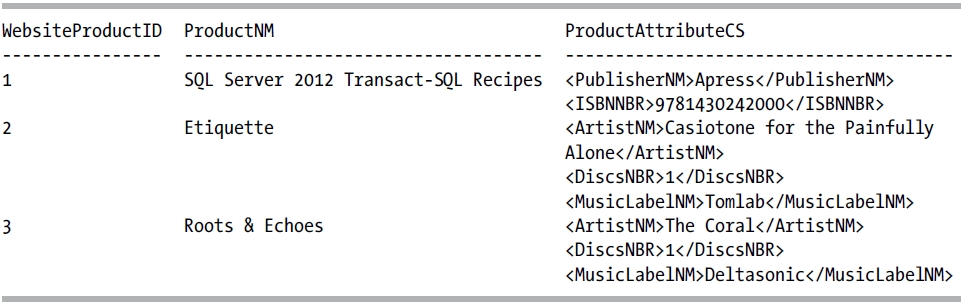
SELECT ProductNM, ProductAttributeCS
  FROM dbo.WebsiteProduct
 WHERE ISBNNBR IS NOT NULL;
This query returns the following result set:
ProductNM                               ProductAttributeCS
------------------------------------	---------------------------------
SQL Server 2012 Transact-SQL Recipes	<PublisherNM>Apress</PublisherNM>
                                        <ISBNNBR>9781430242000</ISBNNBR>
You can also execute INSERT and UPDATE statements against the COLUMNSET columns.
INSERT dbo.WebsiteProduct (ProductNM, ProductAttributeCS)
VALUES ('Roots & Echoes',
   '<ArtistNM>The Coral</ArtistNM>
   <DiscsNBR>1</DiscsNBR>
   <MusicLabelNM>Deltasonic</MusicLabelNM>'),
![]() Caution Any columns not specified will be set to NULL. If you use an UPDATE statement, data in existing columns will be set to NULL if the columns were not specified.
Caution Any columns not specified will be set to NULL. If you use an UPDATE statement, data in existing columns will be set to NULL if the columns were not specified.
Once a column set is defined for a table, performing a SELECT * query no longer returns each individual sparse column, as the following query demonstrates (only nonsparse columns and then the column set):
SELECT * FROM dbo.WebsiteProduct;
This query returns the following result set:
13-10. Adding a Constraint to a Table
Problem
You need to add one or more constraints (PRIMARYKEY, UNIQUE, or FOREIGNKEY) to a table in order to enforce referential integrity rules on the table or between tables.
Solution
Use the ALTERTABLE statement to add PRIMARYKEY, UNIQUE, or FOREIGNKEY constraints to enforce referential integrity rules on this table. The following statements create a table and then create PRIMARYKEY, UNIQUE, and FOREIGNKEY constraints on it:
CREATE TABLE dbo.Person (
  PersonID INT IDENTITY NOT NULL,
  BusinessEntityId INT NOT NULL,
  First_Name VARCHAR(50) NULL,
  Last_Name VARCHAR(50) NULL);

ALTER TABLE dbo.Person
  ADD CONSTRAINT PK_Person PRIMARY KEY CLUSTERED (PersonID),
   CONSTRAINT FK_Person FOREIGN KEY (BusinessEntityId)
   REFERENCES Person.BusinessEntity (BusinessEntityID),
   CONSTRAINT UK_Person_Name UNIQUE (First_Name, Last_Name);
How It Works
The ALTER TABLE statement allows you to modify an existing table, including adding constraints to it. You can also use the CREATE TABLE statement to create the table and add the constraints to it simultaneously:
IF OBJECT_ID('dbo.Person','U') IS NOT NULL
   DROP TABLE dbo.Person;
CREATE TABLE dbo.Person (
  PersonID INT IDENTITY NOT NULL,
  BusinessEntityId INT NOT NULL,
  First_Name VARCHAR(50) NULL,
  Last_Name VARCHAR(50) NULL,
  CONSTRAINT PK_Person PRIMARY KEY CLUSTERED (PersonID),
  CONSTRAINT FK_Person FOREIGN KEY (BusinessEntityId)
   REFERENCES Person.BusinessEntity (BusinessEntityID),
  CONSTRAINT UK_Person_Name UNIQUE (First_Name, Last_Name) );
Constraints place limitations on the data that can be entered into a column or columns. Constraints on a single column can be created as either a table constraint or a column constraint; constraints being created on more than one column must be created as a table constraint.
A column constraint is specified in the CREATETABLE statement as part of the definition of the column. For a column constraint, the constraint applies to the single column. In comparison, a table constraint is specified in the CREATETABLE statement after the comma separating the columns. Although not required, table constraints are generally placed after all column definitions. In the previous example, the constraints are created as table constraints. The same table, with column constraints for the single-column constraints, is shown here:
IF OBJECT_ID('dbo.Person','U') IS NOT NULL
   DROP TABLE dbo.Person;
CREATE TABLE dbo.Person (
  PersonID INT IDENTITY NOT NULL
   CONSTRAINT PK_Person PRIMARY KEY CLUSTERED (PersonID),
  BusinessEntityId INT NOT NULL
   CONSTRAINT FK_Person FOREIGN KEY (BusinessEntityId)
   REFERENCES Person.BusinessEntity (BusinessEntityID),
  First_Name VARCHAR(50) NULL,
  Last_Name VARCHAR(50) NULL,
  CONSTRAINT UK_Person_Name UNIQUE (First_Name, Last_Name) );
A primary key is a special type of constraint that identifies a single column or set of columns, which in turn uniquely identifies all rows in the table.
A primary key enforces entity integrity, meaning that rows are guaranteed to be unambiguous and unique. Best practices for database normalization dictate that every table has a primary key. A primary key provides a way to access the record and ensures that the key is unique. A primary key column can’t contain NULL values.
Only one primary key is allowed for a table, and when a primary key is designated, an underlying table index is automatically created, defaulting to a clustered index (index types are reviewed in Chapter 18). You can also explicitly designate that a nonclustered index will be created when the primary key is created instead, if you have a better use for the single clustered index allowed for a table. An index created on the primary key counts against the 1,000 total indexes allowed for a table.
A composite primary key is the unique combination of more than one column in the table. To define a composite primary key, you must use a table constraint instead of a column constraint.
In the prior example, a PRIMARYKEY constraint is created on the PersonID column.
You can have only one primary key defined on a table. If you want to enforce uniqueness on other nonprimary key columns, you can use a UNIQUE constraint. A unique constraint, by definition, creates an alternate key. Unlike a PRIMARY KEY constraint, you can create multiple UNIQUE constraints for a single table, and you are also allowed to designate a UNIQUE constraint for columns that allow NULL values (although only one NULL value is allowed for a single-column key per table). Like primary keys, UNIQUE constraints enforce entity integrity by ensuring that rows can be uniquely identified.
The UNIQUE constraint creates an underlying table index when it is created. This index can be CLUSTERED or NONCLUSTERED (although you can’t create the index as CLUSTERED if a clustered index already exists for the table).
As with PRIMARY KEY constraints, you can define a UNIQUE constraint when a table is created either on the column definition or at the table constraint level.
You can have only one NULL value for a single-column UNIQUE constraint. For a multiple-column UNIQUE constraint, you can have only a single NULL value in that column for the values of the remaining columns in the UNIQUE constraint. Consider the following code that inserts data into the previous table, which has a UNIQUE constraint defined on the nullable First_Name and Last_Name columns:
INSERT INTO dbo.Person (BusinessEntityId, First_Name) VALUES (1, 'MyName'),
INSERT INTO dbo.Person (BusinessEntityId, First_Name) VALUES (1, 'MyName2'),
INSERT INTO dbo.Person (BusinessEntityId) VALUES (1);
In the first two INSERT statements, NULL values are being inserted into the Last_Name column. You can have multiple NULL values in the Last_Name column as long as the First_Name column is different. Both of these statements are allowed once. Trying to run either of these a second time will generate an error:
Msg 2627, Level 14, State 1, Line 1
Violation of UNIQUE KEY constraint 'UK_Person_Name'. Cannot insert duplicate key in object 'dbo.Person'. The duplicate key value is (MyName2, <NULL>).
![]() Note In SQL Server 2012, the constraint violation error messages have been enhanced to show the values that are causing the error. As such, you can tell that the previous error statement comes from the second INSERT statement.
Note In SQL Server 2012, the constraint violation error messages have been enhanced to show the values that are causing the error. As such, you can tell that the previous error statement comes from the second INSERT statement.
In the third INSERT statement, NULL values are being inserted into both the First_Name and Last_Name columns. Again, this is allowed once. Subsequent attempts will generate the same error (except that the values being displayed will be different).
Foreign key constraints establish and enforce relationships between tables and help maintain referential integrity, which means that every value in the foreign key column(s) must exist in the corresponding column(s) for the referenced table. Foreign key constraints also help define domain integrity, in that they define the range of potential and allowed values for a specific column or columns. Domain integrity defines the validity of values in a column. Foreign key constraints can be defined only by referencing a table that has a constraint enforcing entity integrity, either a PRIMARYKEY or UNIQUE constraint.
Foreign key constraints can be created as a table constraint or, if the constraint is on a single column, as a column constraint. In the prior example, a FOREIGNKEY constraint is created between the BusinessEntityId column in the table being created, and the BusinessEntityId column in the Person.BusinessEntity table.
You can create multiple FOREIGNKEY constraints on a table. Creating a FOREIGNKEY constraint does not create any indexes on the table.
When there is a FOREIGNKEY constraint between tables, SQL Server restricts the ability to delete a row from the referenced table or update the column to a different value, unless the referencing table does not contain that value. Furthermore, SQL Server restricts the ability to insert a row into the referencing table unless there is a row with that value in the referenced table. Since SQL Server must check for this existence in the referencing table when updating or deleting records in the referenced table, it can be advantageous to create an index in the referencing table on the foreign key column(s) to support this lookup.
13-11. Creating a Recursive Foreign Key
Problem
You need to ensure that the values in a column exist in a different column in the same table. For example, an employee table might contain a column for employee_id and another column for manager_id. The data in manager_id column must exist in the employee_id column.
Solution
Create a recursive foreign key:
CREATE TABLE dbo.Employees (
   employee_id INT IDENTITY PRIMARY KEY CLUSTERED,
   manager_id INT NULL REFERENCES dbo.Employees (employee_id));
![]() Note Some people will call a recursive foreign key a self-referencing foreign key. Use whichever you want; they mean the same thing.
Note Some people will call a recursive foreign key a self-referencing foreign key. Use whichever you want; they mean the same thing.
How It Works
The table is created with two columns. The first column is employee_id, and it is an identity column, with a primary key created as a column constraint. The second column is manager_id. It is defined as nullable, and it has a foreign key that is referencing the employee_id column in the same table.
Now let’s insert some data by running the following statements and then query the results:
INSERT INTO dbo.Employees DEFAULT VALUES;
INSERT INTO dbo.Employees (manager_id) VALUES (1);
SELECT * FROM dbo.Employees;
This query returns the following results:
employee_id	manager_id
-----------	----------
1               NULL
2               1
If we then run the following statement:
INSERT INTO dbo.Employees (manager_id) VALUES (10);
SQL Server will generate an error since there is no employee_id with a value of 10:
Msg 547, Level 16, State 0, Line 9
The INSERT statement conflicted with the FOREIGN KEY SAME TABLE constraint "FK__Employees__manag__6EE06CCD". The conflict occurred in database "AdventureWorks2008R2", table "dbo.Employees", column 'employee_id'.
13-12. Allowing Data Modifications to Foreign Keys Columns in the Referenced Table to Be Reflected in the Referencing Table
Problem
You need to change the value of a column on a table that is involved in a foreign key relationship as the referenced table, and there are rows in the referencing table using this value.
Solution
Create the foreign key with cascading changes.
How It Works
Foreign keys restrict the values that can be placed within the foreign key column or columns. If the associated primary key or unique value does not exist in the reference table, the INSERT or UPDATE to the table row fails. This restriction is bidirectional in that if an attempt is made to delete a primary key but one or more rows that reference that specific key exists in the foreign key table, an error will be returned. All referencing foreign key rows must be deleted prior to deleting the targeted primary key or unique value; otherwise, an error will be raised.
SQL Server provides an automatic mechanism for handling changes in the primary key/unique key column, called cascading changes. In previous examples, cascading options weren’t used. You can allow cascading changes for deletions or updates using ON DELETE and ON UPDATE. The basic syntax for cascading options is as follows:
[ ON DELETE { NO ACTION | CASCADE | SET NULL | SET DEFAULT } ]
[ ON UPDATE { NO ACTION | CASCADE | SET NULL | SET DEFAULT } ]
[ NOT FOR REPLICATION ]
Table 13-1 details these arguments.
Table 13-1. Cascading Change Arguments
In this example, two parent tables are created and populated, and a third table is created using cascading options in the foreign key definitions to these parent tables. Data is then inserted into the third table. The data in the third table is selected. Finally, one of the rows in a parent table is deleted (causing a cascade delete), a row in the other parent table is modified (causing a cascade update to NULL), and the data in the third table is again selected.
IF OBJECT_ID('dbo.PersonPhone','U') IS NOT NULL DROP TABLE dbo.PersonPhone;
IF OBJECT_ID('dbo.PhoneNumberType','U') IS NOT NULL DROP TABLE dbo.PhoneNumberType;
IF OBJECT_ID('dbo.Person','U') IS NOT NULL DROP TABLE dbo.Person;

CREATE TABLE dbo.Person (
  BusinessEntityId INT PRIMARY KEY,
  FirstName VARCHAR(25),
  LastName VARCHAR(25));

CREATE TABLE dbo.PhoneNumberType (
  PhoneNumberTypeId INT PRIMARY KEY,
  Name VARCHAR(25));

INSERT INTO dbo.PhoneNumberType
SELECT PhoneNumberTypeId, Name
FROM Person.PhoneNumberType;

INSERT INTO dbo.Person
SELECT BusinessEntityId, FirstName, LastName
FROM Person.Person
WHERE BusinessEntityID IN (1,2);

CREATE TABLE dbo.PersonPhone (
   [BusinessEntityID] [int] NOT NULL,
   [PhoneNumber] [dbo].[Phone] NOT NULL,
   [PhoneNumberTypeID] [int] NULL,
   [ModifiedDate] [datetime] NOT NULL,
   CONSTRAINT [UQ_PersonPhone_BusinessEntityID_PhoneNumber_PhoneNumberTypeID]
   UNIQUE CLUSTERED
   ([BusinessEntityID], [PhoneNumber], [PhoneNumberTypeID]),
   CONSTRAINT [FK_PersonPhone_Person_BusinessEntityID]
   FOREIGN KEY ([BusinessEntityID])
   REFERENCES [dbo].[Person] ([BusinessEntityID])
   ON DELETE CASCADE,
   CONSTRAINT [FK_PersonPhone_PhoneNumberType_PhoneNumberTypeID]
   FOREIGN KEY ([PhoneNumberTypeID])
   REFERENCES [dbo].[PhoneNumberType] ([PhoneNumberTypeID])
   ON UPDATE SET NULL
);

INSERT INTO dbo.PersonPhone (BusinessEntityId, PhoneNumber, PhoneNumberTypeId, ModifiedDate)
VALUES (1, '757-867-5309', 1, '2012-03-22T00:00:00'),
   (2, '804-867-5309', 2, '2012-03-22T00:00:00'),

SELECT 'Initial Data', * FROM dbo.PersonPhone;

DELETE FROM dbo.Person
WHERE BusinessEntityID = 1;

UPDATE dbo.PhoneNumberType
   SET PhoneNumberTypeID = 4
 WHERE PhoneNumberTypeID = 2;

SELECT 'Final Data', * FROM dbo.PersonPhone;
This example produces the following results:
BusinessEntityID	PhoneNumber	PhoneNumberTypeID	ModifiedDate
----------------	--------------	-----------------	-------------------------
Initial Data 1	        757-867-5309	1	                2012-03-22  00:00:00.000
Initial Data 2	        804-867-5309	2	                2012-03-22  00:00:00.000

BusinessEntityID	PhoneNumber	PhoneNumberTypeID	ModifiedDate
----------------	-------------	-----------------	-------------------------
Final Data 2	        804-867-5309	NULL	                2012-03-22  00:00:00.000
In this example, one of the foreign key constraints uses ON DELETE CASCADE in a CREATE TABLE definition.
CONSTRAINT [FK_PersonPhone_Person_BusinessEntityID]
   FOREIGN KEY([BusinessEntityID])
   REFERENCES [dbo].[Person] ([BusinessEntityID])
   ON DELETE CASCADE,
Using this cascade option, if a row is deleted in the dbo.Person table, any referencing BusinessEntityID in the dbo.PersonPhone table will also be deleted. This can be witnessed in the previous example, where the dbo.Person record for BusinessEntityId = 1 is deleted and the corresponding record in the dbo.PhoneNumber table is also deleted.
A second foreign key constraint is also defined in the CREATE TABLE using ON UPDATE:
   CONSTRAINT [FK_PersonPhone_PhoneNumberType_PhoneNumberTypeID]
   FOREIGN KEY([PhoneNumberTypeID])
   REFERENCES [dbo].[PhoneNumberType] ([PhoneNumberTypeID])
   ON UPDATE SET NULL
If an update is made to the primary key of the dbo.PhoneNumberType table, the PhoneNumberTypeID column in the referencing dbo.PhoneNumber table will be set to NULL. This can be witnessed in the previous example, where the dbo.PhoneNumberType record has the PhoneNumberTypeId value changed from 2 to 4 and the corresponding record in the dbo.PhoneNumber table has its PhoneNumberTypeId value changed to NULL.
13-13. Specifying Default Values for a Column
Problem
You need to ensure that if you don’t specify a column when inserting data into the table, a default value is used to populate that column. For example, you have a column named InsertedDate that needs to contain the date/time whenever a record is added to the table.
Solution
IF OBJECT_ID('dbo.Employees', 'U') IS NOT NULL
   DROP TABLE dbo.Employees;
CREATE TABLE dbo.Employees (
   EmployeeId INT PRIMARY KEY CLUSTERED,
   First_Name VARCHAR(50) NOT NULL,
   Last_Name VARCHAR(50) NOT NULL,
   InsertedDate DATETIME DEFAULT GETDATE());
How It Works
The table is created with a DEFAULT constraint that uses the GETDATE system function to return the current system date and time.
Default constraints are used only if the column is not specified in the INSERT statement. Here’s an example:
INSERT INTO dbo.Employees (EmployeeId, First_Name, Last_Name)
VALUES (1, 'Wayne', 'Sheffield'),
INSERT INTO dbo.Employees (EmployeeId, First_Name, Last_Name, InsertedDate)
VALUES (2, 'Jim', 'Smith', NULL);
SELECT * FROM dbo.Employees;
This query returns the following result set:
EmployeeId	First_Name	Last_Name	InsertedDate
----------	----------	---------	-----------------------
1               Wayne           Sheffield	2012-02-19 00:59:31.547
2               Jim             Smith	        NULL
![]() Note This recipe calls one or more functions that returns a value based upon the current date and time. When you run this recipe on your system, you will get a different result that will be based upon the date and time as set on the computer running your instance of SQL Server.
Note This recipe calls one or more functions that returns a value based upon the current date and time. When you run this recipe on your system, you will get a different result that will be based upon the date and time as set on the computer running your instance of SQL Server.
The first INSERT statement did not specify the InsertedDate column, so the default constraint was fired, and the current system date/time was inserted into the column. The second INSERT statement did specify the InsertedDate column, and a NULL value was specified. The NULL value is what was inserted into the column.
13-14. Validating Data as It Is Entered into a Column
Problem
You need to ensure that data entered into a column follows specific business rules. For example, the date in an EndingDate column must be after the date in the StartingDate column.
Solution
CREATE TABLE dbo.BooksRead (
  ISBN VARCHAR(20),
  StartDate DATETIME NOT NULL,
  EndDate DATETIME NULL,
  CONSTRAINT CK_BooksRead_EndDate CHECK (EndDate > StartDate));
How It Works
The CHECK constraint is created that ensures that the EndDate is greater than the StartDate. If a value is attempted to be entered into the EndDate column that is not greater than the StartDate, then the insert or update will fail.
INSERT INTO BooksRead (ISBN, StartDate, EndDate)
VALUES ('9781430242000', '2012-08-01T16:25:00', '2011-08-15T12:35:00 '),
Since the EndDate is in the previous year, this error will be generated:
Msg 547, Level 16, State 0, Line 7
The INSERT statement conflicted with the CHECK constraint "CK_BooksRead_EndDate". The conflict occurred in database " AdventureWorks2012", table "dbo.BooksRead".
The statement has been terminated.
A CHECK constraint is used to define what format and values are allowed for a column. The syntax of the CHECK constraint is as follows:
CHECK ( logical_expression )
If the logical expression of the CHECK constraint evaluates to TRUE, and the row will be inserted or updated. If the CHECK constraint expression evaluates to FALSE, the row insert or update will fail.
In the previous example, the constraint is created as a table constraint. If the constraint references only the column it applies to, it can be created as a column constraint; otherwise, it must be created as a table constraint.
A CHECK constraint can perform any check that returns a logical value, including using a user-defined scalar function. It can perform pattern matching with the LIKE operator. For example, the following table has a check constraint on the phone number column to ensure that it follows the U.S. standard of XXX-YYY-ZZZZ where all positions are numbers except for the two dashes:
IF OBJECT_ID('dbo.Employees','U') IS NOT NULL
   DROP TABLE dbo.Employees;
CREATE TABLE dbo.Employees (
  EmployeeId INT IDENTITY,
  FirstName VARCHAR(50),
  LastName VARCHAR(50),
  PhoneNumber VARCHAR(12) CONSTRAINT CK_Employees_PhoneNumber
   CHECK (PhoneNumber LIKE '[0-9][0-9][0-9]-[0-9][0-9][0-9]-[0-9][0-9][0-9][0-9]'));
When inserting the following rows, the first insert is successful while the second insert fails:
INSERT INTO dbo.Employees (FirstName, LastName, PhoneNumber)
VALUES ('Wayne', 'Sheffield', '800-555-1212'),

INSERT INTO dbo.Employees (FirstName, LastName, PhoneNumber)
VALUES ('Wayne', 'Sheffield', '555-1212'),
Msg 547, Level 16, State 0, Line 12
The INSERT statement conflicted with the CHECK constraint " CK_Employees_PhoneNumber". The conflict occurred in database "AdventureWorks2008R2", table "dbo.Employees", column 'PhoneNumber'.
The statement has been terminated.
13-15. Temporarily Turning Off a Constraint
Problem
You need temporarily turn off a constraint on a table. For instance, you are performing a bulk-load process where you don’t need to verify that each row meets the constraint requirements.
Solution
Utilize the ALTER TABLE statement to disable a constraint:
ALTER TABLE dbo.Employees
NOCHECK CONSTRAINT CK_Employees_PhoneNumber;
How It Works
The ALTER TABLE statement specifies to no longer check the specified foreign key or check constraint created on the specified table. In the previous example, the CK_Employees_PhoneNumber check constraint that was created on the dbo.Employees table in Recipe 13-14 is disabled. If we then rerun the second insert statement from that recipe, it succeeds.
You can alternatively disable all foreign key and check constraints by replacing the constraint name with ALL. Here’s an example:
ALTER TABLE dbo.Employees
NOCHECK CONSTRAINT ALL;
You can turn the constraint back on to check future data changes by the following ALTER TABLE statement:
ALTER TABLE dbo.Employees
CHECK CONSTRAINT CK_Employees_PhoneNumber;
Note that this does not verify that the data currently existing in the table meets the constraint; it merely enables the constraint for future data changes.
To enable all disabled constraints and verify that all of the data in the table meets those constraint restrictions, you would use the following ALTERTABLE statement:
ALTER TABLE dbo.Employees
WITH CHECK CHECK CONSTRAINT ALL;
In this case, the record inserted from the second insert statement in Recipe 13-14 causes the check to fail. This record needs to be updated to pass the constraint, or it needs to be deleted.
![]() Caution The query optimizer does not consider constraints that are defined WITH NOCHECK. Such constraints are ignored until they are reenabled by using ALTER TABLE <table> WITH CHECK CHECK CONSTRAINT ALL. This may cause performance degradation by not building optimal query execution plans.
Caution The query optimizer does not consider constraints that are defined WITH NOCHECK. Such constraints are ignored until they are reenabled by using ALTER TABLE <table> WITH CHECK CHECK CONSTRAINT ALL. This may cause performance degradation by not building optimal query execution plans.
Problem
You need to remove a constraint from a table.
Solution
Utilize the ALTERTABLE statement to drop a constraint:
ALTER TABLE dbo.BooksRead
DROP CONSTRAINT CK_BooksRead_EndDate;
How It Works
The table_name designates the table you are dropping the constraint from, and the constraint_ name designates the name of the constraint to be dropped. In this example, the CK_BooksRead_EndDate check constraint is dropped from the dbo.BooksRead table that was created in Recipe 13-14. Any constraint (PRIMARY KEY, FOREIGN KEY, UNIQUE, DEFAULT, or CHECK) can be dropped.
13-17. Creating Auto-incrementing Columns
Problem
You need to create a column that automatically increments itself.
Solution
Utilize the IDENTITY property of a column:
IF OBJECT_ID('dbo.Employees','U') IS NOT NULL
   DROP TABLE dbo.Employees;
CREATE TABLE dbo.Employees (
   employee_id INT IDENTITY PRIMARY KEY CLUSTERED,
   manager_id INT NULL REFERENCES dbo.Employees (employee_id),
   First_Name VARCHAR(50) NULL,
   Last_Name VARCHAR(50) NULL,
   CONSTRAINT UQ_Employees_Name UNIQUE (First_Name, Last_Name));
How It Works
The IDENTITY column property allows you to define an automatically incrementing numeric value for a single column in a table. An IDENTITY column is most often used for surrogate primary key columns, because they are more compact than non-numeric data type natural keys. When a new row is inserted into a table with an IDENTITY column property, the column is inserted with a unique incremented value. The data type for an IDENTITY column can be int, tinyint, smallint, bigint, decimal, or numeric (the decimal and numeric data types must have a scale of 0). Tables may have only one identity column defined, and the defined IDENTITY column can’t have a DEFAULT or rule settings associated with it. The IDENTITY attribute must be specified when the column is created (either through the CREATETABLE or ALTERTABLE statement); you cannot specify to change an existing column to have the IDENTITY attribute.
![]() Note Surrogate keys, also called artificial keys, can be used as primary keys and have no inherent business/data meaning. Surrogate keys are independent of the data itself and are used to provide a single unique record locator in the table. A big advantage to surrogate primary keys is that they don’t need to change. If you use business data to define your key (natural key), such as first name and last name, these values can change over time and change arbitrarily. Surrogate keys don’t have to change, because their only meaning is within the context of the table itself.
Note Surrogate keys, also called artificial keys, can be used as primary keys and have no inherent business/data meaning. Surrogate keys are independent of the data itself and are used to provide a single unique record locator in the table. A big advantage to surrogate primary keys is that they don’t need to change. If you use business data to define your key (natural key), such as first name and last name, these values can change over time and change arbitrarily. Surrogate keys don’t have to change, because their only meaning is within the context of the table itself.
The basic syntax for an IDENTITY property column is as follows:
[ IDENTITY [ ( seed ,increment ) ] [NOT FOR REPLICATION] ]
The IDENTITY property accepts two optional values: seed and increment. seed defines the starting number for the IDENTITY column, and increment defines the value added to the previous IDENTITY column value to get the value for the next row added to the table. The default for both seed and increment is 1. The NOT FOR REPLICATION option preserves the original values of the publisher IDENTITY column data when replicated to the subscriber, retaining any values referenced by foreign key constraints (preventing the break of relationships between tables that may use the IDENTITY column as a primary key and foreign key reference).
Using an IDENTITY column does not guarantee that there will not be gaps in the numbers. Identity values are never rolled back, even if the INSERT statement is in a transaction that subsequently is rolled back. Subsequent insert statements will skip those numbers. Here’s an example:
INSERT INTO dbo.Employees (manager_id, First_Name, Last_Name)
   VALUES (NULL, 'Wayne', 'Sheffield')

BEGIN TRANSACTION
INSERT INTO dbo.Employees (manager_id, First_Name, Last_Name)
   VALUES (1, 'Jim', 'Smith'),
ROLLBACK TRANSACTION;

INSERT INTO dbo.Employees (manager_id, First_Name, Last_Name)
   VALUES (1, 'Jane', 'Smith'),

SELECT * FROM dbo.Employees;
This query produces the following result set:
employee_id	manager_id	First_Name	Last_Name
-----------	----------	----------	---------
1	        NULL	        Wayne	        Sheffield
3	        1	        Jane	        Smith
In viewing these results, we can see that the rolled-back INSERT statement created a gap in the employee_id sequencing.
Using an IDENTITY column does not guarantee that the column will contain unique values. To guarantee this, the column needs to have a PRIMARYKEY or UNIQUE constraint on it.
When a table has an IDENTITY column, you can utilize IDENTITYCOL in a SELECT statement to return the IDENTITY column. If the SELECT statement contains more than one table in the FROM clause with an identity column, then IDENTITYCOL must be qualified with the table name or alias.
13-18. Obtaining the Identity Value Used
Problem
You need to know what the value is of the identity column for the row that you just inserted into a table.
Solution
Utilize the @@IDENTITY, SCOPE_IDENTITY, or IDENT_CURRENT system function:
SELECT @@IDENTITY, SCOPE_IDENTITY(), IDENT_CURRENT('dbo.Employees'),
How It Works
The @@IDENTITY, SCOPE_IDENTIY, and IDENT_CURRENT system functions return the last identity value generated by the INSERT, SELECT INTO, or bulk copy statement. All three functions are similar in that they return the last value inserted into the IDENTITY column of a table.
@@IDENTITY returns the last identity value generated by any table in the current session. If the insert statement fires a trigger that inserts into another table with an identity column, the value returned by @@IDENTITY will be that of the table inserted into by the trigger.
SCOPE_IDENTITY returns the last identity value generated by any table in the current session and scope. In the previous scenario, SCOPE_IDENTITY returns the identity value returned by the first insert statement, not the insert into the second table from the trigger.
IDENT_CURRENT returns the last identity value generated for a table, in any session or scope.
13-19. Viewing or Changing the Seed Settings on an Identity Column
Problem
You need to see and/or change the seed value used on an IDENTITY column.
Solution
Utilize DBCC CHECKIDENT to view or change the IDENTITY column’s seed value:
DBCC CHECKIDENT ('dbo.Employees'),
How It Works
DBCC CHECKIDENT checks the current maximum value for the specified table. The syntax for this command is as follows:
DBCC CHECKIDENT
( 'table_name' [ , {NORESEED | { RESEED [ , new_reseed_value ] }}])
[ WITH NO_INFOMSGS ]
Table 13-2 details the arguments of this command.
Table 13-2. CHECKIDENT Arguments
| Argument | Description |
|---|---|
| table_name | This indicates the name of the table to check IDENTITY values for. |
| NORESEED | RESEED | NORESEED means that no action is taken other than to report the maximum identity value. RESEED specifies what the current IDENTITY value should be. |
| new_reseed_value | This specifies the new current IDENTITY value. |
| WITH NO_INFOMSGS | When included in the command, WITH NO_INFOMSGS suppresses informational messages from the DBCC output. |
In this solution, the IDENTITY value is checked for the dbo.Employees table (from Recipe 13-17) and returns the following results:
Checking identity information: current identity value '3', current column value '3'.
DBCC execution completed. If DBCC printed error messages, contact your system administrator.
In Recipe 13-17, it was demonstrated how a gap can occur in an identity column. If there had been a failed insert of multiple records and new records had not been added since, we might want to reclaim those values for use. To accomplish that, we would use the RESEED option. The following code uses the example from Recipe 13-17, with the addition of resetting the IDENTITY column after the transaction was rolled back:
TRUNCATE TABLE dbo.Employees;
INSERT INTO dbo.Employees (manager_id, First_Name, Last_Name)
   VALUES (NULL, 'Wayne', 'Sheffield'),

BEGIN TRANSACTION;
INSERT INTO dbo.Employees (manager_id, First_Name, Last_Name)
   VALUES (1, 'Jim', 'Smith'),
ROLLBACK TRANSACTION;

DBCC CHECKIDENT ('dbo.Employees', RESEED, 1);
INSERT INTO dbo.Employees (manager_id, First_Name, Last_Name)
   VALUES (1, 'Jane', 'Smith'),

SELECT * FROM dbo.Employees;

DBCC CHECKIDENT ('dbo.Employees'),
This code produces the following result set and messages:
Checking identity information: current identity value '2'.
DBCC execution completed. If DBCC printed error messages, contact your system administrator.

employee_id	manager_id First_Name	Last_Name
-----------	---------- ----------	---------
1               NULL       Wayne        Sheffield
2               1          Jane         Smith

Checking identity information: current identity value '2'.
DBCC execution completed. If DBCC printed error messages, contact your system administrator.
You can see in the results that the gap is now omitted.
13-20. Inserting Values into an Identity Column
Problem
You have accidentally deleted some data from a table with an identity column, and you need to insert the missing data from a backup into the table. You need to keep the original identity column values.
Solution
Utilize the SET IDENTITY_INSERT ON statement to insert explicit values into an identity column.
SET IDENTITY_INSERT dbo.Employees ON;
INSERT INTO dbo.Employees (employee_id, manager_id, First_Name, Last_Name)
VALUES (5, 1, 'Joe', 'Smith'),
SET IDENTITY_INSERT dbo.Employees OFF;
How It Works
The SET IDENTITY_INSERT ON statement toggles whether explicit values can be inserted into an identity column. You can have only one table at a time with the IDENTITY_INSERT property set to ON. To insert into an identity column, you must explicitly list the identity column in the list of columns being inserted into.
13-21. Automatically Inserting Unique Values
Problem
You have a database set up using merge replication to multiple subscribers at remote offices. Users at the remote offices insert data into their local database. You need to insert an automatically generated value that will be unique across all locations.
Solution
Utilize the UNIQUEIDENTIFIER data type, with a default constraint using the NEWID or NEWSEQUENTIALID system function.
CREATE TABLE HumanResources.BuildingAccess(
  BuildingEntryExitID uniqueidentifier ROWGUIDCOL
    CONSTRAINT DF_BuildingAccess_BuildingEntryExitID DEFAULT NEWID()
    CONSTRAINT UK_BuildingAccess_BuildingEntryExitID UNIQUE,
  EmployeeID int NOT NULL,
  AccessTime datetime NOT NULL,
  DoorID int NOT NULL);
How It Works
The UNIQUEIDENTIFIER data type is a 16-bit globally unique identifier (GUID) and is represented as a 32-character hexadecimal string. The total number of unique keys is 2128. Since this number is so large, the chances of randomly generating the save value twice is negligible. (Microsoft claims that it will be unique for every database networked in the world.)
Just like an IDENTITY column, a column with the UNIQUEIDENTIFIER data type does not guarantee uniqueness; a PRIMARYKEY or UNIQUE constraint must be used to guarantee uniqueness of the values in the column. Keep in mind that the UNIQUEIDENTIFIER data type does not generate new GUID values; it simply stores the generated values. The UNIQUE constraint is necessary where you need to ensure that the same generated value cannot be inserted into the table twice.
The ROWGUIDCOL indicates that the column is a row GUID column. There can be just one column per table that is designated as a ROWGUIDCOL. Using ROWGUIDCOL allows one to use the $ROWGUID synonym for the column designated as the ROWGUIDCOL.
To automatically insert values into the UNIQUEIDENTIFIER data typed column, you need to use a default constraint with either the NEWID or NEWSEQUENTIALID system function. NEWID generates a random GUID; NEWSEQUENTIALID generates a GUID that is greater than any GUID previously generated by this function on this computer since Windows was started. Since NEWSEQUENTIALID generates an increasing value, its use can minimize page splits and fragmentation.
To show how this all works, the following statements insert one row into the previous table and then select that row:
INSERT HumanResources.BuildingAccess (EmployeeID, AccessTime, DoorID)
VALUES (32, GETDATE(), 2);

SELECT *
  FROM HumanResources.BuildingAccess;
SELECT $ROWGUID
  FROM HumanResources.BuildingAccess;
These queries return the following result sets:
BuildingEntryExitID	                EmployeeID	AccessTime DoorID
------------------------------------	----------	-----------------------	------
06ADA180-DC37-4AAC-9AD5-8DE5FC0B9D73	32	        2012-02-20 21:30:39.320 2

BuildingEntryExitID
z------------------------------------
06ADA180-DC37-4AAC-9AD5-8DE5FC0B9D73
![]() Note Since this example utilizes a function that is virtually guaranteed to generate unique values each time it is called, you will see different GUID values when you run this query.
Note Since this example utilizes a function that is virtually guaranteed to generate unique values each time it is called, you will see different GUID values when you run this query.
13-22. Using Unique Identifiers Across Multiple Tables
Problem
You need to have a unique identifier across multiple tables that is sequentially incremented.
Solution
CREATE SEQUENCE dbo.MySequence
   AS INTEGER
   START WITH 1
   INCREMENT BY 1;
GO
How It Works
A SEQUENCE generates numbers in sequential order. Unlike IDENTITY columns, they are not associated with tables. The complete syntax for a SEQUENCE object is as follows:
CREATE SEQUENCE [schema_name . ] sequence_name
   [ AS [ built_in_integer_type | user-defined_integer_type ] ]
   [ START WITH <constant> ]
   [ INCREMENT BY <constant> ]
   [ { MINVALUE [ <constant> ] } | { NO MINVALUE } ]
   [ { MAXVALUE [ <constant> ] } | { NO MAXVALUE } ]
   [ CYCLE | { NO CYCLE } ]
   [ { CACHE [ <constant> ] } | { NO CACHE } ]
   [ ; ]
Table 13-3 shows the arguments for the creation of a sequence object.
Table 13-3. Sequence Creation Arguments
| Argument | Description |
|---|---|
| sequence_name | The unique name in the database for the sequence. |
| built_in_integer_type user-defined_integer_type | Sequences can be built upon any of the integer data types: tinyint, smallint, integer, bigint, or a user-defined data type that is based on one of these types. If the type is not specified, the sequence defaults to bigint. |
| START WITH <constant> | The first value returned by the sequence object. The default value is the minimum value for that data type for an ascending sequence or the maximum value for that data type for a descending sequence. It must lie between MINVALUE and MAXVALUE. |
| INCREMENT BY <constant> | The value used to increment (if positive) or decrement (if negative) the sequence object when the NEXT VALUE FOR function is called. INCREMENTBY cannot be zero; if not specified, it defaults to 1. |
| MINVALUE | Specifies the minimum value that the sequence object can be; if not specified, it defaults to the minimum value for the data type the sequence object is being built upon. |
| MAXVALUE | Specifies the maximum value that the sequence object can be; if not specified, it defaults to the maximum value for the data type the sequence object is being built upon. |
| CYCLE | Specifies whether the sequence restart at the minimum value when the maximum is exceeded (for descending sequences, restart at the maximum when the minimum is exceeded). Cycling restarts the sequencing from the minimum or maximum value, not the start value. The default is NO CYCLE. |
| CACHE | Increases the performance of sequence objects by caching the current value and the number of values left in the cache. |
To retrieve the next sequence, you need to use the NEXT VALUE FOR system function. The following code utilizes the Test.MySequence sequence:
CREATE TABLE dbo.Table1 (
  Table1ID INTEGER NOT NULL,
  Table1Data VARCHAR(50));
CREATE TABLE dbo.Table2 (
  Table2ID INTEGER NOT NULL,
  Table2Data VARCHAR(50));

INSERT INTO dbo.Table1 (Table1ID, Table1Data)
VALUES (NEXT VALUE FOR dbo.MySequence, 'Ferrari'),
   (NEXT VALUE FOR dbo.MySequence, 'Lamborghini'),

INSERT INTO dbo.Table2 (Table2ID, Table2Data)
VALUES (NEXT VALUE FOR dbo.MySequence, 'Apple'),
   (NEXT VALUE FOR dbo.MySequence, 'Orange'),

SELECT * FROM dbo.Table1;
SELECT * FROM dbo.Table2;
These queries produce the following result sets:
Table1ID        Table1Data
--------	----------
1               Ferrari
2               Lamborghini

Table2ID        Table2Data
--------	----------
3               Apple
4               Orange
Like IDENTITY columns, SEQUENCE numbers are generated outside the scope of transactions; they are consumed whether the transaction is committed or rolled back. Sequences are useful over identity columns in the following scenarios:
- The application requires a number before the insert into the table is made.
- The application requires sharing a single series of numbers between multiple tables or multiple columns within a table.
- The application must restart the number series when a specified number is reached.
- The application requires the sequence values to be sorted by another field. To accomplish this, the NEXT VALUE FOR function can apply the OVER clause to the function call. (See Chapter 7 for more details of using the OVER clause.)
- The application requires that multiple numbers be assigned at the same time. For instance, you need to ensure that sequential numbers are used for the data being inserted. If other processes are also getting numbers, you could acquire numbers with a gap between some. This is accomplished by calling the sp_sequence_get_range stored procedure to retrieve several numbers from the sequence at once.
- You need to change the specification of the sequence, such as the increment value.
13-23. Using Temporary Storage
Problem
You need to temporarily store interim query results for further processing.
Solution #1
Utilize a temporary table.
CREATE TABLE #temp (
  Column1 INT,
  Column2 INT);
Solution #2
Utilize a table variable.
DECLARE @temp TABLE (
  Column1 INT,
  Column2 INT);
How It Works
Temporary storage can utilize either a temporary table or a table variable. Temporary tables come in two varieties: local (uses a single #) or global (uses two: ##). A global temporary table is visible to all sessions. A local temporary table is available to the current session, from the time the table is created to the time when all procedures are executed from that session after the table is created. A table variable is visible within the current batch only.
Temporary storage can be the target of any of the data manipulation language (DML) statements (INSERT, UPDATE, DELETE, SELECT, MERGE) that any permanent table can be the target of.
Temporary storage can be useful to do the following:
- Eliminate repeated use of a query or CTE
- Perform preaggregation or interim calculation storage
- Staging table/prevalidation table
- Data access to remote servers
Both temporary tables and table variables are stored in memory and are spilled to disk only when necessary.
Table 13-4 shows the differences between temporary tables and table variables.
Table 13-4. Temporary Table/Table Variable Differences
| Feature | Table Variables | Temporary Tables |
|---|---|---|
| Scope | Current batch only. | Current session, available to nested stored procedure called after creation. (Global temporary tables visible to all sessions.) |
| Usage | User-defined functions, stored procedures, triggers, batches. | Stored procedures, triggers, batches. |
| Creation | DECLARE statement only. | CREATETABLE or SELECTINTO statement. |
| Table name | Maximum 128 characters. | Local: Maximum 116 characters. Global: Maximum 128 characters. |
| Column data types | Can use user-defined data types and XML collections defined in the current database. | Can use user-defined data types and XML collections defined in the tempdb database. |
| Collation | String columns inherit collation from the current database. | String columns inherit collation from the tempdb database for regular databases or from the current database if it is a contained database. |
| Indexes | Can only have indexes that are automatically created with PRIMARY KEY and UNIQUE constraints as part of the DECLARE statement. | Indexes can be created with PRIMARY KEY and UNIQUE constraints as part of the CREATE TABLE statement. Indexes can be added afterward with the CREATE INDEX statement. |
| Data insertion | INSERT statement only (including INSERT/EXEC). | INSERT statement (including INSERT/EXEC). SELECT INTO statement. |
| Constraints | PRIMARY KEY, UNIQUE, NULL, CHECK, and DEFAULT constraints are allowed, but they must be incorporated into the creation of the table variable in the DECLARE statement. FOREIGN KEY constraints are not allowed. | PRIMARY KEY, UNIQUE, NULL, CHECK, and DEFAULT constraints are allowed. They can be created as part of the CREATE TABLE statement, or they can be added with the ALTER TABLE statement. FOREIGN KEY constraints are not allowed. |
| Truncate table | Table variables cannot use the TRUNCATE TABLE statement. | Temporary tables can use the TRUNCATE TABLE statement. |
| Parallelism | Supported for SELECT statements only. | Supported for SELECT, INSERT, UPDATE, and DELETE statements. |
| SET IDENTITY_INSERT | Usage not supported. | Usage is supported. |
| Stored procedure recompilations | Not applicable. | Creating temporary tables and data inserts may cause stored procedure recompilations. |
| Destruction | Destroyed automatically at the end of the batch. | Destroyed explicitly with the DROP TABLE statement. Destroyed automatically when the session ends. For global temporary tables, they will not be dropped until no other session is running a statement that accesses the table. |
| Implicit transactions | Implicit transactions last only for the length of the update against the table variable. Table variables use fewer resources than temporary tables. | Implicit transactions last for the length of the transaction, which requires more resources than table variables. |
| Explicit transactions | Table variables are not affected by a ROLLBACK TRANSACTION statement. | Data is rolled back in temporary tables when a ROLLBACK TRANSACTION statement occurs. |
| Statistics | The query optimizer cannot create any statistics on table variable columns, so it treats all table variables has having one record when creating execution plans. | The query optimizer can create statistics on columns, so it can use the actual row count for generating execution plans. |
| Parameter to stored procedures | Table variables can be passed as a parameter to stored procedures (as a predefined user-defined table type). | Temporary tables cannot be passed to stored procedures. (They are still in scope to nested stored procedures.) |
| Explicitly named constraints | Explicitly named constraints are not allowed on table variables. | Explicitly name constraints are allowed on temporary tables except in contained databases. The schema that the table is in can have only one constraint with that name, so beware of multiuser issues. |
| Dynamic SQL | Must declare and populate table variables in the dynamic SQL to be executed. | Temporary tables can be created prior to being used in the dynamic SQL. Population of the temporary table can occur prior to or within the dynamic SQL. |
Since statistics are not created on table variables, the performance of table variables can suffer when the result set becomes too large, when column data cardinality is critical to the query optimization process, and even when joined to other tables. When encountering performance issues, be sure to test all alternative solutions, and don’t necessarily assume that either of these options is less desirable than other.