Chapter 9. Working with Margins, Padding, Alignment, and Floating
Now that you’ve learned some of the basics of creating web content, in this chapter you’ll learn the nitty-gritty of using CSS to enhance that content. Throughout the previous chapter, you have learned how to use basic CSS for display purposes (such as font sizes and colors). In the chapters that follow, you’ll dive in to using CSS to control aspects of your entire web page and not just individual pieces of text or graphics.
Before tackling page layout, however, it is important to understand four particular CSS properties individually before putting them all together:
• The margin and padding properties—For adding space around elements
• The align and float properties—Used to place your elements in relation to others
The examples provided during this chapter are not the most stylish examples of web content ever created, but they are not intended to be. Instead, the examples clearly show just how XHTML and CSS are working together. After you master CSS through this and other chapters, you’ll be able to create web-based masterpieces such as the one shown in Figure 9.1, an example at CSS Zen Garden.
Figure 9.1 This is one of many examples in the CSS Zen Garden of XHTML and CSS at work.

The sites at CSS Zen Garden probably do not look like the typical e-commerce or social networking sites that you visit on a regular basis. Instead, these sites showcase the artistic possibilities that can unfold using CSS. Make no mistake, these sites take careful thought and planning, but the potential designs are limitless.
Sites in the CSS Zen Garden (http://www.csszengarden.com/) show the types of design that can be accomplished through using standards-compliant CSS. All of the user-submitted entries in the Garden use exactly the same HTML file, but artists are free to modify the CSS file to create their own visual display. The example shown in Figure 9.1 is by Andy Clarke of Stuff and Nonsense (http://www.stuffandnonsense.co.uk/).
Using Margins
Style sheet margins enable you to add empty space around the outside of the rectangular area for an element on a web page. It is important to remember that the margin property works with space outside of the element.
Following are the style properties for setting margins:
• margin-top—Sets the top margin
• margin-right—Sets the right margin
• margin-bottom—Sets the bottom margin
• margin-left—Sets the left margin
• margin—Sets the top, right, bottom, and left margins as a single property
You can specify margins using any of the individual margin properties or using the single margin property. Margins can be specified as auto, meaning the browser itself sets the margin in specific lengths (pixels, points, ems) or in percentages. If you decide to set a margin as a percentage, keep in mind that the percentage is calculated based on the size of the entire page, not the size of the element. So, if you set the margin-left property to 25%, the left margin of the element will end up being 25% of the width of the entire page.
Note
You can remember the shorthand order at least two different ways. First, if you think of an element as a rectangle, start at the top and work your way clockwise around the sides: top side, right side, bottom side, left side. Or you can use a first-letter mnemonic device and remember “TRBL,” pronounced “trouble,” which also represents a possible state of being should you forget the order of the margin properties.
Also note that the TRBL order is valid for padding properties and border properties as well.
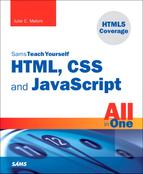
The code in Listing 9.1 produces four rectangles on the page, each 250 pixels wide, 100 pixels high, and with a 5-pixel solid black border (see Figure 9.2). Each rectangle—or <div>, in this case—has a different background color. We want the margin around each <div> to be 15 pixels on all sides, so we can use the following:
margin-top:15px;
margin-right:15px;
margin-bottom:15px;
margin-left:15px;
Figure 9.2 The basic color blocks sample page shows four color blocks, each with equal margins.
You could also write that in shorthand, using the margin property:
margin:15px 15px 15px 15px;
When you use the margin property (or padding, or border) and you want all four values to be the same, you can simplify this even further and use:
margin:15px;
When using shorthand for setting margins, padding or borders, there are actually three approaches, which vary based on how many values you use when setting the property:
• One value—The size of all the margins
• Two values—The size of the top/bottom margins and the left/right margins (in that order)
• Four values—The size of the top, right, bottom, and left margins (in that order)
You might find it easier to stick to either using one value or all four values, but that’s certainly not a requirement.
Listing 9.1 Simple Code to Produce Four Colored <div>s with Borders and Margins
<?xml version="1.0" encoding="UTF-8"?>
<!DOCTYPE html PUBLIC "-//W3C//DTD XHTML 1.1//EN"
"http://www.w3.org/TR/xhtml11/DTD/xhtml11.dtd">
<html xmlns="http://www.w3.org/1999/xhtml" xml:lang="en">
<head>
<title>Color Blocks</title>
<style type="text/css">
div {
width:250px;
height:100px;
border:5px solid #000000;
color:black;
font-weight:bold;
text-align:center;
}
div#d1 {
background-color:red;
margin:15px;
}
div#d2 {
background-color:green;
margin:15px;
}
div#d3 {
background-color:blue;
}
div#d4 {
background-color:yellow;
margin:15px;
}
</style>
</head>
<body>
<div id="d1">DIV #1</div>
<div id="d2">DIV #2</div>
<div id="d3">DIV #3</div>
<div id="d4">DIV #4</div>
</body>
</html>
You can see the output of Listing 9.1 in Figure 9.2.
Next, working with just the margin property in the style sheet entries in Listing 9.1, let’s shift the margins around. In this example, you can’t really see the right-side margin on any of these <div> elements because there’s nothing to the right of them and they are not aligned to the right. With that in mind, let’s set margin-right to 0px in all of these. Beyond that, the next set of goals is to produce the following:
• No margin around the first color block.
• A left-side margin of 15 pixels, a top margin of 5 pixels, and no bottom margin around the second color block.
• A left-side margin of 75 pixels and no top margin or bottom margins around the third color block.
• A left-side margin of 250 pixels and a top margin of 25 pixels around the fourth color block.
This seems like it would be straightforward—no margin is being set around the first block. Except we want a margin at the top of the second block, so really there will be a visible margin between the first and second blocks, even if we are not specifying a margin for the first block.
The new style sheet entries for the four named <div>s would now look like this:
div#d1 {
background-color:red;
margin:0px;
}
div#d2 {
background-color:green;
margin:5px 0px 0px 15px;
}
div#d3 {
background-color:blue;
margin:0px 0px 0px 75px;
}
div#d4 {
background-color:yellow;
margin:25px 0px 0px 250px;
}
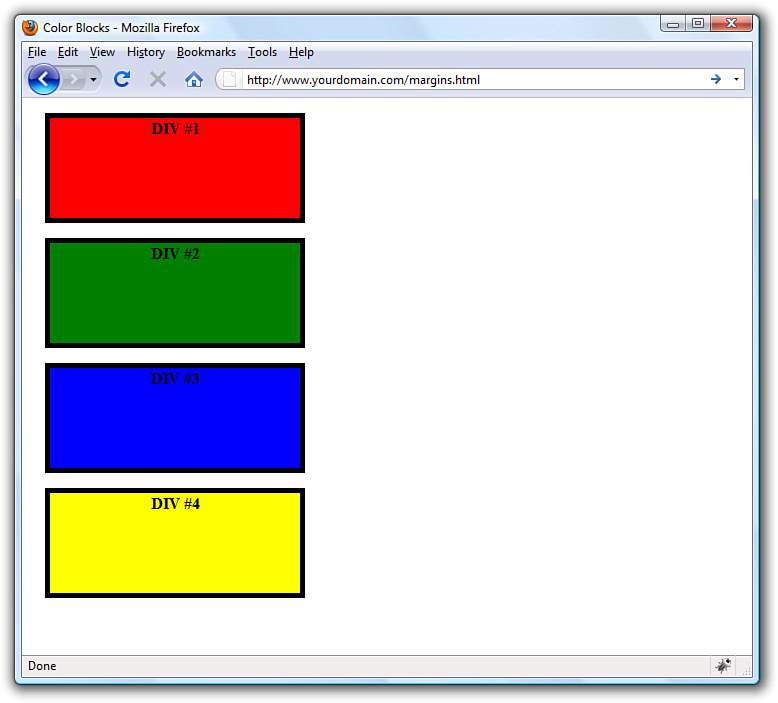
The result of the previous code changes (see Figure 9.3) seems random but is actually quite useful for pointing out a few other important points. For example, when you recall that one of the goals was to produce no margin at all around the first color block, you might expect the border of the color block to be flush with the browser window. But, as shown in Figure 9.3, there is a clear space between the content of the page and the frame of the browser window.
Figure 9.3 Modifications to the color blocks sample page display some different margins.
If we were working on element placement—which we will get to in the next chapter—this would cause a problem in your layout. To ensure that your placements and margins are counted from a position flush with the browser, you will need to address the margin of the <body> element itself. In this case, you would add the following to your style sheet:
body {
margin:0px;
}
Another “gotcha” to remember is that if you have two bordered elements stacked on top of each other but with no margin between them, the point at which they touch will appear to have a double border. You might then consider making the top element’s border-bottom half the width and also make the bottom element’s border-top half the width. If you do this, the borders will appear to be the same width as the other sides when stacked on top of each other.
Also, you might have thought that by using a left-side margin of 250 pixels—the width of the <div>s—the fourth color block would begin where the third color block ended. That is not the case, however, because the third color block has a margin-left of 75 pixels. In order for them to even be close to lining up, the margin-left value for the fourth div would have to be 325 pixels.
Changing the styles to those shown in the code that follows produces the spacing shown in Figure 9.4.
body {
margin:0px;
}
div {
width:250px;
height:100px;
color:black;
font-weight:bold;
text-align:center;
}
div#d1 {
border:5px solid #000000;
background-color:red;
margin:0px;
}
div#d2 {
border-width:6px 6px 3px 6px;
border-style:solid;
border-color:#000000;
background-color:green;
margin:10px 0px 0px 15px;
}
div#d3 {
border-width:3px 6px 6px 6px;
border-style:solid;
border-color:#000000;
background-color:blue;
margin:0px 0px 0px 15px;
}
div#d4 {
border:5px solid #000000;
background-color:yellow;
margin:0px 0px 0px 265px;
}
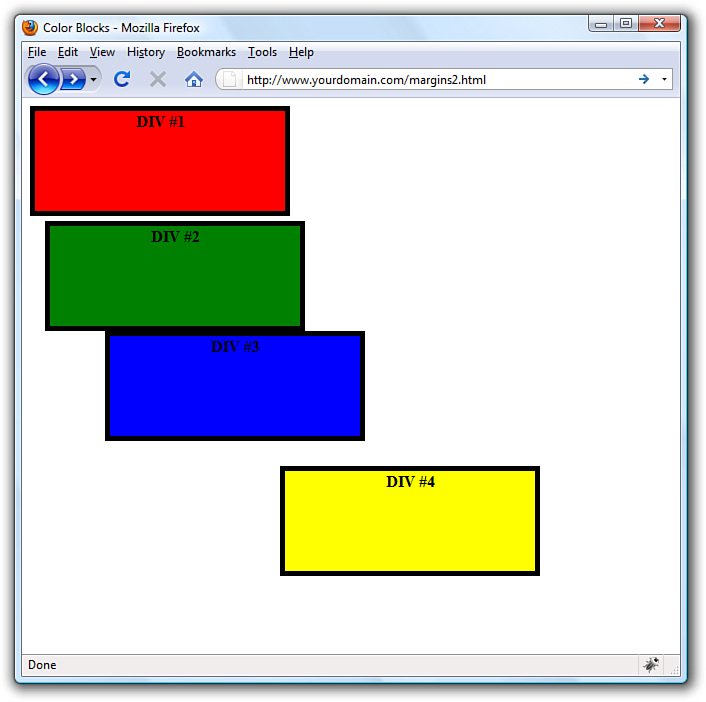
Figure 9.4 A third modification to the color blocks pulls items into closer relation with each other.

These changes give the <body> element a zero margin, thus ensuring that a margin-left value of 25 pixels truly is 25 pixels from the edge of the browser frame. It also shows the second and third color blocks stacked on top of each other, but with modifications to the border element so that a double border does not appear. Additionally, the fourth color block begins where the third color block ends.
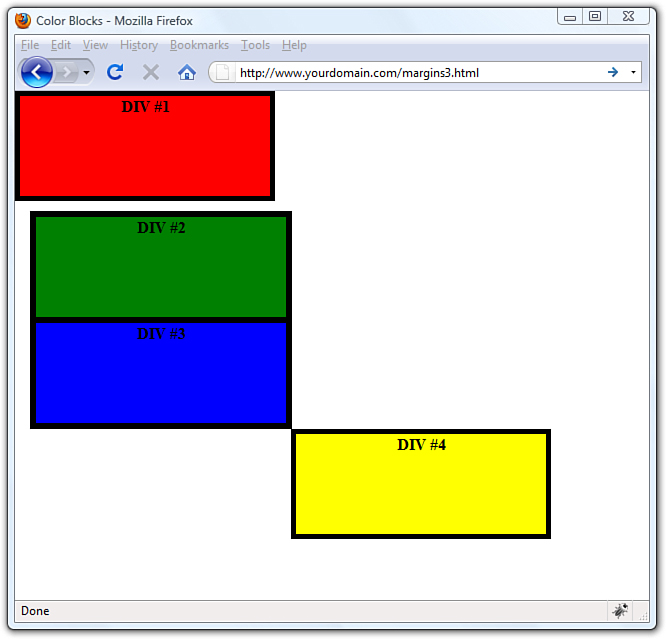
As you can see in Figure 9.4, there is some overlap between the right edge of the third color block and the left edge of the fourth color block. Why is that the case, if the color blocks are 250 pixels wide, the third color block has a margin-left value of 15 pixels, and the fourth color block is supposed to have a 265 pixel margin to its left? Well, it does have that 265 pixel margin, but that margin size is not enough because we also have to factor in the 6 pixels of border. If we change the margin property for the fourth color block to reflect the following code, the third and fourth blocks line up according to plan (see Figure 9.5):
margin:0px 0px 0px 276px;
Figure 9.5 Changing the margin to allow for 11 pixels of border width.
As shown in these examples, margin specifications are incredibly useful for element placement, but you must use caution when setting these specifications.
Padding Elements
Padding is similar to margins in that it adds extra space to elements, but the big difference is where that space is located. If you recall, margins are added to the outside of elements. On the other hand, padding adds space inside the rectangular area of an element. As an example, if you create a style rule for an element that establishes a width of 50 pixels and a height of 30 pixels, and then sets the padding of the rule to 5 pixels, the remaining content area will be 40 pixels by 20 pixels. Also, because the padding of an element appears within the element’s content area, it will assume the same style as the content of the element, including the background color.
You specify the padding of a style rule using one of the padding properties, which work very much like the margin properties. The following padding properties are available for use in setting the padding of style rules:
• padding-top—Sets the top padding
• padding-right—Sets the right padding
• padding-bottom—Sets the bottom padding
• padding-left—Sets the left padding
• padding—Sets the top, right, bottom, and left padding as a single property
As with margins, you can set the padding of style rules using individual padding properties or the single padding property. Padding can also be expressed using either a unit of measurement or a percentage.
Following is an example of how you might set the left and right padding for a style rule so that there are 10 pixels of padding on each side of an element’s content:
padding-left:10px;
padding-right:10px;
As with margins, you can set all the padding for an element with a single property (the padding property). To set the padding property, you can use the same three approaches available for the margin property. Following is an example of how you would set the vertical padding (top/bottom) to 12 pixels and the horizontal padding (left/right) to 8 pixels for a style rule:
padding:12px 8px;
Following is more explicit code that performs the same task by specifying all the padding values:
padding:12px 8px 12px 8px;
In all the previous figures, you’ll note that the text DIV #1, DIV #2, and so on appears at the top of the colored block, with just a little space between the border and the text. That amount of space hasn’t been specified by any padding value, but it appears as a sort of default within the element. But if you want specific control over your element padding, Listing 9.2 shows some examples. All of the color blocks are 250 pixels wide, 100 pixels high, have a 5-pixel solid black border, and 25 pixels of margin (see Figure 9.6). The fun stuff happens within the padding values for each individual <div>.
Figure 9.6 The basic color blocks sample page shows four color blocks with variable padding.

Listing 9.2 Simple Code to Produce Four Colored <div>s with Borders, Margins, and Padding
<?xml version="1.0" encoding="UTF-8"?>
<!DOCTYPE html PUBLIC "-//W3C//DTD XHTML 1.1//EN"
"http://www.w3.org/TR/xhtml11/DTD/xhtml11.dtd">
<html xmlns="http://www.w3.org/1999/xhtml" xml:lang="en">
<head>
<title>Color Blocks</title>
<style type="text/css">
body {
margin:0px;
}
div {
width:250px;
height:100px;
border:5px solid #000000;
color:black;
font-weight:bold;
margin:25px;
}
div#d1 {
background-color:red;
text-align:center;
padding:15px;
}
div#d2 {
background-color:green;
text-align:right;
padding:25px 50px 6px 6px;
}
div#d3 {
background-color:blue;
text-align:left;
padding:6px 6px 6px 50px;
}
div#d4 {
background-color:yellow;
text-align:center;
padding:50px;
}
</style>
</head>
<body>
<div id="d1">DIV #1</div>
<div id="d2">DIV #2</div>
<div id="d3">DIV #3</div>
<div id="d4">DIV #4</div>
</body>
</html>
You should immediately recognize that something is amiss in this example. The color blocks are all supposed to be 250 pixels wide and 100 pixels high. The color blocks in Figure 9.6 are not uniform because despite our efforts to control the size of the <div>, the padding applied later overrides that initial size declaration.
If you place the text in a <p> element and give that element a white background (see Figure 9.7), you can see where the padding is in relation to the text. When there just isn’t room to use all the padding that is defined, the surrounding element has to make adjustments. You will learn about this effect in detail in Chapter 10, “Understanding the CSS Box Model and Positioning.”
Figure 9.7 Showing the padding in relation to the text.

The greatest number of “tweaks” or “nudges” you make in your web design with CSS will have to do with margins and padding. Just remember: margins outside the element, padding inside it.
Keeping Everything Aligned
Knowing that content on a web page doesn’t always fill the entire width of the rectangular area in which it is displayed, it is often helpful to control the alignment of the content. Even if text within a rectangular area extends to multiple lines, alignment still enters the picture because you might want the text left-justified, right-justified, or centered. There are two style properties that enable you to control the alignment of elements: text-align and vertical-align.
You saw examples of these style properties in action—aligning images—in Chapter 8, “Working with Colors, Images, and Multimedia,” but it doesn’t hurt to mention these properties again here because alignment plays a role in overall page design as well.
As a refresher, using text-align aligns an element horizontally within its bounding area, and it can be set to left, right, center, or justify.
The vertical-align property is similar to text-align except that it is used to align elements vertically. The vertical-align property specifies how an element is aligned with its parent, or in some cases, the current line of elements on the page. Current line refers to the vertical placement of elements that appear within the same parent element—in other words, inline elements. If several inline elements appear on the same line, you can set their vertical alignments the same to align them vertically. A good example would be a row of images that appear one after the next—the vertical-align property enables you to align them vertically.
Following are common values for use with the vertical-align property:
• top—Aligns the top of an element with the current line
• middle—Aligns the middle of an element with the middle of its parent
• bottom—Aligns the bottom of an element with the current line
• text-top—Aligns the top of an element with the top of its parent
• baseline—Aligns the baseline of an element with the baseline of its parent
• text-bottom—Aligns the bottom of an element with the bottom of its parent
Alignment works in conjunction with margins, padding, and—as you will learn in the next section—the float property to enable you to maintain control over your design.
Understanding the Float Property
Understanding the float property is fundamental to understanding CSS-based layout and design; it is one of the last pieces in the puzzle of how all these elements fit together. Briefly stated, the float property allows elements to be moved around in the design such that other elements can wrap around them. You will often find float used in conjunction with images (as you saw in Chapter 8), but you can—and many designers do—float all sorts of elements in their layout.
Elements float horizontally, not vertically, so all you have to concern yourself with are two possible values: right and left. When used, an element that floats will float as far right or as far left (depending on the value of float) as the containing element will allow it. For example, if you have three <div>s float values of left, they will all line up to the left of the containing body element. If you have your <div>s within another <div>, they will line up to the left of that element, even if that element itself is floated to the right.
Floating is best understood by seeing a few examples, so let’s move on to Listing 9.3. This listing simply defines three rectangular <div>s and floats them next to each other (floating to the left).
Listing 9.3 Using float to Place <div>s
<?xml version="1.0" encoding="UTF-8"?>
<!DOCTYPE html PUBLIC "-//W3C//DTD XHTML 1.1//EN"
"http://www.w3.org/TR/xhtml11/DTD/xhtml11.dtd">
<html xmlns="http://www.w3.org/1999/xhtml" xml:lang="en">
<head>
<title>Color Blocks</title>
<style type="text/css">
body {
margin:0px;
}
div {
width:250px;
height:100px;
border:5px solid #000000;
color:black;
font-weight:bold;
margin:25px;
}
div#d1 {
background-color:red;
float:left;
}
div#d2 {
background-color:green;
float:left;
}
div#d3 {
background-color:blue;
float:left;
}
</style>
</head>
<body>
<div id="d1">DIV #1</div>
<div id="d2">DIV #2</div>
<div id="d3">DIV #3</div>
</body>
</html>
The resulting page is shown in Figure 9.8, and already you can see a problem—these three color blocks were supposed to be floated next to each other. Well, actually they are floated next to each other, except the browser window is not wide enough to display these three 250-pixel-wide blocks with 25 pixels of margin between them. Because they are floating, the third one simply floats to the next line.
Figure 9.8 Using float to place the color blocks.
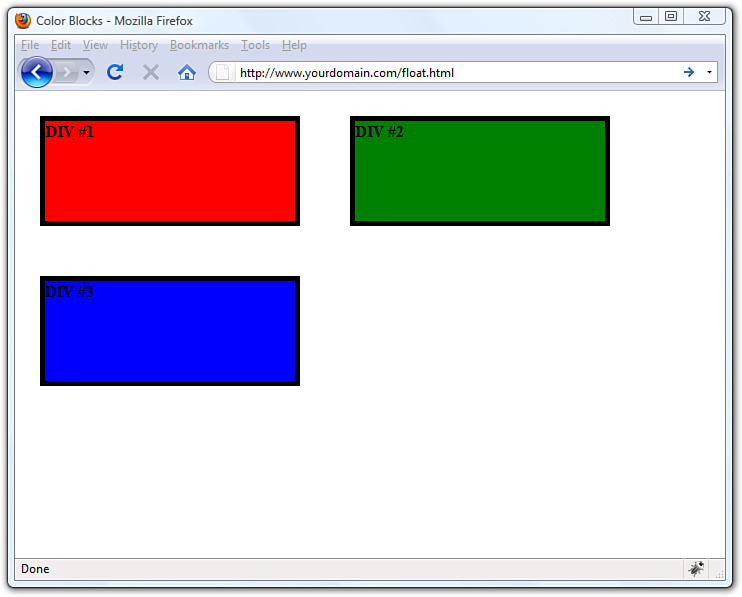
You can imagine this could be a problem in a specifically designed visual layout, so pay attention to your margins, padding, alignment, and floating while also testing within a target browser window size. Granted, the browser window shown in Figure 9.8 is a small one—to make this point about floating elements moving to the next line when there is no room for them to fit where they should. In other words, if you open the same HTML file with a larger browser window, you might not see the issue—this is why you should also check your sites at different resolutions to see if a fix is needed. The fix here is to adjust the margins and other size-related properties of your <div>s.
Figure 9.9 shows another interesting possibility when using the float property. The only changes made to the code from Listing 9.3 involved making the color blocks only 100-pixels wide, reducing the margins to 10px, and changing the float alignment of the second color block to right (instead of left).
Figure 9.9 Using float to place the color blocks.
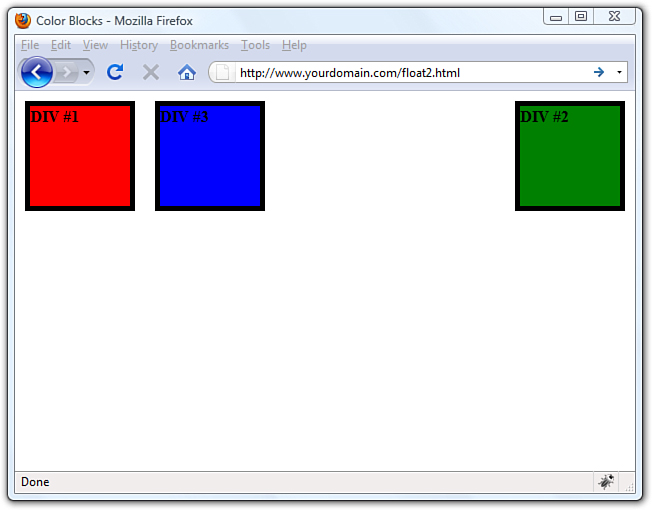
However, something very interesting happened. The second color block now appears visually as the third color block because it is flush right. The second color block has a float value of right, so it has floated all the way to the right. The first and third color blocks are floating as left as possible, regardless of the way in which the <div> code appears in the HTML, which is as follows:
<div id="d1">DIV #1</div>
<div id="d2">DIV #2</div>
<div id="d3">DIV #3</div>
Floating takes a lot of practice to get used to, especially when there are additional elements in your page and not just a few colored blocks. For example, what happens when you add a basic paragraph into the mix? All elements placed after the floating element will float around that element. To avoid that, use the clear property.
The clear property has five possible values: left, right, both, none, and inherit. The most common values are left, right, and both. Specifying clear:left ensures there are no other floating elements allowed to the left, clear:right ensures there are no other floating elements to the right, and so on. Floating and clearing is a learn-by-doing process, so look for more situations in the Workshop section later in this chapter.
Summary
This chapter introduced you to some of the most fundamental style properties in CSS-based design: margin, padding, and float. You learned how the margin property controls space around the outside of elements and how the padding property works with space within the elements.
After a refresher on the text-align and vertical-align properties you learned about in a previous lesson, you learned about the float property. The float property allows for specific placement of elements and additional content around those elements.
Q&A
Q. The examples of margins and padding all had to do with boxes and text. Can I apply margins and padding to images as well?
A. Yes, you can apply margins and padding to any block-level element, such as a <p>, a <div>, an <img/>, lists such as <ul> and <ol>, and list items (<li>)—just to name a few.
Workshop
The workshop contains quiz questions and exercises to help you solidify your understanding of the material covered. Try to answer all questions before looking at the “Answers” section that follows.
Quiz
1. To place two <div> elements next to each other, but with a 30-pixel margin between them, what entry or entries can you use in the style sheet?
2. Which CSS style property and value is used to ensure that content does not appear to the left of a floating element?
3. What style sheet entry is used to place text within a <div> to appear 12 pixels from the top of the element?
Answers
1. You can use several. The first <div> uses a style property of margin-right:15px and the second <div> uses a style property of margin-left:15px. Or you can assign the full 30 pixels to either <div> using margin-right or margin-left as appropriate.
2. In this instance, use clear:left.
Exercises
• Fully understanding margins, padding, alignment, and floating takes practice. Using the color blocks code or <div>s of your own, practice all manner and sorts of spacing and floating before moving on to the next chapter. The next chapter discusses the CSS box model as a whole, which encompasses the individual items discussed in this chapter.
• While you’re at it, practice applying margins and padding to every block-level element you’ve learned so far. Get used to putting images within blocks of text and putting margins around the images so that the text does not run right up to the edge of the graphic.