Chapter 19. Responding to Events
In your experience with JavaScript so far, most of the scripts you’ve written have executed in a calm, orderly fashion, moving from the first statement to the last. You’ve seen a few event handlers used in sample scripts to focus your attention on other aspects of programming, and it is likely that you used your common sense to follow along with the actions. That alone speaks to the relative ease and simplicity of using JavaScript event handlers within your HTML.
In this chapter, you’ll learn to use the wide variety of event handlers supported by JavaScript. Rather than executing in order, scripts using event handlers can interact directly with the user. You’ll use event handlers in just about every script you write throughout the rest of this book, and in fact they’re likely to feature prominently in most scripts you will write, period.
Understanding Event Handlers
As you learned in Chapter 14, “Getting Started with JavaScript Programming,” JavaScript programs don’t have to execute in order. You also learned they can detect events and react to them. Events are things that happen to the browser—the user clicking a button, the mouse pointer moving, or a web page or image loading from the server.
A wide variety of events enable your scripts to respond to the mouse, the keyboard, and other circumstances. Events are the key method JavaScript uses to make web documents interactive.
The script that you use to detect and respond to an event is called an event handler. Event handlers are among the most powerful features of JavaScript. Luckily, they’re also among the easiest features to learn and use—often, a useful event handler requires only a single statement.
Objects and Events
As you learned in Chapter 15, “Working with the Document Object Model (DOM),” JavaScript uses a set of objects to store information about the various parts of a web page—buttons, links, images, windows, and so on. An event can often happen in more than one place (for example, the user could click any one of the links on the page), so each event is associated with an object.
Each event has a name. For example, the onMouseOver event occurs when the mouse pointer moves over an object on the page. When the pointer moves over a particular link, the onMouseOver event is sent to that link’s event handler, if it has one.
To define an event handler, you add the word on to the beginning of the event’s name. For example, the onMouseOver event handler is called when the mouse moves over a link. To define the event handler, you add it to that particular link’s <a> HTML tag.
Note
Notice the strange capitalization on the onMouseOver keyword. This is the standard notation for event handlers. The on is always lowercase, and each word in the event name is capitalized. However, to be truly XHTML-compliant, when you use these event handlers in your code, you must write them entirely in lowercase.
Creating an Event Handler
You don’t need the <script> tag to define an event handler. Instead, you can add an event handler attribute to an individual HTML tag. For example, here is a link that includes an onMouseOver event handler:
<a href="http://www.google.com/"
onmouseover="alert('You moved over the link.'),">
This is a link.</a>
Note that this is all one <a> tag, although it’s split into multiple lines. This specifies a statement to be used as the onMouseOver event handler for the link. This statement displays an alert message when the mouse moves over the link.
Note
The example seen here uses single quotation marks to surround the text. This is necessary in an event handler because double quotation marks are used to surround the event handler itself. (You can also use single quotation marks to surround the event handler and double quotation marks within the script statements.)
You can use JavaScript statements like the previous one in an event handler, but if you need more than one statement, it’s a good idea to use a function instead. Just define the function in the header of the document, and then call the function as the event handler like this:
<a href="#bottom" onmouseover="DoIt();">Move the mouse over this link.</a>
This example calls a function called DoIt() when the user moves the mouse over the link. Using a function is convenient because you can use longer, more readable JavaScript routines as event handlers.
Defining Event Handlers with JavaScript
Rather than specifying an event handler in an HTML document, you can use JavaScript to assign a function as an event handler. This enables you to set event handlers conditionally, turn them on and off, and change the function that handles an event dynamically.
Tip
For simple event handlers, you can use two statements if you separate them with a semicolon. However, in most cases it’s easier to use a function to perform the statements.
To define an event handler in this way, you first define a function, and then assign the function as an event handler. Event handlers are stored as properties of the document object or another object that can receive an event. For example, these statements define a function called mousealert, and then assign it as the onMouseDown event handler for the document:
function mousealert() {
alert ("You clicked the mouse!");
}
document.onmousedown = mousealert;
Tip
Setting up event handlers this way is also a good practice in general: It enables you to use an external JavaScript file to define the function and set up the event, keeping the JavaScript code completely separate from the HTML file.
You can use this technique to set up an event handler for any HTML element, but an additional step is required: You must first find the object corresponding to the element. To do this, use the document.getElementById function. First, define an element in the HTML document and specify an id attribute:
<a href="http://www.google.com/" id="link1">
Next, in the JavaScript code, find the object and apply the event handler:
obj = document.getElementById("link1");
obj.onclick = MyFunction;
You can do this for any object as long as you’ve defined it with a unique id attribute in the HTML file. Using this technique, you can easily assign the same function to handle events for multiple objects without adding clutter to your HTML code.
Supporting Multiple Event Handlers
What if you want more than one thing to happen when you click on an element? For example, suppose you want two functions called update and display to both execute when a button is clicked. You can’t assign two functions to the onclick property. One solution is to define a function that calls both functions:
function UpdateDisplay() {
update();
display();
}
This isn’t always the ideal way to do things. For example, if you’re using two third-party scripts and both of them want to add an onLoad event to the page, there should be a way to add both. The W3C DOM standard defines a function, addEventListener, for this purpose. This function defines a listener for a particular event and object, and you can add as many listener functions as you need.
Unfortunately, addEventListener is not supported by Internet Explorer, so you have to use a different function, attachEvent, in that browser. See Chapter 21, “Using Unobtrusive JavaScript,” for a function that combines these two for a cross-browser event-adding script.
Using the event Object
When an event occurs, you might need to know more about the event—for example, for a keyboard event, you need to know which key was pressed. The DOM includes an event object that provides this information.
To use the event object, you can pass it on to your event handler function. For example, this statement defines an onKeyPress event that passes the event object to a function:
<body onkeypress="getkey(event);">
You can then define your function to accept the event as a parameter:
function getkey(e) {
...
}
In Firefox, Safari, Opera, and Chrome, an event object is automatically passed to the event handler function, so this will work even if you use JavaScript rather than HTML to define an event handler. In Internet Explorer, the most recent event is stored in the window.event object. The previous HTML example passes this object to the event handler function. If you define the event handler with JavaScript, this is not possible, so you need to use some code to find the correct object:
function getkey(e) {
if (!e) e=window.event;
...
}
This checks whether the e variable is already defined. If not, it gets the window.event object and stores it in e. This ensures that you have a valid event object in any browser.
Unfortunately, although both Internet Explorer and non-Internet Explorer browsers support event objects, they support different properties. One property that is the same in both browsers is event.type, the type of event. This is simply the name of the event, such as mouseover for an onMouseOver event and keypress for an onKeyPress event. The following sections list some additional useful properties for each browser.
Internet Explorer event Properties
The following are some of the commonly used properties of the event object for Internet Explorer:
• event.button—The mouse button that was pressed. This value is 1 for the left button and usually 2 for the right button.
• event.clientX—The x-coordinate (column, in pixels) where the event occurred.
• event.clientY—The y-coordinate (row, in pixels) where the event occurred.
• event.altkey—A flag that indicates whether the Alt key was pressed during the event.
• event.ctrlkey—A flag that indicates whether the Ctrl key was pressed.
• event.shiftkey—A flag that indicates whether the Shift key was pressed.
• event.keyCode—The key code (in Unicode) for the key that was pressed.
• event.srcElement—The object where the element occurred.
Non-Internet Explorer event Properties
The following are some of the commonly used properties of the event object for modern browsers that are not Internet Explorer:
• event.modifiers—Indicates which modifier keys (Shift, Ctrl, Alt, and so on) were held down during the event. This value is an integer that combines binary values representing the different keys.
• event.pageX—The x-coordinate of the event within the web page.
• event.pageY—The y-coordinate of the event within the web page.
• event.which—The keycode for keyboard events (in Unicode) or the button that was pressed for mouse events (It’s best to use the cross-browser button property instead.)
• event.button—The mouse button that was pressed. This works just like Internet Explorer except that the left button’s value is 0 and the right button’s value is 2.
• event.target—The object where the element occurred.
Note
The event.pageX and event.pageY properties are based on the top-left corner of the element where the event occurred, not always the exact position of the mouse pointer.
Using Mouse Events
The DOM includes a number of event handlers for detecting mouse actions. Your script can detect the movement of the mouse pointer and when a button is clicked, released, or both. Some of these will be familiar to you already because you have seen them in action in previous chapters.
Tip
One of the most common uses for the onMouseOver and onMouseOut event handlers is to create rollovers—images that change when the mouse moves over them. You’ll learn how to create these later in the chapter.
Over and Out
You’ve already seen the first and most common event handler, onMouseOver. This handler is called when the mouse pointer moves over a link or other object.
The onMouseOut handler is the opposite—it is called when the mouse pointer moves out of the object’s border. Unless something strange happens, this always happens sometime after the onMouseOver event is called.
Note
The object in this case can be a link. It can also be a form element. You’ll learn more about forms in Chapter 26, “Working with Web-Based Forms.”
This handler is particularly useful if your script has made a change when the pointer moved over the object—for example, displaying a message in the status line or changing an image. You can use an onMouseOut handler to undo the action when the pointer moves away.
Ups and Downs (and Clicks)
You can also use events to detect when the mouse button is clicked. The basic event handler for this is onClick. This event handler is called when the mouse button is clicked while positioned over the appropriate object.
For example, you can use the following event handler to display an alert when a link is clicked:
<a href="http://www.google.com/"
onclick="alert('You are about to leave this site.'),">
Go Away</a>
In this case, the onClick event handler runs before the linked page is loaded into the browser. This is useful for making links conditional or displaying a disclaimer before launching the linked page.
If your onClick event handler returns the false value, the link will not be followed. For example, the following is a link that displays a confirmation dialog. If you click Cancel, the link is not followed; if you click OK, the new page is loaded:
<a href="http://www.google.com/"
onclick="return(window.confirm('Are you sure?'));">
Go Away</a>
This example uses the return statement to enclose the event handler. This ensures that the false value that is returned when the user clicks Cancel is returned from the event handler, which prevents the link from being followed.
The onDblClick event handler is similar, but is used only if the user double-clicks on an object. Because links usually require only a single click, you could use this to make a link do two different things depending on the number of clicks. (Needless to say, this could be confusing.) You can also detect double-clicks on images and other objects.
To give you even more control of what happens when the mouse button is pressed, two more events are included:
• onMouseDown is used when the user presses the mouse button.
• onMouseUp is used when the user releases the mouse button.
These two events are the two halves of a mouse click. If you want to detect an entire click, use onClick. Use onMouseUp and onMouseDown to detect just one or the other.
To detect which mouse button is pressed, you can use the button property of the event object. This property is assigned the value 0 or 1 for the left button and 2 for the right button. This property is assigned for onClick, onDblClick, onMouseUp, and onMouseDown events.
Caution
Browsers don’t normally detect onClick or onDblClick events for the right mouse button. If you want to detect the right button, onMouseDown is the most reliable way.
As an example of these event handlers, you can create a script that displays information about mouse button events and determines which button is pressed. Listing 19.1 shows the mouse event script.
Listing 19.1 The JavaScript File for the Mouse Click Example
function mousestatus(e) {
if (!e) e = window.event;
btn = e.button;
whichone = (btn < 2) ? "Left" : "Right";
message=e.type + " : " + whichone + "
";
document.form1.info.value += message;
}
obj=document.getElementById("testlink");
obj.onmousedown = mousestatus;
obj.onmouseup = mousestatus;
obj.onclick = mousestatus;
obj.ondblclick = mousestatus;
This script includes a function, mousestatus, that detects mouse events. This function uses the button property of the event object to determine which button was pressed. It also uses the type property to display the type of event because the function will be used to handle multiple event types.
After the function, the script finds the object for a link with the id attribute testlink and assigns its onmousedown, onmouseup, onclick, and ondblclick events to the mousestatus function.
Save this script as click.js. Next, you will need an HTML document to work with the script, as shown in Listing 19.2.
Listing 19.2 The HTML File for the Mouse Click Example
<?xml version="1.0" encoding="UTF-8"?>
<!DOCTYPE html PUBLIC "-//W3C//DTD XHTML 1.1//EN"
"http://www.w3.org/TR/xhtml11/DTD/xhtml11.dtd">
<html xmlns="http://www.w3.org/1999/xhtml" xml:lang="en">
<head>
<title>Mouse Click Text</title>
</head>
<body>
<h1>Mouse Click Test</h1>
<p>Click the mouse on the test link below. A message
will indicate which button was clicked.</p>
<h2><a href="#" id="testlink">Test Link</a></h2>
<form action="" name="form1">
<div>
<textarea rows="10" cols="70" name="info"></textarea>
</div>
</form>
<script type="text/javascript" src="click.js"></script>
</body>
</html>
This file defines a test link with the id property testlink, which is used in the script to assign event handlers. It also defines a form and a textarea used by the script to display the events. To test this document, save it in the same folder as the JavaScript file you created previously and load the HTML document into a browser. The results are shown in Figure 19.1.
Figure 19.1 The mouse click example in action.
Note
Notice that a single click of the left mouse button triggers three events: onMouseDown, onMouseUp, and onClick.
Using Keyboard Events
JavaScript can also detect keyboard actions. The main event handler for this purpose is onKeyPress, which occurs when a key is pressed and released or held down. As with mouse buttons, you can detect the down and up parts of the keypress with the onKeyDown and onKeyUp event handlers.
Note
ASCII (American Standard Code for Information Interchange) is the standard numeric code used by most computers to represent characters. It assigns the numbers 0–128 to various characters—for example, the capital letters A through Z are ASCII values 65 to 90.
Of course, you might find it useful to know which key the user pressed. You can find this out with the event object, which is sent to your event handler when the event occurs. In Internet Explorer, event.keyCode stores the ASCII character code for the key that was pressed. In non-Internet Explorer browsers, the event.which property stores the ASCII character code for the key that was pressed.
If you’d rather deal with actual characters than key codes, you can use the fromCharCode string method to convert them. This method converts a numeric ASCII code to its corresponding string character. For example, the following statement converts the event.which property to a character and stores it in the key variable:
key = String.fromCharCode(event.which);
Because different browsers have different ways of returning the key code, displaying key browsers independently is a bit harder. However, you can create a script that displays keys for either browser. The following function will display each key as it is typed:
function DisplayKey(e) {
// which key was pressed?
if (e.keyCode) keycode=e.keyCode;
else keycode=e.which;
character=String.fromCharCode(keycode);
// find the object for the destination paragraph
k = document.getElementById("keys");
// add the character to the paragraph
k.innerHTML += character;
}
The DisplayKey function receives the event object from the event handler and stores it in the variable e. It checks whether the e.keyCode property exists and stores it in the keycode variable if present. Otherwise, it assumes the browser is not Internet Explorer and assigns keycode to the e.which property.
Note
The final lines in the DisplayKey function use the getElementById function and the innerHTML attribute to display the keys you type within a paragraph on the page.
The remaining lines of the function convert the key code to a character and add it to the paragraph in the document with the id attribute keys. Listing 19.3 shows a complete example using this function.
Listing 19.3 Displaying Typed Characters
<?xml version="1.0" encoding="UTF-8"?>
<!DOCTYPE html PUBLIC "-//W3C//DTD XHTML 1.1//EN"
"http://www.w3.org/TR/xhtml11/DTD/xhtml11.dtd">
<html xmlns="http://www.w3.org/1999/xhtml" xml:lang="en">
<head>
<title>Displaying Keypresses</title>
<script type="text/javascript">
function DisplayKey(e) {
// which key was pressed?
if (e.keyCode) keycode=e.keyCode;
else keycode=e.which;
character=String.fromCharCode(keycode);
// find the object for the destination paragraph
k = document.getElementById("keys");
// add the character to the paragraph
k.innerHTML += character;
}
</script>
</head>
<body onkeypress="DisplayKey(event)">
<h1>Displaying Typed Characters</h1>
<p>This document includes a simple script that displays
the keys you type in the paragraph below. Type a few keys
to try it. </p>
<p id="keys"></p>
</body>
</html>
When you load this example, watch the characters you’ve typed appear in a paragraph of the document. Figure 19.2 shows this example in action.
Figure 19.2 Displaying the keys that were pressed.
Using the onLoad and onUnload Events
Another event you might use often is onLoad. This event occurs when the current page (including all of its images) finishes loading from the server.
Caution
Because the onLoad event occurs after the HTML document has finished loading and displaying, you cannot use the document.write or document.open statements within an onLoad event handler. This would overwrite the current document.
The onLoad event is related to the window object, and to define it, you use an event handler in the <body> tag. For example, the following is a <body> tag that uses a simple event handler to display an alert when the page finishes loading:
<body onload="alert('Loading complete.'),">
Images can also have an onLoad event handler. When you define an onLoad event handler for an <img> tag, it is triggered as soon as the specified image has completely loaded.
To set an onLoad event using JavaScript, you assign a function to the onload property of the window object:
window.onload = MyFunction;
You can also specify an onUnload event for the <body> tag. This event will be triggered whenever the browser unloads the current document—this occurs when another page is loaded or when the browser window is closed.
In the next section you’ll see an event handler in action, within the context of functionality you’re likely to encounter when developing your own sites.
Using onclick to Change <div> Appearance
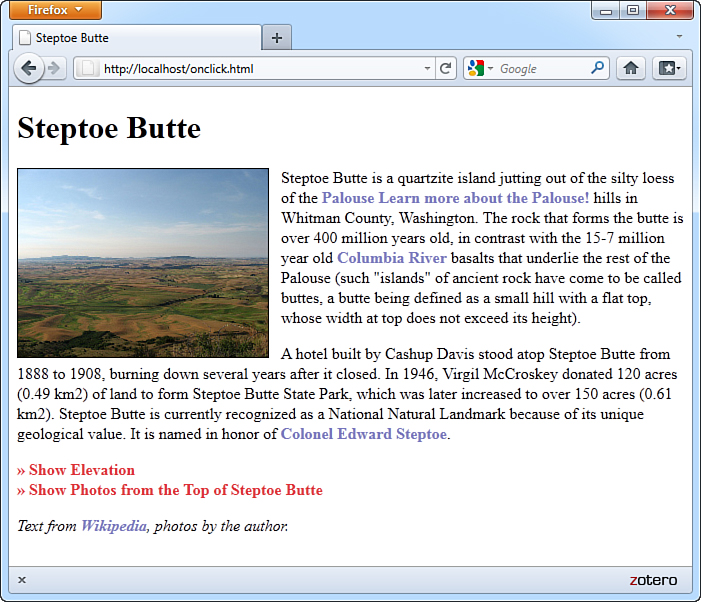
As you’ve seen, the onclick event can be used to invoke all sorts of action; you might think of a mouse click as a way to submit a form by clicking on a button, but you can capture this event and use it to provide interactivity within your pages as well. In this example, you will see how you can use the onclick event to show or hide information contained in a <div>. In this case, you are adding interactivity to your page by allowing the user to show previously hidden information when users click on a piece of text. This is referred to as a piece of text because, strictly speaking, the text is not a link. That is to say, it will look like a link and act like a link, but it will not be marked up within an <a> tag.
Listing 19.4 provides the complete code for this example, as shown initially in Figure 19.3.
Figure 19.3 The initial display of Listing 19.4.
Listing 19.4 Using onclick to Show or Hide Content
<?xml version="1.0" encoding="UTF-8"?>
<!DOCTYPE html PUBLIC "-//W3C//DTD XHTML 1.1//EN"
"http://www.w3.org/TR/xhtml11/DTD/xhtml11.dtd">
<html xmlns="http://www.w3.org/1999/xhtml" xml:lang="en">
<head>
<title>Steptoe Butte</title>
<style type="text/css">
a {
text-decoration: none;
font-weight: bold;
color: #7a7abf;
}
#hide_e {
display: none;
}
#elevation {
display: none;
}
#hide_p {
display: none;
}
#photos {
display: none;
}
#show_e {
display: block;
}
#show_p {
display: block;
}
.fakelink {
cursor:pointer;
text-decoration: none;
font-weight: bold;
color: #E03A3E;
}
</style>
</head>
<body>
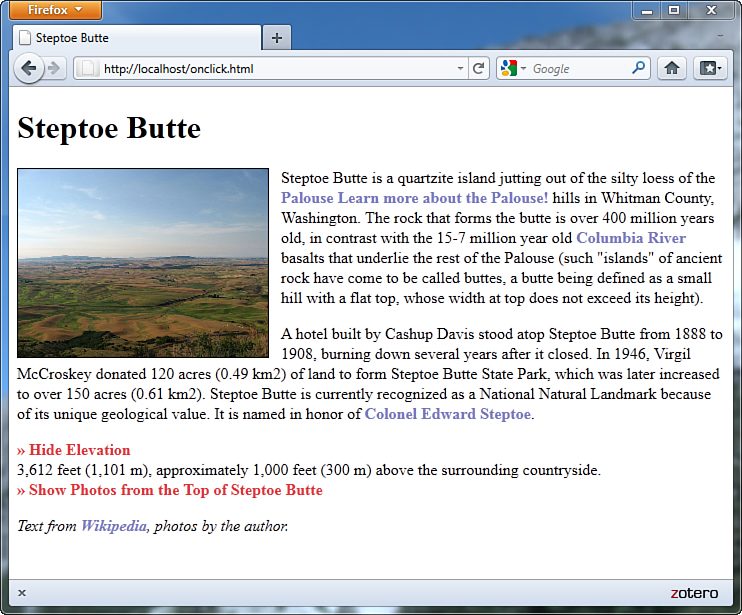
<h1>Steptoe Butte</h1>
<p><img src="steptoebutte.jpg" alt="View from Steptoe Butte"
style="float:left;margin-right:12px;margin-bottom:6px;border:1px
solid #000" />Steptoe Butte is a quartzite island jutting out of the
silty loess of the <a class="tip"
href="http://en.wikipedia.org/wiki/Palouse">Palouse <span>Learn more
about the Palouse!</span></a> hills in Whitman County, Washington.
The rock that forms the butte is over 400 million years old, in
Contrast with the 15-7 million year old
<a href="http://en.wikipedia.org/wiki/Columbia_River">Columbia
River</a> basalts that underlie the rest of the Palouse (such
"islands" of ancient rock have come to be called buttes, a
butte being defined as a small hill with a flat top, whose width at
top does not exceed its height).</p>
<p>A hotel built by Cashup Davis stood atop Steptoe Butte from
1888 to 1908, burning down several years after it closed. In 1946,
Virgil McCroskey donated 120 acres (0.49 km2) of land to form
Steptoe Butte State Park, which was later increased to over 150
acres (0.61 km2). Steptoe Butte is currently recognized as a
National Natural Landmark because of its unique geological
value. It is named in honor of <a
href="http://en.wikipedia.org/wiki/Colonel_Edward_Steptoe">
Colonel Edward Steptoe</a>.</p>
<div class="fakelink"
id="show_e"
onclick="this.style.display='none';
document.getElementById('hide_e').style.display='block';
document.getElementById('elevation').style.display='inline';
">» Show Elevation</div>
<div class="fakelink"
id="hide_e"
onclick="this.style.display='none';
document.getElementById('show_e').style.display='block';
document.getElementById('elevation').style.display='none';
">» Hide Elevation</div>
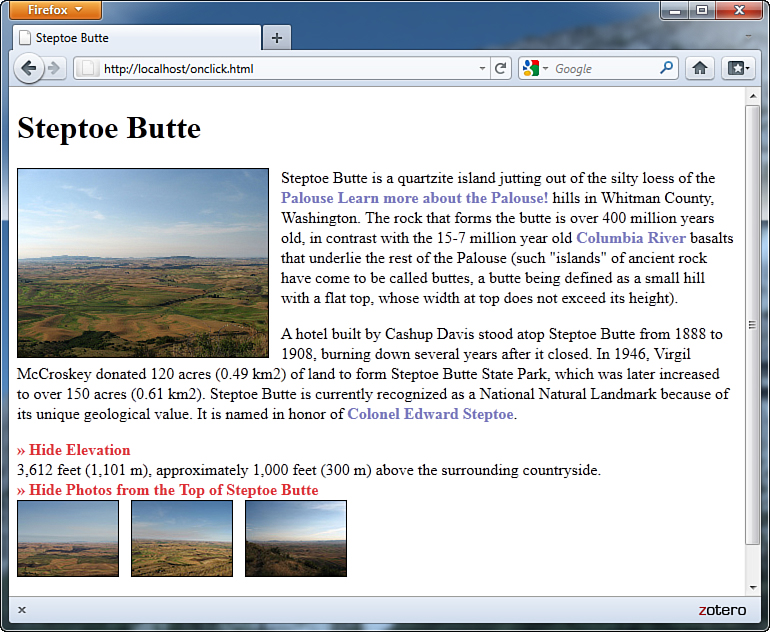
<div id="elevation">3,612 feet (1,101 m), approximately 1,000
feet (300 m) above the surrounding countryside.</div>
<div class="fakelink"
id="show_p"
onclick="this.style.display='none';
document.getElementById('hide_p').style.display='block';
document.getElementById('photos').style.display='inline';
">» Show Photos from the Top of Steptoe Butte</div>
<div class="fakelink"
id="hide_p"
onclick="this.style.display='none';
document.getElementById('show_p').style.display='block';
document.getElementById('photos').style.display='none';
">» Hide Photos from the Top of Steptoe Butte</div>
<div id="photos"><img src="steptoe_sm1.jpg" alt="View
from Steptoe Butte"style="margin-right: 12px; border: 1px
solid #000" /><img src="steptoe_sm2.jpg" alt="View from
Steptoe Butte" style="margin-right: 12px; border: 1px solid
#000" /><img src="steptoe_sm3.jpg" alt="View from Steptoe
Butte" style="margin-right: 12px; border: 1px solid #000" />
</div>
<p><em>Text from
<a href="http://en.wikipedia.org/wiki/Steptoe_Butte">
Wikipedia</a>, photos
by the author.</em></p>
</body>
</html>
To begin, look at the six entries in the style sheet. The first entry simply styles links that are surrounded by the <a></a> tag pair; these links display as nonunderlined, bold, blue links. You can see these regular links in the two paragraphs of text (and in the line at the bottom of the page) in Figure 19.3.
The next four entries are for specific IDs, and those IDs are all set to be invisible (display: none) when the page initially loads. The two IDs that follow are set to display as block elements when the page initially loads. Again, strictly speaking, these two IDs would not have to be defined as such because it is the default display. The style sheet includes these entries for the purpose of illustrating the differences. If you count the number of <div> elements in Listing 19.4, you will find six in the code: four invisible and two that are visible upon page load.
The goal in this example is to change the display value of two IDs when another ID is clicked. But first you have to make sure users realize a piece of text is clickable, and that typically happens when users see their mouse pointers change to reflect a link is present. Although not shown in Figure 19.3, when you look at this example in your browser you will see that the mouse pointer changes to a hand with a finger pointing at a particular link.
This functionality is achieved by defining a class for this particular text; the class is called fakelink, as you can see in this snippet of code:
<div class="fakelink"
id="show_e"
onclick="this.style.display='none';
document.getElementById('hide_e').style.display='block';
document.getElementById('elevation').style.display='inline';
">» Show Elevation</div>
The fakelink class ensures that the text is rendered as nonunderlined, bold, and red; cursor: pointer causes the mouse pointer to change in such a way that users think the text is a link of the type that would normally be enclosed in an <a></a> tag. But the really interesting stuff happens when we associate an onclick attribute with a <div>. In the sample snippet just shown, the value of the onclick attribute is a series of commands that change the current value of CSS elements.
Let’s look at them separately:
this.style.display='none';
document.getElementById('hide_e').style.display='block';
document.getElementById('elevation').style.display='inline';
What you are looking at are different JavaScript methods meant to change particular elements. In the first line, the this keyword refers to the element itself. In other words, this refers to the <div> ID called show_e. The keyword style refers to the style object; the style object contains all the CSS styles that you assign to the element. In this case, we are most interested in the display style. Therefore, this.style.display means “the display style of the show_e ID,” and what we are doing here is setting the value of the display style to none when the text itself is clicked.
But that is not all we are doing because there are three actions that occur within the onclick attribute. The other two actions begin with document.getElementByID() and include a specific ID name within the parentheses. We use document.getElementByID() instead of this because the second and third actions set CSS style properties for elements that are not the parent element. As you can see in the snippet, in the second and third actions, we are setting the display property values for the element IDs hide_e and elevation. All told, when users click the currently visible <div> called show_e:
• The show_e <div> becomes invisible.
• The hide_e <div> becomes visible and is displayed as a block.
• The elevation <div> becomes visible and is displayed inline.
The result of these actions is shown in Figure 19.4.
Figure 19.4 After clicking “Show Elevation,” the visibility of it and other <div> elements change based on the commands in the onclick attribute.
There is another set of <div> elements in the code in Listing 19.3, the ones that control the visibility of the additional photos. These elements are not affected by the onclick actions in the elevation-related elements. That is to say, when you click on either Show Elevation or Hide Elevation, the photo-related <div> elements do not change at all. You could show the elevation and not the photos (as seen in Figure 19.4), the photos and not the elevation, or both the elevation and photos at the same time (see Figure 19.5).
Figure 19.5 The page after clicking both Show Elevation and Show Photos from the Top of Steptoe Butte.
This brief example has shown you the very beginning of the layout and interaction possibilities that await you when you master CSS in conjunction with JavaScript events. For example, you can code your pages so that your users can change elements of the style sheet, change to an entirely different style sheet, move blocks of text to other places in the layout, take quizzes or submit forms, and much, much more.
Summary
In this chapter, you’ve learned to use events to detect mouse actions, keyboard actions, and other events, such as the loading of the page. You can use event handlers to perform a simple JavaScript statement when an event occurs or to call a more complicated function.
JavaScript includes a variety of other events. Many of these are related to forms, which you’ll learn more about in Chapter 26. In a longer example at the end of this chapter, you saw how to use onclick to show or hide text in a page with some design elements in it. Some new CSS was introduced: the use of the cursor property. Assigning a cursor property of pointer enabled you to indicate to users that particular text was acting as a link even though it was not enclosed in <a></a> tags as you are used to seeing.
In the next chapter, you’ll learn about the objects associated with windows, frames, and layers and how they work with JavaScript.
Q&A
Q. Can you capture mouse or keyboard events on elements other than text, such as images?
A. Yes, these types of events can be applied to actions related to clicking on or rolling over images and text. However, other multimedia objects, such as embedded YouTube videos or Flash files, are not interacted with in the same way, as those objects are played via additional software for which other mouse or keyboard actions are applicable. For instance, if you click on a YouTube video that is embedded in your web page, you are interacting with the YouTube player and no longer your actual web page—that action cannot be captured in the same way.
Q. What happens if I define both onKeyDown and onKeyPress event handlers? Will they both be called when a key is pressed?
A. The onKeyDown event handler is called first. If it returns true, the onKeyPress event is called. Otherwise, no keypress event is generated.
Q. When I use the onLoad event, my event handler sometimes executes before the page is done loading or before some of the graphics. Is there a better way?
A. This is a bug in some older browsers. One solution is to add a slight delay to your script using the setTimeout method.
Workshop
The workshop contains quiz questions and exercises to help you solidify your understanding of the material covered. Try to answer all questions before looking at the “Answers” section that follows.
Quiz
1. Which of the following is the correct event handler to detect a mouse click on a link?
a. onMouseUp
b. onLink
c. onClick
2. When does the onLoad event handler for the <body> tag execute?
a. When an image is finished loading
b. When the entire page is finished loading
c. When the user attempts to load another page
3. Which of the following event object properties indicates which key was pressed for an onKeyPress event in Internet Explorer?
a. event.which
b. event.keyCode
c. event.onKeyPress
Answers
1. c. The event handler for a mouse click is onClick.
2. b. The <body> tag’s onLoad handler executes when the page and all its images are finished loading.
3. b. In Internet Explorer, the event.keyCode property stores the character code for each key press.
Exercises
• Add commands to the onClick attributes in Listing 19.4 so that only one of the <div> elements (the elevation or photos) is visible at a time.