
What You'll Learn in This Hour:
What a component is
Components and interfaces
What a component diagram is
Applying component diagrams
Component diagrams in the big picture of the UML
In previous hours, you learned about diagrams that deal with conceptual entities. For example, a class diagram represents a concept—an abstraction of items that fit into a category. A state diagram also represents a concept—changes in the state of an object.
In this hour, you're going to learn about a UML diagram that represents a different kind of entity: a software component.
A software component is a modular part of a system. Because it's the software implementation of one or more classes, a component resides in a computer, not in the mind of an analyst. A component provides interfaces to other components.
In UML 1.x, data files, tables, executables, documents, and dynamic link libraries were defined as components. In fact, modelers used to classify these kinds of items as deployment components, work product components, and execution components. UML 2.0 refers to them instead as artifacts—pieces of information that a system uses or produces.
A component, by contrast, defines a system's functionality. Just as a component is the implementation of one or more classes, an artifact (if it's executable) is the implementation of a component.
You model components and their relationships so that
Clients can envision the structure and the functionality in the finished system.
Developers have a structure to work toward.
Technical writers who have to provide documentation and help files can understand what they're writing about.
You're ready for reuse.
Let's explore that last one. One of the most important aspects of components is the potential they provide for reusability. In today's rapid-fire business arena, the quicker you bring a system to fruition, the greater your competitive edge. If you can build a component for one system and reuse it in another, you contribute to that edge. Taking the time and the effort to model a component helps reuse occur.
You revisit reuse at the end of the next section.
When you deal with components, you have to deal with their interfaces. Early in my discussion of classes and objects, I talked about interfaces. As you might recall from Hour 2, “Understanding Object-Orientation,” an object hides what it does from other objects and from the outside world. (I referred to that as encapsulation or information-hiding.) The object has to present a “face” to the outside world so that other objects (including, potentially, humans) can ask the object to execute its operations. This face is the object's interface.
I elaborated on this idea in Hour 5, “Understanding Aggregations, Composites, Interfaces, and Realizations.” As I mentioned then, an interface is a set of operations that allows you to access a class's behavior—like the control knob that enables you to get a washing machine to perform washing machine–related operations. Think of an interface as a class that only has operations—no attributes. Bottom line: The interface is a set of operations that a class presents to other classes.
In my discussion of interfaces in Hour 5, I also mentioned that the relationship between a class and its interface is called realization.
Wait a second. It sounds like modeling an interface is an exercise in modeling a concept. At the top of this hour, I said that when you model a component, you model something that's not conceptual but lives in a computer. What's the connection?
In fact, an interface can be either conceptual or physical. The interface a class uses is the same as the interface its software implementation (a component) uses. For you as a modeler, this means that the way you represent an interface for a class is the same as the way you represent an interface for a component. Although the UML symbology distinguishes between a class and a component, it makes no distinction between a conceptual interface and a physical one.
Here's an important point to remember about components and interfaces: You can reach a component's operations only through its interfaces. As is the case with a class and its interface, the relation between a component and its interface is called realization.
Here's another important point: A component can make its interface available so that other components can utilize the interface's operations. In other words, a component can access the services of another component. The component that offers the services is said to present a provided interface. The component that accesses the services is said to use a required interface.
Interfaces figure heavily into the important concepts of component replacement and component reuse. You can replace one component with another if the new component conforms to the same interfaces as the old one.
To illustrate replacement and interfaces, here's an example from the world of automobiles. A few years ago, a friend of mine owned a certain classic sports car from the 1960s. (I won't name the manufacturer.) He quickly discovered that one additional piece of equipment was absolutely essential—another car so he could visit the sports car in the shop! Why? The engine was, to put it mildly, “high-spirited” and constantly required repair. My friend's solution was to get a standard engine from another make of car—less powerful but more reliable—and replace the original engine. He was able to do this because the new engine, though designed and built for an entirely different automobile, just happened to interface properly with the other components of the sports car.
This is also a good illustration of reuse. You can reuse a component in another system (like the replacement engine for the sports car) if the new system can access the reused component through that component's interfaces. If you can refine a component's interfaces so that a wide array of other components can access them, you can engineer that component for reuse in development projects across your whole enterprise.
This is where modeling interfaces comes in handy. Life is easier for a developer trying to replace or reuse a component if the component's interface information is readily available in the form of a model. If not, the developer has to go through the time-consuming process of stepping through code.
A component diagram contains—appropriately enough—components, along with interfaces and relationships. Other types of symbols that you've already seen can also appear in a component diagram.
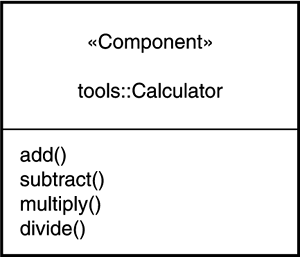
In UML 1.x, the component diagram's main icon is a rectangle that has two rectangles overlaid on its left side. Many modelers found the 1.x symbol too cumbersome, particularly when they had to show a connection to the left side. For this reason, UML 2.0 provides a new component icon. In UML 2.0, the icon is a rectangle with the keyword «component» near the top. For continuity over the near-term, you can include the 1.x icon inside the 2.0 icon. Figure 12.1 shows these icons.

Figure 12.2 shows that if the component is a member of a package, you can prefix the component's name with the name of the package. You can also show the component's operations in a separate panel.
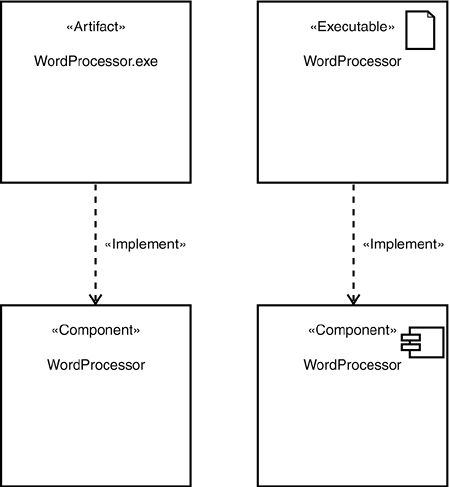
Speaking of artifacts, Figure 12.3 shows a couple of ways to represent them, and it also shows how to model the relationship between a particular kind of artifact (an executable) and the component it implements. As you can see, you can place a notation symbol in the artifact icon, analogous to the UML 1.x component symbol in the component icon.
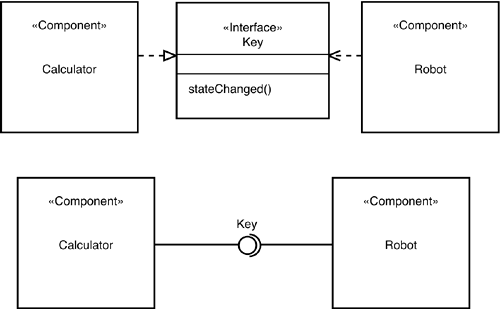
A component and the interfaces it realizes can be represented in two ways. The first shows the interface as a rectangle that contains interface-related information. It's connected to the component by the dashed line and large open triangle that indicate realization. (See Figure 12.4.)

Figure 12.4. You can represent an interface as a rectangle that contains information, connected to the component by a realization arrow.
Figure 12.5 shows the second way. It's iconic: You represent the interface as a small circle connected to the component by a solid line. (Compare Figures 12.4 and 12.5 with Figures 5.6 and 5.7.)

Figure 12.5. You can represent an interface as a small circle connected to the component by a solid line
In addition to realization, you can represent dependency—the relationship between a component and an interface through which it accesses another component. As you'll recall, dependency is visualized as a dashed line with an arrowhead. You can show realization and dependency on the same diagram, as in the upper diagram of Figure 12.6. The lower diagram of Figure 12.6 shows the equivalent ball-and-socket notation that you saw in Hour 5. In the terminology I mentioned earlier, the “ball” represents a provided interface and the “socket” represents a required interface.
When you model a component's interfaces as in Figure 12.6, you show what UML calls an external, or “black box,” view. You also have the option of showing an internal, or “white box,” view. This view shows interfaces listed inside the component icon and organized by keywords. Figure 12.7 shows a white box view of the components in Figure 12.6.

An example will get you started with component diagrams. This example models a program from Rogers Cadenhead's Teach Yourself Java 2 in 24 Hours, Third Edition (Sams Publishing, 2003). Entertaining and well-written, I highly recommend this book if you want to (a) quickly become proficient in Java, (b) learn how to say “Hello World” in Esperanto, and (c) find out how Rogers became the only computer author ever to be named a co-MVP in an NBA playoff game. (That last one's a stretch, but you'll enjoy it.)
The example comes from Rogers's Hour 16 (“Building a Complex User Interface”). The Java code creates an application called ColorSlide. This is a set of three sliders that enable you to mix amounts of red, green, and blue to create a color. One slider corresponds to each of those colors. The location of each slider determines the amount of its color that goes into the mix. The created color appears in a panel below the sliders.
Figure 12.8, taken from Rogers's book, shows the finished product. Of course, the figure is in shades of gray, so you can't actually see the created color. The positioning of the sliders in the figure creates North Texas Mean Green, a color that apparently holds great significance to students and alumni of the University of North Texas.
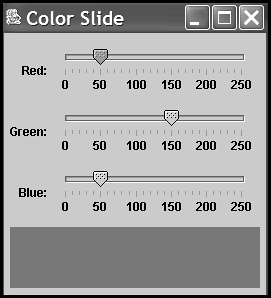
Figure 12.8. Rogers Cadenhead's ColorSlide application (from Teach Yourself Java 2 in 24 Hours, Third Edition).
To help you understand the thought process behind this program, I'll take you through a sequence of component diagrams. The objective is for you to see how the program takes shape and at the same time learn some modeling techniques.
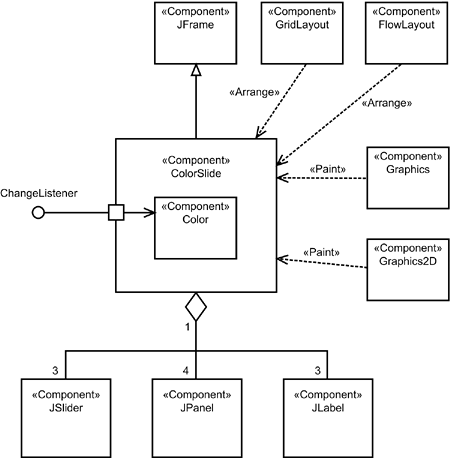
Figure 12.9 sets the stage by showing the packages that supply the Java elements used in the program. The acronym awt stands for “abstract windowing toolkit,” a group of components that display and control a graphic user interface (GUI). The specific components for this program are Color (which displays a color), GridLayout and FlowLayout (which arrange the elements in the GUI), and Graphics and Graphics2D (which paint the GUI—that is, they render it onscreen).

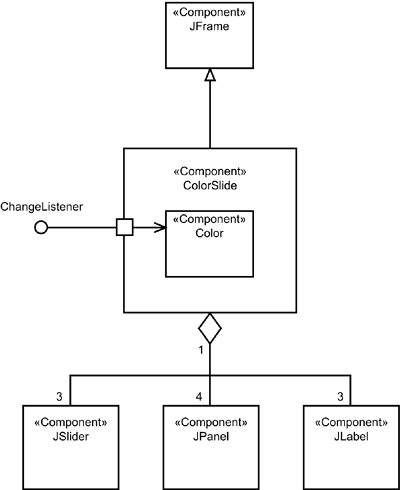
The name on the tab of the other major package, swing, is a group of components that you can add to a graphic user interface. The names of the components in the package in this figure are pretty self-explanatory: JSlider is a slider, JFrame is a frame, JPanel is a panel (an area within the frame), and JLabel is a label.
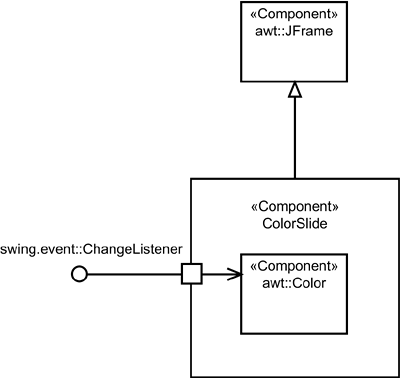
The package labeled swing.event supplies the ChangeListener interface. This interface waits for state changes to occur in the GUI.
Figure 12.10 shows the highest level of analysis for our components. It presents, in a general way, the idea that ColorSlide inherits from JFrame and provides ChangeListener, a required interface for a Person who interacts with ColorSlide. Interaction between ChangeListener and ColorSlide takes place through a port. The results of that interaction are sent to Color, as indicated by the arrow from the port to Color. UML 2.0 refers to the ball-and-socket connection as an assembly connector and to the arrow as a delegation connector. (The concept of connectors is new in UML 2.0.)
Note that the package names appear as prefixes for the component names. (Strictly speaking, awt is really java.awt and swing.event is really javax.swing.event, but I decided to cut down on the clutter.) In Java, a program imports packages at the beginning of the code, meaning that the programmer doesn't have to specify the package for each component throughout the program. The remaining figures reflect the import of the packages and don't include the package names.
Figure 12.11 moves to another level of analysis and shows that ColorSlide is an aggregation whose components are JSlider, JPanel, and JLabel, with the indicated multiplicities. Because the program deals with red, blue, and green, you can see why the model specifies three sliders and three labels (one label per slider). It specifies four panels because each slider has to have its own area, and the part that displays the color has to have a designated area, too.
Next, Figure 12.12 takes into account the laying out of the components and the rendering of the GUI. The keyword «Arrange» shows that GridLayout and FlowLayout arrange the panels, sliders, and labels. (I won't go into the details of how they do the arranging.) The keyword «Paint» indicates that Graphics and Graphics2D handle the rendering. (Again, I'll skip the details.) These keywords aren't built into UML. I added them for clarity.
If you've been following along closely, you might have become aware of a slight disconnect. Figures 12.11 and 12.12 show JSlider as a component and ChangeListener as the interface. A user can create colors only by manipulating the sliders. Each time a slider moves, the movement causes the displayed color to change. How do you show the relationships between the sliders and the interface?
The next level of analysis provides the answer and shows that the program creates instances of the components in the GUI. To model those instances, you can use the icons for objects that you learned in Hour 3. What about those sliders? In Java, when you create an object (like an instance of a slider) you can register it as a change listener. In this case, registering a slider-object as a change listener means that when the slider moves, the movement is noted and the displayed color changes as a result.
Figure 12.13 shows this level of analysis and presents the objects that make up ColorSlide. The ChangeListener is a required interface for the three instances of JSlider. A delegation connector connects the port to current, an instance of Color. The canvas object is an instance of a class called ColorPanel, a child class of JPanel. For completeness, the figure shows the inheritance relationship between ColorPanel and JPanel.

Why bother creating the ColorPanel class? How, exactly, do you register an object as an interface? How do those awt components work? You'll just have to read Rogers's book to find out.
You're almost done with the big picture. Figure 12.14 includes the component diagram, which focuses on a system's software architecture. In the next hour, you'll learn how to model the hardware architecture.

A component is a modular part of a computer system, distinguishable from an artifact, which is a piece of information that system uses or creates. Components define a software system's functionality.
A component provides interfaces that allow other components to access it. For an accessing component, the interface is said to be required.
In UML 1.x, the component icon is a rectangle with two small rectangles overlaid on its left side. In UML 2.0, the component icon is a rectangle with the keyword «Component» near the top. For continuity in the near term, UML 2.0 recommends using a tiny 1.x component icon in the upper right corner of the new icon. The artifact icon is a rectangle with the keyword «Artifact» near the top. You can put a note symbol in its upper right corner.
You can represent an interface in either of two ways. One representation is a rectangle containing information about the interface and connected to the component with a dashed line and an empty triangle. The other is a small circle connected to the component with a solid line. In UML 2.0, you can use a ball-and-socket notation to show that an interface is provided by one component and required by another. The ball is the small circle I just mentioned. The socket is an open semi-circle connected with a solid line to another component. The ball represents a provided interface, whereas the socket represents a required interface.
In this workshop, you get to solidify your knowledge about components and how to model them. You can find answers to the Quiz questions in Appendix A, “Quiz Answers.”
1: | Although UML 1.x is gradually giving way to UML 2.0, most existing models and many modeling tools still conform to the old standard. To give you some practice with this standard, convert Figures 12.8–12.13 to UML 1.x. This isn't just a trivial change from one icon to another: Remember that ports and connectors do not exist in UML 1.x. |
2: | Create a white box view of |