
Hour 3 Learning Basic Hosting
What You’ll Learn in This Hour:
![]() Overview of hosting
Overview of hosting
![]() Building a host from scratch
Building a host from scratch
![]() Adding basic events to it
Adding basic events to it
![]() Configuring the host to use persistence
Configuring the host to use persistence
![]() Adding additional events to better track the workflow life cycle
Adding additional events to better track the workflow life cycle
![]() Adding the services through configuration
Adding the services through configuration
WF can be run from or hosted from Windows Forms applications, Console Applications, Windows Services, or any .NET 2.0 or later app domain. WF provides a general hosting framework that can be accessed from the various applications it is hosted in. This hour describes WF’s workflow hosting infrastructure and how to configure it through its use of pluggable runtime services.
You will start off building your own bare-bones host. This will help you understand what goes into inserting WF into your application. You will then add events to this host to see how your host application can listen to events that happen in your workflow. You will use the persistence runtime service to serialize your workflow to SQL Server when workflows go idle to preserve memory and improve stability. Then you will add more events that help you monitor the series of events the workflow goes through from its active state to its persisted state. Adding the persistence service will also show you how the WF host can be tailored to the needs of your application. Finally, you learn how to add persistence through an App.Config file.
The main class you will work in this hour is the WorkflowRuntime. For all intents and purposes it is the WF workflow engine. It is instantiated in a host application and runtime services are added to it. It holds the events that facilitate host-workflow interaction.
Workflow is a part of all types of applications. Windows Forms applications, ASP.NET, Windows Services, and just about all other applications contain some sort of logic that can be supplied through a workflow. Because of this, workflows must be embeddable within all these applications. You can’t, after all, tell everybody that they have to use a custom process to run workflows if you expect it to attract a mainstream adoption. .NET applications of all types run in a Windows AppDomain (a CLR application isolation unit). WF can be called from an application running in an AppDomain provided by Windows XP SP2, Windows 2003, or Windows Vista that contains the .NET Framework 3.0 or later. Therefore, WF can be embedded in any Windows application running these operating systems. It doesn’t matter if the specific application is a Windows Forms, ASP.NET, Windows Service, a custom line-of-business application, or something else. The WF workflow engine can be called from any of these applications. Calling the WF workflow engine from another application is referred to as hosting.
Simply running from different applications is not enough to make WF practical across the many types of applications that run on Windows. It must also be able to scale up to complex server requirements and scale down to much simpler, constricted client requirements.
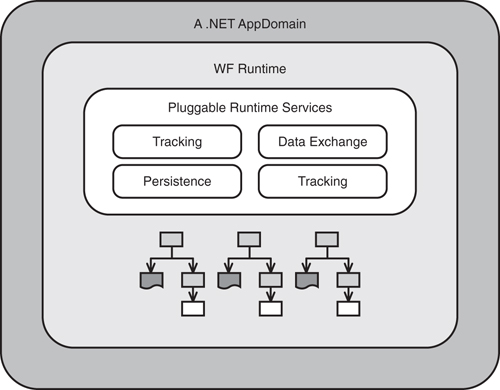
The hosting infrastructure in WF is supplied by the WF runtime. The WF runtime is enabled by the WorkflowRuntime class that is called from the host. The class is supported by three redistributable system DLLs. The capability to serve disparate hosting needs is provided by pluggable runtime services such as persistence, tracking, and transactions—that can be registered with the runtime to tune its capabilities to the needs of the host. The WF runtime executes the workflow, manages its life cycle, and acts as a broker among the host, workflow, and registered runtime services.
Figure 3.1 demonstrates an AppDomain host, which could be an ASP.NET, Windows Forms, or other type of application, that has started the WF runtime. The WF runtime is configured with four runtime services and is running three workflow instances.
In this section, you will create a Console Application and manually add the hosting code yourself to create a workable host.
Follow the next steps to create the solution and projects.
1. Start Visual Studio 2008. Select File, New, Project.
2. Click the + to the left of Other Project Types.
3. Select the Visual Studio Solutions project template.
4. Enter BasicHostingSolution as the Name.
5. Enter or browse to C:SamsWf24hrsHoursHour03BasicHosting for the Location.
6. Click OK.
7. You should now see the BasicHostingSolution solution in the Solution Explorer. If not, click Tools, Options, expand Projects and Solutions, click the General button, and ensure that the Always Show Solution Check Box is checked, and click OK. The purpose of this step is not to show the Solution Explorer, but rather to ensure that solutions with fewer than two projects show in the Solution Explorer.
1. Right-click BasicHostingSolution in the Solution Explorer, and select Add, New Project.
2. Expand the Visual C# project templates and select Windows.
3. Select the Console Application project template.
4. Enter BasicHostingProject as the Name.
5. Enter or browse to C:SamsWf24hrsHoursHour03BasicHostingBasicHostingSolution for the Location.
6. Click OK.
1. Right-click BasicHostingSolution in the Solution Explorer, and select Add, New Project.
2. Expand the Visual C# project templates and select Workflow.
3. Select the Sequential Workflow Library project template.
4. Enter WorkflowsProject as the Name.
5. Enter or browse to C:SamsWf24hrsHoursHour03BasicHostingBasicHostingSolution for the Location.
6. Click OK.
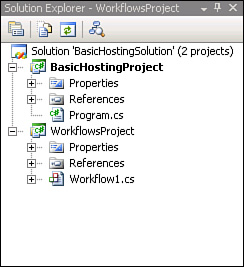
You should have a solution with two projects, as shown in Figure 3.2.
Now we will switch to the WorkflowsProject and create a workflow in the next steps that can be used throughout this hour to test the host.
1. Add a Code activity, a Delay activity, and another Code activity in that order.
2. Double-click the first Code activity and add the following code to its handler:
Console.WriteLine
("before delay: '{0}'", DateTime.Now.ToLongTimeString( ));
3. Go back to the workflow designer and set the Delay activity TimeoutDuration property to 00:00:05 (5 seconds).
4. Double-click the second Code activity and add the following code to its handler:
Console.WriteLine
("after delay: '{0}'", DateTime.Now.ToLongTimeString( ));
5. You are done creating the workflow. Build the project and fix any errors before proceeding.
Now we have to turn our console host into a workflow host, which requires the following steps:
1. Referencing the three workflow DLLs—System.Workflow.Activities, System.Workflow.ComponentModel, and System.Workflow.Runtime.
2. Instantiating the WorkflowRuntime type, which for all intents and purposes is the WF runtime.
3. Instantiating the WorkflowInstance type and calling its methods to create and start a workflow instance.
4. Registering workflow completed and terminated events against the WorkflowRuntime type.
5. Ensuring that the console host remains in scope while the workflow executes. This is vital because if the console host does terminate before the workflow completes, the workflow will immediately halt execution because the workflow runs in the console host’s AppDomain.
In the next steps, you add basic hosting logic.
1. Right-click BasicHostingProject in the Solution Explorer, select Add Reference, click the .NET tab, select System.Workflow.Activities, System.Workflow.ComponentModel, and System.Workflow.Runtime, and press OK to reference the three workflow DLLs.
2. Right-click BasicHostingProject in the Solution Explorer again, select Add Reference, click the Projects tab, select WorkflowsProject, and click OK to reference the project that will hold the workflows.
3. Open Program.cs in the BasicHostingProject project and replace the current using directives with the ones shown:
using System;
using System.Workflow.Runtime;
using System.Threading;
4. Instantiate the WorkflowRuntime inside the Main method (via a using WorkflowRuntime block so that it will be destroyed when the scope ends) as shown.
using(WorkflowRuntime workflowRuntime = new WorkflowRuntime( ))
{
}
5. Create and start a workflow instance by adding the code shown between the brackets in the using WorkflowRuntime block.
// Create the workflow instance
WorkflowInstance instance =
workflowRuntime.CreateWorkflow(
typeof(WorkflowsProject.Workflow1));
// Start the workflow instance
instance.Start( );
6. Your Program.cs should now look like this:
using System;
using System.Workflow.Runtime;
using System.Threading;
namespace BasicHostingProject
{
class Program
{
static void Main(string[ ] args)
{
using (WorkflowRuntime workflowRuntime = new WorkflowRuntime( ))
{
// Create the workflow instance
WorkflowInstance instance =
workflowRuntime.CreateWorkflow(
typeof(WorkflowsProject.Workflow1));
// Start the workflow instance
instance.Start( );
}
}
}
}
You have almost created a host. There is one problem, though. The host runs workflows asynchronously. By default, the console host will terminate before running the workflow. You will block the host in the next steps, so that it will wait for the workflow to run. You will learn how to run the host synchronously in Hour 17, “Learning Advanced Hosting.”
1. Insert the following line of code directly after the opening class bracket that will declare a variable used to ensure that the host remains in scope until the workflow completes:
static AutoResetEvent waitHandle;
2. Add the following code directly below the opening bracket of the using WorkflowRuntime block to instantiate the blocking event.
waitHandle = new AutoResetEvent(false);
3. Now we have to tell the host at what point to wait for the blocking event (wait handle) to be set. Add the following line after the instance.Start( ); line of code.
// Position where host will wait for waithandle to be set
waitHandle.WaitOne( );
4. Because this is a console application and we may want to run it in debug mode, let’s add a couple of lines to the end of the using WorkflowRuntime block (before the end bracket). This will ensure that the console messages will remain after the workflow completes (or more accurately, the AutoResetEvent is set).
// Keep the console screen alive when workflow comnpletes
Console.WriteLine("Press enter to continue");
Console.Read( );
5. Your main method and static variable declaration should now look like this:
static AutoResetEvent waitHandle;
static void Main(string[ ] args)
{
using (WorkflowRuntime workflowRuntime = new WorkflowRuntime( ))
{
waitHandle = new AutoResetEvent(false);
// Create the workflow instance
WorkflowInstance instance =
workflowRuntime.CreateWorkflow(
typeof(WorkflowsProject.Workflow1));
// Start the workflow instance
instance.Start( );
// Position where host will wait for waithandle to be set
waitHandle.WaitOne( );
// Keep the console screen alive when workflow comnpletes
Console.WriteLine("Press enter to continue");
Console.Read( );
}
}
The host application interacts with and controls the WF runtime via events. There are a number of events, and you will now use two fundamental ones: completed and terminated. Other events will be covered in the “Add Monitoring Events” section later in this hour and in Hour 17, “Learning Advanced Hosting.”
1. Open Program.cs.
2. Register the WorkflowCompleted event with the runtime. When the completed event is raised, you will set the wait handle event and the host will terminate, but only after the workflow is processed. To add the WorkflowCompleted event, move below the line that initializes AutoResetEvent to false, enter workflowRuntime., select WorkflowCompleted from the menu, press the spacebar, enter +=, and press Tab twice.
3. You should see the following event and hander. The event is created in the Main method and the handler is created below the Main method (we will change its contents shortly):
workflowRuntime.WorkflowCompleted += new EventHandler
<WorkflowCompletedEventArgs>(workflowRuntime_WorkflowCompleted);
static void workflowRuntime_WorkflowCompleted
(object sender, WorkflowCompletedEventArgs e)
{
throw new NotImplementedException( );
}
4. Below the WorkflowCompleted event registration enter workflowRuntime, select WorkflowTerminated from the menu, press the spacebar, enter +=, and press Tab twice.
5. Enter the following code in the WorkflowCompleted event handler to print workflow completed information to the console and to release the blocking event:
Console.WriteLine("Workflow {0} completed.",
e.WorkflowInstance.InstanceId.ToString( ));
waitHandle.Set( );
![]()
Public Properties and a type of property called a DependencyProperty (introduced in Hour 4, “Learning Host-Workflow Data Exchange”) can be accessed in the WorkflowCompleted event as well as the workflow instance ID. The properties are stored in the OutputParameters collection property. The following code accesses the workflow property MyProperty and stores its value to a variable:
string MyProperty = (string) e.OutputParameters["MyProperty"];
6. Enter the following code in the WorkflowTerminated event handler to print the workflow instance ID and the exception message to the console and to release the blocking event:
Console.WriteLine("Workflow {0} terminated because {1}",
e.WorkflowInstance.InstanceId, e.Exception.Message);
waitHandle.Set( );
7. You are done creating the host. Build the project and fix any errors before proceeding.
8. Your Main method should now look like Listing 3.1.
LISTING 3.1 Completed Host Main Method
static void Main(string[ ] args)
{
using (WorkflowRuntime workflowRuntime = new WorkflowRuntime( ))
{
waitHandle = new AutoResetEvent(false);
workflowRuntime.WorkflowCompleted += new
EventHandler<WorkflowCompletedEventArgs>(workflowRuntime_WorkflowCompleted);
workflowRuntime.WorkflowTerminated += new
EventHandler<WorkflowTerminatedEventArgs>
(workflowRuntime_WorkflowTerminated);
// Create the workflow instance
WorkflowInstance instance =
workflowRuntime.CreateWorkflow(
typeof(WorkflowsProject.Workflow1));
// Start the workflow instance
instance.Start( );
// Position where host will wait for waithandle to be set
waitHandle.WaitOne( );
// Keep the console screen alive when workflow comnpletes
Console.WriteLine("Press enter to continue");
Console.Read( );
}
}
That is it. You have now created a basic workflow host. There are many other events and runtime services that will be added to most applications. You also may want to invest in a more robust host that implements a Singleton pattern, but this host will function. You also should understand the default persistence behavior that is covered in the next section before creating a WF application.

Persistence is a WF feature that stores a workflow to a specified storage medium when the workflow goes idle. A workflow will go idle when awaiting external input or for a timer to expire. Delay activities create timers, so our workflow will go idle when it executes the Delay activity. The default behavior is to leave workflows in memory when they go idle. For some scenarios, this is appropriate. As mentioned in Hour 2, “A Spin Around Windows Workflow Foundation,” not all workflows run for long periods of time. Some execute in whole in one burst. There is no need for these workflows to persist because they never go idle. There are probably other scenarios that do not require persistence as well.
The default behavior, however, is not appropriate for many common workflow scenarios that feature approval-centric and other workflows that run, wait for input, run again, wait for input again, and so on before completing. The default behavior will leave all these workflows in memory during their periods of inactivity, creating scalability and reliability problems. Luckily WF does ship with an out-of-the-box (OOB) persistence service that persists idle workflows to SQL Server. The OOB persistence service is called the SqlWorkflowPersistenceService, and it is one of the pluggable runtime services mentioned earlier in the hour.
![]()
You can also create your own custom persistence services that persist to an Oracle database, a file, or any other storage medium. Creating custom persistence services is not covered in this book. The WF, WCF samples, described in the installation section of Hour 1, “Understanding Windows Workflow Foundation,” contains samples that persist workflows to files and the console. These are good examples to explore, if you are interested in creating a custom persistence service.
Follow these steps to register and configure the SqlWorkflowPersistenceService:
1. Open Program.cs in the BasicHostingProject and add the variables declarations directly below the opening bracket of the using WorkflowRuntime block to configure the persistence service (they are described shortly):
// Persitence parameter values
bool unloadOnIdle = true;
TimeSpan reloadIntevral = new TimeSpan(0, 0, 0, 20, 0);
TimeSpan ownershipDuration = TimeSpan.MaxValue;
2. Add the following code to Program.cs to register the persistence service above the line of code that instantiates the workflow instance (the parameters are explained shortly):
// Instantiate a sql persistence service
SqlWorkflowPersistenceService sqlPersistenceService =
new SqlWorkflowPersistenceService(connectionString,
unloadOnIdle, ownershipDuration, reloadIntevral);
3. Now add the line of code shown next below the code you just added to add the persistence service to the runtime:
workflowRuntime.AddService(sqlPersistenceService);
If your connection string is different from mine, you should change it throughout this hour and the rest of the book. You will create the WFTrackingAndPersistence database a little later in this hour, and I recommend using that name for compatibility. However, if your data source is different than localhost, if your database is SQL Express and not SQL Server, or if you are not using integrated security, you will have to substitute your configuration from here on. For your reference, here is the connection string for SQL Express:
static string connectionString = "Initial
Catalog=WFTrackingAndPersistence;" +
"Data Source=localhost\SQLEXPRESS; " +
"Integrated Security=SSPI;";
4. Add the static variable below the opening class bracket to store the database connection:
static string connectionString = "Initial Catalog=
WFTrackingAndPersistence;" +
"Data Source=localhost; Integrated Security=SSPI;";
5. Add the following using directive to the top of the file below the existing using directives:
using System.Workflow.Runtime.Hosting;
That is it. You have now transformed the runtime from one that could only run limited workflows that would not survive a server shutdown to one that can run many workflows and free them from memory after each execution burst.
You did pass the SQL persistence service a few parameters. Let’s look at them:
![]() The first holds the database connection.
The first holds the database connection.
![]() The second specifies that the workflow should unload, and thus persistence should take place automatically when the workflow is idled. Alternatively, you could track the idled event and persist the workflow yourself. A workflow will go idle when it is waiting either for an external event or for a timed activity to complete, such as a
The second specifies that the workflow should unload, and thus persistence should take place automatically when the workflow is idled. Alternatively, you could track the idled event and persist the workflow yourself. A workflow will go idle when it is waiting either for an external event or for a timed activity to complete, such as a Delay activity.
![]() The third holds how long the runtime should hold a lock on a workflow. In this hour, we will keep it simple and set this property to the max value. This value is satisfactory for single server setups and does not account well for server crashes. Hour 5, “Creating an Escalation Workflow,” covers how to properly configure this property in server farm scenarios and to better support server crashes.
The third holds how long the runtime should hold a lock on a workflow. In this hour, we will keep it simple and set this property to the max value. This value is satisfactory for single server setups and does not account well for server crashes. Hour 5, “Creating an Escalation Workflow,” covers how to properly configure this property in server farm scenarios and to better support server crashes.
![]() The fourth determines how often the runtime will look for persisted workflows with expired timers, such as a
The fourth determines how often the runtime will look for persisted workflows with expired timers, such as a Delay activity that has run its course. This property will also be looked at in more detail in Hour 5.
Because you set the UnloadOnIdle property of the SqlWorkflowPersistenceService to true, the workflow will automatically idle and then persist each time it is waiting on external input or a timer. To see how this process works and to get a chance to work with a few more of the workflow events, let’s track the process the workflow goes through from actively running to persistence.
You will register events with the WorkflowRuntime and add event handlers to track the following workflow events: idled, unloaded, persisted, and loaded. The workflow first idles, then is unloaded and persisted, and unlimitedly loaded back into memory again. Our sample workflow will go idle when it encounters the Delay activity and will then persist. The workflow will be reloaded when the delay expires.
You should register the events and create the handlers on the WorkflowRuntime. You will use the workflowRuntime variable to do so because the WorkflowRuntime has been assigned to it.
In the next steps you will register additional events and create handlers for them.
1. Open Program.cs and move your cursor below the WorkflowTerminated event registration in the Main method.
2. Enter workflowRuntime., select WorkflowIdled from the menu, press the spacebar, enter +=, and press Tab twice.
3. You should see the following event and hander. The event is created in the Main method and the handler is created outside of Main method (we will change its contents shortly):
workflowRuntime.WorkflowIdled +=
new
EventHandler<WorkflowEventArgs>(workflowRuntime_WorkflowIdled);
static void workflowRuntime_WorkflowLoaded(object sender,
WorkflowEventArgs e)
{
throw new Exception("The method or operation is not implemented.");
}
4. Below the WorkflowIdled event registration handler enter workflowRuntime., select WorkflowUnloaded from the menu, press the spacebar, enter +=, and press Tab twice.
5. Below the WorkflowUnloaded event registration handler enter workflowRuntime., select WorkflowPersisted from the menu, press the spacebar, enter += and press Tab twice.
6. Below the WorkflowPersisted event registration handler enter workflowRuntime., select WorkflowLoaded from the menu, press the spacebar, enter += and press Tab twice.
Follow the next steps to add code to the handlers you created in the previous steps.
1. Be careful where you insert the code, because WF puts the most recently added handler on top.
2. Replace the default code in the workflowRuntime_WorkflowIdled handler with the following:
Console.WriteLine("Workflow {0} idled at {1}",
e.WorkflowInstance.InstanceId, System.DateTime.Now.ToLongTimeString( ));
3. Replace the default code in the workflowRuntime_WorkflowUnloaded handler with the following:
Console.WriteLine("Workflow {0} unloaded at {1}",
e.WorkflowInstance.InstanceId, System.DateTime.Now.ToLongTimeString( ));
4. Replace the default code in the workflowRuntime_WorkflowPersisted handler with the following:
Console.WriteLine("Workflow {0} persisted at {1}",
e.WorkflowInstance.InstanceId, System.DateTime.Now.ToLongTimeString( ));
5. Replace the default code in the workflowRuntime_WorkflowLoaded handler with the following:
Console.WriteLine("Workflow {0} loaded at {1}",
e.WorkflowInstance.InstanceId, System.DateTime.Now.ToLongTimeString( ));
6. Build and fix errors, if any.
WF does not create a persistence or a tracking database for you when you install the product. One database can be used for both. The same tracking/persistence database can be used by different workflows. This book will use the WFTrackingAndPersistence database for all persistence and tracking exercises throughout this book. Each host specifies the connection string for these databases, so you can have multiple databases for performance, security, or other reasons if you choose to.
![]()
The desire to avoid making SQL Server or SQL Express a hard dependency on WF is probably why persistence is not turned on by default, which seems reasonable. After all, there may be no database in some scenarios and other databases in other scenarios.
Follow the next set of steps to create persistence and tracking databases in SQL Server.
![]()
Per the installation requirements in Hour 1, “Understanding Windows Workflow Foundation,” Sequel Server Management Studio is necessary (or at least the easiest way) to perform some of the required SQL Server tasks. Sequel Server Management Studio for express or standard SQL Server can be downloaded. This book assumes that you have Sequel Server Management Studio installed in all future directions related to SQL Server.
1. Open Microsoft SQL Server Management Studio. Select your SQL Server and log in to the dialog.
2. Right-click Databases, select New Database, and name it WFTrackingAndPersistence. Then click OK at the bottom of the dialog.
3. Create a database named WFTrackingAndPersistence in any version of SQL Server 2000 or later. One way is to enter Create Database WFTrackingAndPersistence in the query window.
4. In the SQL Query Analyzer, select the WFTrackingAndPersistence database.
5. On the File menu, click Open, File, and then open the SQL script %WINDIR%Microsoft.NETFrameworkv3.0Windows Workflow FoundationSQLENSqlPersistenceService_Schema.sql. (If your language is not English, replace EN with your language code.)
6. Make sure that WFTrackingAndPersistence is open, and run the query by clicking Execute or pressing F5. This creates the persistence tables.
7. Check to ensure the CompletedScope and InstanceState tables have been added to the database.
8. On the File menu, click Open, and then open the SQL script %WINDIR%Microsoft.NETFrameworkv3.0Windows Workflow FoundationSQLENSqlPersistenceService_Logic.sql.
9. Make sure that WFTrackingAndPersistence is open, and run the query by clicking Execute or pressing F5. This creates the persistence stored procedures.
10. Check to ensure that about 10 stored procedures have been added to the database.
In the next steps you will add the tracking tables to the database.
1. On the File menu, click Open, File, and then open the SQL script %WINDIR%Microsoft.NETFrameworkv3.0Windows Workflow FoundationSQLENTracking_Schema.sql.
2. Make sure that WFTrackingAndPersistence is open, and run the query by clicking Execute or pressing F5. This creates the tracking tables.
3. Check to ensure that approximately 20 tables have been added to the database.
4. On the File menu, click Open, and then open the SQL script %WINDIR%Microsoft.NETFrameworkv3.0Windows Workflow FoundationSQLENTracking_Logic.sql.
5. Run the query by clicking Execute or pressing F5. This creates tracking the stored procedures.
6. There should now be numerous stored procedures.
1. Run the workflows and you should see the results shown in Figure 3.4.
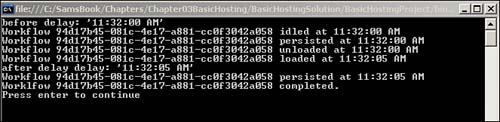
You may notice the last call to persistence and think it is odd. Its purpose is to remove the workflow from the persistence store because the workflow is completed. Also note that the time between idled and reloaded may be affected by the reloading interval you specified.
2. Open Program.cs and set value of unloadOnIdle to false.
3. Run the workflow again; as you see, the workflow no longer unloads, persists, or reloads. It still idles, but that does not trigger the unload that previously led to the other events.
So far you added the persistence service and database connection to the host via code. It may be preferable to add one or both of these through configuration (an App.Config file) instead, mainly to permit change without recompilation. A workflow runtime section must be added to the App.Config file to configure the workflow runtime through configuration.
In the next steps you will add the persistence service and database connection to the host via configuration.
1. Add a reference to System.Configuration from the BasicHostingProject.
2. Create an App.Config file by right-clicking the project, selecting Add, New Item, selecting the Application Configuration File template, and clicking the Add button.
3. Add a configuration section that contains the internal workflow configuration instructions between the opening and closing Configuration elements in the App.Config file. The section name you provide here is used in the other sections of the App.Config file for identification purposes.
<configSections>
<section name="WFR"
type="System.Workflow.Runtime.Configuration.WorkflowRuntimeSection,
System.Workflow.Runtime, Version=3.0.00000.0, Culture=neutral,
PublicKeyToken=31bf3856ad364e35" />
</configSections>
4. Add the next element between the configSection and Configuration ending elements. This element must have the same name as the section name in the previous step.
<WFR Name="BasicHostingExample">
</WFR>
5. Add a common section to store the database connection within the WFR element you just added:
<CommonParameters>
<add name="ConnectionString"
value="Initial Catalog= WFTrackingAndPersistence;
Data Source=localhost;
Integrated Security=SSPI;" />
</CommonParameters>
6. Add the Services section—that contains the SqlWorkflowPersistenceService and its parameters—within the WFR element below the element you just added:
<Services>
<add
type="System.Workflow.Runtime.Hosting.SqlWorkflowPersistenceService,
System.Workflow.Runtime, Version=3.0.00000.0,
Culture=neutral, PublicKeyToken=31bf3856ad364e35"
UnloadOnIdle="true"
LoadIntervalSeconds="10"/>
</Services>
7. Your completed configuration file should now look like Listing 3.2.
LISTING 3.2 Workflow Configuration File
<?xml version="1.0" encoding="utf-8" ?>
<configuration>
<configSections>
<section name="WFR"
type="System.Workflow.Runtime.Configuration.WorkflowRuntimeSection,
System.Workflow.Runtime, Version=3.0.00000.0, Culture=neutral,
PublicKeyToken=31bf3856ad364e35" />
</configSections>
<WFR Name="BasicHostingExample">
<CommonParameters>
<add name="ConnectionString"
value="Initial Catalog= WFTrackingAndPersistence;
Data Source=localhost;
Integrated Security=SSPI;" />
</CommonParameters>
<Services>
<add type="System.Workflow.Runtime.Hosting.SqlWorkflowPersistenceService,
System.Workflow.Runtime, Version=3.0.00000.0,
Culture=neutral, PublicKeyToken=31bf3856ad364e35"
UnloadOnIdle="true"
LoadIntervalSeconds="10"/>
</Services>
</WFR>
</configuration>
8. Comment out the line of code in Program.cs that adds SqlPersistenceService to the runtime that looks like this: workflowRuntime.AddService(sqlPersistenceService);. There can be only one persistence service registered with the runtime at a time, and it will conflict with the one being added through configuration now.
9. Instruct your host to use the configuration file by adding the name of your configuration element to the line that instantiates the runtime. The difference is that "WFR" is added between the two parentheses at the end of the line as shown:
using (WorkflowRuntime workflowRuntime = new WorkflowRuntime("WFR"))
10. Run the workflow and it should idle, persist, unload, and reload as it did when you ran the workflow earlier with unloadOnIdle set to true.
11. Now change UnloadOnIdle to false in the App.Config file and run it again. It should now idle but persist, unload, or reload, as the workflow did when it was programmatically set to false.
That is it. You now have a host that will persist workflows and can control persistence programmatically or through configuration. There are other services you will encounter later, but persistence is a key one. Most server and many client scenarios will call for persistence to free memory and provide durability across reboots.
You now know that the WorkflowRuntime class is the WF runtime or engine. You also know the basics of creating a host, registering events, and adding pluggable runtime services into the host. You have a basic idea of how persistence works and how a workflow transitions from active to persisted. Adding the persistence service offered you insight into how WF can be configured to the needs of its host. Finally, you know that runtime services can also be added through configuration files. In the previous hour you ran through a workflow and in this hour, through the runtime, or hosting a workflow. In the next hour you will learn about one more runtime service that provides for host-workflow data exchange, which is the missing component so far, because you have to move data between the host and the workflow.