
Hour 24 Creating Control Flow Activities Session 2
What You Will Learn in This Hour:
![]() Control flow activity: add custom designer
Control flow activity: add custom designer
![]() Control flow activity:
Control flow activity: ToolBoxItem
![]() Control flow activity: custom validation
Control flow activity: custom validation
![]() Control flow activity: attached properties
Control flow activity: attached properties
![]() Implementing compensation
Implementing compensation
![]() Activity life cycle artifacts
Activity life cycle artifacts
In this hour, you extend the activity you worked on the previous hour. You start by adding a custom designer that allows you to specify the look-and-feel and to control its design-time validation. You prepopulate the branches in the activity using the ToolBoxItem. You then learn to further validate the activity at design-time by adding custom validation. Then you use attached properties that allow all child activities to be evaluated, not just ones populated with GeneralControlFlowBranch activities. Finally you wrap up by adding compensation and reviewing the activity life cycle.
You need to create a custom designer for the GeneralControlFlow activity. The custom designer is used to control the way the activity is interacted with at design-time.
The custom designer you apply to the GeneralControlFlow activity is derived from ParallelActivityDesigner. The OnCreateNewBranch method is overridden so that GeneralControlFlow activity branches can be added to the GeneralControlFlow activity via its shortcut menu. The CanInsertActivities is overridden to ensure that only GeneralControlFlowBranch activities are added to the GeneralControlFlow activity.
Follow the next steps to add a class in which you will code the custom activity designer.
1. Right-click the CustomControlflowActivities project and select Add, Class.
2. Name the class GeneralControlFlowDesigner.
3. Add :ParallelActivityDesigner to the right of the class name to derive from the ParallelActivityDesigner type.
4. Add the following using directives:
using System.Workflow.ComponentModel.Design;
using System.Workflow.ComponentModel;
using System.ComponentModel;
Follow the next steps to override the OnCreateNewBranch method to return a GeneralControlFlowBranch activity.
1. Add a couple of blank lines after the opening class bracket and enter protected override. Press the spacebar and select the OnCreateNewBranch method to create the OnCreateNewBranch method.
2. Remove the content in the method body.
3. Add the following code to the OnCreateNewBranch method to add a GeneralControlFlowBranch activity:
return new GeneralControlFlowBranch( );
Follow the next steps to override the CanInsertActivities method to enforce that only GeneralControlFlowBranch activities are added.
1. Add a couple of blank lines and type protected override, press the spacebar, and select the CanInsertActivities method to create the CanInsertActivities method.
2. Add the following code to the top of the CanInsertActivities method to ensure that only activities of type GeneralControlFlowBranch are added:
foreach (Activity a in activitiesToInsert)
{
if (!(a is GeneralControlFlowBranch))
{
return false;
}
}
Follow the next steps to decorate the GeneralControlFlow activity with a GeneralControlFlowDesigner attribute to associate it with the new designer.
Follow the next steps to test the new designer you created by adding legal and illegal activities to it.
1. Open the workflow in design mode.
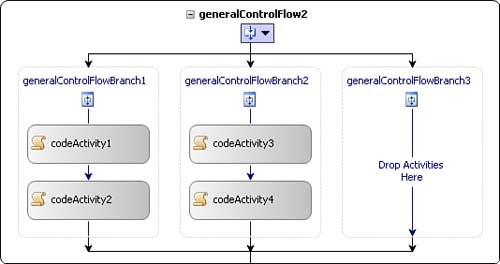
2. Right-click the GeneralControlFlow activity and select Add Branch. A new GeneralControlFlowBranch will be added, as shown in Figure 24.1.
3. Delete the branch you just added.
4. Try to add a Sequence activity (or any activity other than the GeneralControlFlowBranch) to the GeneralControlFlow activity; it will not let you.
The IfElse and Parallel activity both have two branches when placed on the workflow. This is more convenient and contributes to their look-and-feel. In this step, you create a new class derived from ActivityToolboxItem and attribute the GeneralControlFlow activity to point to the new custom class.
Follow the next steps to add the new class that will derive from ActivityToolboxItem.
The overridden CreateComponentsCore method instantiates a GeneralControlFlow activity and adds two GeneralControlFlowBranch activities to it. Otherwise, most of this code is boilerplate and is therefore not explained in detail.
Follow the next steps to code the GeneralControlFlowToolBoxItem class and associate it with the GeneralControlFlow activity.
1. Replace the code in the GeneralControlFlowToolBoxItem class with the following code that adds two GeneralControlFlowBranch activities to the GeneralControlFlow activity when the GeneralControlFlow activity is added from the toolbox:
using System;
using System.Collections.Generic;
using System.Linq;
using System.Text;
using System.Workflow.Activities;
using System.Workflow.ComponentModel.Design;
using System.Runtime.Serialization;
using System.ComponentModel.Design;
using System.ComponentModel;
using System.Workflow.ComponentModel;
namespace CustomControlflowActivities
{
class GeneralControlFlowToolBoxItem : ActivityToolboxItem
{
public GeneralControlFlowToolBoxItem(Type type)
: base(type)
{
}
private GeneralControlFlowToolBoxItem(SerializationInfo info,
StreamingContext context)
{
this.Deserialize(info, context);
}
protected override IComponent[]
CreateComponentsCore(IDesignerHost host)
{
CompositeActivity activity = new GeneralControlFlow( );
activity.Activities.Add(new GeneralControlFlowBranch( ));
activity.Activities.Add(new GeneralControlFlowBranch( ));
return new IComponent[] { activity };
}
}
}
2. Add the following attribute to the GeneralControlFlow activity to tell it to use the custom ToolBoxItem:
[ToolboxItem(typeof(GeneralControlFlowToolBoxItem))]
3. Build the CustomControlflowActivities project so that the activity will be updated when you test it on the workflow.
Follow the next steps to add a GeneralControlFlow activity to the workflow and see it prepopulated with GeneralControlFlowBranch activities.
1. Open the workflow in design mode.
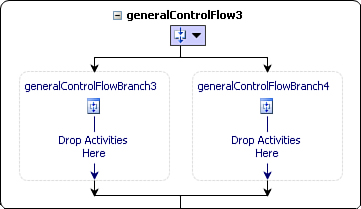
2. Add a GeneralControlFlow activity to the workflow. It should be prepopulated with two GeneralControlFlowBranch activities, as shown in Figure 24.2.
3. Delete the GeneralControlFlow activity you just added from the workflow. There is no need to run the workflow because it is a design-time change.
Two of WF’s main objectives are to enable more spontaneous application logic creation and to diversify the application logic creation market. XAML-only workflows can be executed without compilation and writing code. Technically savvy businesspeople can create XAML-only workflows using the SharePoint Designer in SharePoint workflow, for example. In addition, dynamic update allows running workflow instances to be changed. Although powerful, these capabilities are also dangerous. What if, for example, a workflow model, although syntactically correct, is obviously erroneous? Maybe the workflow model contains a custom start transfer activity but does not implement its complete bank transfer cohort.
Custom activities can be associated with classes that derive from ActivityValidator or CompositeActivityValidator. These derived classes can traverse the entire workflow model. Therefore, the validation logic contained in a start transfer activity can search the workflow model for a complete transfer activity, and if not found, the WF validation logic throws an exception.
Validation is called on when workflows are loaded, compiled, or dynamic update is applied. A workflow cannot be run or changed without passing validation. Validation should be used to check the workflow model and its design-time properties. It should not, for example, be used to ensure that the customer number passed to a workflow is correct. This is not a design-time error, but rather caused by the specific data sent to a specific workflow instance. Either the workflow or the host application should validate the customer number at runtime.
We will employ validation to ensure that the ExecutionMode property is set to either Sequential or Parallel, to ensure that the BranchesToExecute is larger than or equal to 0, and to ensure that only GeneralControlFlowBranch activities are added to the GeneralControlFlow activity.
Because we are validating a control flow activity, we will derive from CompositeActivityValidator for reasons explained shortly. If validating a basic activity, derive from ActivityValidator, which is similar but has no child activity validation capability.
Follow the next steps to add the custom validation class.
1. Right-click the CustomControlflowActivities project and select Add, Class.
2. Name the class GeneralControlFlowValidator.
3. Add :CompositeActivityValidator to the right of the class name to derive from the CompositeActivityValidator type.
4. Add the following using directives:
using System.Workflow.ComponentModel.Compiler;
using System.Workflow.ComponentModel;
It is your job to locate any errors and populate a variable of type ValidationErrorCollection with them. Each entry to ValidationErrorCollection must contain a description and an error number provided by you. You must also call its base.ValidateProperties method so that validation is called on all the control flow activity’s child activities. If any errors are returned in the ValidationErrorCollection variable, WF raises an exception and the workflow is invalidated.
Follow the next steps to override the Validate method and validate the GeneralControlFlow activity’s properties.
1. Add the following code inside the class you just created to override the Validate method:
public override ValidationErrorCollection Validate(
ValidationManager manager, object obj)
{
}
2. Add the following code to the method body so that base validation is called on all GeneralControlFlow activity child activities:
// Leave the base error validation intact
ValidationErrorCollection errorCollection =
base.ValidateProperties(manager, obj);
3. Add the following code to create a GeneralControlFlow object from the obj parameter:
GeneralControlFlow generalControlFlow =
obj as GeneralControlFlow;
4. Add the following if statement to ensure that validation occurs only when the activity is on a workflow and not when the activity itself is being compiled when the property will rightfully be null:
// A null parent signifies the activity is being compiled
// and validation should only occur when being placed on a
workflow
// and not when the activity is being compiled.
if (generalControlFlow.Parent != null)
{
}
5. Add the following code inside the if statement you just added to update the errorCollection variable if the BranchesToExecute are less than 0.
// Ensuring BranchesExecute >= 0
if (generalControlFlow.BranchesToExecute < 0)
errorCollection.Add(new ValidationError
("BranchesToExecute must be larger than or equal to
0", 1));
6. Add the following code below the if statement you added a couple of steps ago to update the errorCollection variable if the ExecutionMode is not Sequential or Parallel:
Follow the next steps to ensure that the GeneralControlFlow activity holds only activities of type GeneralControlFlowBranch. This validation may seem redundant, because we already enforce that only GeneralControlFlowBranch activities are added to the GeneralControlFlow activity in the custom designer. However, designer validation is enforced only when the workflow is constructed graphically. If the author directly edits the XAML or code, the designer validation will not be called on. Therefore, at many times, validation such as enforcing which child activities a parent will accept should be performed in the designer and in code validation. The first prohibits the child activity from being inserted in the first place. And the latter produces a red exclamation mark over the activity and works no matter how the workflow is constructed.
1. Add the following code below the code you added in the previous step to ensure that only GeneralControlFlowBranch activities are inserted as child activities.
// Ensuring that only GeneralControlFlowBranch children
// are added.
foreach (Activity a in
generalControlFlow.EnabledActivities)
{
if (!(a is GeneralControlFlowBranch))
{
errorCollection.Add(new ValidationError
("Can only add GeneralControlFlowBranch
activities.", 1235));
}
}
2. Add the following code outside of the if generalControlFlow.Parent != null statement to return errors, if any:
return errorCollection;
3. The completed Validate method should look like Listing 24.1.
LISTING 24.1 GeneralControlFlow Activity Validate Method
public override ValidationErrorCollection Validate(
ValidationManager manager, object obj)
{
// Leave the base error validation intact
ValidationErrorCollection errorCollection =
base.ValidateProperties(manager, obj);
GeneralControlFlow generalControlFlow =
obj as GeneralControlFlow;
// A null parent signifes the activity is being compiled
// and validaiton should only occur when being placed on a workflow
// and not when the activity is being compiled.
if (generalControlFlow.Parent != null)
{
// Ensuring BranchesExecute >= 0
if (generalControlFlow.BranchesToExecute < 0)
errorCollection.Add(new ValidationError
("BranchesToExecute must be larger than or equal to
0", 1));
// Ensuring ExecutionMode is set to Sequential or Parallel.
if (!(generalControlFlow.ExecutionMode.Contains("Sequential")
|| generalControlFlow.ExecutionMode.Contains("Parallel")))
errorCollection.Add(new ValidationError
("Execution mode must be sequential or parallel", 1));
// Ensuring that only GeneralControlFlowBranch children
// are added.
foreach (Activity a in generalControlFlow.EnabledActivities)
{
if (!(a is GeneralControlFlowBranch))
{
errorCollection.Add(new ValidationError
("Can only add GeneralControlFlowBranch
activities.", 1235));
}
}
}
return errorCollection;
}
Follow the next steps to decorate the GeneralControlFlow activity with the GeneralControlFlowValidator attribute.
Follow the next steps to test the custom validation you just created.
1. Open the workflow in design mode.
2. Click the GeneralControlFlow activity.
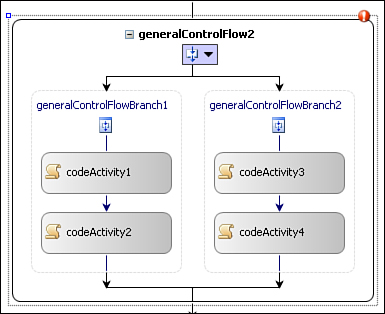
3. Enter Seq in the ExecutionMode property and the red exclamation mark should appear (Figure 24.3).
4. Enter Sequential in the ExecutionMode property and the red exclamation mark should disappear.
5. If you like, open Workflow1.designer.cs and add a non-GeneralControlFlowBranch activity to the GeneralControlFlow activity; the red exclamation mark will reappear.
Attached properties allow parent activity properties to be propagated to child activities. The ConditionedActivityGroup (CAG), for instance, propagates its condition property to its child activities. This propagated property is evaluated on each branch to determine whether the branch should execute. This is the case no matter which child activity (Sequence, Code, and so on) is inserted into the CAG. In this step you change the GeneralControlFlow activity to use attached properties. This allows child activities to virtually acquire these properties while placed in the GeneralControlFlow activity, again just like activities placed in a While or CAG activity “acquire” condition properties. Doing so eliminates the requirement to create a custom child activity each time an activity needs to project properties on a child activity.
Four steps are required to implement attached properties in WF:
1. Create a customized or attached DependencyProperty (details soon).
2. Create a class that extends IExtenderProvider, which marshals the property between the parent and child activities.
3. Create a custom designer that displays the attached property in the property window.
4. Access the attached property from the GeneralControlFlow activity, which is different than when accessing a standard dependency property.
It is not trivial to implement attached properties. A Microsoft Program Manager has created a sample that we will largely follow to implement them. Most of the code is boilerplate, and you do not need to modify it much to use on different activities and properties. The first step, creating the attached property itself, changes the most and is therefore explained in the most detail. The other more stable steps, creating the IExtenderProvider and the designer specifics, are not covered in detail. The focus is on what needs to be changed so that you can use them with other activities and properties and take advantage of attached properties in your applications. See www.dennispi.com/2006/03/getting-dependencyproperty_03.html if you want more details.
Attached properties are another reason to use dependency properties.
The dependency property you will create to serve as an attached property will call the DependencyProperty.RegisterAttached method instead of the DependencyProperty.Register method used by standard dependency properties. Its setters and getters will be static methods that work with the object type. They cannot be typed to an activity because it is unknown what activity or type they will be projected on.
Follow the next steps to create the attached property.
1. Open the GeneralControlFlow activity in code view.
2. Create a standard dependency property named Condition below the constructor and set its type to ActivityCondition.
3. Change DependencyProperty.Register to DependencyProperty.RegisterAttached in the dependency code initiation as shown:
public static DependencyProperty ConditionProperty =
DependencyProperty.RegisterAttached("Condition",
typeof(ActivityCondition), typeof(GeneralControlFlow));
4. Delete the remaining portion of the dependency property.
5. Add the following static method that can be called by the child activity to get the condition property:
public static object GetCondition(object dependencyObject)
{
return ((DependencyObject)
dependencyObject).GetValue(ConditionProperty);
}
6. Add the following static method that can be called by the child activity to set the condition property:
public static void SetCondition(object dependencyObject,
object value)
{
((DependencyObject)dependencyObject).SetValue(
ConditionProperty, value);
}
7. The completed attached property should look like Listing 24.2.
LISTING 24.2 Attached Dependency Property
public static DependencyProperty ConditionProperty =
DependencyProperty.RegisterAttached("Condition",
typeof(ActivityCondition), typeof(GeneralControlFlow));
public static object GetCondition(object dependencyObject)
{
return ((DependencyObject)
dependencyObject).GetValue(ConditionProperty);
}
public static void SetCondition(object dependencyObject,
object value)
{
((DependencyObject)dependencyObject).SetValue(
ConditionProperty, value);
}
Follow the next steps to create and code a class that implements IServiceProvider to project the Condition property onto its child activity.
1. Right-click the CustomControlflowActivities project and select Add, Class.
2. Name the class ConditionPropertyExtenderProvider.
3. Add the following using directives:
using System.Workflow.ComponentModel;
using System.ComponentModel;
4. Add :IExtenderProvider to the right of the class name to implement the IExtenderProvider interface.
5. Add the following class attribute to tell the extender provider class the name of the property to service:
[ProvideProperty("Condition", typeof(Activity))]
The attribute is obviously specific to the property being attached.
Follow the next steps to create methods that retrieve and set the Condition property on the current activity if its parent is the GeneralControlFlow activity.
1. Add the following code to the class to call the GetCondition method that returns the Condition property if the parent activity is a GeneralControlFlow activity:
public ActivityCondition GetCondition(Activity theActivity)
{
if (theActivity.Parent is GeneralControlFlow)
return
theActivity.GetValue(GeneralControlFlow.ConditionProperty)
as ActivityCondition;
else
return null;
}
Only the code that references the GeneralControlFlow activity and the ConditionProperty is specific to the activity and condition. The other code is boilerplate.
2. Add the following code to call the SetCondition method that returns the Condition property if the parent activity is a GeneralControlFlow activity:
public void SetCondition(Activity theActivity, ActivityCondition
value)
{
if (theActivity.Parent is GeneralControlFlow)
theActivity.SetValue(GeneralControlFlow.ConditionProperty,
value);
}
Again, only the code that references the GeneralControlFlow activity and the ConditionProperty is specific to the activity and condition. The other code is boilerplate.
Follow the next steps to determine whether the current activity’s parent activity is GeneralControlFlow activity, and if so to allow it to be extended.
1. Add the following code to implement the IExtenderProvider.CanExtend method to check whether the activity’s parent is a GeneralControlFlow activity:
bool IExtenderProvider.CanExtend(object extendee)
{
return (extendee is Activity) &&
(((Activity)extendee).Parent is GeneralControlFlow);
}
2. Build the CustomControlflowActivities project.
Follow the next steps to modify the custom designer to show the attached Condition property.
1. Open the GeneralControlFlowDesigner designer class.
2. Add the following using directive:
using System.ComponentModel.Design;
3. Add the Initialize method in Listing 24.3 to the GeneralControlFlowDesigner class that is all boilerplate other than two calls to ConditionPropertyExtenderProvider:
LISTING 24.3 Attached Property Activity Designer Initialize Method That Projects the Condition Property
protected override void Initialize(Activity activity)
{
base.Initialize(activity);
IExtenderListService extenderListService =
(IExtenderListService)GetService(typeof(IExtenderListService));
if (extenderListService != null)
{
bool foundExtender = false;
foreach (IExtenderProvider extenderProvider in
extenderListService.GetExtenderProviders( ))
{
if (extenderProvider.GetType( ) ==
typeof(ConditionPropertyExtenderProvider))
foundExtender = true;
}
if (!foundExtender)
{
IExtenderProviderService extenderProviderService =
(IExtenderProviderService)GetService(typeof(IExtenderProviderService));
if (extenderProviderService != null)
{
extenderProviderService.AddExtenderProvider(new
ConditionPropertyExtenderProvider( ));
}
}
}
}
4. Build the CustomControlflowActivities project.
The Evaluate method on the Condition property is called differently when accessing it on an attached property; otherwise, the concept is the same: call evaluate and see if the branch should execute.
Follow the next steps to modify the GeneralControlFlow activity’s Execute method to work with attached properties.
First the Condition property is retrieved. Then the call to the Evaluate method is from the Condition property and not the activity. When using a standard property, the Condition property is accessed via the activity.
1. Open the GeneralControlFlow activity in code view.
2. Replace the foreach line of code at the top of the Execute method with the following code that loops through activities, specifically GeneralControlFlowBranch activities.
foreach (Activity a in this.EnabledActivities)
3. Add the following code to the top of the foreach in the Execute method to retrieve the Condition property by calling the GetValue method you added when creating the Condition property:
// Retrieve the activity condition form the Condition
property
ActivityCondition ac =
(ActivityCondition)a.GetValue(ConditionProperty);
4. Replace the current line of code that calls Evaluate through the activity (if (a.Condition.Evaluate(a, executionContext))) with the following code that calls it through the Condition property:
if (ac.Evaluate(a, executionContext))
5. Build the CustomControlflowActivities project.
Follow the next steps to remove the validation that enforces that only GeneralControlFlowBranch activities are added to the GeneralControlFlow activity, because attached properties allow for any child activities to be added.
1. Open the GeneralControlFlowDesigner class.
2. Remove the CanInsertActivities method.
3. Open the GeneralControlFlowValidator class.
4. Remove the foreach and the code within it that ensures only GeneralControlFlowBranch activities are added.
5. Open the GeneralControlFlow activity in code view and remove the ToolBoxItem class attribute. It is appropriate to prepopulate the parent activity only when the child activities are confined to specific type.
6. Build the CustomControlflowActivities project.
1. Delete the current GeneralControlFlow activity from the workflow.
2. Add a new GeneralControlFlow activity to the workflow.
3. Add a Sequence activity to the left branch and a Code activity to the right branch (remember to hover).
4. Click the Sequence activity branch, and you will see a Condition property. Then click the Code activity branch, and you will see a Condition property (Figure 24.4).

5. If you would like, add activities to the Sequence activity, update the Condition properties, and then run the workflow.
WF activities have an official life cycle tracked by an enumeration, additional handlers related to this life cycle, and optional handlers.
WF activity execution is governed by a finite state machine (Figure 24.5). The activity will always be in one of the states. The standard activity execution path has been from Initialized to Executing to Closed for most activities we have worked with the last three chapters. One activity in this chapter also entered the Canceling state. The two other possible activity states are Faulting and Compensating. Let’s take a brief look at how each state is entered:
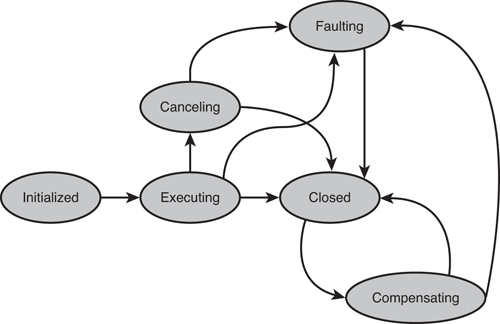
The Initialized state is entered when the host calls WorkflowRuntime.CreateWorkflow. At this time all workflow activities are initialized.
The Executing state is entered when the parent activity calls the ActivityExecutionContext.ExecuteActivity method. The one exception is that the root activity is executed (or scheduled for execution) when WorkflowInstance.Start is called.
The Canceling state occurs when parent activity calls ActivityExecutionContext.CancelActivity or when a control flow activity faults. In our early completion activity earlier in the hour, we saw that a control flow activity will cancel one or more of its child activities when they are in the executing state and the activity is ready to close. The base Cancel method handler is called for these activities; if you need to perform additional cleanup, you can override the Cancel method. We will not do this.
The Faulting state is entered when an unhandled exception occurs in an activity. More precisely, the faulting state is entered when an unhandled exception occurs in any of the activity life cycle states (handlers) with the exception of Initialized, which raises an exception to the host starting the workflow. When a basic activity faults, the default behavior is to call ActivityExecutionContext.Closed and pass the exception to the parent activity. When called on a control flow activity, the default behavior is to cancel the currently executing child activities first and then close and pass the exception to the parent activity. It has to do this to be able to close. We will not override the default fault handling.
The Compensating state is entered when a downstream activity invokes the compensation handler for the current activity. Unlike all other states, compensation takes place on activities in a closed state. You will create a compensation handler shortly.
The Closed state is called when the activity requests to be closed, either by returning ActivityExecutionStatus.Closed from the Executing, Canceling, or Faulting methods, or by calling ActivityExecutionContext.Closed from a handler. Only the activity may close itself.
The ActivityExecutionStatus enumeration mirrors the activity life cycle. There is one entry for each life cycle state.
These additional activity virtual methods that may be overridden are not part of the activity life cycle but can be invoked at various points of the life cycle. The OnActivityExecutionContextLoad handler is called each time the activity is loaded, which may occur multiple times if the activity is persisted. The OnActivityExecutionContextUnload is conversely called each time the activity is unloaded. The OnClosed and Uninitialized methods are called when the activity is closed.
There is no default compensation in WF. Activities that want compensation must implement the ICompensateableActivity.Compensate method. Basic activities can have compensation logic stored in the ICompensateableActivity.Compensate method. Control flow activities can have both the Compensate method and a Compensation Handler associated with them.
In this section, you will implement the ICompensateableActivity.Compensate method. You are not associating any specific custom compensatory logic with the activity and therefore will simply return ActivityExecutionStatus.Closed. If there was compensation logic you wanted executed each time this activity was compensated, it would be placed here. By adding the method and returning closed, you allow for a custom Compensation Handler to be associated with the activity. This allows the workflow author to choose what compensation logic the activity should receive for that specific workflow model.
Follow the next steps to add a Compensation Handler to the GeneralControlFlow activity.
1. Go to the workflow and right-click a GeneralControlFlow activity.
2. Notice it has no View Compensation Handler option.
3. Replace the GeneralControlFlow class signature with the following, which also implements the ICompensateableActivity.Compensate:
public partial class GeneralControlFlow : CompositeActivity,
ICompensatableActivity
4. Go to the end of the class and insert the following method:
// Make the activity compensation-eligible.
ActivityExecutionStatus ICompensatableActivity.Compensate(
ActivityExecutionContext executionConttext)
{
return ActivityExecutionStatus.Closed;
}
5. Build the CustomControlflowActivities project.
6. Go back to the workflow, right-click the GeneralControlFlow activity, and notice there is now a View Compensation Handler option (Figure 24.6). This activity may now have compensation handlers associated with it.
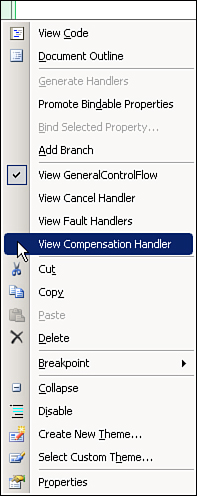
![]()
See Hour 16, “Working with Exceptions, Compensation, and Transactions,” for additional compensation coverage.
This hour concludes the five-part series on custom activities. The first hour in the series covered basic activities, the second two multiburst activities, and that last two control flow activities. This hour built on the GeneralControlFlow activity you started last hour. It already could execute in parallel, terminate early, and have conditions applied when GeneralControlFlowBranch activities were placed in it. This hour you added validation, designer support, and learned to apply conditions to any child activity among other items. Finally, as stated before, the capability to add control flow patterns to WF allows patterns found at www.workflowpatterns.com, BPEL, and other places to be added to WF by you, third parties, and Microsoft over time.