
Introduction
If you’re reading this book, you’ve probably decided to write your own book. Congratulations and good luck! Maybe you’ve already written dozens of books and are looking for a new approach to your work. Congratulations and good luck to you, as well! No matter where you are in the writer’s journey, your path is undoubtedly fraught with milestones and challenges. There will be all manner of dragons—in the form of sick children, reluctant heroes and heroines, inopportune empty printer cartridges, or poorly motivated villains—and it’s your job to handle them all, be they real or in your fictional world, with aplomb.
What Is Scrivener?
The process of getting your words from your head onto the screen should not be one of those challenges. Thanks to Scrivener, it doesn’t have to be. Unlike a word processor, which allows you to sequentially type your story, Scrivener acts as a complete writing project management system. Scrivener stores not only your manuscript, but also your research, target data, and synopsis and project notes. You can plot your book on virtual index cards or in an outline, and then use those elements to write scenes out of order or even move them around in the manuscript. When you’ve completed your manuscript, you can compile all of the scenes into one document. Scrivener can even compile your manuscript into ePub or Kindle format for self-publishing.
Perhaps the best part of Scrivener is that you can use it the way you choose. Plotters may want to dig deep into every feature of the application, plotting out their entire story in advance, attaching keywords to every scene, setting word count targets, and creating collections of scenes based on point-of-view characters. Pantsers may appreciate the ability to create a new scene on the fly, type as much or as little as they want, and then figure out where to place it later.
Although ideally suited to fiction writing, Scrivener is not limited to this use. Scrivener works well in an academic setting, with footnote features and the ability to collect research directly into the application or link to external sources. Screenwriters will appreciate the screenplay templates and formatting options, as well as the ability to export into Final Draft format. There are dozens of creative uses for Scrivener, as well. You can use it as a daily journal, creating a new entry every day and using keywords and collections to sort entries by topic. You can even use it to sort your recipe collection, creating folders for different courses or food groups and entering an image of the dish on the related index card.
Mac Versus Windows Versus Linux Versus iPad
Scrivener has been developed for multiple platforms. Scrivener for the Mac was first released in 2005 and is, therefore, the furthest along in development. Scrivener was released for the Windows platform in late 2011. Scrivener 1 for Windows did not initially contain all of the features of Scrivener 2 for Mac, although it is gaining features quickly. Scrivener for Windows 1.5 has recently been released, narrowing the gap between platforms. I will point out any differences between the versions throughout the book, along with workarounds where possible. Eventually, however, this point might well be moot, as the developers intend for the Mac and Windows platforms to reach parity.
Scrivener is also unofficially available for Linux as a free beta version. Development of the Linux version is on par with the Windows version. Thus, any differences between Mac and Windows platforms will be the same between Mac and Linux. Keep in mind, however, that there is no official support for the Linux version.
If you’re an iPhone or iPad user, there’s both good news and bad news. The good news is that an iOS version of Scrivener is in development. The bad news is that it most likely will not be released until late 2013, at the earliest. The other good news, however, is that in the meantime you can work on your Scrivener files in other iOS word processors using methods described in this book. Chapter 18, “Taking Scrivener Out and About,” explains this process in detail.
How This Book Is Organized
This book is divided into six main parts, as follows:
• Part I, “Getting Started in Scrivener,” discusses the main components of Scrivener, how to customize your writing space, and how to begin writing your book in Scrivener.
• Part II, “Organizing Your Writing Process,” covers how to use the corkboard and outliner tools, how to use Scrivener to collect your research, and features to help you revise your manuscript.
• Part III, “Digging Deeper into Scrivener,” explains how to get the most out of the Inspector, keywords, and other meta-data. You also learn how to create your own template sheets and project templates to fully customize Scrivener to work with your writing process.
• Part IV, “Managing Your Writing Projects,” shows you how to track your progress with project and document targets. You learn how to search your project and create collections of related project elements. Finally, this section discusses how to back up your work and use Scrivener on multiple computers, share a project between Mac and Windows computers, or even work on a scene on your iPad and sync it back to your project.
• Part V, “Generating a Completed Manuscript,” covers the process of turning your scenes and chapters into a compiled manuscript or e-book to submit to an editor or agent or directly self-publish.
• Part VI, “Using Scrivener in Other Scenarios,” explains some of the other ways people use the application. If you’re a screenwriter, lawyer, student, or translator, this section gives you ideas to help you integrate Scrivener into your workflow. If you purchased this book in hard copy format, please note that the chapters of Part VI are available online at quepublishing.com/title/9780789751454.
The chapters in this book are organized in a logical order, at least to my mind. If you’re looking for an explanation of a particular Scrivener feature, however, feel free to skip around or use the index to hone in on exactly what you seek.
Conventions Used in This Book
This book uses standard conventions to explain menu commands and keyboard shortcuts. As with most computer-related topics, there is often more than one way to do things. In those cases, I’ve tried to present multiple options and leave it to you, the reader, to discover which method works best for you.
Menu and Toolbar Commands
When you need to access a command from the menu, you will see instructions such as “Select Project, New Text.” This means you choose Project from the menu bar, and then click on New Text from that menu. When you need to access a command from the toolbar, you will see instructions such as “Click the Show Project Statistics icon.” If there is any doubt as to where you can find a command, I specify to access the menu bar or click a button in the toolbar.
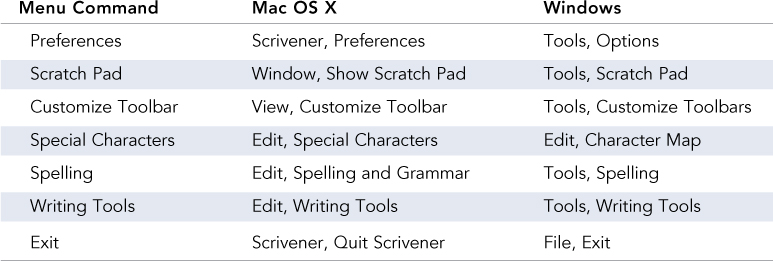
Although the Scrivener developers have attempted to put menu commands in the same locations across both platforms, there are some differences between Windows and Mac OS X, which occasionally hinder this effort. Table I.1 lists some of these differences.
Keyboard Shortcuts
Many commands can be accessed directly from the keyboard using a series of key combinations. For example, instead of going to the menu bar and clicking Project, New Text to create a new text file, you can use Cmd-N. To use this keyboard shortcut, press and hold the Cmd key while typing the letter N. If you’re on a PC, you can use Ctrl+N to create a new text file—that is, press and hold the Ctrl key while typing the letter N.
I note keyboard shortcuts when introducing pertinent commands. You can also locate the keyboard shortcuts in the Scrivener menus themselves, which is a good way to learn the shortcuts for your most-accessed commands.
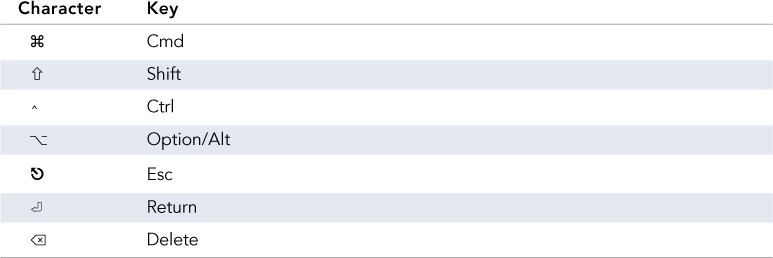
Scrivener for Mac follows the OS X convention of using characters to represent certain keys for keyboard shortcuts. Table I.2 explains the keyboard shortcut characters and the keys to which they correlate.
Context Menus
Context menus are pop-up menus that contain commands appropriate to the context of the position of the mouse pointer or cursor. Instead of moving the mouse to the menu bar and navigating a series of menus, you can often right-click to bring up a context menu and access the necessary command from there. As with keyboard shortcuts, I note where commands are available from a context menu.
Most Windows mice have two buttons, with the left button used to make a selection and the right button used to bring up context menus. If you are using a one-button Mac mouse or a Magic Mouse, you can press the Control key as you click to get the same result. If you’re using a Mac trackpad, you can either Control-click or click with two fingers to bring up a context menu.
Special Elements
This book includes special elements that provide additional warnings or information about some features. These elements are designed to draw your attention to these points.
![]() Tip
Tip
A Tip is a piece of advice or a trick to help you use Scrivener more efficiently or effectively.
![]() Note
Note
Notes are designed to provide additional information that may be useful but is not completely necessary to accomplish a task.
 Caution
A Caution warns you of quirks or problems when taking certain actions. Ignoring a caution may impede your work, so take special note of these!
Extra Sidebars
Scrivener Absolute Beginner’s Guide also contains two extra sidebars specific to this book.
Assumptions About Computer Knowledge
Scrivener Absolute Beginner’s Guide is an introductory-level book about Scrivener. It is not, however, an introductory-level book about computers in general. I assume that you know how and have already installed the Scrivener application and that you know how to perform basic computer tasks such as Cut and Paste.
If you need help with these basic computer topics, I suggest OS X Mountain Lion Absolute Beginner’s Guide by Yvonne Johnson for Mac users and Using Windows 8 by J. Peter Bruzzese or My Microsoft Windows 7 PC by Katherine Murray for Windows users. These books will get you up to speed.
Getting More Help
Scrivener is a complex application, and the demands your personal approach to writing make of it may not be fully covered in this book. Fortunately, help is always close at hand! The best source of support is the forum at the Literature & Latte website (http://www.literatureandlatte.com). On this site, you can join the thriving Scrivener user community and get help directly from the extremely helpful developer, Keith Blount, and his staff as well as other users. Come for the tech support—stay for the quirky conversations about writing and just about anything else under the sun.
The Help menu in Scrivener contains links to an interactive tutorial, the PDF Scrivener Manual, and online video tutorials. If you are a visual or kinetic learner, I highly recommend using the interactive and video tutorials along with this book.
You can also find information about Scrivener on my own website at http://www.jenniferkettell.com.