
18. Taking Scrivener Out and About
Back in the old days, people were lucky to have one computer in the household. These days, every member of the family often has his or her own laptop, tablet, and smartphone (which does more than those desktop computers of old). You may begin a project on your office computer, add to it on your tablet during your evening commute on the train, and complete it at home.
With all this swapping of computers and platforms, it’s important to understand how to transfer your Scrivener projects between them and how to keep projects in sync.
Using Scrivener on Multiple Computers
Scrivener is very portable. To open a project on another computer that is running Scrivener, you should first save the project as a Zip file. This ensures that all of the folders and files within the project are transferred as a group. It also prevents you from accidentally merging projects in Windows. To create a Zip file of your project, choose File, Back Up, Back Up To from the menu. Be sure to select the Backup as Zip File option in the Back Up To dialog box (the Backup Project To dialog box in Windows). Then choose one of the following:
• Save the project to a USB flash drive or other portable media to transfer it to the other computer. While you can work directly from the USB flash drive, it is faster to copy the file onto the other computer and work from there.
• Save the project to a cloud storage account that is accessible from the second computer.
• Save the project as a Zip file and email it to an account that is accessible from the second computer.
 Caution
Before transferring the file, be sure to save a backup copy just in case. Also be careful not to work on the same project from multiple computers at the same time. If you transfer the project from your home computer to your office, do not open the project on your home computer again until you have transferred the most recent version of the project back to the home computer.
Although there are differences between the Mac and Windows versions of Scrivener, they are fully compatible with each other. You can use the same project on both a Mac and in Windows, as long as you don’t open it on both platforms at the same time. If a project contains a feature that is available in Scrivener for Mac but not Scrivener for Windows, such as custom meta-data, the Windows version simply overlooks it. This does not change your ability to use those features on the Mac, however.
Caution
If you are sharing projects between a Mac and Windows, be sure the Mac is running version 2.0 or higher of Scrivener. Project files from earlier versions of Scrivener for Mac are not compatible with the Windows platform.
The Mac and Windows platforms save Scrivener projects differently. In Windows, your project appears as a folder, with all of the files and elements of your project within it. On the Mac, your project appears as a single file, but it is actually a folder, as well, simply one that takes advantage of the Mac’s ability to package files together. Thus, when you transfer the .scriv file from the Mac to Windows, it appears as a folder. To open the project within Windows, open the folder and select the .scrivx file within it. When you transfer the .scriv folder back to the Mac, it once again appears as a single file, which can be double-clicked to open in Scrivener for Mac.
![]() Tip
Tip
When transferring a project between the two platforms, be sure to copy the entire .scriv folder from Windows. If you transfer a project from Windows to the Mac and see a yellow file icon bearing the letters XML and a filename with a .scrivx extension, shown in Figure 18.1, you will know you failed to copy the entire project.
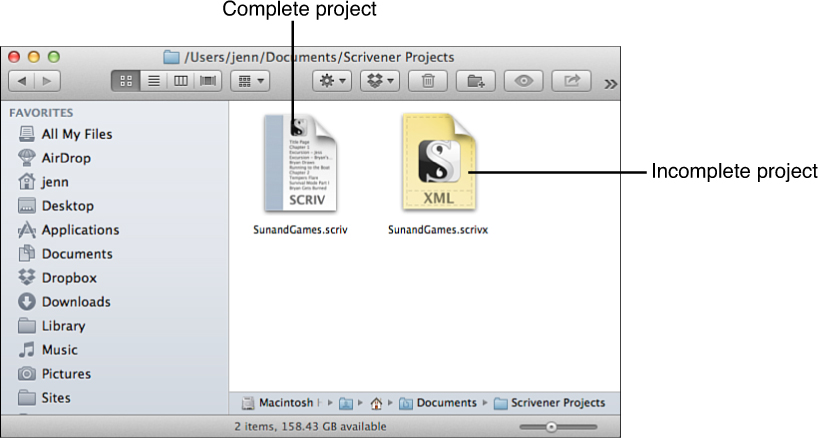
Figure 18.1 If you see a yellow XML icon after transferring a Scrivener project from Windows to the Mac, you’ve left critical portions of the project behind.
Using Dropbox to Access Your Scrivener Project
In Chapter 17, “Backing Up Your Work,” you learned how to use Dropbox to store your automatic and manual backups in the cloud. You can also use Dropbox to save the working project file in order to access it from multiple computers.
To create a project in your Dropbox folder, follow the regular steps to select a project template and create a new project. When choosing a location for the file, select the Dropbox folder or a subfolder within it. You can also move a preexisting project into the Dropbox folder or subfolder.
Although Dropbox is a wonderful solution to working on your project cross-computer and cross-platform, there is the risk of corrupting the file or unintentionally creating multiple versions. Use the following best practices to avoid these problems:
• Only work on the project from one computer or device at a time. If you access the project from multiple devices at the same time, your project will become out of sync, and you will end up with multiple versions of the file, each containing different changes.
• Do not access the project when it is in the midst of being uploaded or downloaded from the Dropbox server. If the file displays a badge signifying it is syncing (usually a blue badge with two arrows circling), wait until the badge indicates the transfer is complete (usually a green check mark) before opening the project.
• Do not shut down your computer while Dropbox is syncing files. If the sync does not complete, your project will become corrupted.
• Get in the habit of always opening the project by double-clicking on it in the Dropbox folder instead of automatically opening it from within the Scrivener application. This forces you to look at the badge on the project icon so you will know if the file is busy. When you are finished working on the project, close it before exiting Scrivener in order to prevent yourself from automatically opening the project the next time you launch the application.
![]() Tip
Tip
If all of your projects are stored on Dropbox, you can disable the Reopen Projects That Were Open on Quit option in the General tab of the Preferences window on the Mac. In Windows, the Open Recent Projects on Program Launch in Windows option in the General tab of the Options window is deselected by default.
• If you have a slow Internet connection, lengthen the interval at which Scrivener automatically saves your work. If you save every time you stop typing for 2 seconds, the project needs to update on the Dropbox server more frequently. Changing this interval in the General panel of the Preferences/Options dialog box means that the project is updated in larger chunks, but it doesn’t need to access the Dropbox server as often.
![]() Tip
Tip
If you use Dropbox to share a project with coauthors or critique partners, use extra precautions. Unless you and your partners communicate effectively, you will not know when someone else is accessing the project, increasing the possibility of the project becoming out of sync.
One method for avoiding this problem is to create an icon for each member of the group. When you open the Scrivener project, upload your icon to the Dropbox folder. When you have completed your work and synced the file back to Dropbox, remove your icon from the folder. Once you establish this routine, you and your writing partners will know with a glance at the Dropbox folder if anyone is using the file before you open it.
Syncing Your Project (Mac Only)
When you transfer a project between computers that each have a copy of Scrivener, working on multiple computers and platforms is easy. But what if you cannot install Scrivener on your office computer? How do you continue working if your laptop goes in for repairs and you are forced to work on the local library computers? How do you share your project with a co-worker who does not use Scrivener? The solution to all these scenarios is to sync your project with an external folder.
When you sync with an external folder, the contents of your Draft folder (and other folders, if you want) are saved as .rtf or .txt files in a folder in Finder. You can then transfer these files to another computer or edit them in another application, save them back to the external folder, and synchronize the changes within Scrivener the next time you open the project. If you select a Dropbox folder as the external folder, the files are readily available from other computers or even your iPhone or iPad.
![]() Note
Note
If you are a script writer, you can also sync files in Final Draft (.fdx) or Fountain screenplay syntax format.
Caution
You cannot use the Sync with an External Folder tool to sync two versions of Scrivener. This feature is only for editing project files with other applications and synchronizing those files back into your project. Attempting to sync two Scrivener projects results in corrupted projects.
To set up synchronized folders:
1. Open the project in Scrivener.
2. Choose File, Sync, with External Folder from the menu.
3. In the Sync with External Folder dialog box, shown in Figure 18.2, click the Choose button.
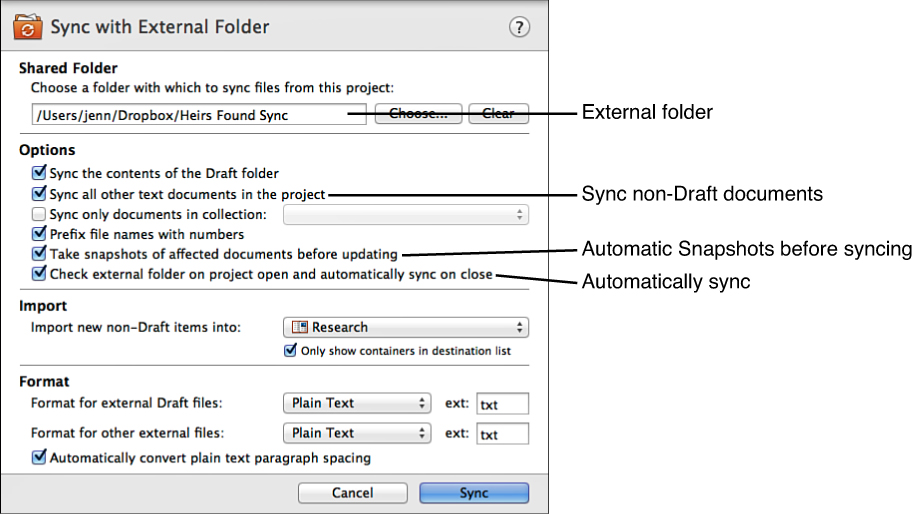
Figure 18.2 The Sync with External Folder dialog box, shown here set up to sync to a Dropbox folder, coordinates the transfer of synchronized files to and from your project.
4. In the Open dialog box, select an empty folder with which to sync your project file. Click the New Folder button to create a new folder. If you want to sync with Dropbox, select or create a folder within your Dropbox folder.
Caution
You cannot save more than one project in a single external folder. Scrivener relies on a numbering system to determine which items to synchronize, and having multiple files meeting that criteria corrupts the project.
5. Click Open to select the folder and return to the Sync with External Folder dialog box.
6. Select from the following options:
• Sync the Contents of the Draft Folder: Selected by default, this synchronizes all of the documents in your Draft folder.
• Sync All Other Text Documents in the Project: This option synchronizes any other text documents in the project. These documents are saved in a subfolder titled Notes within your external folder.
• Sync Only Documents in Collection: If this option is selected, only documents that are included in the collection specified in the drop-down menu are synchronized.
![]() Note
Note
This option works in conjunction with the two prior options. Only those files from the Draft or other text documents, depending on which options you selected, that also appear in the specified collection are synced.
• Prefix File Names with Numbers: Selected by default, Scrivener prefixes each filename with a number to note its position in the Binder hierarchy. This allows you to sort your files in order.
![]() Tip
Tip
Keep this option selected unless you have a specific reason to deselect it. If you disable it, sorting the files causes them to appear in alphanumeric order based on the title of each file, making it more difficult for you to locate files. Disabling this feature does not change Scrivener’s ability to maintain the files in their proper order in your project, however.
• Take Snapshots of Affected Documents before Updating: Selected by default, Scrivener automatically takes a Snapshot of each document that requires updating before performing the update. See Chapter 10, “Editing Your Manuscript,” to learn more about Snapshots.
![]() Tip
Tip
Although Scrivener makes this an optional setting, this is another one that should not be disabled unless you have a good reason for doing so. If you make changes to a document in your project at the same time a coauthor is editing the file in the external folder, this feature takes a Snapshot of the project document before updating with the external file. You can then use the Snapshot pane in the Inspector to compare the two versions of the document and edit the updated project document accordingly. Without this Snapshot, the changes you made in the project document would be lost.
• Check External Folder on Project Open and Automatically Sync on Close: Selected by default, this option checks the external folder whenever you open or close the project in Scrivener and synchronizes accordingly to keep the project updated.
• Import New Non-Draft Items Into: If you selected the Sync All Other Text Documents in the Project option, you can select a target container for any new items you create in the Notes subfolder of the external folder. This option is grayed out if you did not select to sync non-Draft items.
• Format for External Draft Files: This option sets the file type for files in the sync folder. If the files will be edited in Microsoft Word or another word processor, choose Rich Text. If you are going to edit files on your iPad or iPhone, as explained in the next section, choose Plain Text. For scripts, choose Final Draft or Fountain.
![]() Note
Note
Fountain is a text-based screenplay markup language. Visit http://www.fountain.io for more information.
• Format for Other External Files: If you select the Sync All Other Text Documents in the Project option, select a format for those documents.
• Automatically Convert Plain Text Paragraph Spacing: When this option is selected, Scrivener inserts an extra carriage return between paragraphs to make it easier to see paragraph separations. These carriage returns are automatically stripped when the file is updated back into the Scrivener project.
7. Click Sync. A progress bar displays as Scrivener exports your files. The message shown in Figure 18.3 tells you when the process is complete.
![]() Note
Note
You can also sync your project with Simplenote, a cross-platform text application. To do this, select File, Sync, with Simplenote and follow the prompts, assigning a unique keyword for each project. Simplenote’s cloud system is proprietary, so your files are only available to apps that access that system. I prefer syncing my files through Dropbox because they are then available to a wider range of applications.
Using Files in the External Folder
Once the sync is complete, you can open the files in the external folder from other applications. If you sync to Dropbox, you can access the files from other computers and devices.
Scrivener exports the contents of the Draft folder into a subfolder titled Draft. If you selected to sync non-Draft items, they appear in the Notes subfolder, regardless of their parent folder in the Scrivener project. As you work with the project, a third folder titled Trashed Files may appear. This folder stores documents that had previously been synced but have been removed from the project or encountered a conflict with the project.
You can add new text files to either the Draft or Notes folders. These files are added to your project when you sync. Files created in the Draft folder are automatically added to the Draft folder in your project. Files created in the Notes folder are added to the folder you selected in the Sync with External Folder dialog box.
![]() Note
Note
You cannot add nontext files to a project via the external folder. Scrivener only syncs text files.
Unless you disabled the Check External Folder on Project Open and Automatically Sync on Close option, Scrivener automatically keeps your project in sync whenever you open and close it. If you or a co-worker has modified or added a file in the external folder while the project is open, you can manually sync by choosing File, Sync, with External Folder Now from the menu. To save time, Scrivener only synchronizes files that have changed in the project or in the external folder.
Working Wisely with Synced Folders
The sync feature works quite well, as long as you understand its capabilities and limitations:
• Scrivener uses the modification date of external files and project documents to determine which is the most current. The Take Snapshots of Affected Documents before Updating feature can help avoid conflicts, but it is still best to try to work in one application at a time.
• Do not rename files in the sync folder! Scrivener relies on the filenames to match up external files with project documents. Each file has a number appended to the end of the title to note its position in the Binder hierarchy. You can, of course, still rename items in the Binder.
• If you export files in Plain Text (.txt), any formatting in the document is lost. If you need to use bold, italic, or underlining, mark the text so you can search and replace later. For example, if you need to underline something, type it as _here is text_ so you can replace the underscores with proper underlines when you open the project document in Scrivener.
• If you export files in Rich Text Format (.rtf), you can add comments to the file in Word or another word processor. When you synchronize the file back into the project, those comments are preserved. This is an excellent way to solicit feedback on portions of your project from people who do not use Scrivener.
• Although Plain Text does not provide formatting options, it does allow you to work in more apps, particularly on the iPad or iPhone.
• If you need to duplicate a project, disable the Check External Folder on Project Open and Automatically Sync on Close option before doing so. If you duplicate a project while this feature is enabled, it attempts to synchronize to the same folder as the original project, which can corrupt both projects.
Using iPad Apps with Scrivener Files (Mac Only)
Although Scrivener is not yet available for iOS devices, you can still work on your project files from your iPad or iPhone. As you discovered in the previous section, Scrivener can sync to a Dropbox folder. If you install the Dropbox app on your iPhone or iPad, this folder will then be available on the device.
To add or edit files on your iOS device, you need to also install a text editor app. Popular apps include PlainText ($1.99), iA Writer ($4.99), Elements ($4.99), and Notebooks ($8.99). Each app has its own method of accessing Dropbox and opening a file within the app.
![]() Note
Note
Pages is a popular iPad word processing application, but it is not ideal for working with Scrivener projects. Pages syncs through iTunes or iCloud, not Dropbox. This limits the folder’s availability to other applications and platforms.
Using iA Writer with Scrivener Files (Mac Only)
As an example, here are the steps to use iA Writer for a Scrivener project:
1. Use the step-by-step instructions earlier in this chapter to set up your Scrivener project to sync with an external folder in Dropbox.
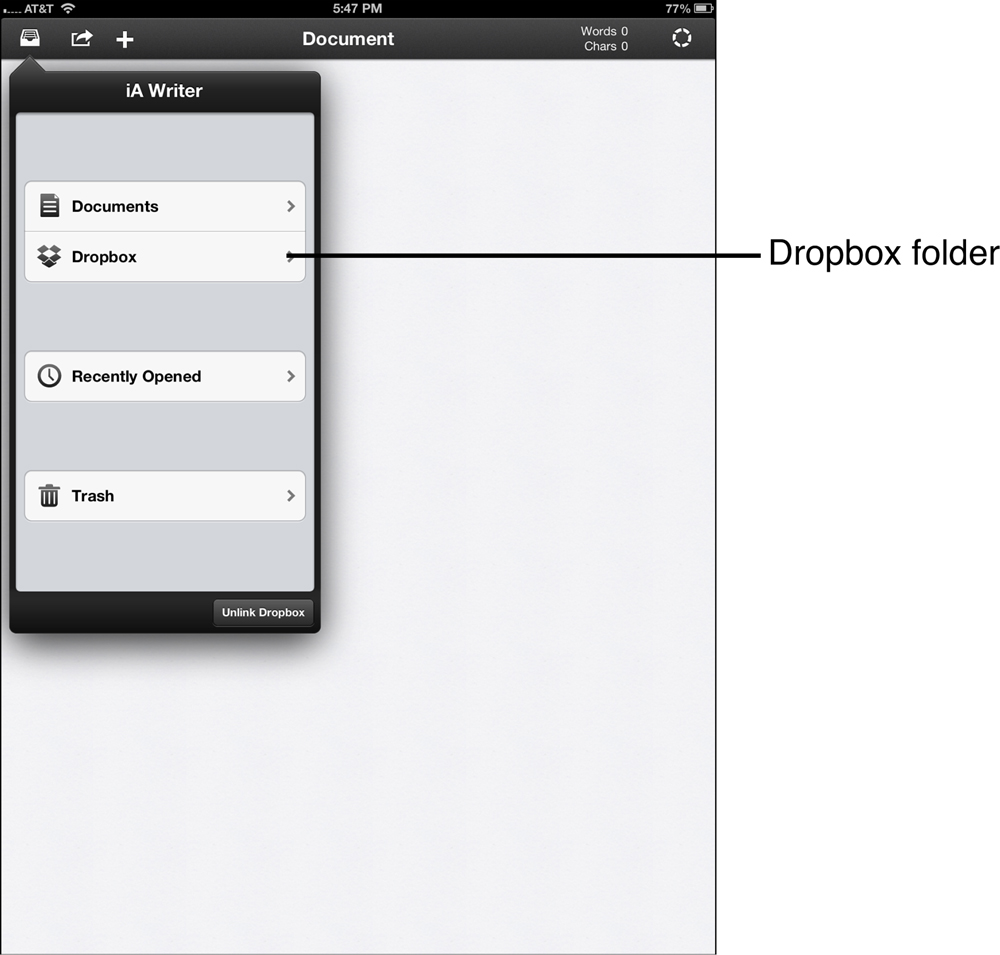
2. On your iPad, open iA Writer, as shown in Figure 18.4.
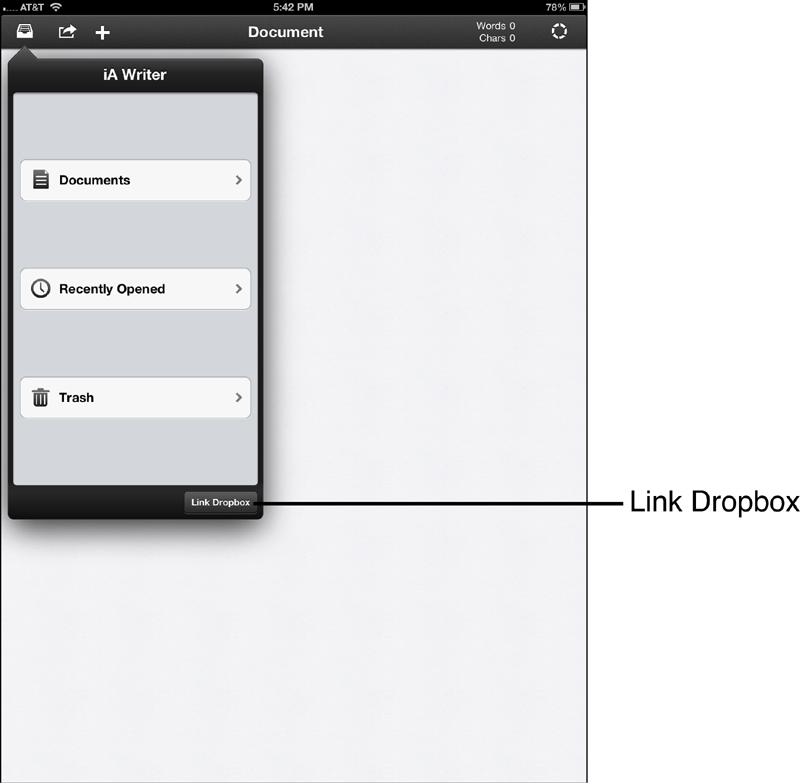
Figure 18.4 Before you can access your project files in iA Writer, you need to link your Dropbox account to the app.
3. Tap the File button.
4. Click the Link Dropbox button. The Dropbox app opens.
5. In the Dropbox app, click Allow to link your account to iA Writer. You are then returned to the iA Writer app.
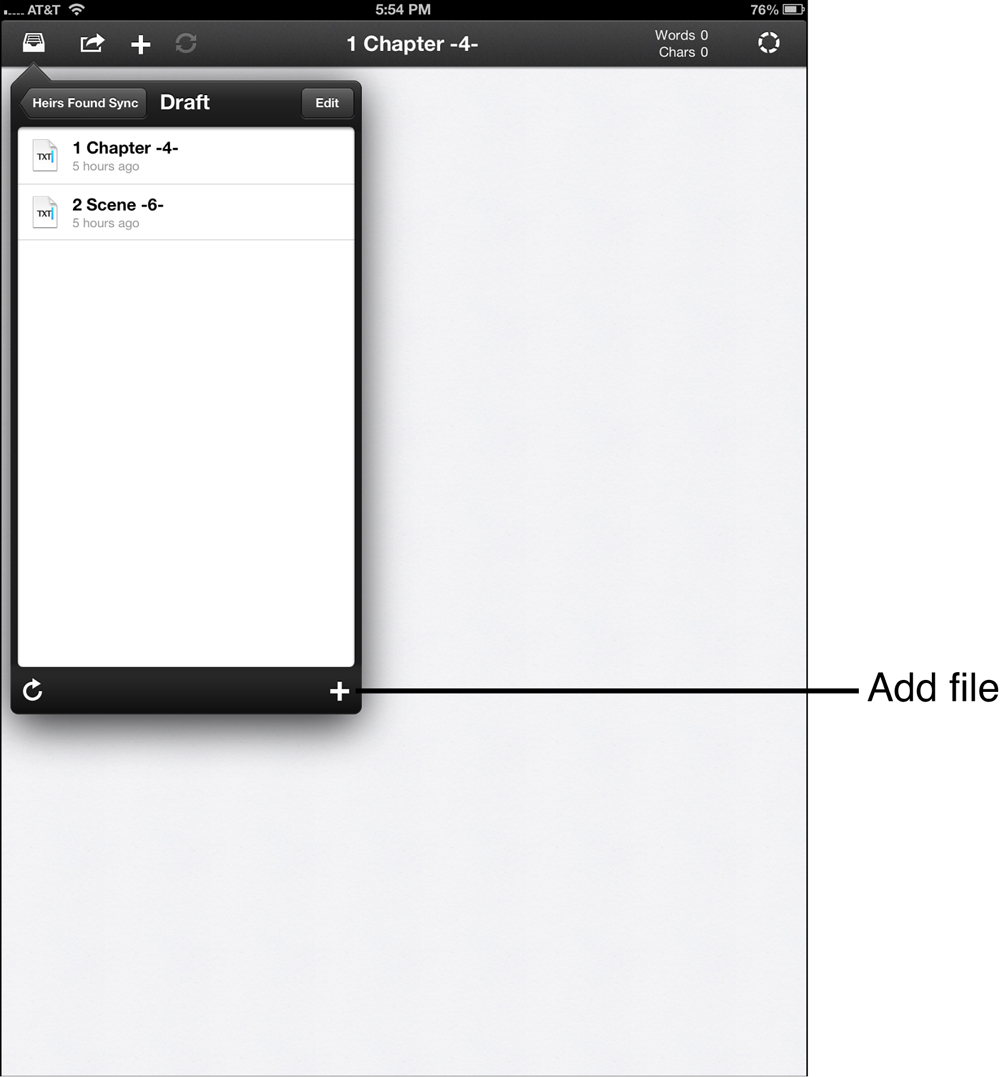
6. Click the Dropbox option, shown in Figure 18.5.
7. Navigate to the folder containing your project; then click either the Draft or Notes folder to access your files (Figure 18.6).
8. Select a file to open it in iA Writer.
When you have finished editing a file, it is automatically synced back to Dropbox, where it will then be synced with your Scrivener project the next time you open it.
If you want to add a file to the project, navigate into the Draft or Notes folder; then click the Add (+) button.
![]() Tip
Tip
If you use your iPad for writing, consider connecting it to a Bluetooth keyboard. You will find you can type much faster, more comfortably, and more accurately. You are also then free to prop your iPad up on a stand or folded SmartCover to use it as more of a display. Just remember to position yourself close enough to touch the screen, as there is no mouse available (no matter how frequently you find yourself reaching for one).
Using Index Card for iOS (Mac Only)
iPad users have another synchronization option. Index Card is an affordable ($4.99 for iPad, $1.99 for iPhone) iOS corkboard and outlining app. Inspired by Scrivener, it allows you to create and manipulate index cards on a virtual corkboard. Index cards contain a title, synopsis, and the main text of the item. Index Card also has a List view, similar to Scrivener’s Outliner. Although you cannot change the order of Scrivener’s Binder hierarchy using the Sync with External Folder feature, the Sync with Index Card for iOS feature was intended for exactly that.
Setting up the syncing process between Index Card and Scrivener takes several steps. This synchronization process relies on Dropbox, so you must have Dropbox installed on both your computer and your iPhone or iPad. You also need to install Index Card on your device before proceeding.
Index Card projects are flat lists rather than the multilevel hierarchical structure allowed by Scrivener. Thus, one of the limitations of Index Card is that you must first create a collection in Scrivener. That collection becomes the basis for syncing with Index Card. Take the following steps to do this:
1. Open your Dropbox folder in Finder and create a new folder titled IndexCard.
If you have already saved the file from Index Card into your Dropbox folder, this folder might have already been created.
2. In Scrivener’s Binder, select the documents you want to port to Index Card.
3. Select View, Collections, Show Collections from the menu to view the Collections pane.
4. Click the Add (+) button in the Header bar to create a new collection containing the selected documents.
5. Name the new collection and then press Return.
6. Choose File, Sync, with Index Card for iOS from the menu.
7. In the Sync with Index Card for the iPad dialog box, shown in Figure 18.7, choose the collection you created from the Collection drop-down menu.
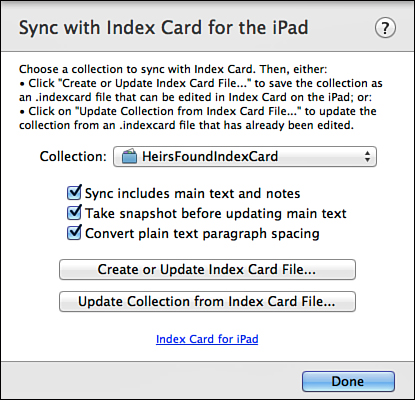
Figure 18.7 The Sync with Index Card for the iPad dialog box contains options for syncing your Scrivener project with the Index Card app.
8. Choose from the following options, all of which are selected by default:
• Sync Includes Main Text and Notes: Scrivener stores the text of your document in the text field of the index card. If you have any document notes in the item, they are stored in the Notes field of the index card. If this option is not selected, Scrivener does not update the text of your project document even if you enter text on a card in Index Card.
• Take Snapshot before Updating Main Text: Scrivener automatically takes a Snapshot of each item that has changed in the collection before updating the document text for that item.
• Convert Plain Text Paragraph Spacing: This option adds an extra break between paragraphs to make it easier to view paragraphs.
9. Click Create or Update Index Card File. The Save As dialog box opens automatically in the IndexCard folder you created in your Dropbox folder.
10. In the Save As dialog box, enter a name for the .indexcard file.
After you complete step 10, Scrivener creates the .indexcard file. Now you can open it in the Index Card app on your iPhone or iPad by doing the following:
1. Open the Index Card app on your device.
2. Tap on the gear icon, shown in Figure 18.8, and select Dropbox Link from the Settings menu.
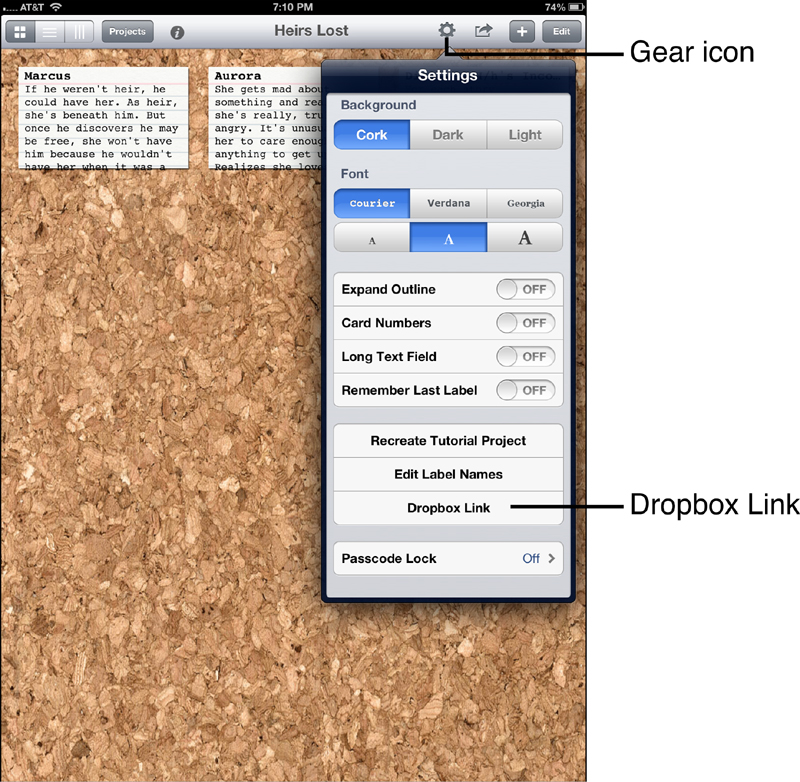
Figure 18.8 Before you can access your project in Index Card, you must link your Dropbox account to the app.
3. Click Allow to link your Dropbox account to the Index Card app.
4. Tap the Projects icon in Index Card to open the Projects menu, shown in Figure 18.9.
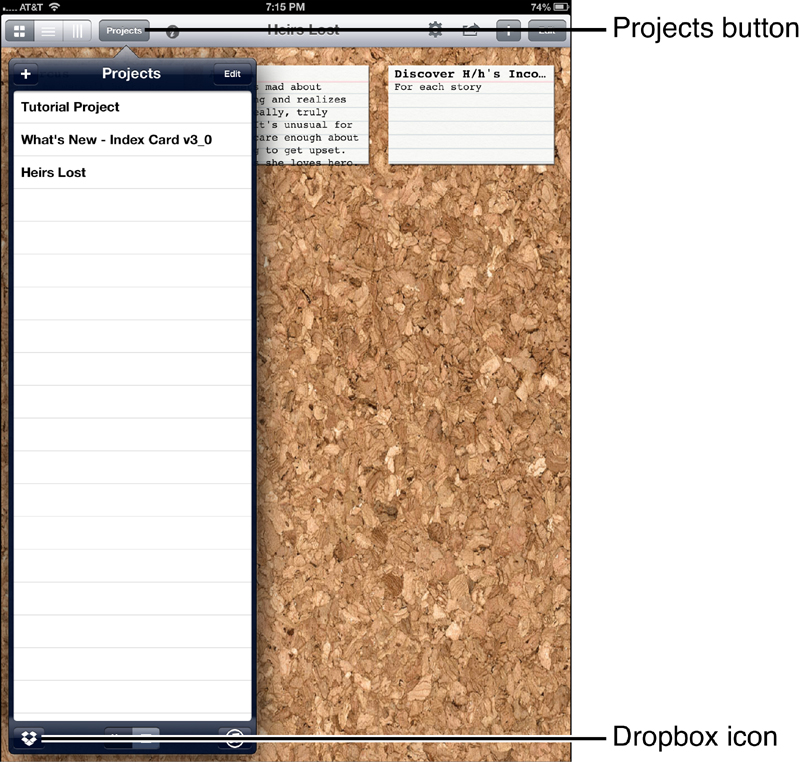
5. Tap the Dropbox icon at the bottom of the Projects menu, then select your project from the Copy from Dropbox menu. Your project is copied to the main Projects list and automatically opens in the Corkboard.
Once the project opens in the Index Card app, shown in Figure 18.10, you can edit cards, change the order of the cards, and add new cards. When you have finished your work, take the following steps to update the Dropbox folder and then sync with Scrivener:

1. Click on the Share icon at the top of the screen.
2. Click Copy to Dropbox from the pop-up menu.
3. In the Copy to Dropbox screen, shown in Figure 18.11, swipe the Export Notes switch to On in order to enable text changes to sync.
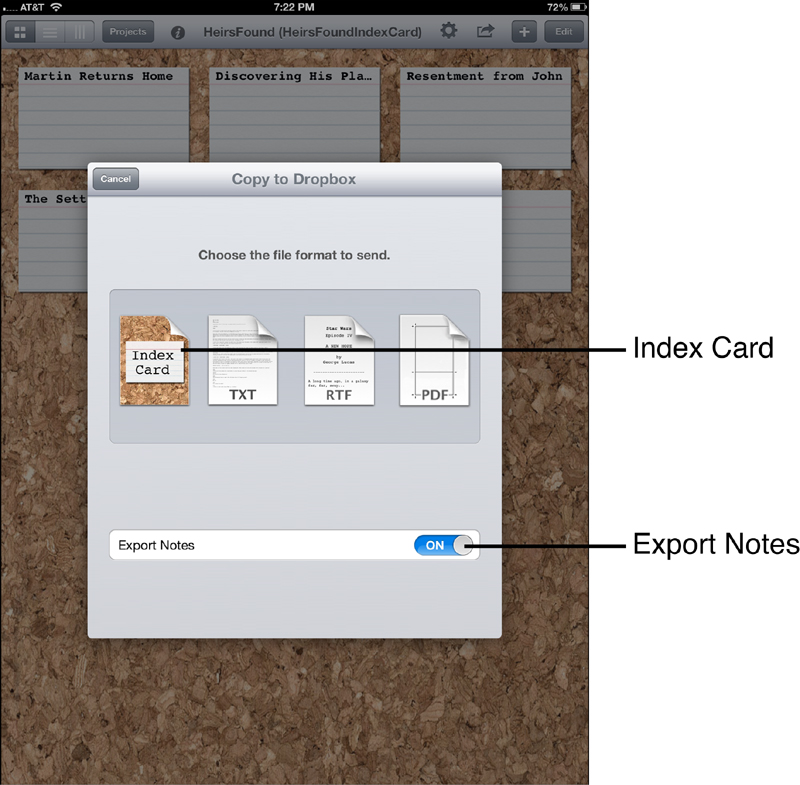
4. Tap the Index Card button to save the file to your Dropbox folder. Click Replace when prompted to overwrite the file or save using a different filename.
5. When the file transfer is complete, open your project in Scrivener.
6. Choose File, Sync, with Index Card for iOS from the menu.
7. In the Sync with Index Card for the iPad dialog box, click the Update Collection from Index Card file to update your project.
8. In the Open dialog box, select the file you edited and then click Open.
The collection in your Scrivener project reflects the changes you made in Index Card. Changes in the order of the documents appear in the collection, but not the Binder. If you want to update the Binder to sort in the order of the collection, press Cmd-A in the collection to select all the documents; then right-click on the selection to open the context menu and choose Move To from the menu. Choose the folder into which you want to move the documents. The Binder then reflects the new positions for the documents.
The next time you want to use Index Card, update your collection and then select File, Sync, with Index Card for iOS. Click the Create or Update Index Card File and overwrite the old .indexcard file with the new collection.